Azio LEVETRON MECH4 KB588U User manual

Mech4

Mech4
THE MECH4 ADVANTAGE
•Power Within Reach:
Macro keys are useful but only if they’re easily accessible. The Mech4
gaming keyboard was design with that in mind. The modular D-Pad can be adjusted to perfectly
complement your hands natural gaming position. Stop wasting time reaching for Macro keys all
the way across the keyboard!
•Improve Your Game:
Our simplistic design approach improves your speed and accuracy by
keepingjust5Macrokeystothe immediateleftand6additionalones(D-Pad)directlyaboveyour
hand -- all at your ngertips. Too many Macro keys lumped up together in the same place or split
to all corners of the keyboard will only bring additional confusion and stress!
•Unrestricted Modular Customization:
Attach the Numeric Keypad on the left-wing of the
Mech4 and instantly add 17 additional Macro keys to your arsenal. Attach it to the right-wing
and use it as a standard numeric keypad or leave it detached to make more room for your mice.
Virtually all keys across the Mech4 are user programmable!
•Built for War:
Thisultra-durablekeyboardisdesignedforheavycombat.TheCherrymechanical
switch extends its lifespan to 50 million keystrokes. In addition, this keyboard is designed to be
waterresistant, featuringspecial sealsanddrainage gutters.Spilling yourdrinkon yourkeyboard
is no longer an excuse for losing!
PACKAGE CONTENTS
• AZiO Levetron Mech4 Gaming Keyboard
• Modular Numeric Keyboard
• Modular Macro D-Pad
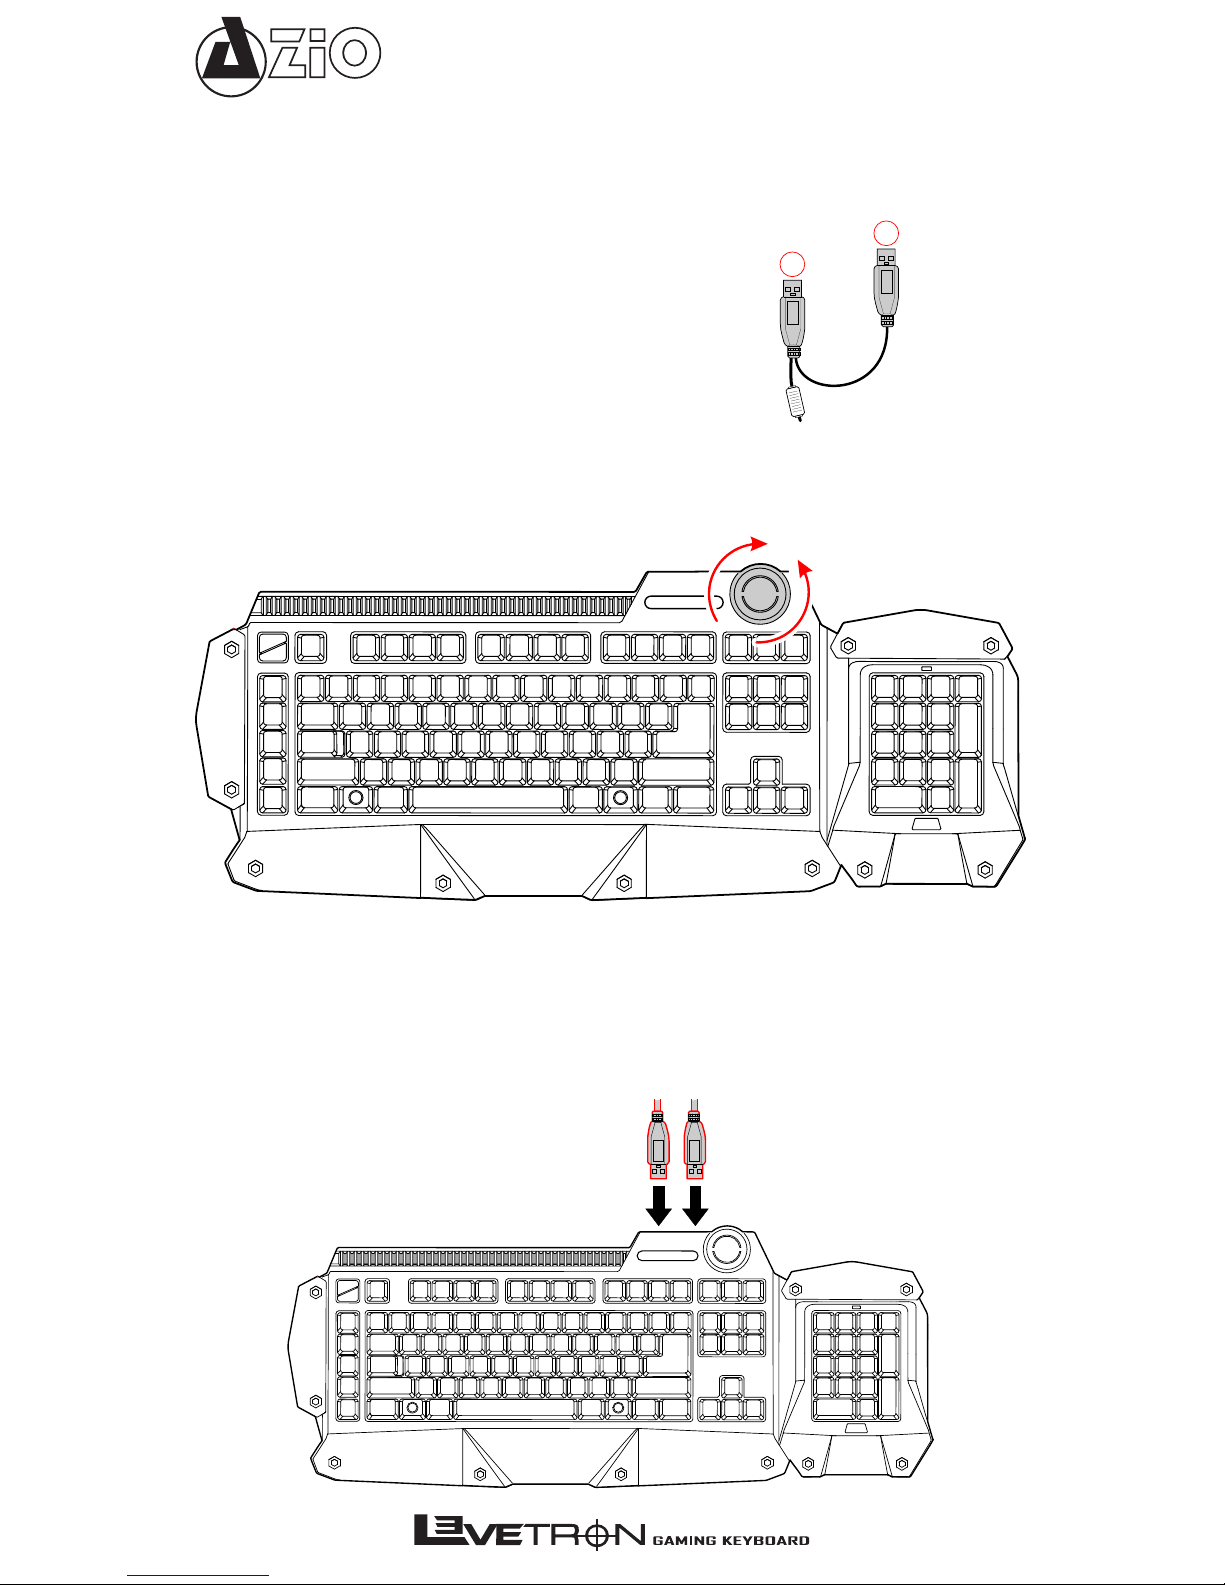
• USB Cable for Numeric Keypad (AMale toAMale)
• User Guide
• Software CD
FEATURES
•Mechanical Keys:
The Cherry black mechanical switch is widely believed to provide the best
gaming experience. Featuring a linear design ideal for rapid pressing of keys and the right
stiffness to help prevent accidental key presses.
•Modular Design:
Add functionalities by attaching modular accessories. Numeric Keypad and
Macro Keypad modules included.
•Anti-Ghost:
Ensures multiple keys register when press simultaneously.
•Win on/off Key:
Disables the Windows key to prevent accidental pressing of the key during
game play which will take you back to Windows and minimize the game.
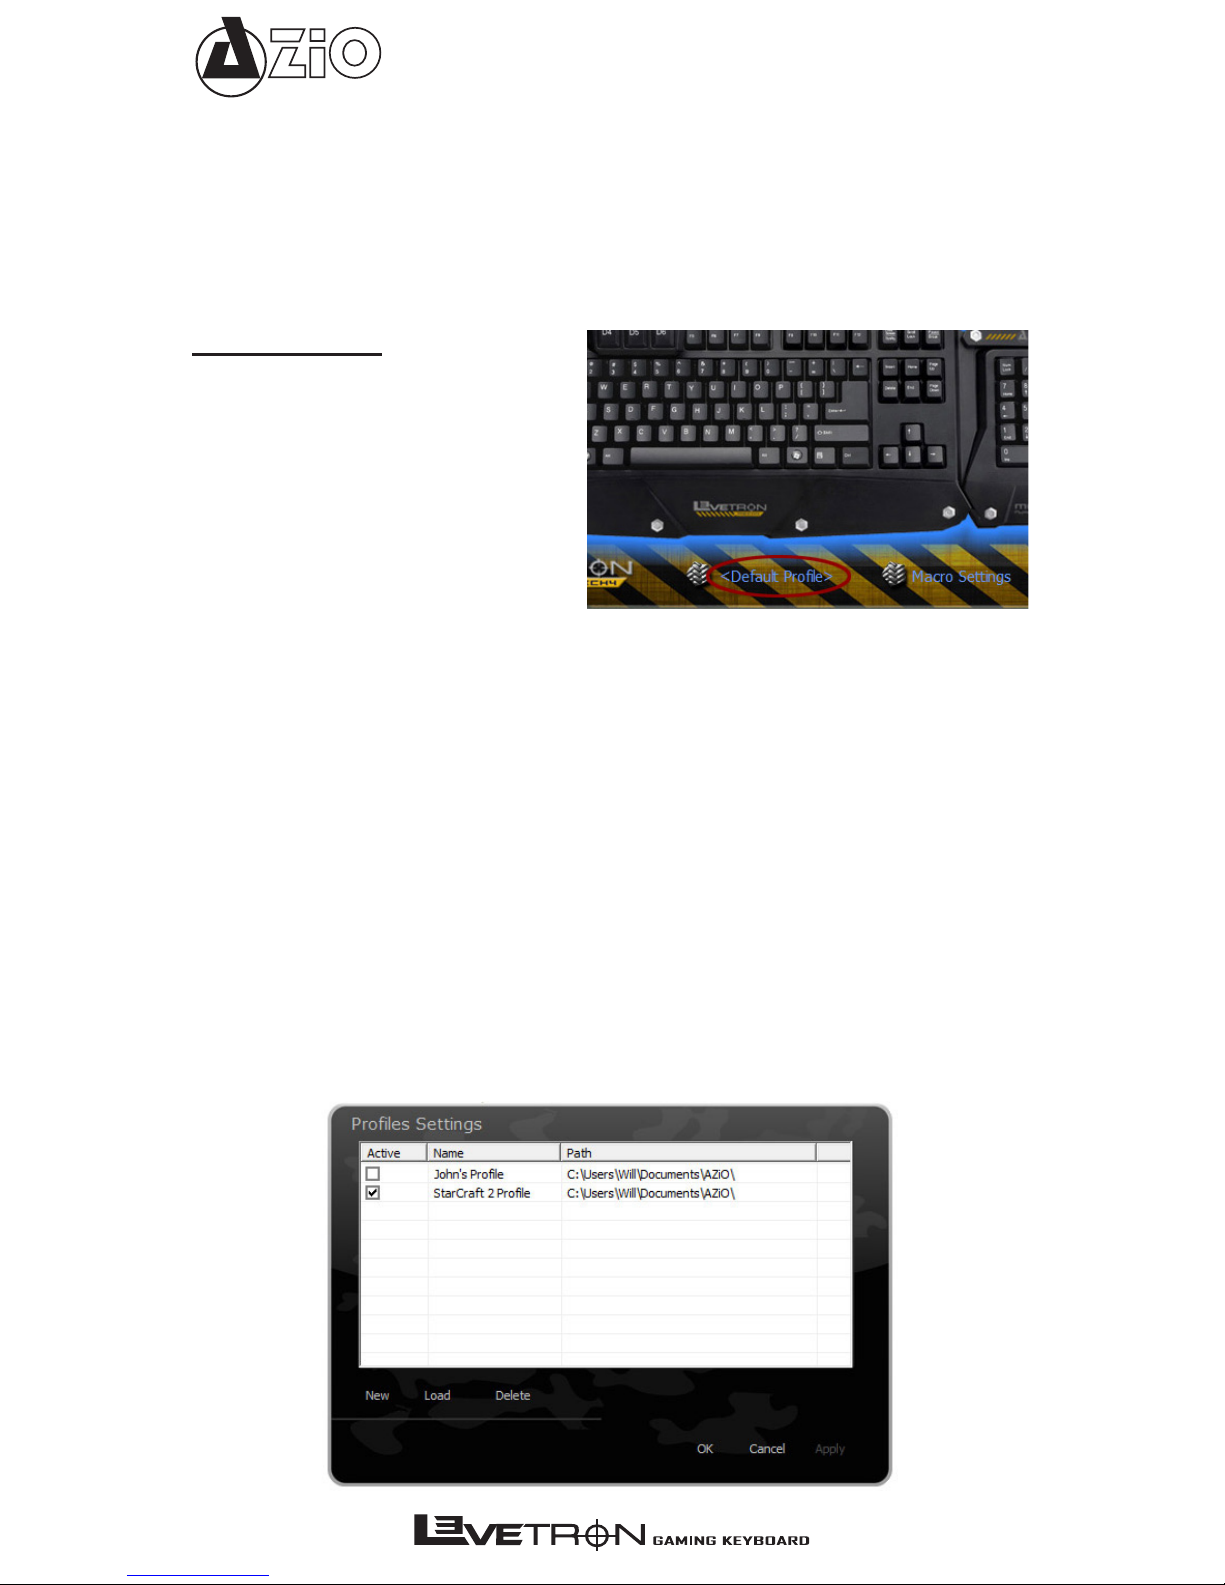
•UnlimitedProles:
Create and save as many proles as you like for maximum key customization.
Requires software installation.
•Expansion Module:
This modular design allows users to extend their utility by connecting
low-powered USB modules such as an add-on Macro keypad (included), web cam, USB fan,
microphone, LED lights, etc. Modular accessories will be launched periodically.
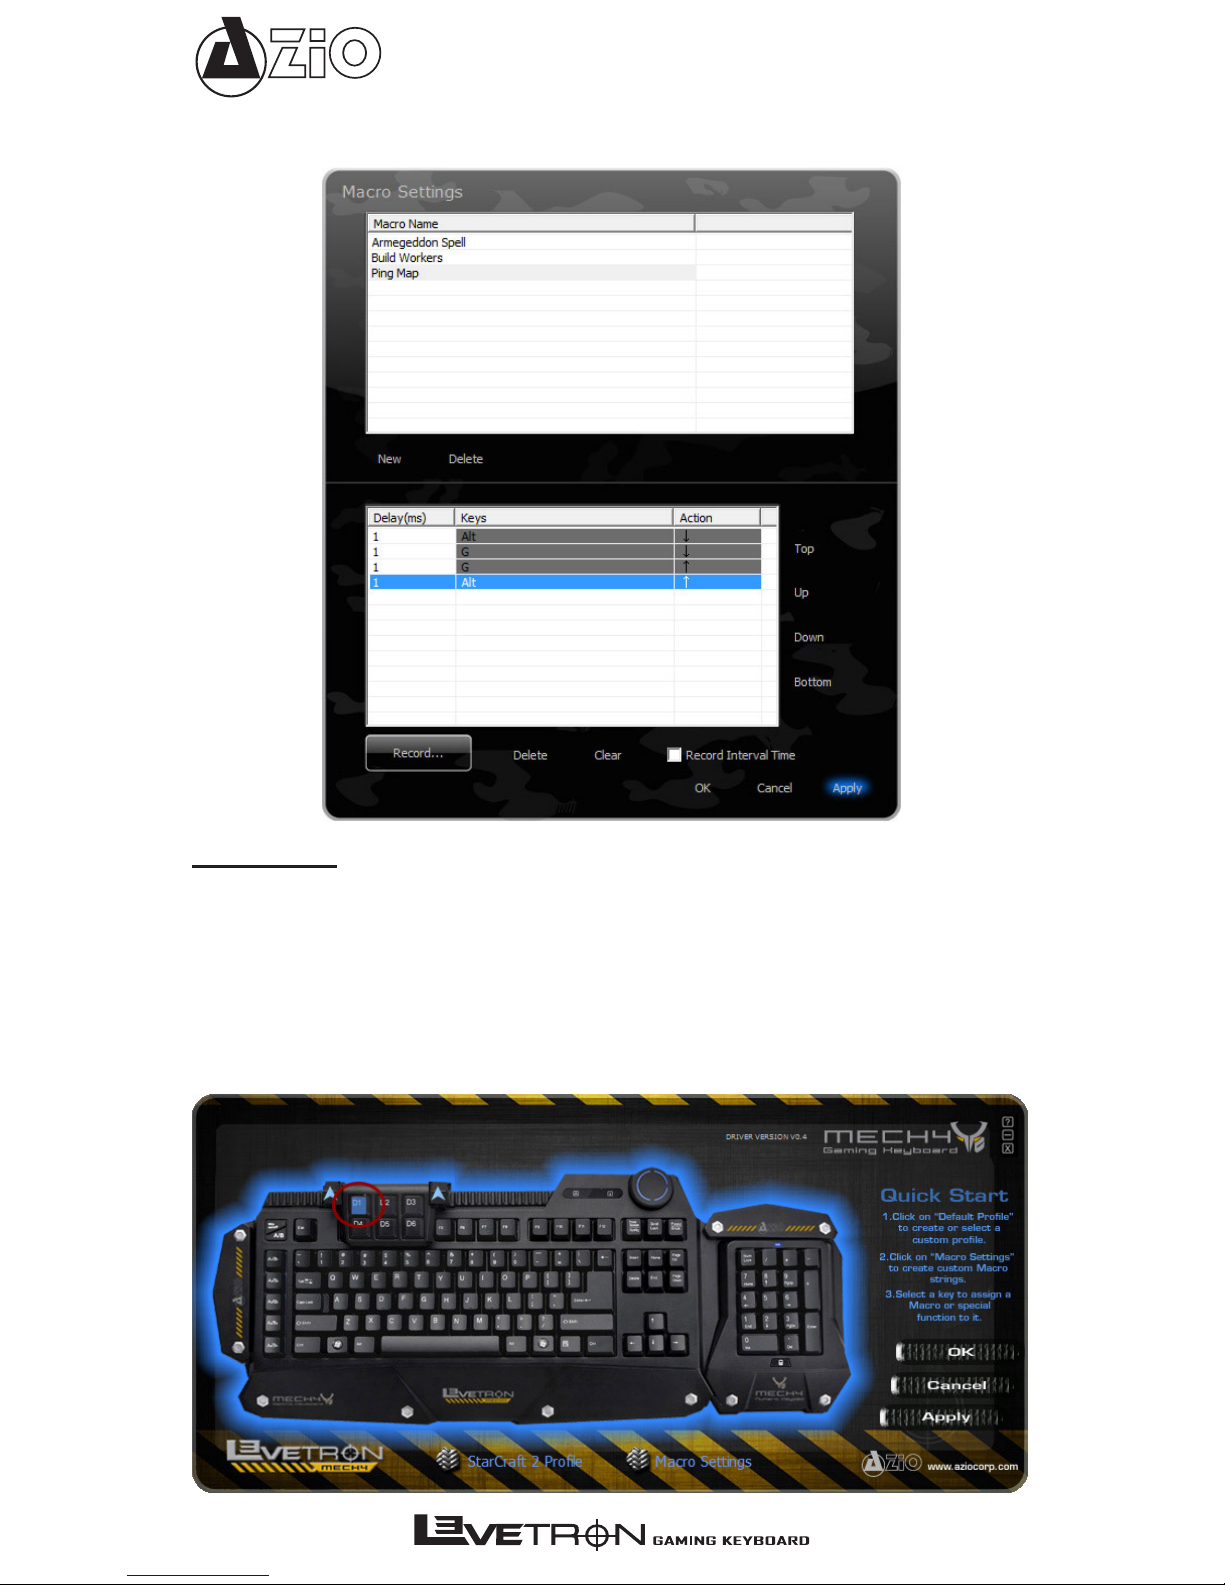
•Macro D-Pad:
The add-on Macro D-Pad expansion allows for 6 additional programmable keys.
The expansion module rail enables custom positioning by sliding the D-Pad left or right.
•Volume Knob:
Control the volume of your PC intuitively by turning a knob.
•Numeric Keypad:
Thenumeric keypadcan beattached toeitherside ofthe keyboardorremain
detached. Attach it on the left-wing of the keyboard and program the pad as additional custom
functions or Macros. It can also be used as a standalone USB numeric keypad with the included
USB cable.
•Water-Resistant:
Engineeredtoremainfunctional evenifaccidentallyexposed toliquid.Insuch
an event, do not ip or shake the keyboard and the liquid will properly drain itself.
•2x USB Expansion Ports:
Connect your low-powered USB devices directly to the keyboard for
added convenience.
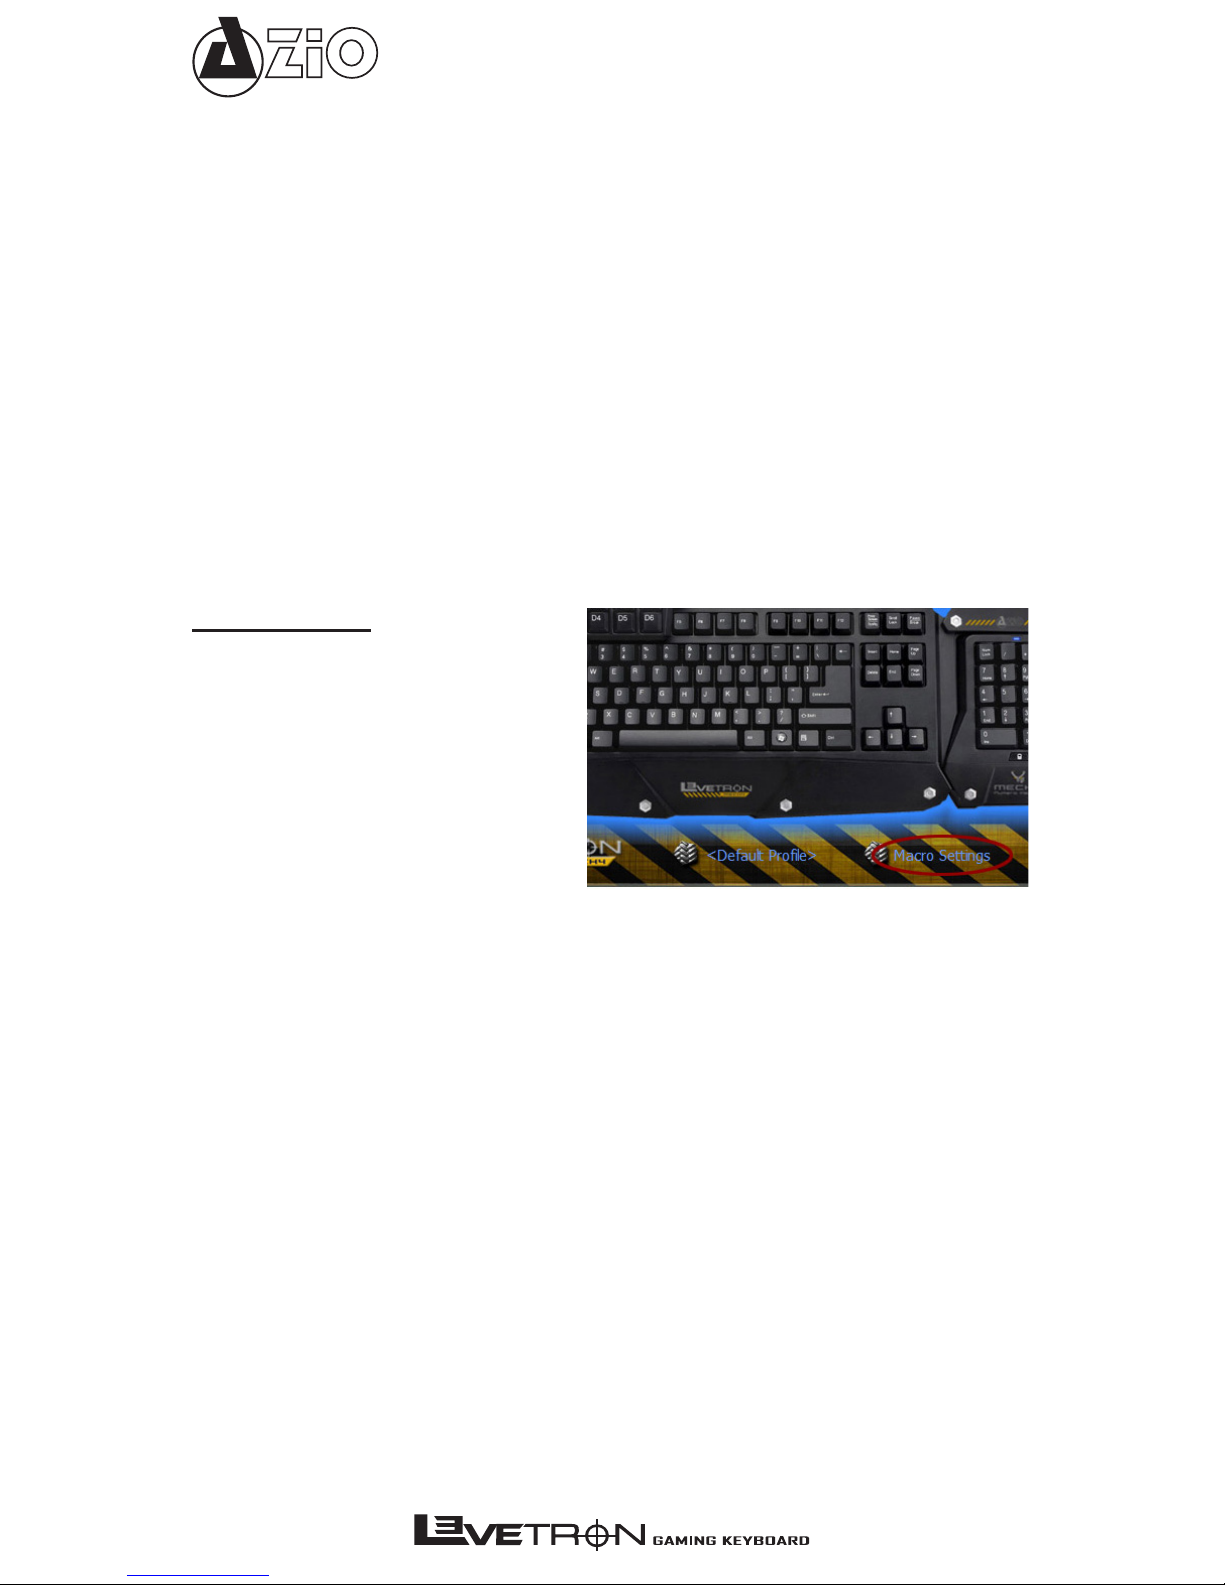
•Fully Programmable Keys:
The included Software allows for full customization of the entire
keyboard and dedicated Macro-keys.
•Adjustable Height:
The keyboard stand offers three levels of height adjustment and a non-slip
base for all three heights.
•Braided Cables & Gold-Plated USB Connector:
Enhanced durability and conductivity.

Mech4
SPECIFICATIONS
•Interface:
USB
•OS Support:
Windows XP/Vista/7 (all versions)
•Switch Type:
Mechanical (Cherry MX Black)
•Keyboard Macro Keys:
5 Keys x 2 Sets (A/B)
•Modular Macro Keys:
6 Keys
•Switch Lifecycle:
50 Million
•Cable Length:
6 feet
•Keyboard Dimensions:
7.75” x 18.50”x 1.60” inches (LxWxH)
•Numerical Keypad Dimensions:
6.75” x 5.50” x 1.60” inches (LxWxH)
SYSTEM REQUIREMENTS
• PC with built-in USB ports
• Windows XP, Vista, or 7
• CD ROM for software installation
• At least 35mb of hard disk space
KEYBOARD LAYOUT
The components of this keyboard includes:
1.
Alternate detachable Numeric Keypad position
2.
“Windows Start” key disable button / MacroA/B button
3.
Modular Macro D-Pad
4.
Caps Lock & Scroll Lock LEDs
5.
Expansion USB Ports
6.
Volume Knob
7.
Modular Numeric Keypad (with NumLock LED)
8.
Calculator Shortcut Button
36
2
5
4
7
8
1

Mech4
KEYBOARD SETUP
Attach the Modular Macro D-Pad:
• Slide the add on Macro D-Pad into the adjustable expansion module rail. The D-Pad slides left to
right and clicks into your preferred position for customized use of additional macro keys.
• Connect the USB cord to one of the two USB expansion ports next to the volume knob.
• The Macro D-Pad can be ipped up or down. The up position allows access to the “F#” keys.
• Before ipping the D-Pad to the down position, please unlatch the stand on the bottom side of
the pad.
WARNING:
Advanced features such as key customization requires software installation.
Detaching the Numeric Keypad:
• To remove the numeric keypad, rst push and hold down the top release button on the bottom
side of the keyboard. The buttons are colored in RED in the following diagram.
• While pressing the top release button, pull the swivel bracket up to release the keypad lock.
Next,press thesecondreleasebutton andpullthe keypadawayfrom thekeyboard.TheNumeric
Keypad is disconnected from either sides of the keyboard the say way.

Mech4
Connecting Your Keyboard to a Computer:
• ConnectthekeyboarddirectlytoaUSBportonthecomputer.DonotconnectthroughaUSBhub.
Windowsshoulddetect thedeviceandinstall thedrivers.Youmay seeawindowthattells youthe
hardware is installed and ready.
WARNING
: The keyboard cable comes with
2 USB connectors. The main connector (A) is
required for operation. The second connector (B)
is a power extension connector which is used to
drawadditionalpowerfromanotherUSB port.We
recommendconnectingboth toensurethebuilt-in
USB expansion ports function properly.
Built-in Volume Control:
• You can raise or lower the volume directly from the keyboard’s volume control knob.
Up
Down
USB Expansion Ports:
• Connect your low-power devices to the USB expansion ports. Supports devices such as the
includedAdd-on Macro D-Pad, mouse, thumb drives, etc.
WARNING:
Thebuilt-inUSB expansionportscanonlysupport USBdevicesthathave lowpower
requirements. Power hungry USB devices such as USB hard drives will need to be self-powered
to function properly.
A
B

Mech4
Win on/off:
• Don’t let accidents interrupt your game-play. Easily disable the Windows Menu key by pressing
the Win on/off key and avoid having your game minimized by Windows.
Using the Built-in Macro Keys:
• Select from ten dedicated Macro keys using theA/B selector key. Clicking on theA/B key toggles
between macro keystrokes set “A” and macro keystrokes set “B.”
Win
on/off
A/B
Win
on/off
A/B
SOFTWARE INSTALLATION
Software Installation Procedure:
1.
Plug the keyboard’s USB cable into a USB port of the PC.
2.
Insert the software CD into the CD or DVD ROM drive.
3.
Follow the on-screen setup wizard to install software.
4.
Click the nish button to complete the software installation.
Software Un-install Procedure:
1.
To un-install, click the “Start menu” and navigate to Control Panel.
2.
Select “Add/Remove Programs”.
3.
Click on “AZiO KB588U Driver”.
4.
Click on Remove or Un-install.
Accessing the Software Help
• To use the application help, rst double-click the software Icon to launch the software. The help
section is accessed by by clicking on the question mark in the upper right corner of the screen.

Mech4
USING THE SOFTWARE
The functions of the software can be broken down to 3 categories:
1. ProleSettings:
Create specic proles for all users and applications.
2. Macro Settings:
Create strings of custom Macro functions to program to different keys.
3. Key Customization:
Select a key and program it to a different key, a special function or a
custom Macro string from step 2.
PROFILE SETTINGS
All user created Macros and user custom-
ized settings are saved to Proles. The
information in each Prole is saved to
a corresponding le in your computer.
“Default Prole” is the default prole and
contains no customized settings of the
keyboard. Click on it to access the Proles
Settings page to add or edit your own
proles.
The Proles Settings page is divided into three columns – Active, Name, and Path. Each row
represents one Prole.
Active:
Put a checkmark next to the Prole that you want to make active.
Name:
This column displays the name of the Prole.
Path:
This shows the lename and location of where the Prole is saved to.
If no proles are selected to be active, the system will revert to the default prole. Please note that
the default prole does not contain any customized functions and cannot be programmed. Other
functions on this page include:
New:
Click here to create a new Prole. Enter the le name. The lename will also be the name of
the Prole. This information is displayed under the “Name” column of this page.
Load:
Load a previously saved Prole.
Delete:
Delete a Prole.
WARNING:
After making any changes, remember to click on “OK”, “Cancel” or “Apply”. “OK” will
save all setting and exit Prole Settings interface. “Cancel” will exit without saving any changes.
Clicking “Apply” will save the changes without exiting the interface.

Mech4
CreateaNewProle
Click “New” from the Proles Settings interface to create a new Prole. Type a name in the “Save
as” pop-up window and click “Save.” Please note that the le name will also be used as the Prole
name. This prole will be saved in the “AZiO” folder within the “Documents” folder.
After saving, the software will return to the Prole Settings window. The newly added Prole will
appear in the Prole list. Tick the “Active” checkbox on the left to active it and “apply” to save the
settings without exiting. To nish the setup and return to the main interface, click the “OK” button.
LoadanExistingProle
To load a previously created or downloaded prole, click “Load” and select the le from the pop-
up window. The software will automatically return to the Prole Settings window. To activate it,
please tick the checkbox next to the respective Prole name.
DeleteaProle
Unwanted Proles can be deleted in the Prole Settings window by selecting it and clicking on
“Delete”. Click “OK” or “Apply.” This operation will only delete the Prole data from this software,
it will not delete the physical saved le of the Prole. To delete the save le, please use Windows
Explorer and go to the “AZiO” folder within the “Documents” folder.
MACRO SETTINGS
Macro functions allow players to create
short, long and complex command se-
quences for their applications and games.
This section will illustrate how to create or
edit a Macro function.After which, please
see the next section for assigning keys to
the Macros created here. For now, click on
“Macro Settings” to enter the Macro settings
interface.
Creating a new Macro function:
1. Start by clicking on “New”.
2. Enter a name or description for this Macro function and press Enter.
3. Ticking the “Record interval time” checkbox will record the Macro string in the same timing
sequence each key is pressed or released. The delay is calculated in milliseconds and can
be manually entered or edited after the Macro string is created. If left unchecked, the software
will assign it a default value of 1ms delay between each key actions. Please note that
1,000ms is equal to 1 second.
4. Click on “Record” to start entering the Macro string.
5. When completed, click on “Stop Record” and “Apply” to apply the changes or “Cancel” to
cancel the changes.
Editing an existing Macro function:
Please refer to the diagram on the next page.
1. In the top section, select the Macro to be edited.
2. On the bottom section, double-click on the portion of the Macro string to be modied. For
example, double-click on the Delay value, orAction value to make changes.
3. Clicking on “Delete” will delete that line and clicking on “Clear” will clear all strings of that
Macro.
4. Clicking on “Record” will allow you to add more commands to the Macro.
5. To move a specic string of the Macro up or down, highlight the respective string and use the
navigation buttons to the right.
6. Click on Ok, Cancel, orApply when completed.

Mech4
Macro Settings Interface Diagram
KEY SETTINGS
The Levetron Mech4 gaming keyboard is designed to be highly customizable. Just about every
key can be programmed to have a different key assignment, to perform special functions such as
launching an application or multimedia/web navigating, and to execute Macro functions.
To Program a key, open the software interface and simply click on the respective key on the virtual
keyboard on-screen. For example, click on the D1 key to program it. Clicking on the UP arrows
next to the D-Pad will lift up the Macro D-Pad, allowing access to the “F#” keys beneath it.

Mech4
Key Settings Interface
Once a key have been chosen for program-
ming, the Key Settings interface (on the right)
will be displayed. Please click on the button
which corresponds to the function of your
choice.After which, please click on “OK” or
“Cancel” to return back to the main interface.
WARNING:
After changing any key settings,
you will still need to click on the “Apply” button
on the MAIN software interferface in order for
the change to take effect.
• Default Function:
This is the default setting and basically means there is no changes.
• No Function:
This option turns OFF the key (thus, No Function).
• Assign New Key:
Click here to give this key a new key assignment or function. This in-
cludes web browser functions as well as multimedia functions such as play/pause, next track,
back track, etc. Scroll through the drop-down list to see all available options.
• Run…:
Set this key to launch a program or application of your choice.
• Play Macro:
Use this option to assign to the key a Macro function which was created in the
“Macro Settings” section.
• Stop Playing Macro:
Click here to stop the Macro function once it has been activated but
not yet completed. For example, if a very long Macro was executed, use this function to stop
it half way through.Alternatively, right-click on the system-tray icon and select “Stop playing
macro.”
• Say String:
This function allows users to preset a commonly used text and instantly recall
the text. This can be used in many different ways. Here are a couple of usage examples: (1)
Use it during gaming to say commonly used phrases such as “good luck, have fun!” or “heads
up, incoming!”, etc. Or use it for commonly used commands. For example, in StarCraft 2, pro-
gram one of your keys as “/dance” or “/cheer” so you can instantly taunt your opponent on the
y! We’re condent that you will nd even more creative ways to use these functions than us.
When nished programming individual keys, from the main user interface, please make sure to
click “Ok” or “Apply” to make the changes effective. From the main interface, in order to distinguish
the keys, all customized keys will be displayed in ORANGE. BLACK color keys indicates default
function and the BLUE mouse roll-over indicates that the key is customizable.

Mech4
SUPPORT & WARRANTY
Support
If you need assistance with this product, please visit our website at www.aziocorp.com for
frequently asked questions and troubleshooting tips. Otherwise, please contact our dedicated
customer care team.
There are several ways to reach us:
By Phone:
(866) 468-1198
By eMail:
On Live Help:
http://www.aziocorp.com/support/helpdesk.htm
Limited Lifetime Warranty
AZiO Corporation warrants only to the original purchaser of this product, when purchased from an
AZiO-authorized reseller or distributor, that this product will be free from defects in material and
workmanship under normal use and service for the life of the product.AZiO reserves the right, be-
fore having any obligation under this warranty, to inspect the damagedAZiO product, and all costs
of shipping theAZiO product toAZiO for inspection shall be borne solely by the purchaser. In order
to keep this warranty in effect, the product must have been handled appropriately and must not
have been misused in any way. This warranty does not cover any damage due to accident, misuse,
abuse or negligence. Please retain the dated sales receipt as evidence of the original purchaser &
date of purchase. You will need it for any warranty service.
In order to claim under this warranty, Purchaser must make claim toAZiO within 60 days of occur-
rence, and must present acceptable proof of original ownership (such as original receipt) for the
product.AZiO, at its option, shall repair or replace the defective unit covered by this warranty. This
warranty is non-transferable and does not apply to any purchaser who bought the product from a
reseller or distributor not authorized byAZiO, including but not limited to purchases from internet
auction sites. This warranty does not affect any other legal rights you may have by operation of
law. ContactAZiO through email, chat, or through one of the technical support numbers listed for
warranty service procedures.

Mech4
Table of contents
Other Azio Keyboard manuals