Baby Jogger CITY GO PD348959F User manual

1
FAILURE TO PROPERLY USE THIS CHILD RESTRAINT INCREASES THE RISK OF SERIOUS
INJURY OR DEATH IN A SUDDEN STOP OR CRASH.
KEEP INSTRUCTIONS FOR FUTURE USE
Do not install or use this child restraint until you read and understand the
instructions in this manual.
car seat & base
PD348959F
babyjogger.com

2
TABLE OF CONTENTS
Registration.......................................................................................................................................3
Warnings.............................................................................................................................................5
LATCH System ............................................................................................................................9
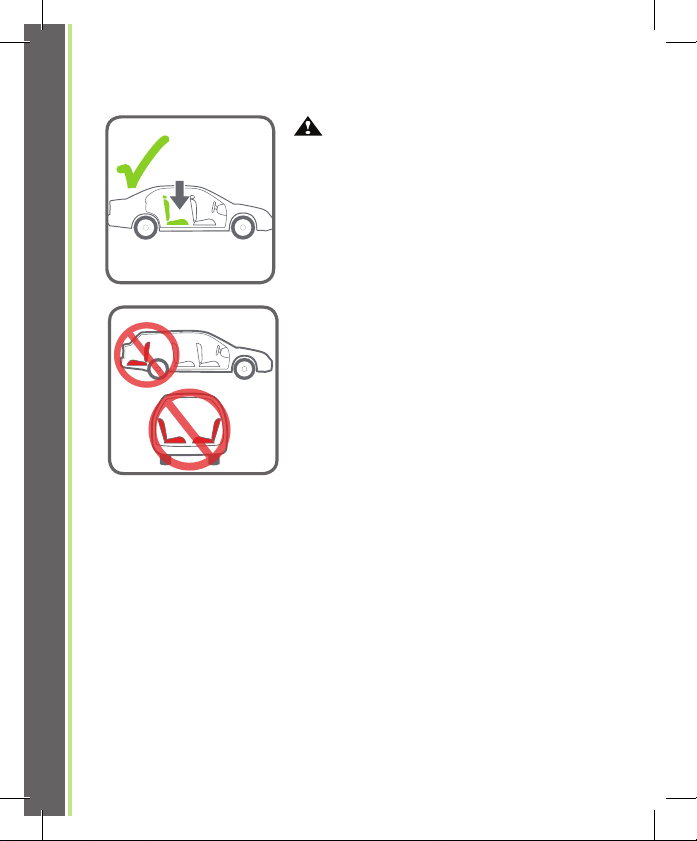
Vehicle Installation Safety...............................................................................................10
Features.............................................................................................................................................14
Adjusting the Handle............................................................................................................17
Attaching the Canopy.........................................................................................................18
Body Support...............................................................................................................................19
Attaching & Removing Car Seat............................................................................20
Adjusting the Recline...........................................................................................................21
Base Installation
• LATCH......................................................................................................................................22
• Lap/Shoulder Belt........................................................................................................25
• Lap Belt Only.....................................................................................................................28
Seat Installation Without Base
• Lap Belt Only......................................................................................................................31
• Lap/Shoulder Belt Only.........................................................................................33
Placing Child in the Carrier...........................................................................................37
Adjusting the Buckle...........................................................................................................40
Securing the Child in the Restraint........................................................................41
LATCH and Instruction Storage..............................................................................43
Remove Head Support & Seat Pad....................................................................44
Care and Maintenance.....................................................................................................45
Warranty..........................................................................................................................................46

3
Please complete the pre-paid registration card that is attached to
your child restraint and send the portion shown below in today or
register online at www.babyjogger.com/carseatregistration.
Child restraints could be recalled for safety reasons.You must register
this restraint to be reached in a recall.Send your name, address,
email address if available and the restraint’s model number and
manufacturing date to:
Baby Jogger, LLC
P.O.Box 169, Elverson, PA 19520-9901
or call 1-800-241-1848
or register online at
www.babyjogger.com/carseatregistration
REGISTERING YOUR CHILD RESTRAINT
Tear o and mail this part. Please print clearly in the spaces below.
Name
Mailing Address
City State Zip Code
Email Address
Baby Jogger, LLC
DO NOT USE 7 YEARS AFTER THE MANUFACTURE DATE

4
Call the U.S.Government’s Vehicle Safety Hotline at 1-888-327-
4236 (TTY: 1-800-424-9153), or go to http://www.NHTSA.gov.
This child restraint conforms to all applicable Federal Motor Vehicle
Safety Standards.This restraint is certified for use in motor vehicles
and aircraft.Use only in forward facing aircraft seats.Follow the
instruction in the “Seat Installation-Lap Belt Only” section.When
installing in an airplane using the base, install the same way as in
an automobile with a lap only belt leaving the lock-off unlatched to
allow for buckle clearance.
It is not intended to be used in low-speed vehicles such as golf carts,
ATV’s or any other non-certified vehicles.
If you have any questions regarding installation of your seat, please
contact consumer care:
Baby Jogger, LLC
4110 Premier Drive
High Point, NC 27265
1-800-241-1848
www.babyjogger.com
For information regarding child restraints:
www.NHTSA.gov
www.safekids.org
www.seatcheck.org
FOR RECALL INFORMATION
CERTIFICATION
IF YOU NEED ASSISTANCE OR HAVE ANY QUESTIONS

5
WHEN USED IN YOUR VEHICLE
DO NOT place rear-facing child seat on front seat
with an active airbag.DEATH OR SERIOUS INJURY
can occur.The back seat is the safest place for
children 12 and under.
• Only place this child restraint in a rear-facing direction on a
forward facing vehicle seat when using it in a vehicle.NEVER
install this child restraint on vehicle seats that face the side or
rear of the vehicle.
• Never leave child unattended.
• Read these instructions carefully before using and before
installing this seat in a vehicle.
• Failure to completely follow the instructions provided in this
manual as well as the labels on this product can result in
DEATH or SERIOUS INJURY.
• Read your vehicle owner’s manual for important information
concerning child restraint installation.
• DO NOT ALLOW anyone who has not read the instruction
manual to install or use this child restraint.
• Register your child restraint with the manufacturer.
• According to accident statistics, children are safer when
properly restrained in rear seating positions, than in the front
seating positions.
• Owners of vehicles with airbags should refer to their vehicle
owner’s manual for child restraint installation instructions.
WARNING

6
• For low birth-weight infants, you must always use the body
support.The body support must be used for infants who
weigh less than 6 lb (2.7 kg).Only use the body support
when the harness is used in the bottom 2 sets of harness
slots.
• Some children with special needs, such as pre-term babies
or those who have tested positive for positional apnea,
may be at increased risk of suering breathing or other
diculties in a child restraint.If your child has special needs,
we recommend consulting a physician to determine the
proper child restraint for your child before using this product.
• Snugly adjust the belts provided with this child restraint
around your child.
• Secure this child restraint with the vehicle’s child restraint
anchorage system (LATCH) if available or with a vehicle
belt, never both.
• Never leave an infant restraint and base unsecured in your vehicle.
An unsecured infant restraint or base can be thrown around and
may injure occupants in a sharp turn, sudden stop, or crash.
• To prevent ejection, securely attach the child restraint to the
base and lift up to check that it is attached.
• Make sure nothing interferes with the carrier attachment to
the base.
• ALWAYS store the LATCH connectors when they are not
being used for installation.
• NEVER place two LATCH connectors on one vehicle LATCH
anchor.
• If installing carrier without base in vehicle, check the red level

7
line on the side of the child restraint to make sure that it is level
with the ground..
• DO NOT allow children to play with or around this child
restraint.
• Always replace the child restraint and base after a crash of
any kind even if it was unoccupied.A crash can cause unseen
damage to the child restraint that may not be visible.
• Do not modify your child restraint or base or use any
accessories or parts not supplied by the manufacturer of
your child restraint.
• The child restraint may become very hot if left in the sun or hot
areas.Always make sure to check the temperature of any metal
or plastic parts before placing your child in the child restraint.
• NEVER use a second-hand child restraint or base that you do
not know its history.
• DISCONTINUE USE of this child restraint after 7 years from
the manufacture date.The manufacture date can be found
on the underside of your child restraint.
• DO NOT use this child restraint unless your child meets the
following height and weight criteria.
Weight: 4-35 lb (2 - 16 kg)
Height: 32 in (81 cm) or less in height
Child’s head MUST be 1” (2.5 cm)
or more below the top of the seat as
shown here.
1" (2.5 cm)

8
FOR USE AS AN INFANT CARRIER
• Read all instructions before use of the infant carrier.
• Keep instructions for future use.
• NEVER LEAVE child unattended.
• SUFFOCATION HAZARD: Infant carrier can roll over on soft
surfaces and suocate child.NEVER place carrier on beds,
sofas or other soft surfaces.
• STRANGULATION HAZARD: Children
have STRANGLED in loose or partially
buckled harness straps.Fully restrain the
child even when carrier is used outside the
vehicle.
• FALL HAZARD: Child’s activity can move carrier.NEVER
place carrier tops, tables or other elevated surfaces.
• DO NOT use on shopping carts.
• Never use infant carrier or base if it has been damaged
or broken or any component is missing.Do not use a cut,
frayed or damaged child restraint harness, vehicle seat belt
or LATCH belt.
• NEVER use this child restraint with other manufacturer’s
strollers or with strollers for which it was not intended.
• ALWAYS MAKE SURE handle is locked in the upright
carrying position before lifting.An unlocked handle could
result in serious injury to your child from falling from the child
restraint.
WARNING

9
LATCH stands for Lower Anchors and Tethers for CHildren.
The LATCH system can make installation easier without using
the vehicle’s seat belts.LATCH is a way to secure your child restraint
to your vehicle by using the LATCH connectors on your child restraint
base.These connectors attach to the lower points in certain vehicle
seating positions.Refer to your vehicle owner’s manual for LATCH
locations.
The child restraint base is designed to be
used at the standard spacing of 11” (28
cm) from the center of one anchor point to
the center of another anchor point.Please
refer to your vehicle owner’s manual for
information about using LATCH in certain
seating positions.
LATCH may be used for spacing larger
than 11” (28 cm) ONLY if your vehicle
manufacturer allows it.
If your vehicle does not have lower anchor points, you can still install
your child restraint with the vehicle’s belt system.
LATCH SYSTEM

10
WARNING!
• Failure to place the child restraint in the
correct seating positions increases the
risk of serious injury or death.
• DO NOT place rear-facing child seat
on front seat with airbag.DEATH or
SERIOUS INJURY can occur.
• The back seat is the safest place for
children 12 and under.Owners of
vehicles with airbags should refer to
their owner’s manual for child restraint
installation instructions.
• The VEHICLE seat must face forward.
• NEVER place the child restraint on any
vehicle seat that does not lock.Folding
seats can fall forward and could cause
serious injury to your child in a vehicle
crash.
VEHICLE SEAT LOCATIONS

11
12
Motorized Shoulder
Belt with Lap Belt
Non-Locking Lap
Belts with Emergency
Locking Retractor
(ELR)
Lap or Shoulder
Belt Mounted on
Vehicle Door
Lap/Shoulder Belts
with 2 Retractors
(including inflatable
seatbelts)
34
UNSAFE VEHICLE SEAT BELTS
WARNING! The following types of vehicle seat belts are NOT
compatible with this child seat.If any of the belt types listed are
in the chosen seating position, choose another seating position
within in the vehicle.

12
SAFE VEHICLE SEAT BELTS
The following vehicle belt systems are
SAFE to use for child restraint installation.
1 Lap Belt with Locking Latch Plate - The
vehicle belt is tightened by pulling on
the free end of the strap until the belt is
tight.
2 Lap Belt with Automatic Locking
Retractor (ALR)- The automatic locking
retractor does not allow the lap belt
to get longer once it is buckled.The
vehicle belt is tightened by feeding the
seat belt webbing into the retractor.
1
2

13
3
4
SAFE VEHICLE SEAT BELTS
3 Lap/Shoulder Belt with Locking Latch
Plate - The lap portion of this belt does
not loosen once the belt is buckled.The
vehicle belt is tightened by pulling up
hard on shoulder belt and feeding the
webbing into the retractor.
4 Lap/Shoulder Belt with Sliding Latch
Plate - The latch plate slides freely along
the lap/shoulder belt.Vehicle belts with
sliding latch plates are typically locked at
the retractor by pulling all of the webbing
out slowly to switch the retractor.The
vehicle belt is tightened after switching
the retractor by pulling up hard on
shoulder belt and feeding the webbing
into the retractor.

14
1 Handle 7 Buckle
2 Canopy 8 Buckle Strap Cover
3 Head Rest 9 Body Support
4
5
Lap Belt Guide
Harness Cover
10
11
Harness Adjustment Button
Harness Adjustment Strap
6 Chest Clip
12
3
4
5
6
7
8
9
10
11

15
1 Handle 7 Buckle
2 Canopy 8 Buckle Strap Cover
3 Head Rest 9 Body Support
4
5
Lap Belt Guide
Harness Cover
10
11
Harness Adjustment Button
Harness Adjustment Strap
6 Chest Clip
15 Base Release Handle
16 Shoulder Belt Guide
17 Head Support Height Adjustment
18 Locking Clip Storage
19 Crotch Strap Clip
15
16 17
18
19

16
1 Level Indicators 6 LATCH Adjuster
2 Belt Lock-O 7 LATCH Release Button
3 LATCH Strap 8 LATCH Connector
4 LATCH & Vehicle Belt Path 9 Recline Foot
5 LATCH Storage Compartment
23
6
9
78
1
4
5

17
1 Level Indicators 6 LATCH Adjuster
2 Belt Lock-O 7 LATCH Release Button
3 LATCH Strap 8 LATCH Connector
4 LATCH & Vehicle Belt Path 9 Recline Foot
5 LATCH Storage Compartment
A
B
C
D
1
2
There are 4 positions:
A - Carry position
B/C - Middle positions
D - Stationary position
In vehicle - any postion.
1 Squeeze handle release buttons on both
sides.Rotate the handle.The handle will
lock into position.
2 Both adjustment buttons must pop out to
lock handle in place.
WARNING: Always make sure the
handle is securely locked in the upright
carrying position before carrying.
ADJUSTING THE HANDLE

18
1
2
CANOPY
1 To attach canopy, insert the canopy bow
into the canopy mounting brackets on
both sides of the seat until it clicks into
place.Pull canopy over back of infant
restraint.
2 To remove, press release tab and
remove from mounting bracket.

19
1
USING THE BODY SUPPORT
WARNING:
• To prevent ejection or serious injury, only
use the body support for children under
12 lb (5 kg).
• For infants weighing under 6 lb (2.7 kg),
you must always use the body support.
• If there is a gap between the buckle
strap and the child, place a tightly rolled
washcloth around the buckle strap.

20
1 Attach the carrier into the base until you
hear a click.Lift up on the handle of the
carrier to make sure that it is securely
attached in the base.
2 To remove the seat from the base, pull up
the release handle located on the rear of
the car seat.Lift carrier up.
ATTACHING & REMOVING THE CAR SEAT
1
2
Table of contents
Languages:
Other Baby Jogger Car Seat manuals

Baby Jogger
Baby Jogger city turn User manual

Baby Jogger
Baby Jogger PD349119B User manual

Baby Jogger
Baby Jogger city GO User manual

Baby Jogger
Baby Jogger city GO i-Size User manual

Baby Jogger
Baby Jogger City Go 8JA Series User manual

Baby Jogger
Baby Jogger City Single User manual

Baby Jogger
Baby Jogger city GO User manual

Baby Jogger
Baby Jogger city GO 2 RAPIDLOCK User manual

Baby Jogger
Baby Jogger city GO User manual

Baby Jogger
Baby Jogger city GO i-Size User manual