baby joy BC10089 User manual

Baby Swing
BC10089
USER’S MANUAL
THIS INSTRUCTION BOOKLET CONTAINS IMPORTANT SAFETY INFORMATION. PLEASE READ AND KEEP FOR FUTURE REFERENCE.

01
Before You Start
General Warnings:
Attention: To prevent possible injury by entanglement, remove this toy when the
child starts trying to get up on its hands and knees in a crawling position.
Danger! Keep all small parts and packaging materials for this product away from
babies and children, otherwise they may pose a choking hazard.
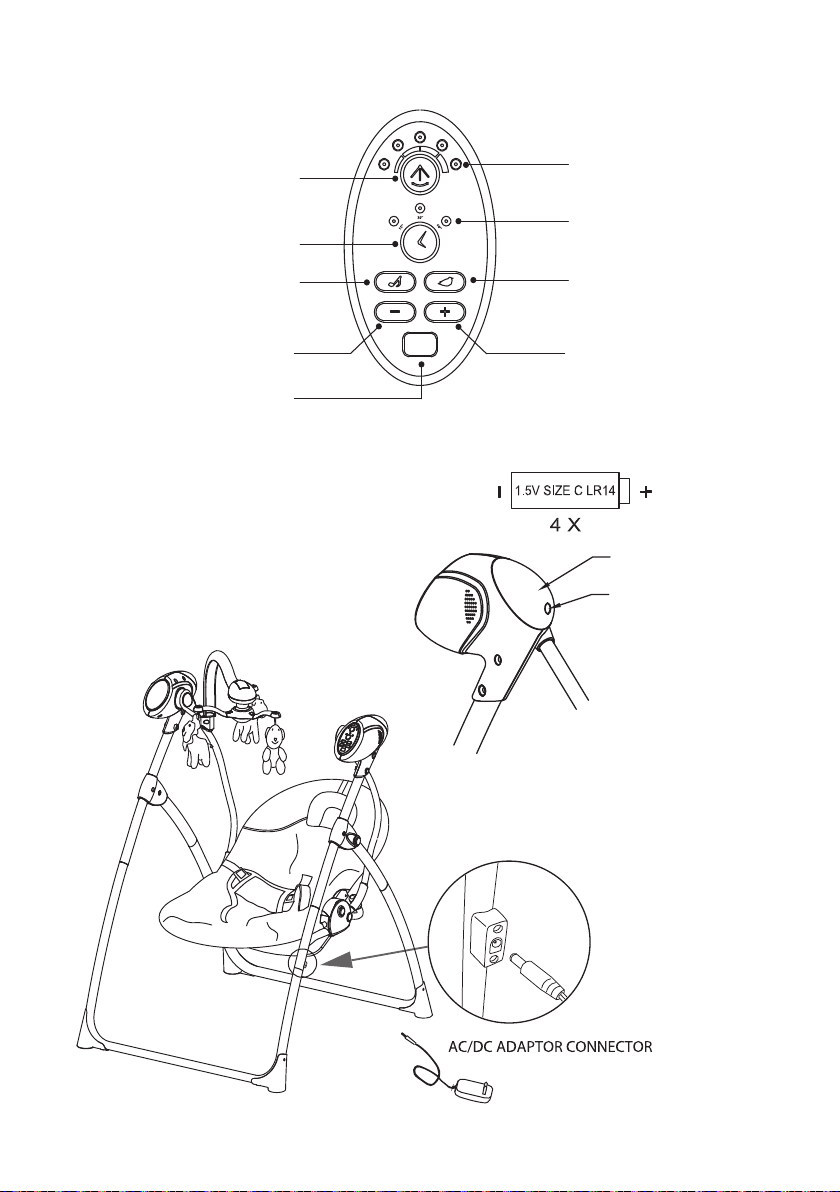
The product must be installed and used under the supervision of an adult.
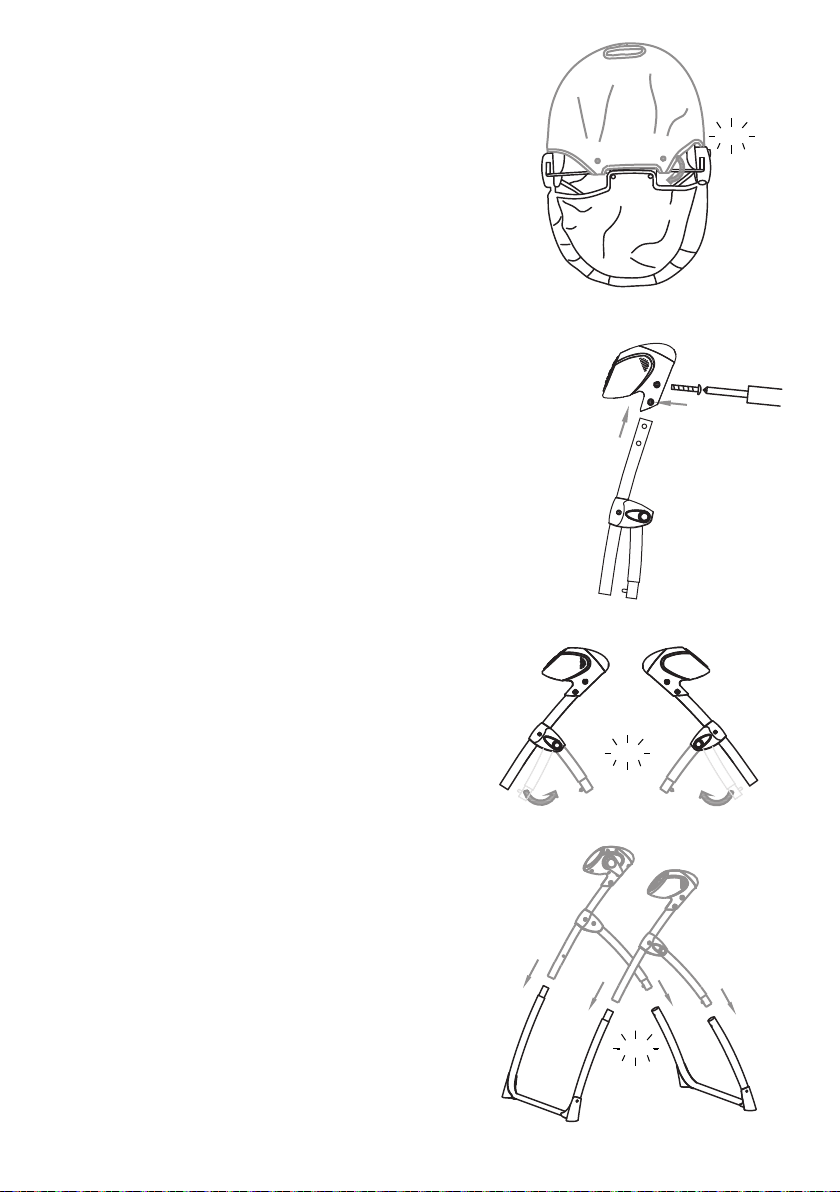
Read through each step carefully and follow the proper order.
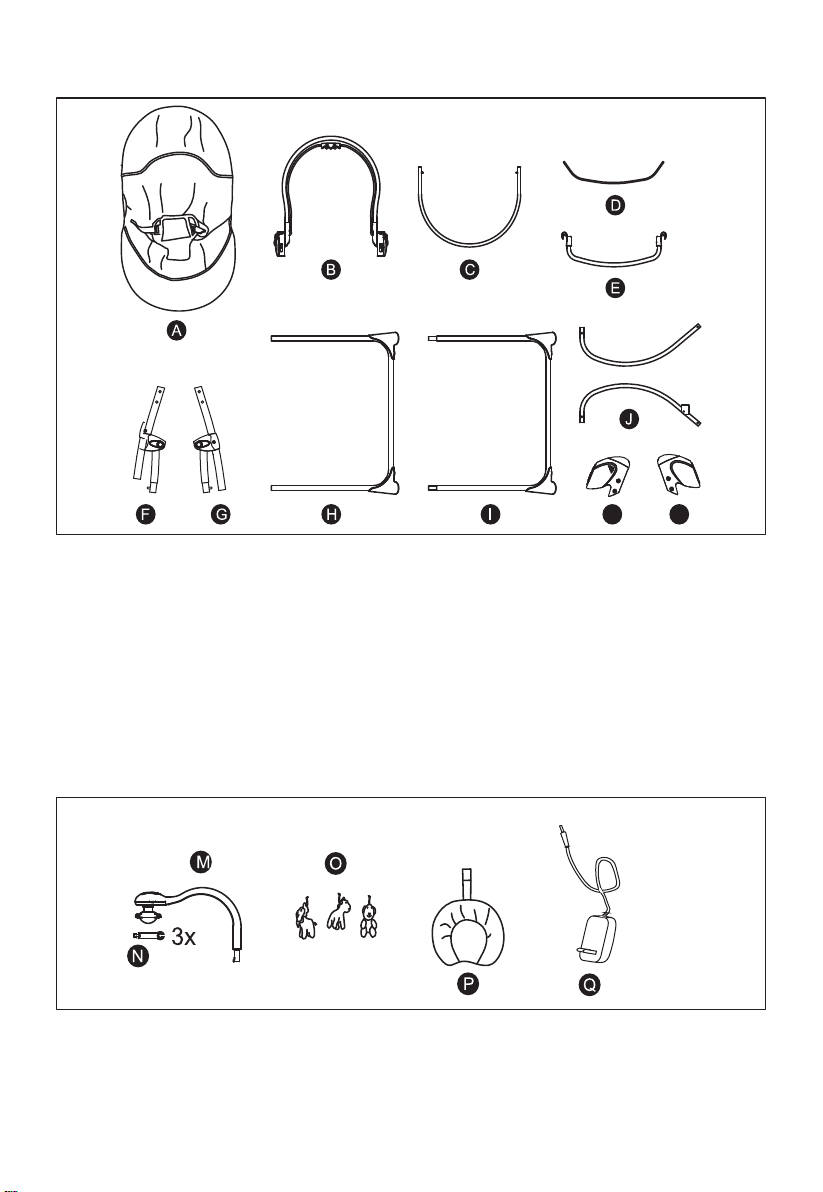
Remove all Packaging, separate and count all parts and hardware before
installation.
Please ensure that all parts are correctly installed, incorrect installation can lead to
a danger.
We recommend that, where possible, all items are assembled near the area in
which they will be placed in use, to avoid moving the product unnecessarily once
assembled.
Ensure a secure surface during installation, and place the product always on a flat,
steady and stable surface.
Please read all instructions carefully and keep it for future reference.
01

Standard Configuration Parts
A. seat cover B. backrest tube C. seat support tube
D. fabric fixed steel wire E. cross tube
F. left support tube group G. right support tube group
H. front leg I. rear leg J. hanging tubes
K. left driving part L. right driving part
Selective Parts
M. main toy bar N. toy bar arm O. toys P. head support
Q. AC/DC power adapter
KL
02

click
ASSEMBLY
1. Insert the seat support tube into the
backrest tube and “click” into place.
2. Put on the seat cover to the seat
frame.
3. Insert the steel wire through fabric
sewing housing, put the two ends of
the steel wire into the plastic holes
and “click” into place.
4. Fix the seat cover onto the steel
wire with the buttons.
03
click
click

5. Fix the backrest fabric onto the steel
wire with the buttons.
6. Unfasten the screw. (Attention: do not take
off the screw caps). Insert the leg into music
device and fasten the screws. Same as the
other side. Attention: the folding buttons on
legs should be outward always.
click
04
click
click
7. Unfold the 2 driving system parts
until you hear “click” sound.
8. Install the front legs and rear
legs by inserting the two legs into
the upper part tube until you hear
“click” sound.

click
2 hanging tubes into the plastic part holes
until you hear “click” sound.
10. Install the cross tube:
Install the cross tubes onto the 2
hanging tubes and “click” into place.
05
9. Install the hanging tubes: Insert the
11. Install the seat unit: Install the
seat unit by inserting the 2 hanging
tubes into the seat socket.

12. Assemble the toy bar: put on the
3 toy bar arms onto the toy bar, and
then put on the 3 plush toys into the
holes of the arms.
13. Insert the toy bar frame into the
toy bar hole according to the guide
line, and then you can turn around
the toy bar by 360 degree, you can
stop in different position.
06

SCREW
BATTERY BOX COVER
FUNCTIONS
1. Adjust the backrest positions:
there are 3 positions of backrest
position, adjust it by pulling handle
of the backrest.
2. Adjust the positions of toy bar:
The toy bar can be hand moved
to different positions as you like,
easy for parents to amuse
baby.
3. Install the battery of toy bar:
(BATTERIES NOT INCLUDED)
Install 2pcs 1.5V AAA LR03 size
batteries, and turn on the toy bar
button, then the toy bar can be
turned around automatically, turn
on the light button to open the
lamp light.
07

4. Folding: Folding the swing by pressing the 2 buttons on the 2
sides of the swing frame.
08

SWING CONTROL PLATE INSTRUCTIONS
SPEED LIGHT
TIMING LIGHT
SPEED BUTTON(5 SPEED, PRESS THE
BUTTON TO MOVE TO NEXT SPEED)
TIMER BUTTON(3 TIMER, 15 MINUTES, 30 MINUTES,
60 MINUTES, PRESS BUTTON TO MOVE TO NEXT
TIMER FUNCTION)
MUSIC BUTTON(12 MELODIES, PRESS
THE BUTTON TO MOVE TO NEXT ONE)
NATURE SONGS BUTTON(5 NATURE
SONGS, PRESS THE BUTTON TO
MOVE TO NEXT ONE)
SONG VOLUME DECREASE SONG VOLUME INCREASE
REMOTE CONTROL
SIGNAL RECEIVER
09
SCREW
BATTERY
BOX COVER
(BATTERIES
NOT INCLUDED)

10
WARNING
Read this instruction carefully before using and keep it for future reference.
Failure to follow these warnings and the assembly instruction could result in
serious injury or death.
Products need to be installed by adult and used under adult’s supervision.
1. Do not use the product if any parts are broken, torn or missing and use
only spare parts approved by the manufacturer.
2. Always use harness. Do not move or lift this product with the baby inside it.
3. Never leave child unattended. Do not let children play with this product.
4. Stop using product when child attempts to climb out or reaches 20 lbs.
5. It is dangerous to place this product on an elevated surface. Always use
on a flat, level floor.
6. To avoid injury ensure that children are kept away when unfolding and
folding this product.
7. Be aware of the risk of open fire and other sources of strong heat, such as
electric bar fires, gas fires, etc. In the vicinity of the product.
8. This product does not intend for prolonged period of sleep. Should your
child need to sleep, then place the child in a suitable cot or bed.
9. Do not use the product without the seat cushion.
10. Discontinue using your product should it become damaged or broken.
11. Transformers used with the infant swing are to be regularly examined for
damage to the cord, plug, enclosure and other parts, and in the event of such
damage they shall not be used.
12. The infant swing shall only be used with the recommended transformer.
FALL HAZARD: Children have suffered head injuries falling from rockers.
• ALWAYS use restraints. Adjust to fit snugly.
• NEVER lift or carry baby in rocker.
• STOP using product when baby starts trying to sit up or has reached 20 lbs,
whichever comes first.
• ALWAYS place rocker on floor. Never use on any elevated surface.
SUFFOCATION HAZARD: Babies have suffocated when seats tipped over on
soft surfaces.
• NEVER use on a bed, sofa, cushion, or other soft surface.
•Stay near and watch child during use. This product is not safe for unsupervised
use or unattended sleep.

11
For safe battery use
1. Keep the batteries out of children’s reach.
2. Only the recommended batteries or equivalent are to be used, volts and size.
3. Batteries are inserted with the correct polarity.
4. Remove exhausted batteries from the product.
5. Do not short-circuit supply terminals.
6. Rechargeable batteries are to be removed before being charged.
7. Rechargeable batteries are only to be charged under adult supervision.
Non-rechargeable batteries are not to be recharged.
8. Any battery may leak battery acid if mixed with a different battery type, if
inserted incorrectly(put in back-wards) or if all batteries are not replaced or
recharged at the same time. Do not mix old and new batteries. Do not mix
alkaline, standard(carbon-zinc) or rechargeable(nickel-cadmium) batteries.
9. Any battery may leak battery acid or explode if disposed of in fire or an
attempt is made to charge a battery not intended to be recharged.
10. Never use a charger made from one type of battery to charge another
type.
11. Discard leaky batteries immediately. Leaky batteries can cause skin
burns or other personal injury. When discarding batteries, be sure to
dispose of them in the proper manner, according to your state and local
regulations.
12. Always remove batteries if the product is not going to be used for a
month or more. Batteries left in the unit may leak and cause damage.
13. Recommended type batteries-alkaline disposables, size C(LR14-1.5v).
Never mix battery types. Change batteries when product ceases to operate
satisfactorily.
CAUTION
To prevent battery leaks, which can burn skin and eyes:
• Always replace the entire set of batteries at one time.
• Never mix old and new batteries, or batteries of different brands or types.
• Remove batteries when storing product for a long time.
• Dispose of used batteries immediately.

12
MAINTENANCE
This product requires regular maintenance to keep it in good working order.
Regularly check all parts of the product to ensure that they are operating
correctly and for signs of wear or damage. Only replacement parts supplied
or recommended by the manufacturer should be used.
CLEANING
Refer to care label on the product for cleaning instructions for fabrics. Clean
metal or plastic components with mild detergent and warm water. Never
use abrasive, ammonia based, bleach based or spirit type cleaners. Ensure
the product is fully dry before use or storage.

Please give us a chance to make it right and do better !
Contact our friendly customer service department for help first.
Replacements for missing or damaged parts will be shipped ASAP !
Contact Us !
Do NOT return this item. US:cs.us@costway.com
UK:cs.uk@costway.com
US office: Fontana UK office: Ipswich AU office: Truganina
Table of contents
Popular Baby Swing manuals by other brands

Hartman
Hartman Dubai 69804012 quick start guide

Bright Starts
Bright Starts Bounce n Spring Deluxe manual

stilum
stilum volucris 2 Maintenance instructions

SPORTSPOWER
SPORTSPOWER SW-003 User and assembly manual

eibe
eibe fantallica 552024143 Series Assembly and maintenance guide

Bright Starts
Bright Starts Giggle Bugs Activity Jumper 60028-6WS manual