VERTBAUDET 70334 0022 User manual

Item No.:ref 70334 0022
Importé par/imported by/ Importado por/ Importiert von / Importato da /
Geïmporteerd door
VERTBAUDET
216 rue Winoc Chocqueel
59200 Tourcoing

1
1
2
3
4
5
6
7
8
9
10
11
12
13
23 4
5
6
78
9
10
11
12 13
Tube de support avant et arrière
Tube de support transversal
Tube de portage et vis
Tube de support siège
Tube de support arrière
Pièces gauche et droite de mouvement
Barre de jouets
Tube de renfort dorsal
Vibrateur
Siège
Appuie-tête
Adaptateur
Cadre transat
2
FR

1
3
5
6
Assemblage
1. Insérez les pièces de support
dans les pièces de mouvement
jusqu'à entendre un « clic ». Tirez
sur les tubes pour vérifier qu'ils sont
bien attachés.
Attention : Faites attention au sens
de la courbe des tubes.
2. Insérez les tubes de support
avant et arrière dans les tubes
supérieurs jusqu'à entendre un «
clic » (Note : La courbe du tube de
support avant est tournée vers
l'intérieur, celle du tube de support
arrière est tourné vers l'extérieur)
comme sur l'image.
3. Installez les tubes de
portage : Insérez 2 tubes de
portage dans les trous des
pièces en plastique jusqu'à ce
que le loquet remonte, puis
fixez les vis dans le trou à
l'aide d'un tournevis.
3

2
4
8
2
10
4. Installez les tubes de support
transversal :
Installez le tube de support
transversal en le clipsant dans
les 2 tubes de portage jusqu'à
ce que le loquet remonte.
5. Insérez le tube de support du
siège dans le tube de renfort
dorsal jusqu'à ce que le loquet
remonte
7. Attachez le tissu du siège
6. Insérez l'assemblage dans le
tube de portage jusqu'à
entendre un « clic ».
4

7
9
8. Insérez le siège sur le
support du siège et installez le
vibrateur
(Attention : le compartiment à
piles doit être tourné vers le
bas).
9. Barre de jouets et jouets :
Insérez la barre de jouets dans
les trous de part et d'autre du
siège jusqu'à entendre un clic.
Pour libérer la barre de jouets,
appuyez sur les 2 boutons en
plastique aux extrémités de la
barre.
Son
Vibration
5

13
10. Ajustez le dossier :
Appuyez sur les 2 boutons latéraux
du siège en même temps pour
ajuster la position du dossier, dans
l'une des 2 positions.
11. Si vous souhaitez utiliser le produit en
tant que transat, retirez le siège du support
balancelle et insérez le cadre du transat
12. Fermez le harnais
6
Retirez les couvercles des
trous avant de passer en
mode transat

INSTRUCTIONS PLAQUE DE COMMANDE BALANCELLE
A.BOUTON VITESSE (5 VITESSES, APPUYEZ SUR LE BOUTON
POUR PASSER À LA SUIVANTE)
B.BOUTON MINUTEUR (3 MINUTEURS, 15 MIN, 30 MIN ET 60 MIN).
APPUYEZ SUR LE BOUTON POUR PASSER AU MINUTEUR
SUIVANT
C.BOUTON MUSIQUE (12 MÉLODIES, APPUYEZ SUR LE BOUTON
POUR PASSER À LA SUIVANTE, MAINTENIR ENFONCÉ PENDANT
2 SECONDES POUR ÉTEINDRE)
A
B
C
D
E
F
G
D.AUGMENTER VOLUME MUSIQUE
E.DIMINUER VOLUME MUSIQUE
F.COMPARTIMENT À PILES
(TAILLE DES PILES : 4x C/LR14)
G.BOUTON DE PLIAGE DU CADRE
BALANCELLE
H.ADAPTATEUR
I.SON
J.VIBRATION
(TAILLE DES PILES : 2* C/LR14)
J
H
I
7

8
AVERTISSEMENT !
VEUILLEZ LIRE ATTENTIVEMENT CES INSTRUCTIONS AVANT UTILISATION ET LES CONSERVER
POUR POUVOIR LES CONSULTER À L'AVENIR.
Ne pas utiliser le produit si une pièce est manquante ou cassée.
N'utiliser que les accessoires ou pièces détachées vendus ou approuvés par le fabricant
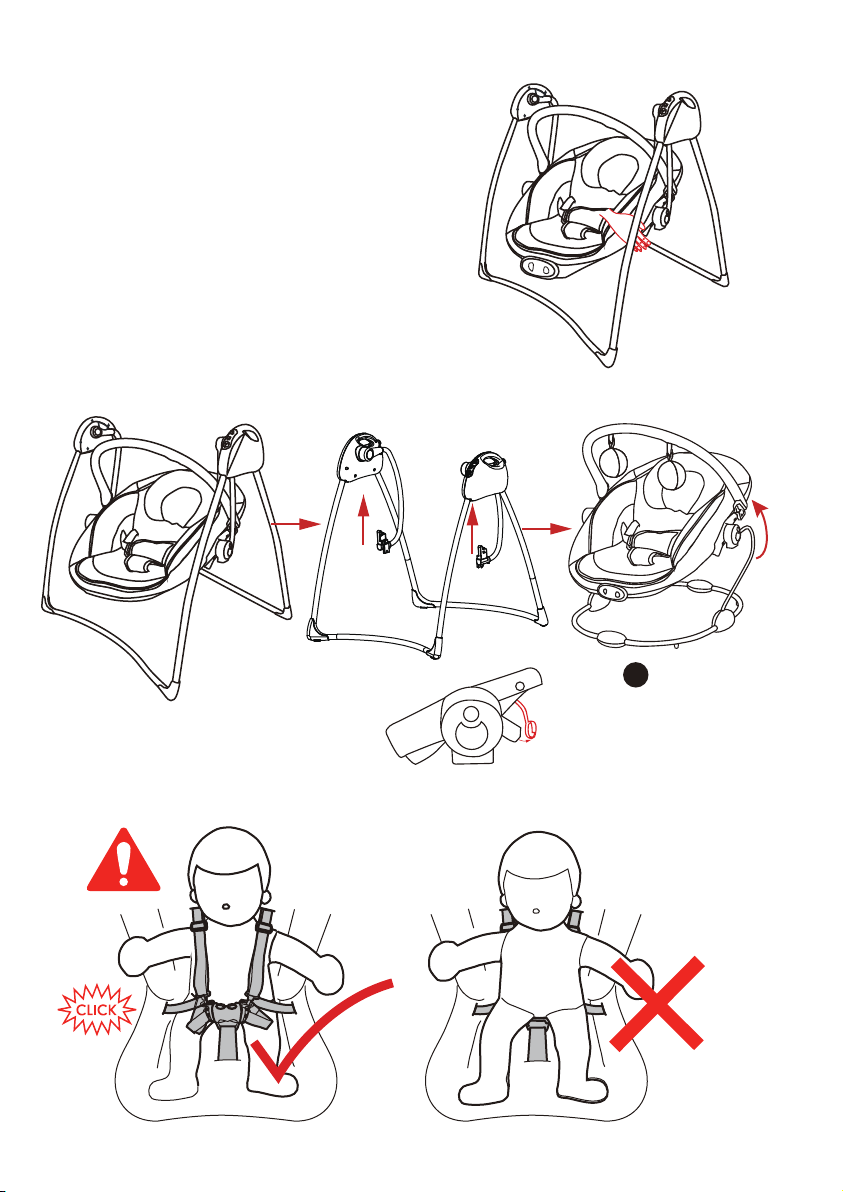
Toujours utiliser le système de retenue. NE JAMAIS LAISSER UN ENFANT SANS SURVEILLANCE
TOUJOURS UTILISER SUR UN SOL PLAT ET NIVELÉ
Ne jamais utiliser ce produit sur une surface surélevée (p.ex. une table).
CE PRODUIT NE CONVIENT PAS À UNE PÉRIODE PROLONGÉE DE SOMMEIL. SI VOTRE ENFANT
DOIT DORMIR, INSTALLEZ-LE DANS UN LIT OU UN BERCEAU ADAPTÉ.
NE PAS UTILISER LE PRODUIT SANS LE COUSSIN DU SIÈGE
Ce siège ne doit pas être utilisé comme lit ou berceau. Un enfant endormi doit être installé dans un lit ou
berceau approprié
Ne pas utiliser ce produit avec un enfant pouvant s'asseoir seul ou pesant plus de 9 kg
Pour éviter les blessures, veiller à ce que les enfants ne soient pas à proximité lors du pliage et du dépliage
du produit
Ne pas laisser les enfants jouer avec ce produit
Ne pas déplacer ou soulever le produit lorsqu'un enfant est assis dedans.
Laver la housse déhoussable avec un détergent léger et à cycle doux
Ne jamais utiliser la barre de jeux pour soulever la balancelle
Le balancement ne fonctionne qu’avec bébé dans la balancelle, si vous retirez votre enfant le balancement
s’arrête.
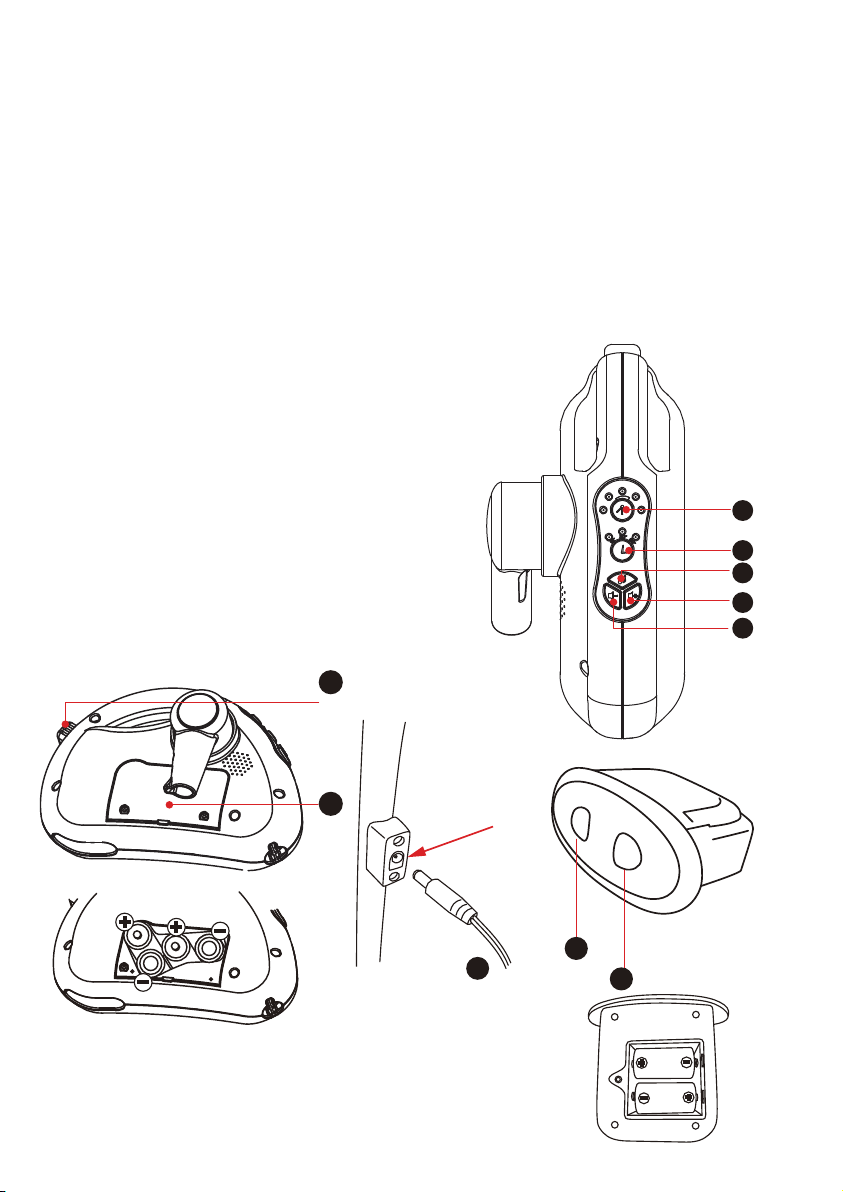
UTILISATION DES BATTERIES EN TOUTE SÉCURITÉ
GARDER LES BATTERIES HORS DE PORTÉE DES ENFANTS
N'UTILISER QUE LES BATTERIES RECOMMANDÉES OU ÉQUIVALENTES
VOLTS ET TAILLE
LES POLARITÉS DES BATTERIES DOIVENT ÊTRE RESPECTÉES LORS DE L'INSERTION DE
CELLES-CI
Ne pas recharger les batteries non rechargeables
Ne pas mélanger différents types de batteries ou des batteries neuves et utilisées
RETIRER LES BATTERIES USAGÉES DU PRODUIT
BATTERIES RECOMMANDÉES : ALCALINE JETABLE TAILLE C(LR14-1.5V)
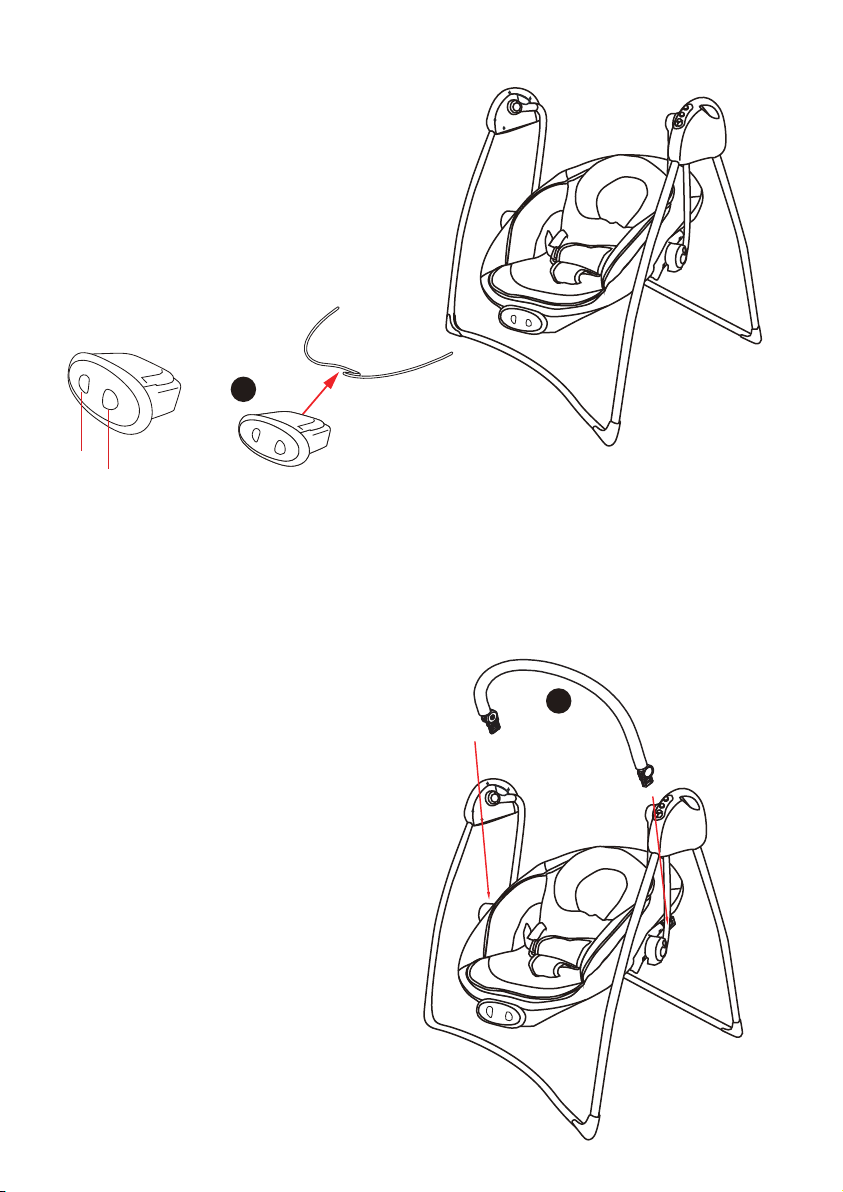
Le transformateur utilisé avec la balancelle pour enfant doit être régulièrement contrôlé pour vérifier l'état du
cordon, de la prise, du boitier et des autres pièces et il ne doit pas être utilisé en cas de dommage.
La balancelle pour enfant ne doit être utilisée qu'avec le transformateur recommandé.
Les transformateurs et alimentations des jouets ne sont pas prévus pour être utilisés en tant que jouets, et
l'utilisation de ces produits par les enfants doit être faite sous la supervision des parents.

1
1
2
3
4
5
6
7
8
9
10
11
12
13
23 4
5
6
78
9
10
11
12 13
Front and rear support tube
Cross support tube
Hang tube and screw
Seat support tube
Rear support tube
Left and right driving part group
Toybar
Backrest tube
Vibrator
Seatpad
Head support
Adapter
Bouncer frame
9
EN

1
3
5
6
1.Insert the support feet into driving
part group seperately until a "Click",
please pull the tubes to maker sure
they are installed to position.
Warning: Please pay attention to the
direction of the curvature of the
tubes.
Assembly
2.Insert front and rear support tube
into upper part tube until a
''click''.(Ps: Front support tube
curved inward, rear support tube
carved outward),like right picture.
3.Install the hanging tubes:
Insert the 2 hanging tubes into
the plastic part holes until the
shrapnel pop-up,them twist the
screw with a screwdriver into
the hole.
10

2
4
8
2
10
4.Install the cross support tube:
Install the cross tube by click
onto the 2 hanging tubes until
the shrapnel pop-up.
5.Insert the seat support tube into
the backrest tube until the
shrapnel pop-up.
7.Fabric seat assembly
6.Insert support tube group into
the hanging tube plastic until a
''click''.
11

7
9
8. Insert the seat pad onto the
seat frame and then insert the
vibrator (Warning: Battery
compartment face down).
9.Toy bar and toys:
Insert the toy bar by click in the 2
ends to the hole in each side, you
can also release the toy bar by
press the 2 plastic spring buttons
in the end of toy bar.
Sound
Vibration
12

13
10. Adjust the bakrest:
Press the 2 side button on the seat
joint together to adjust the position of
the backrest,
there is 2 positions.
11.If you want to use it as a bouncer.
remove the swing seat and insert the
bouncer frame
12.Securing the harness
13
Please open the hole
cover before change
to bouncer

SWING CONTROL PLATE INSTRUCTIONS
A.SPEED BUTTON (5 SPEED, PRESS THE BUTTON TO MOVE
TO THE NEXT SPEED)
B.TIMER BUTTON (3 TIMERS, 15MINS, 30MINS AND 60MINS.
PRESS BUTTON TO MOVE TO THE NEXT TIMER FUNCTION)
C.MUSIC BUTTON (12 MELODIES, PRESS THE BUTTON TO
MOVE TO THE NEXT ONE; PRESS FOR 2 SECONDS TO TURN
OFF)
A
B
C
D
E
F
G
D.SONG VOLUME INCREASE
E.SONG VOLUME DECREASE
F.BATTERY DOOR
(BATTERY SIZE: 4* C/LR14)
G.SWING FRAME FOLDING BUTTON
H.ADAPTER
I.BOX-SOUND
J.BOX-VIBRATION
(BATTERY SIZE: 2* C/LR14)
J
H
I
14

15
WARNING!
READ THESE INSTRUCTIONS CAREFULLY BEFORE USE AND KEEP THEM FOR FUTURE
REFERENCE.
Do not use your childcare article if any of its parts are broken or missing.
Use only accessories or spare parts sold or approved by the manufacturer
Always use the restraint system. NEVER LEAVE CHILD UNATTENDED
ALWAYS USE ON A FLAT, LEVEL FLOOR
Never use this product on an elevated surface (eg table)
THIS PRODUCT IS NOT INTENTED FOR PROLONGED PERIOD OF SLEEP. SHOULD YOUR CHILD
NEED TO SLEEP, THEN PLACE THE CHILD IN A SUITABLE COT OR BED.
DO NOT USE THE PRODUCT WITHOUT THE SEAT CUSHION
This chair should not be used in place of a bed or bassinet. A sleeping child should be in an appropriate
bed or bassinet
Do not use this product once your child can sit up unaided or weighs more than 9kg
To avoid injury ensure that children are kept away when unfolding and folding this product
Do not let your child play with this product
Do not move or lift this product with the baby inside it.
Wash the removable cover with mild detergent on gentle cycle
Never use the toy bar to carry the reclined cradle
The swing works only with baby in the swing, if you remove your child the swinging stops.
FOR SAFE BATTERY USE
KEEP THE BATTERIES OUT OF CHILDREN’S REACH
ONLY THE RECOMMENDED BATTERIES OR EQUIVALENT ARE TO BE USED
VOLTS AND SIZE
BATTERIES ARE TO BE INSERTED WITH THE CORRECT POLARITY
Do not recharge non-rechargeable batteries
Different types of batteries or new and used batteries are not to be mixed
REMOVE EXHAUSTED BATTERIES FROM THE PRODUCT
RECOMMENDED TYPE BATTERIES-ALKALINE DISPOSABLES, SIZE C(LR14-1.5V)
Transformer used with the infant swing are to be regularly examined for damage to the cord, plug,
enclosure and other parts, and in the event of such damage, they shall not be used.
The infant swing shall only be used with the recommended transformer.
Transformers and power supplies for toys are not intended to be used as toys,and
the use of these products by children shall be under the full supervision of parents.

1
1
2
3
4
5
6
7
8
9
10
11
12
13
23 4
5
6
78
9
10
11
12 13
Vorderes und hinteres Stützrohr
Querträgerrohr
Hängerohr und Schraube
Sitzhalter
Hinteres Stützrohr
Antriebsteil rechts und links
Spielzeugstange
Rohr Rückenlehne
Schwingungsgerät
Sitzpolster
Kopfstütze
Adapter
Rahmen der Wippe
16
DE

1
3
5
6
Zusammenbau
1. Die Stützfüße einzeln in das
Antriebsteil schieben, bis ein "Klick"
zu hören; ziehen Sie dann einmal an
jedem Rohr um sicherzustellen, dass
sie fest sitzen.
Warnhinweis: Achten Sie auf die
Krümmungsrichtung der Rohre.
2. Die Stützrohre vorne und hinten
in den oberen Rohrabschnitt
einführen, bis ein 'Klick zu hören
ist. Hinweis: Das vordere Stützrohr
ist nach innen gekrümmt, das
hintere Stützrohr nach außen,
siehe Bild rechts.
3. Die Hängerohre anbringen:
Die 2 Hängerohre in die
Löcher des Plastikteils
einschieben, bis das Teil
hochkommt, dann mit einem
Schraubendreher im Loch
eindrehen.
17

2
4
8
2
10
4. Das Querträgerrohr
anbringen:
Das Querträgerrohr in die
beiden Hängerohre einrasten
lassen, bis das Teil hochkommt.
5. Das Sitzhalterohr in das Rohr
der Rückenlehne einschnappen
lassen, bis das Teil hochkommt.
7. Zusammenbau der Stoffteile
des Sitzes
6. Die Stützrohrgruppe in das
Plastikteil des Hängerohrs
einschieben, bis ein "Klick" zu
hören ist.
18

7
9
8. Das Sitzpolster in den
Sitzrahmen einlegen und dann
das Schwingungsgerät
einsetzen
(Warnung: Das Batteriefach
muss nach unten zeigen).
9. Spielzeugstange und Spielzeug:
Die Spielzeugstange an beiden
Enden in die Löcher auf jeder Seite
einführen, bis ein "Klick" zu hören
ist; die Spielzeugstange kann
wieder herausgenommen werden,
indem die beiden Druckknöpfe am
Ende der Stange gedrückt werden.
Klang
Schwingun
19

13
10. Rückenlehne anpassen:
Zur Anpassung der Rückenlehne die
beiden Knöpfe am Sitzgelenk
gleichzeitig drücken.
Es gibt 2 Positionen
11. Wenn das Gerät als Wippe verwendet
werden soll, den Schwingsitz herausnehmen
und den Wippenrahmen anbringen.
12. Gurt befestigen
20
Vor dem Wechsel zur Wippe
die Abdeckung vom Loch
abnehmen.
Other manuals for 70334 0022
1
Table of contents
Languages:
Other VERTBAUDET Baby Swing manuals
Popular Baby Swing manuals by other brands

TP
TP Active fun TP140 Instructions for assembly maintenance and use

Graco
Graco 1424 owner's manual

Graco
Graco Lovin' Hug 1751537 owner's manual

Fisher-Price
Fisher-Price X4400 quick start

Kids II
Kids II ingenuity InLighten Cradling Swing Landry The... manual

Terra Bound Solutions
Terra Bound Solutions 581-438 Assembly manual