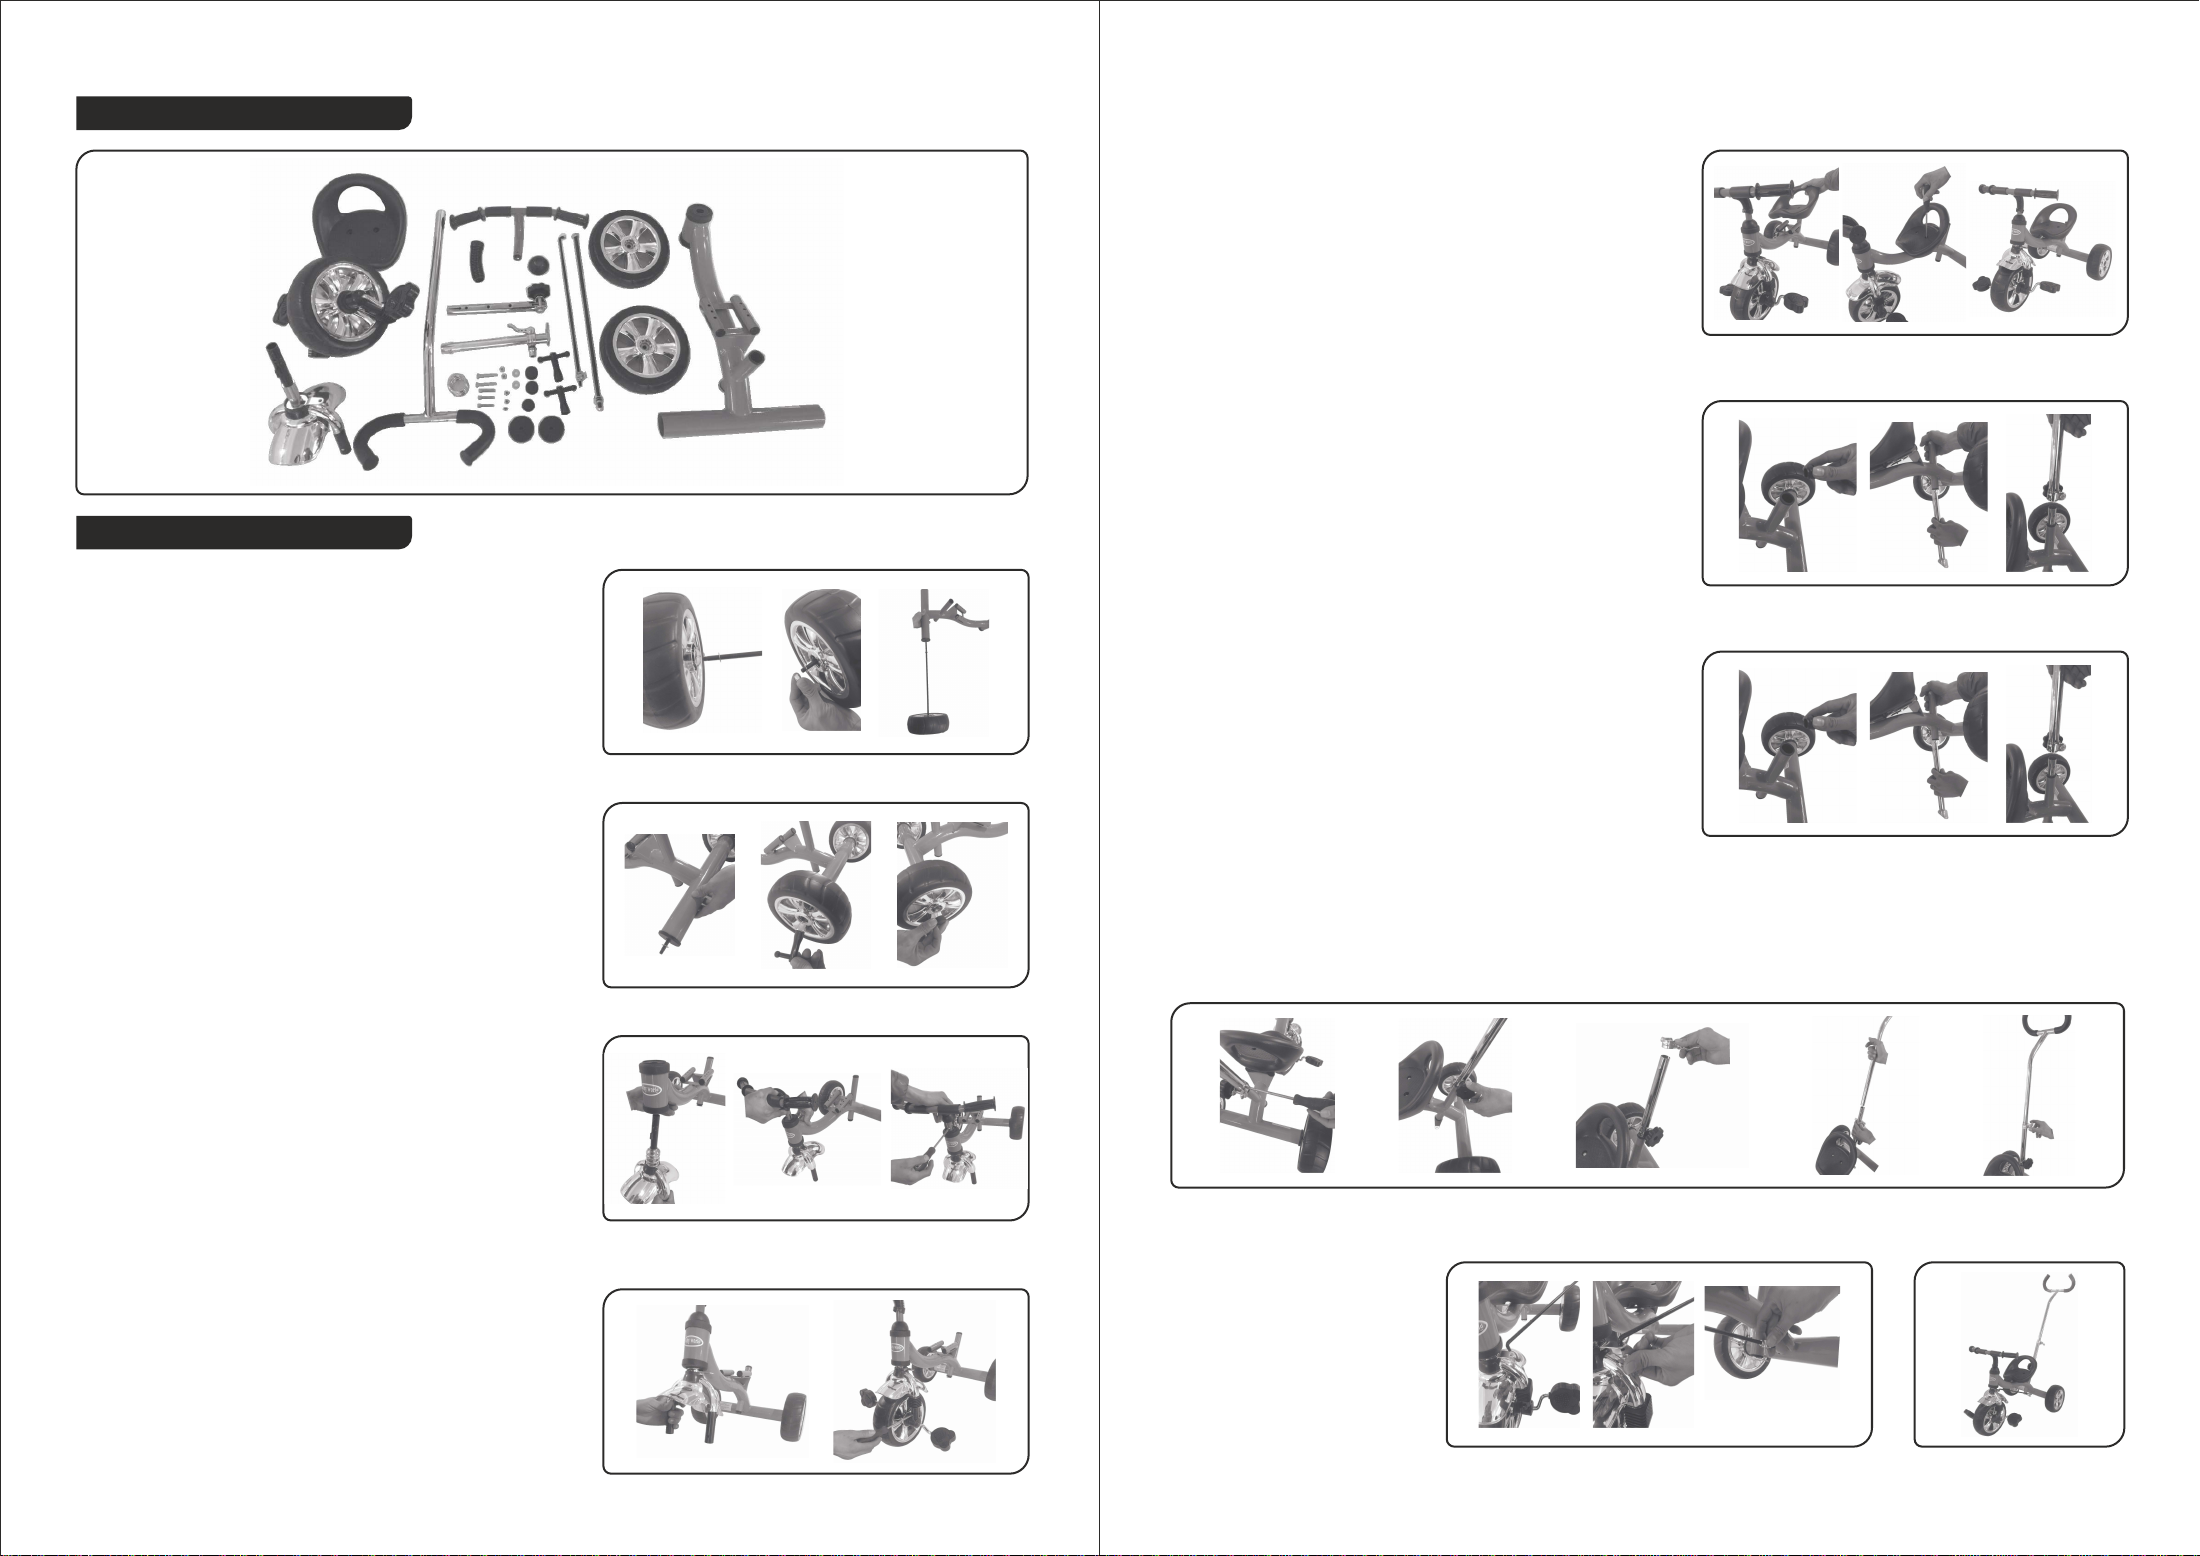
manuals.online logo
Brands
  1. Home
  2. •
  3. Brands
  4. •
  5. Babyhug
  6. •
  7. Bicycle
  8. •
  9. Babyhug BGTB003 User manual

Babyhug BGTB003 User manual

Other Babyhug Bicycle manuals

Babyhug Gladiator User manual

Babyhug

Babyhug Gladiator User manual

Babyhug Ranger Tricycle BGBR044 User manual

Babyhug

Babyhug Ranger Tricycle BGBR044 User manual

Popular Bicycle manuals by other brands

Grace ONE manual

Grace

Grace ONE manual

Woosh Gran Camino manual

Woosh

Woosh Gran Camino manual

Razor FLASHRIDER 360 user manual

Razor

Razor FLASHRIDER 360 user manual

TAUBIK SOHO 2.0 user manual

TAUBIK

TAUBIK SOHO 2.0 user manual

Oxybul FREEbul 331067 manual

Oxybul

Oxybul FREEbul 331067 manual

Cycle Force Group BICYCLE BABY TRAILER & JOGGER Assembly instructions

Cycle Force Group

Cycle Force Group BICYCLE BABY TRAILER & JOGGER Assembly instructions

Giant TWIST FREEDOM DX datasheet

Giant

Giant TWIST FREEDOM DX datasheet

RAMBO R1000X2M-FF-BFD manual

RAMBO

RAMBO R1000X2M-FF-BFD manual

Vermeiren SAFARI Maintenance manual

Vermeiren

Vermeiren SAFARI Maintenance manual

Velec A2/36V owner's manual

Velec

Velec A2/36V owner's manual

Cervélo S3 2019 Assembly manual

Cervélo

Cervélo S3 2019 Assembly manual

Festo EGSC-BS-KF Instructions & Operating

Festo

Festo EGSC-BS-KF Instructions & Operating

Gio Electric H1 Volt owner's manual

Gio Electric

Gio Electric H1 Volt owner's manual

Huka orthros manual

Huka

Huka orthros manual

DAHON CIAO - 2009 manual

DAHON

DAHON CIAO - 2009 manual

Aprimatic ONDA 500 Installation, use and maintenance instructions

Aprimatic

Aprimatic ONDA 500 Installation, use and maintenance instructions

Greyp G6 Series user manual

Greyp

Greyp G6 Series user manual

Babboe Carve-E user manual

Babboe

Babboe Carve-E user manual

manuals.online logo
manuals.online logoBrands
  • About & Mission
  • Contact us
  • Privacy Policy
  • Terms and Conditions

Copyright 2025 Manuals.Online. All Rights Reserved.

Babyhug Pluto Tricycle
Style Code : BGTB003
®
18 to 36
Months
Carrying Capacity
up to 25 kg
Please read the instructions manual thoroughly before using the products and keep for future reference
Made in China
Imported & Marketed By
Brainbees Solutions Pvt. Ltd.
Corporate & Registered Office Address:
Rajashree Business Park, Plot No: 114,
Survey No. 338, Tadiwala Road,
Near Sohrab Hall, Pune 411 001
Customer Care :
020-46608179
customercar[email protected]
Warning:
• This tricycle is suitable for 18-36 month old children.
• Must be used under adult’s supervision only.
• Must be installed by an adult only.
• Do not ride on slope and bumpy surface. Not to be used on heavy traffic roads.
• Do not ride during rain, strong wind or snowing weather.
• Please make sure all the screws are tightened when assembling.
• Please dispose the plastic bags soon after you open the package. Keep away from children to avoid danger
of asphyxia
Maintenance:
• Please use dry cloth to wipe clean
• Regularly check for any loose screws or damage parts.
• Avoid over loading the tricycle beyond the weight capacity
Customer Care Address:
Same as Importer's address
Parental Push Bar Large Front Wheel Strong & Sturdy Frame
Assembly
A: Rear wheel assembly
Installing the rear wheel 1:
Insert the rear end of the shaft into the rear wheel, put a nut
at the end and then put the back shaft into the frame beam.
Installing the rear wheel 2:
Insert the rear end of the shaft through another rear wheel,
cover with a nut, and tighten with wrench on both ends of
the rear axle. Fix the rear wheel cover.
Installing the mudguard and the handle:
Fix the front fork with the mudgaurd, put the spring on the
top of the fork, insert the front fork into the front of the
frame, Insert the handle bar and x it with screws.
Please note: Since the spring is used for fastening, while the
handle is installed, the frame should be pressed down so
that the hole on the front fork and the hole in the tap can be
accessed for the screw.
Installing the front wheel:
Place the plastic pieces on both sides of
the front wheel on the front fork and fasten with screws.
Installing the seat:
Place the seat on the seat plate, and x the screws at the
bottom.
Installing the push handle 1:
Remove the bush on the pipe of the handle, insert the lower
part of the push handle from the bottom, up to the handle
pipe of the frame, Cover the middle of the handle with the
HAFU and then set the middle of the handle to the lower
part of the push handle.
Installing the push handle 2:
After aligning the two screw holes in the middle part of the
push handle and the lower part of the push handle,put the
screw then lock on. Screw the plastic nut on the HAFA.
Installing the push handle 3:
Put the quick release screw on the middle of the handle, cover the upper part of the handle, then lock the quick
release screw.
Installing the steering wire:
The front end of the steering
wire is inserted into the hole
in the front of the frame,with
a nut lock, insert the back end
into the hole in the iron plate
of the lower part of the push
handle and lock it with a nut.
Installation completed