GOGOBEST GM30 User manual

ELECTRIC BICYCLE
User Manual
GM30


Contents
Riding safety .............................................................................................................................................. 1
General equipment use and care .............................................................................................................. 1
Product overview ...................................................................................................................................... 2
Package contents ...................................................................................................................................... 2
How to assemble the e-bike ..................................................................................................................... 3
How to charge the battery ....................................................................................................................... 8
How to remove the battery ..................................................................................................................... 9
Riding modes ........................................................................................................................................... 10
Display and buttons ................................................................................................................................ 11
Using Gears ............................................................................................................................................. 11
Guidelines for Using Gears ...................................................................................................................... 12
Product dimension drawing .............................................................................................. 12
Using Brakes ........................................................................................................................................... 13
Guidelines forUsing Brakes ..................................................................................................................... 13
Specifications .................................................................................................................................................. 14
Maintenance ........................................................................................................................................... 14
Battery Storage ....................................................................................................................................... 15
Battery Fuse ........................................................................................................................................... 16
Tyre Pressures ........................................................................................................................................ 16
Chain Care .............................................................................................................................................. 16
Torque Settings ...................................................................................................................................... 16
Frequently Asked Questions .................................................................................................................. 17
Record Your bike Info ............................................................................................................................ 17

1
Riding Safety
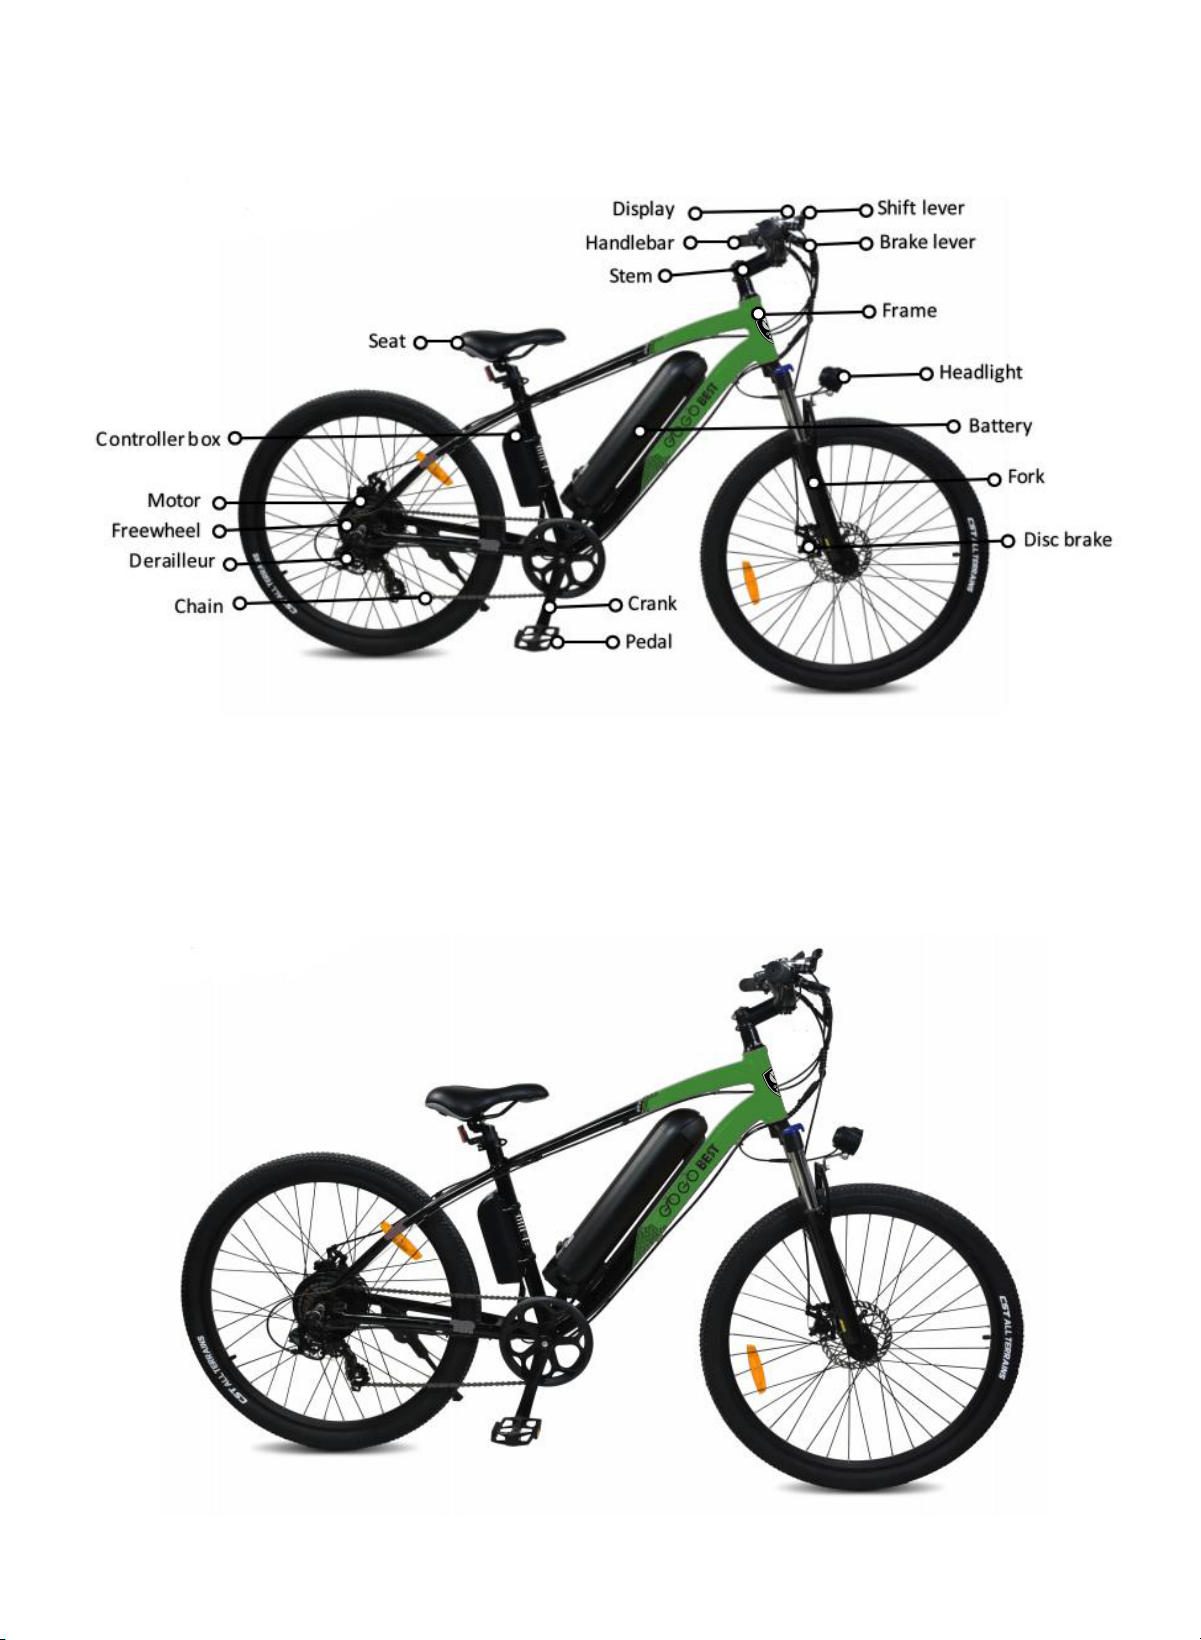
Thank you for choosing the GO GO BEST GM30electric city bike (hereinafter referred to as GM30), It is extremely
important that you follow the safety guidelines contained in this manual in order to ensure maximum safety for you as well
as maximum durability of your e-Bike.
Before you ride your GM30 for the first time, please be absolutely sure that it has been correctly
assembled. You will find step by step instruction in this manual.
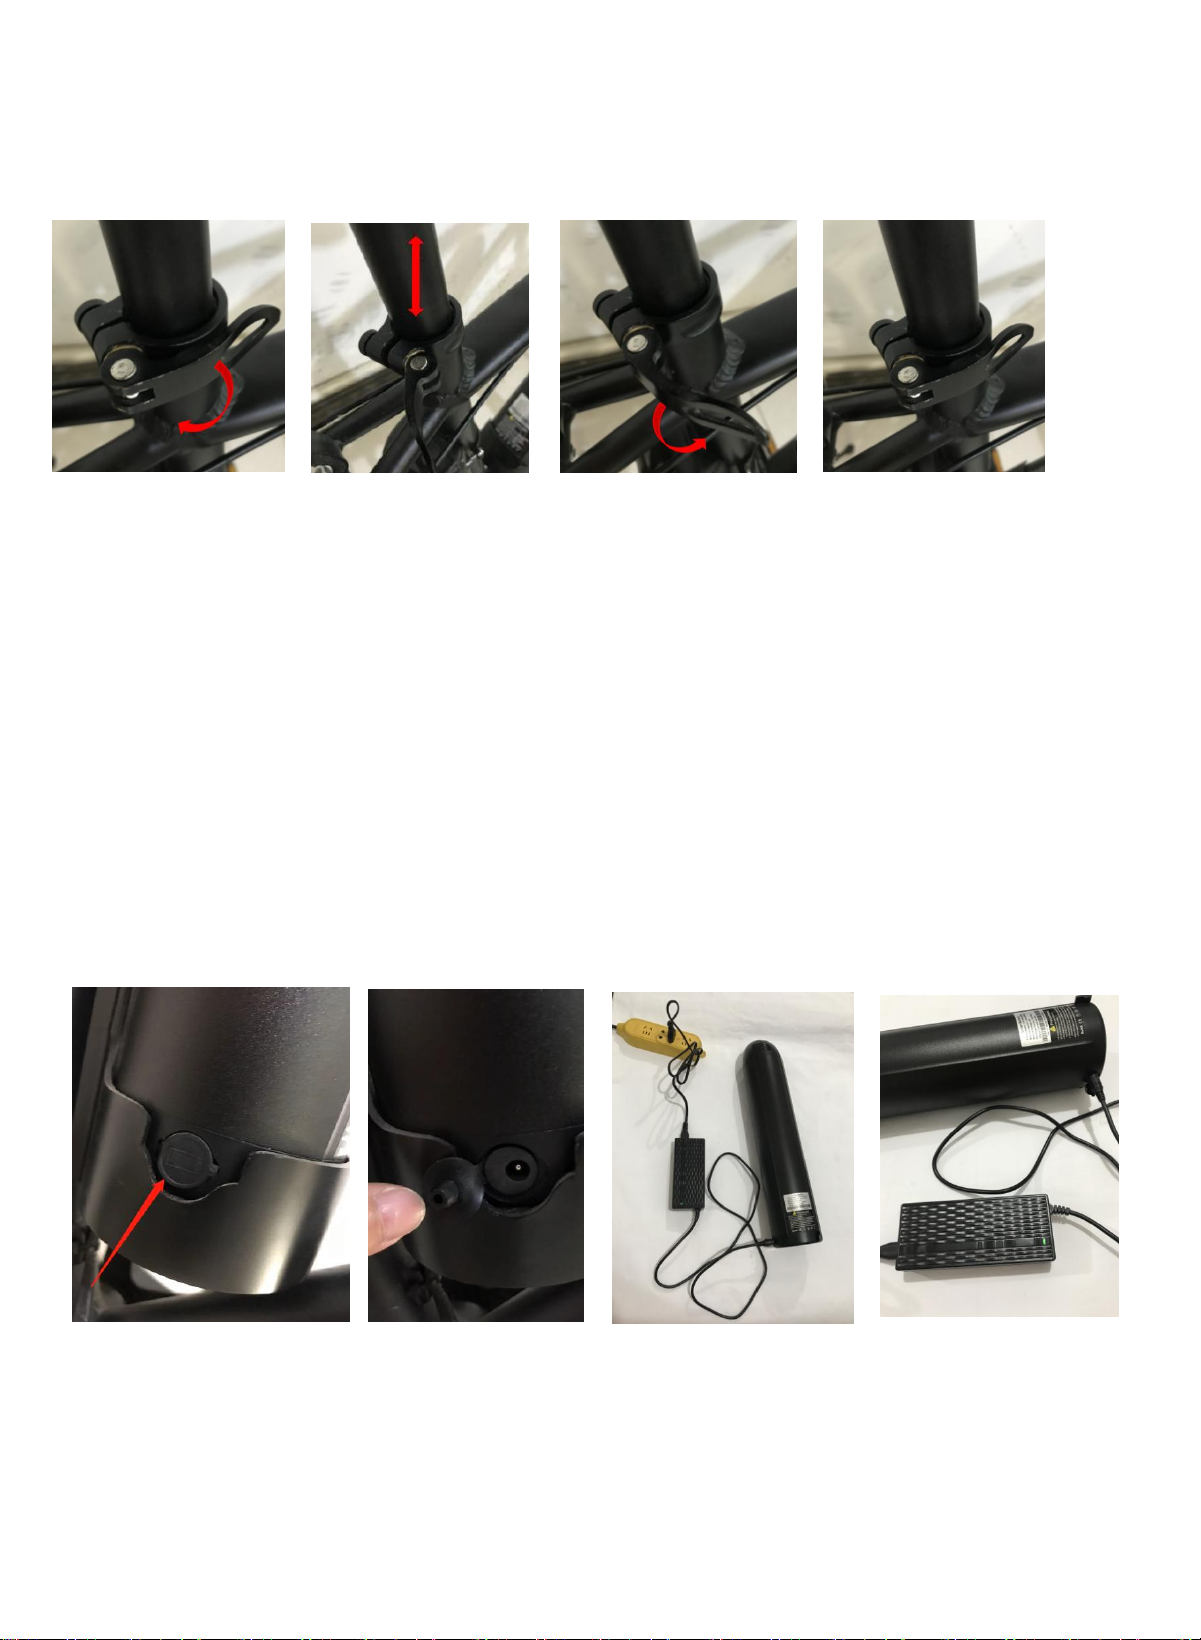
Key assembly steps that must be completed with absolute certainty (to include secure fastening) are pedals, saddle
height, handlebar (both rotation and height), fenders, cargo rack and wheels.
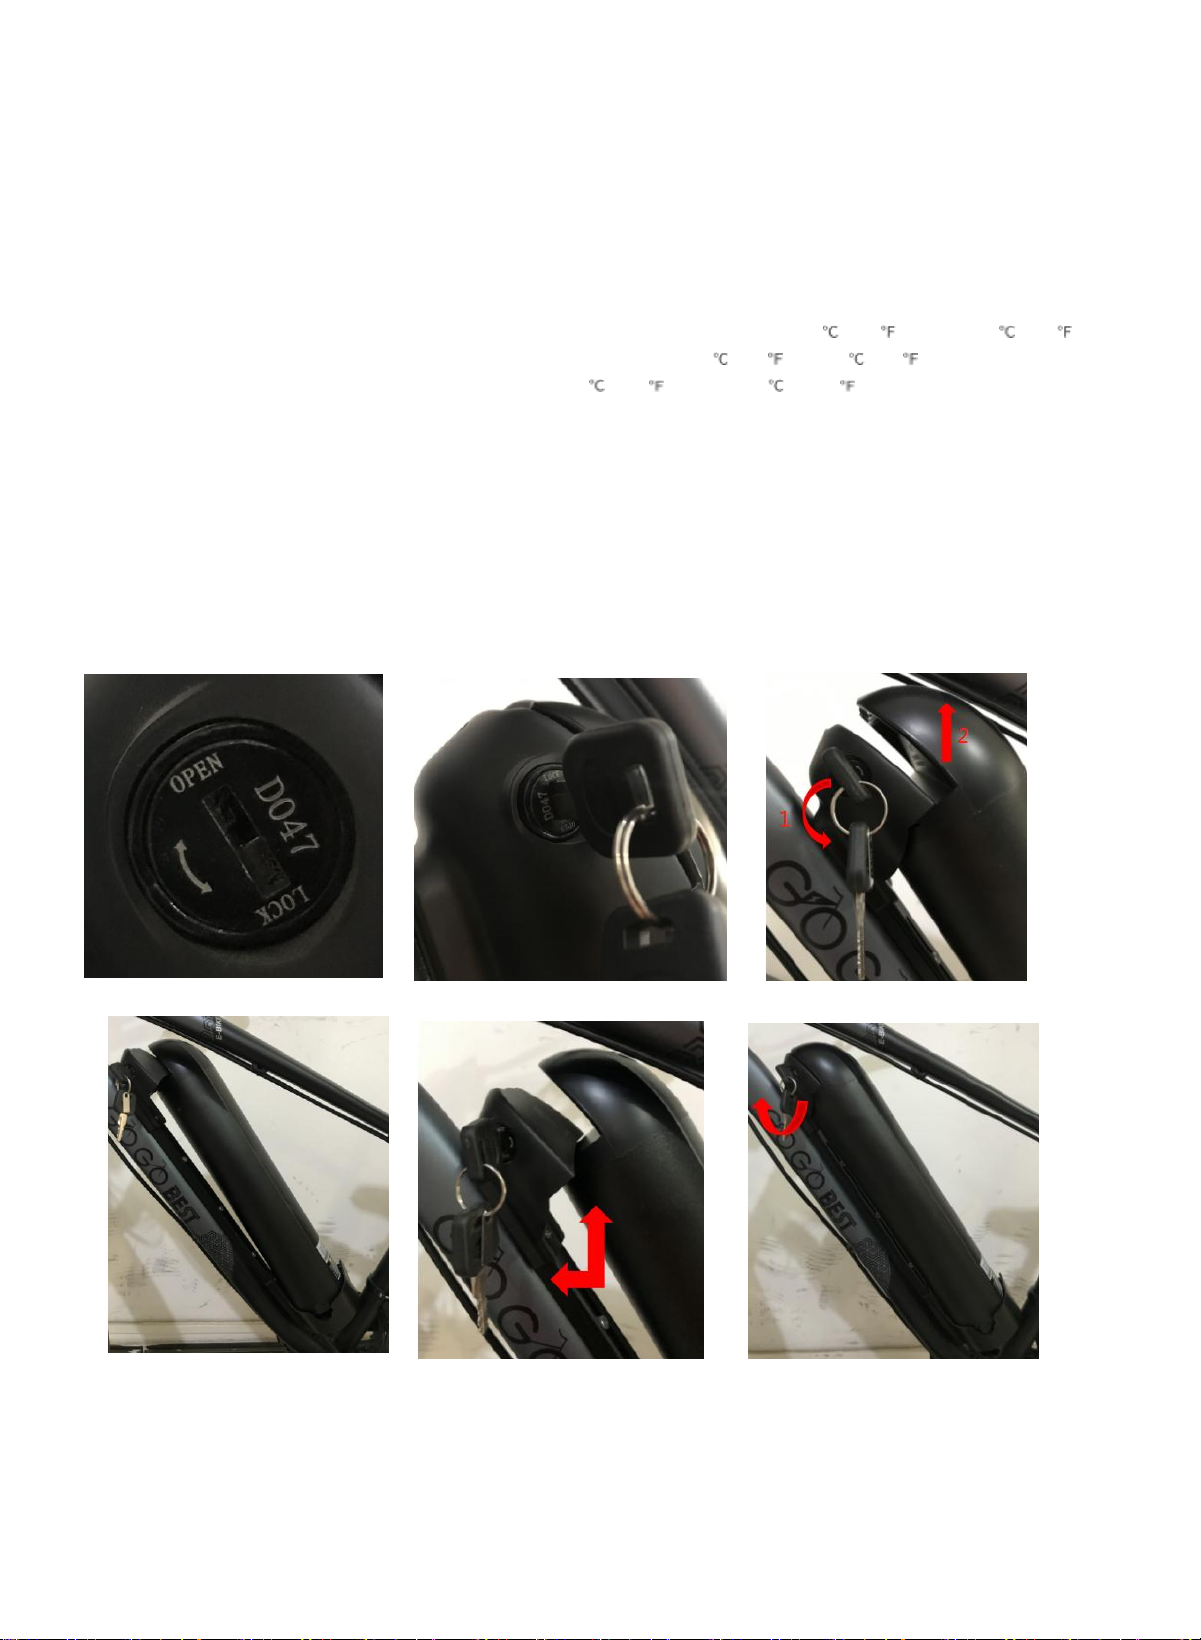
Please ensure all safety latches, including quick releases and rings, are locked in place and snug without any movement.
Please ensure all bolts (including the front/rear wheels, saddle, fenders, cargo rack and brake rotors) are properly tightened.
Certain components must be tightened to exact specifications using a torque wrench for safety assurance.
We recommend you to always wear a helmet when riding any e-Bike.
Frequently check your tire pressures. They should be pumped to 2.7-4.4 BAR
Do not attempt to charge your e-Bike if the charger or the power outlet is wet.
Do not drink and ride Even a small amount of alcohol can impair your judgment, lowering your ability to remain safe on
the
GM30.
Only use the GO GO BEST supplied charger. Do not use a charger from any other different product models.
Charging any e-bike only with 100-240V power. always keep the protect cover is closed when finish the
charging to avoid water or any metal things enter.
Please observe all traffic regulations and other applicable laws, including any lighting laws.
Tips: DO NOT take apart OR repair parts by yourself. Please go to your local bike shop that has experience with e-bikes. If
in doubt, please contact our customer service at or leave us messages on amazon 24 hours online.
General Equipment Use and Care
T he equipment is designed for adults .
Handle the equipment safely and carefully.
Before use,inspecttheequipmentformisalignmentorbindingofmovingparts, loose components, damage or any
Other condition that may affect operation. Check if tire pressure is sufficient.
Prevent unintentional starting of the equipment - ensure equipment and power switches are in the OFF position before
connecting or moving equipment.
when used within its design and usage parameters.
Always keep equipment components (motor, chains, tires, handles, controls, guards etc) and accessories
properly maintained. Keep the equipment clean and, where applicable, properly lubricated.
Store the equipment out of reach of children or untrained persons. To avoid burns or fire hazards, let
the equipment cool completely before transporting or storing. Never place or store the equipment near
flammable materials, combustible gases or liquids etc.
Should not be stored in direct sunlight, at high ambient temperatures or locations that are damp or
humid. Do not clean equipment with solvents, flammable liquids or harsh abrasives.
For specific equipment safety use and care, see Equipment Safety.

2
1. PRODUCT OVERVIEW
2. PACKAGE CONTENTS

3
3. How TO ASSEMBLE THE EBIKE
Before Installation
When unpacking your e-Bike, please verify that the above items are included in the package. If you are missing any components,
please contact your dealer for support. After verifying that all components are present and in good condition, you can
assemble your new e-Bike.
Please keep the box and packaging materials for a while in case you need to ship your GM30 in the future.
Step 1. How to assemble the front wheel
1) ) Remove the front fork protector from the front fork. (Please note: front fork protector is used to prevent the fork
from being deformed during transport. It belongs to the packing material. You can throw away it!)
2) locate the front wheel and front wheel axle.
3) Lift the frame/fork and place the front wheel in the bike’s fork.
4) Make sure that the disc brake is well placed in the middle of the brake caliper.
5) Insert the axle all the way through.
6) Hand tighten or loosen the thumb screw to the proper position, then close the Axle latch. Test and make sure the wheel does
not wobble.
If something appears to be wrongly assembled - even if you have followed the instructions, please contact us before riding your
GM30
, or take to your local shop to have it thoroughly checked.
IMPORTANT: Attach the wheel securely. A loose or detached wheel can cause you to lose control of your GM30 and fall, and
could cause you serious injury.

4
Step 2. How to assemble the handlebar
1) Carefully lift the handlebar and put the black headset dust cover into the handlebar stem;
2) Slide the handlebar stem into the fork tube till it fully inserted. Press firmly on the dust cover till it is secured;
3) Make sure the handlebar stem is in the correct position, then remove the screw cap, use Allen key to tighten bolts 1 (that
is, the bolts connecting the stem and the headset), and cover the cap;
4) Tighten bolts 2 and 3 (that is, the bolts connecting the stem to the handlebar);
5) Loosen the stem bolts(both sides and bottom of stem), you may raise and lower the handlebar as you wish until you
find a height comfortable for riding.This means that you can easily reach the brakes for safe control of the GM30.
CAUTION: Make sure the handlebar is securely in place and that the brake levers are comfortably in reach. Failure to do so
could result in loss of control of your GM30 and could cause you serious injury.

6
Step 3. How to assemble the headlight & fenders
1) Use the hexagon tool to loosen the 3 screws on the front fork( mid and both sides);
2 ) Pass the front fender through the fork from front to back, as pictures, the holes in the fenders need to line up with the
holes in the fork;
3 ) Keep the headlight hole is line up with the fork hole, tighten the bolts.
NOTE: When the fender goes through the fork, the fender bracket will gets stuck in the spokes, just push the fender
down and pull it out by hand, short fender is front fender, long fender is rear fender.
Step 4. Assembling the pedals
1) Each pedal has an “L” sticker or “R” sticker to indicate left or right side of the GM30 .
2 ) To install the left “ L” pedal, carefully No. 15 wrench-screw it in, counter-clockwise direction. Repeat it to install the right
“R” pedal by turning clockwise.

8
Step 5. How to assemble the saddle
1) ) Insert the saddle into the seat post, then screw the bolts tightly.
2) ) Loosen the seat post quick release. Insert the seat post to the desired height before securing it in place with the
quick release. Tighten the saddle bolt before you ride.
IMPORTANT: Do not raise the seat post above the “minimum insert” line clearly printed on the backside of the seat post.
Raising the seat post above the minimum insert line can cause the seat post to fail, which could in turn result in loss of control
of your GM30 and could cause you serious injury.
5. HOW TO CHARGE THE BATTERY
Directly from the bike
Make sure that the engine is turned off (“OFF” position) when charging directly from the bike. Plug the charger first into the
bike charging port, then into the socket.
Removing the battery to charge
Remove the battery directly and plug the charger first into the battery, then directly into the electrical
socket. The battery charger has a charge status LED indicator:
Red - Battery charging.
Green - Battery full charged.
IMPORTANT: When parking a GM30, we recommend you lock your battery by setting it on “OFF” position,
then remove the key. Keep 1 key at home as only 2 keys of every GM30. Give the GM30 a extra long lock to
avoid stolen.

9
Battery usage
*To reach the furthest distance on one charge, it is recommended to pedal the GM30 while the Pedal Assist System is turned
on. It will help save the battery.
*When battery power is low while riding your GM30,It is recommended to pedal as much as possible to minimize battery usage
soy ou can get home on the charge that is left on the battery. Once home, charge it as soon as possible.
*To further get the best distance out of your GM30, refrain from unnecessary braking; coast as much as possible.
IMPORTANT: If your GM30 will be kept for a long period in extreme temperatures (below 0 / 32 or above 35 / 95 ),
remove the battery and keep it in a place where the temperature is between 4 / 40 and 32 / 9 0 .
Do not charge the battery when the air temperature is below 0 / 32 or above 40 / 104 . Serious damage to the
battery could result.
5. HOW TO REMOVE THE BATTERY
1. Insert the key into the key hole, turn the key anticlockwise to a certain position, the battery can be take out by lifting the battery
to the up side and moving it to the right side.
2. Put the battery back to the battery channel, lift it and moving it to the left side to the certain position, turn the key clockwise to
a certain position to lock the battery on the bike.

10
6. RIDING MODES
All Electric - Power on the LCD display and switch the speed modes from 1~5 by Shiatsu style throttle.
Pedal Assist - Power on the LCD display and switch the speed modes from 1~5 by pedaling.
Regular Bike - Power off the LCD display and pedal like a normal bike.
Speed Modes
All Electric
Pedal Assisted
0
√
X
1-5
X
√
Display off
X
X
*Start your e-bike by pressing and holding the ON/OFF button 2s.
*Max speed (all electric mode) is 15.53mph /25 km/h (100% charging condition).
*Switch between gears by pushing the gear lever.
Grip
Throttle
ON/OFF Bell
Shift lever
Brake lever
Display

11
7. DISPLAY AND BUTTONS
8. Using Gears
Some model bicycles are equipped with gears. Gears are used to change the ratio between rotations of
the rear wheel and the crank set. This enables you to pedal less and travel faster on flat or downhill
sections, or pedal faster and travel slower to climb hills. Gearing is independent to pedal assistance, so
pedal assistance operates the same regardless of selected gear. Remember, however, that pedal
assistance is " governed" by overall speed.
The selectable gears are located on the rear wheel, known as a "gear cluster" or "cassette". The larger the
gear, the smaller number of rotations per rotation of the crank. The largest gear is the "lowest" and is
referred to as "1". As each gear becomes smaller, it is a "higher" gear then the previous and is numbered
sequentially. The number of gears may vary between different models. Beneath the gear cluster is the
derailleur mechanism, which moves the chain, so it runs on different gears. The derailleur is operated by
the rider using controls mounted on the handlebars. The gear change is "indexed" so each gear selection
positively engages – this is factory set and should require no adjustment. There may be slight variations
between bicycle models in method to change gear " up" (from a lower gear to a higher gear), or to
change gear "down" (from a higher gear to a lower gear).
The image shows a "7-speed" type that uses a button for changing up gears (push button to activate
derailleur), and a lever for changing down gears ( rotate lever forward to activate derailleur).
UP
Down

12
9. Guidelines for Using Gears
To get the best performance and service life from the gear change system, understand and apply the
following techniques:
You MUST be pedaling during gear changes.
Do not attempt to change multiple gears in a single action. Allow each gear change to complete fully
before the nextchange.
Always use an appropriate gear for your speed, the terrain and incline. This helps you ride most
efficiently.
Keep the chain and gears properly lubricated and clean.
If you notice noise after changing gear or an ability to select a gear or the chain not running
smoothly, have the gear system inspected and adjusted by a bicycle mechanic or suitably qualified person.
10. Product dimension drawing
Unit: inch

13
11. Using Brakes
All bicycle models are equipped with a front and rear wheel braking system. Brakes are used to slow the bicycle
down. The braking systems may use different mechanics; however, the functionality is the same, and that is to change
the energy of the moving bicycle into heat energy (“friction” ):
For disc brakes, this means pads made from a special friction material pinching against a disc mounted to the centre of
the bicycle wheel.
The brakes are operated by the rider through levers mounted to the handlebars,The left-hand lever operates the front
brake, the right- hand lever operates the rear brake. The ability of the rider to adequately slow and/or stop the bicycle
depends largely on the skill of the rider, the surface being ridden on and other factors such as rain, tires, adjustment and
condition of the brake parts etc.
12. Guidelines for Using Brakes
To get the best performance and service life from the brake system, understand and apply the following techniques:
In wet conditions, which reduces friction, always provide additional distance for braking and adjust how quickly
you apply the brakes.
When applying the brakes, particularly the front brake, use a lower pressure to start with until you feel the
brakes starting to “ bite”, then increase pressure as required.Do NOT over-apply the brakes and cause the wheel
to stop rotating - this may result in loss of control.
Maintain the brake friction components (pads, shoes, rubbers) in good condition and replace when they reach
the wear limit.
Maintain brake adjustment so that the brakes perform eff ectively, the levers are comfortably
positioned, and there is not excessive play in adjustable components.
If the brakes are not performing effectively, making abnormal noise or any part is not serviceable or cannot be
adjusted correctly, have the brakes inspected and adjusted by a bicycle mechanic or suitably qualified person.
If the brake cables become frayed or otherwise damaged, have them replaced by a bicycle mechanic or suitable
qualified person.

14
13. Contact information
14. Maintenance
Some maintenance activities described may be beyond the scope of some users. Do NOT attempt procedures that you are
not comfortable with, or do not have the necessary tools, experience or knowledge for - take the unit to an authorised
service centre or qualifed technician for servicing. Items in the maintenance schedule below that are recommended to
be performed by a qualified technician are highlighted yellow.
Failure to follow the maintenance recommendations, using incorrect or non compatible accessories or replacement
parts, or general negligence may result in making the product warranty void. Improper adjustment or service may
result in damage to the bicycle or make it hazardous.
Maintenance requirements may be affected by any number of factors from your riding style to geographic location.
When new, parts of the bicycle may "break-in" over the course of the first approximate 100km of riding, possibly
including the stretching of cables, spoke tension changes etc. It is recommended to have the bicycle inspected and
serviced at an authorised service centre or by a qualified technician.
The bicycle components are subject to wear and stress. If a component is weakened through stress, age etc, it may fail
without warning. It is important to regularly inspect the bicycle for any signs of component fatigue - look for cracks, fraying,
discoloration etc, as this may indicate that a part is near the end of its useful life and should be replaced.
Clean the bicycle with a soft, damp cloth - do NOT use high pressure water cleaners or hoses, pressured air, solvents,
abrasives etc. For the console, battery and motor, do NOT use any liquids.
When transporting in a vehicle, it is recommended to have the battery out of the bicycle during transport.
Store the bicycle where it will be protected from rain, sun etc to help prevent corrosion, fading etc.. For safety, longest
possible service life and reliability, maintain the bicycle properly. Use the components before each ride. The proper
condition and function of these Systems is critical to your maintenance schedule below for guidance. It is very important
that you check certain systems and safety.

15
Maintenance Schedule
Component / Condition
Check Before
Every Ride
*Check
Periodically
Clean /
Lubricate
Adjust / Tighten /
Replace as Required
Tyre Pressure
Tyre Wear / Damage
Brake Adjustment
Handlebar Tightness
Controls and Display
Seat Post Tightness
Fasteners / Mounting Hardware
Brake Pads / Shoes
Brake Cable Wear
Chain
Reflectors
Battery / Charger
Steering Head Bearings
Derailleur
Wheel Spoke Tension
Wheel Trueness
Wheel Bearings
Bottom Bracket (Crank) Bearings
* Every 5 to 10 rides depending on ride length and conditions.
15. Battery Storage
When storing the batteries for a long period of time:
Charge the batteries at least every 30 days to avoid capacity loss. Batteries slowly self- discharge when unused over
a long period. If the battery cells are left at a critically low charge state, the lifespan and capacity will be permanently
reduced.
Always disconnect the charger from the mains electrical supply and battery before storing the battery.
Avoid storing batteries in extreme temperatures, whether hot or cold. The recommended battery storage
temperature is between 0 and 25 ° C (32 to 77 ° F). Avoid exposing batteries to temperatures at or above 40°C
(104°F) for extended periods.
Batteries are best kept in a cool, dry place. Do not allow batteries to accumulate condensation, as this may
cause shorting or corrosion.

16
16. Battery Fuse
Use fuses of the same type only - the rating (in Amperes) is printed on the end of the fuse. . If the fuse"
blows" regularly, have the bicycle inspected at an authorised service centre.
The bicycle battery/ electrical system may feature fuse protection to prevent damage in the event of a short
circuit, overload or over current situation. For example, if the electrical system is exposed to excessive moisture. On
some model bicycles, the fuse is accessible and can be easily replaced. If the fuse is "blown", the bicycle
electronics will not be available until the fuse is replaced. To replace the fuse:
1. Using a suitable screwdriver, remove (rotate left) the fuse holder on the battery pack until fully unscrewed,
then pull the fuse holder and fuse from the bicycle.
2. Discard the blown fuse. Insert the replacement fuse into the fuse holder.
3. Insert the fuse and fuse holder to the bicycle, and re install (rotate right) the fuse holder until fully.
17.
Tyre Pressures
The tyres must always be inflated to the correct pressure (as specified on the tire sidewall) before every ride. Riding
the bicycle with either too low or too high pressures will affect bicycle performance, may affect effective electrical
assistance range, and may render the bicycle as dangerous. Use an accurate pressure gauge when checking
pressures.
18.
Chain Care
The chain periodically requires lubrication, depending on frequency of use and conditions etc.
If the chain is noisy or running roughly, lubricate it by applying a small amount of bicycle chain lubricant to it.
Do not allow the lubricant to get on to the tires.
19.
Torque Settings
It is important to regularly check all fasteners for adequate tightness. The following are considered highly important
and should be adjusted to the specified torque values using a suitable bicycle torque wrench, sockets and adaptors.
Depending on bicycle model and design, some fasteners listed below may not be applicable:
•Front Axle Nut – 35Nm
•Rear Axle Nut – 35Nm
•Handlebar Clamp Bolt – 10Nm
•Handlebar Neck Lock Bolt - 15Nm
•Handlebar Stem Bolt – 24Nm
•Pedal Bolts – 35Nm
•Brake Calliper Mounting Bolt – 7Nm
•Brake Cable Anchor Bolt – 7Nm

17
20.
Frequently Questions & Answers
:Is it normal for batteries to get warm when charging?
:Yes, it is normal that the batteries will become warm during the charging process.
:How long will my batteries last before needing replacement?
:Average battery life depends on use and conditions. Even with proper care, rechargeable batteries
do not last forever. Generally, lithium-ion batteries will last more than 800 charge discharge cycles. A
partial charge/discharge counts fractionlly against those numbers;
discharging the battery to 50% then recharging it completely uses up one half of a charge cycle. "End
of useful life" refers to the point at which a battery can no longer supply 60% or more of its original
rated ampere-hour (Ah) capacity. A this point, degradation of the battery being able to be fully
charged accelerates and the battery will need to be replaced.
:What happens if the battery discharges while riding?
:Pedal assistance will stop when battery charge reaches a minimum level (check level on the console,if
applicable). Lights (if applicable) may still function for a period. Your bike can be ridden without pedal
assistance.
Record Your Bike Info
No
Item
Info
1
Bicycle Serial Number
2
Battery Serial Number
3
Model
4
Color
5
Date of Purchase
6
Dealer’s Name
7
Dealer’s Phone
8
Dealer’s E-mail


Table of contents
Other GOGOBEST Bicycle manuals