babymoov A010001 User manual

Babymoov
Parc Industriel des Gravanches - 16, rue Jacqueline Auriol
63051 Clermont-Ferrand cedex 2 - France
www.babymoov.com
Notice d’utilisation • Instructions for use
Benutzungsanleitung • Gebruikshandleiding
Instrucciones de uso • Instruções de uso • Istruzioni per l’uso
6+
Réf. : A010001 - A010002

B
1
C
2
2
e
d
h
k
a
i
J
f
A
0
b
c
g

D
E
3
F
8
5
4
6
7
3

4
G
9
H
10
11
I
12
13
14

AVER ISSEMEN S
•NE PAS LAISSER L’ENFAN SANS SURVEILLANCE.
• Ne convient pas aux enfants pesant plus de 15 kg.
• Ne pas utiliser la chaise haute si tous les éléments ne
sont pas fixés et réglés de manière appropriée.
• N’utiliser la chaise haute que si l’enfant est capable
de rester assis tout seul.
•OUJOURS U ILISER LE HARNAIS DE SÉCURI É À
CINQ POIN S pour empêcher la chute ou le
glissement de l’enfant ; ne jamais laisser l’enfant
jouer avec le harnais de sécurité. Avant chaque
utilisation, S’ASSURER QUE LE HARNAIS DE SÉCURI É
ES SOLIDEMEN FIXÉ.
• Ne pas effectuer de réglages lorsque l’enfant est
assis dans la chaise haute.
• La tablette et la sur-tablette amovibles n’ont pas été
conçues pour supporter le poids de l’enfant, ni pour
maintenir l’enfant en position assise. Elles ne
remplacent pas le harnais de sécurité.
• Ne pas utiliser la chaise haute sans sa housse
de protection.
• Faire attention la position des membres de l’enfant
lors de son installation.
• Ne pas utiliser le produit proximité de marches
et d’escaliers.
• Ne pas poser la chaise haute en hauteur.
• Utiliser toujours la chaise haute sur une surface plane
horizontale et dégagée.
• Éloigner la chaise haute de toute flamme, des sources
de chaleur intenses telles que les appareils électriques
ou gaz.
• Éloigner la chaise haute des rallonges, cuisinières,
prises électriques, etc... ou objets pouvant être la
portée de l’enfant.
• Ne pas soulever la chaise haute par la tablette amovible.
• Ne pas soulever ou transporter la chaise haute lorsque
l’enfant y est assis.
• Pour éviter tout risque d’étouffement, conserver les
sacs plastiques de l’emballage hors de portée des
bébés et des jeunes enfants.
• Ne pas laisser l’enfant jouer avec la chaise haute pliée.
CONFORME AUX EXIGENCES DE SÉCURI É
EN 14988 1 : 2006
COMPOSI ION DE LA CHAISE HAU E
a. Pieds antidérapants
b. Poignée de pliage
c. Boutons de réglage de la hauteur
d. Dossier inclinable
e. Tablette amovible
f. Bouton du réglage de la tablette
g. Bouton d’inclinaison du dossier
h. Sur-tablette amovible
i. Housse de protection
j. Harnais de sécurité 5 points
k. Entrejambe
Merci d’avoir choisi la Chaise haute Slim BABYMOOV
IMPOR AN A CONSERVER POUR CONSUL A ION UL ÉRIEURE :
POUR LA SÉCURI E DE VO RE BÉBÉ, VEUILLEZ LIRE A EN IVEMEN CE MANUEL
D’INS RUC ION E LE CONSERVER SOIGNEUSEMEN POUR VOUS Y RÉFÉRER UL ÉRIEUREMEN .
CONSIGNES DE SÉCURI É À RESPEC ER
- Ne convient pas aux enfants pesant plus de 15 kg.
- Ne jamais laisser l’enfant dans la chaise haute sans surveillance.
- Les opérations de montage et de réglage doivent être réalisées par un adulte.
- Ne pas utiliser la chaise haute si des parties sont cassées, déchirées ou manquantes.
- Tenir les petites pièces hors de portée des enfants.
F
CHAISE HAU E SLIM • Notice d’utilisation 5
U ILISA ION E CARAC ÉRIS IQUES DE LA CHAISE HAU E
A. Pour installer l’entrejambe (k), fixer celui-ci sous la tablette l’aide des 4 vis incluses. Pour plus d’aisance, réaliser
cette opération avec la chaise pliée (Figure 0).

B. Appuyer sur les boutons situés sur les deux côtés intérieurs de la chaise haute en écartant simultanément les
deux pieds antidérapants (a) (Figure 1).
C. Une fois les deux pieds (a) totalement écartés, se positionner l’arrière de la chaise haute. Appuyer sur la poignée
de pliage (b) en l’enfonçant pleine main et en la dirigeant vers la gauche. Tenir simultanément le dossier (d)
avec l’autre main et le soulever jusqu’ ce que l’on entende un clic (Figure 2).
D. Pour régler la hauteur de la chaise haute, se placer l’avant de celle-ci. Enfoncer les deux boutons (c) situés
sur les deux côtés avant de la chaise haute en élevant ou en abaissant simultanément la chaise haute jusqu’
la hauteur souhaitée (Figures 3, 4 et 5).
Conseil : pour faciliter le réglage de la chaise haute, poser son pied sur la partie horizontale du pied
antidérapant (a).
E. Pour régler la tablette amovible (e), tirer vers soi le bouton (f) vers l’intérieur ou vers l’extérieur (Figure 6). Pour
ôter la tablette amovible (e), la tirer au maximum vers l’extérieur (Figure 7).
F. Pour installer la sur-tablette amovible (h), la saisir grâce aux ouvertures positionnées de chaque côté et la poser
sur la tablette amovible (e) en veillant ce qu’elle recouvre bien les rebords de cette dernière. Pour retirer la
sur-tablette amovible (e), la soulever (Figure 8).
G. Pour régler l’inclinaison du dossier (d), tirer le bouton (g) et incliner simultanément le dossier (d) vers l’avant
ou vers l’arrière (Figure 9).
H. Pour retirer la housse de protection (i), ouvrir la fermeture glissière présente dans le dos de la housse (i) (Figure
10). Retirer les deux pressions présentes de chaque côté de la housse, ainsi que les quatre pressions présentes
sous l’assise de celle-ci (i). Soulever la housse de protection (i) en la dégageant du dossier (d). Pour retirer le harnais
de sécurité 5 points (j) : incliner les embouts, reliés aux bretelles du harnais (j) et positionnés dans le dos de la
housse de protection (i), de façon pouvoir les faire passer travers la housse de protection (i) (Figure 11).
Réaliser la même action avec le rectangle métallique présent sous l’assise de la housse de protection (i).
I. Pour replier la chaise haute, se positionner derrière celle-ci, appuyer sur la poignée de pliage (b) en l’enfonçant
pleine main et en la décalant vers la gauche. Ramener délicatement le dossier (d) vers l’avant (Figure 12).
Avant le pliage, veiller ce que la chaise haute soit réglée la position haute maximum afin que lors du
pliage, le dossier (d) ne touche pas le sol. Une fois le dossier (d) totalement rabattu, appuyer sur les boutons
présents l’intérieur des pieds antidérapants (a) (Figure 13) et resserrer les deux pieds (a) (Figure 14).
EN RE IEN E INS RUC IONS DE LAVAGE
Votre produit nécessite un minimum d’entretien. LES OPÉRA IONS DE NE OYAGE E D’EN RE IEN DOIVEN Ê RE
ÉFFEC UÉES UNIQUEMEN PAR DES ADUL ES.
• Vérifier souvent la chaise haute pour s’assurer qu’il n’y ait pas de vis desserrées, de pièces usées, de tissus
déchirés, ou de points décousus.
• Nettoyer régulièrement les parties en plastique avec un chiffon humide, ne pas utiliser de solvants ou d’autres
produits du même type.
• Ne pas plonger la housse de protection (i) en PVC dans l’eau mais la nettoyer en surface avec un chiffon
humide et un détergent neutre.
• Faire remplacer ou réparer les pièces si nécessaire. N’utiliser que des pièces détachées conseillées par
Babymoov.
• Protéger le produit contre les agents atmosphériques, l’eau, la pluie ou la neige.
• Une exposition excessive au soleil ou la chaleur peut provoquer la décoloration des pièces.
• 50 % Polyester - 50 % PVC
tInaj
CHAISE HAU E SLIM • Notice d’utilisation
6

WARNINGS
•NEVER LEAVE HE INFAN WI HOU SUPERVISION.
• Not suitable for children weighing over 15 kg.
• Do not use the high chair, if the parts are not properly
fixed and adjusted.
• Only use the high chair if the infant is capable of
sitting up unaided.
•ALWAYS USE HE FIVE-POIN SAFE Y HARNESS to
prevent the infant from falling or slipping. Never allow
the infant to play with the safety harness. MAKE SURE
HE SAFE Y HARNESS IS FIXED SECURELY before use.
• Do not adjust when the infant is seated in the high chair.
• The removable tray and over-tray are not designed to
take the infant's weight or to hold the infant in the
seated position. They do not replace the safety harness.
• Do not use the high chair without its protective cover.
• Be careful of the position of the infant’s arms and
legs when fitting him/her into the chair.
• Do not use the product near steps or stairs.
• Do not put the high chair on a surface high up.
• Always use the high chair in a flat, horizontal and
uncluttered area.
• Keep the high chair well away from any naked
flame, source of intense heat such as electrical or
gas appliances.
• Keep the high chair well away from extension leads,
cookers, electric sockets, etc or any object which the
infant might find within its reach.
• Do not lift up the high chair by the removable tray.
• Never lift or carry the high chair with the infant in it.
• Keep the plastic bags of the packaging out of
reach of babies and young children to avoid any
risk of suffocation.
• Do not allow the infant to play with the high chair
folded up.
COMPLIES WI H SAFE Y REQUIREMEN S
EN 14988 1 : 2006
COMPOSI ION OF HIGH CHAIR
a. Non-slip legs
b. Folding handle
c. Height adjustment buttons
d. Reclining back
e. Removable tray
f. Tray adjustment button
g. Back recline button
h. Removable over-tray
i. Protective cover
j. 5-point safety harness
k. Crotch piece
hank you for choosing the BABYMOOV Slim High Chair
KEEP HIS INFORMA ION, YOU MAY NEED O REFER O I LA ER:
FOR HE SAKE OF YOUR BABY'S SAFE Y, PLEASE READ HIS INS RUC ION MANUAL
CAREFULLY AND KEEP I SAFE SO HA YOU CAN REFER O I A A LA ER DA E.
PLEASE COMPLY WI H HESE SAFE Y INS RUC IONS
- Not suitable for children weighing over 15 kg.
- Never leave the infant in the high chair without supervision.
- The assembly and adjusting operations must be carried out by an adult.
- Do not use the high chair if any part is broken, torn or missing.
- Keep small pieces away from children.
EN
SLIM HIGH CHAIR • Instruction manual 7
USE AND SPECIFICA IONS OF HIGH CHAIR
A. When installing the crotch piece (k), fix it under the tray using the 4 screws provided. It will be easier to do this
while the chair is folded (Figure 0).

B. Press the buttons on both sides inside the high chair simultaneously spreading out the two non-slip legs (a)
(Figure 1).
C. When the two legs (a) are fully spread out, go behind the high chair, press the folding handle (b) by pushing
down on it firmly with your hand and directing it to the left. At the same time, hold the back (d) with your other
hand and lift it up until you hear a click (Figure 2).
D. To adjust the height of the high chair, stand in front of it, push down the two buttons (c) on both sides of the front
of the high chair, simultaneously raising or lowering the high chair to the desired height (Figures 3, 4 and 5).
Advice: to facilitate the adjustment of the high chair, lay the horizontal part of the non-slip leg (a) flat.
E. To adjust the removable tray (e), pull the button towards you (f) inwards or outwards (Figure 6). To remove the
removable tray (e), pull it fully outwards (Figure 7).
F. To fit the removable over-tray (h), clip it into the openings either side and lay it on top of the removable tray
(e) making sure it covers the edges of the removable tray (e). To remove the removable over-tray (e), lift it up
(Figure 8).
G. To adjust the angle of the back (d), pull button (g) and simultaneously tilt the back (d) forwards or backwards
(Figure 9).
H. To remove the protective cover (i), open the zip fastening in the back of the cover (i) (Figure 10). Open the two
press studs either side of the cover, as well as the four press studs under the seat (i). Lift off the protective cover
(i) from the back (d). To remove the 5-point safety harness (j) : tilt the end pieces connected to the straps of
the harness (j) and at the back of the protective cover (i), so as to pass them through the protective cover (i)
(Figure 11). Do the same with the metal rectangle under the seat of the protective cover (i).
I. To fold up the high chair, stand behind it, press down on the folding handle (b) firmly with your hand and shift
it to the left. Gently bring the back (d) forwards (Figure 12). Before folding, make sure that the high chair is adjusted
to the highest position so that the back (d) does not touch the floor when folding. When the back (d) is fully folded,
press the buttons inside the non-slip legs (a) (Figure 13) and bring the two legs (a) together (Figure 14).
CARE AND MAIN ENANCE
Your product requires a minimum of maintenance. HE CLEANING AND CARE OPERA IONS MUS ONLY BE
PERFORMED BY ADUL S.
• Check the high chair often for loose screws, worn parts, torn fabrics, or stitching that has come undone.
• Clean the plastic parts regularly with a damp cloth, do not use solvents or similar products.
• Do not dip the PVC protective cover (i) in water. Surface clean with a damp cloth and neutral detergent.
• Change or repair parts if required. Only use spare parts recommended by Babymoov.
• Protect the product from weathering agents, water, rain or snow.
• Excessive exposure to the sun or heat may cause fading of parts.
• 50 % Polyester - 50 % PVC
tInaj
SLIM HIGH CHAIR • Instruction manual
8

WARNHINWEISE
•KINDER NICH UNBEAUFSICH IG LASSEN.
• Nicht geeignet für Kinder mit einem Körpergewicht von
über 15 kg.
• Den Hochstuhl nicht benutzen, wenn Teile lose oder
falsch eingestellt sind.
• Den Hochstuhl nicht benutzen, wenn das Kind in der
Lage ist, allein zu sitzen.
•IMMER DAS FÜNFPUNK -SICHERHEI SGESCHIRR
BENU ZEN, um ein Fallen oder allmähliches Rutschen
des Kinds zu vermeiden; das Kind nie mit dem
Sicherheitsgeschirr spielen lassen. Vor jeder Benutzung
SICHERS ELLEN, DASS DAS SICHERHEI SGESCHIRR
FES ANGEBRACH IS .
• Keine Einstellungen am Hochstuhl vornehmen, wenn
das Kind darin sitzt.
• Das abnehmbare und das aufgesetzte Brett sind nicht
für die Aufnahme von Babys Gewicht oder das Halten
des Kinds in Sitzposition ausgelegt. Sie ersetzen nicht
das Sicherheitsgeschirr.
• Den Hochstuhl nicht ohne Schutzbezug verwenden.
• Beim Hinsetzen des Kinds auf die Position der
Gliedmaßen achten.
• Das Produkt nicht in der Nähe von Stufen oder Treppen
verwenden.
• Den Hochstuhl nie erhöht aufstellen.
• Den Hochstuhl immer auf einer ebenen,
waagerechten, freien Oberfläche aufstellen.
• Den Hochstuhl von Flammen und intensiven
Wärmequellen wie strom- und gasbetriebenen
Geräten entfernen.
• Den Hochstuhl von Tischauszügen, Herden,
Steckdosen, usw. sowie Gegenständen in Reichweite
von Kindern entfernt halten.
• Den Hochstuhl nicht am abnehmbaren Brett anheben.
• Den Hochstuhl nicht anheben oder tragen, wenn
Baby darin sitzt.
• Um jede Erstickungsgefahr zu vermeiden, die
Plastiktüten der Verpackung außer Reichweite von
Kindern halten.
• Kinder nicht mit dem zusammengeklappten Hochstuhl
spielen lassen.
EN SPRICH DEN SICHERHEI SANFORDERUNGEN
EN 14988 1 : 2006
AUFBAU DES HOCHS UHLS
a. Rutschsichere Füße
b. Klappgriff
c. Knopf für die Höheneinstellung
d. Neigbare Rückenlehne
e. Abnehmbares Brett
f. Einstellknopf für das Brett
g. Knopf zur Neigungseinstellung der Rückenlehne
h. Abnehmbares Aufsatzbrett
i. Schutzbezug
j. Fünfpunkt-Sicherheitsgeschirr
k. Mittelsteig
Vielen Dank für Ihre Wahl für den Hochstuhl Slim von BABYMOOV
WICH IGE HINWEISE, ZUR SPÄ EREN EINSICH AUFBEWAHREN:
FÜR DIE SICHERHEI IHRES BABYS LESEN SIE BI E AUFMERKSAM DIE VORLIEGENDE
BEDIENUNGSANWEISUNG UND BEWAHREN SIE DIESE ZUR SPÄ EREN EINSICH AUF.
SICHERHEI SVORSCHRIF EN
- Nicht geeignet für Kinder mit einem Körpergewicht von über 15 kg.
- Kinder nie unbeaufsichtigt im Hochstuhl lassen.
- Aufbau und Einstellung dürfen nur durch einen Erwachsenen erfolgen.
- Den Hochstuhl nicht benutzen, wenn Bestandteile beschädigt sind oder fehlen.
- Kleinteile außer Reichweite von Kindern halten.
DE
HOCHS UHL SLIM • Benutzungsanleitung 9
BENU ZUNG UND ECHNISCHE EIGENSCHAF EN DES HOCHS UHLS
A. Um den Mittelsteig (k), unter dem Tisch zu befestigen, benutzen Sie bitte die 4 inbegriffenen Schrauben. Der
Hochstuhl muss zusammengeklappt sein (Abbildung 0).

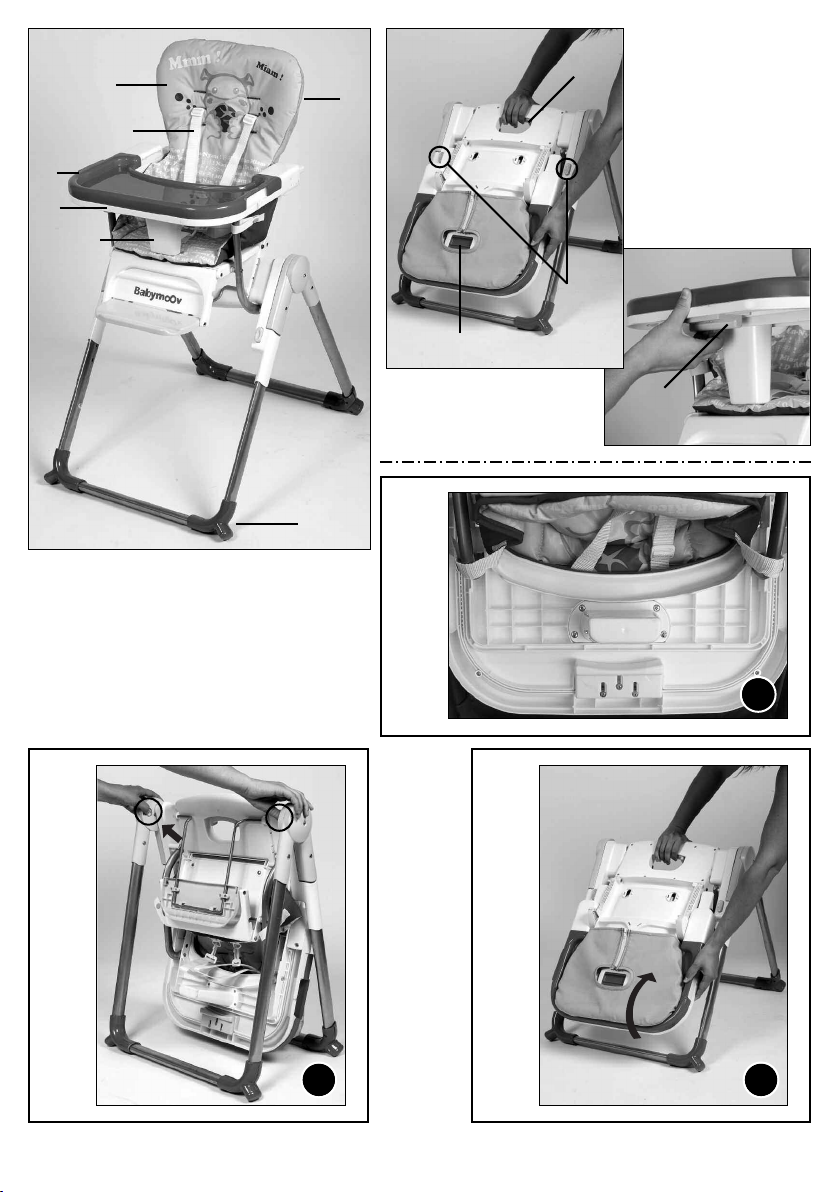
B. Auf die Knöpfe an den beiden Innenseiten des Hochstuhls drücken, dabei die beiden rutschsicheren Füße (a)
gleichzeitig zur Seite drücken (Abbildung 1).
C. Wenn die beiden Füße (a) ganz zur Seite gedrückt sind, sich hinter den Hochstuhl stellen. Mit der gesamten
Handfläche auf den Klappgriff (b) drücken und nach links schieben. Gleichzeitig mit der anderen Hand die
Rückenlehne (d) halten und anheben, bis ein Klick zu hören ist (Abbildung 2).
D. Zur Höheneinstellung des Hochstuhls, sich vor den Hochstuhl stellen; die beiden Knöpfe (c) zu beiden Seiten
des Hochstuhls nach innen drücken, dabei gleichzeitig den Hochstuhl auf die gewünschte Höhe anheben oder
absenken (Abbildungen 3, 4 und 5).
Empfehlung: die Einstellung des Hochstuhls fällt einfacher, wenn der waagerechte Teil des rutschsicheren Fußes
(a) flach aufliegt.
E. Zur Einstellung des abnehmbaren Bretts (e), den Knopf (f) zu sich, nach innen oder außen ziehen (Abbildung 6).
Das Brett (e) abnehmen, indem es möglichst weit nach außen gezogen wird (Abbildung 7).
F. Zum Einsetzen des abnehmbaren Aufsetzbretts (h), dieses über die beidseitigen Öffnungen fassen und auf dem
abnehmbaren Brett (e) einsetzen; dabei darauf achten, dass es die Ränder des abnehmbaren Bretts (e)
abdeckt. Das abnehmbare Aufsetzbrett (e) zum Abnehmen anheben (Abbildung 8).
G. Zur Neigungseinstellung der Rückenlehne (d), den Knopf (g) ziehen und die Rückenlehne (d) gleichzeitig nach
vorne oder hinten neigen (Abbildung 9).
H. Zum Abnehmen des Schutzbezugs (i) den Reißverschluss im Rücken des Bezugs (i) öffnen (Abbildung 10).
Die beiden seitlichen Druckknöpfe des Bezugs sowie die vier Druckknöpfe unter seiner Sitzfläche (i). Die
beiden seitlichen Druckknöpfe des Bezugs sowie die vier Druckknöpfe unter seiner Sitzfläche (i) abnehmen.
Den Schutzbezug (i) anheben und dabei von der Rückenlehne (d) trennen. Abnehmen des 5-Punkt-
Sicherheitsgeschirrs (j): die an den Gurten des Geschirrs (j) befestigten, im Rücken des Schutzbezugs (i)
befindlichen Endstücke neigen, so dass sie durch den Schutzbezug (i) passen (Abbildung 11). Auf gleiche Weise
mit dem dreieckigen Metallteil unter der Sitzfläche des Schutzbezugs (i) verfahren.
I. Zum Zusammenklappen des Hochstuhls sich hinter den Hochstuhl stellen, mit der ganzen Handfläche auf den
Klappgriff (b) drücken und nach links schieben. Die Rückenlehne (d) vorsichtig nach vorne schieben (Abbildung
12). Vor dem Klappen darauf achten, dass der Hochstuhl auf die hohe Endstellung gebracht wird, damit die
Rückenlehne (d) beim Klappen nicht den Boden berührt. Wenn die Rückenlehne (d) ganz eingeklappt ist, die
Knöpfe im Inneren der rutschsicheren Füße (a) drücken (Abbildung 13) und die beiden Füße (a)
zusammenschieben (Abbildung 14).
PFLEGE UND WAR UNG
Das Produkt ist weitgehend wartungsfrei. REINIGUNGS- UND WAR UNGSARBEI EN DÜRFEN NUR VON
ERWACHSENEN AUSGEFÜHR WERDEN.
• Den Hochstuhl häufig überprüfen, um sicherzustellen, dass er keine lockeren Schrauben, abgenutzten Teile,
zerrissenen Stoff oder aufgetrennte Nähte aufweist.
• Kunststoffteile regelmäßig mit einem feuchten Lappen reinigen, keine Lösungsmittel oder ähnliche Mittel verwenden.
• Den PVC-Schutzbezug (i) nicht in Wasser tauche, sondern oberflächlich mit einem feuchten Lappen und
Neutralreiniger reinigen.
• Bei Bedarf müssen diese Teile ausgetauscht oder repariert werden. Nur von Babymoov empfohlene
Ersatzteile verwenden.
• Das Produkt vor Witterungseinflüssen, Feuchtigkeit, Regen oder Schnee schützen.
• Wird das Produkt längere Zeit extremer Sonneneinstrahlung oder Hitze ausgesetzt, kann dies zum Verfärben
der Teile führen.
• 50 % Polyester - 50 % PVC
tInaj
HOCHS UHL SLIM • Benutzungsanleitung
10

WAARSCHUWINGEN
•HE KIND NIE ZONDER OEZICH LA EN.
• Niet geschikt voor kinderen die meer wegen dan 15 kg.
• De kinderstoel niet gebruiken als alle onderdelen niet
op een correcte manier zijn vastgemaakt of afgesteld.
• De kinderstoel mag slechts gebruikt worden als het
kind in staat is zelf te blijven zitten.
•GEBRUIK AL IJD HE VIJFPUN S VEILIGHEIDSHARNAS
om de val of het afglijden van het kind te vermijden;
laat het kind nooit met het veiligheidsharnas spelen.
Controleer vóór elk gebruik dat het veiligheidsharnas
S EVIG VAS ZI .
• Doe geen afstellingen terwijl het kind in de
kinderstoel zit.
• Het afneembare tablet en boventablet zijn niet
gemaakt om het gewicht van het kind te dragen,
noch om het kind er in zitstand op te houden. Deze
onderdelen vervangen niet het veiligheidsharnas.
• Gebruik de kinderstoel niet zonder zijn
beschermingshoes.
• Let op de positie van de ledematen wanneer u het kind
in de stoel zet.
• Gebruik het product niet in de buurt van treden of trappen.
• Zet de kinderstoel niet op een hoogte.
• Gebruik de kinderstoel steeds op een vlakke,
horizontale en vrije oppervlakte.
• Houd de kinderstoel verwijderd van elke vlam, van
hevige warmtebronnen zoals elektrische toestellen
of gastoestellen.
• Houd de kinderstoel verwijderd van verlengdraden,
kitchenettes, elektrische stopcontacten, enz... of
voorwerpen die in het bereik van het kind zouden
kunnen komen.
• De kinderstoel niet opheffen met het afneembare tablet.
• De kinderstoel niet opheffen of verplaatsen terwijl het
kind erin zit.
• Om elk risico op verstikking te vermijden, de plastic
zakken van de verpakking buiten het bereik van baby’s
en jonge kinderen bewaren.
• Laat het kind niet spelen met de geplooide kinderstoel.
CONFORM DE VEILIGHEIDSVOORSCHRIF EN
EN 14988 1 : 2006
SAMENS ELLING VAN DE KINDERS OEL
a. Antislip poten
b. Vouwhandvat
c. Hoogte verstelknop
d. Verstelbare rugleuning
e. Afneembare tablet
f. Tablet verstelknop
g. Rugleuning verstelknop
h. Afneembare boventablet
i. Beschermingshoes
j. 5-punts veiligheidsharnas
k. Sport
Bedankt gekozen te hebben voor de Slim BABYMOOV kinderstoel
BELANGRIJK E BEWAREN VOOR LA ERE RAADPLEGING:
VOOR DE VEILIGHEID VAN UW BABY, GELIEVE DEZE HANDLEIDING AANDACH IG E LEZEN
EN ZORGVULDIG E BEWAREN OM DEZE LA ER E KUNNEN RAADPLEGEN.
IN ACH E NEMEN VEILIGHEIDSINS RUC IES
- Niet geschikt voor kinderen die meer wegen dan 15 kg.
- Het kind nooit zonder toezicht in de kinderstoel laten zitten.
- De montage en het afstellen moeten uitgevoerd worden door een volwassene.
- De kinderstoel niet gebruiken als bepaalde onderdelen stuk, gescheurd of ontbrekend zijn.
- Kleine onderdelen buiten het bereik van kinderen bewaren.
NL
KINDERS OEL “SLIM” • Gebruikshandleiding 11
GEBRUIK EN KENMERKEN VAN DE KINDERS OEL
A. Om deze sport (k) te installeren, hem onder het blad vastzetten met behulp van de 4 meegeleverde schroeven.
Het is makkelijker deze handeling te verrichten als de stoel is ingeklapt (Afbeelding 0).

B. Druk op de knoppen die zich aan de beide binnenkanten van de kinderstoel bevinden en spreid tegelijk de
antislip poten uit elkaar (a) (Afbeelding 1).
C. Plaats uzelf aan de achterkant van de kinderstoel eens de poten (a) gespreid zijn. Druk op het vouwhandvat
(b) door deze met de volledige hand in te drukken en deze naar links te draaien. Houd tegelijk met de andere
hand de rugleuning (d) vast en hef deze naar boven tot u een klik hoort (Afbeelding 2).
D. Plaats uzelf aan de voorkant van de kinderstoel om de hoogte van de kinderstoel af te stellen; druk de twee
knoppen (c) in die zich aan de twee voorkanten van de kinderstoel bevinden door tegelijk de kinderstoel tot
de gewenste hoogte te verhogen of te verlagen (Afbeelding 3, 4 et 5).
Advies: om het afstellen van de kinderstoel te vergemakkelijken, plaatst u best het horizontale gedeelte van
de antislip poot (a) plat.
E. Om het afneembare tablet af te stellen (e) trekt u de knop naar zich toe (f) naar de binnenkant of naar de
buitenkant (Afbeelding 6). Om het afneembare tablet weg te nemen (e), trekt u deze zo ver mogelijk naar buiten
(Figure 7).
F. Om het afneembare boventablet te plaatsen (h) neemt u deze vast bij de openingen aan elke zijde en plaatst
u deze op het afneembare tablet (e) door erop te letten dat deze volledig de randen van het afneembare tablet
bedekt (e). Om het afneembare boventablet weg te nemen (e) heft u deze op (Afbeelding 8).
G. Om de stand van de rugleuning (d) af te stellen trekt u aan de knop (g) en stelt u tegelijk de rugleuning (d) af
naar voren of naar achteren (Afbeelding 9).
H. Om de beschermingshoes te verwijderen (i), opent u de rits aan de achterkant van de hoes (i) (Afbeelding 10).
Verwijder de twee klemmen aan elke kant van de hoes, alsook de vier klemmen aan de onderkant (i). Til de hoes
(i) op door deze van de rugleuning te verwijderen (d). Om het 5-punts veiligheidsharnas te verwijderen (j): plooit
u de uiteinden die verbonden zijn met de riemen van het harnas (j) en die zich aan de achterkant van de
beschermhoes (i) bevinden, zodanig dat u ze doorheen de beschermhoes kunt brengen (i) (Afbeelding 11). Doe
het zelfde met de metalen rechthoek aan de onderkant van de beschermhoes (i).
I. Om de kinderstoel opnieuw dicht te plooien plaatst u zich achter de kinderstoel en drukt u op het vouwhandvat
(b) door deze met de volledige hand in te drukken en naar links te draaien. Breng de rugleuning (d) voorzichtig
naar voren (Afbeelding 12). Let er alvorens het plooien op dat de kinderstoel afgesteld is op de maximum
hoogtepositie zodat de rugleuning (d) tijdens het plooien de grond niet raakt. Eens dat de rugleuning (d)
volledig neergedrukt s, duwt u op de knoppen aan de binnenkant van de antislip poten (a) (Afbeelding 13) en
trekt u de twee poten opnieuw samen (a) (Afbeelding 14).
ONDERHOUD EN REINIGING
Uw product vereist een minimum aan onderhoud. DE REINIGING EN HE ONDERHOUD MOGEN ENKEL
UI GEVOERD WORDEN DOOR VOLWASSENEN.
• Controleer regelmatig de kinderstoel om zeker te zijn dat er geen losse schroeven, versleten onderdelen,
gescheurde stoffen, of losse naaisteken zijn.
• Reinig regelmatig de plastic onderdelen met een vochtig doek, gebruik geen oplosmiddelen of andere
gelijkaardige producten.
• De PVC beschermhoes (i) niet onderdompelen in water maar reinigen aan de oppervlakte met een vochtige
doek en een neutraal detergent.
• Laat indien nodig onderdelen vervangen of herstellen. Gebruik enkel onderdelen die aangeraden worden
door Babymoov.
• Bescherm het product tegen atmosferische invloeden zoals water, regen of sneeuw.
• Een overmatige blootstelling aan zon of warmte kunnen verkleuring van de onderdelen veroorzaken.
• 50 % Polyester - 50 % PVC
tInaj
KINDERS OEL “SLIM” • Gebruikshandleiding
12

ADVER ENCIAS
•NO DEJE AL NIÑO SIN VIGILANCIA.
• No conviene a niños que pesen más de 15 Kg.
• No utilice la trona si algún elemento no está fijado o
ajustado como es debido.
• Utilice la trona únicamente si el niño es capaz de
permanecer sentado por sí solo.
•U ILICE SIEMPRE EL ARNÉS DE SEGURIDAD DE CINCO
PUN OS para evitar que el niño se caiga o se escurra;
no deje nunca al niño jugar con el arnés de seguridad.
Antes de cada utilización, ASEGÚRESE DE QUE EL
ARNÉS DE SEGURIDAD ES Á FIJADO CON SOLIDEZ.
• No ajuste la trona con el niño sentado en ella.
• La mesita y la bandeja separable no han sido
diseñadas para soportar el peso del niño, ni para
mantener al niño en posición sentada. No pueden
sustituir al arnés de seguridad.
• No utilice la trona sin su funda protectora.
• Tenga cuidado con la posición de las extremidades
del niño cuando lo siente.
• No utilice el producto cerca de escalones ni escaleras.
• No coloque la trona en alto.
• Utilice siempre la trona sobre una superficie plana,
horizontal y despejada.
• Aleje la trona de toda llama o fuente de calor intenso,
como aparatos eléctricos o de gas.
• Aleje la trona de prolongadores, cocinas, enchufes,
etc. o de cualquier objeto que pudiera quedar al
alcance del niño.
• No levante la trona cogiéndola por la mesita separable.
• No levante ni desplace la trona cuando el niño esté
sentado en ella.
• Para evitar todo riesgo de asfixia, conserve las bolsas
de plástico del embalaje fuera del alcance de bebés
y niños pequeños.
• No deje al niño jugar con la trona plegada.
CUMPLE CON LOS REQUISI OS DE SEGURIDAD
EN 14988 1 : 2006
COMPOSICIÓN DE LA RONA
a. Patas antideslizantes
b. Asa de plegado
c. Botones de ajuste de la altura
d. Respaldo reclinable
e. Mesita separable
f. Botón de ajuste de la mesita
g. Botón de inclinación del respaldo
h. Bandeja separable
i. Funda de protección
j. Arnés de seguridad de 5 puntos
k. Entrepierna
Gracias por haber elegido la trona Slim BABYMOOV
¡IMPOR AN E! CONSERVAR PARA PODER CONSUL AR EN EL FU URO:
POR LA SEGURIDAD DE SU BEBÉ, LEA DE ENIDAMEN E ES E MANUAL DE INS RUCCIONES
Y CONSÉRVELO CUIDADOSAMEN E PARA CONSUL ARLO EN EL FU URO.
INS RUCCIONES DE SEGURIDAD QUE DEBE RESPE AR
- No conviene a niños que pesen más de 15 Kg.
- Nunca deje al niño en la trona sin vigilancia.
- Las operaciones de montaje y ajuste deberá realizarlas un adulto.
- No utilice la trona si falta alguna de las piezas o si alguna está rota o rasgada.
- Mantenga las piezas pequeñas fuera del alcance de los niños.
ES
RONA SLIM • Instrucciones de uso 13
U ILIZACIÓN Y CARAC ERÍS ICAS DE LA RONA
A. Para instalar la entrepierna (k), fíjela por debajo de la mesita con los 4 tornillos provistos. Para mayor
comodidad, realice esta operación con la silla plegada (Imagen 0).

B. Pulse los botones situados en la cara interior de ambos laterales de la trona, separando al mismo tiempo las
dos patas antideslizantes (a) (Imagen 1).
C. Una vez que las dos patas (a) estén totalmente separadas, sitúese detrás de la trona. Presione el asa de plegado
(b), hundiéndola con la mano y dirigiéndola hacia la izquierda. Al mismo tiempo, sujete el respaldo (d) con
la otra mano y levántelo hasta oir un clic. (Imagen 2).
D. Para ajustar la altura de la trona, sitúese delante de ésta, presione los dos botones (c) situados a ambos lados
de la trona, elevando o bajando al mismo tiempo la trona hasta la altura deseada (Imágenes 3, 4 y 5).
Consejo: para facilitar el ajuste de la trona, asegúrese de que la parte horizontal de la pata antideslizante
(a) esté totalmente horizontal en el suelo.
E. Para ajustar la mesita separable (e), tire hacia sí el botón (f), hacia el interior o el exterior (Imagen 6). Para retirar
la mesita separable (e), tire de ella al máximo hacia el exterior (Imagen 7).
F. Para instalar la bandeja separable (h), cójala por las aberturas situadas a cada lado y colóquela sobre la mesita
separable (e) procurando que cubra bien los bordes de ésta (e). Para retirar la bandeja separable (e), basta
con levantarla (Imagen 8).
G. Para regular la inclinación del respaldo (d), tire del botón (g), reclinando simultáneamente el respaldo (d) hacia
adelante o hacia atrás (Imagen 9).
H. Para retirar la funda protectora (i), abra la cremallera situada al dorso de la funda (i) (Imagen 10). Desabroche
los dos botones de presión situados a cada lado de la funda, así como los cuatro botones de presión
presentes bajo el asiento (i). Levante la funda protectora (i) separándola del respaldo (d). Para retirar el arnés
de seguridad de 5 puntos (j) : incline las conteras ligadas a las correas del arnés (j) y situadas en el dorso de
la funda protectora (i) para poder pasarlas a través de la funda protectora (i) (Imagen 11). Repita la operación
con el rectángulo metálico situado bajo el asiento de la funda protectora (i).
I. Para plegar la trona, sitúese detras de ésta, presione el asa de plegado (b) hundiéndola con la mano y
desplazándola a la izquierda. Desplace con cuidado el respaldo (d) hacia adelante (Imagen 12). Antes de
plegarla, asegúrese de que la trona esté ajustada a su altura máxima, para que el respaldo (d) no toque el suelo
cuando se pliegue. Una vez que haya abatido totalemente el respaldo (d), pulse los botones situados en la cara
interior de las patas antideslizantes (a) (Imagen 13) y apriete de nuevo ambas patas (a) (Imagen 14).
CUIDADOS Y LIMPIEZA
Su producto requiere un mantenimiento mínimo. LAS OPERACIONES DE LIMPIEZA Y MAN ENIMIEN O DEBERÁN
SER REALIZADAS ÚNICAMEN E POR ADUL OS.
• Examine a menudo la trona para asegurarse de que los tornillos no se hayan aflojado, que ninguna pieza se
haya desgastado, la tela desgarrado o algún punto descosido.
• Limpie con regularidad las partes de plástico con un trapo húmedo, no utilice disolventes ni demás productos
de ese tipo.
• No sumerja la funda protectora (i) de PVC en agua; sólo limpie su superficie con un trapo húmedo y
detergente neutro.
• Si es necesario, cambie o repare las piezas. Utilice únicamente piezas de recambio recomendadas por Babymoov.
• Proteja el producto contra agentes atmosféricos, agua, lluvia o nieve.
• Una exposición excesiva al sol o al calor puede provocar la decoloración de las piezas.
• 50 % Poliéster - 50 % PVC
tInaj
RONA SLIM • Instrucciones de uso
14

AVISOS
•NÃO DEIXE A CRIANÇA SEM VIGILÂNCIA.
• Não conveniente para crianças com mais de 15 kg
de peso.
• Não utilize a cadeira alta sem todos os seus
elementos fixados e regulados de forma adequada.
• Utilize a cadeira alta somente se a criança já for
capaz de se manter sentada por si só.
•U ILIZE SEMPRE O CIN O DE SEGURANÇA DE CINCO
PON OS para impedir a queda ou o deslizamento da
criança; nunca deixe a criança brincar com o cinto de
segurança. Antes de cada utilização, ASSEGURE-SE
DE QUE O CIN O DE SEGURANÇA SE ENCON RA
BEM PRESO.
• Não faça ajustamentos com a criança sentada na
cadeira alta.
• O tabuleiro e o tabuleiro superior amovíveis não
foram construídos para suportarem o peso da criança
nem para manterem a criança em posição sentada.
Não substituem o cinto de segurança.
• Não utilize a cadeira alta sem a cobertura de protecção.
• Dê atenção posição dos membros da criança
quando a instalar.
• Não utilize o produto perto de degraus ou de escadas.
• Não coloque a cadeira alta em sítios altos.
• Utilize sempre a cadeira alta numa superfície plana,
horizontal e sem obstáculos.
• Afaste a cadeira alta de chamas e de fontes de calor
intenso, tais como aparelhos eléctricos ou a gás.
• Afaste a cadeira alta de extensões eléctricas,
aparelhos de cozinha, tomadas eléctricas, etc., ou
de objectos ao alcance da criança.
• Não levante a cadeira alta pelo tabuleiro amovível.
• Não levante nem transporte a cadeira alta com a
criança sentada nela.
• Para evitar riscos de asfixia, guarde os sacos de
plástico da embalagem fora do alcance de bebés e
de crianças.
• Não deixe a criança brincar com a cadeira alta dobrada.
EM CONFORMIDADE COM AS EXIGÊNCIAS
DE SEGURANÇA
EN 14988 1 : 2006
CONS I UIÇÃO DA CADEIRA AL A
a. Pés antideslizantes
b. Pegas de dobrar
c. Botões para regular a altura
d. Costas reclináveis
e. Tabuleiro amovível
f. Botão de regulação do tabuleiro
g. Botão de reclinar as costas
h. Tabuleiro superior amovível
i. Cobertura de protecção
j. Cinto de segurança de 5 pontos
k. Entrepernas
Agradecemos ter comprado a Cadeira Alta Slim BABYMOOV
É IMPOR AN E CONSERVAR ES E FOLHE O PARA CONSUL A SEMPRE QUE NECEESSÁRIO:
PARA A SEGURANÇA DO SEU BEBÉ, LEIA A EN AMEN E ES E FOLHE O E CONSERVE-O
CUIDADOSAMEN E PARA O CONSUL AR FU URAMEN E.
INS RUÇÕES DE SEGURANÇA A RESPEI AR
- Não conveniente para crianças com mais de 15 kg de peso.
- Nunca deixe a criança na cadeira alta sem vigilância.
- As operações de montagem e regulação devem ser feitas por uma pessoa adulta.
- Não utilize a cadeira alta se esta tiver peças partidas, rasgadas ou em falta.
- Mantenha as peças pequenas fora do alcance de crianças.
P
CADEIRA AL A SLIM • Instruções de uso 15
U ILIZAÇÃO E CARAC ERÍS ICAS DA CADEIRA AL A
A. Para instalar o entrepernas (k), fixá-lo por baixo da placa com os 4 parafusos fornecidos juntamente. Para
maior facilidade, fazer esta operação com a cadeira dobrada (Figura 0).

B. Carregue nos botões situados em ambos os lados interiores da cadeira alta afastando simultaneamente os
dois pés antideslizantes (a) (Figura 1).
C. Depois dos pés (a) totalmente afastados, coloque-se atrás da cadeira alta. Carregue na pega de dobrar (b)
com a mão toda, dirigindo-a para a esquerda. Segure ao mesmo tempo as costas (d) com a outra mão e
levante-as até ouvir um "clic" (Figura 2).
D. Para regular a altura da cadeira alta, coloque-se frente da cadeira; carregue nos dois botões (c) situados
nos dois lados da frente da cadeira alta, levantando ou baixando simultaneamente a cadeira alta até
altura pretendida (Figuras 3, 4 e 5).
Conselho: para facilitar a regulação da cadeira alta, assente completamente a parte horizontal do pé
antideslizante (a).
E. Para regular o tabuleiro amovível (e), puxe o botão (f) para dentro ou para fora (Figura 6). Para retirar o
tabuleiro amovível (e), puxe-o ao máximo para o exterior (Figura 7).
F. Para instalar o tabuleiro superior amovível (h), segure-o nas aberturas existentes em cada lado e coloque-o
no tabuleiro amovível (e), tendo o cuidado de verificar que tapa bem os rebordos do tabuleiro amovível (e).
Para retirar o tabuleiro superior amovível (e), basta levantá-lo (Figura 8).
G. Para regular a reclinação das costas (d), puxe o botão (g) e desloque simultaneamente as costas (d) para a
frente ou para trás (Figura 9).
H. Para retirar a cobertura de protecção (i), abra o fecho de correr existente nas costas da cobertura(i) (Figura
10). Retire as duas molas de pressão em cada lado da cobertura e as quatro por baixo do banco (i). Levante
a cobertura de protecção (i), separando-a das costas (d). Para retirar o cinco de segurança de 5 pontos (j) :
incline as ponteiras ligadas aos suspensórios do cinto (j) e colocadas nas costas da cobertura de protecção
(i), de forma que possam passar através da cobertura de protecção (i) (Figura 11). Faça o mesmo com o
rectângulo metálico existente por baixo do assento da cobertura de protecção (i).
IPara dobrar a cadeira alta, coloque-se atrás dela, carregue com toda a mão na pega de dobrar (b) deslocando-
a para a esquerda. Desloque cuidadosamente as costas (d) para a frente (Figura 12). Antes de dobrar, assegure-
se de que a cadeira alta esteja regulada para a posição alta máxima para que durante a dobragem as costas
(d) não toquem no chão. Depois das costas (d) completamente dobradas, carregue nos botões situados no interior
dos pés antideslizantes (a) (Figura 13) e volte a apertar os dois pés (a) (Figura 14).
CUIDADOS E CONSERVAÇÃO
Este produto necessita de um mínimo de assistência, AS OPERAÇÕES DE LIMPEZA E ASSIS ÊNCIA DEVEM SER
REALIZADAS UNICAMEN E POR PESSOAS ADUL AS.
• Inspeccione com frequência a cadeira para verificar se há parafusos desapertados, peças gastas, tecidos
rasgados, ou pontos descosidos.
• Limpe periodicamente as peças de plástico com um pano humedecido, mas não use solventes nem outros
produtos semelhantes.
• Não mergulhe em água a cobertura de protecção (i) em PVC, mas lave a superfície com um pano humedecido
e um detergente neutro.
• Mande substituir ou reparar as peças sempre que necessário. Utilize exclusivamente peças sobressalentes
aconselhadas por Babymoov.
• Proteja o produto contra agentes atmosféricos, água, chuva, ou neve.
• Uma exposição excessiva ao sol ou ao calor pode provocar a descoloração das peças.
• 50 % Poliéster - 50 % PVC
tInaj
CADEIRA AL A SLIM • Instruções de uso
16

AVVER ENZE
•NON LASCIARE MAI IL BAMBINO
SENZA SORVEGLIANZA.
• Non adatto ai bambini di peso superiore ai 15 kg.
• Non utilizzare il seggiolone con elementi non fissati
o non correttamente regolati.
• Usare il seggiolone solo se il bambino è in grado di
stare seduto da solo.
•USARE SEMPRE LE IMBRAGA URE DI SICUREZZA A
CINQUE PUN I per impedire che il bambino cada o
scivoli; non lasciare giocare il bambino con le
imbragature di sicurezza. Prima di ogni utilizzo,
ASSICURARSI CHE LE IMBRAGA URE DI SICUREZZA
SIANO BEN FISSA E.
• Non effettuare le regolazioni quando il bambino è
seduto nel seggiolone.
• Il tavolino e il sovra-tavolino non sono stati progettati
per sostenere il peso del bambino, né perché il
bambino possa esservi seduto sopra. Non
sostituiscono le imbragature di sicurezza.
• Non usare mai il seggiolone senza la sua fodera
di protezione.
• Fare attenzione alla posizione degli arti del bambino
durante il suo inserimento.
• Non utilizzare il prodotto in prossimit di passaggi e
di scale.
• Non sistemare il seggiolone in posizione sopraelevata.
• Utilizzare sempre il seggiolone su una superficie
orizzontale, piana e libera.
• Tenere il seggiolone lontano da fiamme o fonti di
calore intenso quali apparecchi elettrici o a gas.
• Tenere il seggiolone lontano da prolunghe, fornelli,
prese elettriche, ecc. o da oggetti da tenere fuori dalla
portata dei bambini.
• Non sollevare il seggiolone dal tavolino amovibile.
• Non sollevare o trasportare il seggiolone con il
bambino seduto all’interno.
• Per evitare rischi di soffocamento, tenere i sacchetti
di plastica dell’imballaggio fuori dalla portata dei
bambini.
• Non lasciar giocare il bambino con il seggiolone
chiuso.
CONFORME AI REQUISI I DI SICUREZZA
EN 14988 1 : 2006
COMPONEN I DEL SEGGIOLONE
a. Piedini antiscivolamento
b. Impugnature per la chiusura
c. Tasti di regolazione dell'altezza
d. Schienale inclinabile
e. Tavolino amovibile
f. Tasto di regolazione del tavolino
g. Pulsante di inclinazione dello schienale
h. Sovra-tavolino amovibile
i. Fodera di protezione
j. Imbragatura di sicurezza a 5 punti
k. Cinghia inguinale
Grazie per aver scelto il Seggiolone Slim BABYMOOV
SI PREGA DI CONSERVARE LE IS RUZIONI PER RIFERIMEN I FU URI:
PER LA SICUREZZA DEL VOS RO BAMBINO, LEGGERE A EN AMEN E QUES O MANUALE
DELLE IS RUZIONI E CONSERVARLO PER RIFERIMEN I FU URI.
IS RUZIONI DI SICUREZZA
- Non adatto ai bambini di peso superiore ai 15 kg.
- Non lasciare mai il bambino nel seggiolone senza sorveglianza.
- Le operazioni di montaggio e di regolazione devono essere realizzate da un adulto.
- Non utilizzare il seggiolone in caso di parti rotte, lacerate o mancanti.
- Tenere le piccole parti fuori dalla portata dei bambini.
I
SEGGIOLONE SLIM • Istruzioni per l’uso 17
U ILIZZO E CARA ERIS ICHE DEL SEGGIOLONE
A. Per installare la cinghia inguinale (k), fissarla sotto la tavoletta mediante le 4 viti incluse. Per una maggiore
comodit , procedere a questa operazione con la sedia piegata (Figura 0).

B. Premere i tasti che si trovano ai due lati interni del seggiolone e contemporaneamente inserire i due piedini
antiscivolamento (a) (Figura 1).
C. Una volta che i due piedi (a) sono ben inseriti, posizionarsi dietro al seggiolone. Premere le impugnature per
la chiusura (b) abbassandole e portandole verso sinistra. Tenere contemporaneamente lo schienale (d) con
l'altra mano e sollevarlo fino ad avvertire un clic. (Figura 2).
D. Per regolare l'altezza, mettersi davanti al seggiolone; premere i due tasti (c) laterali nella parte anteriore del
seggiolone e contemporaneamente regolare l'altezza nella posizione desiderata (Figure 3, 4 e 5).
Suggerimento: per facilitare la regolazione del seggiolone, tenere la parte orizzontale del piedino antiscivolamento
(a) appoggiata a terra.
E. Per regolare il tavolino amovibile (e), tirare verso di sé il tasto (f) e spostarlo in avanti o indietro (Figura 6). Per
togliere il tavolino (e), tirarlo completamente all'esterno (Figura 7).
F. Per installare il sovra-tavolino amovibile (h), afferrarlo dalle due aperture poste ai lati e sistemarlo sul tavolino
(e) assicurandosi di incastrarlo correttamente sullo stesso (e). Per togliere il sovra-tavolino amovibile (e),
sollevarlo (Figura 8).
G. Per regolare l'inclinazione dello schienale (d), tirare il tasto (g) e contemporaneamente inclinare lo schienale
(d) in avanti o indietro (Figura 9).
H. Per togliere la fodera di protezione (i), aprire la cerniera lampo che si trova nella parte posteriore (i) (Figura 10).
Aprire i due automatici che si trovano ai lati della fodera e i quattro sulla seduta (i). Sollevare la fodera di
protezione (i) togliendola dallo schienale (d). Per sfilare l'imbragatura a 5 punti di sicurezza (j): inclinare gli attacchi
legati alle bretelle dell'imbragatura (j) e posti sul retro della fodera di protezione (i) in modo da farli passare attraverso
la fodera (i) (Figura 11). Ripetere la stessa operazione con il rettangolo metallico posto sulla seduta della fodera
di protezione (i).
I. Per piegare il seggiolone, posizionarsi dietro al seggiolone, premere l'impugnatura per la chiusura (b) spingendola
e piegandola verso sinistra. Piegare delicatamente lo schienale (d) in avanti (Figura 12). Prima di chiudere il
seggiolone, accertarsi che sia regolato nella posizione di altezza massima per evitare che, nella chiusura, lo
schienale (d) tocchi terra. Quando lo schienale (d) è completamente abbassato, premere i tasti presenti nella
parte interna dei piedini antiscivolamento (a) (Figura 13) e chiuderli (a) (Figura 14).
CURA E MANU ENZIONE
Questo prodotto ha bisogno di pochi interventi di manutenzione. LE OPERAZIONI DI PULIZIA E DI MANU ENZIONE
DEVONO ESSERE EFFE UA E ESCLUSIVAMEN E DA UN ADUL O.
• Verificare regolarmente il seggiolone per assicurarsi che non ci siano viti allentate, parti usurate, tessuti lacerati
o punti scuciti.
• Pulire regolarmente le parti in plastica con un panno umido; non utilizzare solventi o altri prodotti simili.
• Non immergere la fodera di protezione (i) di PVC in acqua, ma pulirla in superficie con un panno umido e un
detersivo neutro.
• Far sostituire o riparare le parti necessarie. Utilizzare solo i ricambi consigliati da Babymoov.
• Proteggere il prodotto dagli agenti atmosferici, quali la pioggia o la neve.
• Un’esposizione eccessiva al sole o al calore può provocare la decolorazione delle parti.
• 50 % Poliestere - 50 % PVC
tInaj
SEGGIOLONE SLIM • Istruzioni per l’uso
18

19

Photographies non contractuelles A010001-Manual-Artwork-02
Nomdesparents: .......................................................................
Prénomsdesparents:....................................................................
Adresse: ..............................................................................
......................................................................................
CodePostal/Ville: ......................................................................
N°detéléphone:........................................................................
E-mail:................................................................................
Prénomsdevosenfants: .................................................................
Datesdenaissance: .....................................................................
Nomduproduitacheté: ..................................................................
Référence:.............................................................................
N°decodebarre(obligatoire): .............................................................
Datedel’achat: ........................................................................
Lieudel’achat: .........................................................................
Votre opinion sur la qualité du produit : Mauvaise 1 2 3 4 5 très bonne
Combien de produits Babymoov avez-vous déjà acheté ?
1 2 3 4 5 6 7 8autre: .................................................................
Avez-vous des commentaires sur ce produit ?
............................................................
............................................................
Avez-vous une idée d’un produit génial
à créer pour bébé ?
.....................................................
.....................................................
.....................................................
• Nous vous rappelons que vous disposez d'un droit d'accès, de modification, de rectification et de suppression des données qui vous concernent (art. 34 de la loi "Informatique
et Libertés" du 6 janvier 1978). Pour exercer ce droit, adressez-vous Babymoov - Parc Industriel des Gravanches - 16, rue Jacqueline Auriol - 63051 Clermont-Ferrand cedex 2.
• Les informations qui vous concernent sont destinées Babymoov. Nous pouvons être amenés les transmettre des tiers (partenaires commerciaux, etc).
Le souhaitez-vous ? Oui ❒Non ❒
❐Oui, je souhaite garantir à vie mon produit Babymoov et je vous joins une copie de
mon ticket de caisse (OBLIGA OIRE). Sans cela, nous ne pourrons garantir à vie
votre achat.
❐Oui, je souhaite recevoir la Moovletter, lettre d’information électronique sur les
nouveautés et la société Babymoov. Merci de bien remplir votre adresse e-mail.
Bon de garantie à vie
( renvoyer le jour de l’achat)
Only for France and DOM TOM
* sous réserve d’une utilisation conforme la notice. La garantie vie ne couvre pas les détériorations dues une utilisation anormale, le textile, les consommables (sucettes,
ampoules…), la sérigraphie, l’usure normale de certains éléments comme le plastique, le roulant...
*
This manual suits for next models
1
Table of contents
Languages:
Other babymoov High Chair manuals