Nuna Zaaz User manual

instruction manual

3
Thanks for
choosing Nuna®!
Nuna designs distinctive, smart and
exciting products.
The Nuna® high chair owes its character to a
balanced combination of style and functionality.
Thanks to the modular accessories and the as-
sisted height adjustment, you can adapt the
chair very easily to your and your child’s needs
in everyday life.
The Nuna® chair, when fitted with all accesso-
ries, is a fully equipped high chair. By removing
these accessories, it becomes a toddler chair
and subsequently can be used for an older child.
Enjoy your high chair!
1
2
3
4
5
6
3
Illustrations

16
14
13
15
17
nuna.eu
710
811
912
45

67
EN
Contents
Illustrations 1-3
English (EN) 5
Safety and Warnings 6-7
Contents of the box 8
How to assemble the Nuna chair 9-11
How to use the Nuna chair 12
How to disassemble the Nuna chair 13-14
Cleaning and maintenance 15
Warranty 16
Contact 17

9
8
EN
EN
Safety and
recommendations
Please take note of the following before using the Nuna chair.
Safety is very important to us and you can be assured that our products
comply with the relevant standards.
If you have any questions or comments regarding the Nuna high chair, we
will be glad to hear them through our website nuna.eu
89
WARNINGS
Failure to follow these warnings and instructions could result in
serious injury or death.
To prevent serious injury or death from falls or sliding out, secure the
child in the high chair at all times by using the restraining system.
The tray and the arm bar are not designed to secure the child in the chair.
It is recommended that the high chair be used only by children capable
of sitting upright unassisted.
It is recommended that you stop using the high chair when your child
weighs more than 110 pounds (50 kgs).
Strangulation Hazard: Do not place high chair in any location where there
are cords, such as window blind cords, drapes, phone cords, etc.
Do not use the high chair if any parts are torn, broken or missing.
Always use the high chair on a level, stable surface.
Never use the arm bar without using the cushion.
IMPORTANT! KEEP THIS MANUAL
FOR FUTURE REFERENCE!
Read all instructions before assembly and use of the product.
The Nuna high chair can be used only when the child can sit upright
unaided (around 6–7 months), and we recommend that you stop
using it when your child weighs more 110 lbs (50 kgs).
This chair is designed to be used by children and not by adults.

11
10
EN
EN
Contents of the Box
Check that you have all the parts for this product before assembling it.
Refer to the illustrations provided at the beginning of this manual to
identify each part.
Nuna key
(Harness restraint removal tool)
Tray
Harness restraint 5 pts
Arm bar
Seat cushion
Seat (with flap and height adjustment
lock on reverse side)
Footrest
Leg frame
Tools Needed:
Nuna key to remove harness restraint
when desired (included in the box)
How to assemble
the Nuna chair
Check that you have all the parts for this product before assembling it.
The assembly should be performed only by adults.
Assemble Seat onto Leg Frame
Once the seat is attached to the legs of the chair, it is considered to be a
permanent assembly. However, it is possible to reverse this assembly if the
seat needs to be put into storage or shipped. We recommend this should
not be a regular occurrence.
1 Place the leg frame on the floor facing you, as illustrated. (1)
2 Take the seat. Release the lock by pulling down the latch at the rear
of the seat flap. Then pull the flap forward completely. (2)
3 Position the seat over the leg frame to line up the slots behind the
seat flap with the white tracks on the leg frame, as illustrated. (3)
4 Once the seat is correctly positioned over the white tracks, keep the
flap up and firmly push the seat downward until you hear a click.
If the flap is not completely up you will not be able to push the seat
down. Continue to push firmly on the sitting surface until the seat
reaches its lowest position.
5 To lock the seat, lower the flap and listen for the click as the lock
clicks back into position.
The seat is now permanently mounted to the legs and can be adjusted
within the range between the highest and lowest positions.

13
12
EN
EN
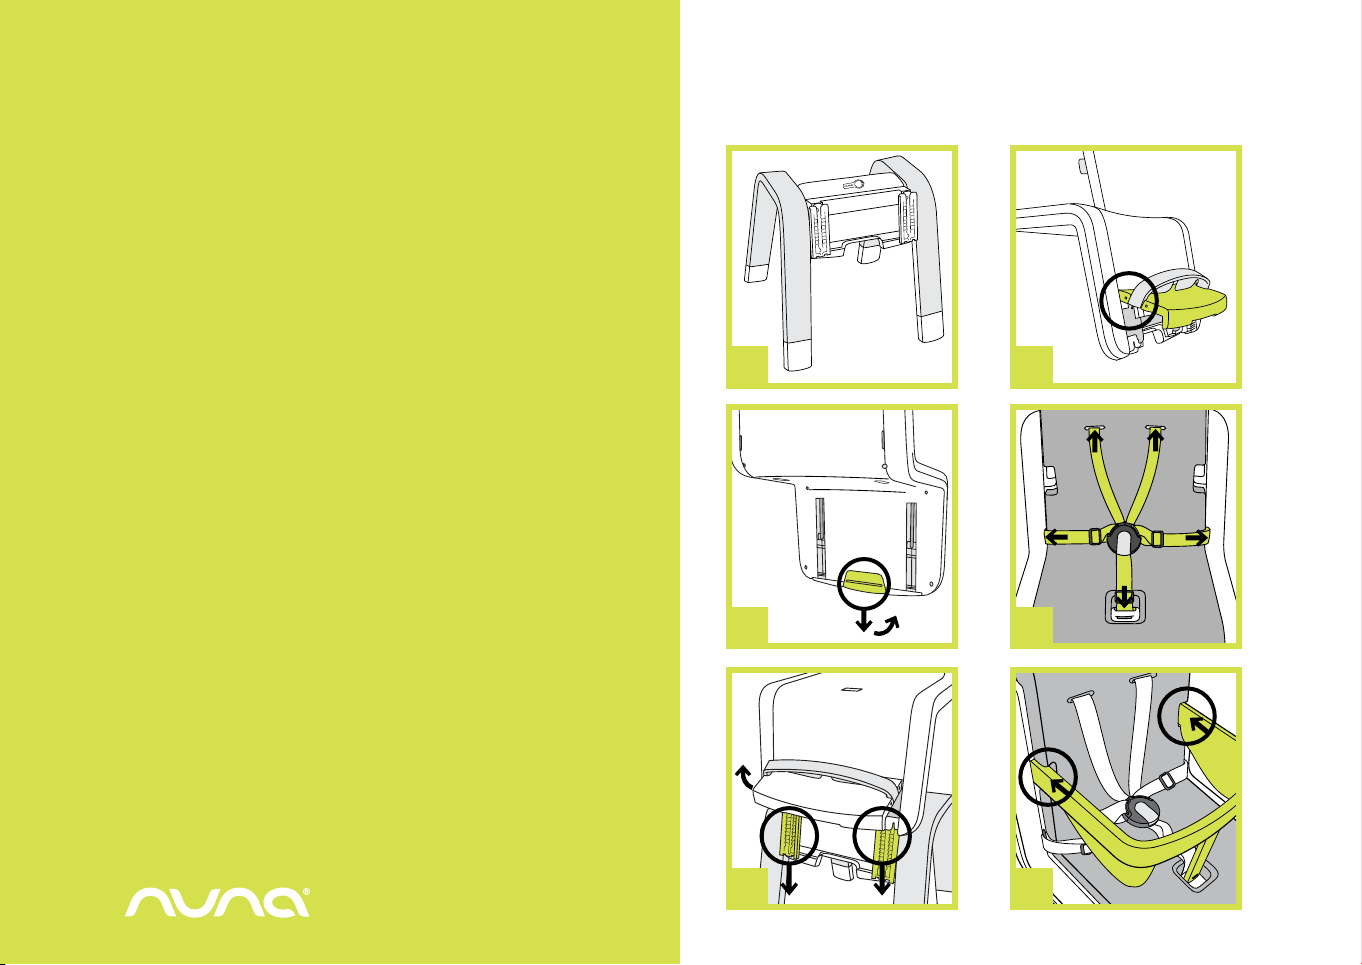
Assemble Footrest onto Seat
1 Slide down the lock behind the flap and lift the flap completely.
The seat automatically rises up to its highest position. (2)
2 Attach the footrest on one side of the flap and then flex the footrest
to attach it on the other side. (4)
3 Lower the flap down into position. Listen for the click as the lock
clicks back into position.
Assemble Seat Cushion onto Seat
1 First remove the harness restraint if necessary, then place the seat
cushion onto the seat.
2 Insert the seat cushion clip into the inner of two holes in the sitting
surface of the seat and listen for a click.
Assemble Harness Restraint onto Seat
WARNING When used as a high chair, the child must always wear the
harness restraint correctly fitted and adjusted.
1 Insert waist clips into the lower backrest holes (around the seat
cushion, when cushion in use) and listen for a click. (5)
2 Insert shoulder harness clips into the upper backrest holes and listen for
click. (5)
3 Insert the remaining crotch clip (through the seat cushion, when
cushion in use) into the inner of two holes in the sitting surface of the
seat and listen for a click. (5)
4 Check that the harness attachment is secure by pulling on each
attachment point.
Assemble Arm Bar onto Seat
WARNING The Arm bar alone DOES NOT guarantee the restraint of
your child!
1 Hook the ends of the arm bar into the holes in the backrest of the seat
(through the seat cushion, when cushion in use). (6)
2 Click the front part of the arm bar into the outer of two holes in the
sitting surface of the seat (through the seat cushion, when cushion
in use). (7)
3 Check that the arm bar is secure by pulling up on the front of the
arm bar.
Assemble Tray onto Arm Bar
WARNING The tray and the arm bar alone DO NOT guarantee the
restraint of your child!
1 Position the tray over the arm bar. Insert the tabs at the back of the
tray into the slots between the arm bar and the backrest of the seat,
as illustrated. (8)
2 Push the tray down until the side clips fasten around the arm bar. (9)
3 Check that the tray is secure by pulling up on the front of the tray.

15
14
EN
EN
How to use the
Nuna chair
Adjusting the Seat Height
WARNING DO NOT adjust the height of the chair while a child
is in the seat!
1 Slide down the lock behind the flap and lift the flap completely.
The seat automatically rises up to the highest position. (2)
2 To lower the seat, keep the flap lifted completely and push down
firmly on the sitting surface of the seat until it reaches the
desired position. (10)
3 Lower the flap down into position. Listen for the click as the lock
clicks back into position. The seat position is now locked.
Adjust the Harness Restraint and Buckle
1 Don’t forget to check and adjust the harness to fit your child snugly.
(13)
2 To lock the harness, insert each clip into the buckle and listen for a
click. (14, 15, 16)
3 To release the buckle, push on the Nuna button at the center and
remove the two clips. (17)
How to disassemble
the Nuna chair
Remove the Tray
1 Release the two clips on both sides under the tray. (9)
2 Gently lift the tray upwards so that it clears the arm bar and
pull away from the back of the seat.
Remove the Arm Bar
1 Push the button on the front of the arm bar and pull the arm bar up to
release it from the seat. (7)
2 Unhook the two ends from the backrest and remove. (6)
Remove the Harness Restraint
WARNING When used as a high chair, the child must always wear the
harness restraint correctly fitted and adjusted.
The harness can be removed for cleaning or when the chair is used for an
older child.
Insert the Nuna key into each of the slots of the harness restraint
at the back and underside of the seat to release the plastic clips.
Pull on the belts to remove. (11)

17
16
EN
EN
Remove the Seat Cushion
1 To remove the seat cushion, first remove the tray, the safety bar and the
harness restraint if necessary.
2 Insert the Nuna key into the slot at the underside of the seat to release
the plastic clip.
Remove the Footrest
1 Slide down the lock behind the flap and lift the flap completely.
The seat automatically rises up to the highest position. (2)
2 Firmly flex one end of the footrest and unhook it from the flap.
Unhook the other end and remove it. (4)
3 Remember to lower the flap and listen for the click as the lock
clicks back into position.
Dismantling the Seat from the Leg Frame
Once the seat is attached to the legs of the chair, it is considered to be a
permanent assembly. However, it is possible to reverse this assembly if the
seat needs to be put into storage or shipped. We recommend this should
not be a regular occurrence.
1 Slide down the lock behind the flap and lift the flap completely.
The seat automatically rises up to the highest position. (2)
2 Gently pull forward the two clips on each side, as illustrated. (12)
3 Slide the seat up and remove from the legs. If the flap is not
completely up, you will not be able to slide the seat upwards.
Cleaning and
maintenance
You can clean the high chair and accessories with a damp cloth or a
neutral detergent, but do not use abrasive detergents or solvents which
could damage the material.
The anodised aluminium legs are maintenance free but will be damaged
by impact or scratching.
Continued and extended exposure to sunlight can change the colour of
many materials.
Inspect your high chair regularly in order to detect any damage.

19
18
EN
EN
Warranty
and service
The Nuna high chair is covered by a one year warranty. If this product
shows a defect during the warranty period, please contact your retailer.
If the retailer is unable to help you, they will make contact with the local
Nuna distributor.
Please be aware that the model number and serial number located under
the seat of the product will be required in the event of a warranty claim.
To register your product, please go to our website at nuna.eu
Terms of warranty
The warranty takes effect at the date of purchase of the product and is valid
for one year. The warranty provides you with a right of repair but not a product
exchange or return. The warranty will not be extended even if some repairs
have been made. Nuna has the right to improve the design of the product
without any obligation to update the products manufactured previously.
The warranty will not apply in the following circumstances:
• If you can not provide the sales receipt or proof of purchase of
the product.
• If the defect results from normal wear.
• If the defect results from an accident.
• If the defect results from a failure to follow the instructions of assembly,
use, care and maintenance provided in the instruction manual.
• If the defect results from overloading (maximum weight = 50kg).
• If repairs have been carried out by a third party.
• If the defect results from the use of accessories others than Nuna.
Where to find
Nuna products?
If you are looking for Nuna retailers in your area, please consult our
website: nuna.eu
Contact
We always look forward to improving our products and developing new
ideas so please feel free to contact us to submit any comments or
questions regarding the Nuna products.
nuna.eu
Nuna International BV
De Beeke 8, 5469 DW,
ERP The Netherlands
Tel. no.:+31 413 213671
Thanks for choosing
Nuna!

nuna.eu
IM-0075A
Other manuals for Zaaz
6
Table of contents
Other Nuna High Chair manuals