9
11.Safety Instructions for AC Power Adapter
• The adapter should not be exposed to direct heat sources such as a candle, stove, radiator, heat
register or other appliance that emits heat.
• During continual use, the power adapters may become warm to the touch. This is normal and should
not be a concern.
• Examine intactness of the power cord and its plug.
• The adapter must be handled with care: Do not handle roughly, drop or throw.
• Once removing the power adapter from the wall outlet, hold and pull from the receptacle. Do not pull
on the cable itself or bend the cable as that will put additional stress on the cable and could lead to damages.
• Do not touch the power adapter with wet hands or allow liquids to spill on it.
• Make sure the mains adaptor cables are kept out of reach of your baby and other young children at all
times. To avoid possible danger from power cords, the cords should be secured and never be
hung on or near the crib.
• Do not replace the plugs or cable on your power adapter. This product should only be used with the AC
power adapters supplied by the manufacturer, as included in this package.
• Never cut, damage or bend the power cord.
• Do not put any objects on top of the power cord, which could cause overheating, damage,
inflammation and electrocution.
• Do not leave the power adapter connected to the wall outlet when it is not plugged into the Baby or
Parent unit.
WARNING:
• Do not replace the power cord by non-original substitutes. Improper connection may cause
electrocution.
• Do not place the AC adaptor cable in a high wear and tear location. Never use a frayed or
compromised cord.
• Intended for indoor use only.
12. Safety Instructions for Li-ion battery
• Do not attempt to repair or adjust any of the electrical or mechanical functions of the unit.
• Do not dismantle, cut, open, crush, bend, puncture, or shred cells or batteries.
• If a battery leaks, do not let the battery liquid touch skin or eyes. If this happens,
immediately flush the affected areas with water, and seek medical assistance.
3.3 Icons overview
4. Getting Started
4.1 Turning ON the Baby Unit (Camera)
* Only use the AC adapter included in this package.
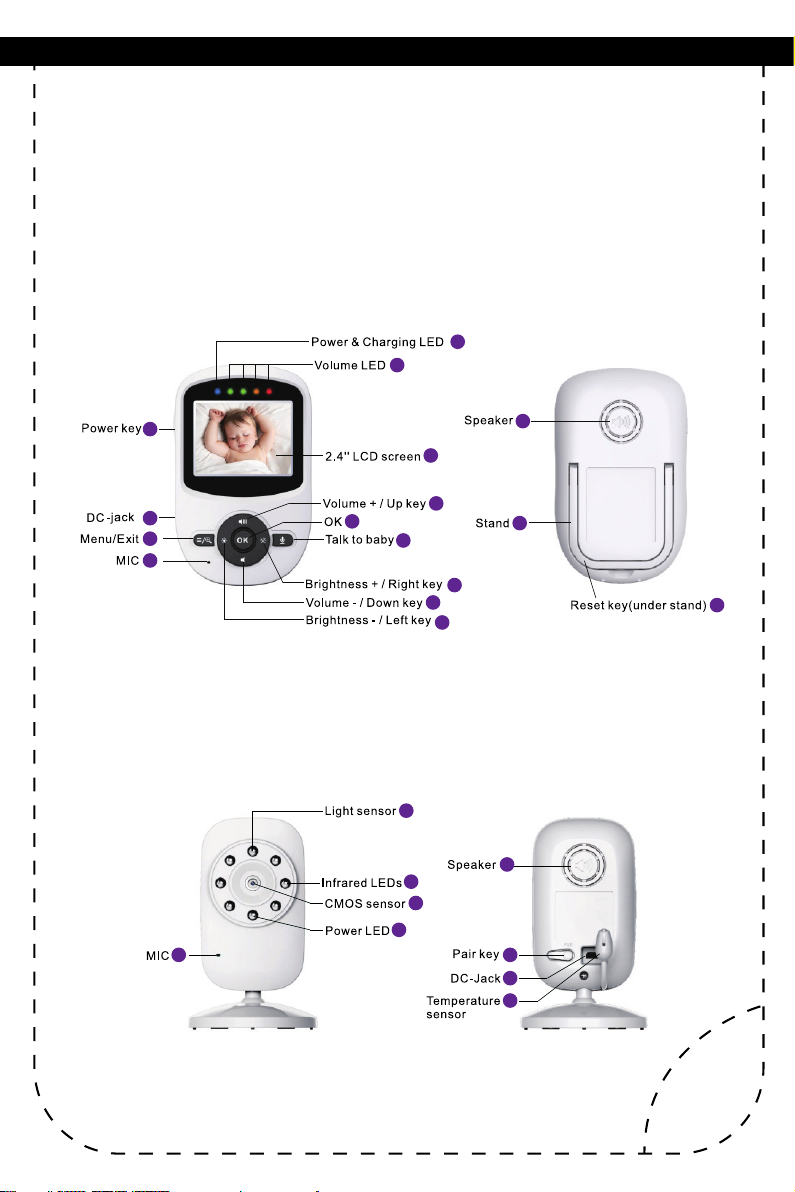
• Connect the adapter plug into the connector socket (DC-Jack) on the back of the Baby Unit (24).
• Plug the AC adapter into the wall outlet.
• Power LED (2) will light up and the unit will turn on automatically once the adapter is connected to the
wall outlet.
4.2 Turning ON the Parent Unit
* Only use the AC adapter included in this package.
* The parent unit is supplied with a built-in rechargeable Li-ion battery (3.7V 950mAh). Whenever
possible, keep the Parent Unit plugged in to keep the battery charged.
• Connect the adapter plug into the DC-jack on the left side of the Parent Unit (13).
• Plug the AC adapter into the wall outlet.
• Press and hold the power key on the top left side of the Parent Unit;
• Once the Parent Unit is turned on, the power LED will light up and “Babysense Video”
image will display on the LCD.
4.3 Charging the Parent Unit
• Connect the power adapter to the Parent Unit (13);
• Plug the adapter into the wall outlet.
• Charging LED on the Parent Unit will light in RED (2).
• When unit is turned on, the charging LED will light in ORANGE and battery charging icon (changing
bars) will appear at the top right corner of the LCD screen.
• It takes about 8 hours to fully charge the battery.
• Full battery indicator (4 fixed bars) will appear at the top right corner of the LCD screen,
indicating the battery is fully charged.
Note: Before the first use or after a long product storage, it is recommended to fully charge the Parent
Unit battery prior to operating the monitor.
4.4 Set Up
• The Baby Unit should be placed at least 6 feet (2 meters) away from the baby's crib
on a flat surface. Alternatively, it can be wall-mounted.
• Never place the Baby Unit inside the crib, bed or playpen.
• Make sure the unit, cords and mains adaptor are out of reach of the baby and other
young children. To avoid a strangulation hazard, the power cords should be
secured and never be hung on or near the baby.
10. Technical Data
Frequency
Operating Range
Power Adapter
LCD Screen
Rechargeable battery (built-in in
Parent Unit)
Operating time with battery fully charged
(Parent Unit)
* It takes about 8hours to fully charge
the battery.
2.4GHz FHSS
Up to 960 feet (open space)
Input: 100-240VAC 50 / 60Hz, 200mA Max;
Output: 5V, 600mA;
2.4” TFT LCD
Model: YB 503450
3.7V, 950 mAh, 3.515Wh
Approx. up to 12 hours (ECO on)
Transimitting Power 18dBm Max
Image sensor type 1/6.5 " Color CMOS
IR LED Type 940nm
Operation Environment Indoor use only; Temperature: 32-104 °F
Humidity: 5% to 90% rh. (relative humidity)