Backyard Pro 554C3H830 LP User manual

1
LP GAS COMMERCIAL
OUTDOOR GRILL
USER MANUAL
WARNING
03/2016#554C3H830 LP, #554C3H830DELLP, #554C3H860 LP, #554C3H860DELLP
DANGER:
DO NOT use gas grill for indoor cooking or heang.
TOXIC fumes can accumulate and cause asphyxiaon.
Do not use in or on boats or recreaonal vehicles.
PROP 65 WARNING:
Chemicals known the the state of California to cause cancer,
birth defects or other reproducve harm are created by the
combusble propane.
WARNING:
Improper installaon, adjustment, alteraon, service, or
maintenance could cause injury or property damage. Read
the installaon, operaon, and maintenance instrucons
thoroughly.
Failure to follow these instrucons could result in re or
explosion that could cause property damage, personal injury
or death.
SAVE THESE INSTRUCTIONS FOR FUTURE REFERENCE. IF YOU
ARE ASSEMBLING THIS UNIT FOR SOMEONE ELSE, GIVE THIS
MANUAL TO HIM OR HER TO SAVE FOR FUTURE REFERENCE.


2
Warnings
DANGER
WARNING
IF YOU SMELL GAS:
Shut o gas to the appliance.
Exnguish any open ame.
Open lid.
If odor connues, keep away from the appliance and immediately call your
gas supplier or your re department.
1. Do not store or use gasoline or other ammable liquids or vapors in the
vicinity of this or any other appliance.
2. An LP cylinder not connected for use shall not be stored in the vicinity of
this or any other appliance.
WARNING
FOR YOUR SAFETY
1. DO NOT store or use gasoline or any other ammable vapors and liquids within
25 feet (8m) of this or any other appliance.
2. When cooking with oil/grease, do not allow the oil/grease to exceed 350 °F
(177°C). Do not store or use extra cooking oil in the vicinity of this or any other
appliance.
3. An LP Cylinder not connected for use should be stored a minimum of 10 feet
(3m) away from this or any other appliance. Never ll the cylinder beyond 80
percent full. If the above informaon not followed exactly, a re causing death or
serious injury may occur.

3
FOR YOUR SAFETY
NOTE: The use and installaon of this product must conform to local codes. In absence of local codes,
use the Naonal Fuel Gas Code, ANSI Z223.1/NFPA54, Natural Gas and Propane Installaon Code, CSA
B149.1, or Propane Storage and Handling Code, B149.2.
IMPORTANT NOTICE: Read all instrucons prior to assembly and use.
Read and understand all warnings and precauons prior to operang your grill.
CAUTION:
1. This grill is for use with propane gas only (propane gas cylinder not included).
2. Never aempt to aach this grill to the self-contained propane system of a camper trailer,
motor home or house.
3. Never use charcoal or lighter uid with the gas grill.
4. Do not use gasoline, kerosene or alcohol for lighng. The LP-gas supply cylinder must be
constructed and marked in accordance with the specicaons for propane gas cylinders of the
U.S. Department of Transportaon (DOT) CFR 49. Or the Naonal Standard of Canade, CAN/
CSA-B339, Cylinder, Spheres and Tubes for Transportaon of Dangerous Goods. This grill is not
intended to be used in or installed on recreaon vehicles and/or boats.
5. Do not aempt to move the grill while it is lit.
6. Do not use the grill unless it is completely assembled and all parts are securely fastened and
ghtened.
7. Keep all combusble items and surfaces at least 24 inches (60.9cm) away from grill at all
mes.
8. DO NOT use this grill or any gas product near unprotected combusble construcons.
9. Do not use in an explosive atmosphere. Keep grill area clear and free from combusble
materials, gasoline and other ammable vapors and liquids.
10. Do not touch metal parts of grill unl it has completely cooled (about 45 minutes) to avoid
burns, unless you are wearing protecve gear (BBQ miens, pot holders, etc.)
11. Do not alter this grill in any manner.
12. Clean and inspect the hose before each use. If there is evidence of abrasion, wear, cuts,
or leaks, the hose must be replaced prior to operang the appliance. The replacement hose
assembly will be that which is specied by the manufacturer.
13. Move gas hoses as far away as possible from hot surfaces and dripping hot grease.
14. Never keep a lled container in a hot car or car trunk. Heat will cause the gas pressure to
increase, which may open the relief valve and allow gas to escape.
15. Keep the grill’s valve compartment, burners and circulang air passages clean. Inspect the
grill before each use.
Warnings

4
Warnings
WARNING:
1. This grill is for outside use only, and should not be used in a building, garage or any other
enclosed area.
2. The use of alcohol, prescripon or non-prescripon drugs may impair the operator’s ability
to properly assemble or safely operate the grill.
3. Always open grill lid slowly and carefully as heat and steam trapped within the grill can burn
you severely.
4. Always place your grill on a hard, level surface far away from combusbles. An asphalt or
blacktop surface may not be acceptable for this purpose.
5. Do not leave a lit grill unaended. Keep children and pets away from the grill at all mes.
6. Do not place this grill on any type of tabletop surface.
7. Do not use the grill in high winds.
DANGER:
Liquid propane gas is ammable and hazardous if handled improperly. Know its characteriscs
before using any propane product.
• Propane Characteriscs: Flammable, explosive under pressure, heavier than air and seles in
pools and low areas.
• In its natural state, propane has no odor. For your safety, an odorant has been added.
• Contact with propane can cause freeze burns to skin.
• This grill is shipped from the factory for propane gas use only.
• Never use a propane cylinder with a damaged body, valve, collar or foong.
• Dented or rusted propane cylinders may be hazardous and should be checked by your
propane gas supplier.

5
Your new Backyard Pro Grill has been designed and manufactured to high quality standards. It will
provide you with many years of enjoyment with a minimal amount of maintenance. Please keep in
mind the following FOR YOUR SAFETY.
OPERATION
1. Your gas grill requires reasonable care during operaon. It will be hot during cooking and cleaning.
You should never leave the grill unaended or move the grill when in use.
2. Children should never use your gas grill. Keep younger children and pets away when in use.
3. Only use your gas grill outside in a well-venlated area. Never use indoors in any building, garage,
shed, or under any type of ammable canopy or overhang.
4. Ensure your grill is on level ground and the locking casters are locked before use.
5. Turn all gas valves o should the burners go out when cooking.
6. Do not lean over the grill or touch the edges of the rebox, wind screen or griddle top when in use.
7. Turn the burners o, and shut o the LP cylinder should a grease re occur.
8. Do not obstruct the ow of combuson and venlaon air to this grill.
9. Keep the outdoor cooking gas appliance area clear and free from combusble materials, gasoline,
and other ammable vapors and liquids.
10. Keep the venlaon openings of the cylinder enclosure free and clear from debris.
11. Do not put a barbecue cover or other ammable material in the storage area of this grill.
12. Do not use charcoal briquees, lava rock, or any type of ceramic product in the gas secon of this
grill.
13. Do not install or use on or in a recreaonal vehicle and/or boats.
LP Gas and Cylinder Informaon
Your new gas grill operates on LP (Liquid Petroleum) Gas. It is odorless, colorless, and non-toxic when
produced. You can smell LP gas as it has been given an odor similar to roen cabbage for your safety.
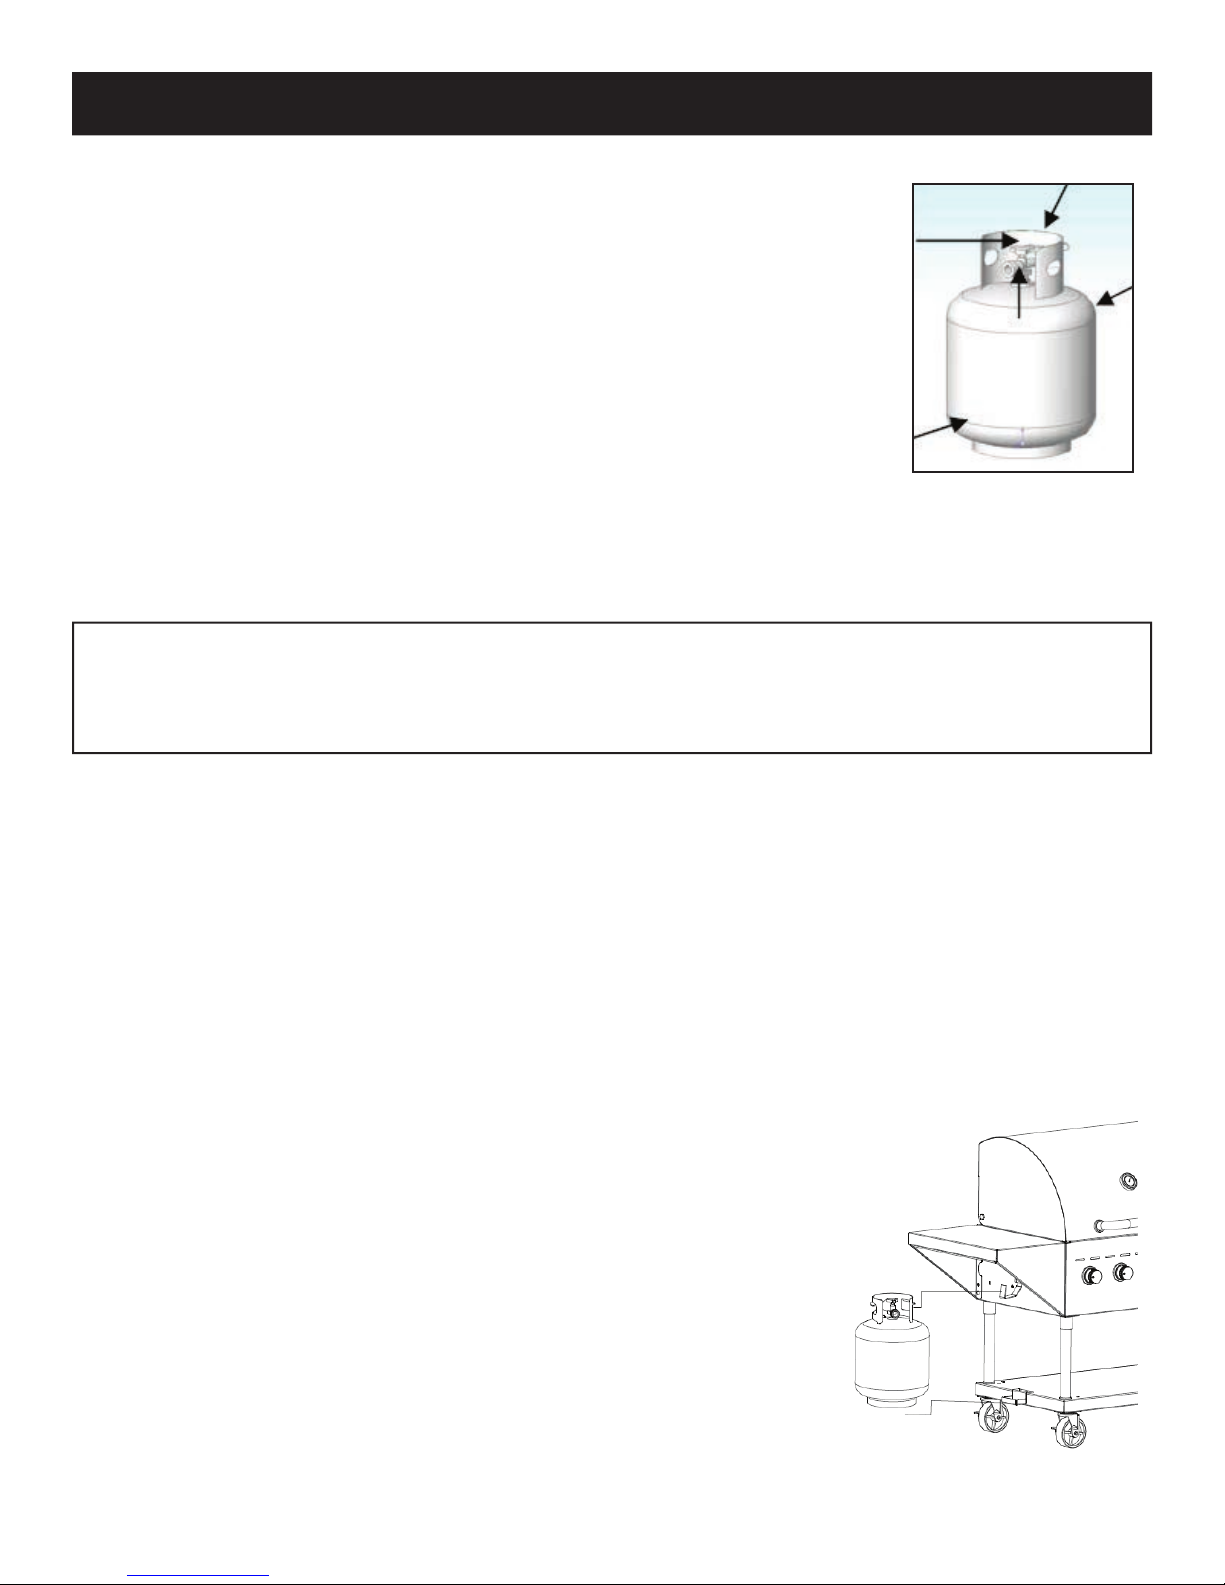
Your grill uses the newest and safest LP Gas Cylinder.
1. O.P.D. (Overll Protecon Device) – prevents accidental gas leaks
caused by overlling of the tank. Each tank contains a oat that
closes the input valve when the tank is 80% full. This allows room
for the LP gas to expand in hot temperatures. A triangular hand wheel
disnguishes this type of tank.
2. O.C.C.1 Type 1 Quick Connect Valve – provides fast tank hook-ups and
requires only to be ghtened by hand.
TRANSPORTATION AND STORAGE
1. The cylinder used must include a collar to protect the cylinder valve.
2. Do not store a spare LP-gas cylinder under or near this appliance.
3. Never ll the cylinder beyond 80 percent full;
4. If the informaon in “2” and “ 3” is not follow exactly, a re
Causing death or serious injury may occur.
5. Always transport in an upright posion.
6. Do not smoke when transporng your cylinder.
7. Place dust cap on cylinder valve outlet whenever the cylinder is not in use.
Only install the type of dust cap on the cylinder valve outlet that is provided
with the cylinder valve.
Other types of cap or plugs may result in leakage of propane.
General Informaon and Instrucons
Triangular hand wheel
Dust cap

6
CYLINDER SPECIFICATIONS
When purchasing or exchanging a cylinder for your gas grill, it must be constructed and marked in
accordance with the specicaons for LP gas cylinders of the U.S. Department of Transportaon (DOT)
or the Naonal Standard of Canada, CAN/CSA-B339 Cylinders, Spheres and Tubes for Transportaon
of Dangerous Goods; and Commission, as applicable; and provided with a listed over-lling prevenon
device (OPD), and provided with a cylinder connecon device compable with the connecon for
outdoor cooking appliances.
Provide with a listed overlling prevenon device.
Provided with a cylinder connecon device compable with the connecon for outdoor cooking
appliances
The cylinder must also be equipped with:
A shut-o valve terminang in a Type 1 gas cylinder valve outlet,
A Type 1 valve that prevents gas ow unl a posive seal is obtained,
An arrangement for vapor withdrawal,
A collar to protect the cylinder shut-o valve.
A safety relief device having direct communicaon with the vapor space of the cylinder,
A listed over-lling prevenon device (OPD)
LP GAS CYLINDER (NOT SUPPLIED WITH THIS GRILL)
The LP (Liquid Propane) gas cylinder specically designed to be used with this grill must have a 20 lb.
(9.1 kg) capacity incorporang a Type 1 cylinder valve and an over-lling protecon device (OPD).
This grill is designed to t Worthington, Manchester or SMPC brand 20 lb. (9.1 kg) cylinders. Other
brand DOT cylinders may t this grill if the cylinder has similar dimensions of the top and boom rings.
DO NOT connect this grill to an exisng #510 POL cylinder valve with Le Hand threads. The Type 1
valve can be idened with the large external threads on the valve outlet.
DO NOT connect to a propane cylinder exceeding this capacity.
DO NOT connect to a cylinder that uses any other type of valve connecon device.
Other cylinders may be acceptable for use with the appliance provided they are compable with the
appliance retenon means and accompanied by illustraon depicng the cylinder mounted to the
appliance ulizing the cylinder retenon means and the point of contact between the cylinder and the
retenon means
General Informaon and Instrucons
WARNING:
A frosty cylinder valve indicates possible gas overll.
Close the LP valve and call your dealer immediately.

7
CAUTION:
The gas pressure regulator provided with this outdoor cooking appliance must be used.
This regulator is set for an outlet pressure of 11 inches water column.
LP CYLINDER LEAK TEST
A leak test should be done each me a cylinder is relled or exchanged. Do not
smoke or use any type of ammable material in the area during this leak test.
Do not use an open ame to check for leaks.
1. Test outside in a well venlated area.
2. Use a paintbrush and a soluon of 50% liquid soap and 50% water.
Do not use cleaning agents and they can damage the fuel supply parts.
3. Brush liquid onto areas highlighted with arrows.
4. Growing bubbles indicate a leak.
TO CONNECT THE CYLINDER TO THE REGULATOR HOSE
1.Be sure the LP cylinder is “OFF” by turning the hand wheel clockwise
unl it stops.
2. Place the cylinder on the hook beside of body with the valve facing
outward. See Assembly Instrucons to secure.
3. Be sure all burner controls are turned to the “O” posion.
4. Remove the safety cap from the from the cylinder valve.
5. Center the nipple of the regulator into the cylinder valve
6. Turn the black nut clockwise unl it stops.
Hand Tighten Only. Do Not Use A Wrench
Regulator and Cylinder Connecons
Your regulator is equipped with a Q.C.C. Type 1 quick connect system. It will not allow gas to ow
unl a posive seal has been made. It has a thermal element that will shut o the gas ow if the
temperature reaches 240 degrees F (115 degrees C). It also has a ow-liming device that will restrict
the ow of gas to 10 cubic feet per hour (0.28 cubic meters per hour).
Before each use, check the gas hose for excessive abrasion or wear, or cuts. Replace a hose assembly
showing those signs with the hose assembly specied in the p arts list before using the grill
General Informaon and Instrucons

8
WARNING:
1. Do not connect this grill to any unregulated sources of propane.
2. Before each use, check the gas hose for excessive abrasion or wear, or cuts. Replace
a hose assembly showing those signs with the hose assembly specied in the parts list
before using the grill.
3. Always perform the Leak Test listed below before using your grill for the rst
me, if the cylinder has been changed, any gas components have been changed, the
regulator ow-liming device has been acvated, or aer a long period of non-use.
4. Do not aempt to connect this grill to the LP system of a motor home or trailer.
LEAK TESTING THE REGULATOR, VALVES, HOSES AND CONNECTIONS
1. Ensure the LP cylinder valve and all burners are “O”.
2. Ensure the LP cylinder is connected to the regulator.
3. If the informaon in1 & 2 is not followed exactly, a re causing death or serious injury may occur.
4. Mix up a soluon of 50% water and 50% liquid dish soap. Do not use any household cleaner soluon.
5. Open the LP tank valve by turning the hand wheel counterclockwise one turn. If you hear a rushing
sound, turn the gas o immediately. In that case, there could be a leak at the connecon. Reconnect
the cylinder to the regulator.
6. Spray or brush on the soluon covering the following areas: regulator and cylinder connecon, gas
hose connecons to the regulator, all gas hoses, all gas hose connecons to the burners including the
main and side burners.
7. Growing bubbles on any of the parts and connecons listed above indicate a gas leak. Immediately
shut o the LP tank valve by turning the valve clockwise. Reghten the connecons or order
replacement parts as needed. Connue to test as necessary unl no leaks are detected.
8. Close the LP tank valve by turning the hand wheel clockwise.
General Informaon and Instrucons

9
WARNING:
1. DO NOT USE THE GRILL if you cannot stop the leaks. Be sure the LP cylinder
valve is closed. If the LP cylinder is sll leaking, contact your LP dealer or local re
department.
2. Do not use any match or open ame, or smoke, during leak tesng.
3. Do not light a burner during leak tesng.
4. The replacement hose assembly must be the one idened.
FOR YOUR SAFETY
1. Minimum clearance from sides and back of unit to adjacent combusble
construcon below top of unit, 36 inches (91 cm) from sides and 36 inches (91 cm)
from back.
2. Do not locate this outdoor cooking gas appliance under overhead-unprotected
combusble surfaces.
WARNING
1. Do not use this grill in any enclosed area, garage, shed, or under any type of
overhead structure or canopy.
2. Operate this grill only in a well venlated area.
Do not face the grill directly into the wind.
Keep any electrical supply cord and the fuel supply hose away from any heated
surfaces and water.
APARTMENT
RESIDENTS
Check with your apartment
manager regarding your
regulaons for grills.
General Informaon and Instrucons

10
WARNING:
1. Read instrucons before lighng.
2. If ignion does not occur in 5 seconds, turn the burner control(s) o, wait 5 minutes
and repeat the lighng procedure.
General Informaon and Instrucons
LIGHTING
Always visually inspect your grill before lighng. Replace any hoses that are frayed or cracked before
lighng your grill. Look for anything that may be blocking spaces for venlaon and remove. Aer
lighng, always check the ame to ensure you have a good ame all along each burner. If not able to
light, or the ame is not even along the enre burner(s), then see the Trouble Shoong secon.
LIGHTING THE MAIN BURNERS USING ELECTRONIC IGNITION
1. Ensure all burner control knobs are in the “O” posion.
2. Turn on the LP gas by turning the hand wheel on the cylinder valve.
3. Turn one burner control knob marked with an igniter ame “” to “High”.
4. Depress the electronic ignion buon and hold down. You should hear a clicking sound, which
shows the electronic ignion is working.
5. If the burner does not light within 5 seconds, turn the burner control knob to “O”. Wait 5 minutes
for the gas to clear, and repeat the above procedure. Use the Manual direcons if it sll will not light.
6. When lit, turn the control knob to the desired seng.
MANUALLY LIGHTING THE BURNERS WITH THE MATCH LIGHTING STICK
1. Ensure all burners are in the “O” posion.
2. Slowly turn on the gas at the LP tank valve if it is not already on.
3. Place a match in the Match Holder. This is located in the top center drawer of the grill cabinet
underneath the right main burner.
4. Use the holder to slide the lit match though the cooking grates and the front of the heat tent to the
le of the burner you wish to light.
5. Press and turn the burner control knob to “HI/LIGHT”. Connue to push in and hold up to 5 seconds
or unl the burner lights.
6. If the burner does not light within 5 seconds, turn the burner control knob to “O”. Wait 5 minutes
for gas to clear, and try again.
7. When lit, turn the control knob to the desired heat seng.
TURNING OFF YOUR GRILL
1. Turn o the gas supply at the LP tank by turning the valve clockwise.
2. Turn all burner control knobs to the “O” posion.

11
WARNING:
1. Do not clean any part of your barbecue grill in a self-cleaning oven.
2. Do not use oven cleaners, abrasive kitchen cleaners, cleaners that contain citrus
products, or mineral spirits.
3. Do not use any type of steel bristled brush.
4. Clean your grill regularly to prohibit grease build-ups and avoid a grease re or
excessive are-ups.
5. Always allow the grill to cool down prior to cleaning.
WARNING:
Small insects, such as spiders, are able to access the burner tubes. Somemes they will
build nests or spin webs. In either case, this can block or reduce the amount of gas owing
through the burner. You will usually see a smaller ame, or a ame that is mostly yellow
rather than blue, coming from the burner when this happens. Other signs include the grill
not heang evenly, not reaching temperature, or burners not igning. In cases with severe
blockage, this can cause the ame to burn backwards, and outside of the burner tubes,
which can cause damage to your grill and/or personal injury. IMMEDIATELY SHUT OFF THE
FLOW OF LP GAS AT THE CYLINDER BY TURNING THE HAND WHEEL CLOCKWISE SHOULD
THIS HAPPEN. Wait for the grill to cool, and then clean all burners.
General Informaon and Instrucons
CLEANING YOUR GRILL
STAINLESS STEEL
Clean with mulpurpose, low abrasive, non-phosphorous metal or stainless steel polish and a so
cloth. Always polish in the direcon of the lines. Do not allow grease and dirt to accumulate. In
addion, the following products and naturally occurring substances in the outdoors will damage
all stainless steel nishes. Use cauon so that they do not come in contact with your Gas Grill.
Immediately wash them o and dry the stainless steel should they ever come in contact with your Gas
Grill. This includes, but is not limited to, Pool Chemicals (chlorine and bromine), Lawn Ferlizer, Ice
Melng Salts, Sea or Salt Water, Urine, Bird Droppings, and Tree Sap.
OTHER EXTERIOR SURFACES
Wash with a mild dish soap and warm water. A cloth, so brush, or plasc cleaning pad can be used.
Rinse thoroughly and wipe dry.
COOKING GRATES AND HEAT DIFFUSERS
Use a s brass brush. Wash with warm water and mild dish soap as needed, rinse, and dry.
GREASE PAN AND TRAY
Check aer each use. Remove and empty the Tray when half full. Remove and clean the Pan as grease
builds up. Both can be washed with warm water and mild dish soap.
BURNERS
We recommend you clean your burners at least twice a year, or before use if the grill has not been
used in over one month.

12
CLEANING THE BURNERS
1. Ensure the LP gas is turned o at the LP cylinder.
2. Remove the cooking grates, ame tamer, and grease tray.
3. Remove the coer pins located underneath the back end of each burner.
4. Li each burner up and out.
5. Clean the inside of the burner using a s wire. A straightened coat hanger is one suggested tool. An
alternave way to clean the inside of the burner is using compressed air. Always wear eye protecon if
using this method. Never enlarge the burner ports during cleaning.
6. Brush the outer surface of the burner.
7. Ensure all ports (holes) are free of all debris
8. Inspect the burner. Replace if any cracks or enlarged holes.
9. Reinstall the burners making sure the burners seat over the valves as shown in the gure to the right.
10. Secure the back of the burners to the rebox with the coer pins.
11. Replace the grease tray, ame tamer, and cooking grates.
12. Perform a Leak Test described earlier in this guide.
BURNER FLAMES
Always inspect the burner ame aer lighng. A good ame should be primarily blue with a yellow
p and have a minimal amount of noise. Some yellow ps are OK if under one inch. New burners
somemes have oil residue, which will cause yellow ame when burning o. Variaons in gas supply,
altude, weather, and other factors can all impact burner performance. Older grills can also show
more yellow ame as food deposits, oils, and fats can build up.
ALWAYS
1. Keep the grilling area clear and free from combusble materials, gasoline and other ammable
vapors and liquids.
2. Do not obstruct the ow of combuson and venlaon air.
3. Keep the venlaon openings of the cylinder enclosure free and clear from debris.
GRILL STORAGE
1. Clean your grill before storage.
2. Storage of a gas grill indoors is permissible only if the cylinder is disconnected and removed
from the gas grill.
3. Cover the grill.
4. Perform a Leak Test before use aer storage.
WARNING:
Properly locang the burner with respect to the orice is vital for safety.
General Informaon and Instrucons

13
Grilling with Your New Grill
GRILLING WITH YOUR NEW GRILL
Welcome to the world of grilling. Whether you’re already an established griller, or just starng
out, your new grill should bring you much enjoyment and sasfacon, to say nothing of some
phenomenal meals. We encourage you to experiment to nd your own favorite recipes.
The control panel is labeled “HI/LIGHT”, “LOW”, and “OFF” for each burner control knob. Simply
push in on the temperature control knobs and turn to the desired heat seng. A thermometer
is placed in the hood so that you can see the cooking temperature inside the grill.
The heat diusers are designed to help evenly distribute heat throughout the grill. They are also
designed to catch and smoke the right amount of drippings, adding more avors to your meal.
DIRECT VS. INDIRECT COOKING
Food cooked on the grill is either done using direct or indirect cooking. Direct cooking is when
the food is cooked directly over the heat. Food is placed in-between the burners for indirect
cooking.
DIRECT – used for preheang and searing.
Use direct cooking to sear meats. This helps to keep food moist by locking in juices. Some food,
such as steak, is rst seared using Direct cooking, and then nished cooking using the Indirect
method. This is generally used for quicker cooking foods. Preheat the grill to 500°F (260°C). You
can shut o one or more burners if you do not need to use the enre grilling surface once you
reach over 500°F (260°C). You can also use a medium high heat of 400°F or more by turning
the burners down slightly. Place the food directly over the heat source. Remain vigilant when
grilling using this method, as it’s easy to overcook.
INDIRECT – how most food is cooked on a gas grill
Indirect cooking is used for foods that take longer to cook, including large cuts of meat such
as roasts. It’s also used for cooking more delicate food that can dry out quickly such as sh
and poultry, for faer foods to reduce are-ups, and when grilling using a roasng pan or
aluminum foil. Preheat the grill to 500°F (260°C). Then turn some burners o, and others to
medium to low depending on the temperature you want to maintain.
Generally, turn the center burner o for a 3-burner model and the 2 inside burners o on a
4-burner model.
Grills with more than 4 burners will vary depending on what you are cooking. Generally, you
want to keep the temperature around 350°F. Do not place the food directly over any burners
when using this grilling method.

14
Grilling with Your New Grill
GRILLING TIPS AND TRICKS
1. Always “Preheat” your grill before cooking. Light all main burners, turn to “HI”, and close the
lid unl the thermometer reads over 500°F (260°C), which should be 4 minutes. Then adjust the
burner control knobs to the proper temperature. Note that no preheang is necessary for the
side burner.
2. The thermometer measures the temperature at the top of the lid. The temperature down by
the cooking grates is generally somewhat warmer.
3. Mother Nature can impact your grilling mes. Allow more cooking me for cold, wind, and
higher altudes.
We recommend you place the grill in an area protected from much wind.
4. Trim away any excess fat from meat to reduce are-ups.
5. Keep similar size porons together so that they cook more evenly.
6. Generally speaking, the more food on the grill, the longer the cooking me.
7. Be aware when using the Direct cooking method, as food can easily become overcooked,
burned, or dry out. Food may require more turning, or somemes, may need to be moved o
the ame.
8. Larger pieces of meat generally require more cooking me per pound than smaller pieces of
meat.
9. If a major are-up, or too many are-ups occur, turn o the gas, move the food away from
the are-up, and close the hood. Restart the grill once the are-up has died down.
10. Turn foods infrequently. Generally, only turn a steak once during cooking.
11. Use tongs rather than a fork when turning the food on the grill. Less juice will be lost that
way.
FOOD SAFETY
1. Always use safe food handling and preparaon when using this grill.
2. Wash all poultry, seafood, and vegetables before cooking.
3. Use separate plaers, plates, and utensils for uncooked and cooked foods.
4. Leave all meat, poultry, and seafood in the refrigerator unl ready to cook.
5. Use a meat thermometer to ensure foods are adequately cooked.

15
Trouble Shoong Guide
TROUBLE SHOOTING GUIDE
BURNER WILL NOT LIGHT
1. Gas supply is turned o. Turn on gas at LP tank.
2. Out of propane. Check to be sure you sll have propane in your tank.
3. Regulator is not properly seated into the tank valve. Remove and reaach. Hand ghten only.
4. Crimped fuel supply hose. Inspect and straighten.
5. Regulator failure or damaged hose. Order replacement part and replace.
6. Make sure you can hear the electronic igniter clicking. If not, replace the baery with an “AA” size.
Inspect the electrode to be sure it’s not coated in grease or dirt. If so, clean with rubbing alcohol.
Check the distance from the electrode p to the burner. The p of the electrode should be 1/8” to
¼” from the main burner and 1/8” to 3/16” from the side burner. Adjust if necessary. Inspect the
electrodes to be sure they are not cracked or broken. If so, order replacement parts and replace.
7. Blockage in the gas system. Inspect the burners to be sure insects, spider webs, etc do not block
them.
Clean if necessary. Inspect under the control panel to be sure the burners are aligned properly with the
valves.
IRREGULAR FLAME OR YELLOW FLAME
1. New burner may have residual oil, which will burn o.
2. Tubes in burners are blocked. Remove and clean.
3. Burners have a high grease or dirt build-up. Remove and clean.
4. Burners are not aligned properly with the valves. Inspect under the control panel.
SUDDEN DROP IN GAS PRESSURE OR FLAMES BLOW OUT
1. Out of gas. Check to be sure you sll have propane in your tank.
2. Your excessive fuel ow valve has tripped, thereby reducing the ow of gas. Turn o all burners, wait
30 seconds, and relight grill. If problem persists, turn o all burners. Disconnect regulator from tank.
Wait 10 minutes. Reconnect regulator and leak test. Slowly turn on LP tank and relight grill. Other ways
the ow liming device can be acvated include
a. A ruptured gas hose. Inspect, perform a leak test, and replace as necessary.
b. Opening the control knobs before turning on the LP gas at the tank. Turn on the gas at
the LP tank rst before turning on a control knob to light.
c. Improper purging of tank before it was lled. See your LP gas dealer.
3. Wind could be blowing out your burners. Turn front of grill to face wind or move out of the wind.
EXCESSIVE FLARE-UPS
1. Flame tamer, inside of grill, grates, and burners need to be cleaned.
2. Grease tray needs to be cleaned and emped.
3. Using too high of heat to cook. Reduce control knob seng.
4. Direct cooking method will produce more are-ups than indirect. If using direct method, try using
indirect
FIRE BEHIND THE CONTROL PANEL
Immediately shut o LP tank valve and allow grill to cool.
1.) Check burners for obstrucons and clean.
2.) Inspect under the control panel to be sure the burners are aligned properly with the valves.
3.) Gas is leaking from a faulty connecon or damaged hose. Perform a leak test and inspect for leaks.
Tighten or replace parts as necessary.

16
Frequently Asked Quesons
FREQUENTLY ASKED QUESTIONS
Can I convert my gas grill from one fuel source to another?
No. Your gas grill is manufactured to specic standards developed by CSA and ANSI for your
safety and grilling performance for either LP or Natural Gas. We do not oer conversion kits nor
do we recommend you change the fuel type.
How are your grills tested?
Our grills are tested and cered by CSA, a leading worldwide independent tesng center, to
meet or exceed various CSA and ANSI standards along with various performance standards.
The burners and gas line in each grill are also individually tested when each grill comes o the
assembly line just prior to packaging. Each burner is ignited for this test.
What is the humming noise I somemes here coming from my regulator?
The humming sound you can hear is just gas owing through the regulator. There is no need to
be concerned with a low volume of noise.
My grill has a low ame on some burners, or some burners will not light at all.
What can cause this?
This can be caused by the regulator’s ow liming device, which is generated by a sudden
change in pressure. Opening the tank valve too quickly can cause this. In this case, close the
LP tank valve and disconnect from the regulator. Let it stand for 10 minutes. Reconnect the
regulator to the LP tank.
Open the grill lid. Slowly open the LP tank valve. Follow the burner lighng procedures and light
the burner furthest from the LP tank. Connue to light the other burners as you move towards
the LP tank.
Can I use ceramic plates, briquees of any kind, or lava rocks?
No. Your grill is designed for use only with the heat diusers. Grease drips down on to the
diusers and is burned, creang steam and addional avor.
Other manuals for 554C3H830 LP
1
This manual suits for next models
3
Table of contents
Other Backyard Pro Grill manuals

Backyard Pro
Backyard Pro 554BP2D12 User manual

Backyard Pro
Backyard Pro 554PL2030 User manual

Backyard Pro
Backyard Pro 554SMOKR60KD User manual

Backyard Pro
Backyard Pro 554CHAR30 User manual

Backyard Pro
Backyard Pro 554LPG30RD User manual

Backyard Pro
Backyard Pro 554LPG30 User manual

Backyard Pro
Backyard Pro 554PL2040 User manual

Backyard Pro
Backyard Pro 554C3H860 LP User manual

Backyard Pro
Backyard Pro 554C3H830 LP User manual