manuals.online logo
Brands
  1. Home
  2. •
  3. Brands
  4. •
  5. BALCO
  6. •
  7. Personal Care Product
  8. •
  9. BALCO BE220407 User manual

BALCO BE220407 User manual

1. 1 x Contouring roller head
2. 1 x Facial roller handle
3. 1 x T-bar head
4. 1 x Velvet storage bag*
5. 1 x Activ Energy AA battery*
6. 1 x User guide*
*Not shown
Vibrating
SCULPTING
Roller
User Guide
Model: BE220407
Version 1.1
Safety Instructions Pars List
• This product is intended for domestic use only. It is not
intended for commercial, trade or industrial use.
• WARNING: Keep the appliance dry.
• Do not use while bathing or in the shower.
• Do not place or drop into water or other liquid.
• The battery should not be recharged.
• Please remove the exhausted batteries from the appliance
and safely dispose.
• If the appliance is to be stored unused for a long period, the
battery should be removed.
• Never shor-circuit the supply terminals of batteries.
• The supplier is not responsible for the end use of this product
including any improper use or when used for purposes that
are not speciied.
• This appliance is not intended for use by persons (including
children) with reduced physical, sensory or mental
capabilities, or lack of experience and knowledge, unless they
have been given supervision or instruction concerning use of
the appliance by a person responsible for their safety.
• Children should be supervised to ensure that they do not play
with the appliance.
• Cleaning and user maintenance shall not be made by children
without supervision.
1
2 3
Getting Stared
Remove any packaging material and labels before using
your LACURA Beauty® Vibrating Scultping Roller for the
irst time.
Do not use the appliance if any par has been damaged.
In case of damage, contact our Aer Sales Suppor line
for advice on a replacement or return. Damage caused
by misuse is not covered under warranty.
Adding Batteries
The battery comparment is in the
main body of the Vibrating Sculpting
Roller. To install/replace the battery
follow the below steps.
1. Remove the bottom base by
twisting counter clockwise until
it unscrews completely.
2. Inser 1 x AA battery. Either
negative or positive end going in
irst are both workable.
3. Twist the battery cover
clockwise until it is secure.
Turning On/Of
1. To turn on, rotate base counter
clockwise until vibration stars.
2. To turn of, rotate base
clockwise until vibration stops.
Turn on Turn of
Interchangeable Heads
The Vibrating Scultping Roller comes with two
interchangeable heads - contour roller & T-bar. To
change the head, follow the below steps.
1. Hold the body of the facial roller with a irm grip.
2. Unscrew the head counterclockwise until the head
is fully removed .
3. Replace with desired head and screw back on in a
clockwise motion until it is fully secure.
The contouring roller is designed to help stimulate
circulation, promote collagen production, and help
contour the face.
The T-bar helps target speciic areas to help reduce
puiness and reduce the appearance of ine lines and
wrinkles.
Both interchangeable heads can be placed in the fridge prior
to use. Placing the heads in the fridge before use will maximize
the cooling efect. Do not place the main body which contains
the battery in the fridge as low temperatures drains the
battery very quickly.
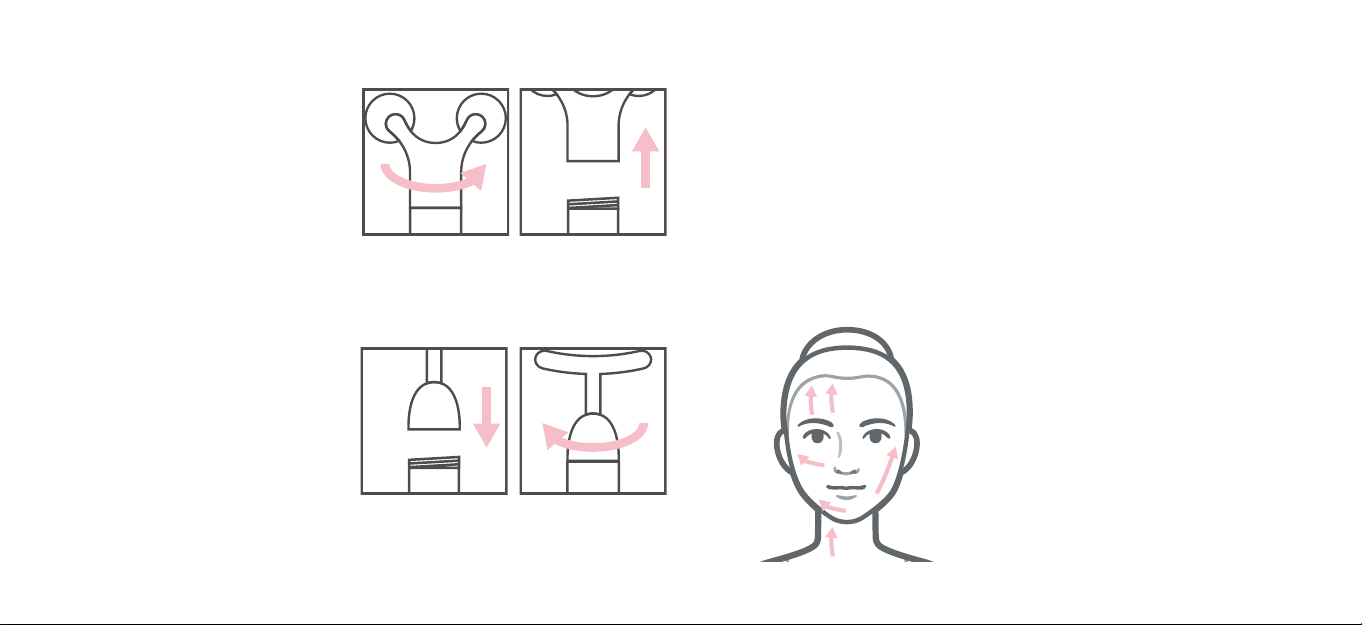
Operation
Using the Vibrating Sculpting Roller
A 10-minute Vibrating Roller session is like an intense
workout for your entire face. For optimal results use
morning and night for up to 10 minutes. Your skin will
begin to feel more toned, lied, sculpted, and refreshed.
Apply 1-2 drops of cleanser, serum or moisturiser to
each area of the face and spread evenly.
Follow the massage diagram. Use upward and outward
movements. Repeat in one direction for 8-12 strokes in
each area.
Tips for use
• Due to the high power and sonic vibrations we
recommend replacing the battery every 2 weeks or
so (based on daily usage, which we advise for best
results).
• If you feel your Vibrating Sculpting Roller vibration
frequency is getting weaker, then it is time to
replace the battery.
• While using the Sculpting Roller each day, your
skin might become pink/red, this is a result of the
increased circulation and blood low.
• For an extra relaxing routine, you can put your
Sculpting Roller heads in the fridge for 5-10
minutes, making the heads cold on contact with the
skin. This is perect in the mornings to reduce the
appearance of pufy eyes and cheeks.
• Do not put the main body of the Sculpting Roller in
the fridge as it contains a battery. Only refrigerate
the interchangeable heads.
Unscrew Remove
Attach Tighten

Popular Personal Care Product manuals by other brands

DC-Connex DCX-L201 user manual

DC-Connex

DC-Connex DCX-L201 user manual

MPVTruma MicroDrop CalimeroJet instruction manual

MPVTruma

MPVTruma MicroDrop CalimeroJet instruction manual

Bosch PHA230 instruction manual

Bosch

Bosch PHA230 instruction manual

Beautify 4000001 care guide

Beautify

Beautify 4000001 care guide

MEIYATI Pro Spa quick start guide

MEIYATI

MEIYATI Pro Spa quick start guide

Blossom LED M3 R24 installation guide

Blossom

Blossom LED M3 R24 installation guide

Philips HB875/01 user manual

Philips

Philips HB875/01 user manual

Orliman SITLIVE OSL3120 INSTRUCTIONS FOR USE AND PRESERVATION

Orliman

Orliman SITLIVE OSL3120 INSTRUCTIONS FOR USE AND PRESERVATION

GE T8 Basic service manual

GE

GE T8 Basic service manual

Pretika ST102 Instructions for use & warranty information

Pretika

Pretika ST102 Instructions for use & warranty information

Beurer FC 76 Instructions for use

Beurer

Beurer FC 76 Instructions for use

Pebble Grey 500.40.70-75 manual

Pebble Grey

Pebble Grey 500.40.70-75 manual

PUSH ortho quick start guide

PUSH

PUSH ortho quick start guide

Dermlite DL3N instructions

Dermlite

Dermlite DL3N instructions

DERMAPEN SEMI user manual

DERMAPEN

DERMAPEN SEMI user manual

Carex SunLite user guide

Carex

Carex SunLite user guide

Roper Rhodes Intense Installation & Aftercare Instructions

Roper Rhodes

Roper Rhodes Intense Installation & Aftercare Instructions

Interacoustics Titan IMP440 Setup & installation

Interacoustics

Interacoustics Titan IMP440 Setup & installation

manuals.online logo
manuals.online logoBrands
  • About & Mission
  • Contact us
  • Privacy Policy
  • Terms and Conditions

Copyright 2025 Manuals.Online. All Rights Reserved.