BALCO OU200233 User manual

Small Rooftop
Tent
Instruction Manual
Model: OU200233
Version 1.1

Small Rooop Tent
21300 663 907
After Sales Support
customercare@balcobrands.com
www.balcobrands.com
Model number: OU200233
11/2020
Warranty Note
Getting the most out of your Small Rooop Tent:
Read the entire manual
It will help you set up with ease
Visit www.balcobrands.com
We have additional suppor guides
Call Aer Sales Suppor -
Or email customercare@balcobrands.com - we’re always happy to help
Your Small Rooop Tent comes with a 1 year manufacturer’s warranty
Our goods come with guarantees that cannot be excluded under the Australian
Consumer Law. You are entitled to a replacement or refund for a major failure and
compensation for any other reasonably foreseeable loss or damage. You are also
entitled to have the goods repaired or replaced if the goods fail to be of acceptable
quality and the failure does not amount to a major failure.
If you experience any issues with this product or its perormance is not what you had
expected, please contact our friendly customer service team
It is likely that we can resolve problems for you via phone or email
We can be reached on:
Phone: 1300 663 907 (Mon - Fri; 8:30am - 6:00pm AEST)
Email: customercare@balcobrands.com
Web: www.balcobrands.com

Small Rooop Tent
3
1300 663 907
After Sales Support
customercare@balcobrands.com
www.balcobrands.com
Model number: OU200233
11/2020
Contents
Warnings & Notes 4
Maintenance 5
Pack Contents 6
Speciications 7
Operation 8
Unfolding 10
Folding Away 12

Small Rooop Tent
41300 663 907
After Sales Support
customercare@balcobrands.com
www.balcobrands.com
Model number: OU200233
11/2020
Warnings & Notes
1. Keep the small rooop tent windows open when folding.
2. Make sure nothing is le in the small rooop tent before folding, for example
sleeping bags, pillows, etc.
3. Do not put anything on the top of the small rooop tent when the tent is on the
car whether it is in use or not.
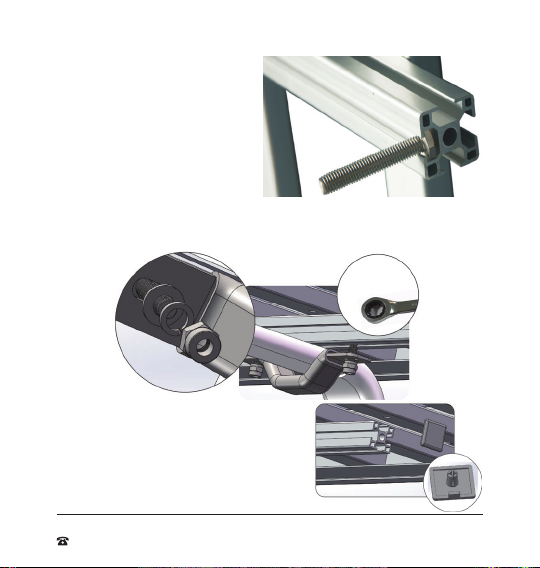
4. Please double check that the nuts that lock the bedframe together with the roof
racks are tightened aer installation and before driving.
5. Do not do strenuous exercise inside the tent.
6. Ensure the cover is closed and the buckle lock is securely fastened before driving!
Maximum driving speed 110KM per hour.
7. The water-resistant cover must be on and secured while driving.
8. Before using the ladder, make sure that all rungs have been locked.
9. Check all pars are in good working condition before using. Do not use damaged,
worn-out, chemically etched ladder.
10. Set the ladder on irm ground. Do not let it stand on one leg. Do not set it on
unsteady ground which as gangue, ice or snow in it without any anti-skid device.
11. Before climbing the ladder, please make sure the crosspieces are locked. Please
do not reach out your body far away. Otherwise you will lose your balance. Face
the ladder while climbing up and down, hold irmly the ladder with both hands.
Distribute your body weight on the middles of the rungs. Do not climb on a single
side. Do not jump from the ladder.
12. Do not pull out the top cross piece unless the ladder is fully extended, or it may
fall.
13. Do not press the contract switch when in use to avoid injury to person.
14. Make sure the ladder is clean. Keep it from grease, dir, snow, paint, and
chemicals.
15. Do not conduct any temporary maintenance on the ladder to damaged pars.
16. The bedframe and the ladder are all electric conductors, keep away from any
live pars.
17. There must be an angle of 75 degrees between the ground and the ladder when
in use.
18. To provide children with protection, do not leave the ladder standalone without
any attention.

Small Rooop Tent
5
1300 663 907
After Sales Support
customercare@balcobrands.com
www.balcobrands.com
Model number: OU200233
11/2020
19. When contracting, grasp the ladder rod by one hand, and press the le and right
switches of the lowest crosspieces. Do collapse the ladder down-top sequentially
and slowly. Caution to avoid hand injuries!
20. To extend the ladder, you need to pull out rungs bottom-up sequentially and lock
each rung carefully.
21. Before extending the ladder, make sure the ground is lat. To reduce the height,
please collapse the ladder irstly, and then extend it again to the height you want.
22. Do not use the tent and ladder in strong wind weather.
23. The design of the ladder only permits one person to use and max loading is
150kg.
Maintenance
1. Use a wet cloth to clean the tent – allow to dry fully before folding.
Warnings & Notes

Small Rooop Tent
61300 663 907
After Sales Support
customercare@balcobrands.com
www.balcobrands.com
Model number: OU200233
11/2020
Pack Contents
1. 1 x Small rooop tent - grey with orange
2. 1 x Telescopic ladder
3. 1 x Mattress
4. 1 x Tooling bag including:
a. 4 x U-shaped ixing plate
b. 8 x M8x50 bolt hexagon head
c. 8 x Plain washer
d. 8 x Spring washer
e. 8 x M8x30 bolt, hexagon head
f. 8 x Plain washer
g. 8 x Spring washer
h. 1 x Ratchet wrench 13mm
i. 1 x Hexagon bar wrench (allen key) 6mm
j. 10 x M8 self - locking nut
k. 4 x Inser with spring ball
l. 4 x M8x12 bolt, hexagon sockets
m. 4 x Spring washer
n. 4 x 30 x 30 plastic caps
o. 4 x Fillet
5. 1 x Manual

Small Rooop Tent
7
1300 663 907
After Sales Support
customercare@balcobrands.com
www.balcobrands.com
Model number: OU200233
11/2020
• Closed size: 130 x 105 x 32cm
• Open size: 221 x 130 x 102cm
• Weight: 51kg
• Aluminium frame
• Aluminium telescopic ladder
• Mattress: 7cm thick
• Fabric:
• Fly : 210D silver coated oxford fabric(waterproof : 3000mm & UV 50+)
• Inner body : 190gsm polycotton (waterproof : 2000mm)
• Outer cover: 610G PVC with net fabric
Speciications

Small Rooop Tent
81300 663 907
After Sales Support
customercare@balcobrands.com
www.balcobrands.com
Model number: OU200233
11/2020
• At least 2 people are needed to install a Balco Small Rooop Tent.
• The small rooop tent should be installed so the opening is over either passenger
or driver side doors. Do not install to open over the boot of the car.
1. Ensure that the roof racks have more then 3cm between the rack and the top of
the car.
Note: You will need a set of suitable roof racks and have them install on the car roof
before you install the tent. You will need to check with the manufacture of the roof
racks that they will be suitable for use with a rooop tent.
2. Remove the small rooop tent from the box and place on a clean surace. You
will need to have access to
the bottom of the tent. If you
can see the two connecting
tubes this is the bottom, if
not carefully turn the tent
over.
Note: We recommend that two
people turn the tent over, this will
make it easier and help prevent
any damage to the tent.
3. According to the direction
and size of the roof rack,
loosen the screws, and adjust
the direction and distance of
the two-connecting tubes on
the bottom of the tent, then
tighten the screws.
4. Place the tent on the roof of
the car and adjust the tent to
an appropriate position on
the car roof.
Note: Make sure that the boot
door can be opened without
hitting the tent.
Operation

Small Rooop Tent
9
1300 663 907
After Sales Support
customercare@balcobrands.com
www.balcobrands.com
Model number: OU200233
11/2020
5. Once you are happy with the
position, slide the M8 x 50 bolts to
the appropriate position from the
end of the connecting tube. There
needs to be one bolt on each side
of the rack.
Note: When the distance between the
roof rack and the car roof is less than
4cm the shor bolts (M8 x30) will need
to be used instead of the longer M8x50
bolts.
6. The bolts pass through the hole
of the u – shape ixing plate, lat washer then spring washer, then tighten the M8
self-locking nut using a ratchet wrench. This needs to be done on four corners,
respectively.
7. Inser the plastic cap (30x30cm) into the
end of the connecting tubes.
Operation

Small Rooop Tent
10 1300 663 907
After Sales Support
customercare@balcobrands.com
www.balcobrands.com
Model number: OU200233
11/2020
Unfolding
1. Take of the cover.
2. Hold irmly on the lowest
rung of the ladder and then
pull the ladder towards
yourself and away from the
car. This will star to open
the tent.
Operation

Small Rooop Tent
11
1300 663 907
After Sales Support
customercare@balcobrands.com
www.balcobrands.com
Model number: OU200233
11/2020
Operation
3. Once you have the ladder out, you will need to
extent the ladder completely. Secure the front of
the small rooop tent by sliding the pole into the
connector on each corner at the front. There is one
on each side.
4. You can adjust the height using the rungs at the top.
All rungs need to be fully extended and locked into
place before use. When in use the ladder should be
at an 75° angle.
5. Once inside the tent connect the roof poles to each end of the small rooop tent.

Small Rooop Tent
12 1300 663 907
After Sales Support
customercare@balcobrands.com
www.balcobrands.com
Model number: OU200233
11/2020
Folding Away
1. Make sure there is nothing le inside before you
star folding it away.
2. Open all of the windows and leave them open before
you star to fold away.
3. Release the roof poles at the front and inside the
tent.
4. Press and hold the button on the bottom of the
ladder. As you fold the ladder over
it will fold the small rooop tent.
5. Cover the small rooop tent with
the waterproof over aer folded,
make sure you hook the cover
around the bedframe, and it is
secure.
Operation

Aer Sales
Suppor Ph. 1300 663 907
customercare@balcobands.com
Table of contents
Other BALCO Tent manuals
Popular Tent manuals by other brands

Classic Accessories
Classic Accessories Storigami Instructions & Care

ABSCO SHEDS
ABSCO SHEDS CPSW33 manual

Mammoth Tents
Mammoth Tents Classic+ 240L Assembly guide

Bestway
Bestway Sierra RidgeAIR X6 owner's manual

Loap
Loap CAMPA 4 instruction manual

Sierra Designs
Sierra Designs METEOR 2 Pitching instructions