Baldor UM Series Installation instructions

Visit us on the web:
www.servo-repair.com
www.servorepair.ca
www.ferrocontrol.com
www.sandvikrepair.com
www.accuelectric.com
For 24/7 repair services :
USA: 1 (888) 932 - 9183
Canada: 1 (905) 829 -2505
Emergency After hours: 1 (416) 624 0386
Servicing USA and Canada
Scroll down to view your document!
Over 100 years cumulative experience
24 hour rush turnaround / technical support service
Established in 1993
The leading independent repairer of servo motors and drives in North America.

UM Series
DC Servo Control
SERVO DRIVE
Installation & Operating Manual
4/00 MN1213

Table of Contents
Table of Contents iMN1213
Section 1
General Information 1-1. . . . . . . . . . . . . . . . . . . . . . . . . . . . . . . . . . . . . . . . . . . . . . . . . . . . . . . . . . . . .
Limited Warranty 1-1. . . . . . . . . . . . . . . . . . . . . . . . . . . . . . . . . . . . . . . . . . . . . . . . . . . . . . . . . . . . .
Product Notice 1-2. . . . . . . . . . . . . . . . . . . . . . . . . . . . . . . . . . . . . . . . . . . . . . . . . . . . . . . . . . . . . . .
Safety Notice 1-2. . . . . . . . . . . . . . . . . . . . . . . . . . . . . . . . . . . . . . . . . . . . . . . . . . . . . . . . . . . . . . . .
Section 2
Product Overview 2-1. . . . . . . . . . . . . . . . . . . . . . . . . . . . . . . . . . . . . . . . . . . . . . . . . . . . . . . . . . . . . . .
Section 3
Receiving and Installation 3-1. . . . . . . . . . . . . . . . . . . . . . . . . . . . . . . . . . . . . . . . . . . . . . . . . . . . . . . .
Receiving & Inspection 3-1. . . . . . . . . . . . . . . . . . . . . . . . . . . . . . . . . . . . . . . . . . . . . . . . . . . . . . . .
Location Considerations 3-1. . . . . . . . . . . . . . . . . . . . . . . . . . . . . . . . . . . . . . . . . . . . . . . . . . . . . . .
Mechanical Installation 3-1. . . . . . . . . . . . . . . . . . . . . . . . . . . . . . . . . . . . . . . . . . . . . . . . . . . . . . . .
Electrical Installation 3-2. . . . . . . . . . . . . . . . . . . . . . . . . . . . . . . . . . . . . . . . . . . . . . . . . . . . . . . . . .
Electrical Noise Considerations 3-2. . . . . . . . . . . . . . . . . . . . . . . . . . . . . . . . . . . . . . . . . . . .
Input Power Transformer 3-4. . . . . . . . . . . . . . . . . . . . . . . . . . . . . . . . . . . . . . . . . . . . . . . . . .
Power Wiring 3-5. . . . . . . . . . . . . . . . . . . . . . . . . . . . . . . . . . . . . . . . . . . . . . . . . . . . . . . . . . . .
Signal Wiring 3-6. . . . . . . . . . . . . . . . . . . . . . . . . . . . . . . . . . . . . . . . . . . . . . . . . . . . . . . . . . . .
Optional Input Connections 3-8. . . . . . . . . . . . . . . . . . . . . . . . . . . . . . . . . . . . . . . . . . . . . . . .
Section 4
Adjustments and Start-Up 4-1. . . . . . . . . . . . . . . . . . . . . . . . . . . . . . . . . . . . . . . . . . . . . . . . . . . . . . . .
Overview 4-1. . . . . . . . . . . . . . . . . . . . . . . . . . . . . . . . . . . . . . . . . . . . . . . . . . . . . . . . . . . . . . . . . . .
Initial Settings 4-1. . . . . . . . . . . . . . . . . . . . . . . . . . . . . . . . . . . . . . . . . . . . . . . . . . . . . . . . . . . . . . .
Start–Up Velocity Mode 4-2. . . . . . . . . . . . . . . . . . . . . . . . . . . . . . . . . . . . . . . . . . . . . . . . . . . . . . .
Start–Up Torque Mode 4-3. . . . . . . . . . . . . . . . . . . . . . . . . . . . . . . . . . . . . . . . . . . . . . . . . . . . . . . .
Test Points 4-3. . . . . . . . . . . . . . . . . . . . . . . . . . . . . . . . . . . . . . . . . . . . . . . . . . . . . . . . . . . . . . . . . .
Section 5
Troubleshooting 5-1. . . . . . . . . . . . . . . . . . . . . . . . . . . . . . . . . . . . . . . . . . . . . . . . . . . . . . . . . . . . . . . .
Overview 5-1. . . . . . . . . . . . . . . . . . . . . . . . . . . . . . . . . . . . . . . . . . . . . . . . . . . . . . . . . . . . . . . . . . .
Maintenance 5-1. . . . . . . . . . . . . . . . . . . . . . . . . . . . . . . . . . . . . . . . . . . . . . . . . . . . . . . . . . . . . . . .
Initial Checks 5-1. . . . . . . . . . . . . . . . . . . . . . . . . . . . . . . . . . . . . . . . . . . . . . . . . . . . . . . . . . . . . . . .
Reset the Servo Control 5-1. . . . . . . . . . . . . . . . . . . . . . . . . . . . . . . . . . . . . . . . . . . . . . . . . . . . . . .
Section 6
Specifications & Product Data 6-1. . . . . . . . . . . . . . . . . . . . . . . . . . . . . . . . . . . . . . . . . . . . . . . . . . . .
Appendix A
Personality Module A-1. . . . . . . . . . . . . . . . . . . . . . . . . . . . . . . . . . . . . . . . . . . . . . . . . . . . . . . . . . . . . .
Jumper and Personality Module Settings A-1. . . . . . . . . . . . . . . . . . . . . . . . . . . . . . . . . . . . . . . .
Personality Module Current Settings A-1. . . . . . . . . . . . . . . . . . . . . . . . . . . . . . . . . . . . . . . .
Peak and Continuous Current Levels A-2. . . . . . . . . . . . . . . . . . . . . . . . . . . . . . . . . . . . . . .
Record of “Set Up” Configuration A-3. . . . . . . . . . . . . . . . . . . . . . . . . . . . . . . . . . . . . . . . . . . . . . .

ii Table of Contents MN1213

Section 1
General Information
General Information 1-1MN1213
Copyright Baldor 1999. All rights reserved.
This manual is copyrighted and all rights are reserved. This document may not, in
whole or in part, be copied or reproduced in any form without the prior written
consent of Baldor.
Baldor makes no representations or warranties with respect to the contents hereof
and specifically disclaims any implied warranties of fitness for any particular
purpose. The information in this document is subject to change without notice.
Baldor assumes no responsibility for any errors that may appear in this document.
Limited Warranty
For a period of two (2) years from the date of original purchase, BALDOR will repair or
replace without charge controls and accessories which our examination proves to be
defective in material or workmanship. This warranty is valid if the unit has not been
tampered with by unauthorized persons, misused, abused, or improperly installed and
has been used in accordance with the instructions and/or ratings supplied. This warranty
is in lieu of any other warranty or guarantee expressed or implied. BALDOR shall not be
held responsible for any expense (including installation and removal), inconvenience, or
consequential damage, including injury to any person or property caused by items of our
manufacture or sale. (Some states do not allow exclusion or limitation of incidental or
consequential damages, so the above exclusion may not apply.) In any event, BALDOR’s
total liability, under all circumstances, shall not exceed the full purchase price of the
control. Claims for purchase price refunds, repairs, or replacements must be referred to
BALDOR with all pertinent data as to the defect, the date purchased, the task performed
by the control, and the problem encountered. No liability is assumed for expendable items
such as fuses.
Goods may be returned only with written notification including a BALDOR Return
Authorization Number and any return shipments must be prepaid.

1-2 General Information MN1213
Product Notice Intended use:
These drives are intended for use in stationary ground based applications in
industrial power installations according to the standards EN60204 and VDE0160.
They are designed for machine applications that require variable speed controlled
three phase brushless AC motors.
These drives are not intended for use in applications such as:
–Home appliances
–Medical instrumentation
–Mobile vehicles
– Ships
– Airplanes
Unless otherwise specified, this drive is intended for installation in a suitable
enclosure. The enclosure must protect the control from exposure to excessive or
corrosive moisture, dust and dirt or abnormal ambient temperatures. The exact
operating specifications are found in Section 6 of this manual.
The installation, connection and control of drives is a skilled operation,
disassembly or repair must not be attempted.
In the event that a control fails to operate correctly, contact the place of purchase
for return instructions.
Safety Notice:This equipment contains high voltages. Electrical shock can cause serious or fatal
injury. Only qualified personnel should attempt the start–up procedure or
troubleshoot this equipment.
This equipment may be connected to other machines that have rotating parts or
parts that are driven by this equipment. Improper use can cause serious or fatal
injury. Only qualified personnel should attempt the start–up procedure or
troubleshoot this equipment.
–System documentation must be available at all times.
–Keep non-qualified personnel at a safe distance from this equipment.
–Only qualified personnel familiar with the safe installation, operation and
maintenance of this device should attempt start-up or operating
procedures.
–Always remove power before making or removing any connections to
this control.
PRECAUTIONS: Classifications of cautionary statements.
WARNING: Indicates a potentially hazardous situation which, if not avoided, could
result in injury or death.
Caution: Indicates a potentially hazardous situation which, if not avoided,
could result in damage to property.

General Information 1-3MN1213
PRECAUTIONS:
WARNING: Do not touch any circuit board, power device or electrical connection
before you first ensure that power has been disconnected and there is no
high voltage present from this equipment or other equipment to which it is
connected. Electrical shock can cause serious or fatal injury.
WARNING: Be sure that you are completely familiar with the safe operation of this
equipment. This equipment may be connected to other machines that
have rotating parts or parts that are controlled by this equipment.
Improper use can cause serious or fatal injury.
WARNING: Be sure all wiring complies with the National Electrical Code and all
regional and local codes or CE Compliance. Improper wiring may cause a
hazardous condition.
WARNING: Be sure the system is properly grounded before applying power. Do not
apply AC power before you ensure that grounds are connected. Electrical
shock can cause serious or fatal injury.
WARNING: Do not touch any electrical component for at least five (5) minutes after AC
power is disconnected to allow capacitors to discharge. Electrical shock
can cause serious or fatal injury.
WARNING: Improper operation of control may cause violent motion of the motor shaft
and driven equipment. Be certain that unexpected motor shaft movement
will not cause injury to personnel or damage to equipment. Peak torque of
several times the rated motor torque can occur during control failure.
WARNING: Motor circuit may have high voltage present whenever AC power is
applied, even when motor is not rotating. Electrical shock can cause
serious or fatal injury.
WARNING: If a motor is driven mechanically, it may generate hazardous voltages that
are conducted to its power input terminals. The enclosure must be
grounded to prevent a possible shock hazard.
WARNING: When operating a motor with no load coupled to its shaft, remove the shaft
key to prevent injury if it were to fly out when the shaft rotates.
WARNING: The motor shaft will rotate during the autotune procedure. Be certain that
unexpected motor shaft movement will not cause injury to personnel or
damage to equipment.
WARNING: The user must provide an external hard-wired emergency stop circuit to
disable the control in the event of an emergency.
Caution: Suitable for use on a circuit capable of delivering not more than the RMS
symmetrical short circuit amperes listed here at rated voltage.
Horsepower RMS Symmetrical Amperes
1–50 5,000
Caution: To prevent equipment damage, be certain that the input power has
correctly sized protective devices installed as well as a power disconnect.
Continued on next page.

1-4 General Information MN1213
Caution: Avoid locating control immediately above or beside heat generating
equipment, or directly below water or steam pipes.
Caution: Avoid locating control in the vicinity of corrosive substances or vapors,
metal particles and dust.
Caution: For UL installations, do not connect any resolver cable shields to the
motor frame. At a minimum, resolver signal integrity will be compromised
and damage to the control may result.
Caution: Do not connect AC power to the control terminals U, V and W. Connecting
AC power to these terminals may result in damage to the control.
Caution: Baldor recommends not using “Grounded Leg Delta”transformer power
leads that may create ground loops and degrade system performance.
Instead, we recommend using a four wire Wye.
Caution: Logic signals are interruptible signals; these signals are removed when
power is removed from the drive.
Caution: Controls are intended to be connected to a permanent main power source,
not a portable power source. Suitable fusing and circuit protection devices
are required.
Caution: The safe integration of the drive into a machine system is the
responsibility of the machine designer. Be sure to comply with the local
safety requirements at the place where the machine is to be used.
Caution: Controls must be installed inside an electrical cabinet that provides
environmental control and protection. Installation information for the drive
is provided in this manual. Motors and controlling devices that connect to
the drive should have specifications compatible to the drive.
Caution: Violent jamming (stopping) of the motor shaft during operation may
damage the motor and control.
Caution: Do not tin (solder) exposed wires. Solder contracts over time and may
cause loose connections.
Caution: Electrical components can be damaged by static electricity. Use ESD
(electro-static discharge) procedures when handling this control.
Caution: Ensure that motor and tachometer wires are properly connected. Incorrect
installation may result in improper rotation or incorrect commutation.

Section 2
Product Overview
Product Overview 2-1MN1213
Overview The Baldor UM series high frequency DC servo control provides performance with
attention to economy. It is designed to operate a wide variety of Baldor DC brush
type permanent magnet servo motors. The UM series control is a key component
in motion control applications and provides 1 to six axes control. It precisely
controls both the current and velocity at the motor. Several configurations are
available to suit most application requirements.
Current mode operation is useful in applications where commanded motor torque
must be proportional to a voltage at the signal input. Since torque is proportional
to motor current, constant current must be provided to the motor to develop
constant torque. The current mode operation differs from velocity mode operation
in that the velocity loop is basically disabled (gain is reduced from 6000 A/V to
approximately 6 A/V). The current loop controls the output current proportional to
the input voltage (VCS).
Typical applications requiring current mode operation are:
SWeb controls
SBrake applications
SBolt tightening
Current mode operation is also useful if a Baldor motion controller is precisely
controlling the velocity loop. In this configuration tachometer feedback is not
required.
“UM” and “LD” series servo circuit boards are not interchangeable.
Motors Baldor servo controls are compatible with many motors from Baldor and other
manufacturers. Baldor compatible motors include:
SM2200 –Series motors
SM3300 –Series motors
SM4000 –Series motors
SM4500 –Series motors
Refer to the BR1202 catalog or contact your local Baldor distributor or sales
representative for assistance with motor sizing and compatibility.
Features Status Indicators
SFault Protection Latch or Current Foldback SExternal Reset Input
S20kHz “Inaudible” Switching SVoltage Error (VE)
STest Points to aid during setup SExcess Current (EC)
SJumper Selections to quickly tailor an application SThermal Protection (EC)
SStandard ±10VDC command input signal SGround Fault (GF)
SVelocity / Current Configuration SSurge Current (SC) and Short Circuit Protection
SDecoupled current sense (monitor absolute or actual value) SLogic Voltage Status (MV, PV) or (–15V, +15V)
SLeft and Right Limit – over travel limit SBus Voltage Status (PB) or (BUS)
SInterlock (disable output to motor) SAC Input Voltage Status (AC)
SPushbutton Reset

2-2 Product Overview MN1213
Functional Description
The servo control consists of a power amplifier, a velocity control amplifier, and
fault logic circuitry.
Power Amplifier
The power section of a PWM bridge normally acts as a low output impedance
voltage source. However, if an analog signal representing motor current is applied
to the input of the amplifier and a current command is present, the impedance of
the PWM bridge then becomes high. These high impedance bridges exhibit a
unique characteristic referred to as current sourcing. That is, motor current (and
therefore motor torque) becomes proportional to commanded input current.
Current Sense Coupler
The current sense coupler of the power amplifier serves as the current loop
feedback mechanism. The unit isolates the high voltage motor signal from the low
voltage control circuitry.
Switching Configuration
The power amplifier contains a transistor bridge output stage that conditions the
voltage and current that is applied to the motor.
Velocity Control Amplifier
The high gain front end velocity control amplifier accepts a speed command
(Signal) and a tachometer voltage (Tach). The VCA clamped error signal (C
adjustment) is applied to the power amplifier as a current command.
Fault Logic Circuitry
The Fault Logic Circuitry functions are described in the following paragraphs.
Excess Current Limit
A comparator checks motor current for overload conditions beyond rated output. If
the comparator is tripped, it disables the control, lights the EC indicator, and pulls
the interlock line ”low”(if P4 is in latch position). The control must be reset.
Surge Current Sensor
The surge current sensor pulls the interlock line low internally if the peak output
current is exceeded. The control must be reset.
Overheat Sensor
If the thermal switch on the heatsink indicates the temperature exceeded a preset
level, the switch sets the EC (Excess Current) latch, which operates the EC fault
indicator. The fault is cleared when the heat sink temperature decreases.
Left Limit, Right Limit
Limit switches are typically mounted on machinery to restrict the load from moving
into over–travel conditions. When a limit switch is activated, travel in that direction
is not allowed. However, the motor can be reversed to move the load.
Decoupled Current Sense (DCS)
The Decoupled Current Sense (DCS) pin is isolated from the high voltage motor
lines. Therefore, motor current is evaluated safely by connecting an oscilloscope
or voltmeter to the DCS pin of the input connector and common (TPl).
Tachometer Filter
The tachometer filter rejects tachometer commutator noise by reducing the tach
path bandwidth so that the high gain velocity control amplifier can be responsive
yet reject tachometer noise.

Section 3
Receiving and Installation
Receiving & Installation 3-1MN1213
Receiving & Inspection Baldor Controls are thoroughly tested at the factory and carefully
packaged for shipment. When you receive your control, there are several things
you should do immediately.
1. Observe the condition of the shipping container and report any damage
immediately to the commercial carrier that delivered your control.
2. Remove the control from the shipping container and remove all packing
materials. The container and packing materials may be retained for
future shipment.
3. Verify that the part number of the control you received is the same as the
part number listed on your purchase order.
4. Inspect the control for external physical damage that may have been
sustained during shipment and report any damage immediately to the
commercial carrier that delivered your control.
5. If the control is to be stored for several weeks before use, be sure that it
is stored in a location that conforms to published storage humidity and
temperature specifications stated in this manual.
Location Considerations The location of the control is important. Installation should be in an area
that is protected from direct sunlight, corrosives, harmful gases or liquids, dust,
metallic particles, and vibration. Exposure to these can reduce the operating life
and degrade performance of the control.
Several other factors should be carefully evaluated when selecting a location for
installation:
1. Clearance must be provided for air flow.
2. Altitude derating. Up to 3300 feet (1000 meters) no derating required.
Derate the continuous and peak output current by 3% for each 1000 feet
(305 meters) above 3300 feet up to 10,000 feet (3050 meters) maximum.
3. Temperature derating. From 0°C to 40°C ambient no derating
required. Above 40°C, derate the continuous and peak output current by
2.5% per °C above 40°C. Maximum ambient is 50°C.
Mechanical Installation See Figure 3-1.
Refer to Section 7 for the dimensions and layout of the chassis. Layout and drill
the four holes for mounting the chassis. Cut any openings in the cabinet for
wiring. debur all edges.
1. Mount the control to the mounting surface. The control must be securely
fastened to the mounting surface by the four control mounting holes.
2. Use one of the mounting holes to attach a ground wire to earth or the
central system ground.
3. Open the servo control card shipping box and remove each circuit board.
Remove the protective bag and install each board on the chassis using
the two phillips head machine screws (module mounting screws) located
in each slot position of the chassis. Tighten each screw using a long
phillips screwdriver.
4. Locate the large bus connector of the prewired harness and connect it to
J6.
5. Locate the smaller connector of the same harness and connect it it J5.
Note: Be careful not to bend connector pins and be sure pins are aligned before
pushing onto the connector.

3-2 Receiving & Installation MN1213
Figure 3-1 Installing the Circuit Boards
Electrical Installation
All interconnection wires between the control, AC power source, motor, host
control and any operator interface stations should be in metal conduits. Use listed
closed loop connectors that are of appropriate size for wire gauge being used.
Connectors are to be installed using crimp tool specified by the manufacturer of
the connector. Only class 1 wiring should be used.
All wiring must performed to the requirements of the National Electrical Code
(NEC) and local requirements.
Electrical Noise Considerations
All electronic devices are vulnerable to significant electronic interference signals
(commonly called “Electrical Noise”). At the lowest level, noise can cause
intermittent operating errors or faults. From a circuit standpoint, 5 or 10 millivolts
of noise may cause detrimental operation. For example, analog speed and torque
inputs are often scaled at 5 to 10VDC maximum with a typical resolution of one
part in 1,000. Thus, noise of only 5 mV represents a substantial error.
At the extreme level, significant noise can cause damage to the drive. Therefore,
it is advisable to prevent noise generation and to follow wiring practices that
prevent noise generated by other devices from reaching sensitive circuits. In a
control, such circuits include inputs for speed, torque, control logic, and speed and
position feedback, plus outputs to some indicators and computers.
Relay and Contactor Coils
Among the most common sources of noise are the coils of contactors and relays.
When these highly inductive coil circuits are opened, transient conditions often
generate spikes of several hundred volts in the control circuit. These spikes can
induce several volts of noise in an adjacent wire that runs parallel to a
control-circuit wire. Figure 3-2 illustrates noise suppression for AC and DC relay
coils.

Receiving & Installation 3-3MN1213
Figure 3-2 AC and DC Coil Noise Suppression
AC Coil DC Coil
RC snubber
0.47 mfDiode
-
+
33 W
Control Enclosures
Motor controls mounted in a grounded enclosure should also be connected to
earth ground with a separate conductor to ensure best ground connection. Often
grounding the control to the grounded metallic enclosure is not sufficient. Usually
painted surfaces and seals prevent solid metallic contact between the control and
the panel enclosure. Likewise, conduit should never be used as a ground
conductor for motor power wires or signal conductors.
Special Motor Considerations
Motor frames must also be grounded. Motors must be grounded directly to the
control and plant ground with as short a ground wire as possible. Capacitive
coupling within the motor windings produces transient voltages between the motor
frame and ground. The severity of these voltages increases with the length of the
ground wire.
Analog Signal Wires
Analog signals generally originate from speed and torque controls, plus DC
tachometers and process controllers. Reliability is often improved by the following
noise reduction techniques:
•Use shielded twisted-pair wires with the shield grounded at the drive end
only.
•Route analog signal wires away from power or control wires (all other
wiring types).
•Cross power and control wires at right angles (90°) to minimize inductive
noise coupling.

3-4 Receiving & Installation MN1213
Input Power Transformer
The UM series servo control requires an external isolation transformer that
provides an ungrounded AC power source.
•UM controls with a 100VDC bus require 70VAC RMS nominal.
•UM controls with a 150VDC bus require 105VAC RMS nominal.
To determine the proper size transformer (kVA rating), use this guideline:
(Rated Continuous Current) X (Bus Voltage) X (# of Axes) +kVARating
Example:
UM4–100–2 with 3 UM3015HS–100
(15A) X (100VDC) X (3 Axes) = 4.5kVA
This method of transformer sizing is safe and it may be a little oversized. In most
cases, servo controls are not continuously operating at full voltage and current all
the time. It is common practice to use a smaller transformer that is sized just
larger than to actual continuous voltage and current consumed by the motor(s).
Baldor has several transformers to suit your application. Identification of these
transformers is shown in Figure 3-3. ±5% output voltage taps are provided to
accommodate variations in incoming AC voltage.
Figure 3-3 Input Transformer Identification
Phase
Blank = 3 Phase (3T)
E = Single Phase ( T)
T –
Transformers: XXX
kVA Rating
00.5 = 0.5 kVA
01.0 = 1 kVA
01.5 = 1.5 kVA
03.0 = 3.0 kVA
05.0 = 5.0 kVA
10.0 = 10.0 kVA
15.0 = 15.0 kVA
– XX – XXXX
AC Input Voltage
1123 = 115 / 230 VAC
2346 = 230 / 460 VAC
Control Output
100 = 100V
150 = 150V
Table 3-1 Current and Voltage Rating By Control
Input Voltage 70 VAC 105 VAC
Control Bus Voltage 100 VDC 150 VDC AC Input Power
Control
# of Motors Output Current Amps Wire Size
Cont. Peak Catalog Number Catalog Number AWG mm2
One 6 15 UM2–100–1–10S – 14 2.5
15 30 UM2–100–1–01S UM2–150–1–01S 12 2.5
Two 6 15 UM2–100–1–20S – 14 2.5
15 30 UM2–100–1–02S UM2–150–1–02S 12 2.5
Three 6 15 UM4–100–2–30S – 14 2.5
15 30 UM4–100–2–03S UM4–150–2–03S 12 2.5
Four 6 15 UM4–100–2–40S – 14 2.5
15 30 UM4–100–2–04S UM4–150–2–04S 12 2.5
Five 6 15 UM6–100–2–50S 14 2.5
15 30 UM6–100–2–05S UM6–150–2–05S 12 2.5
Six 6 15 UM6–100–2–60S – 14 2.5
15 30 UM6–100–2–06S UM6–150–2–06S 12 2.5
Note: An isolation transformer is required to provide these voltages.

Receiving & Installation 3-5MN1213
Power Wiring Be sure to use the correct size wire for each connection. AC Input Power wires,
Motor and the main ground wire should be the size stated in Table 3-1.
The logic and fan power lines should be 16 AWG.
1 to 4 Axis Procedure (Refer to Figure 3-4).
1. Be sure all voltage sources are turned off.
2. Connect AC power from the isolation transformer to AC Bus Power Input
L1, L2, L3. Single phase use L1, L2.
3. Connect 115VAC power to logic and fan input terminals 11 and 12 of the
terminal block.
For UMX–XXX–5 or UMX–XXX–6, use 240 VAC 50 Hz nominal to
supply logic and fan power.
4. Connect the negative and positive wires from each servo motor to the
terminal block as shown in the figure.
Figure 3-4 1 to 4 Axis Power Wiring
1
2
3
4
5
6
7
8
9
10
11
12
Axis 1 Motor
-
+
Axis 2 Motor
-
+
Axis 3 Motor
-
+
Axis 4 Motor
-
+
115VAC for logic & fan po er
6 Axis Procedure (Refer to Figure 3-5).
1. Be sure all voltage sources are turned off.
2. Connect AC power from the isolation transformer to AC Bus Power Input
L1, L2, L3. Single phase use L1, L2.
3. Connect 115VAC power to logic and fan input terminals of the 2 position
terminal block to the right of the 12 position terminal block.
For UMX–XXX–5 or UMX–XXX–6, use 240 VAC 50 Hz nominal to
supply logic and fan power.
4. Connect the negative and positive wires from each servo motor to the
terminal block as shown in the figure.

3-6 Receiving & Installation MN1213
Figure 3-5 6 Axis Power Wiring
Axis 1 Motor
-
+
Axis 2 Motor
-
+
Axis 3 Motor
-
+
Axis 4 Motor
-
+
115VAC for logic & fan po er
1
2
3
4
5
6
7
8
9
10
11
12
1
2
3
4
5
6
-
+Axis 5 Motor
-
+Axis 6 Motor
Signal Wiring Input Signals (Refer to Figure 3-6).
1. Connect the positive (+) tachometer wire (of the first servo motor) to the
Tach (+) input (pin 5) of the Phoenix Connector for Axis 1.
2. Connect the negative (–) side tachometer wire (of the first servo motor)
to the Tach (–) input (pin 6) of the Phoenix Connector for Axis 1.
3. Connect the tachometer cable shield to (pin 11) common.
4. Connect the –lead of a VOM to (Test Point) TP–1 and the + lead to
TP–6. Rotate the tachometer by hand and observe the VOM.
Clockwise rotation (facing the shaft) should cause a positive voltage
measurement.
Figure 3-6 Input Signal Connector
1
2
3
4
5
6
7
8
9
10
11
12
13
14
15
16
17
18
Differential
Common
Auxiliary Input
Signal Input
Tach + Input
Tach - Input
Decoupled Current Sense
Left Limit (Normally Open)
Right Limit (Normally Open)
Interlock
Common
+15VDC
Common
-15VDC
Reset
Common
Left Limit (Normally Closed)
Right Limit (Normally Closed)
1
P1
1
P2
1
P3
ASTRCB
123456
±10VDC
Signal
Tachometer +
–
Cable
Shield
Test Points
Off
On
Normally Closed Limit Circuit P1
Phoenix
Connector
Machine
Control
On
Off
Actual
Absolute
Current Monitor Value DCS P3
Differential Input P2
Latch
Foldback
EC Fault Function P4
Potentiometers
Reset
SW1

Receiving & Installation 3-7MN1213
5. Repeat steps 1, 2, 3 and 4 for each of the tachometers and be sure to
use the Phoenix Connector for the correct Axis.
6. Differential Command Input –Connect the input Velocity Command
Signal to pin 1 and its return to pin 4. Ensure that jumper P2 is in its right
most position (pins 1 and 2).
Single Ended Command Input –Connect the Velocity Command Signal
to pin 4 and its return to pin 2. Ensure that jumper P2 is in its left most
position (pins 2 and 3).
7. Repeat for each axis and be sure to use the Phoenix Connector for the
correct Axis.
Limit, Interlock and Reset Switches (Refer to Figure 3-7).
When the left or right limit is activated, motor rotation in that direction is not
allowed. An activated limit switch disables the amplifier and the motor will coast to
a stop. This function can be used for an axis over–travel limit to prevent further
operation in the inhibited direction, but it does allow the control to back out of the
limit (rotate in the opposite direction).
1. Connect a normally open switch to pins 8 & 9. Or, if you use normally
closed switches, connect these to pins17 & 18.
2. Set jumper P1 for normally open or closed operation.
Note: If Pl is in the left position (normally closed) and no limit switches are
connected, the control will assume the limit switch has opened and disable
its output in that direction (i.e. the control will not operate).
3. Connect the switch common to pin 16.
Steps 4 and 5 are optional input connections.
4. Connect the interlock switch to pin 10.
5. Connect the reset switch to pin 15.
6. Repeat steps 1, 2, 3, 4 and 5 for each axis.
Figure 3-7 Limit, Reset and Interlock Connections
1
2
3
4
5
6
7
8
9
10
11
12
13
14
15
16
17
18
Differential
Common
Auxiliary Input
Signal Input
Tach + Input
Tach - Input
Decoupled Current Sense
Left Limit (Normally Open)
Right Limit (Normally Open)
Interlock
Common
+15VDC
Common
-15VDC
Reset
Common
Left Limit (Normally Closed)
Right Limit (Normally Closed)
1
P1
1
P2
1
P3
ASTRCB
123456
Test Points
Normally Open
Normally Closed
Limit Circuit P1
Phoenix
Connector
On
Off
Actual
Absolute
Current Monitor Value DCS P3
Differential Input P2
Latch
Foldback
EC Fault Function P4
Potentiometers
Normally Open Limits
Left
Right
Normally Closed Limits
Left
Right
Interlock
Reset
Reset
SW1

3-8 Receiving & Installation MN1213
Optional Input Connections
Current Monitor Interface (Connections are made at pins 7 and 11).
Decoupled current sense (DCS) is an analog representation of amplifier current.
Using an oscilloscope, a technician can look at output current of the amplifier. An
analog output voltage of 1 volt peak to peak represents approximately 1/10 of
peak current. If you have a UM3015HS–100 amplifier card and your DCS voltage
is 1.5V peak, amplifier output current is:
30 amps peak 1/10 x (1.5) = 4.5 amps OR
3 x DCS voltage = output current (for UM3015)
1.5 x DCS voltage = output current (for UM1506)
Interlock (Connection is made at pin 10, see Figure 3-8).
The interlock is bidirectional. That is, it can be closed to common internally or
externally to disable the control. The internal interlock activates for:
SHigh bus or low bias voltage. (VE Indicator ON).
SGround Fault current. (GF Indicator ON).
SExcess I2T current or overtemp (in latch mode). (EC indicator ON).
SExcessive bus surge current. (SC Indicator ON).
Refer to Section 5 Troubleshooting for corrective action.
The interlock function can be used to tie multiple servo control cards together,
locking all the cards together. In this configuration, a fault on one axis card will
interrupt all the other cards, the output stages of all the servo control cards will be
disabled (i.e., motors will coast to a stop with no holding torque). An emergency
stop could also be wired to the interlock line.
Reset (Connection is made at pin 15, see Figure 3-9).
The reset line is used to externally reset the servo control. When the reset signal
is closed to common temporarily and then released, the control will be enabled
(restarted) if a fault condition is not present. If activated, the reset line will totally
disable the servo control card until it released. The Reset button, SW1, a
momentary switch was added for your convenience and will provide the same
results (see Figures 3-6 and 3-7).
+15VDC (Connection is made at pin 12 and 13, see Figure 3-7).
This is ±15VDC at 50mA power source. This output can be used by external
devices or can be used with a voltage divider network to provide the signal input to
the servo control card.

Receiving & Installation 3-9MN1213
Emergency Stop
Some applications require a positive stop to disconnect the motor in the event of
an emergency. A relay with 4 sets of contacts can be connected as shown in
Figure 3-10 to provide the E stop function.
Figure 3-10 Emergency Stop Connection

3-10 Receiving & Installation MN1213
This manual suits for next models
18
Table of contents
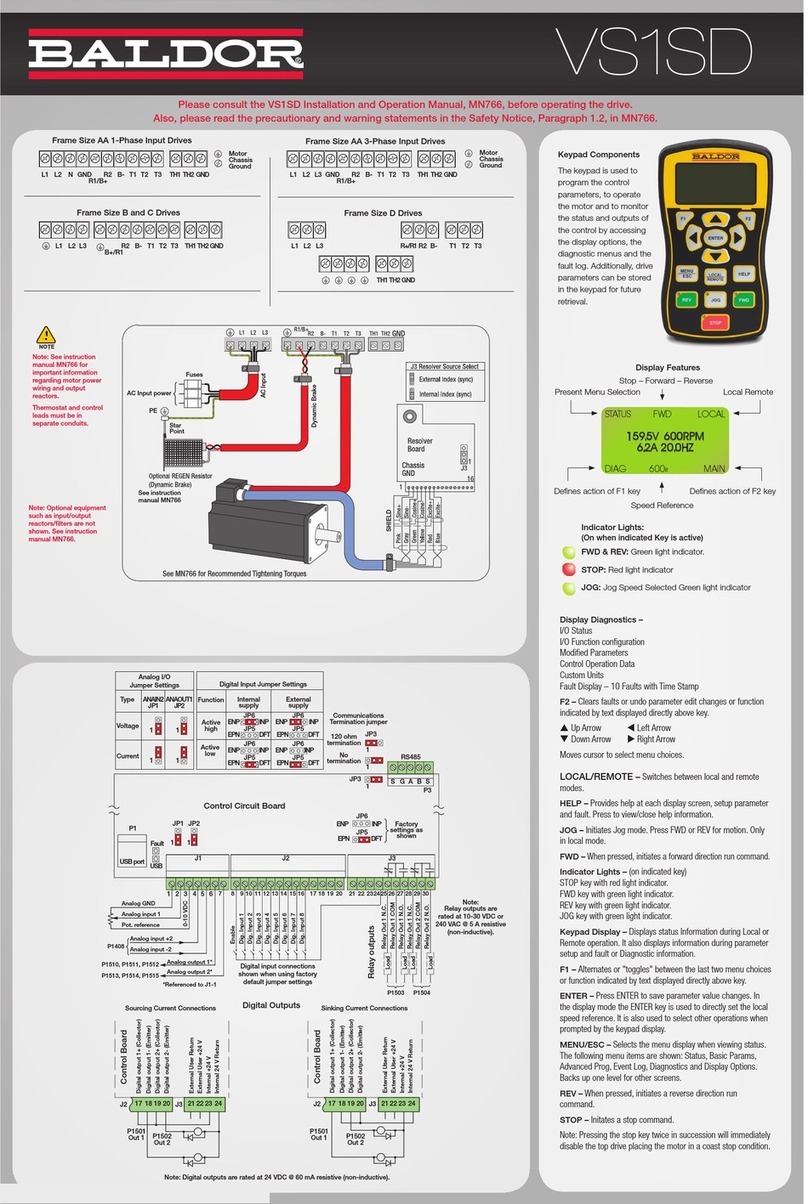
Other Baldor Servo Drive manuals

Baldor
Baldor Flex+DriveII User manual

Baldor
Baldor 23H Series Installation instructions

Baldor
Baldor MotiFlex e100 User manual

Baldor
Baldor VS1SD Installation instructions

Baldor
Baldor Flex+DriveII User manual

Baldor
Baldor MicroFlex e100 User manual

Baldor
Baldor FDH1A05TB-EN20 User manual

Baldor
Baldor VS1SD Owner's manual

Baldor
Baldor MicroFlex User manual

Baldor
Baldor MintDrive II User manual