Draper Expert 23420 User manual

23420
These instructions accompanying the product are the original instructions. This document is part of the product,
keep it for the life of the product passing it on to any subsequent holder of the product. Read all these instructions
before assembling, operating or maintaining this product.
This manual has been compiled by Draper Tools describing the purpose for which the product has been designed,
and contains all the necessary information to ensure its correct and safe use. By following all the general safety
instructions contained in this manual, it will ensure both product and operator safety, together with longer life of the
product itself.
All photographs and drawings in this manual are supplied by Draper Tools to help illustrate the operation of the
product.
Whilst every effort has been made to ensure the accuracy of information contained in this manual, the Draper
Tools policy of continuous improvement determines the right to make modifications without prior warning.

1. INTRODUCTION
1.1 SCOPE
Part of our Expert range, this product is intended for
trade use with the quality & features to meet and exceed
the expectations of the most demanding user. Any
application other than that it was intended for, is
considered misuse.
This product is not a toy and must not be used by
children or any person with reduced physical, sensory or
mental capabilities or lack of experience and knowledge,
or people unfamiliar with these instructions.
Local regulations may restrict the age of the operator.
1.2 UNDERSTANDING THIS MANUALS
SAFETY CONTENT:
IMPORTANT: For detailed and concise instructions on
the correct use of this kit, refer to the vehicle
manufacturer’s manual.
Warning! Do not over pressurize the system, as
excessive pressure may cause failure of the radiator,
hoses etc.
2. UNPACKING AND
CHECKING
2.1 PACKAGING
Carefully remove the product from the packaging and
examine it for any sign of damage. Check contents
against the parts shown in Fig A. If any part is damaged
or missing, please contact the Draper Help Line (see
warranty). Do not attempt to use the product!
The packaging material should be retained during the
warranty period, in case the product needs to be
returned for repair.
Warning!
• Some of the packaging materials may be harmful to
children. Do not leave any of these materials in
reach of children.
• If any of the packaging is to be thrown away, make
sure they are disposed of correctly, according to local
regulations.
3. TESTING
3.1 MANUAL PRESSURE TESTING
INSTRUCTIONS - FIG.1
1. Carefully undo and remove the radiator or expansion
tank pressure cap (use a cloth or gloves and arm
protection if the radiator cap is known to be hot).
2. Select the correct adaptor and configuration of the
stationary seat accessories and ensure it is securely
fitted to the filler neck of the radiator or expansion
tank.
3. Attach the quick-coupling connector (1) onto the
male tailpiece of the adaptor fitted to the radiator.
4. Depress the hand pump handle (2) and check the
reading indicated on the pressure gauge (3). Ideal
readings should range between 12-15PSI (always
check relevant manufacturer’s manual), if the
pressure level is below this range or the pressure
drops during testing, a leak in the coolant system
(radiator, hose, etc.) is the most likely source of the
problem.
5. Once the test is complete, release the air pressure
by depressing the quick release valve (4).
Disconnect the quick-coupling connector (1) and
adaptor assembly and replace the radiator filler cap
securely.
1
FIG.
3.2 USING KIT WITH COMPRESSED
AIR LINE
Warning!
Input air pressure must be set to below 25psi on
compressed air line BEFORE connecting to cooling
system. Failure to do so will cause damage to the
system and danger to the user.
- Proceed as in steps 1-4 of manual testing.
- Ensure air tap (5) is in closed position (right angle to
coupling).
- Connect compressed air line to air inlet (6).
- Connect to adaptor using quick-coupling (1).
- Slowly open air tap (5) until air pressure gauge (3)
shows the required test pressure (always check
relevant manufacturer’s manual).
- Once the test is complete, completely close air tap
(5), disconnect compressed air line (6) then
carefully re-open air tap (5) to release stored
pressure and remove from cooling system. Finally,
replace the cap securely.
–
2
–
–
3
–
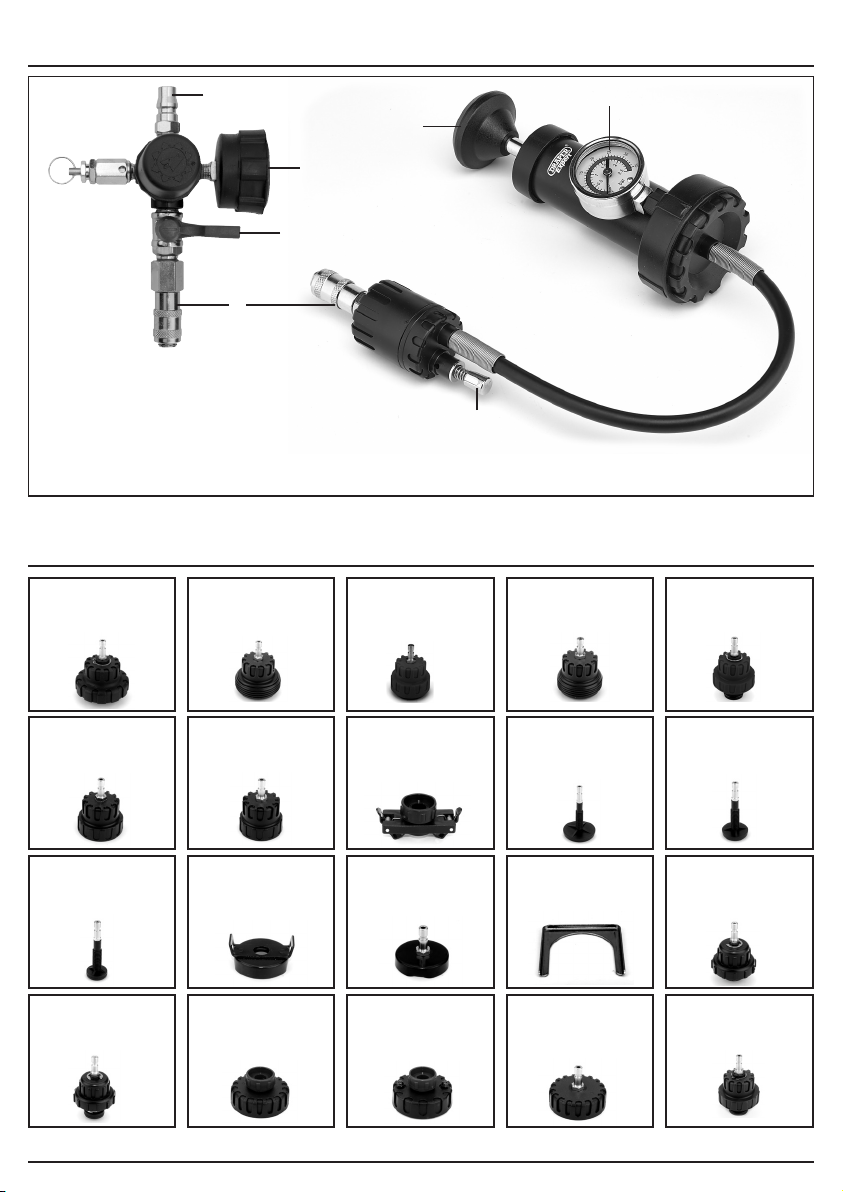
4. IDENTIFICATION – FIG.A
5. ADAPTORS AND ACCESSORIES
Note: For details of our full range of accessories
and consumables, please visit drapertools.com
(1) Quick-coupling.
(2) Hand pump handle.
(3) Pressure gauge.
(4) Depressurisation pin.
(5) Air tap.
(6) Compressed air connection.
(1)
(2)
(3)
(3)
(6)
(5)
(4)
FIG.A
Adaptor 1
Adaptor 6
Adaptor 11
Adaptor 16
Adaptor 2
Adaptor 7
Adaptor 12
Adaptor 17
Adaptor 3
Adaptor 8
Adaptor 13
Adaptor 18
Adaptor 4
Adaptor 9
Adaptor 14
Adaptor 19
Adaptor 5
Adaptor 10
Adaptor 15
Adaptor 20
Mercedes Benz, for 60mm
external cap thread.
Audi (new A4, A5, A6) for
62mm internal threaded cap.
Vauxhall/Opel, Ford universal
for 48mm external cap thread.
BMW for 57mm internal cap
thread.
BMW for 49mm external cap
thread.
Volvo, Citroen, Fiat, Renault,
Peugeot universal for 45mm
external cap thread.
Audi/VW universal for 43mm
external cap thread.
Universal adjustable sprung
adaptor seat.
Adaptor pin for adaptor 8 with
50mm diameter base for main
Japanese & European
vehicles.
Adaptor pin for adaptor 8 with
35mm diameter base for main
Japanese & European
vehicles.
Adaptor pin for adaptor 8 with
27mm diameter base for main
Japanese & European
vehicles.
Universal cap adaptor. Universal cap adaptor. U-piece stainless steel cap
clamp.
Honda/Toyota sprung clamp
cap - 42mm.
Mitsubishi/Ford/Nissan/Mazda
sprung clamp - 44mm.
Ford - for use with adaptors 9,
10, 11 - 52mm external cap
thread.
Ford - for use with adaptors 9,
10, 11 - 56mm for standard
lug cap.
Mercedes Benz for 50mm
external cap thread.
Ford - for 49mm external cap
thread.

–
4
–
6. MAINTENANCE
6.2 MAINTENANCE
Regular inspection and cleaning reduces the necessity
for maintenance operations and will keep your tool in
good working condition.
Do not use solvents or fuels to clean the product. When
not in use, store the product in a safe, dry place.
7. WARRANTY
7.1 WARRANTY
Draper tools have been carefully tested and inspected
before shipment and are guaranteed to be free from
defective materials and workmanship.
Should the tool develop a fault, please return the
complete tool to your nearest distributor or contact:
Draper Tools Limited, Chandler’s Ford, Eastleigh,
Hampshire, SO53 1YF. England.
Telephone Sales Desk: +44 (0)23 8049 4333 or:
Product Helpline +44 (0)23 8049 4344.
A proof of purchase must be provided.
If upon inspection it is found that the fault occurring is
due to defective materials or workmanship, repairs will
be carried out free of charge. This warranty period
covering labour is 12 months from the date of purchase
except where tools are hired out when the warranty
period is 90 days from the date of purchase. This
warranty does not apply to any consumable parts, any
type of battery or normal wear and tear, nor does it
cover any damage caused by misuse, careless or
unsafe handling, alterations, accidents, or repairs
attempted or made by any personnel other than the
authorised Draper warranty repair agent.
Note: If the tool is found not to be within the terms of
warranty, repairs and carriage charges will be quoted
and made accordingly.
This warranty applies in lieu of any other warranty
expressed or implied and variations of its terms are not
authorised.
Your Draper warranty is not effective unless you can
produce upon request a dated receipt or invoice to verify
your proof of purchase within the warranty period.
Please note that this warranty is an additional benefit
and does not affect your statutory rights.
Draper Tools Limited.
8. DISPOSAL
8.1 DISPOSAL
– At the end of the machine’s working life, or when it
can no longer be repaired, ensure that it is disposed
of according to national regulations.
Configuration of
universal adjustable
seats for European
cars.
Configuration of
universal adjustable
seats for Japanese
cars.
Adaptor 21
Adaptor 29
Adaptor 23
Adaptor 25
Adaptor 27
Adaptor 24
Adaptor 26
Adaptor 28
Adaptor 30
Adaptor 22
Adaptor for Ford (after 2010)
pressure caps
Adaptor for Toyota and Honda
pressure caps.
Adaptor for Mitsubishi, Ford,
Nissan and Mazda pressure
caps.
Adaptor for Nippon and Hino
pressure caps.
Adaptor for Renault, Audi and
VW pressure caps.
Adaptor for Volvo, Citroen,
Renault, Fiat and Peugeot
pressure caps.
Adaptor for Opel, VW and
Ford pressure caps.
Adaptor for Volvo and Renault
pressure caps.
Adaptor for BMW pressure
caps.
Adaptor for Mercedes
pressure caps.
Other Draper Test Equipment manuals


Popular Test Equipment manuals by other brands


Redtech
Redtech TRAILERteck T05 user manual

Venmar
Venmar AVS Constructo 1.0 HRV user guide

Test Instrument Solutions
Test Instrument Solutions SafetyPAT operating manual

Hanna Instruments
Hanna Instruments HI 38078 instruction manual

Kistler
Kistler 5495C Series instruction manual

Waygate Technologies
Waygate Technologies DM5E Basic quick start guide

StoneL
StoneL DeviceNet CK464002A manual

Seica
Seica RAPID 220 Site preparation guide

Kingfisher
Kingfisher KI7400 Series Training manual

Kurth Electronic
Kurth Electronic CCTS-03 operating manual

SMART
SMART KANAAD SBT XTREME 3G Series user manual

Agilent Technologies
Agilent Technologies BERT Serial Getting started