Barkmate 113R User manual
Barkmate 113R Dog Training System Manual
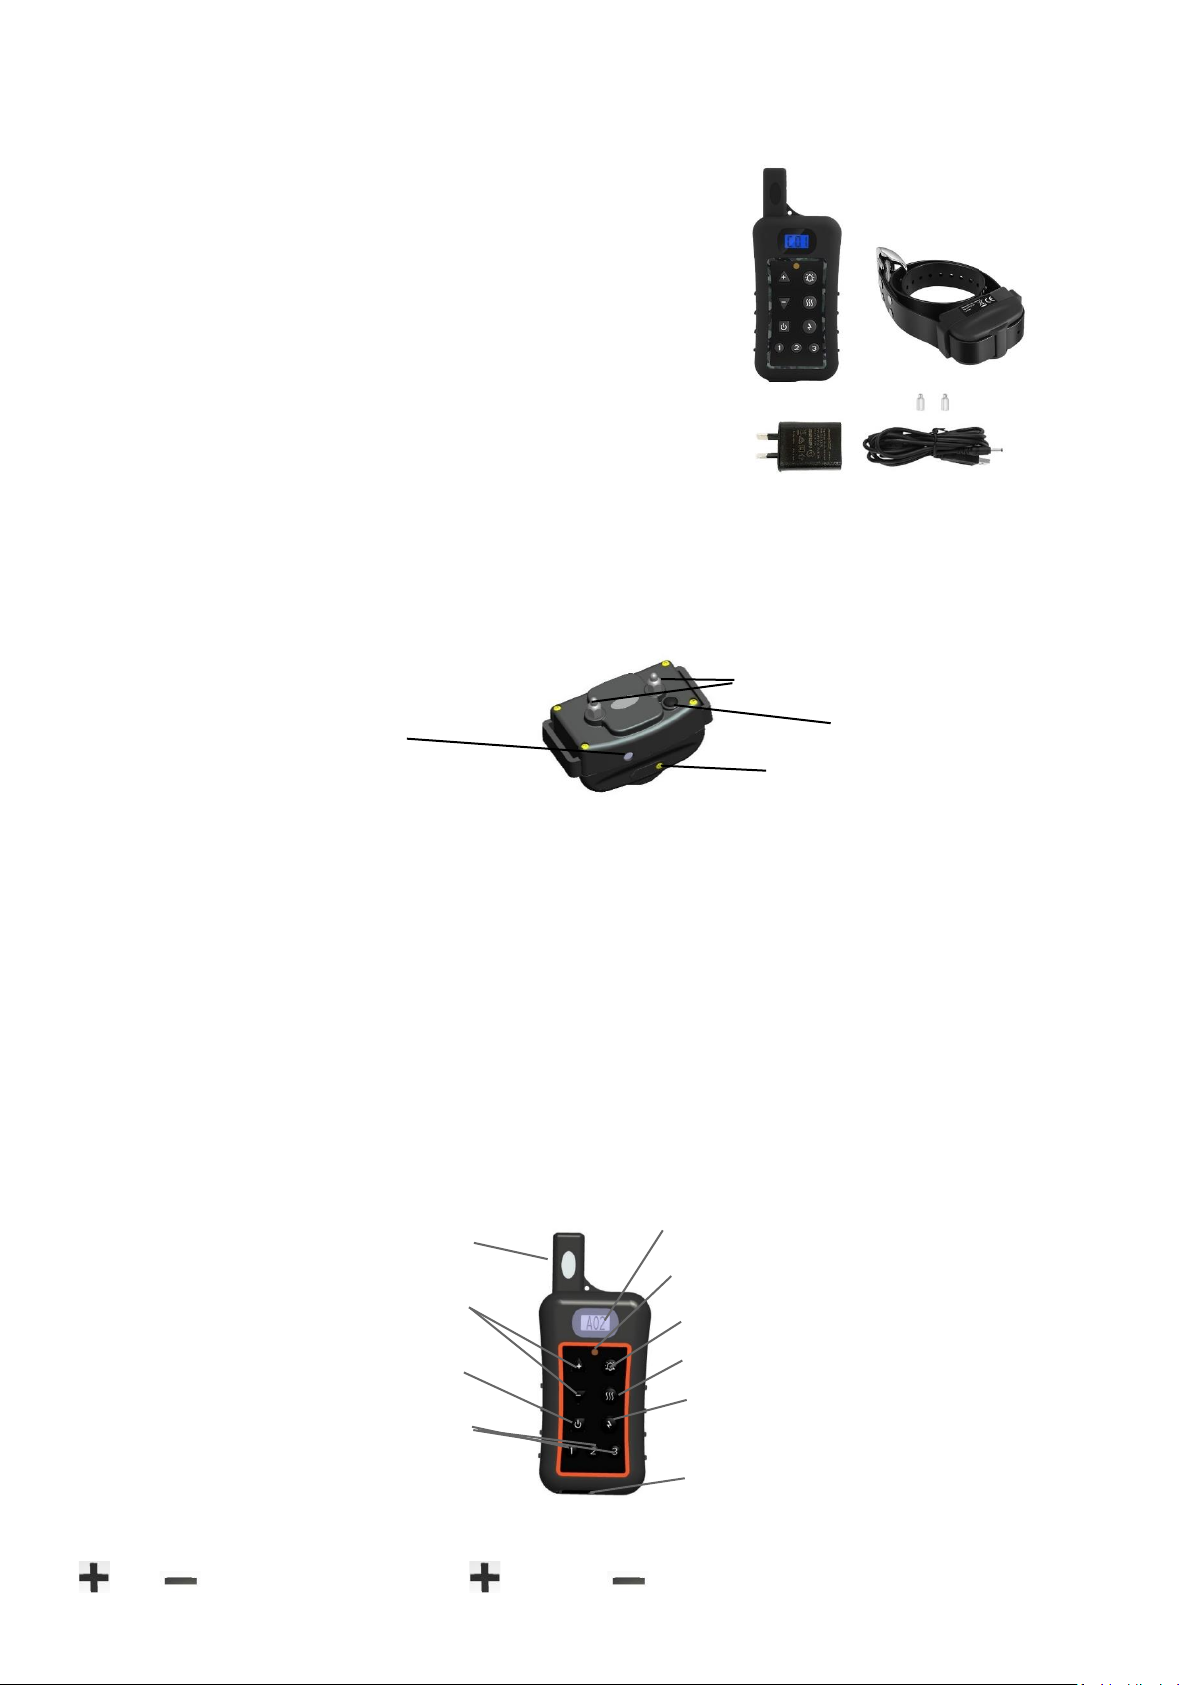
113R Remote Training Kit Contents
1. Remote Trainer Transmitter
2. 113R Receiver Collar (Medium to Large Size Dogs)
3. 113R Collar and Remote Transmitter Charger
4. 1 Pair of Long Contact Probes for long hair dog
Features:
•Up to 800 metres range
•Expandable to control 3 dogs (with purchasing extra collar)
•Waterproof (IPx7)
•Tone, Vibration and 10 variable levels in both continuous and nick stimulation
•Transmitter and collar are rechargeable with 3 hours quick charge
•Easy to use, comfortable and ergonomic transmitter
•Battery indicator
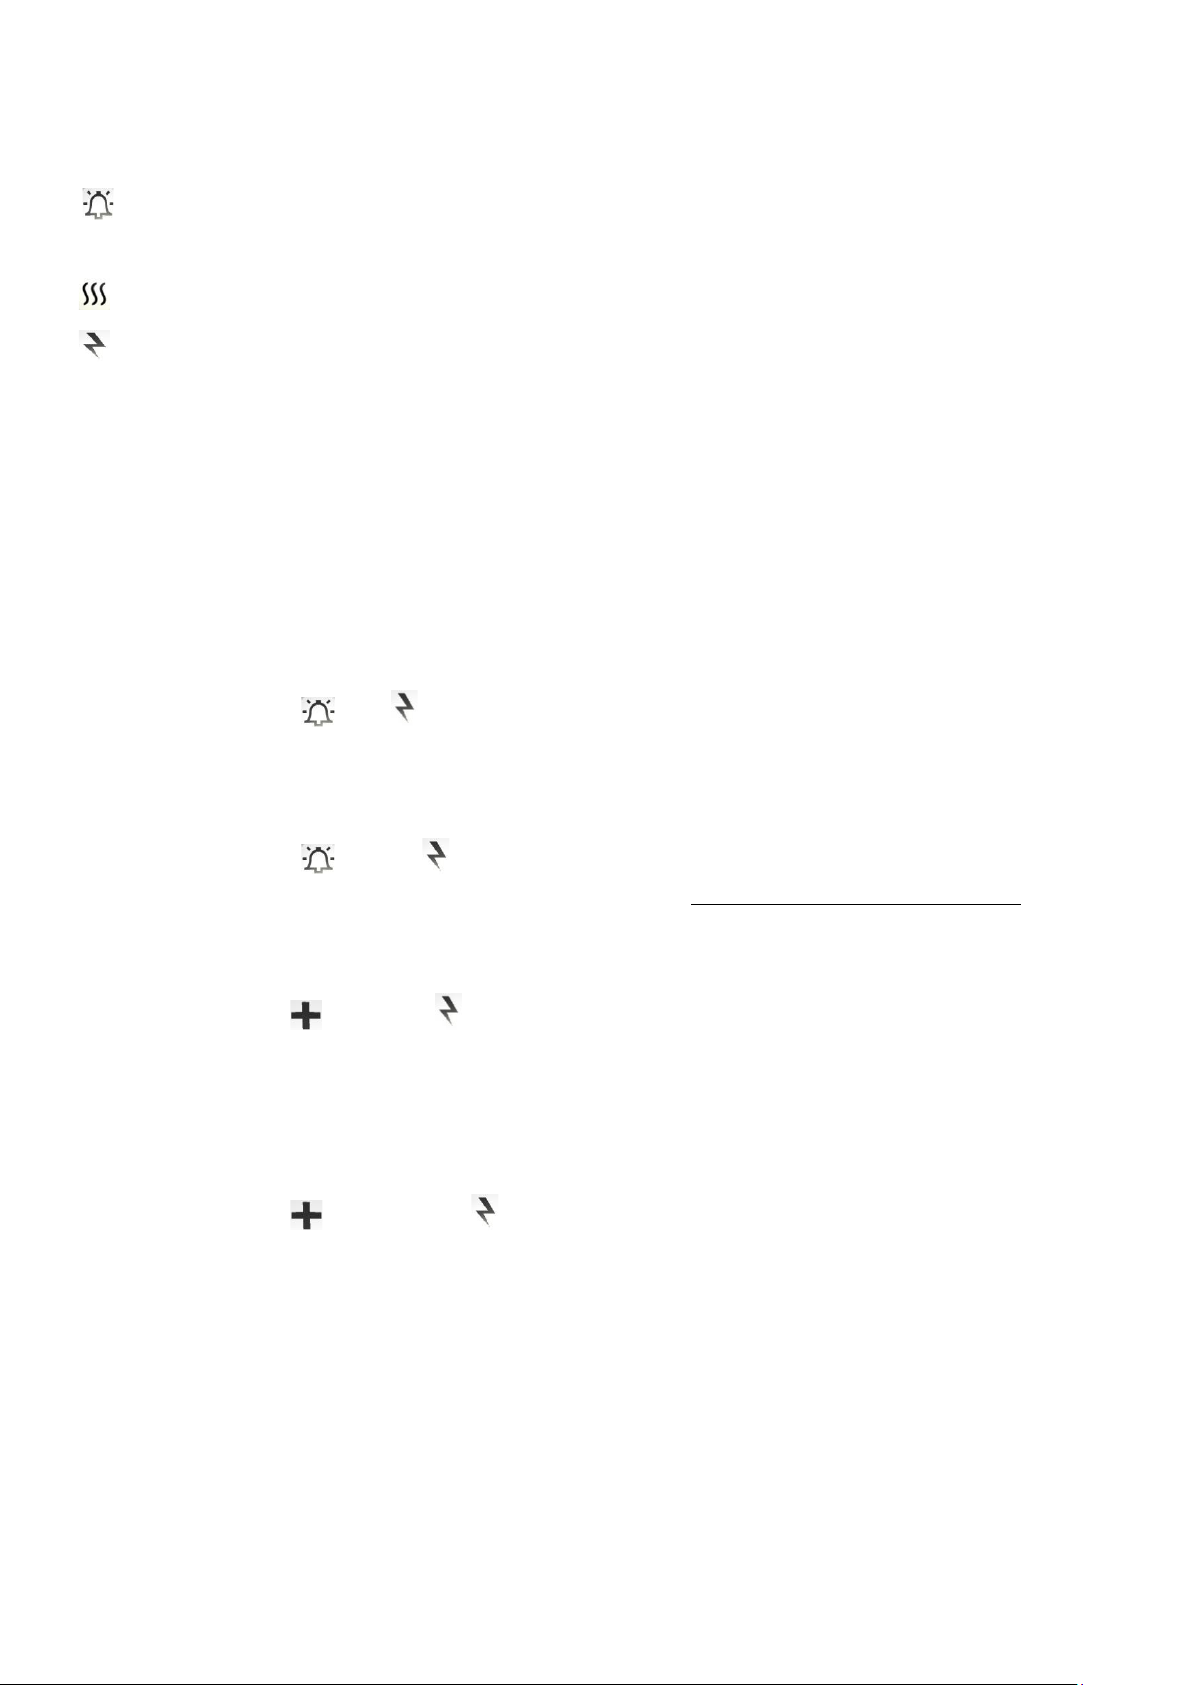
The Barkmate 113R Receiver Collar
The Standard Barkmate 113R Receiver Collar can be used for Barkmate Dog Fence system as well as Barkmate Remote Dog Training System. This collar has two
operating mode which are Dog Fence Mode and Dog Training Collar Mode. Please make sure the collar is in Dog Training Collar mode before using.
On/Off Button –change operating mode
Press and hold on 4 seconds to turn the collar on. The Collar will beep twice rapidly, and the green LED light will flash once every 5 seconds. Press and hold on 4
seconds to turn the collar off. The collar emits a long beep, and the LED light will turn off. NOTE: when turning the collar off, it is very IMPORTANT to release the
button after the LONG BEEP, or the collar will go into pairing mode. It will lose the connection with the OPTIONAL remote transmitter.
Switch between Fence Collar only mode or Dog Training Collar mode
Fence Collar only mode: Containment only, LED flashes Green twice every 5 seconds
Dog Training Collar mode: Remote training activated, LED flashes Green once per 5 seconds
Change the operating mode when the collar is ON! Press and hold the ON/OFF button while the collar is on for 2 seconds, the LED will turn Red. Release the
Button immediately, the Green light will flash either once or twice to indicate the current operating mode. Twice every 5 second is the Fence only Mode and
once every 5 second is the Dog Training Mode. To change the mode, repeat the step. If the ON/OFF button has been pressed too long, the collar will be turned
off and you will hear a long beep.
The 113R collar has 3-hour fast charge battery. The LED will flash Red when it needs to charge, and Green means fully charged.
The Barkmate Remote Training Transmitter
Stimulation Level Adjustment Button
“” and “ ” to adjust the stimulation output. Press to increase and to decrease. The Maximum level is 10.
Contact Probes
Use the short or long probes to match your
dog’s coat.
LED Indicator
This indicates the status: On/Off,
Low battery, and Charging status
Charging Port
To charge, open the rubber cover
and insert the adaptor plug into Jack.
On/Off Button
Antenna
Stimulation Level
Adjustment Button
On/Off Button
Dog Collar Selector
Dog 1, Dog 2, Dog 3
LED indicator
LCD display
Beep/Tone Button
Vibration Button
Static Correction Button
Charging Port Cover
The ON/OFF Button
Hold the button for 2 seconds to turn it on. The LED indicator turn Blue then off, and the LCD should show default “A01. To switch the power off, hold this
button for 2 seconds and the power light indicator will switch off.
Beep/Tone Button
“” Press the button, the collar will emit a no- stimulation Beep.
Vibration Button
“” Press once for a single short vibration. Press and hold the button for a continuous vibration for max. 8 seconds.
“ ” Press once for a single short static correction with pre-set output. Press and hold the button for a continuous static correction for max. 8 seconds.
The Dog Selector Buttons
The Transmitter is able to train up to 3 dogs up to 800 metres line of sight. The default is in “1”. The LCD screen will display dog ID “A XX”. Press “2” button to
switch to dog 2. The LCD will display “BXX”. Press 3to switch to dog 3. And the LCD will display “C XX”. A = Dog 1; B = Dog 2; C = Dog 3; “XX” = The output level
for static correction & vibration.
Please Note: The LED flashes Red when the battery is low.
The Barkmate Training remote is able to control up to 3 collars. You may need to unpair the collar before you can pair it with the new remote as the collar may
be paired with a different remote for testing purpose from the factory. MAKE SURE the collar is in dog training mode (flashes GREEN once every 5 seconds).
Unpairing the new collar/remove coding
1. Turn both collar (wish to unpair) and remote transmitter on. (if you have more than one collar, please turn off other
collars). Keep the collar close to transmitter (almost touches or touches each other).
2. Press & hold both “ ” and “ ” button on the remote in the same time, until the digit on the LCD changes very fast.
3. Press any dog selector button (“1”, “2” or “3”). Once you press the button, the collar should beep five times rapidly. If
the collar doesn’t beep, release the button and press/hold the button (“1”, “2” or “3”) again.
If you want to remove an existing collar from the number, you can press and hold the number of dog selector button
until the collar beeps five times and flashes Green Rapidly.
4. Press & hold both “ ” and the “ ” button again until the digit on the LCD display stop changing. The collar is
unpaired (coding removed) from previous transmitter successfully. Dog collar should still flash Green rapidly.
Pair the new collar to the remote
1. Turn both collar (wish to pair) and remote transmitter on (Collar in Dog Training Mode).
2. Press & hold the “ ”button and “ ” button at the same time, until the digit on the LCD display changes very fast. It
means the remote transmitter is enter the pairing mode. The LED on dog collar should flash quickly in the same time.
5. Press & hold on the Dog selection button: Press and hold “1” to match the Receiver Collar as the dog 1, press and hold
“2” to match the Receiver Collar as the dog 2, or press and hold “3” to match the collar as the dog 3. The collar should
“beep” 5 times rapidly and green LED on the collar will flash normally. If the collar doesn’t beep, release the button and
press/hold the button again.
3. Release the Dog Selector button.
4. Press & hold the “ ” button and the “ ” button at the same time again, until the digit on LCD display is no longer
changing, then release both buttons.
5. Select the number of collar and test with warning beep or vibration
Transmitter Charging
The transmitter has 2-hour fast charge lithium battery. When the Transmitter is plugged in with DC power supply, the LCD will display “CHA”. This means the
device is charging. The LCD will display “FUL” when the transmitter is fully charged.
Troubleshooting
The Dog Does not respond to stimulation
1. Check if the collar is fitted properly
2. For long/thick hair dog, trim the hair of the contact area. Use the long contact probes, must make good contact with skin.
3. Recharge the battery/replace new battery of the collar, test the output with the collar test light tool. The collar will still beep with low battery but it
would not emit the strength of stimulation.
If the signal is not consistent, please contact DogMaster Trainers Support Line: AU: 07 5559 9100, NZ: (07) 855 4799.
Other Barkmate Pet Care Product manuals


Popular Pet Care Product manuals by other brands


J&J Global
J&J Global Edenbranch 703001 quick start guide

cedarcraft
cedarcraft CCGC2349 quick start guide

Exo Terra
Exo Terra REPTI CLEAR F250 instruction manual

Savic
Savic Ruffy 2 Assembly instructions

Petsafe
Petsafe Staywell 500 Series installation guide

Bissell
Bissell Pet Inspired BarkBath QT 2290 Series user guide