BARMATIC COOLICE ICE250 User manual

You should read this user manual carefully before
using the appliance.
Przed uruchomieniem urządzenia należy koniecznie
dokładnie przeczytać niniejszą instrukcję obsługi.
User manual | Instrukcja obsługi
Ice cube machine COOLICE
Kostkarka COOLICE
ICE250, ICE350, ICE500, ICE700, ICE900

Keep these instructions with the appliance.
Zachowaj instrukcję urządzenia
For indoor use only.
Do użytku wewnątrz pomieszczeń.
3
EN
Dear Customer,
Thank you for purchasing this Barmatic appliance. Read this manual carefully, paying particular attention to
the safety regulations outlined below, before installing and using this appliance for the first time.
Safety regulations
• This appliance is intended for buffet and household use.
• Only use the appliance for the intended purpose it was designed for as described in this
manual.
• The manufacturer is not liable for any damage caused by incorrect operation and
improper use.
• Keep the appliance and electrical plug away from water and other liquids. In the event
the appliance falls into water, immediately remove the power plug from the socket. Do
not use the appliance until it has been checked by a certified technician. Failure to follow
these instructions will cause life threatening risks.
• Never attempt to open the housing of the appliance by yourself.
• Do not insert objects into the housing of the appliance.
• Do not touch the plug with wet or damp hands.
• DANGER OF ELECTRIC SHOCK!Do not attempt to repair the appliance by yourself,
repairs are only to be conducted by qualified personnel.
• Never use a damaged appliance! When it’s damaged, disconnect the appliance from the
socket and contact the retailer.
• WARNING! Do not immerse the electrical parts of the appliance in water or other liquids.
• Never hold the appliance under running water.
• Regularly check the power plug and cord for any damage. When damaged it must be
replaced by a service agent or similarly qualified person in order to avoid danger or injury.
• Make sure the cord does not come in contact with sharp or hot objects and keep it away
from open fire. Never pull the power cord to unplug it from the socket, always pull the
plug instead.
• Make sure that the power cord and/or extension cord do not cause a trip hazard.
• Never leave the appliance unattended during use.
• WARNING!
As long as the plug is in the socket the appliance is connected to the power
source.
• Turn off the appliance before unplugging it from the socket.
• Connect the power plug to an easily accessible electrical socket so that in case of emergency
the appliance can be unplugged immediately.
• Never carry the appliance by the cord.
• Do not use any extra devices that are not supplied together with the appliance.
• Only connect the appliance to an electrical outlet with the voltage and frequency mentioned
on the appliance label.
• Never use accessories other than those recommended by the manufacturer. Failure to do
so could pose a safety risk to the user and could damage the appliance. Only use original
parts and accessories.
4
EN
• This appliance should not be operated by persons with reduced physical, sensory or mental
capabilities, or persons that have a lack of experience and knowledge.
• This appliance should, under any circumstances, not be used by children.
• Keep the appliance and its power cord out of reach of children.
• WARNING: ALWAYS switch off the appliance and unplug from power socket before
cleaning, maintenance or storage.
Special Safety Regulations
•
This appliance is intended only for making ice cube. Any other use may lead to damage of
the appliance or personal injury
.
•
Use the appliance only as described in this manual
.
•
min. height 15mm :
Caution! Risk of fire! The refrigerant used is R290 in this appliance. It is a
highly flammable refrigerant. The insulation foaming agent used is C5H10 in
this appliance. They are highly flammable
.
•
WARNING: Do not damage the refrigerant circuit
.
•
WARNING: Keep all ventilation openings in the appliance enclosure clear of obstruction
.
•
Do not place the appliance on a heating sources (gasoline, electric, charcoal cooker, etc.).
Keep the appliance away from any hot surfaces and open flames. Always operate the
appliance on a level, stable, clean, heat-resistant and dry surface
.
•
After the installation is done, do not move your ice maker and wait for at least two hours
to start it
.
•
Make sure you cleaned the inside surface of your product before first use
.
• Do not use power strips or extension cords to run your product.
• The cleaning and maintenance of the device should not be made by children unless they are
under supervision.
• In case the unit is located in an area with no side ventilation, ice maker does not work
properly. Leaving enough room around the unit will allow the unit work properly. Normal
ice-production capacity is directly relevant with the condenser air delta temperature, water
temperature, states of the condenser air channel and age of the machine.
• The ice machine must be located inside temperature controlled room. Running the ice
machine outdoors or in an area that the temperature can go outside of the working limits
may harm the machine, and your warranty may become void. Ice machines are designed
and built with the highest respect for security.
• WARNING: Connect to potable water supply only.

5
EN
Water softeners / filters
•CAUTION: all appliances requiring constant connection with the water supply
system (including this appliance) must have an additional water softener and/
or filters attached in order to remove calcium and magnesium compounds.
The softener or filters must be used in compliance with the manufacturer’s
recommendations set out in the user’s manual.
•If the softener and/or filters is not attached or is misused and/or regenerated, the
distributor shall reject all complaints entailing repairs required due to the limescale
build-up in the appliance.
•The presence of particles in the water due to quality of the water supply and / or
contamination with dirt, installation residue, burrs, slag and so on will adversely affect
the operation of the ice maker. Such contamination may cause inefficient operation,
no ice making, loud noises, etc. Problems with the machine due to plumbing and/or
calcified water are not covered by the warranty.
•It is recommended to use softeners or filters from the wide range offered by Fine Dine.
Ask your sales representative for assistance in the selection of the appropriate model.
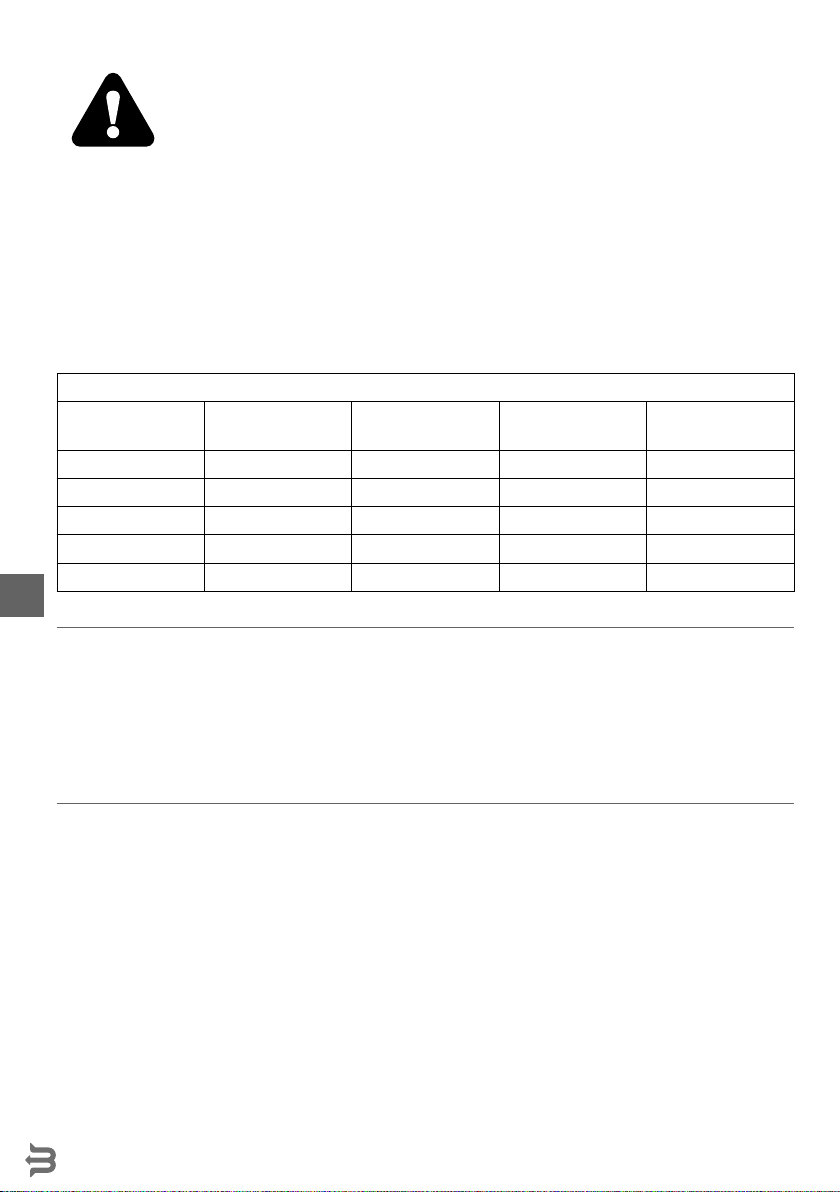
General Hardness of water
°dGH °fH mmol/l °e Water softener
above 24 above 40 above 4,2 above 28 Necessary
18 - 24 32 - 40 3,2 – 4,2 22 - 28 Necessary
12 - 18 19 – 32 2,1 – 3,2 13 - 22 Necessary
4 - 12 7 - 19 0,7 – 2,1 5 - 13 Necessary
below 4 below 7 below 0,7 below 5 Not required
Intended use
• This appliance is intended for buffet and house-
hold use.
• The appliance is designed only for making ice
cubes. Any other use may lead to damage to the
appliance or personal injury.
• Operating the appliance for any other purpose
shall be deemed as misuse of the device. The
user shall be solely liable for the improper use
of the device.
Grounding installation
This appliance is classified as protection class
I and must be connected to a protective ground.
Grounding reduces the risk of electric shock by
providing an escape wire for the electric current.
This appliance is fitted with a power cord that has a
grounding wire and grounded plug. The plug must
be plugged into an outlet that is properly installed
and grounded.

6
EN
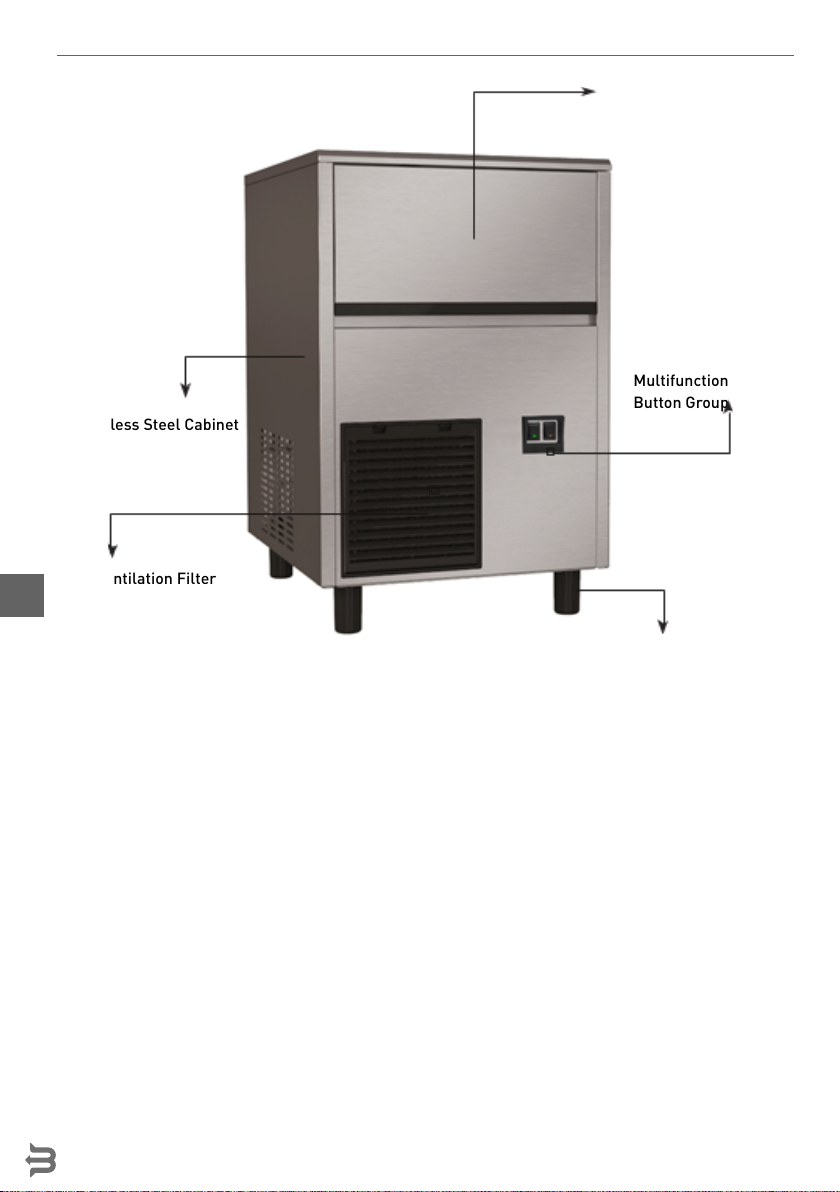
Genearl view
7
EN
8
EN
Technical specification
ATTENTION: Small differences in color and other variations are possible for different visualization, im-
aging technologies or other technical reasons. The manufacturer is not liable for these differences and
deviations. No rights can be obtained due to typographical errors, product descriptions or obvious errors
on the website.
* Adjustable legs can vary according to product models.
Ice Storage Bin Lid
Ventilation Filter
Adjustable Legs*
Multifunction
Button Group
Stainless Steel Cabinet
9
EN
Model ICE250 ICE350 ICE500 ICE700 ICE900
Dimensions [mm] 355x435x(H)590 355x435x(H)590 355x435x(H)590 355x435x(H)590 355x435x(H)590
Production Capacity
[kg] 22 33 47 66 85
Storage Capacity [kg] 4 16 28 40 40
Cooling system Air
Power [W] 300 470 550 780 1000
Daily Electric Con-
sumption [kW] 5,1 8,5 12,6 16,1 16,4
Voltage/ Frequency
[V/Hz] 230V~/ 50
Refrigerant R290
Climate class T
Protection Class Class I
Net weight (kg) 26 38 45 75 85
Installation of Ice Maker
Selection of location
NOTE: Your product should not be in direct contact
with or in close proximity to any heat source
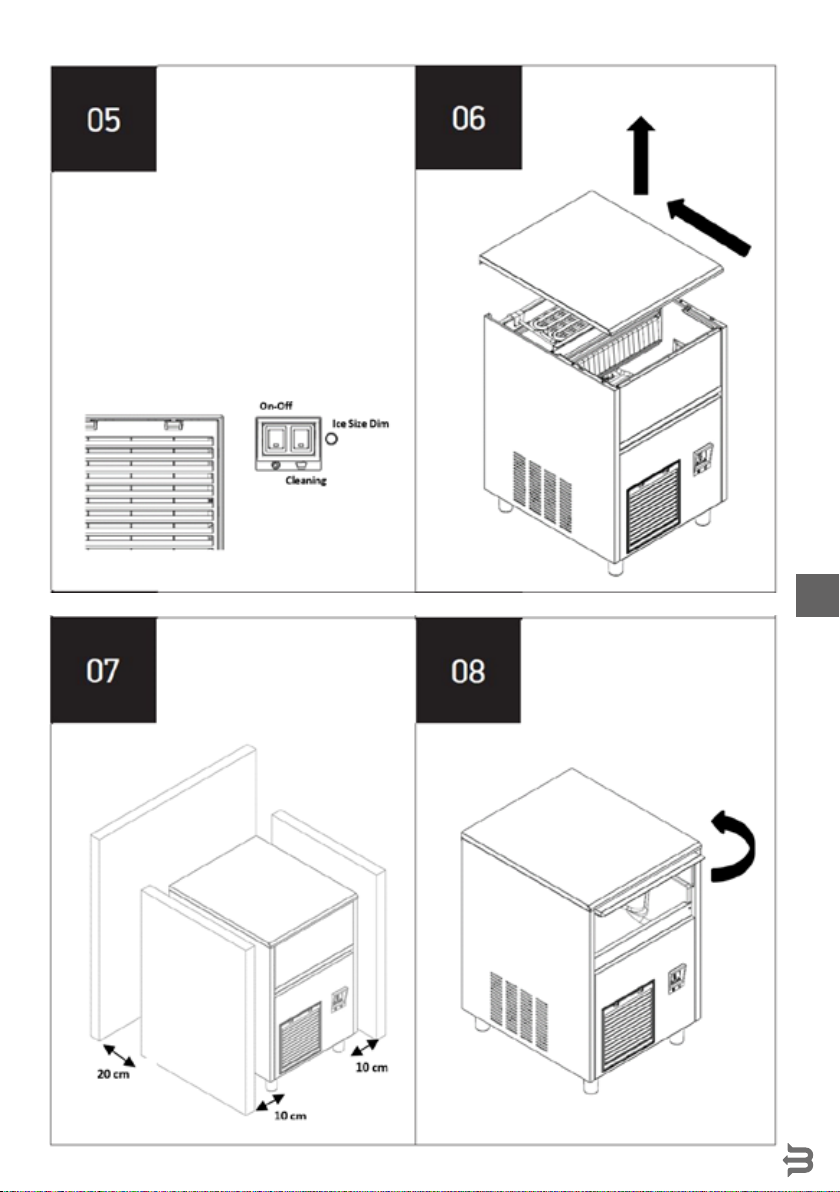
• You should leave at least 10 cm of distance if
you place your ice maker next to other electrical
equipment (such as ovens, computers etc,) that
are considered as heat sources.
• If the product is to be placed next to a wall,
the distance between the back surface of the
product and the wall should not be less than 20
cm (See Figure-7).
• Do not place objects in front of the ventilation
filter of your ice maker that might prevent air
circulation into your product.
• Do not place your product outdoors. This product
is designed to be used indoors.
Electrical Connection
• The voltage and frequency values of the main
power supply have to be the same as written on
the product label. If you are in doubt or need as-
sistance, please contact the nearest Authorized
Service or get help from a qualified electrician.
ATTENTION:
• Make sure your power outlet has been grounded.
• The amperage of the circuit breaker to which the
product will be plugged in should be 10A.
• Do not use power strips with multi sockets or
extension cords to operate your product.
Water Use and Connection
Your ice maker is designed to make ice cubes
within the most ideal time and size. However, it is
important to note that there are some things that
will affect the quality of the ice produced by the ma-
chine, as well as the health of the internal compo-
nents of the ice maker.
The Water Supply
• Should be good for human consumption.
• Should have an optimum level of hardness.
• Should include minimal amount of chlorine.
IMPORTANT: The optimum water filters to be used
on your product are available and can be purchased
from your Authorized Service. Water temperature
should be between 10°C and 30°C.
10
EN
Installation
• Remove and disassemble all packaging materi-
als of the product before installation.
• The ice slide grate, waterproofing plastics and
the ice scoop are provided inside the product. If
any part or accessory is missing, please contact
our customer services.
• Clean the inner cabinet with warm water and a
soft cloth before using the ice maker. Clean the
ice trays with warm soapy water. Dry with a soft,
cotton cloth. After placing the ice maker at the
installation point, wait 2 (two) hours before op-
erating to get the cooling system pressure sta-
bilized. Install the parts inside the ice maker in
accordance with the assembly instructions.
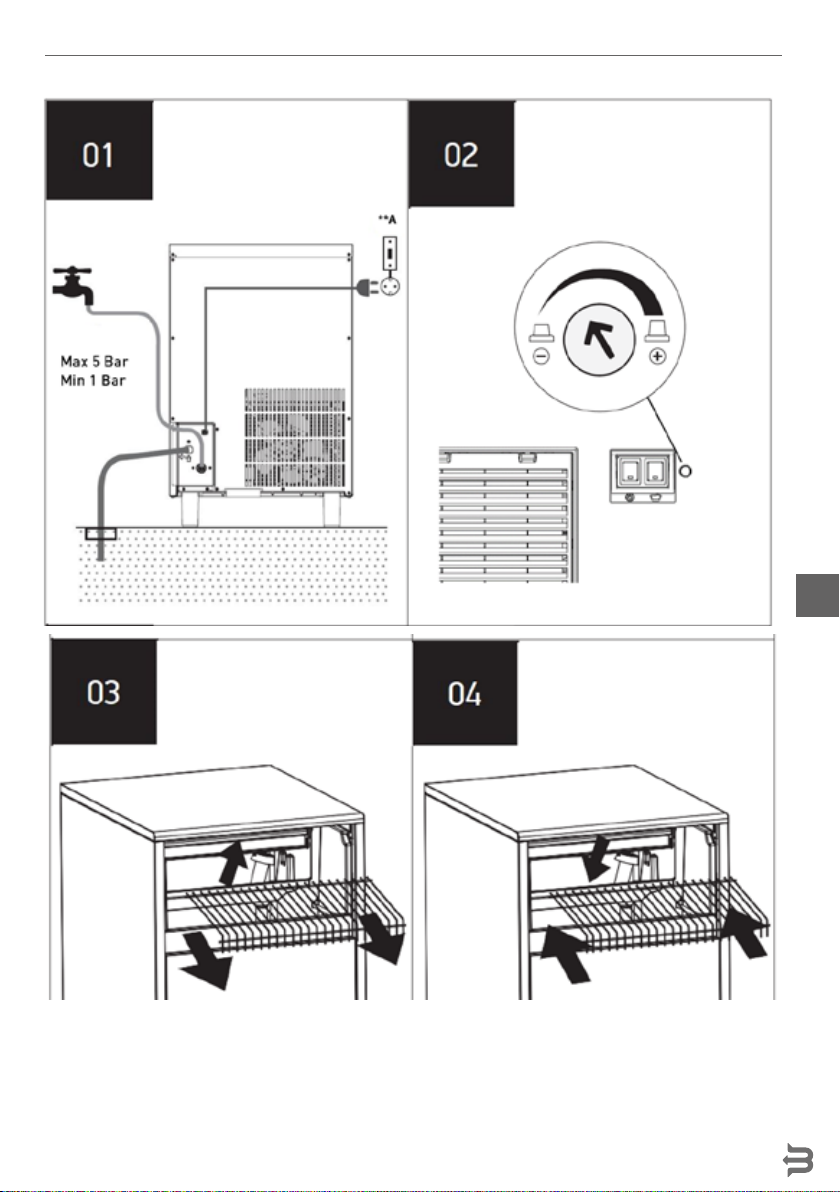
• The cold water inlet pressure must not exceed
the operating water pressure (5 Bar) indicated
on the technical data sheet. If the line pressure
is higher than 5 Bar, a pressure reducer must be
installed.
• Connect your device to the mono phase -
grounded power supply of the rating indicated on
the nameplate. Your device is designed to func-
tion normally within ± 10% of the main voltage. If
this range cannot be provided in your local pow-
er network, it is recommended to use a voltage
regulator.
• If it is necessary to change the location of your
ice maker, be sure to transport the unit accord-
ing to the markings on the original packaging of
the device.
• Protect your device against factors that may
damage the package and the device (moisture,
water, impact, chemical, etc.).
• Only Authorized Service should disassemble the
device. Never interfere with the internal parts
and elements of the ice-maker.
• The device must be commissioned by the Au-
thorized Service.
• Failure to comply with the above conditions will
void your product warranty.
• Do not leave packaging materials (plastic bags,
nylon, etc.) within the reach of children.
• The manufacturer reserves the right to change
the information in this manual. Therefore; this
booklet does not constitute a commitment to
specifications.
Usage instruction
Operating
After installing your Ice Maker following the in-
structions above and making all necessary
connections
• Make sure that the power outlet you are using for
your ice-maker is live and has power.
• Turn on the water.
• Set the On-Off button at the front of your prod-
uct to the On position. (When you set it to the On
position, the power light on the button will turn
on.).
• The product will automatically go into a de-
lay-time mode for 1 minute after it is turned on.
• At the end of the delay-time mode, the product
will start getting water and making ice.
• Your product will complete the ice-making cycle
after a certain time, depending on the ambient
and water temperature.
• To change the dimple size of the ice made by the
ice maker, adjust the potentiometer in the direc-
tion of the arrow. (See Figure-2).
NOTE: In order to allow your product to make ice
in the optimum dimple size and time, you need to
wait for at least 2 hours after the installation, be-
fore turning on the machine.
Shutting Off
• Set the power button at the front of your Ice Mak-
er to “Off” position.
• Unplug the product if you are not going to use
the ice-maker for a long time.
• Turn off the water.

11
EN
There are some malfunction and warning signals defined for the Red light on the power button of the prod-
uct as detailed in the chart below.
Function mode ON OFF
Cleaning 3 sec 1 sec
Fault 2 sec 2 sec
Ice Bin Full 1 sec 1 sec
Cleaning and maintenance
NOTE: Safety rules must be observed before clean-
ing your Ice Maker.
• Unless otherwise specified, turn off and unplug
the unit before starting to clean the Ice Maker.
• The outer cabinet of the product should only
be cleaned by wiping with a damp cloth. Do not
spray the unit with water or any other cleaning
solvent. This causes undesired electrical failures
and jeopardizes the safety of the user.
• Always wear protective gloves and similar pro-
tective equipment during cleaning.
• Never use cleaning agents and chemicals which
may cause cutting, piercing and corrosion to
your product. Your Ice Maker will be out of war-
ranty if chemicals are used for cleaning.
• Do not use any cleaning agents not recommend-
ed by your Authorized Service.
Exterior cleaning of the Ice Maker
The exterior of your ice-maker is made of stain-
less steel. Wipe the exterior surfaces with a cotton
damp cloth or a sponge and then wipe it with a dry,
clean cotton cloth.
Cleaning of the Sprayer System
• Make sure the water and electrical connections
of the product are off, in compliance with the
cleaning instructions above.
• Remove all the ice from the storage bin.
• The power switch should be off, and the water
inlet valve should be opened.
• Remove the slide grate located inside the inner
basin and then remove the level discharge plas-
tic from its slot, and ensure the water to be dis-
charged. (See Figure-3)
• Place the water level drain plastic group back
to its slot after discharging the water inside the
pool. (See Figure-4)
• Then, pour the cleaning solution recommended
by Authorized Service into the water pool.
• Select the ‘cleaning’ setting on your product,
then turn the power switch to the “On” position.
WITHIN 30 SEC OF TURNING ON THE POWER,
YOU MUST PRESS AND HOLD THE ‘CLEANING’
BUTTON FOR 9 SEC. (See Figure-5)
• The cleaning process will continue for 10
minutes.
• At the end of the cleaning cycle, remove all the
produced ice from storage bin.
IMPORTANT: Do not turn off the product while
cleaning is in progress. After the cleaning process,
discharge the water inside the inner basin. (See
figure 3)
NOTE: Right after this cleaning, the Ice Set must
be cleaned
Cleaning of the Ice Set
To remove the top cover, remove the screws in “Fig-
ure-6”. Remove the plastic cover on the cooling
pipes. Clean the cooling pipes and visible surfac-
es in the tank with cleaning solution / soapy cloth.
Then rinse and then dry. Close the plastic cover
that protects the cooling system pipes and then
close the top cover of the product. Then replace the
screws.

12
EN
Cleaning of the Ice Storage Bin
• To clean the ice bin, first turn the power switch to
the “Off” position. Then disconnect the product
from the main power supply.
• Drain the ice completely from the ice bin.
• Wipe the inside of the ice bin with cleaning solu-
tion / soapy cloth and then rinse / dry.
• Take care not to allow any lime and/or cleaning
solution residue to remain.
Cleaning of the Water Inlet Filter
• Disconnect the Ice Maker from main power
supply.
• Disconnect the water connection of your ice
maker.
• Remove the water inlet filter. (The frequency of
cartridge replacement varies depending on the
usage period, but it is recommended to change
every 6 months.).
• Follow the filter manufacturer’s maintenance
and cleaning instructions / recommendations to
perform cleaning and maintenance of the water
inlet filter.
NOTE: Then return the Ice Maker to operation by
following the installation instructions.
IMPORTANT: The applications specified in the
product cleaning instructions should be performed
at least 4-5 times a year.
13. Troubleshooting
Fault Probable Cause Solution
Ice Maker does not work
Power button is Off. Set the power button to the “On” position.
The power connection is faulty. Get the power connection checked by a
qualified electrician.
The Ice Maker is in protection mode. Check the place selection instructions of the
ice maker. Ice Maker does not receive
adequate amount of air.
No power in the outlet. Check the fuse connected to the outlet.
The compressor stops
shortly after it starts
working
Ambient temperature is very high. Check the place selection instructions of the
ice maker. Ice Maker does not receive
adequate amount of air. Clean the ventilation
filter.
Grid voltage is low. Get the power connection checked by a
qualified electrician.
Ice Set is cooled but the
water inside the water
pool is insufficient
Water valve is faulty Contact the nearest Authorized Service.
Water supply pressure is low Make sure that the water supply pressure is
greater than 1 Bar.
Water level drain plastic group seeps Place the water level plastic group to its slot
tightly.
Ice cubes are not
transparent
Water nozzle is blocked Water nozzle sprayer should be checked. The
blocked nozzles should be cleaned.
Water pool is dirty Clean the Ice Maker by following the cleaning
instructions.
Pressure of the water pump is low Contact the nearest Authorized Service.
The water is blurry / dirty / chlorinated Use a water filter.

13
EN
Ices are much smaller
than they should be
Water is insufficient Place the water level plastic group to its slot
tightly.
Cooling system is faulty Check the water main connection for the water
leakage. Contact the nearest Authorized
Service.
Ices are much bigger
than they should be
Time setting is incorrect Set the time on the electronic card to a lower
value.
Sensor is faulty Contact the nearest Authorized Service.
The quantity of the ice is
insufficient
Gas leakage in the defrost solenoid Contact the nearest Authorized Service.
Water valve is faulty Contact the nearest Authorized Service.
Device does not stop
when the ice bin is full
Sensor is faulty Contact the nearest Authorized Service.
Warranty
Any defect affecting the functionality of the appli-
ance that becomes apparent within one year after
purchase will be corrected by free repair or re-
placement provided the appliance has been used
and maintained in accordance with the instructions
and has not been abused or misused in any way.
Your statutory rights are not affected. If the appli-
ance is claimed under warranty, state where and
when it was bought and include proof of purchase
(f.e. receipt).
In line with our policy of continuous product devel-
opment we reserve the right to change the product,
packaging and documentation specifications with-
out notice.
Discarding & Environment
When decommissioning the appliance, the prod-
uct must not be disposed of with other household
waste. Instead, it is your responsibility to dispose to
your waste equipment by handing it over to a des-
ignated collection point. Failure to follow this rule
may be penalized in accordance with applicable
regulations on waste disposal. The separate col-
lection and recycling of your waste equipment at
the time of disposal will help conserve natural re-
sources and ensure that it is recycled in a manner
that protects human health and the environment.
For more information about where you can drop off
your waste for recycling, please contact your local
waste collection company. The manufacturers and
importers do not take responsibility for recycling,
treatment and ecological disposal, either directly
or through a public system.

14
PL
Drogi Kliencie,
Dziękujemy za zakup tego urządzenia Barmatic. Przeczytaj uważnie tę instrukcję, zwracając szczególną
uwagę na przepisy bezpieczeństwa przedstawione poniżej, przed zainstalowaniem i używaniem tego
urządzenia po raz pierwszy.
Przepisy bezpieczeństwa
• Urządzenie przeznaczone do bufetu oraz do użytku domowego.
• Urządzenie należy używać wyłącznie zgodnie z przeznaczeniem, do którego zostało
zaprojektowane zgodnie z opisem w niniejszej instrukcji.
• Producent nie ponosi odpowiedzialności za jakiekolwiek szkody spowodowane
nieprawidłowym działaniem i niewłaściwym użyciem.
• Przechowywać urządzenie i wtyczkę elektryczną z dala od wody i innych płynów.
W przypadku, gdy urządzenie wpadnie do wody, natychmiast wyjmij wtyczkę zasilającą
z gniazda. Nie używać urządzenia, dopóki nie zostanie sprawdzone przez certyfikowanego
technika. Nieprzestrzeganie tych instrukcji spowoduje zagrożenie dla życia.
• Nigdy nie próbuj samodzielnie otwierać obudowy urządzenia.
• Nie wkładaj przedmiotów do obudowy urządzenia.
• Nie dotykać wtyczki mokrymi lub wilgotnymi dłońmi.
• NIEBEZPIECZEŃSTWO PORAŻENIA PRĄDEM!Nie próbuj samodzielnie naprawiać
urządzenia, naprawy mogą być wykonywane wyłącznie przez wykwalifikowany personel..
• Nigdy nie używaj uszkodzonego urządzenia! Po uszkodzeniu odłącz urządzenie od
gniazda i skontaktuj się ze sprzedawcą.
• OSTRZEŻENIE! Nie zanurzaj części elektrycznych urządzenia w wodzie lub innych
płynach.
• Nigdy nie trzymaj urządzenia pod bieżącą wodą.
• Regularnie sprawdzaj wtyczkę zasilającą i przewód pod kątem uszkodzeń. W przypadku
uszkodzenia musi zostać zastąpiony przez agenta serwisowego lub podobnie
wykwalifikowaną osobę w celu uniknięcia niebezpieczeństwa lub obrażeń.
• Upewnij się, że przewód nie styka się z ostrymi lub gorącymi przedmiotami i trzymaj go
z dala od otwartego ognia. Nigdy nie pociągaj za przewód zasilający, aby odłączyć go od
gniazda, zawsze za wtyczkę.
• Upewnij się, że przewód zasilający i/lub przedłużacz nie powodują zagrożenia przejazdem.
• Nigdy nie pozostawiaj urządzenia bez nadzoru podczas użytkowania.
• OSTRZEŻENIE!
Dopóki wtyczka znajduje się w gnieździe, urządzenie jest podłączone do
źródła zasilania.
• Wyłącz urządzenie przed odłączeniem go od gniazda.
• Podłącz wtyczkę do łatwo dostępnego gniazdka elektrycznego, aby w nagłych wypadkach
urządzenie mogło zostać natychmiast odłączone.
• Nigdy nie noś urządzenia za przewód.
• Nie należy używać żadnych dodatkowych urządzeń, które nie są dostarczane razem
z urządzeniem.

15
PL
• Podłącz urządzenie tylko do gniazdka elektrycznego z napięciem i częstotliwością
wymienioną na etykiecie urządzenia.
• Nigdy nie używaj akcesoriów innych niż zalecane przez producenta. Niezastosowanie się do
tego może stanowić zagrożenie dla bezpieczeństwa użytkownika i spowodować uszkodzenie
urządzenia. Używaj tylko oryginalnych części i akcesoriów.
• Urządzenie to nie powinno być obsługiwane przez osoby o ograniczonych możliwościach
fizycznych, sensorycznych lub umysłowych, ani osoby, które mają brak doświadczenia i
wiedzy.
• Urządzenie to w żadnym wypadku nie powinno być używane przez dzieci.
• Przechowywać urządzenie i jego przewód zasilający w miejscu niedostępnym dla dzieci.
• OSTRZEŻENIE: ZAWSZE wyłączyć urządzenie i odłączyć od gniazdka elektrycznego przed
czyszczeniem, konserwacją lub przechowywaniem.
Specjalne przepisy bezpieczeństwa
•
To urządzenie jest przeznaczone wyłącznie do wytwarzania kostek lodu. Wszelkie inne
użycie może prowadzić do uszkodzenia urządzenia lub obrażeń ciała
.
•
Należy używać tego urządzenia wyłącznie zgodnie z opisem podanym w niniejszej
instrukcji
.
•
min. height 15mm :
OSTRZEŻENIE!RYZYKOPOŻARU!Czynnik chłodniczy stosowany w urządzeniu
to R290. Jest on wysoce łatwopalny. Środek pianotwórczy wykorzystywany do
izolacji urządzenia to C5H10. Jest on wysoce łatwopalny
.
•
OSTRZEŻENIE:Nie uszkadzać obwodu czynnika chłodniczego
.
•
OSTRZEŻENIE: Nie zasłaniać jakichkolwiek otworów wentylacyjnych w obudowie
urządzenia
.
• Nie umieszczaj urządzenia na obiekcie emitującym ciepło (kuchenka gazowa, elektryczna,
grill, itp.). Przechowuj urządzenie z dala od jakichkolwiek gorących powierzchni lub
otwartego płomienia. Urządzenie powinno zostać ustawione i być obsługiwane na równej,
stabilnej, czystej i suchej powierzchni, odpornej na działanie wysokich temperatur.
• Po umieszczeniu kostkarki w miejscu istalacji odczekaj przynajmniej 2 godziny przed jej
uruchomieniem.
• Upewnij się, że wyczyściłeś wnętrze urządzenia przed pierwszym użyciem.
• Nie używaj listew zasilających ani przedłużaczy do podłączenia urządzenia.
• Czyszczenia i konserwacji urządzenia nie powinny wykonywać dzieci bez nadzoru.
• W przypadku, gdy boczne otwory wentylacyjne są zablokowane, kostkarka do lodu nie
działa prawidłowo. Pozostawienie wystarczającej ilości miejsca wokół maszyny pozwoli na
jej prawidłowe działanie. Optymalna wydajność produkcji lodu jest bezpośrednio związana
z różnicą temperatury powietrza w kondensatorze, temperaturą wody, stanem kanału
powietrza kondensatora i zużyciem maszyny.
• Kostkarka do lodu musi znajdować się w wentylowanym pomieszczeniu, w celu jej
prawidłowego funkcjonowania. Nie uruchamiaj urządzenia na zewnątrz lub obszarze,
w którym temperatura może wykraczać poza granice robocze.
• UWAGA: Urządzenie musi być podłączone wyłącznie do źródła wody pitnej.
16
PL
Zmiękczacze do wody
•UWAGA:wszystkie urządzenia wymagające stałego podłączenia do sieci
wodnej (między innymi niniejsze urządzenie) koniecznie muszą mieć
podłączony dodatkowo zmiękczacz i/lub filtr wody usuwający z niej związki
wapnia i magnezu. Zmiękczacz lub filtr musi być użytkowany zgodnie z
zaleceniami producenta zawartymi w instrukcji obsługi.
•W przypadku braku podłączenia zmiękczacza i/lub filtra lub jego złego użytkowania i/
lub regeneracji dystrybutor nie będzie uznawać reklamacji związanych z naprawami
wynikającymi z zakamienienia urządzenia.
•Zaleca się stosowanie zmiękczaczy lub filtrów z bogatej oferty Fine Dine. W odpowiednim
doborze konkretnego modelu pomoże Ci przedstawiciel handlowy firmy Fine Dine.
Twardość wody
Stopnie niemieckie
°dGH
Stopnie francuskie
°fH mmol/l Stopnie Clarka
°e
Podłączenie
zmiękczacza
powyżej 24 powyżej 40 powyżej 4,2 powyżej 28 Konieczne
18 - 24 32 - 40 3,2 – 4,2 22 - 28 Konieczne
12 - 18 19 – 32 2,1 – 3,2 13 - 22 Konieczne
4 - 12 7 - 19 0,7 – 2,1 5 - 13 Konieczne
poniżej 4 poniżej 7 poniżej 0,7 poniżej 5 Niewymagane
Przeznaczenie
• Urządzenie przeznaczone do bufetu oraz do użyt-
ku domowego.
• To urządzenie jest przeznaczone wyłącznie do
wytwarzania kostek lodu. Wszelkie inne użycie
może prowadzić do uszkodzenia urządzenia lub
obrażeń ciała.
• Wykorzystanie urządzenia w jakimkolwiek innym
celu uznane będzie za wykorzystanie niezgodne
z przeznaczeniem. Użytkownik będzie wyłącznie
odpowiedzialny za nieprawidłowe wykorzystanie
urządzenia.
Instalacja uziemienia
Urządzenie to jest klasyfikowane jako klasa ochro-
ny I i musi być połączone z podłożem ochronnym.
Uziemienie zmniejsza ryzyko porażenia prądem
elektrycznym, dostarczając przewód ewakuacyjny
dla prądu elektrycznego. To urządzenie jest wy-
posażone w przewód zasilający, który ma przewód
uziemiający i uziemioną wtyczkę. Wtyczka musi być
podłączona do gniazdka, które jest prawidłowo za-
instalowane i uziemione.
17
PL
Ogólny widok urządzenia

18
PL

19
PL
Specyfikacja techniczna
UWAGA: Niewielkie różnice w kolorze lub ogólnym wyglądzie są możliwe z uwagi na różny sposób wizuali-
zacji, technologię lub innych przyczyn technicznych. Producent nie ponosi odpowiedzialności za te różnice
i odchylenia. Nie można uzyskać żadnych praw z powodu błędów typograficznych, opisów produktów lub
oczywistych błędów na stronie internetowej.
* Regulowane nogi mogą różnić się w zależności od modelu produktu.
Pokrywa zbiornika
na lód
Filtr wentylacyjny
Regulowane nóżki*
Panel z przyciskami
wielofunkcyjnymi
Obudwa ze stali
nierdzewnej

20
PL
Model ICE250 ICE350 ICE500 ICE700 ICE900
Wymiary [mm] 355x435x(H)590 355x435x(H)590 355x435x(H)590 355x435x(H)590 355x435x(H)590
Wydajnoś produkcyjna
[kg] 22 33 47 66 85
Pojemnośc zbiornika
na lód [kg] 4 16 28 40 40
Chlodzenie Powietrze
Moc znamionowa [W] 300 470 550 780 1000
Dzienne zużycie energii
[kW] 5,1 8,5 12,6 16,1 16,4
Napięcie / Częstotli-
wość [V/Hz] 230V~/ 50
Czynnik chłodniczy R290
Klasa klimatyczna T
Klasa ochronności Klasa I
Waga netto (kg) 26 38 45 75 85
Instalacja kostkarki
Wybór miejsca umieszczenia kostkarki
UWAGA: Twój produkt nie powinien znajdować się
w bezpośrednim kontakcie z żadnym źródłem cie-
pła ani w jego pobliżu.
• Pozostaw co najmniej 10 cm odstępu, jeśli
umieszczasz kostkarkę do lodu obok innych
urządzeń elektrycznych (takich jak piekarniki,
komputery itp.), które są źródłami ciepła.
• Jeśli produkt ma być umieszczony przy ścianie,
odległość między tylną powierzchnią produktu,
a ścianą nie powinna być mniejsza niż 20 cm
(patrz Rysunek 7).
• Nie umieszczaj przedmiotów przed filtrem wen-
tylacyjnym kostkarki do lodu, które mogą unie-
możliwić cyrkulację powietrza .
• Nie umieszczaj urządzenia na zewnątrz. Urzą-
dzenie do użytku wyącznie w pomieszczeniach.
Podłączenie do sieci elektrycznej
• Wartości napięcia i częstotliwości głównego za-
silacza muszą być takie same, jak na tabliczce
znamionowej. Jeśli masz wątpliwości lub po-
trzebujesz pomocy, skontaktuj się z najbliższym
autoryzowanym serwisem lub uzyskaj pomoc
wykwalifikowanego elektryka.
UWAGA:
• Upewnij się, że gniazdko elektryczne jest
uziemione.
• Natężenie wyłącznika, do którego ma być podłą-
czone urządzenie powinno wynosić 10A.
• Do podłączenia urządzenia nie używaj żadnych
listew zasilających lub dodatkowych przedłuża-
czy z wieloma gniazdkami.
Użycie i podłączenie wody
Twoja kostkarka do lodu jest zaprojektowana do
wytwarzania kostek lodu w najbardziej idealnym
czasie i rozmiarze. Należy jednak pamiętać, że są
pewne rzeczy, które wpłyną na jakość lodu wytwa-
rzanego przez maszynę, a także na stan wewnętrz-
nych elementów kostkarki.
This manual suits for next models
4
Table of contents
Languages:
Other BARMATIC Ice Maker manuals


