Bartlett WeatherBoss User manual


8/28/20
2
Table of Contents
TABLE OF CONTENTS 2
INTRODUCTION 3
HOME SCREEN OVERVIEW 4
MENU SCREEN 5
SETTINGS 5
CONFIGURATION 5
SENSOR READINGS 7
RAIN SENSOR 7
WEATHER SENSOR 7
TEMPERATURE SENSOR 8
HUMIDITY SENSOR (OPTIONAL) 8
LIGHT (PHOTO)SENSOR (OPTIONAL) 9
MANUALLY ACTIVATE ALARM 9
BLOCK ALARM 9
DEFAULTS 10
DIAGRAM 1–ACTIVATION AND DROP OUT DELAYS 11
DIAGRAM 2–NO DELAYS 12

8/28/20
3
Introduction
Thank you for choosing Bartlett Instrument’s WeatherBoss; the weather station that helps
protect your greenhouse and improve growing efficiency. The WeatherBoss includes wind, rain,
temperature, humidity and light readings. The WeatherBoss is both a wind and rain alarm and can act
as a remote sensor module. As a wind and rain alarm, it will activate an output when the wind speed
exceeds a programmed wind speed set point or the rain sensor detects a programmed level of moisture
on the sensor surface. As a remote sensor module, it can share alarms and readings with other
controllers as well as our Headgrower cloud platform.
This manual will guide you through settings and options and explain the function of the
WeatherBoss. The installation manual will guide you through placement and use of the sensors.
General Operation
The main function of the WeatherBoss is to warn when it is raining and/or winds are high. The
optical rain sensor is highly reliable and requires no configuration. The WeatherBoss features two wind
alarms; each allowing a high and low speed set point assignable to the 8 cardinal/ordinal directions. At
the ClimateBoss environmental controller, the alarms can then be assigned to the various vents to give
high and low speed alarm based on direction. For instance, Alarm 1 could be assigned to Vent A. It could
have a high speed alarm for winds from the East but a low speed for winds from the West. Alarm 2
could be the opposite; having a high speed alarm set for wind from the West and low speed alarm from
the East. This alarm could be assigned to Vent B giving it the opposite protection of Vent A.
Through our Radio Link product, the alarms and other sensor readings are broadcast to other
controllers. Sensor reading usage can vary by controllers in the network. For example, the light reading
can be used by a ClimateBoss to extend a greenhouse energy shade. While the TimeBoss controller on
the network may use the same light reading broadcast by the WeatherBoss to turn off lighting when the
sun is bright enough.
The WeatherBoss is most versatile when used with Radio Link, and either the ClimateBoss or
TimeBoss controller, along with Headgrower. However, it is also backwards compatible with CIS and
wired alarm set ups.
User Interface
The WeatherBoss features a color graphic touch screen display to enhance ease of use. Most
indicator boxes also function as buttons so users can quickly access and edit the specified feature’s
settings. Most settings can also be accessed thru the menu list. See figure 1 for a quick guide the display
and key functions.
Communications
WiFi is standard on all “Boss” controllers. The controller uses WiFi to download the latest
firmware so you are always up to date. It can also use the WiFi to talk directly to Headgrower for
programming and monitoring from your phone or desktop. Often the controller is equipped with Radio
Link to allow long distance communications between controllers for sharing sensor data.

8/28/20
4
Home Screen Overview
WiFi Status/Button
Indicates current WiFi status. Green
bars indicate signal strength. A red X
indicates no WiFi connection. Press to
enter the WiFi menu.
Current Time
Current time in
military time.
Press to change
time.
Headgrower Button
Press to view options
for connecting the
controller through
Headgrower. Also
found in the menu.
Menu
Displays the following
menu options:
Settings
Configuration
Humidity Reading
Displays the current humidity
reading. If no sensor is
attached, it will read 0%.
Force
Used to manually activate an
alarm. Will stay active until
cancelled.
Rain Sensor Reading
Displays the current rain
sensor reading. When the
alarm is active, it will
change to either be yellow
(Force) or red (Alarm).
Light Sensor
Reading
Displays the current
light sensor reading
in micro moles per
second per meter
squared.
Wind A2 Reading
Displays the current status for
the Wind Activation #2
Alarm. When the alarm is
active, it will change from
Good to either be yellow
(Force) or red (Alarm).
Outside Temperature
Displays the outdoor
temperature reading.
Informational only.
Wind A1 Reading
Displays the current status for
the Wind Activation #2
Alarm. Alarm will displayed as
pictured when the activation
speed has been maintained
for the activate delay time.
Block
Used to block an active alarm
for 20 minutes before reverting
back to normal operation.
Wind Speed/Direction
Displays the wind speed
and wind direction (if
optional directional sensor
is used). If a standard
anemometer is used, it will
always display N (North).

8/28/20
5
Menu Screen
By pressing the Menu button –indicated by 3 bars in the top left corner - on the Home Screen,
you’ll be taken to the Menu Screen. The Menu Screen is a list of various options from controller info,
WiFi settings, and more. For more information on each component of the Menu, see the descriptions
below:
Settings
Set Clock - Select to set the WeatherBoss clock. It is in military time. For Example: 3PM is
entered as 15:00, 12AM is entered as 0:00, and 10AM is entered as 10:00. The clock can also be
changed from the main screen by pressing Time.
Set Date –Select to set the Day, Month, and Year in the controller.
Temperature/Speed Units –Used to change the temperature & speed scale for the
controller. Options are Fahrenheit/MPH or Celsius/KPH.
Configuration
Controller Info –Firmware Version, Serial Number and Mac address for the controller
are shown here. This information may be required if you need any technical support.
Additionally, it is used in conjunction with the Headgrower cloud platform for remote
monitoring and control of the WeatherBoss. See the WiFi section for more information about
firmware updates.
WiFi –Set up Wi-Fi for Firmware download and for remote control and monitoring from the
Headgrower cloud platform (Requires subscription).
Enable Wi-Fi –Enable or disable the Wi-Fi feature. Disable turns Wi-Fi capabilities off at
all times. Enabled turns the Wi-Fi on any time it is within range of a setup Wi-Fi
connection.
Wi-Fi Setup –To set up Wi-Fi for the WeatherBoss, press “Wi-Fi Setup” and the
controller will scan for nearby networks. Select your desired network and enter the
password (if required) and press “Save”.
***For security reasons, we highly recommend that the user place all controllers into
a separate logical network or VLAN, separate from other networks, routers, and
hardware.
Update Firmware –If your controller is connected to the internet through the WiFi
module, by pressing Update Firmware, the controller will connect to www.bartinst.com
to see if any updates are available. Once it has found the firmware, you have the option
to update your controller. Updating firmware will NOT affect the controller’s programs.

8/28/20
6
Reset WiFi –Press Reset WiFi when having trouble with the WiFi connection. The
controller will reset the WiFi connection and attempt to reconnect to your currently
saved connection.
Manual WiFi Setup –Used to manually set up a WiFi network that is hidden or
otherwise not found when running WiFi Setup. Enter the network name under SSID and
press “Save”. Under Password, enter the network password at press “Save”.
WiFi Status - Displays the currently connected network, WiFi signal strength, and cloud
connection status.
Headgrower Options –Used to set up the WeatherBoss for use with the Headgrower
App and desktop version.
Headgrower Via –Enable to allow the WeatherBoss to communicate to Headgrower.
Headgrower Network –Select appropriate option for the WeatherBoss to communicate
to Headgrower either as a Client, Hub, CIS, or Off. See your Headgrower manual for
more information.
Headgrower Channel –Select the appropriate communication channel for the
Headgrower app. See your Headgrower manual for more information.
Headgrower ID –Displays the HEadgrower ID for your controller. This is similar to your
controllers serial number and cannot be changed.
Humidity Cal –Used to enter the calibration code for the optional humidity sensor.
Calibration codes can be found on the Humidity Calibration sheet sent with your
humidity sensor. The humidity sensor does not come with the standard WeatherBoss
but is an additional option. Set to 0 if no sensor is connected.
Light Sensor Source –Used to activate or deactive the light sensor option. Select Off if
no sensor is used or select Apogee SQ-110-SS if the light sensor is attached. After
making the selection, press “Save”.
Reset Factory Defaults - Resets all settings to factory defaults. Upon selection, you will be
asked to confirm before the controller will be reset.
Calibrate Touch –Used to re-calibrate the touch screen if buttons aren’t working properly.
Press the “Calibrate Touch” button and follow the onscreen instruction to re-calibrate.
Factory Protected - Factory protected is used by Bartlett to set controller and display modes.

8/28/20
7
Sensor Readings
The WeatherBoss comes standard with a wind speed, temperature and optical rain sensor.
Other optional sensors include a wind direction sensor, light sensor, and humidity sensor. See more
information below about each sensor and how the information is used.
Rain Sensor
The optical rain sensor is used to sense when there is rain. When the sensor detects enough run
off, the alarm will activate. If the WeatherBoss is connected via CIS or Radio Link, it will close the
selected vents to Step 1. The output will remain activated until the moisture level drops below the rain
sensitivity level.
Wind Sensor/Alarm
The wind sensor is used to measure wind speed and alert when the wind speed has surpassed
the Activation Speed. There are two alarms so there can be low and high speed alarms from different
directions. If the optional directional sensor is attached, alarm can be activated based off the direction
of the wind as well. The wind speed must remain above the activation speed for the length of time
specified by the activate delay setting. The wind alarm will remain activated until the wind speed drops
below the drop out set point wind speed (Drop Speed). The wind speed must remain below the Drop
Speed for the length of time specified by the Drop Delay setting. The WeatherBoss will default to
reading N (North) for wind direction if a standard anemometer is being used.
High Activation Speed –If the wind speed is greater than the High Activation Speed the alarm
will activate. When the alarm activates, the environmental controller will close any open vents
to the first programmed position. Choose your vent settings in the Headgrower App/Desktop or
through CIS. The activation set point may be programmed for any wind speed between 0 and
99 miles per hour (0 and 159 kilometers per hour).
Low Activation Speed - If the wind speed is greater than the Low Activation Speed the alarm will
activate. When the alarm activates, the environmental controller will close any open vents to
the first programmed position. Choose your vent settings in the Headgrower App/Desktop or
through CIS. The activation set point may be programmed for any wind speed between 0 and 99
miles per hour (0 and 159 kilometers per hour).
***When a directional wind sensor is used, the high and low activation speeds can be used to
set different activation points for different wind directions. For example: N, NW, W, and SW can
all be set to activate at the High Activation Speed, while S, SE, E, and NE can all be set to activate
at the Low Activation Speed.
Activate Delay - The activate delay is the length of time that the wind speed will need to be
above the activation set point for the alarm to activate. When the alarm activates, the
environmental controller will close any open roof vents to the first programmed position. The
activation delay may be programmed from 00:00 (MM:SS) to 99:99 (99 minutes:99 seconds).

8/28/20
8
Drop Speed - If the wind speed is less than the drop out set point the alarm will decactivate.
When the alarm deactivates, the roof vents will be under the control of the environmental
controller. The drop out set point may be programmed for any wind speed between 0 and 120
miles per hour (0 and 192 kilometers per hour).
Drop Delay –The drop out delay is the length of time that the wind speed will need to be below
the drop out set point for the alarm to deactivate. When the alarm deactivates, the roof vents
will be under the control of the environmental controller. The drop out delay may be
programmed from 00:00 (MM:SS) to 99:99 (99 minutes:99 seconds).
Temperature Sensor
The WeatherBoss’s thermistor takes the outside temperature reading. This is an informational
only sensor for outside temperature.
Humidity Sensor (Optional)
The humidity sensor is used to monitor the humidity in the outside air. The humidity probe
needs to be calibrated before proper monitory of humidity levels can occur. The calibration code for
your humidity sensor (found on the paperwork provided with your humidity sensor) needs to be entered
into the WeatherBoss. Go to Menu -> Configuration -> Humidity Cal and enter the 4 digit code provided
and press “Save”. If a humidity sensor is not being used, the setting should be set to 0 and the controller
will display a 0% humidity level at all times. If the WeatherBoss is connected through Radio Link or
Headgrower, the humidity levels sensed can be used to open and close programmed vents and other
High Activate Speed
Click to select the high
activate speed for either
Wind A1 or A2. Represented
by the green bar in the
directional grid on the right.
Low Activate Speed
Click to select the low
activate speed for either
Wind A1 or A2. Represented
by the red bar in the
directional grid on the right.
Wind Direction Settings
Represents the 8 directions sensed
by the directional wind sensor.
Click on a direction to toggle
between which Activate Speed
should be used (Green = High, Red
= Low) for each direction.
Activate Delay
Activate Delay time in MM:SS
(Minutes:Seconds)
Drop Speed
When the wind speed is
less than the Drop Speed
for the Drop Delay time,
the Alarm will deactivate.
Drop Delay
The drop delay is the length of
time the wind speed will need to
be below the Drop Speed before
the alarm will deactivate.

8/28/20
9
equipment. If a humidity sensor is not being used, the setting should be set to 0 and the controller will
display a 0% humidity level at all times.
Light (PAR- Photosynthetic Active Radiation) Sensor (Optional)
The light sensor is used to detect the number of photons arriving in a square meter every
second. The photons are measured in micro moles per second per meter squeared. 300-500 is typical
on a cloudy day. 2000 is high reading on a sunny day. The WeatherBoss only has a light reading to
shared with other Bartlett Environmental controllers connected through Radio Link. When connected
the photo sensor reading can be used to control lighting, shade or misting. If a light sensor is not being
used, it can be deactivated by pressing Menu -> Configuration -> Light Sensor Source, select Off, and
press “Save”.
Manually Activate Alarm
The Force button may be pressed at any time to activate the output of the Weather Alarm, this
is a manual override feature. The Weather Alarm will close any open vents to the first programmed
position that are programmed to in CIS or Headgrower. The roof vents will remain closed for ten
minutes or until the Cancel or Block button is pressed. After ten minutes the roof vents will
automatically return to being controlled by the environmental controller. The Weather Alarm will return
to normal operation. When Force is pressed the Wind A1, Wind A2, and Rain boxes on the main screen
will turn yellow and read Force.
Block Alarm
The Block Alarm button may be pressed at any time to cancel the output of the WeatherBoss,
this is a manual override feature. The WeatherBoss will allow any roof vents to return to the control of
the environmental controller. The roof vents will remain under control of the environmental controller
for 20 minutes or until the Force key is pressed. The WeatherBoss will return to normal operation.

8/28/20
10
Defaults
Restore factory default settings. The default settings are:
Activation Set Point –20 MPH
Drop Out Set Point –15 MPH
Activation Delay –4 Seconds
Drop Out Delay –6 Seconds
Units –English
Response Time –1
Wind Alarm –On
Rain Alarm –On
8/28/20
11
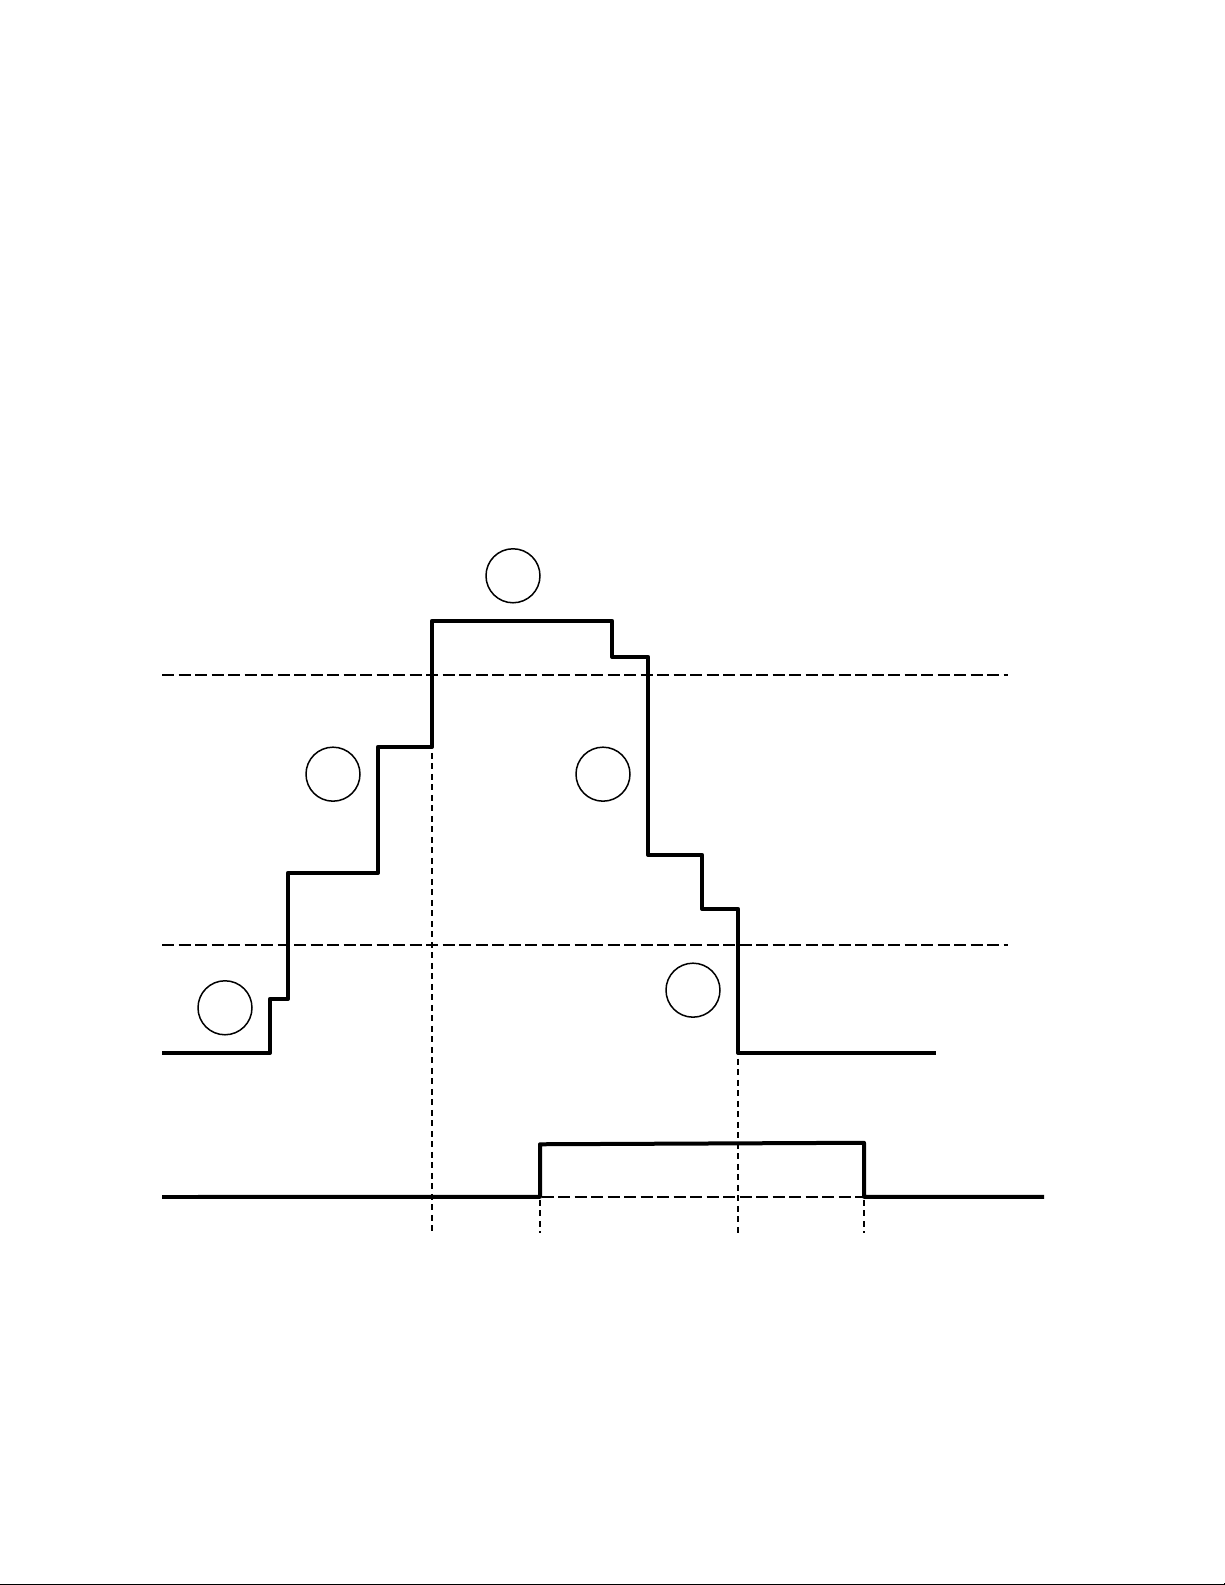
Diagram 1 –Activation and Drop Out Delays
The WeatherBoss will close any open roof vents to the first programmed position when the
when the wind speed exceeds 20 miles per hour for 4 seconds. The roof vents will return control of the
roof vents to the environmental controller when the wind speed drops below 15 miles per hour for 6
seconds.
Activation Set Point –20 MPH
Drop Out Set Point –15 MPH
Activation Delay –4 Seconds
Drop Out Delay –6 Seconds
1. Output Off –Wind speed is below the activation and drop out set points
2. Output Off –Wind speed is below the activation set point and the output has not been triggered
Activation Delay
Activation
Set Point
Drop Out
Set Point
Relay Output
Drop Out
Delay
20 MPH
15 MPH
ON
OFF
OFF
1
2
3
4
5
Output
On
Output
depends on
wind speed
history
Output
Off

8/28/20
12
3. Output On –Wind speed is above the activation set point, output triggers after activatation
delay
4. Output On –Wind speed is below the activation set point and the output has been triggered
5. Output Off –Wind speed is below the activation and drop out set points, output turns off after
drop out delay
Diagram 2 –No Delays
The WeatherBoss will close any open roof vents to the first programmed position when the
when the wind speed exceeds 20 miles per hour. The roof vents will return control of the roof vents to
the environmental controller when the wind speed drops below 15 miles per hour.
Activation Set Point –20 MPH
Drop Out Set Point –15 MPH
Activation Delay –0 Seconds
Drop Out Delay –0 Seconds
Activation
Set Point
Drop Out
Set Point
Relay Output
20 MPH
15 MPH
ON
OFF
OFF
1
2
3
4
5
Output
On
Output
depends on
wind speed
history
Output
Off

8/28/20
13
1. Output Off –Wind speed is below the activation and drop out set points
2. Output Off –Wind speed is below the activation set point and the output has not been triggered
3. Output On –Wind speed is above the activation set point, output triggers immediately
4. Output On –Wind speed is below the activation set point and the output has been triggered
5. Output Off –Wind speed is below the activation and drop out set points, outputs shuts off
immediately
Other manuals for WeatherBoss
1
Table of contents
Other Bartlett Weather Station manuals

Popular Weather Station manuals by other brands


NexxTech
NexxTech 6319296 user manual

Thermor
Thermor bios atmosphere 2.0 instruction manual

Unit Connection Technology
Unit Connection Technology WS0300 user manual

Ambient Weather
Ambient Weather OBSERVER WS-1550-IP user manual

Dexford
Dexford WSRC 2254 operating instructions

La Crosse Technology
La Crosse Technology S84107V2 instruction manual


