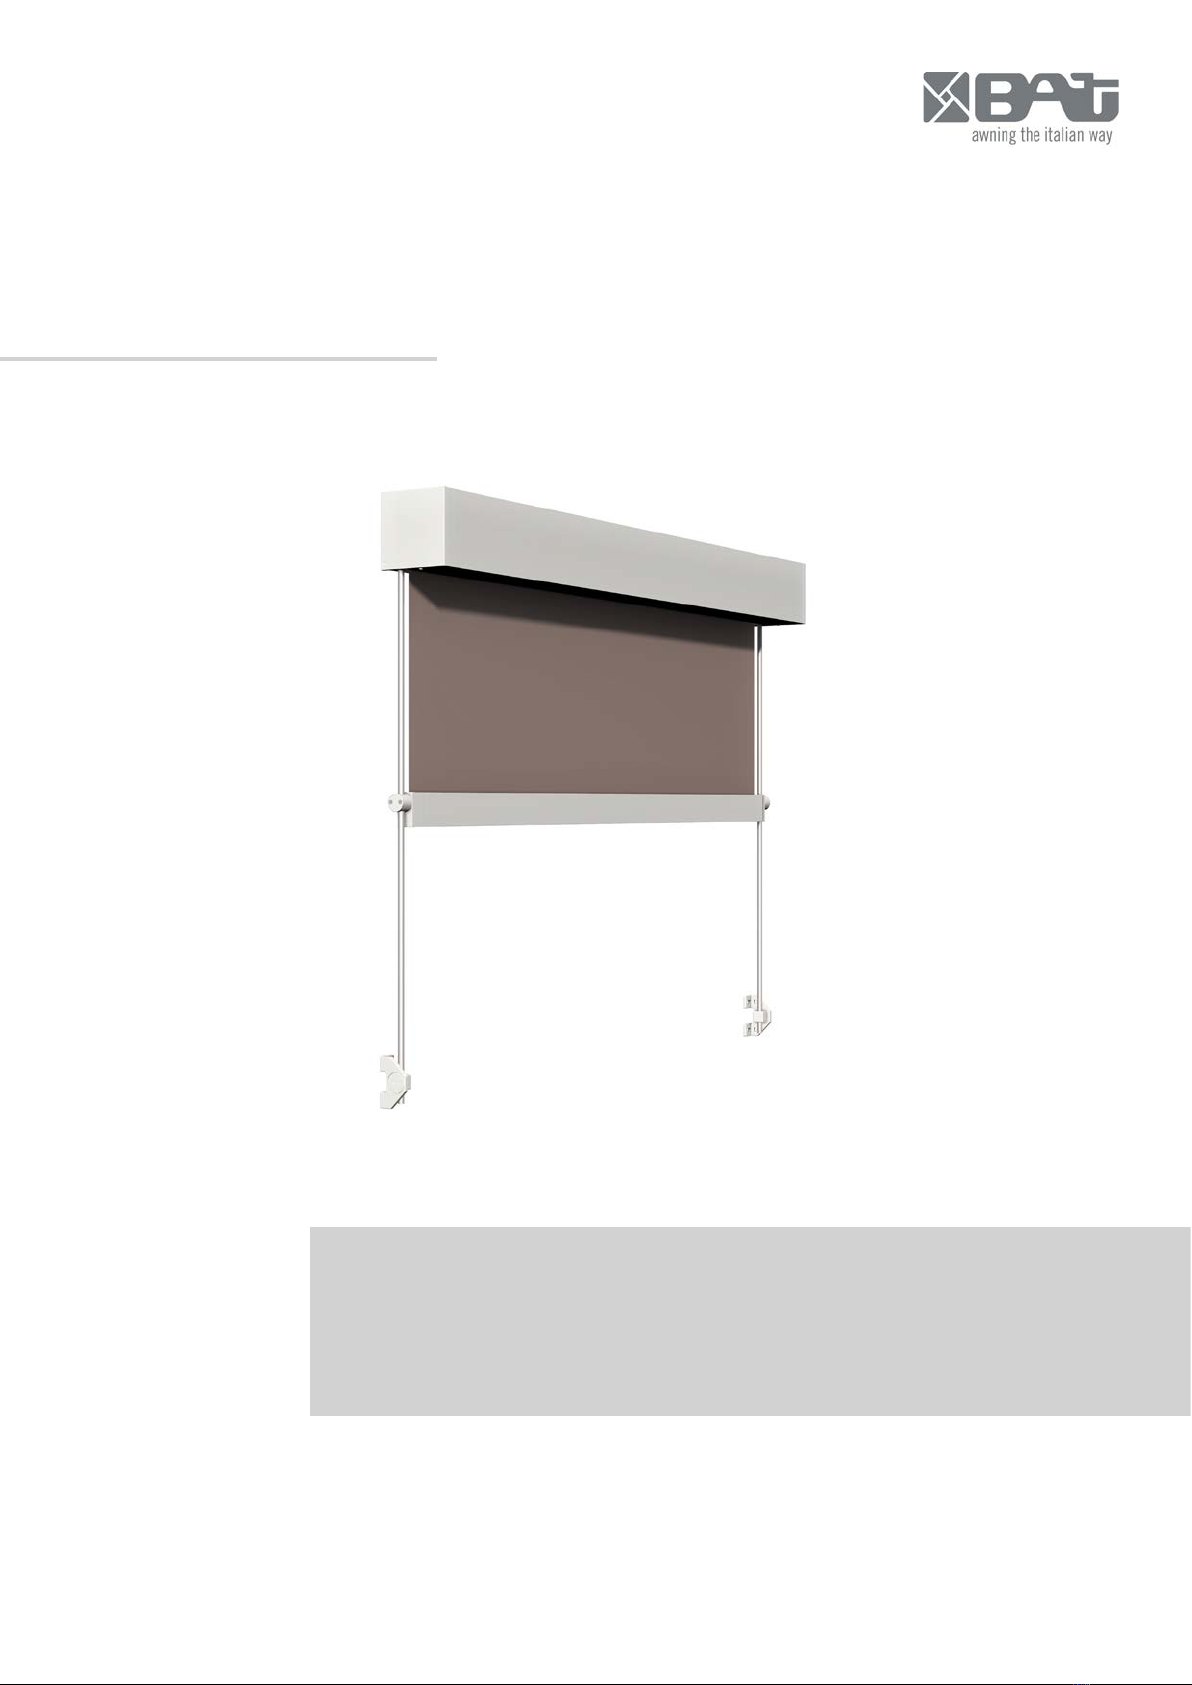
BAT Screeny 130 Series User manual

Screeny 130 Line
Instruction manual

204.09.13 - rev.02
Contents
1 INTRODUCTION ............................................................................................................... 3
1.1 - Symbols used in this manual........................................................................................................................ 3
2 SAFETY............................................................................................................................. 3
2.1 - General Safety Information .......................................................................................................................... 3
2.2 - Safety Devices ............................................................................................................................................. 4
2.3 - Residual Risks.............................................................................................................................................. 4
3 DESCRIPTION OF THE AWNING .................................................................................... 4
3.1 - Components................................................................................................................................................. 4
3.2 - Intended Use and Installation Location ........................................................................................................ 5
3.3 - Technical Data ............................................................................................................................................. 6
3.4 - Technical Data Plate .................................................................................................................................... 7
4 TRANSPORT AND INSTALLATION OF THE AWNING ................................................... 7
4.1 - Transport of the awning................................................................................................................................ 7
4.2 - Installation of the awning.............................................................................................................................. 7
5 USE OF THE AWNING ..................................................................................................... 8
6 MAINTENANCE OF THE AWNING................................................................................... 8
6.1 - Troubleshooting Table.................................................................................................................................. 9
6.2 - Cleaning the awning................................................................................................................................... 10
6.3 - Scheduled Maintenance............................................................................................................................. 10
6.4 - Extraordinary Maintenance ........................................................................................................................ 11
7 REMOVING AND DISPOSING OF THE AWNING.......................................................... 11
8 OPTIONAL ACCESSORIES............................................................................................ 11

3
Instruction manual
Screeny 130 Line
23.07.15 - rev.03
1 INTRODUCTION
This manual is an integral part of the awning and has been written for its user; it is key to the correct use and maintenance of the product.
The pages and content contained within this manual may not be removed, rewritten or modified in any way.
This manual must be kept intact in an easily accessible location until the awning is disposed of.
If this manual is lost or destroyed, the user must request a new copy from the reseller, supplying them with the main product data and the
destination of the new copy.
The manufacturer reserves the right to update its products and their corresponding manuals without any obligation to update previous
products and manuals.
The Manufacturer reserves all rights concerning this manual: no reproduction shall be permitted, in whole or in part, without its express
written authorisation.
The manufacturer shall not be held responsible for any damage resulting from tampering with or unauthorised modification to the product.
1.1 - Symbols used in this manual
The WARNING symbols used in this manual are given below.
INFORMATION AND WARNINGS
Instructions and advice to help ensure correct use and storage of the awning. Failure to follow these
instructions may compromise the product's integrity and/or strength.
CAUTION
Operator hazard! Instructions and warnings to be read and followed carefully. Failure to observe these
instructions may put people's safety at risk.
2 SAFETY
2.1 - General Safety Information
▪Close the awning completely in the event of rain, wind or snow. Danger of damage or injury.
▪Removing the safety devices installed on the awning is strictly forbidden (see Chapter 2.2 “Safety Devices”).
▪If the awning is motorised, it can be opened and closed by pressing a switch and/or via a remote control: both of these must be located
OUTSIDE THE REACH OF CHILDREN.
▪Ensure there is nobody obstructing or excessively close to the awning's moving parts when opening and closing.
▪Do not place objects on the awning fabric.
▪It is forbidden for people to hang on or support themselves from the awning – this would create a serious risk of injury as well as po-
tentially damaging the awning itself.
▪If any doubts remain, consult the reseller BEFORE using the awning.
▪The user must not perform any operation or work on the awning for which they are not authorised (see Chapter 3.2 “Intended Use and
Installation Location” and Chapter 6 “Maintenance”).
▪The manufacturer shall not be held responsible for any damage resulting from tampering with or unauthorised modification to the
product.
▪The user must inform the Reseller immediately if any faults/malfunctions should occur on safety devices or if any other dangerous
situation should occur.
▪All maintenance and cleaning operations must be performed with the electrical supply disconnected.
▪Installation and first use, adjustment and extraordinary maintenance must only be performed by technicians trained and specialised for
those tasks. Contact Technical Support.

A
B
C
D
4
Instruction manual
Screeny 130 Line
23.07.15 - rev.03
2.2 - Safety Devices
(OPTIONAL, only on motorised models)
WIND SENSOR: automatically closes the awning in the event of strong wind. The set point for the wind sensor (anemometer) operation
is recorded during the first-start procedure described in the Installer manual.
(OPTIONAL, only on motorised models)
RAIN Gauge: automatically closes the awning in the event of prolonged rain. The set point for the rain gauge (pluviometer), which meas-
ures the amount of rain which has fallen in a given period of time, is recorded during the first-start procedure described in the Installer
manual.
(OPTIONAL, only on motorised models)
EMERGENCY CRANK: in the event of a power cut, it is possible to roll up the awning thanks to the presence of an emergency manual
crank.
2.3 - Residual Risks
CRUSHING HAZARD FOR FINGERS/UPPER LIMBS between the arms, the guides, the windbreak rollers and the case during opening
and closing of the awning. The product must be installed at a minimum height of 2500 mm. If this is not possible, the manufacturer is
obliged to ensure a warning buzzer is installed on awnings with automatic devices (wind/rain sensor etc.).
3 DESCRIPTION OF THE AWNING
The vertical sun awning can be installed both on the wall or ceiling, individually (Fig. 1) or in a modular layout (Fig. 2). It is available in
manual or motorised versions; for the latter, a wind sensor, rain sensor, twilight sensor and emergency manual crank can be installed on
request.
3.1 - Components
The awning is composed of a metal structure and a fabric screen.
▪Metal structure: this represents the supporting chassis, containing the various mechanisms required to open and close the awning. It
is composed of a box (A - Fig. 1), a bottom profile section (B - Fig. 1), two guides (C - Fig. 1) and a roller tube.
▪Fabric (D - Fig. 1): this is what provides the awning's protection and coverage functions.
The components may vary depending on the model of awning purchased.
The materials used guarantee good resistance to wear caused both by use and by the weather.
Single module Double module
FIG. 1 FIG. 2

5
Instruction manual
Screeny 130 Line
23.07.15 - rev.03
3.2 - Intended Use and Installation Location
The awning is designed to protect against solar radiation and possibly to limit reverberation in the space below it. The product, once in-
stalled, is intended only to perform raising or lowering of the awning fabric to reach the open and closed positions, as well as intermediate
positions if required.
The awning must only be used for the purposes outlined above, even if packaged with impermeable or PVC sheets. Users of the awning
need not be professionals, as long as they are adults.
Any use other than those indicated above is forbidden, as different conditions of use could create
risks to the user and other persons nearby.
The awning MUST NOT be used to support/hold objects or for people to rest on.
Improper use of the product shall absolve the Manufacturer of any liability from damage or injuries which might result. Failure to respect
the indicated conditions of use shall cause any and all warranties provided by the manufacturer to be forfeit.
Motorised versions must not be installed in potentially explosive (ATEX) atmospheres.
Close the awning completely in the event of rain, wind or snow. Danger of damage or injury.
Operation of the awning in icy conditions may lead to damage!
The product may be installed at any height above the minimum of 2500 mm from the ground; if fitted, the opening/closing switch must
be installed in a protected position, at a minimum height of 1500 mm from the ground and in an area which is not dangerous to access.
Use a lockable (key) switch if the awning is to be installed in sensitive locations such as schools,
hospitals, rest homes etc.
If the awning is fitted with remote control, this must be located outside the reach of children.
The remote control may also be used outdoors, as long as the system has an IP rating of IP55 or higher.
The space made available during installation must take into account the space required for movement and allow the awning to open fully.
No ladders or other fixed objects must be installed or positioned near the awning which could
reduce the space required by it.

6
Instruction manual
Screeny 130 Line
23.07.15 - rev.03
3.3 - Technical Data
The weights listed in the tables do not take into account the opening system weight (crank or
motor).
The weights listed in the tables are based on Screen fabric (535 g/m2).
The weights indicated in the tables have been calculated using the maximum awning dimensions.
SCREENY 130
Max. dimensions and weight
(measurements in mm) GA GC GP GPZ C GPZ I
GP
Unica
A/M
GP
Unica M
GPZ
Unica
A/M
GPZ
Unica M GPR GPZ T GPZ TO GPZ TP
Roller tube Ø 80 80 80 80 80 80 80 80 80 80 80 80 80
Width (single module) 5000 5000 5000 5000 5000 5000 5000 5000 5000 5000 5000 5000 5000
Width (double module) - - - - - - - - - - - - -
Height (with awning open) 3000 5000 5000 5000 5000 5000 5000 5000 5000 5000 5000 5000 5000
Approx. weight (Kg) (single module) 56 61 64 81 79 71 70 74 72 74 87 116 90
Performance and safety per EN13561
Wind resistance class 2 2 2 1 1 2 2 2 2 2 1 1 1
Nominal test pressure p(N/m2)=1 70 70 70 40 40 70 70 70 70 70 40 40 40
Motor (where fitted)
Type See manual for installed motor
Specifications CE marking, approved for sun awnings
SCREENY 130 CABRIO
For the specifications of the optional accessories, see Chapter 8 “Optional Accessories” and corresponding instructions.
Max. dimensions and weight
(measurements in mm) GA GC
Roller tube Ø 80 80
Width (single module) 5000 5000
Width (double module) 10000 10000
Height (with awning open) 3000 5000
Approx. weight (Kg) (single module) 39 44
Performance and safety per EN13561
Wind resistance class 2 2
Nominal test pressure p(N/m2)=1 70 70
Motor (where fitted)
Type See manual for installed motor
Specifications CE marking, approved for sun awnings

SCREENY GA
7
Instruction manual
Screeny 130 Line
23.07.15 - rev.03
3.4 - Technical Data Plate
The Technical Data Plate (A) which lists the details for the manufacturer is generally applied to the inner part of the bottom profile section.
The Technical Data Plate (B) which lists the product data and specifications is generally provided with the sales documentation.
4 TRANSPORT AND INSTALLATION OF THE AWNING
4.1 - Transport of the awning
Transport and shipping are the responsibility of the reseller and/or the manufacturer, who shall transport the product using packaging
suitable to protect it up until delivery to the end customer.
Damage to the product sustained during removal of the awning and subsequent handling and/or transport, performed after the
initial installation, is not covered by warranty.
The packaging material must be disposed of and/or recycled pursuant to applicable local legislation.
4.2 - Installation of the awning
Assembly of the components, installation and first start of the product must only be performed by
specialised and qualified technicians, and is the responsibility of the reseller and/or manufacturer.
All instructions and the main safety standards for performing these operations are described in the “Assembly manual” and the “Installer
manual”.
The position chosen by the user for installation of the product must provide adequate support as well as the space necessary for the
awning to open fully (see “Installer manual”).
MANUFACTURER'S FULL NAME + ADDRESS
See section 3.3
TECHNICAL DATA PLATE (A) TECHNICAL DATA PLATE (B)

F
E
8
Instruction manual
Screeny 130 Line
23.07.15 - rev.03
5 USE OF THE AWNING
Before operating the awning, read Chapter 2 “Safety” and Chapter 3.2 “Intended Use and
Installation Location” thoroughly.
Ensure there is nobody obstructing or excessively close to the awning's moving parts when
opening and closing.
Close the awning completely in the event of rain, wind or snow. Danger of damage or injury.
▪Use the awning only as protection against the sun and for the uses described in Chapter 3.2 of this manual, “Intended Use”.
▪It is strictly prohibited to climb on or hang/place any objects from/on the awning.
▪If mould should appear on the awning, clean as described in Chapter 6.2 “Cleaning the awning”.
The awning must always open from the top downwards, never the contrary. Danger of breakage,
with risk of serious personal injury.
In the event of faults or malfunctions, contact your reseller.
MANUAL AWNING
The awning is opened and closed by a rod (E - Fig. 3) attached to
a manual crank (F - Fig. 3).
MOTORISED AWNING
The awning can be opened and closed via:
▪A SWITCH installed near the awning in a position providing
the user with full visibility of the same during its movement. If
installed outdoors, the switch must have appropriate ingress
protection.
▪A REMOTE CONTROL, portable or wall mounted.
The characteristics and operation of these systems are described
in the manuals, supplied as annexes, for the requested controls,
motor and automatic devices.
6 MAINTENANCE OF THE AWNING
All maintenance and cleaning operations must be performed with the electrical supply
disconnected.
Before operating the awning, read Chapter 2 “Safety” thoroughly.
Installation and first use, adjustment and extraordinary maintenance must only be performed by
technicians trained and specialised for those tasks. Contact Technical Support.
FIG. 3

9
Instruction manual
Screeny 130 Line
23.07.15 - rev.03
6.1 - Troubleshooting Table
All safety requirements must be followed in the event of faults or troubleshooting, particularly
when troubleshooting or repairing faults in the electrical components, where there is a risk of potentially
fatal electrocution. Maintenance on the electrical components must be performed only by qualified
technicians.
For faults not listed in the following tables, contact Technical Support.
MANUAL AWNING
PROBLEM CAUSES SOLUTIONS
Fabric does not roll up evenly (forms cone) Arms not symmetrical
Fabric not of even thickness
Contact Technical Support
Roll up the fabric completely
MOTORISED AWNING
Without electronic control unit
PROBLEM CAUSES SOLUTIONS
Fabric does not roll up evenly (forms cone) Arms not symmetrical
Fabric not of even thickness
Contact Technical Support
Roll up the fabric completely
The fabric does not roll up completely
The awning does not open completely
Incorrect end stop regulation
Motor crown wheel shifting during operation
See Motor Man. (supplied as annex)
See Assembly Man., Chapter 7
The motor is very noisy Wiring error
Faulty motor
See Motor Man. (supplied as annex)
The motor stops after 4-5 minutes of contin-
uous operation
Motor thermal cutout Let the motor cool down for a few min-
utes
With electronic control unit
PROBLEM CAUSES SOLUTIONS
The awning will not move Blown fuse
Wiring error
Replace fuse following indications in the
manual supplied as an annex
See Motor Man. (supplied as annex)
The awning movement is intermittent (e.g.
unrolls for 50 cm then stops)
Faulty wind meter See instructions for automatic devices
(supplied as annex)
The awning does not close in strong wind Blown fuse
Faulty wind meter
Replace fuse following indications in the
manual supplied as an annex
See instructions for automatic devices
(supplied as annex)
The awning does not close in heavy rain Blown fuse
Faulty rain gauge
Replace fuse following indications in the
manual supplied as an annex
See instructions for automatic devices
(supplied as annex)
The awning opens and closes on its own
with a remote control system
Flat battery
Damaged remote control
Replace remote control battery (see
Controls instructions)
Replace the remote control

G
10
Instruction manual
Screeny 130 Line
23.07.15 - rev.03
6.2 - Cleaning the awning
All maintenance and cleaning operations must be performed with the electrical supply
disconnected.
Cleaning the awning is essential to protect against the formation of mould due to dust or other material deposited on the fabric; this can be
performed by vacuuming up the dust, or using a damp cloth or sponge with warm water. Dry the awning fabric before cleaning.
Using ladders, trestles or other similar equipment for cleaning must only be performed by specialised personnel, who must follow applica-
ble health and safety legislation and use appropriate PPE such as safety harnesses etc.
Use a soft cloth and a Teflon-based product to clean the stainless-steel parts.
Do not use organic solvents, ammonia or hydrocarbons.
6.3 - Scheduled Maintenance
All maintenance and cleaning operations must be performed with the electrical supply
disconnected.
The operations described below will keep the product in good condition if they are performed according to the indicated frequencies and
timeframes.
Twice a year
Check the fabric for any tears of loose stitching in spring, before you start to use the awning; and in autumn, before closing up for the
winter.
Yearly
Lubricate moving parts with silicone lubricant:
▪The cap opposite the control system (motor or manual rod-crank) (G - Fig. 4).
FIG. 4

11
Instruction manual
Screeny 130 Line
23.07.15 - rev.03
6.4 - Extraordinary Maintenance
Extraordinary maintenance, to be requested from Technical Support, must be performed every two years. If this is not performed, the
warranty shall lapse immediately.
All extraordinary maintenance operations must be performed by qualified and trained personnel.
Request specialist assistance from Technical Support.
See the assembly, installation and commissioning instructions should disassembly/removal of all or part
of the awning be required.
Original spare parts must be used or the warranty shall lapse.
Requests for spare parts must be sent to your reseller.
7 REMOVING AND DISPOSING OF THE AWNING
The awning must be removed and disassembled by trained and qualified personnel. Request
specialist assistance from Technical Support.
These operations must be performed with the awning fully closed.
Cut the power supply to the system by disconnecting the circuit which supplies the awning switch, disconnect the motor, block the arms
by tying them to the guides, open the support brackets and remove the awning from them.
No materials considered hazardous have been used in the awning's construction, and there are therefore no particular instructions for its
disposal or scrapping.
Follow applicable legislation in force when the awning is removed for its disposal.
8 OPTIONAL ACCESSORIES
The awning can be fitted with the following optional accessories, when required:
▪Wind sensor: strong wind sensor (only for motorised awnings)
▪Rain gauge: heavy rain sensor (only for motorised awnings)
▪Twilight sensor: sun sensor (only for motorised awnings)
▪Emergency crank: allows the awning to be closed in the event of a power cut (only for motorised awnings).
The characteristics and operation of these optional accessories are described in the manuals, supplied as annexes, for the requested
controls, motor and automatic devices.
Installation is described in the “Installer manual”.

04 September 2013_rev.02
BAT S.p.A.
Via H.Ford - Z.I. Est
30020 - Noventa di Piave (VE) - Italy
Tel +39 0421 65672
Fax +39 0421 659007
www.batgroup.com
This manual suits for next models
16
Table of contents
Other BAT Accessories manuals