BATHSELECT BZ-5645RB User manual
Plumbers Tape Tape Measure Adjustable Wrench
Screwdriver
Drill
Hex Wrench
Level
Pencil or Marker
Thread Sealant
*not included
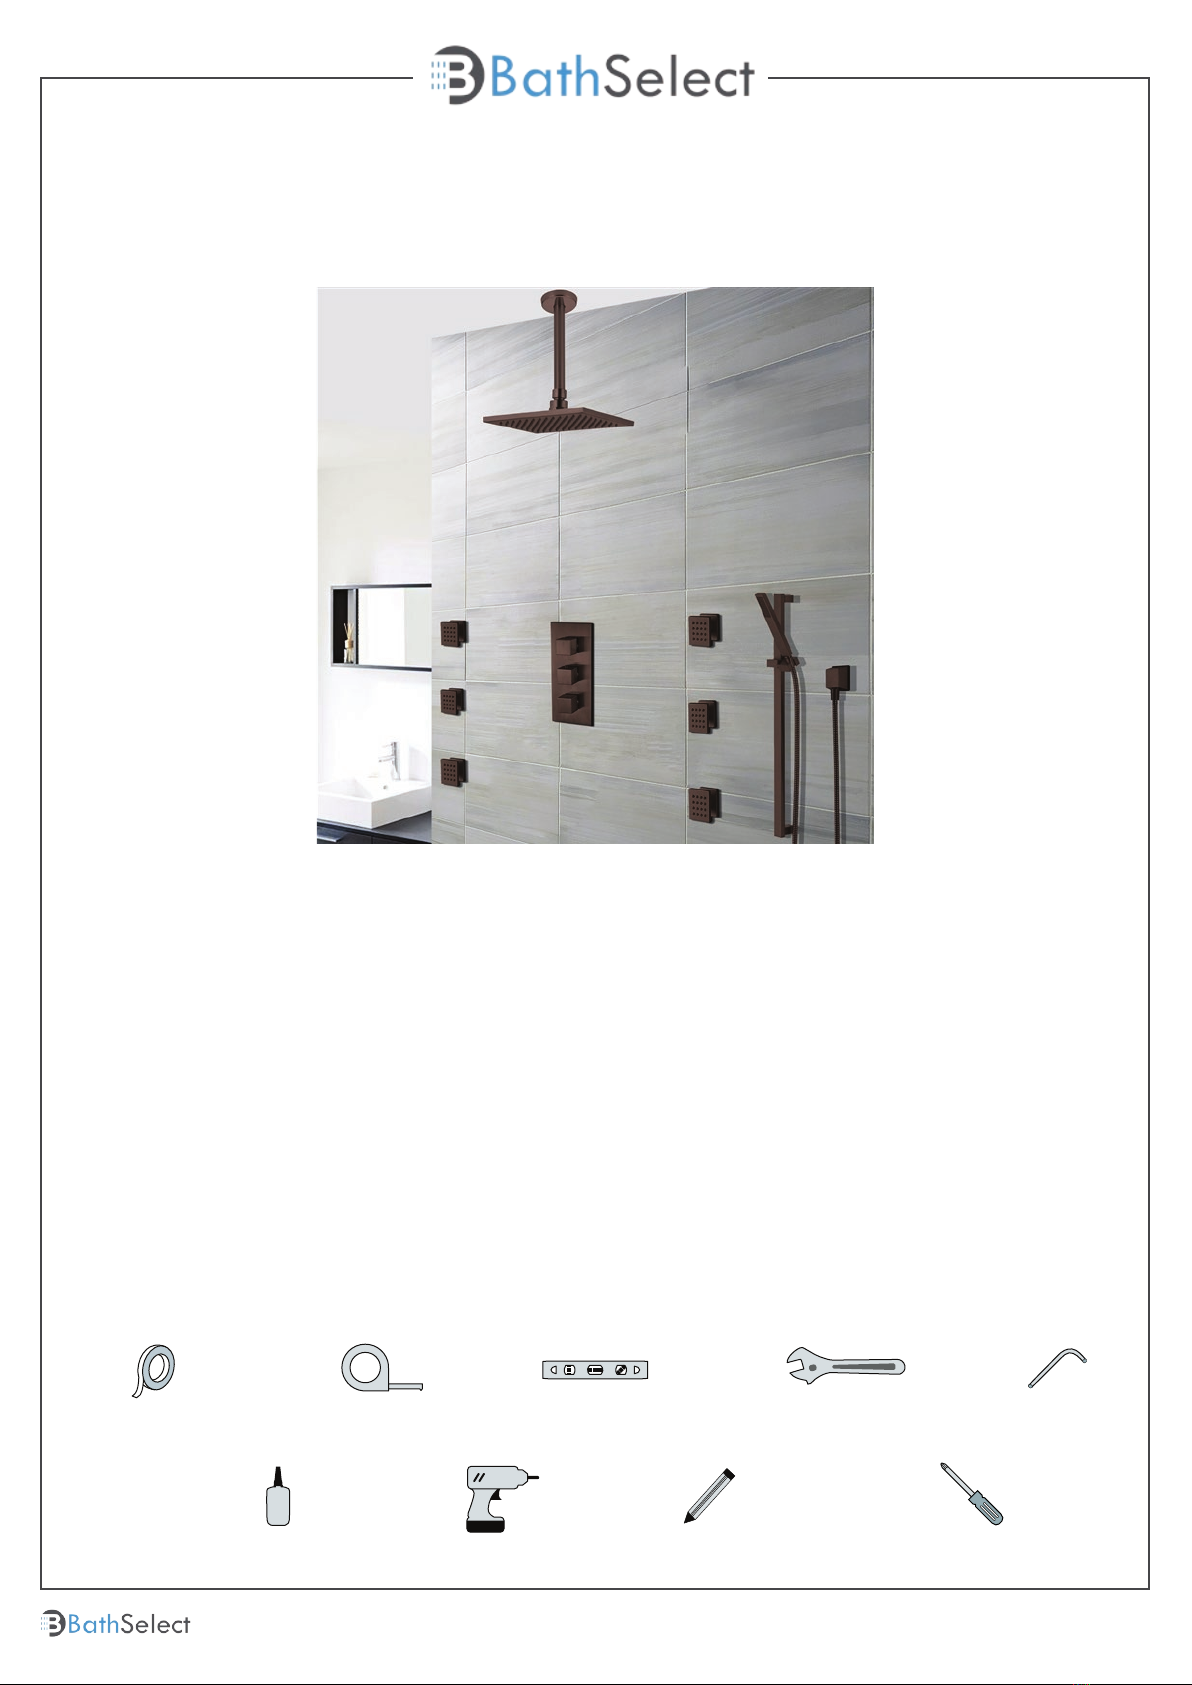
POSSIBLE TOOLS REQUIRED*
SOMA OIL RUBBED BRONZE FINISH THERMOSTATIC
SHOWER SET RAIN HEAD MULTIFUNCTION HANDSET
& 6 JETS INSTALLATION INSTRUCTIONS
Product code: BZ-5645RB
1
Please read installation instructions below. All plumbing should be
installed in accordance with applicable building codes and regulations.
Unpack and inspect the items for any shipping damages. If you find
damages, do not install.
All products must be installed by a professional and certified plumber
otherwise warranty may be voided.
PRIOR TO INSTALLATION
Customer Service: 800-500-9895
bathselect.com
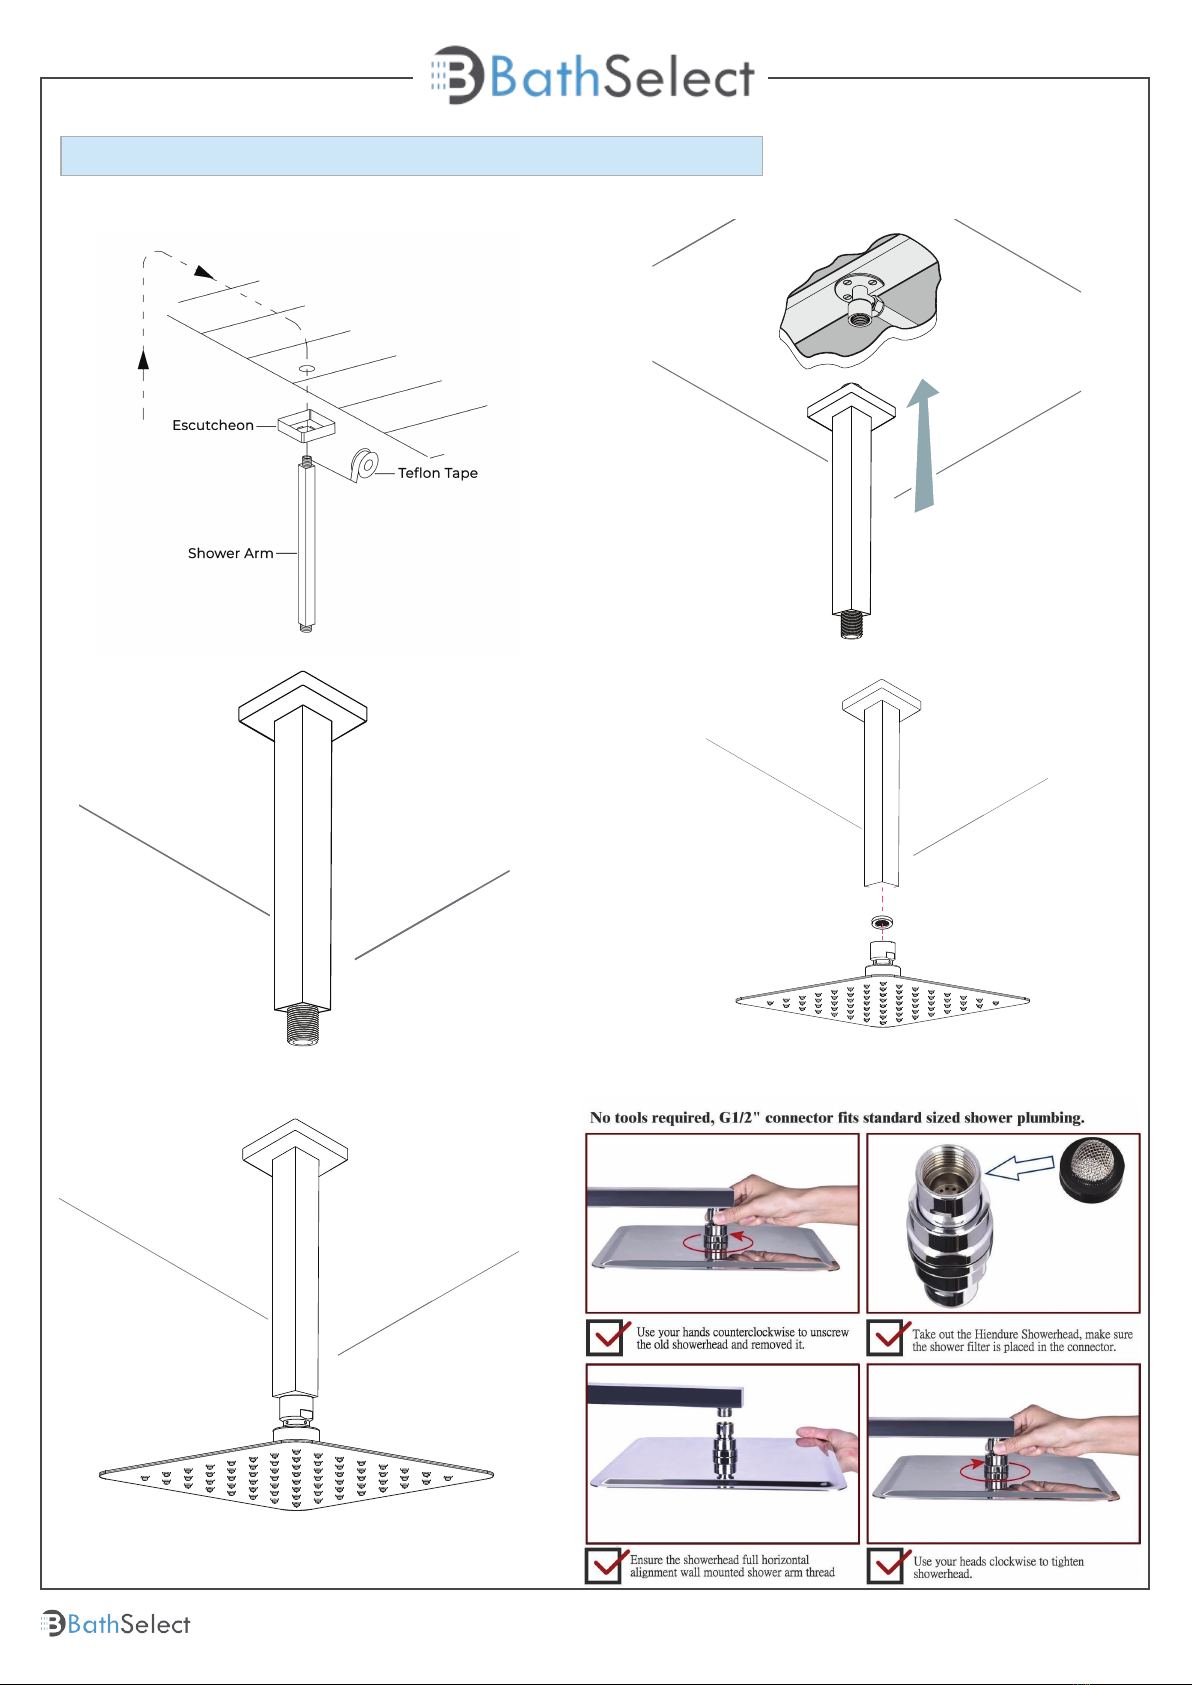
Ceiling Mount Shower Installations Instructions
Step 1: Step 2:
Step 3: Step 4:
Step 5:
Customer Service: 800-500-9895
bathselect.com
2
Step 1: Take Out the Old Shower Head
You can easily remove it by hand, but depending on how long the rain showerhead has
been installed, you might need to use an adjustable wrench. Hence, if you find it difficult
to remove, rotate the showerhead with an adjustable wrench in a counterclockwise
direction to unscrew it.
Step 2: Keep the Shower Arm Clean and In Good Shape
After you have removed the head, check the shower arm threads for any debris and old
Teflon tape. If you find any, remove it and clean them off thoroughly. It’s best to use a
microfiber cloth when cleaning the thread because it removes Teflon tape perfectly and
works great to pick up tiny grits.
Once you’re done cleaning, check if it is corroded or leaking. For damaged threads, it will
be best you replace it entirely so you can have a comfortable shower experience any time.
Step 3: Time to Add New Teflon Tape
Since you have removed the old Teflon tape, you have to replace it with new ones. The
reason is that this tape helps to protect the shower from leaking after installing the
showerhead. Now apply the new Teflon tape about 3-5 turns on the thread and tear the
end part. Use your hands to smooth it out to keep it leveled to the thread. Keep in mind
that when applying the tape, you should go in a clockwise motion so that it doesn’t come
off when you attach the head in the same direction.
Step 4: Connect the Showerhead
As said earlier in the tools needed, we’re using the rubber sealing washer that comes with
the showerhead. This tool helps to make the showerhead stay watertight and secured on
to the thread. Ensure you place it properly before installing it.
After that, reconnect the shower head and tighten it down with your hands. You can
employ a chair or ladder to make things easier for you.
Step 5: Tighten the Showerhead
On To the Thread You will need to get the adjustable wrench handy to tighten down the
shower very well. But make sure you wrap the threads with a terry cloth, so it doesn’t
damage the finish when tightening the showerhead.
Once you have done that, now use the adjustable wrench to tighten down the
showerhead. However, don’t over-tight or force it so that it’s easier to remove in the future.
Customer Service: 800-500-9895
bathselect.com
3
Customer Service: 800-500-9895
bathselect.com
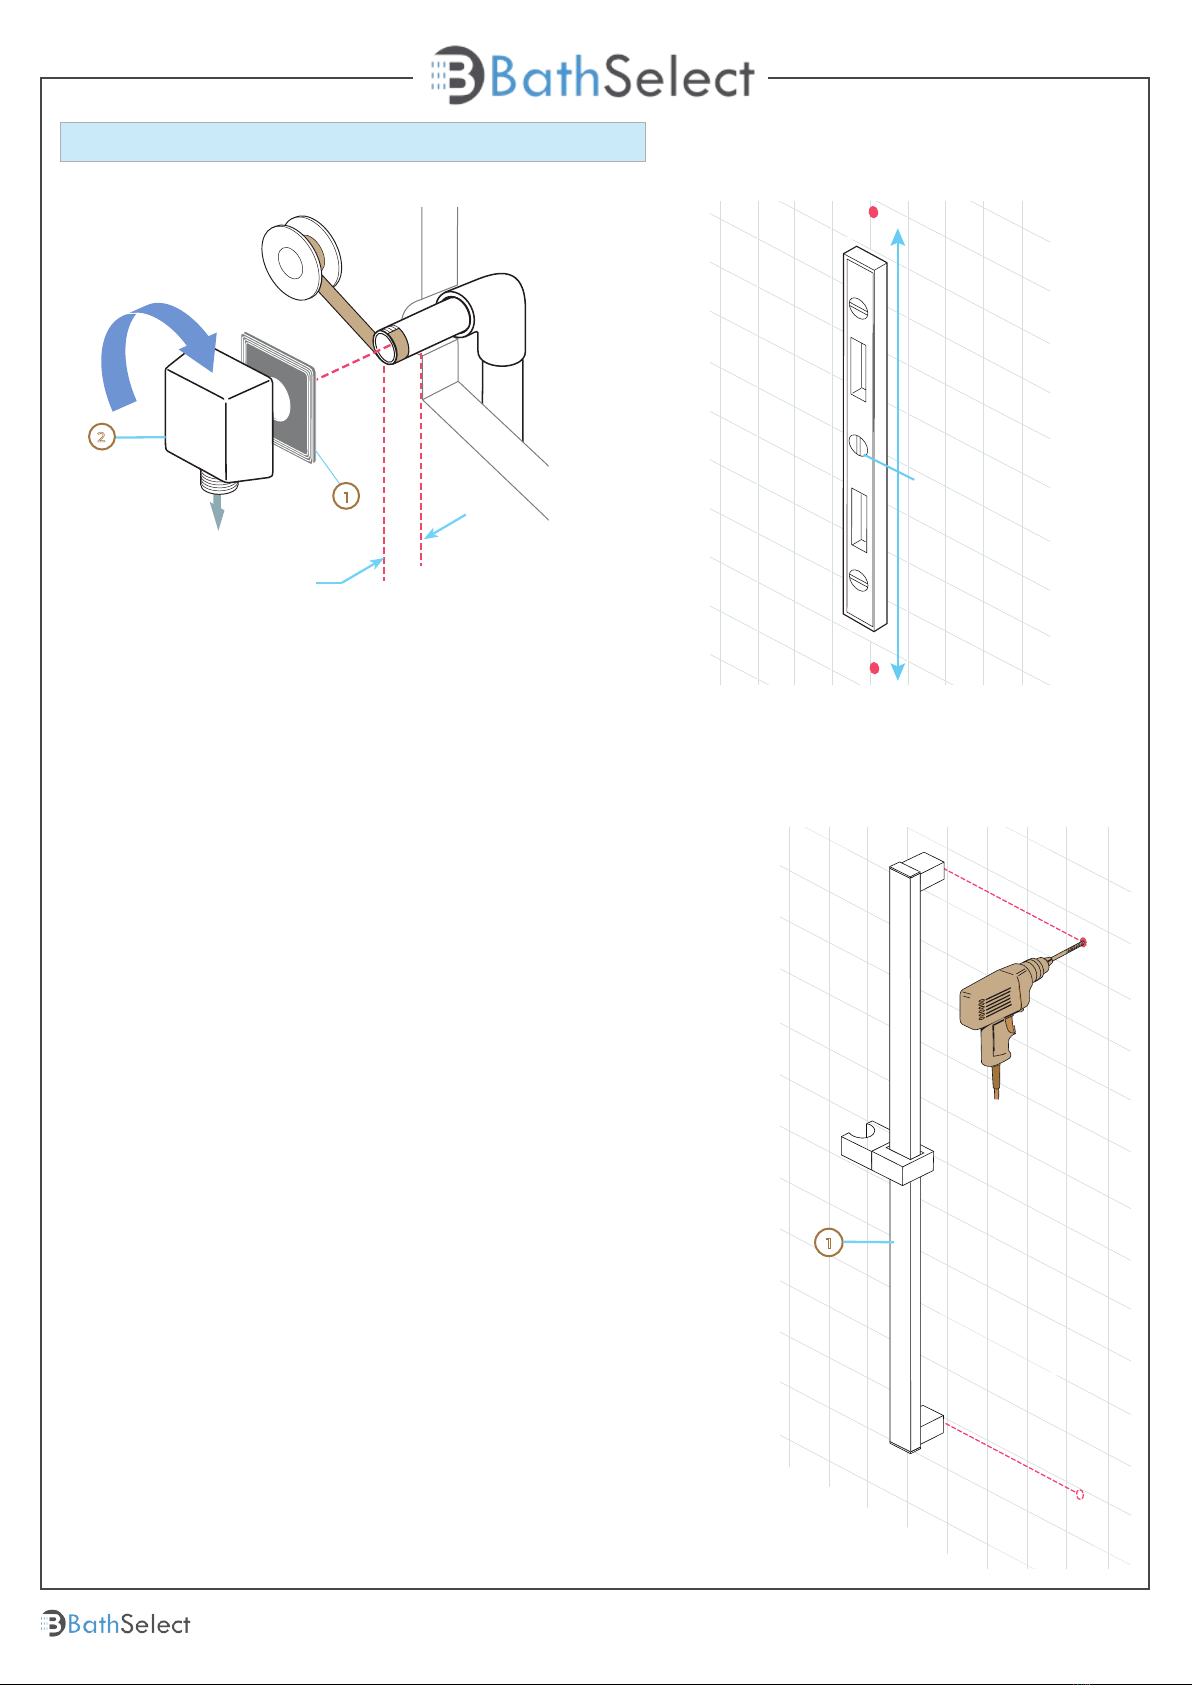
Hand Shower Installations Instruction
0.19” (4.8mm) Max
1
2
1
1. SUPPLY ELBOW INSTALLATION
Apply plumber tape to threaded ends of 1/2" (13 mm)
iron pipe nipple (not supplied) and thread into
shower riser elbow so that nipple extends past the
finished wall no more than 0.19" (4.8 mm) and no less
than 1/16" (1.6 mm). Place the supplied installation
gasket (1) behind the elbow (2). Screw the supply
elbow onto the nipple making sure that the supply
elbow outlet is in a downward facing position.
Minimum diameter for hole is 1" (25 mm) with a
maximum of 1 1/2" (38 mm).
CAUTION: To avoid damage to the supply elbow or
hose finish during installation, wrap with a cloth or
tape and use only a smooth-jawed wrench.
DO NOT OVERTIGHTEN CONNECTIONS.
3. WALL BAR INSTALLATION
Note: Hole size will be determined by your use of just the screw or
anchor and screw for installation. Drill hole for mounting of bottom
post. Start with a smaller drill bit size, 1/8" is recommended, and drill
hole. If you hit a wall stud, go to next step. If you do not hit a wall stud,
change to a drill bit size suitable for the anchors, 1/4" is recommended,
and re-drill hole.
Anchors are for use on drywall or tile. For fiberglass, acrylic and flat
plastic surfaces, use toggle bolts (not included).
Before drilling top mounting hole, it is recommended that you place
the assembled slide bar and post assembly (1) on its side next to the
hole locations you have marked. Make sure posts are pressed fully onto
bar. Align center of bottom post with bottom hole that was just drilled
and make sure center of top post aligns with mark for top hole. If not,
re-mark top hole location. If it aligns, drill top hole in location as
marked.
2. Mark the place for drilling the hole for the lower
post. Mark using a level, in a vertical line from the
lower hole, the placement of the upper post hole.
Distance approximately 25.7" (653 mm).
Step 1: Step 2:
Step 3:
4

Customer Service: 800-500-9895
bathselect.com
1
2
3
4
1
6
2
3
4
5
6
7
8
9
1
2
3
4
5. Slide the slide mechanism (1) and elbow (2)
onto the wall bar (3). Slide wall bar over bracket
tabs (4) and secure the wall bar unit with screws
(5) provided. Install caps (6) into ends of wallbar.
Lower elbow (7) & screw (8) was pre-installed
prior to shipping, tighten screw (9) if you find it
is sliding inside bar.
6. INSTALLATION OF THE SHOWER SET
Connect the shower hose to the wall outlet (1)
and the hand held piece (2), ensuring that the
internal gaskets (3) are present in the shower
hose nuts. Normal 1/2” rubber gaskets can be
used.
Place the conical nut of the hose (4) that is
connected to the hand held piece, in the slide
bar holder (5) and turn it to desired position.
To slide the mechanism up or down, push in on
the button (6) of the mechanism and slide it on
the bar.
4. Insert anchors (1) into drilled holes. Slide
covers (2) over brackets (3), and insert screws (4)
into bracket/cover assembly. Secure assembly
to wall with screws.
Step 4:
Step 5: Step 6: Completed
5

Customer Service: 800-500-9895
bathselect.com
6
Pressure Balancing Loop:
. If installing bodysprays in a bank of 3 or
fewer, a pressure balancing loop is not
necessary.
. If installing bodysprays in a bank of 4 or
greater, a pressure balancing loop must be
used to keep the pressure even between
the bodysprays.
Body Jets Spray Installations Instruction
Step 2: Apply teflon tape to threaded tail pipe
of the body spray
G2
Step 3: Press the escutcheon against the
finished wall
Step 4: Screw the Body spray tightly into the
female of water Supply
Step 1: Attach the escutcheon to the body
spray.
Customer Service: 800-500-9895
bathselect.com
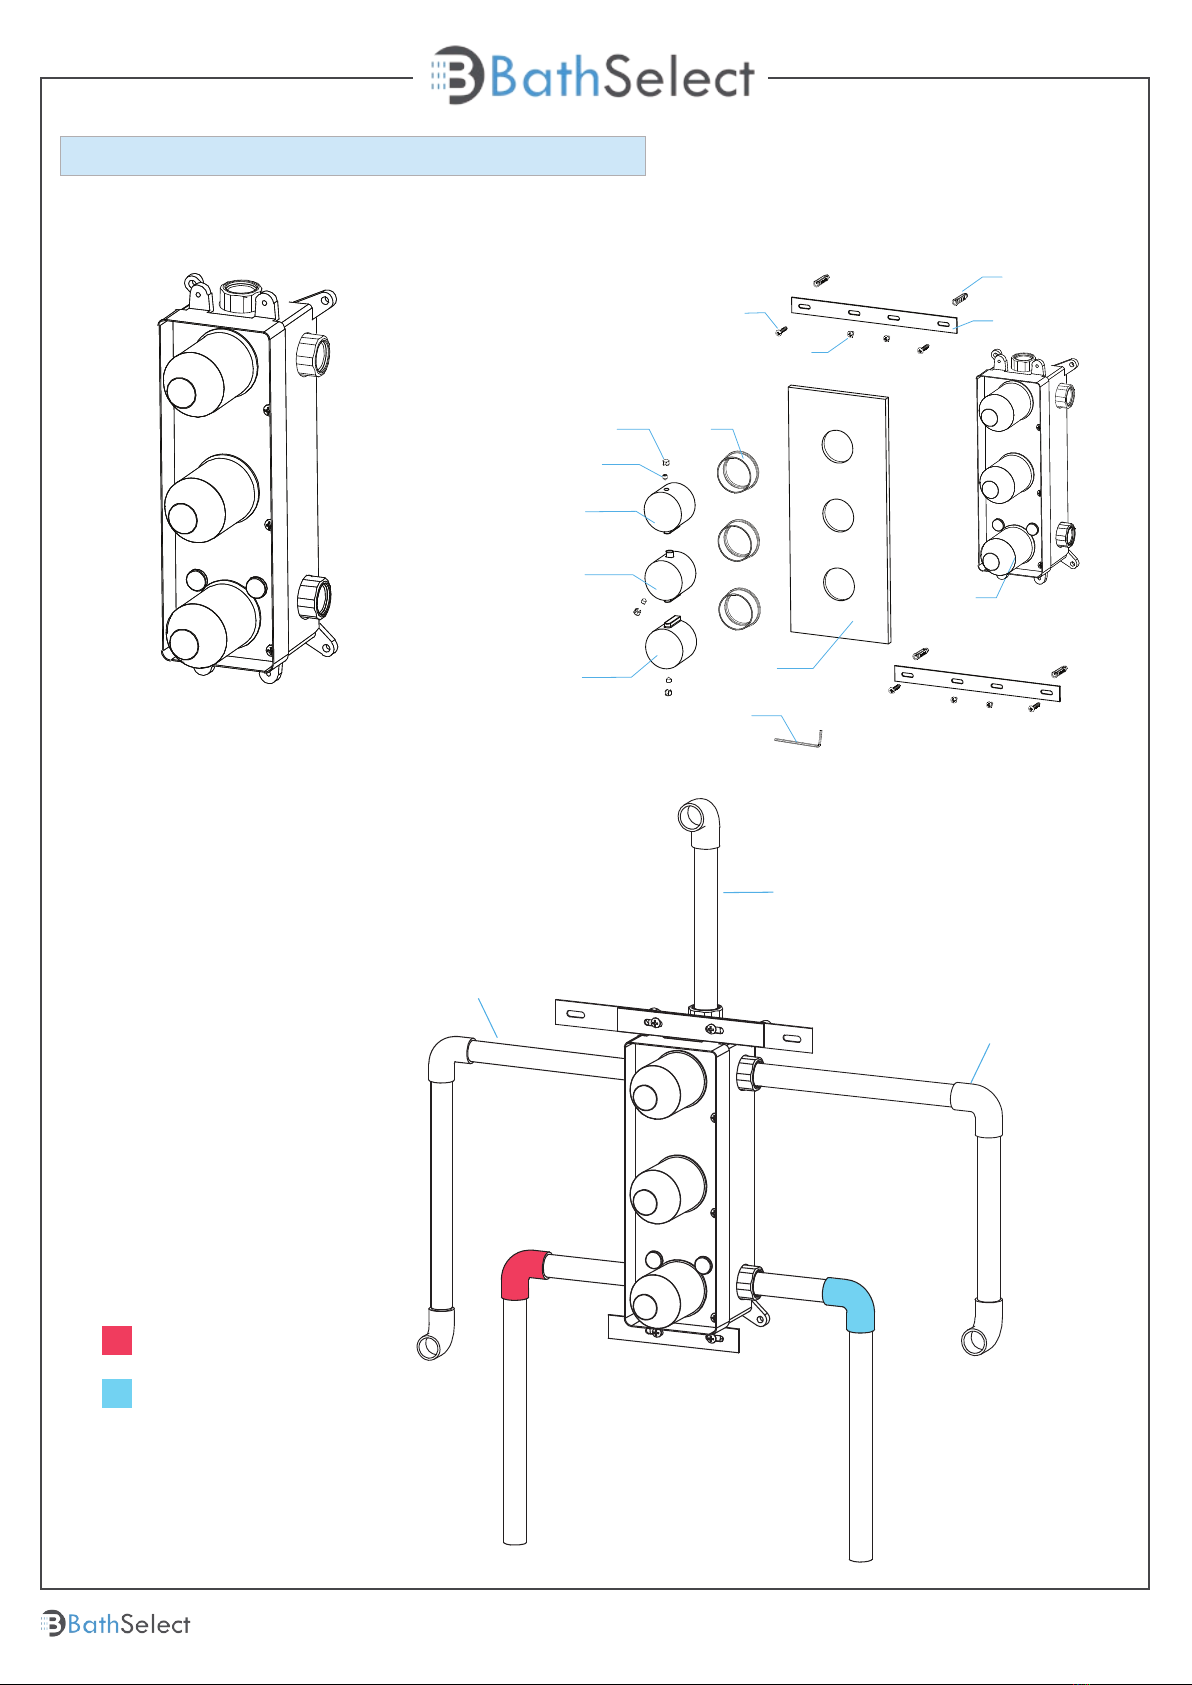
Mixer Installations Instructions
Step 2
Step 1
Step 3 ( Connection)
Hot water
Cold water
Rough-in Body
Anchor
Positioning
Bar
Tapping Screw 1
Tapping Screw 2
Plate
Cover
Button
Screw 1
Diverter
Handle
Temp.
Handle
On/Off
Handle
Hex Wrench
Hot Water In Cold Water In
Function 1
Function 2
Function 3
7
Customer Service: 800-500-9895
bathselect.com
8
Acid
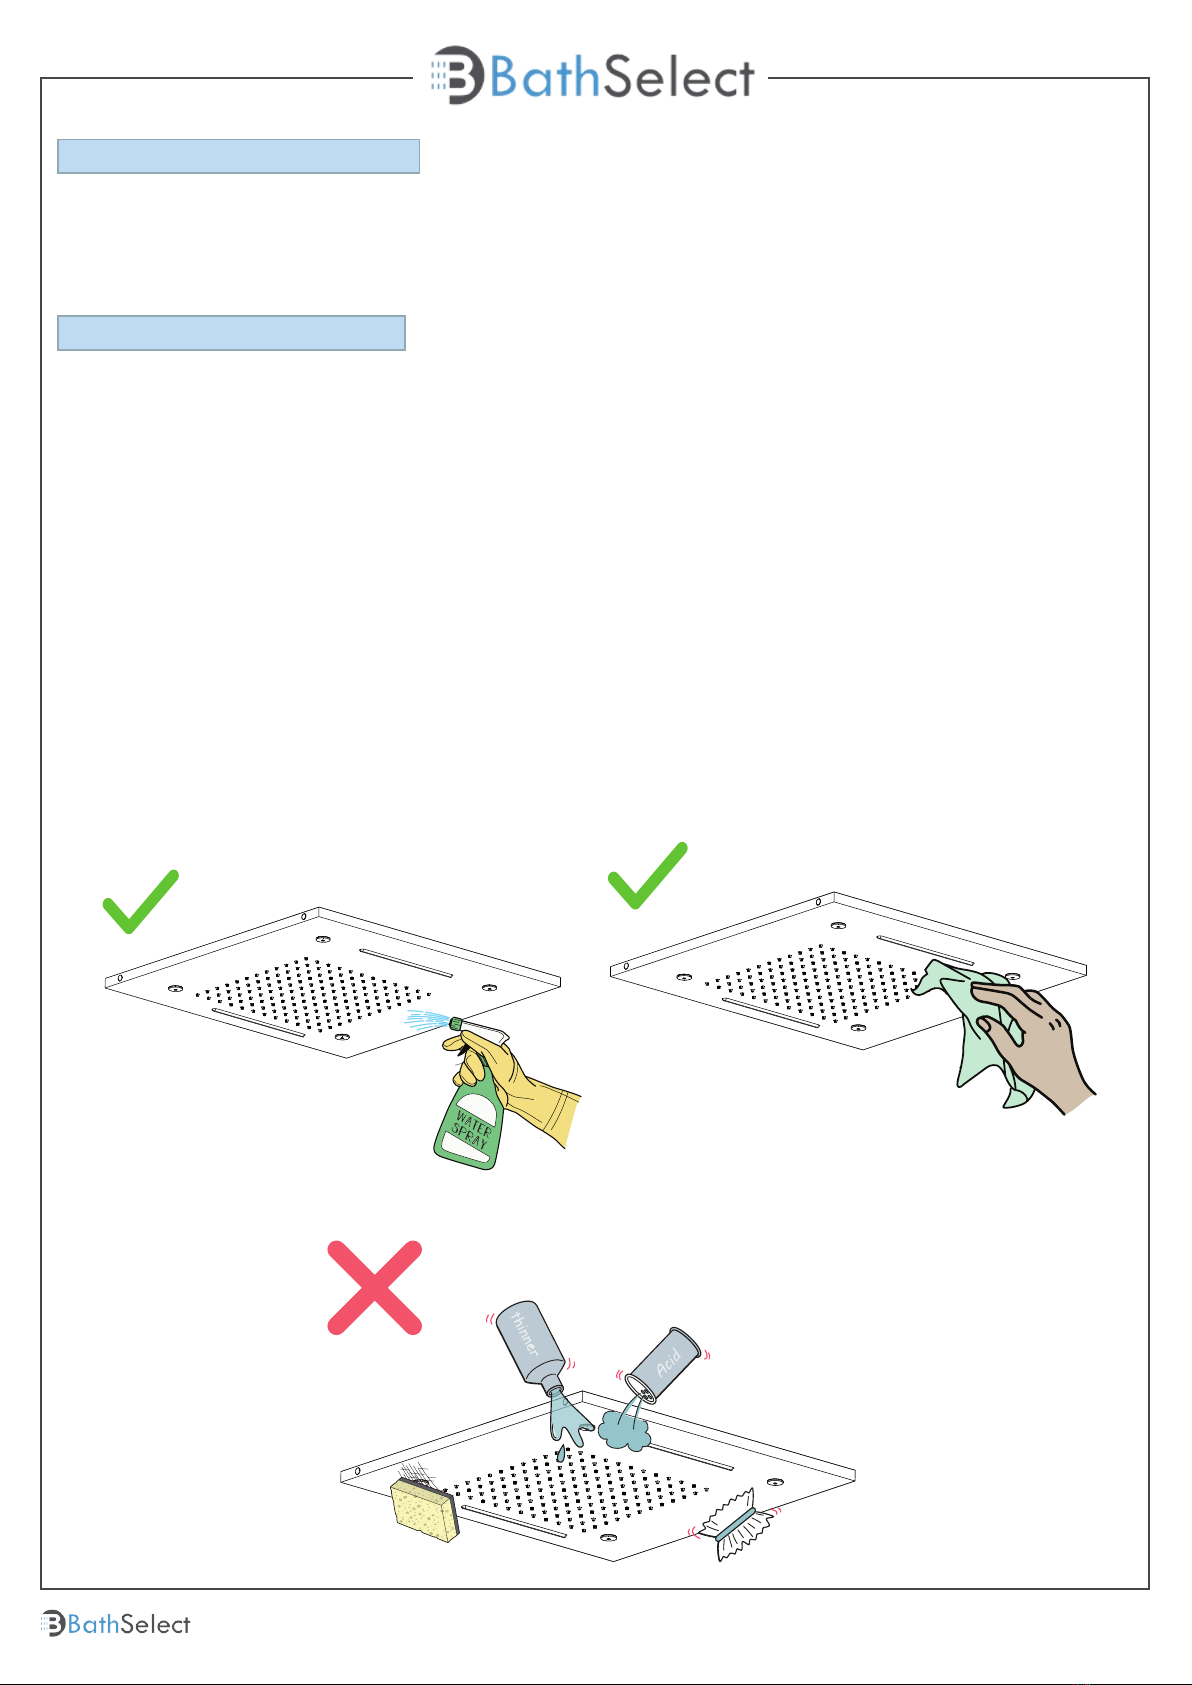
Care & Cleaning
General Information
1. The product can be cleaned with warm water, a mild soap and a clean soft cloth.
2. Clean progressively and gently.
3. It is not required to use any abrasive cleaning pads, wire wool or cloths to clean the
product.
4. Avoid a vigorous cleaning action, as this could contribute to denaturing and dulling
5. Abrasive or strong cleaning products containing ammonia, bleaches, alcohol, dyes,
acids (hydrochloric, formic, phosphorus, chlorine or acetic) will be not be affected.
All products manufactured and supplied by BathSelect are safe and comply to legislative
requirements. Providing they are installed correctly and receive regular maintenance in
accordance with these instructions your user experience will not be affected
6. If using a spray cleaner, apply the cleaning agent onto a soft cloth, never directly
spray onto the product as the cleaner may enter gaps and openings and cause
damage. Do not allow the cleaner to remain on the product for a period of time. After
cleaning, rinse thoroughly with clean water.
Table of contents
Other BATHSELECT Bathroom Fixture manuals


