manuals.online logo
Brands
  1. Home
  2. •
  3. Brands
  4. •
  5. bathstore
  6. •
  7. Other
  8. •
  9. bathstore Atlantes User manual

bathstore Atlantes User manual

Popular Other manuals by other brands

GO Industries 38017 installation instructions

GO Industries

GO Industries 38017 installation instructions

Cissell 30LBCMAN2 manual

Cissell

Cissell 30LBCMAN2 manual

RIDGID K-60SP manual

RIDGID

RIDGID K-60SP manual

Gage Bilt GB751SH-5 Original instructions

Gage Bilt

Gage Bilt GB751SH-5 Original instructions

OVE SIERRA 60 installation manual

OVE

OVE SIERRA 60 installation manual

ReelCraft 7800 OLB21 operating instructions

ReelCraft

ReelCraft 7800 OLB21 operating instructions

Body Armor 4x4 ECO-SERIES user manual

Body Armor 4x4

Body Armor 4x4 ECO-SERIES user manual

ROBLIN DROP Dimensions

ROBLIN

ROBLIN DROP Dimensions

EMG EMG-ACB BARREL Installation information

EMG

EMG EMG-ACB BARREL Installation information

MiniSolar MT-150 Assembling Guide

MiniSolar

MiniSolar MT-150 Assembling Guide

Parkside PSZ 250 B2 Operation and safety notes

Parkside

Parkside PSZ 250 B2 Operation and safety notes

ABB REM 610 Technical reference manual

ABB

ABB REM 610 Technical reference manual

Parkside 55992 translation of original operation manual

Parkside

Parkside 55992 translation of original operation manual

Skyjacker F250 installation instructions

Skyjacker

Skyjacker F250 installation instructions

IBM IBM SYSTEM Z overview

IBM

IBM IBM SYSTEM Z overview

Grech Motors G28 owner's manual

Grech Motors

Grech Motors G28 owner's manual

NOVAK BATTERY CARE SHEET Using

NOVAK

NOVAK BATTERY CARE SHEET Using

Telemotive blue PiraT Mini Startup guide

Telemotive

Telemotive blue PiraT Mini Startup guide

manuals.online logo
manuals.online logoBrands
  • About & Mission
  • Contact us
  • Privacy Policy
  • Terms and Conditions

Copyright 2025 Manuals.Online. All Rights Reserved.

Atlantes Hinge Door & Side Panel
Installation Instructions
E
1 - 7
E
2 - 7
E
3 - 7
Fitting the screen to the wall bracket
To ensure correct and safe installation these steps must be followed exactly
a) Main components of the locking system
Wall bracket with serrated tongue
Hinge bracket with lever open
Location of locking grub screw
E
4 - 7
Place the spacer under the glass
to help position the screen correctly
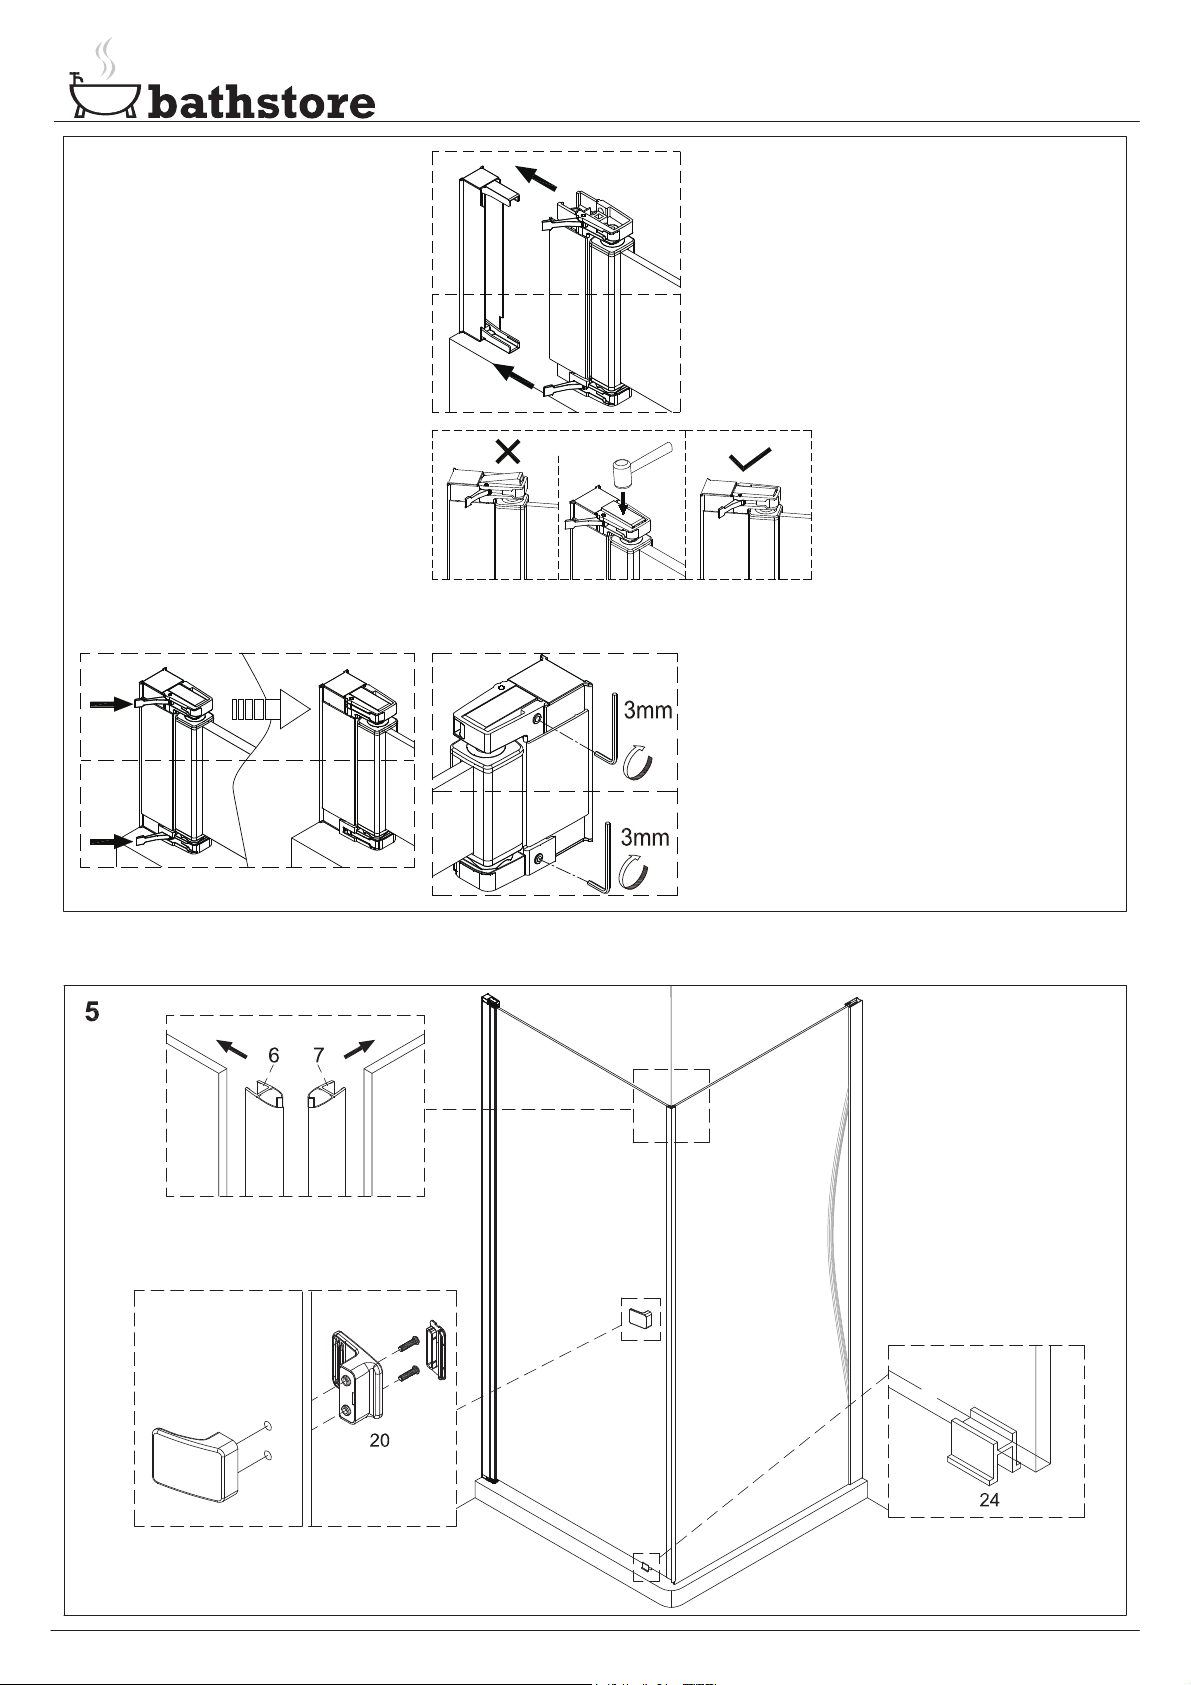
b) Open the levers on the top and bottom
hinge brackets,and slide the assembly onto
the wall bracket and serrated tongues
c) Ensure that the tongues are flush with
the hinge brackets so that the locking
system is fully effective
d) Close the locking levers e) Tighten up the locking grub screws
Note that the grub screws are pointed and designed to dig
into the serrated tongue to make the assembly fully secure.
E
5 - 7
If necessary the hinge bracket and the wall profile
can be adjusted out by up to 20mm
to allow for uneven walls.
E
6 - 7
E
7 - 7
Please see our website
MAINTENANCE FOR EASY CLEAN GLASS
The side with the label “EASY CLEAN THIS SIDE” is coated.
For routine cleaning we recommend the use of clean lukewarm water and a soft cloth in combination with a regular (non-abrasive) household cleaner.
www.bathstore.com for any assistance.
Atlantes Hinge Door Inc Infill & Side Panel
Installation Instructions
D
D
D