Bauma BM600 User manual

INSTALLATION
MANUAL
PRODUCT NAME: DIGITAL DOOR LOCK
Product Applied:BM600/ BM610
Vietnamese English
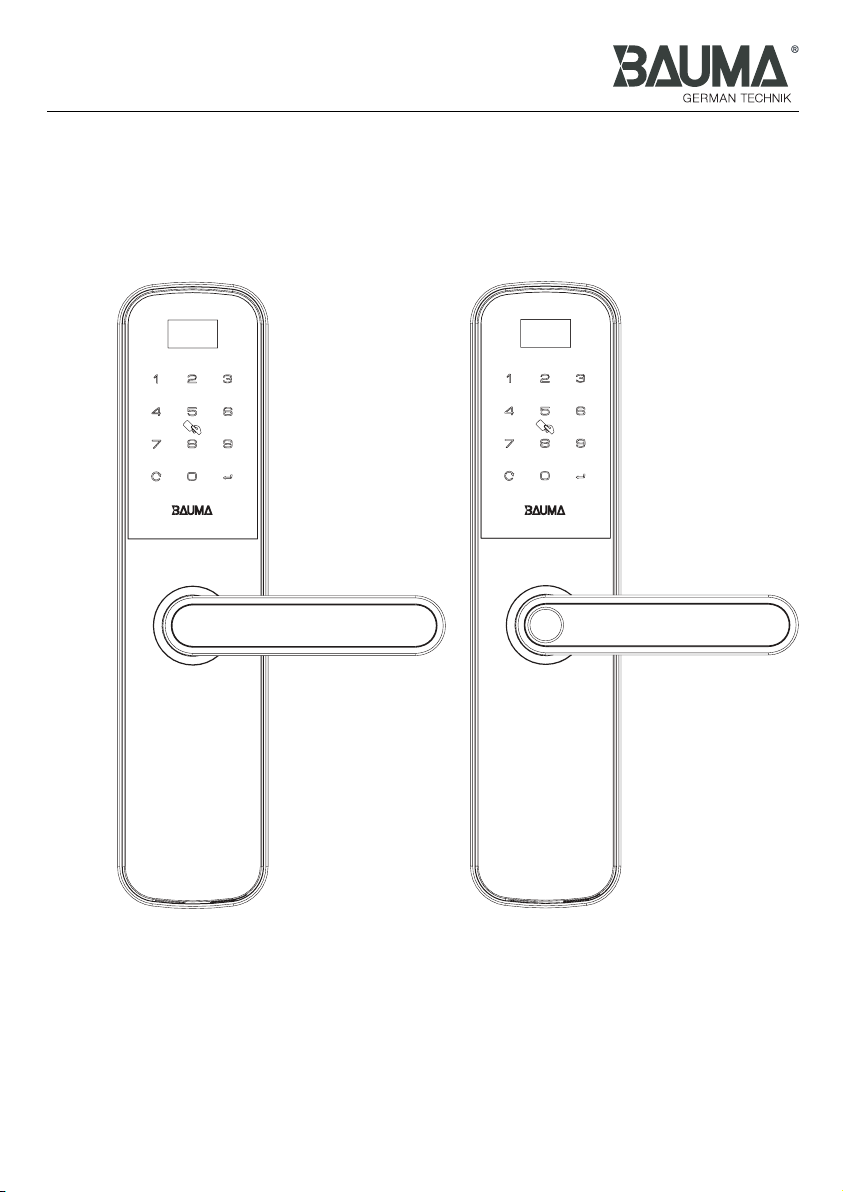
Digital door lock
Model BM600 / BM610
BM600 BM610
DECLARATION: THE PRODUCT FOLLOWS THE STRATEGY OF SUSTAINABLE
DEVELOPMENT. THE COMPANY RESERVES THE RIGHT TO MODIFY AND
IMPROVE THE PRODUCT WITHOUT PRIOR NOTICE.
Version 1.0

Index
Product features----------------------------------------------------------------------------------1
Product specification - exterior trim-------------------------------------------------------------2
Product specification - interior trim-------------------------------------------------------------3
Open & lock the door----------------------------------------------------------------------------4
Service features-----------------------------------------------------------------------------------5
Reverse lever handle-----------------------------------------------------------------------------6
Install spindle, spindle spring and mortise-----------------------------------------------------7
Preparation before installation (for big mortise 60x68)-----------------------------------------------8
Install the trim (for small mortise 50x50)-------------------------------------------------------9
Install the trim (for big mortise 60x68)---------------------------------------------------------10
Read before using
How to use
How to install

Read before using
Product features
Note: *Fingerprint unlock way is available for model BM610 only, please confirm
the product model you purchased.
Door
Thickness
Auxiliary
Function
* Fingerprint
sensor
Power
consumption
Power
supply
Unlock way
Items Sub-items
Big mortise 60x68
Small mortise 50X50
23
Specification
35-60mm
38-60mm
999 pieces
≤air 15KV / contact 8KV
1:N
Semi-conductor
≤0,001%
≤0,1%
20% ~ 95%
-20oC ~ 70oC
< 0,5 seconds
508dpi
Φ13
≤200mA
≤45uA
5V Micro-USB
≤4,8V
Over 10,000 times under normal usage
4 pieces of 1.5V AA alkaline battery
Zigbee - App Hafele Smart Living
2 Keys
Capacity: 3 masters +47 user.
Capacity: 3 masters +47 user.
Capacity: 3 masters +97 user.
Other
Working voltage
Battery life
Low volltage alarm
Back-up power supply
Quiescent current
Dynamic current
Scanning area
Resolution
Responding speed
Working temperature
Relative humidity
FRR
FAR
Fingerprint sensor
Comparison mode
Antistatic ability
Unlock record
*Fingerprint
Password
Card
Mechanical key
22
20
21
19
18
17
16
15
14
13
12
11
10
9
8
7
6
5
4
3
2
1
No
1
Read before using
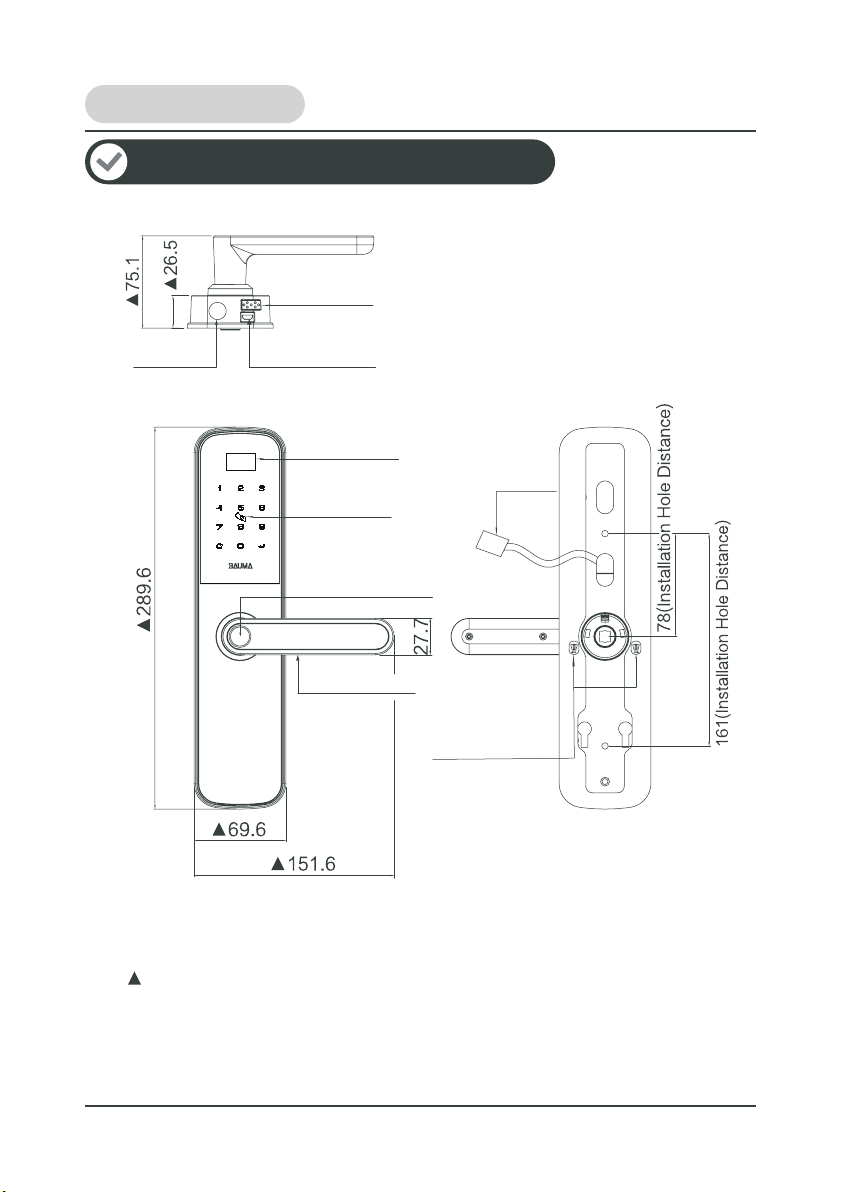
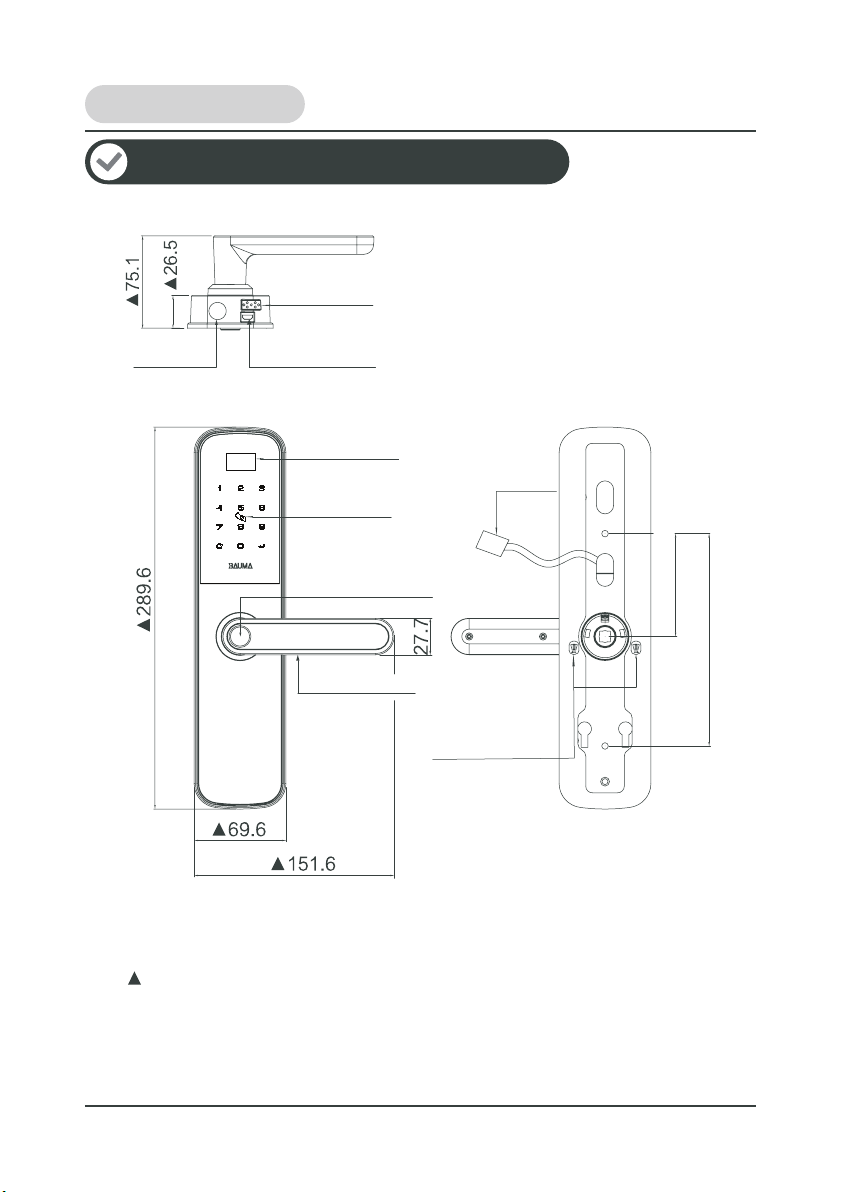
Product specification - exterior trim
Lever Handle
Reversing Switch
Connecting Cable
Touch Keypad
Card Reader Area
(Between 5 and 8)
*Fingerprint Sensor
Exterior Handle
OLED Display
Speaker hole
Cylinder
Note:
The overall dimension above includes silicon pad.
2.
1.
*Fingerprint Sensor is only for model BM610 (Please confirm the product model
and accessories you purchased).
Front Side of Exterior Trim Back Side of Exterior Trim
Micro USB back-up
power supply socket
2
Read before using
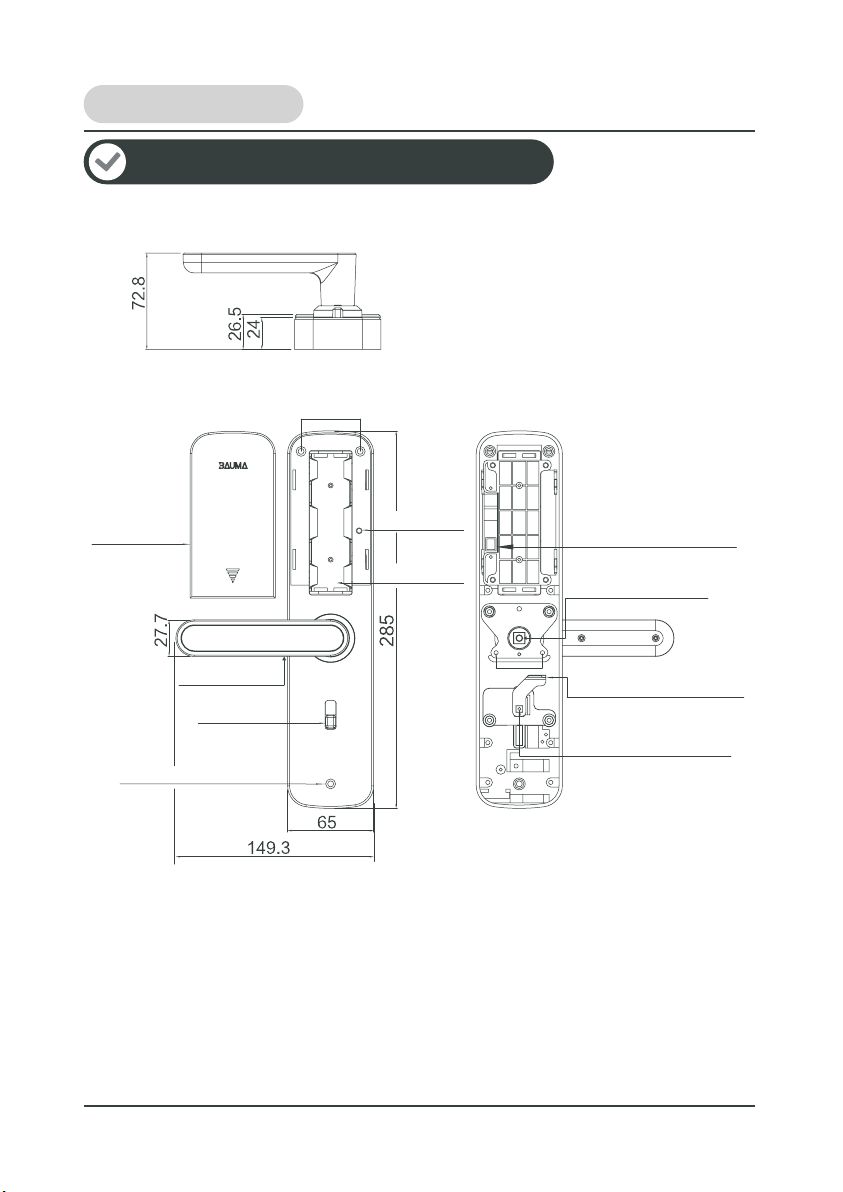
Product specification - interior trim
Slide Plate of Privacy Turn
Slide Plate Fixing Screw
Handle Fixing Screw
Cable Connecting Socket
Installation Screw Hole
Reset Button
Battery Case
Battery Cover
Interior Handle
Privacy Turn
Installation Screw Hole
Front Side of Interior Trim Back Side of Interior Trim
3
How to use
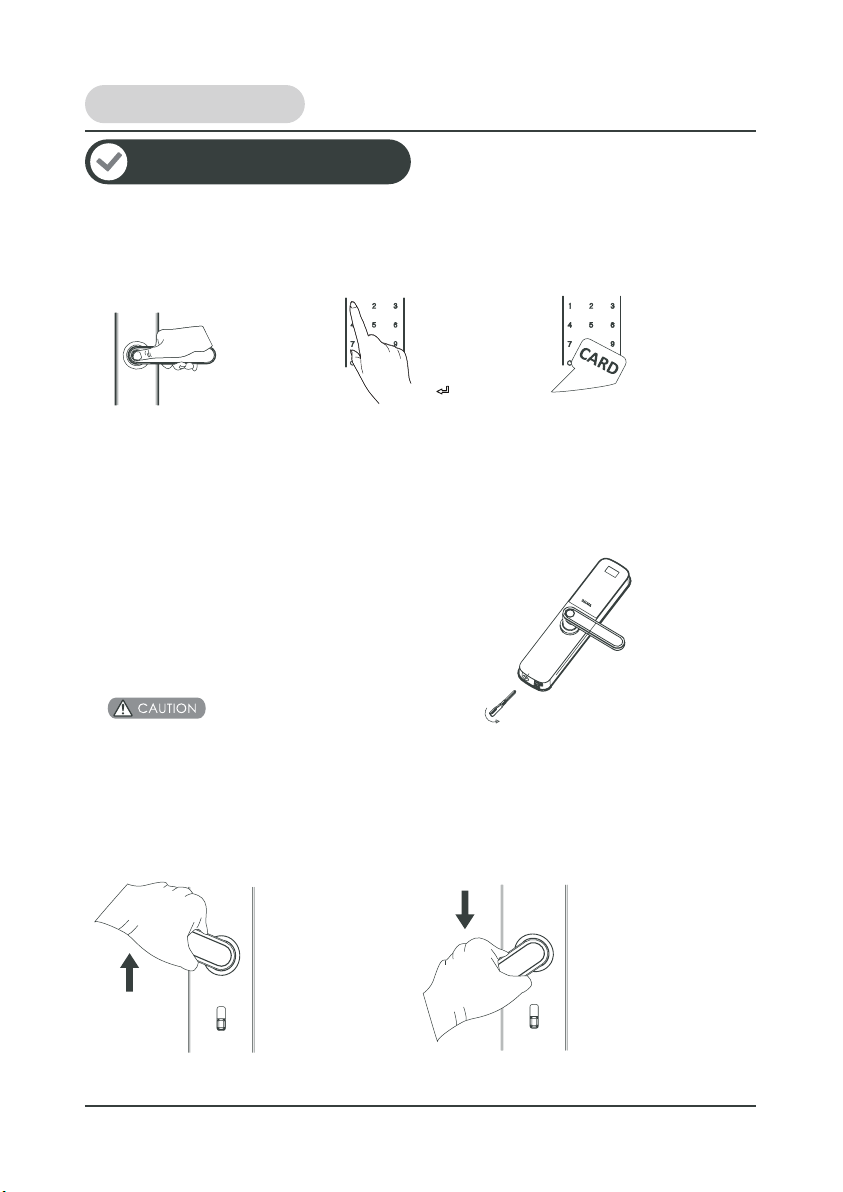
Open & lock the door
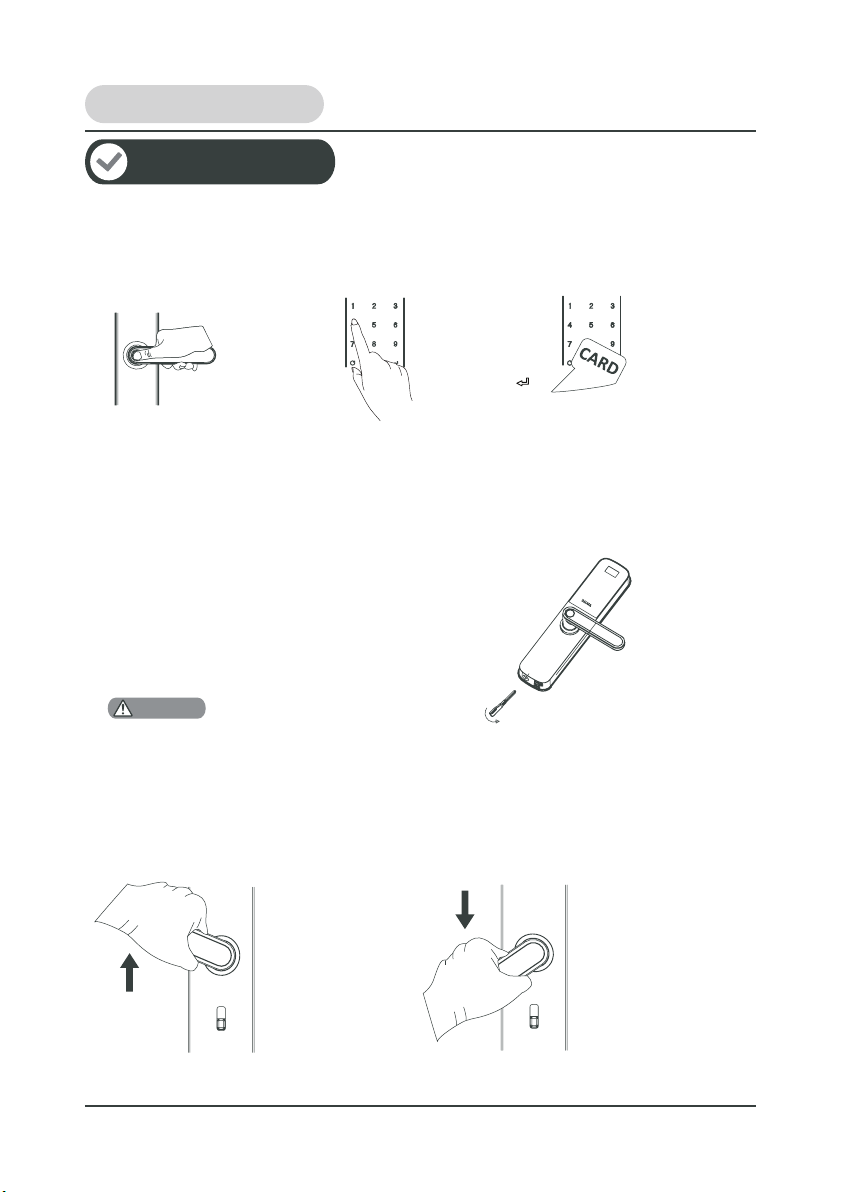
Usage of Mechanical Key
Insert the key into the key hole at bottom of Exterior
Trim and turn it with proper angle to unlock the cylinder,
then press down the handle to open the door.
-----------------------------------------------------
-----------------------------------------------------
How to open the door from outside
Password
1. Touch keypad by
palm to lighten
keypad.
2.Enter the enrolled
password with end
of “ ”.
3. Press down handle
to open the door.
1.Place the enrolled
card properly
between number
5 and 8.
2.Press down handle
to open the door.
Anti-spy coding function
The random number can be added before or after the real user password but the
maximum length is 16 digits. This feature will prevent the real user password from
being exposed.
How to lock the door How to open the door from inside
Press down interior
handle to open the
door.
Fingerprint
(only BM610)
Card
Pull up exterior or
interior handle to
let the dead bolts
come out.
Do not press down the handle while rotating the mechanical key, otherwise, this
incorrect operation may get the lock broken. Always rotate the mechanical key first,
then press down the handle to open the door.
1.Place the
enrolled
finger properly on
the fingerprint
sensor area.
2.Press down
handle
to open the door.
4

How to use
Service features
5V
Emergence power supply
When the battery is too low or completely dead and
the lock cannot be opened from ourside by inputting
master/user identification, connect a 5V power
supply via micro USB port at the bottom of exterior
trim. Then unlock the door with master/user
identification and replace all batteries immediately.
-----------------------------------------------------
-----------------------------------------------------
Restore to factory default settings
Operation instructions :
1.Open battery cover and find the reset button.
2.Press the reset button and keep pressing “ ” on touch
keypad to reset the system.
3.After that all user data and settings will be deleted.
Reset
button
When door is closed, slide privacy button upward to switch
on privacy mode.
When the privacy is turned on, only master identifications
and mechanical key can open the door from outside. User
identifications is prohibited.
Privacy mode
Low power warning and battery replacement
When the battery is lower than 4.8V, there is low power warning signal will appear
on the screen. Please replace all batteries immediately. Make sure the battery is
installed correctly according to the positive and negative pole.
-----------------------------------------------------
1.If passage mode is turned on, it will be turned off automatically
when privacy mode switched on.
2.Please refer to OPERATION MANUAL for the advance setting
of passage mode.
5
How to install
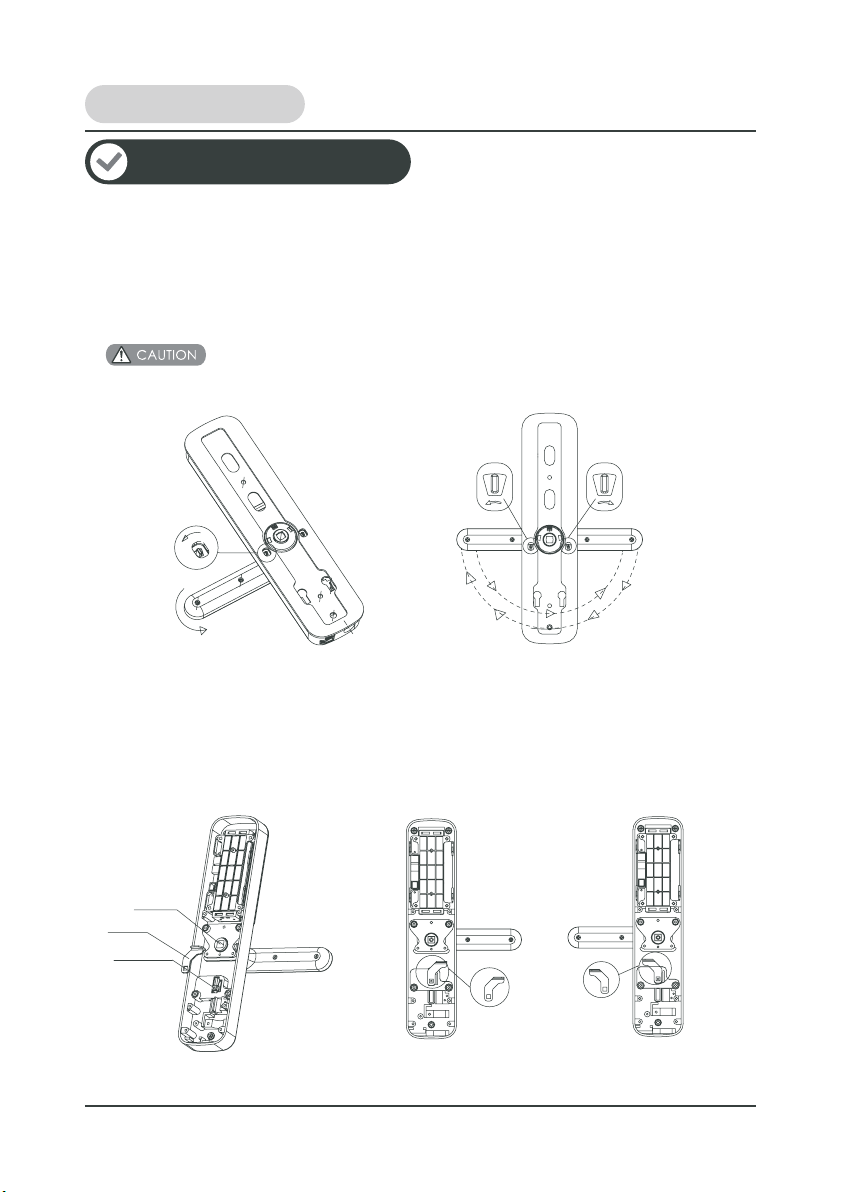
Reverse lever handle
Make sure the lock (cylinder) is locked and pull out the mechanical key before reversing
the lever handle.
1. Remove Screw 1. Take out the slide plate and turn it around (refer to Diagram 1 and
Diagram 2 for left-hand or right-hand open), and then fix the Slide Plate by Screw 1.
2. Remove Screw 2. Take out the lever handle and reverse it to the opposite side (refer to
Diagram 1 and Diagram 2 for left hand or right hand open), and then fix the lever handle by
Screw 2.
Back Side of Interior Trim
for Right Open (Diagram 1)
Back Side of Interior Trim
for Left Open (Diagram 2)
Right Open Left Open
Reverse exterior lever handle
Reverse interior lever handle
-----------------------------------------------------
screw 1
Slide plate
screw 2
There are two reversing switch on the back of exterior plate. When you want to reverse the
lever handle to the other side, push the reversing switch that on the same side of the lever
handle outward, and then turn the lever handle 180°from downward at the same time.
Release the reversing switch and the reversing process of exterior lever handle is done!
6
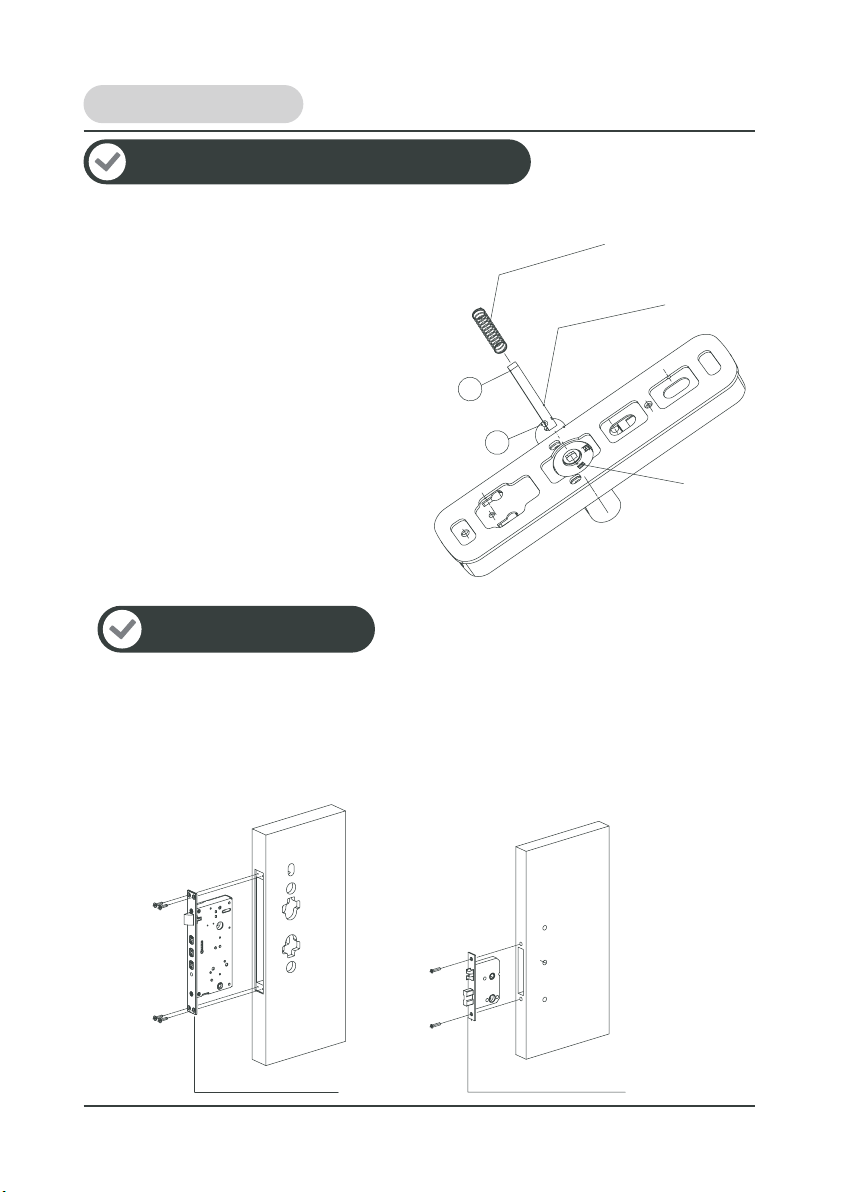
How to install
Install spindle and spindle spring
1. Put Side A of Spindle into Rotor.
2. Put Spindle Spring over the spindle through
Side B.
1. Bore holes on door according to the template provided.
2. Install the mortise into the bored hole on door, and fix it by screws.
Note: Please install according to product accessories.
A
B
Rotor
Spindle
Spindle Spring
Small mortise 50x50
Install the mortise
-----------------------------------------------------
Big mortise 60x68
(please refer to the right Diagram).
7

How to install
Preparation before installation (for big mortise 60x68)
Please install Square Neck Screw on Exterior Trim according to below:
1. Screw 2/3 part of the Screw Bolt into Square Neck Screw.
2. Insert Square Neck Screw into guide channel on Exterior Trim.
3. Twist Screw Bolt tightly to fix Square Neck Screw on Exterior Trim.
(Please refer to diagram 1)
(Note: For small mortise 50x50, there is no need to install Square Neck Screw, please
confirm the product model and accessories you purchase.)
If you buy the lock with big mortise 60x68mm, please follow below preparation before
installationof the trims.
Diagram 1
Screw Bolt
Guide Channel for Square Neck Screw
Square Neck Screw
Preparation of exterior trim (for big mortise 60x68)
8

How to install
Install the trim (for small mortise 50x50)
ytQoN Name
Exterior Trim
Screw Bolt
Spindle
Spindle Spring
Small mortise 50x50
Base Plate
(silicone rubber included)
M4*45 Screw
Interior Trim
M4*14 Screw
Battery Cover
A
B
C
D
E
F
G
H
I
J
A
B
B
C
D
EFG
G
HI
I
J
1. Fix Screw Bolt on protruded screw of
Exterior Trim.
2. Install Spindle and Spindle Spring on
Exterior Trim (please refer to page 7 for more
details about the installation steps of spindle
and spindle spring).
3. Fix Base Plate with Exterior Trim by M4*45
Screw.
4. Install Interior Trim and fix it by M4*14
Screw.
9

How to install
Install the trim(for big mortise 60x68)
No Qty
Name
Exterior Trim
Square Neck Screw
Screw Bolt
Spindle
Spindle Spring
Big mortise 60x68
Base Plate (silicone rubber included)
M4*45 Screw
Interior Trim
M4*14 Screw
Battery Cover
A
BC
CD
E
FGH
H
I
J
J
K
1. Fix Screw Bolt on protruded screw of
Exterior Trim.(refer to "Preparation of
exterior trim for big mortise 60x68").
2. Install Spindle and Spindle Spring on
Exterior Trim (please refer to page 7 for
more details about the installation steps
of spindle and spindle spring).
3. Fix Base Plate with Exterior Trim by
M4*45 Screw.
4. Install Interior Trim and fix it by M4*14
Screw.
10

HƯỚNG DẪN
LẮP ĐẶT
TÊN SẢN PHẨM: KHOÁ ĐIỆN TỬ
Các mã sản phẩm áp dụng: BM600/ BM610
Vietnamese
Khoá điện tử
Phiên bản 1.0
BM600 / BM610
BM600 BM610
SẢN PHẨM SẢN XUẤT DỰA THEO CHIẾN LƯỢC PHÁT TRIỂN BỀN VỮNG.
CÔNG TY CÓ QUYỀN SỬA ĐỔI VÀ CẢI TIẾN SẢN PHẨM MÀ KHÔNG CẦN
THÔNG BÁO TRƯỚC.

Nội dung
Đặc tính sản phẩm------------------------------------------------------------------------------1
Thông số sản phẩm – Mặt ngoài khóa--------------------------------------------------------2
Thông số sản phẩm – Mặt trong khóa--------------------------------------------------------3
Mở & khóa cửa----------------------------------------------------------------------------------4
Tính năng dịch vụ--------------------------------------------------------------------------------5
Đảo chiều tay nắm------------------------------------------------------------------------------6
Lắp trục tay nắm, lò xo và thân khóa---------------------------------------------------------7
Chuẩn bị trước khi lắp đặt (thân khóa lớn 60x68)--------------------------------------------8
Lắp đặt khóa đối với thân khóa nhỏ 50x50---------------------------------------------------9
Lắp đặt khóa đối với thân khóa lớn 60x68---------------------------------------------------10
Thông tin cần biết
Hướng dẫn sử dụng
Hướng dẫn lắp đặt
Ghi chú: * Vân tay chỉ có trên Model BM610, vui lòng xác nhận sản phẩm đã mua.
Độ dày cửa
Chức năng
phụ trợ
* Cảm biến
vân tay
Tiêu thụ
điện
Nguồn điện
Cách mở
khóa
Mục Phụ mục
Big mortise 60x68
Small mortise 50X50
23
Thông số kỹ thuật
35-60mm
38-60mm
999 lần mở gần nhất
≤ Không khí 15KV / tiếp xúc 8KV
1:N
Bán dẫn
≤0,001%
≤0,1%
20% ~ 95%
-20oC ~ 70oC
< 0,5 giây
508dpi
Φ13
≤200mA
≤45uA
5V Micro-USB
≤4,8V
Trên 10.000 lần trong điều kiện sử dụng bình thường
4 Pin alkaline 1,5V AA
Zigbee - Ứng dụng Hafele Smart Living
2 chìa cơ
Dung lượng: 3 thẻ chủ + 47 thẻ người dùng.
Dung lượng: 3 mật khẩu chủ + 47 mật khẩu người dùng.
Dung lượng: 3 vân tay chủ + 97 vân tay người dùng.
Khác
Điện áp hoạt động
Thời gian sử dụng pin
Cảnh báo điện áp thấp
Nguồn điện dự phòng
Dòng tĩnh
Dòng động
Phạm vi quét
Độ phân giải
Tốc độ phản hồi
Nhiệt độ hoạt động
Độ ẩm tương đối
FRR
FAR
Cảm biến vân tay
Chế độ đối chiếu
Khả năng chống tĩnh điện
Lịch sử mở khóa
*Vân tay
Mật khẩu
Thẻ
Chìa khóa cơ
22
20
21
19
18
17
16
15
14
13
12
11
10
9
8
7
6
5
4
3
2
1
STT
Thông tin cần biết
Đặc tính sản phẩm
1
Thông tin cần biết
Thông số sản phẩm – Mặt ngoài khóa
Công tắc đảo
chiều tay nắm
Cáp kết nối
78 (Khoảng cách lỗ lắp đặt)
161 (Khoảng cách lỗ lắp đặt)
Bàn phím cảm ứng
Khu vực đọc thẻ
(Giữa số 5&8)
*Cảm biến vân tay
Tay nắm ngoài
Màn hình OLED
Loa
Ruột khóa cơ
Ghi chú:
Kích thước tổng thể nêu trên tính cả kích thước miếng đệm silicon.
2.
1.
*Vân tay chỉ có trên Model BM610, vui lòng xác nhận sản phẩm đã mua.
Mặt ngoài khóa – Mặt trước Mặt ngoài khóa – Mặt sau
Ổ cắm nguồn dự phòng Micro USB
2

Lẫy công tắc riêng tư
Vít cố định lẫy công tắc
Vít cố định tay nắm
Cổng kết nối cáp
Lỗ bắt vít
Nút thiết lập lại
Hộp lắp pin
Nắp đậy pin
Tay nắm trong
Công tắc chế độ riêng tư
Lỗ bắt vít
Mặt trong khóa – Mặt trước Mặt trong khóa – Mặt sau
Thông tin cần biết
Thông số sản phẩm – Mặt trong khóa
3
Hướng dẫn sử dụng
Mở & khóa cửa
Hướng dẫn sử dụng chìa khóa cơ
Đưa chìa khóa cơ vào lỗ chìa khóa ở phía dưới của mặt
ngoài khóa rồi xoay chìa một góc thích hợp để mở, sau đó
ấn tay nắm xuống để mở cửa.
-----------------------------------------------------
-----------------------------------------------------
Hướng dẫn mở cửa từ bên ngoài
Mật khẩu
1.Dùng lòng bàn tay
chạm vào bàn phím để
bàn phím sáng lên.
2.Nhập mật khẩu đã
đăng ký rồi ấn nút
3.Ấn tay nắm xuống
để mở cửa.
1. Đặt thẻ đã đăng ký
đúng giữa
số 5 và số 8.
2. Ấn tay nắm xuống
để mở cửa.
Chức năng mã ngẫu nhiên chống nhìn trộm
Có thể thêm số ngẫu nhiên vào trước hoặc sau mật khẩu khách thực với
độ dài tối đa là 16 chữ số.
Tính năng này nhằm không để lộ mật khẩu khách thực.
Hướng dẫn khóa cửa Hướng dẫn mở cửa từ bên trong
Gạt tay nắm bên trong
xuống để mở cửa.
Vân tay
(Chỉ có trên BM610)
Thẻ
Nâng tay nắm bên
ngoài hoặc bên trong
lên để đẩy chốt
cố định ra ngoài
Không ấn tay cầm trong khi xoay chìa khóa để tránh làm hỏng khóa. Luôn xoay chìa khóa trước
và ấn tay cầm sau để mở cửa.
LƯU Ý
1. Đặt đúng ngón tay
đã đăng ký trên vùng
cảm biến vân tay.
2. Ấn tay nắm xuống
để mở cửa.
4
Other manuals for BM600
1
This manual suits for next models
2
Table of contents
Languages:
Other Bauma Door Lock manuals

Popular Door Lock manuals by other brands


Assa Abloy
Assa Abloy Valencia Bella user manual

Hafele
Hafele Dialock Cylinder DC Mounting and Brief Operating Instructions

Allegion
Allegion Milre MI-5600 user manual

Sewosy
Sewosy EF300ENC CA installation instructions

Schlage
Schlage Lock with Built-in Alarm user guide

Sanela
Sanela SLZA 43AV Mounting instructions


