Bayou Classic 700-701 u Guide
For Questions and Information call us at: 1-800-864-6194
Monday - Friday (8:00am - 5:00pm CST) Saturday (9:00am - 2:00pm CST)
Barbour International, Inc. •P.O. Box 1839 • Brandon, MS 39043
www.thebayou.com
WARNING
For Outdoor Use Only (outside any enclosure)
FOR YOUR SAFETY:
WARNING
1. Improper installation, adjustment, alteration, service or maintenance
can cause injury or property damage.
FOR YOUR SAFETY:
2. Read the installation, operation, and maintenance instructions thoroughly
before installing or servicing this equipment.
3. Failure to follow these instructions could result in fire or explosion,
which could cause property damage, personal injury, or death.
BAYOU FRYER
Model #700-701
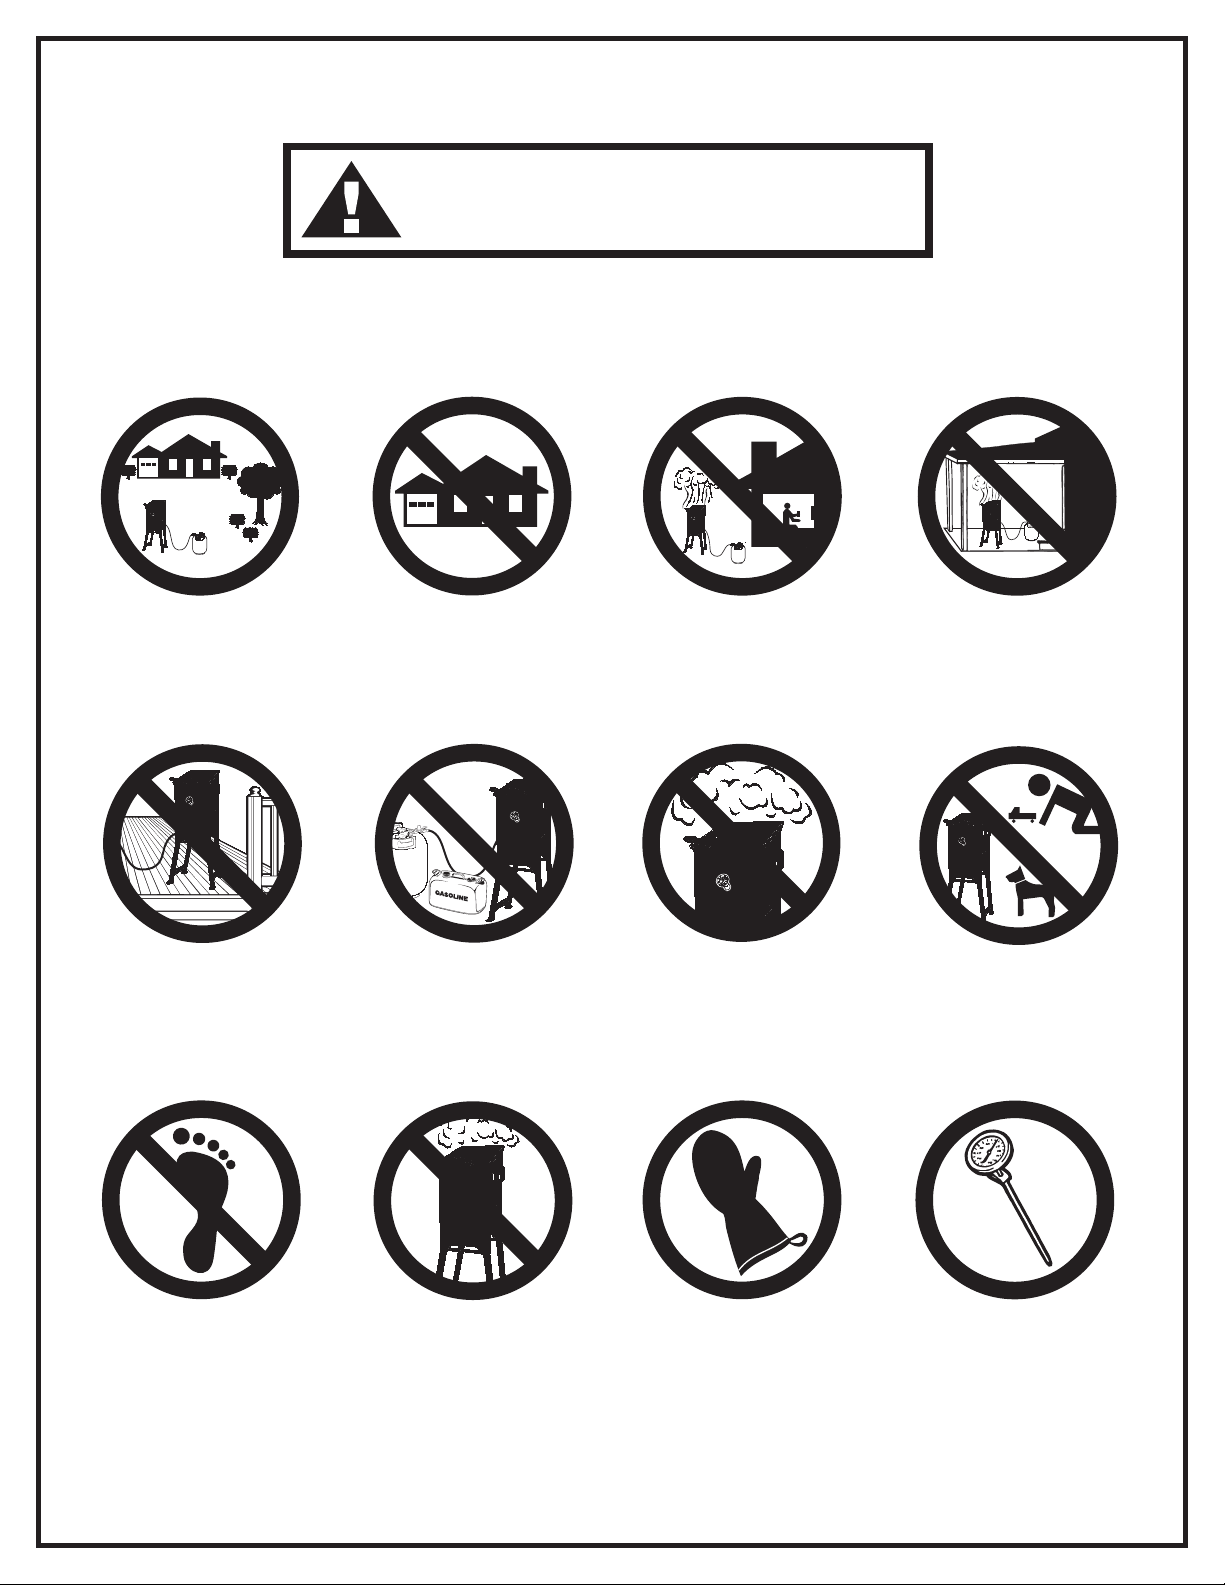
Safety Precautions & Warnings
ALWAYS
wear protective mitts, gloves,
goggles and long sleeve
clothing when cooking.
OUTDOOR USE ONLY!
Do not operate inside
garages or carports.
NEVER!
No barefeet or sandals
when cooking.
NEVER
use under any
roof or overhang.
NEVER!
let children or pets near
the cooking area
during and after use.
NEVER
LEAVE APPLIANCE
UNATTENDED!
HOT!
Unit is extremely hot during and
after use. Allow 2 hours for unit
to cool down before touching.
ALWAYS
use an accurate thermometer
to monitor temperature when
preheating oil or frying.
NEVER
use on decks, boats or
any combustible surface!
NEVER
place flammable or
combustible materials
within 25-ft of cooker.
Remember: Think Safety and Use Common Sense!
ALWAYS
operate in a clear open
area away from buildings,
trees and shrubs.
NEVER
cover pot with lid when
preheating oil or frying.
WARNING
Failure to follow these instructions could result in fire or explosion
which could cause property damage, personal injury or death!
1. Sober adult operation ONLY! Read and understand this manual before using the product. The use
of alcohol, prescription or nonprescription drugs may impair your ability to properly assemble or
safely operate this appliance.
2. This appliance, like any gas appliance, can be extremely dangerous! It can burn you, scald you
with hot oil or water, or start a fire. Misuse of this outdoor appliance can result in serious personal
injury or property damage. The warnings and safety instructions in this manual must be followed
to provide reasonable safety and efficiency in using this appliance.
3. LP (propane) gas is colorless, tasteless, heavier than air, and is both flammable and explosive.
Combustion of propane consumes oxygen and produces carbon monoxide (a poisonous gas).
Therefore, never operate an outdoor appliance inside a building or confined area where ventilation
may be restricted. Make sure the LP Cylinder and the appliance are placed in an open area. Do
not obstruct the flow of combustion and ventilation air.
4. Never leave appliance unattended.
Most accidents occur as a result of leaving the appliance unattended.
When Frying...
any appliance left unattended may eventually over heat, resulting in a serious grease fire.
5. This is an ATTENDED appliance. Do NOT leave this appliance unattended while heating oil or
grease, cooking food or when hot after use. Heated liquid can remain at scalding temperatures
long after cooking has ended.
6. Use ONLY on a level, stable, non-combustible surfaces like brick, concrete or dirt. Do NOT use
this appliance on any surface that will burn or melt like wood, asphalt, vinyl, or plastic.
7. This appliance is for OUTDOOR use only. Do NOT use in a building, garage or any other enclosed
area. Do NOT use on wooden decks, under roof overhangs, on porches, carports or at garage
door openings. This appliance is NOT intended to be installed in or on recreational vechiles and/or
boats. This appliance is not intended for and should NEVER be used as a heater.
8. Do NOT locate this appliance under ANY overhead construction. Keep a minimum clearance of
10 feet from the sides, front and back of the appliance to ANY construction. Keep the area clear
and free of any combustible material such as household chemicals, paint, gasoline and other
flammable vapors and liquids.
9. Keep the fuel supply hose away from any heated surfaces.
10. Clean and inspect the hose before each use of the appliance. If there is evidence of abrasion,
wear, cuts or leaks, the hose must be replaced prior to the appliance being put into operation.
Replacement hose for Bayou Classic Bayou Fryer is
Model #M5HPR-1.
WARNING
Read and understand this manual before using this product.
11. Keep children and pets away from the appliance at all times. Avoid bumping of or impact with
the appliance to prevent spillage or splashing of hot liquid.
12. Do NOT move the appliance when in use. Allow the cooking vessel to cool to 115°F (46°C)
before moving or storing.
DO NOT LEAVE UNATTENDED WHILE COOKER IS IN USE OR IS STILL HOT! (Above 100°F)
13. When cooking with oil, grease or water; the thermometer provided MUST be used. Follow instructions
in this manual for proper installation and use of thermometer. Follow instructions to make sure
thermometer is working properly.
14. NEVER let the oil, grease or water temperature get hotter than 350°F (177°C). If the temperature
goes above 400°F (200°C) or if oil begins to smoke, IMMEDIATELY turn burner OFF. Wait for the
temperature to decrease to less than 350°F (177°C) before relighting burner. Do NOT open lid if
oil has over heated. Opening the lid on overheated oil can result in spontaneous combustion.
After reaching 450°F (230°C), oil or grease temperature can rapidly increase to its point of
spontaneous combustion... a serious grease fire. Therefore, never leave cooker unattended, always
monitor the thermometer.
15. When cooking with oil, grease or water; fire extinguishing materials shall be readily accessible.
In the event of an oil or grease fire do NOT attempt to extinguish with water. Turn off the gas at
the supply cylinder and close lid. Use a Type BC or ABC dry chemical fire extinguisher or smother
fire with dirt, sand or baking soda.
16. NEVER overfill with oil, grease or water.
17. Failure to completely thaw and dry food may cause oil or grease to overflow. When frying with
oil or grease, all foods products MUST be completely thawed and towel dried to remove excess
water.
18. Use extreme caution keeping hands, hair and clothing away from the appliance. Never put face
or hands over burner while lighting. Make sure to turn appliance off when not in use.
Always wear cooking mitts.
19. Use only D.O.T. certified (US Department of Transportation) LP gas cylinders. Always close
LP cylinder valve after use. Always use and store LP cylinder in an upright position. Never store
or transport LP cylinders in occupied enclosures. Carefully read and follow instructions on
LP cylinder.
20. Never fill the Cylinder beyond 80% full. All LP Cylinders in excess of 2.2 lbs(1.0 Kg.) propane
capacity, must include a collar to protect the cylinder valve.
WARNING

WARNING
21. The valve on the propane tank is the "ON/OFF" valve. When finished cooking, or in case of an
emergency, turn the tank valve clockwise to the "OFF" position. Be sure to close the tank valve
before disconnecting the hose. Caution - The valve on the hose and regulator assembly controls
the flame intensity only. It is not an "ON/OFF" valve.
22. Always check for gas leaks before lighting. (See section for Leak Test Instructions.)
23. Follow lighting procedures as stated in this manual. Use a fireplace match or gas appliance
lighter.
24. Always wear shoes while cooking. Always wear mitts when handling the appliance and
accessories.
25. Use Bayou Classic appliances only in accordance with state and local ordinances and codes.
In the absence of local codes, installation must conform with the National Fuel Gas Code,
ANSI Z223.1/NFPA 54, Storage and Handling of Liquefied Petroleum Gases, ANSI/NFPA 58 or
CSA B149.1, Natural Gas and Propane Installation Code; or CSA-B149.2 Natural Gas and
Propane Installation Code.
26. Bayou Classic appliances are not intended for use in a Commercial Setting.
27. Bayou Classic appliances are designed for use with propane gas using ONLY the hose and regulator
assembly supplied with the product. For replacement parts call 1-800-864-6194 (Monday - Friday
8am - 5pm, Saturday 9am - 2pm CST) for assistance. Accessories not recommended by
Bayou Classic must not be used with Bayou Classic Appliances. Never use with natural gas.
28. Carefully read and follow instructions for assembly, checking for gas leaks, lighting,
checking accuracy of a thermometer and cooking.
29. Heat Exhaust Vent on back of appliance is extremely HOT! Keep hands, children, pets away from
opening while in use.
30. Do NOT walk behind appliance while in use or cooling as exhaust is hot and hose is a trip hazard.
31. While in use, appliance will generate a large amount of heat. Use protective gloves to handle
appliance lid and baskets. Do Not move while in use.
32. Cooking with grease generates heat and is a BURN HAZARD.
CAUTION: Handles are extremely HOT during use.
Failure to comply with these warnings and instructions can result in
property damage, personal injury and death.

1. Slide Extension Leg into holes on the Fryer.
Attach using the 4 Bolts.
3. Lock Basket Handle into place by inserting
handle into loops on Basket. Then with some
pressure, carefully force Basket Handle Bars
around the clasp on the Basket.
Assembly Instructions
Parts List
Steel Deep Fryer
2 Stainless Steel Baskets
2 Extension Legs
4 Bolts for Extension Legs
4 Small Bolts for Gas Inlet
2 Long Bolts for Heat Exhaust
1 Gas Inlet
1 Heat Exhaust
1 Thermometer Wrench
2. (a) Attach the Gas Inlet to the opening on back
of Fryer using 4 Small Bolts. Make sure it is
attached to the opening on the right side
of Fryer.
(b) Attach Heat Exhaust to the other opening
on back of Fryer using 2 Long Bolts.
Thermometer Test Instructions
-Always use a thermometer. A thermometer is a sensitive measuring device which may work improperly
if dropped, bent, or twisted. Always check to be sure the thermometer is working properly before
cooking.
- There is a simple way to test the thermometer:
1. While wearing protective gloves, hold the thermometer by the dial. Insert thermometer end
into boiling water. The needle should quickly move around the dial and register approximately
212°F (100°C). This indicates the thermometer is working.
Note: Clean the inside of Bayou Fryer with
soap and water before first use.
(a) (b)
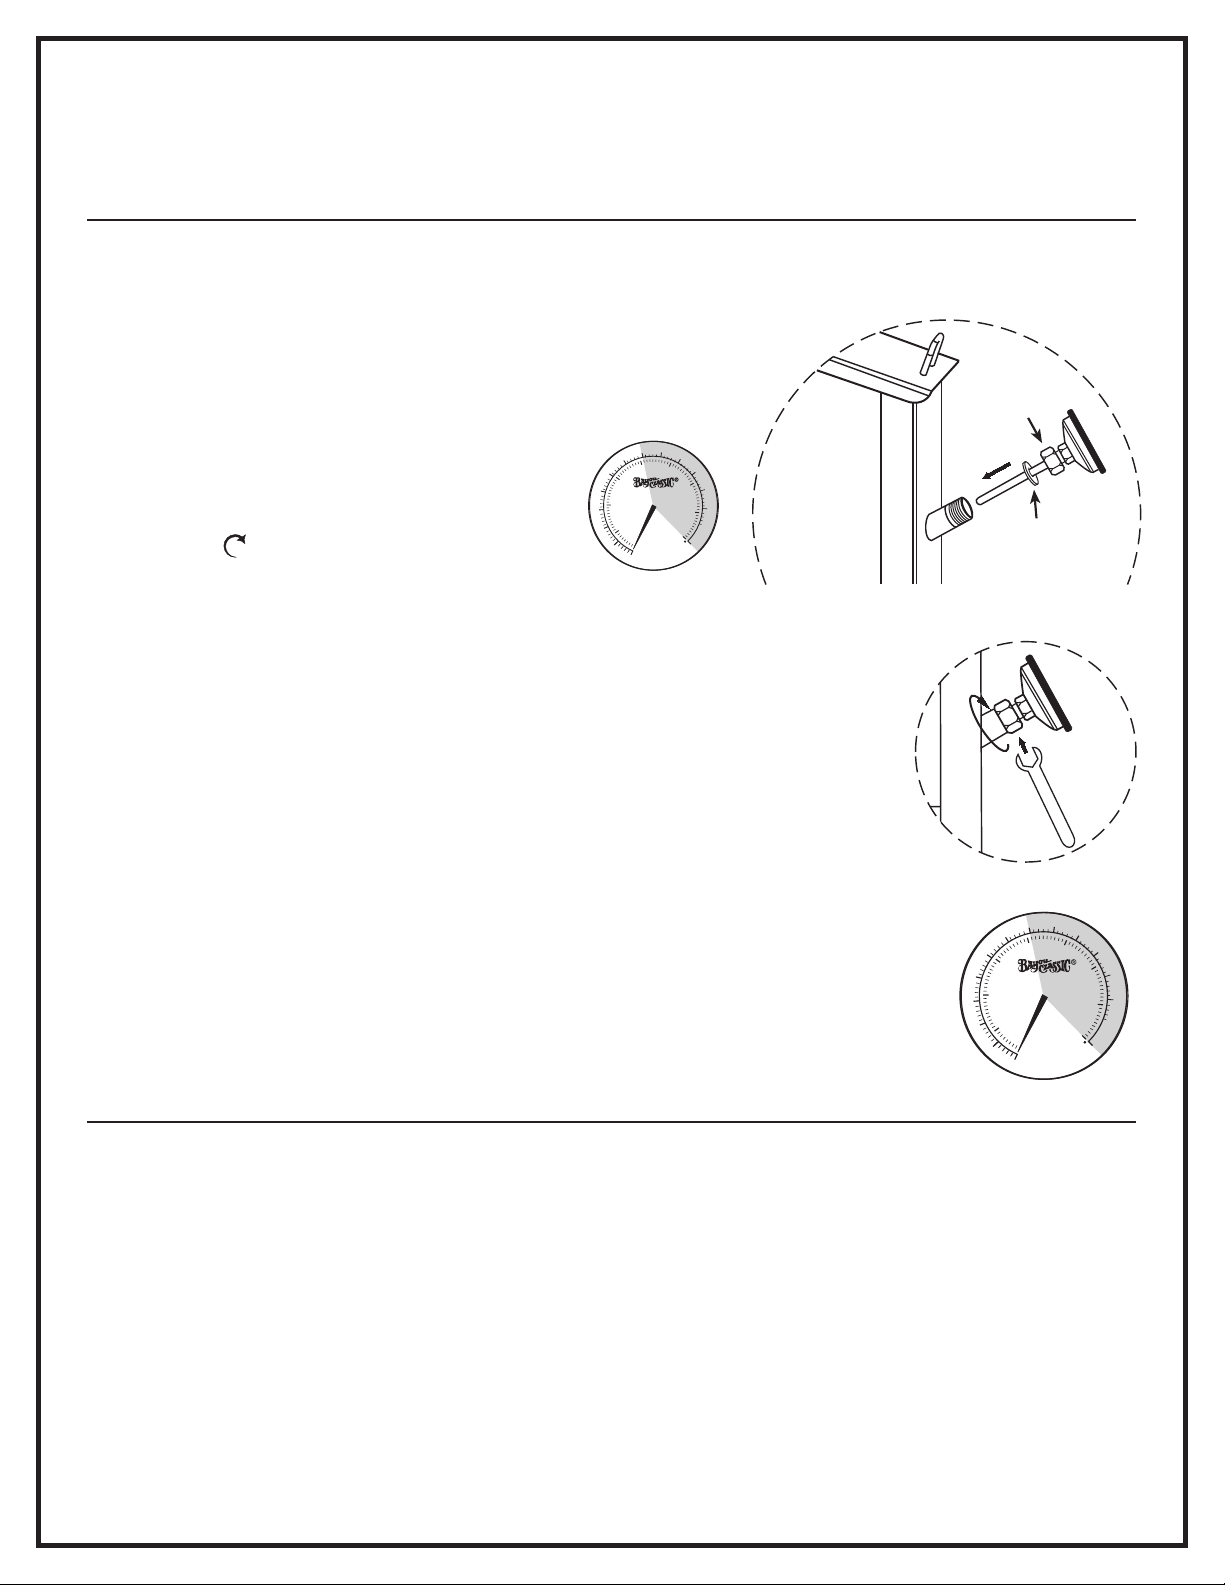
Thermometer Assembly Instructions
3. If the needle stops at a low temperature (i.e. 200°F); this indicates the thermometer has been
compromised and is not working properly. If so, discard the thermometer and call
1-800-864-6194 (Monday - Friday 8am - 5pm, Saturday 9am - 2pm CST) for assistance.
Note: Do not attempt frying if the thermometer is not working!
1. Before installing thermometer, make sure the rubber gasket
is located on stem of thermometer underneath brass nut.
2. Insert Thermometer into hole on front of fryer.
Make sure the thermometer face is in the
upright position. Gently turn the brass nut
clockwise until thermometer is secure.
3. With wrench provided, tighten brass nut of thermometer until it is tightly
secured to Fryer Stem.
4. After attaching Thermometer, make sure thermometer needle is pointing to or near
actual outside temperature.
If you are uncertain about any aspect of thermometer testing and attachment or
fryer operation call 1-800-864-6194 (Monday - Friday 8am - 5pm,
Saturday 9am - 2pm CST) for assistance.
F
I
R
E
H
A
Z
A
R
D
200
350
150
100
250
50
50
150
400
˚C
750
˚F
TURN
OFF
GAS
400
10
F
I
R
E
H
A
Z
A
R
D
200
350
150
100
250
50
50
150
400
˚C
750
˚F
TURN
OFF
GAS
400
10
Upright Position
CAUTION: Be certain to tighten ONLY the brass nut on stem of thermometer.
Do Not tighten top nut on stem. If you tighten the top nut, the dial
will also turn and the calibration will be compromised.
RUBBER
GASKET
BRASS
NUT
1. Appliance must be in open area with at least 10 feet of clearance in all directions to nearest structure
or combustible construction.
2. No combustibles or roof overhead. The appliance shall NOT be located under overhead unprotected
combustible construction.
3. There must be at least 2 feet (24") of space between LP gas tank and cooker.
4. Locate the LP gas tank "upwind" from the appliance. The LP gas tank and appliance must be
positioned so that any wind will direct most radiant heat away from the gas tank. This also helps
fire prevention by blowing the flames of a grease fire away from the gas tank.
Important Precautions
1. Always read, understand and follow the cylinder manufacturer's instructions.
2. The LP-gas supply cylinder to be used must be constructed and marked in accordance with the
specifications for LP-gas cylinders of the U.S. Department of Transportation (DOT) or the
National Standards of Canada, CAN/CSA-B339, Cylinders, Spheres and Tubes for the
Transportation of Dangerous Goods.
3. Make sure that the cylinder valve has the proper receptacle for a handwheel hose connection.
4. When appliance is not in use, the gas must be turned off at the supply cylinder.
5. Storage of an appliance indoors is permissible only if the cylinder is disconnected and removed
from the appliance.
6. Cylinder must be stored outdoors, out of the reach of children and must NOT be stored in a building,
garage or any other enclosed area.
LP Gas Cylinder Information
Bayou Classic Outdoor Appliances are manufactured for use with 20 lb LP Gas cylinders.
Important precautions to remember about LP Gas cylinders include:
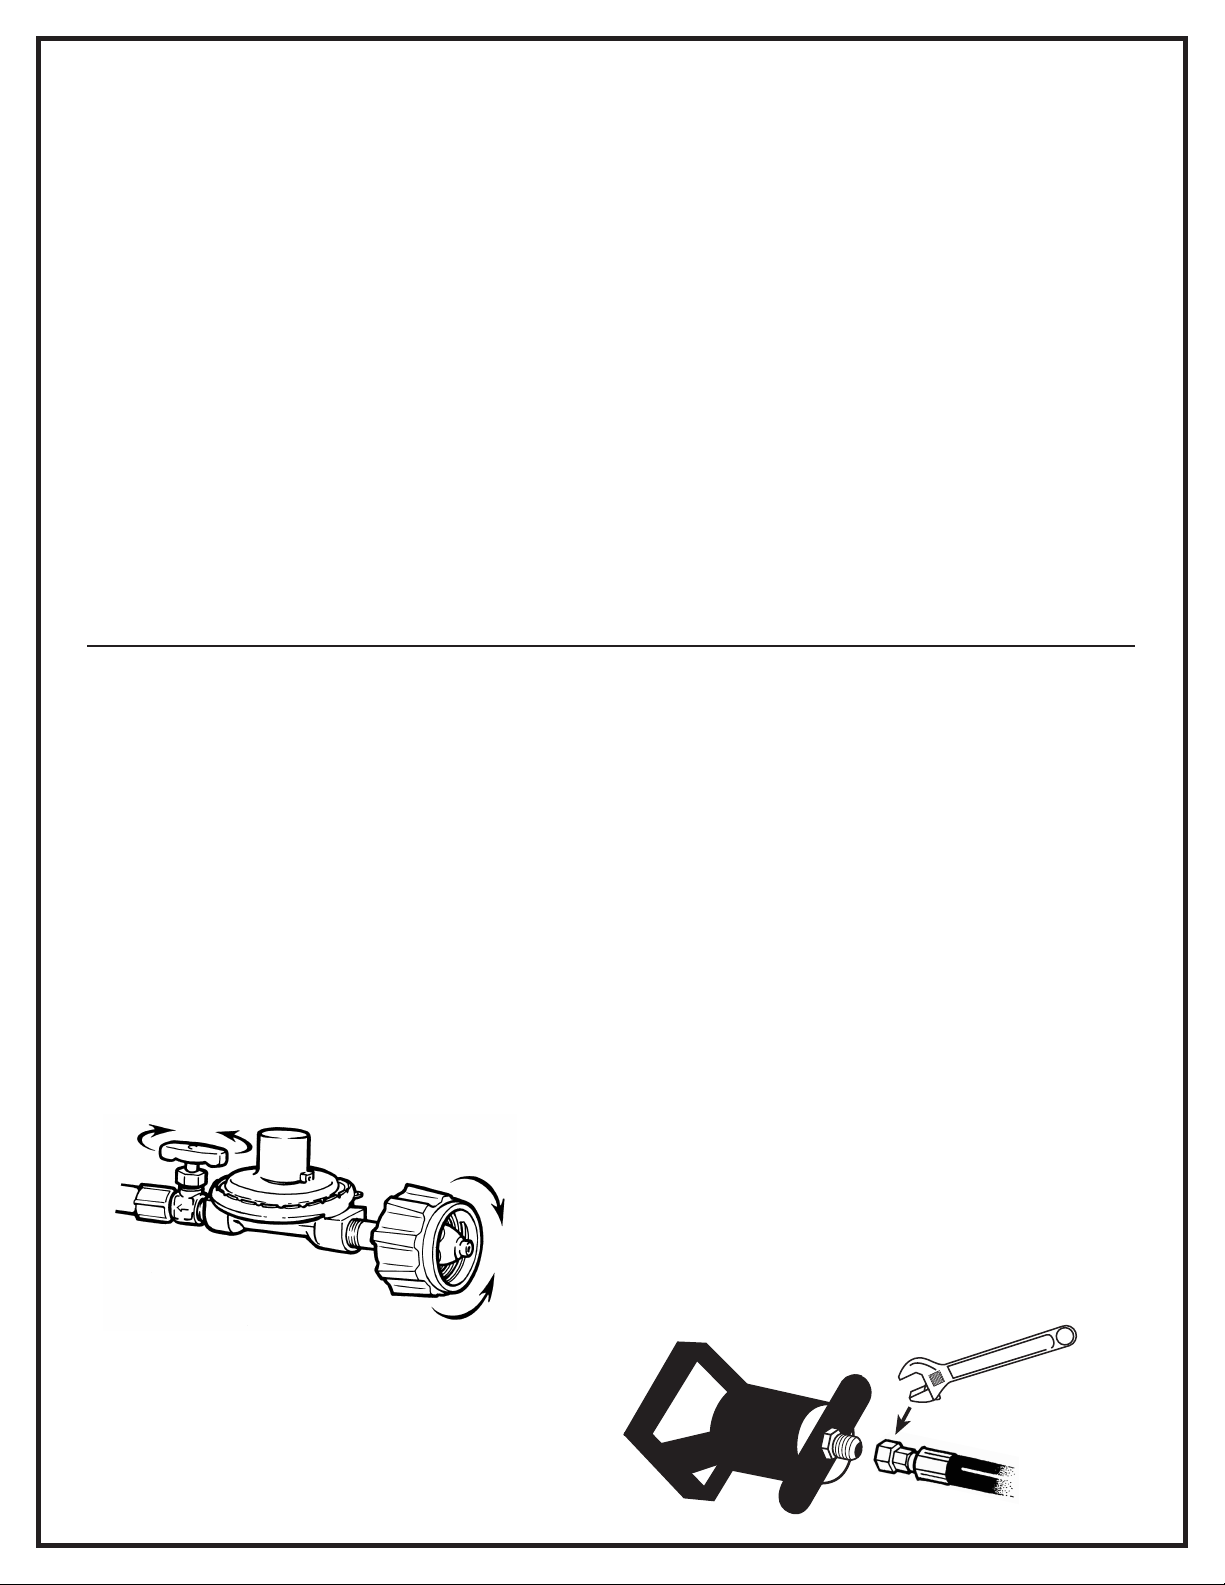
Connect to Tank
(Clockwise)
Disconnect from Tank
(Counter-Clockwise)
Decrease
Gas Flow Increase
Gas Flow
Caution: The Control Valve
Controls the "Volume" of Gas ONLY.
Use the Valve on the Propane Tank
to turn Gas Supply "ON" or "OFF".
PRESET REGULATOR
WITH SIDE VALVE
2. Attach hose with fitting to the Gas Inlet as shown. Turn Clockwise
Wrench Tighten
(but not too tight)
The hose and regulator is a pre-assembled unit. Do not take apart. Simply connect the hose and
regulator assembly to the LP gas cylinder and to the appliance. An adjustable wrench is needed when
attaching the hose to the gas appliance.
If there is evidence of abrasion, wear, cuts or leaks, the hose must be replaced prior
to the appliance being put into operation.
Call 1-800-864-6194 for hose replacement. (Monday - Friday 8am - 5pm, Saturday 9am - 2pm CST)
for assistance.
1. Make sure the valve on the LP cylinder is clean. Connect the hose to the cylinder valve by turning
the handwheel to the right. Hand tighten.
Handwheel Connector conforms to new standards regulating propane tanks.
Hose Attachment Instructions

Lighting Instructions
Clockwise
to closed
position
PRESET REGULATOR
WITH SIDE VALVE
1. When you are sure there are no leaks, turn cylinder valve and
regulator control valve on hose to the closed position.
2. Reopen cylinder valve fully.
3. Have a fireplace match or long-nosed propane lighter lit and
ready to light Gas Inlet.
4. Place lighter in Gas Inlet, then slowly open regulator valve until gas ignites.
5. When lighting for the first time, you will smell paint burning for a few minutes...
This is normal.
6. When finished using the appliance, turn off gas from the cylinder valve first. It will take a few
seconds for the fire to go out and for the propane gas to "bleed" from the hose and regulator
assembly. After the fire is completely out, turn regulator control valve to the "OFF" position.
7. To re-light, repeat steps 1-5. Always use CAUTION as cooker will be hot.
LIGHT HERE
Trouble Shooting Tips
Problems with proper Gas Flow:
This Bayou Classic appliance and most propane tanks
are equipped with a safety device to shut off the flow of
gas should the hose be cut or severed. Sometimes this
safety device may be tripped when lighting the appliance.
To prevent this, ALWAYS make sure the regulator valve is in the closed position before opening the
valve on the LP gas tank.
1. Close the regulator control valve on
the hose. This shuts off the flow of gas
from the regulator to the burner.
2. Open LP cylinder valve by 1/8 to
1/4 turn. This allows gas into the
regulator and stops it at the closed
regluator valve.
3. Using a small brush or spray bottle, splash on a soapy liquid (ex. Dishwashing liquid and water,
or 50% non-ammonia soap and 50% water) on the connections around the regulator and cylinder
connection. (Figure #3) Any bubbles that appear indicate a gas leak. If so, turn off the gas and
tighten the fittings some more. Do Not use cooker if gas leak cannot be stopped.
Call 1-800-864-6194 (Monday - Friday 8am - 5pm, Saturday 9am - 2pm CST) for assistance.
4. After you are certain there are no leaks, turn tank valve and regulator valve to “OFF” position.
Wait 5 minutes for any gas fumes to go away before lighting the burner.
After assembly is complete, always check for gas leaks before lighting.
Spray ALL connections with a soapy
liquid to check for gas leaks.
Appearance of bubbles indicates a leak.
Check for Gas Leaks

Limited Warranty
Barbour International, Inc. ("Vendor") warrants to the original retail purchaser of this appliance, and no other person,
that if this appliance is assembled and operated in accordance with the printed instructions accompanying it, then for a period of one (1) year from
the date of purchase, all parts in such appliance shall be free from defects in material and workmanship. Vendor may require reasonable proof of your
date of purchase from an authorized retailer or distributor. Therefore, you should retain your sales slip or invoice. This Limited Warranty shall be limited
to the repair or replacement of parts, which prove defective under normal use and service and which Vendor shall determine in its reasonable discretion
upon examination to be defective. Before returning any parts, you should contact Vendor's Customer Service Department using the contact information
listed below. If Vendor confirms, after examination, a defect covered by this Limited Warranty in any returned part, and if Vendor approves the claim,
Vendor will replace such defective part without charge. If you return defective parts, transportation charges must be prepaid by you. Vendor will return
replacement parts to the original retail purchaser, freight or postage prepaid.
This Limited Warranty does not cover any failures or operating difficulties due to accident, abuse, misuse, alteration, misapplication, improper installation
or improper maintenance or service by you or any third party, or failure to perform normal and routine maintenance on the appliance, as set out in
this owner's manual. In addition, the Limited Warranty does not cover damage to the finish, such as scratches, dents, discoloration, rust or other weather
damage, after purchase.
This Limited Warranty is in lieu of all other express warranties. Vendor disclaims all warranties for products that are purchased from sellers other that
authorized retailers or distributors. AFTER THE PERIOD OF THE ONE (1)-YEAR EXPRESS WARRANTY, VENDOR DISCLAIMS ANY AND ALL IMPLIED
WARRANTIES, INCLUDING WITHOUT LIMITATION THE IMPLIED WARRANTIES OF MERCHANTABILITY AND FITNESS FOR A PARTICULAR PURPOSE.
FURTHER, VENDOR SHALL HAVE NO LIABILITY WHATSOEVER TO PURCHASER OR ANY THIRD PARTY FOR ANY SPECIAL, INDIRECT, PUNITIVE,
INCIDENTAL, OR CONSEQUENTIAL DAMAGES. Vendor assumes no responsibility for any defects caused by third parties. This Limited Warranty gives
the purchaser specific legal rights; a purchaser may have other rights depending upon where he or she lives. Some jurisdictions do not allow the exclusion
or limitation of special, incidental or consequential damages, or limitations on how long a warranty lasts, so the above exclusion and limitations may
apply to you.
Vendor does not authorize any person or company to assume for it any other obligation or liability in connection with the sale, installation, use, removal,
return, or replacement of its equipment, and no such representations are binding on Vendor.
Cleaning and Storage Instructions
CAUTION
All cleaning and maintenance should be done when appliance is cool.
1. Drain oil. Rinse with soap and water.
2. Before storing, coat inside surface with a cooking spray after cleaning to prevent rust.
COOKING OIL: Cooking oil may be used several times before needing to be replaced. The unique design
of this appliance allows the food batter to fall to the bottom of the heat source where it will not burn. The oil
on the bottom of the appliance is cooler than the oil at the top. For this reason, the oil stays cleaner longer.
(You may want to strain oil after a few uses.)
For Questions and Information call us at: 1-800-864-6194
Monday - Friday (8:00am - 5:00pm CST) Saturday (9:00am - 2:00pm CST)
Operating Instructions
1. The Bayou Fryer has an approximate 4-Gallon capacity. Depending on what you are cooking,
less oil may be required.
2. Heat oil to temperature per recipe.
3. Follow recipe and safety precautions to completion.
4. Allow appliance to cool completely and follow cleaning and storage Instructions.
NEVER LEAVE APPLIANCE UNATTENTED!
(Read and understand warning before use.)
If only a small flame appears, then the safety device may have tripped during lighting. If so, shut off gas at tank,
then re-start the lighting process. If trouble continues, call 1-800-864-6194 (Monday - Friday 8am - 5pm, Saturday
9am - 2pm CST) for assistance.

Other Products by Bayou Classic
Stainless Steel and
Aluminum Stockpots
24-Qt. - 162-Qt.
Cast Iron Dutch Ovens
8.5-Qt. - 20-Qt.
Cast Iron Skillets
6", 8", 10", 12", 14" & 20"
SP10
High Pressure Cooker
7428
Cast Iron
Reversible Griddle
DB375
Dual Burner
Outdoor Patio Stove™
7414
Cast Iron
Reversible Griddle
Barbour International, Inc. •P.O. Box 1839 • Brandon, MS 39043
www.thebayou.com
Jambalaya Kits
4-Gal. to 30 Gal.
500-515
Handcrafted
Cypress Ceramic Grill
BAYOU FRYER ACCESSORIES
AVAILABLE NOW!
Barbour International, Inc. •P.O. Box 1839 • Brandon, MS 39043
www.thebayou.com
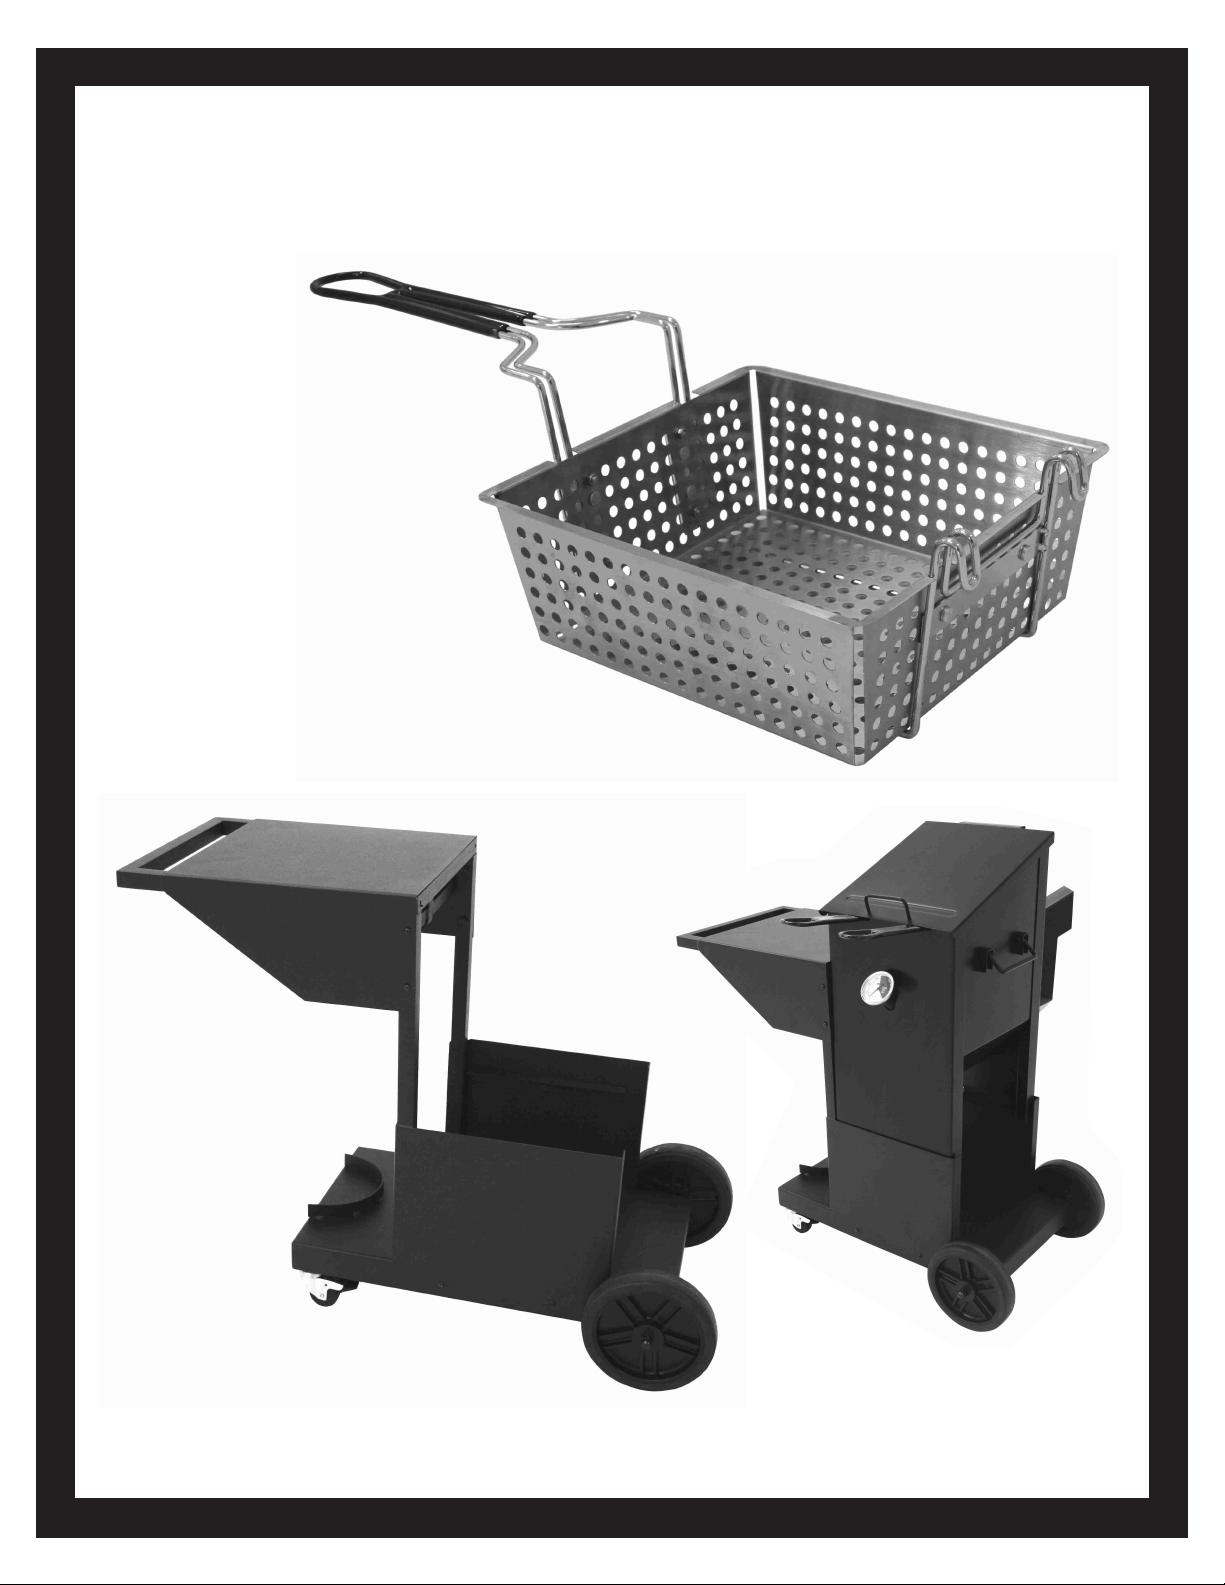
Bayou Fryer
with Accessory Cart
Bayou Fryer Accessory Basket
Basket Dimensions:
12" x 11" x 4.5"
Model #700-188
Model #700-185
Bayou Fryer Accessory Cart
Stainless Steel
Basket
This manual suits for next models
1
Table of contents
Other Bayou Classic Fryer manuals


Popular Fryer manuals by other brands

 Specification sheet")


Frymaster
Frymaster FootPrint Pro Series Installatie- en gebruikshandleiding

Falcon
Falcon G3840 Installation, servicing and user instructions

Chef Tested
Chef Tested 767976 instruction manual

Mistral
Mistral MDF015 instruction manual

PowerXL
PowerXL Vortex Air Fryer Plus quick start guide

Philips
Philips HD975X user manual