BBI SEM Scanner 200 User manual

ENGLISH (EU)
OTH-SEM-IFU-MULTI-LANG-0123 Rev D, December 2018
SEM Scanner 200
(SW V3.60)
Instructions for Use

ENGLISH (EU)
Page 2 of 36
OTH-SEM-IFU-MULTI-LANG-0123 Rev D, January 2018
Table of Contents
1. Warnings and Safety Precautions.........................................................................................................4
2. General.......................................................................................................................................................6
2.1 Nomenclature..............................................................................................................................6
2.2 Indications for Use......................................................................................................................6
2.3 Device Description.....................................................................................................................6
2.3.1 SEM Scanner 200 Device...........................................................................................................7
2.3.2 SEM Scanner 200 Display ..........................................................................................................8
2.4 Additional SEM Scanner 200 Components ...........................................................................9
2.5 Contraindications........................................................................................................................9
2.6 Intended User Profile.................................................................................................................9
2.7 Adverse Events ............................................................................................................................9
2.8 Warranty and Disclaimer..........................................................................................................9
2.9 Table of Symbols ...................................................................................................................... 11
3. Operating Instructions......................................................................................................................... 12
3.1. Unpacking and Inspection....................................................................................................... 12
3.2. Charging the Device................................................................................................................ 12
3.3. Use of Device............................................................................................................................ 15
3.4. Acquiring SEM Scanner 200 Readings.................................................................................. 17
3.5. Displaying an Assessment from a Set of Readings............................................................ 19
3.6. Clinical Interpretation............................................................................................................. 19
3.6.1. Interpretation of the ∆ Symbol............................................................................................. 19
3.6.2. Deriving SEM Scanner Delta (∆) Values – A Prospective Clinical Study (SEM200-
008) ............................................................................................................................................. 19
3.6.3. SEM200-008 –Study Population........................................................................................... 20
3.6.4. SEM200-008 –Results............................................................................................................. 21
3.7. Recommended SEM Scanner 200 Readings at the Sacrum............................................. 22
3.8. Recommended SEM Scanner 200 Readings at the Heels................................................ 24
3.9. Resetting the SEM Scanner 200 ............................................................................................ 26

ENGLISH (EU)
Page 3 of 36
OTH-SEM-IFU-MULTI-LANG-0123 Rev D, January 2018
3.10. Ending SEM Scanner 200 Operation .................................................................................... 27
3.11. Summary of Action Button Functions ................................................................................. 27
4. Cleaning and Disinfection ................................................................................................................... 28
Cleaning and Disinfection Overview .............................................................................................. 28
Scanner Cleaning and Disinfection Instructions........................................................................... 28
5. Troubleshooting.................................................................................................................................... 30
6. Guidance and Manufacturer’s Declaration – Electromagnetic Emissions ................................ 31
6.1. Electromagnetic Environment ............................................................................................... 31
6.2. Electromagnetic Immunity...................................................................................................... 32
6.3. Separation Distance................................................................................................................. 34
7. Specifications.......................................................................................................................................... 35
ENGLISH (EU)
Page 4 of 36
OTH-SEM-IFU-MULTI-LANG-0123 Rev D, January 2018
1. Warnings and Safety Precautions
The SEM Scanner 200 has been designed and constructed in accordance with the European
Medical Device Directives, applicable U.S. regulations and requirements, as well as U.S. and
international standards for operation of electrical equipment, electromagnetic compatibility, and
stipulated safety requirements.
Improper use or handling, however, can result in damage and/or injury. To prevent damage to
the equipment, please read these operating instructions carefully before using your SEM Scanner
200 system. Keep these instructions in a safe place. Follow the instructions below to ensure safe
and trouble-free operation of your system.
Caution: Federal (US) law restricts this device to sale by or on the order of a physician or other
licensed health practitioner.
WARNINGS:
▪WARNING: The standard of care should be followed for reducing the risk of developing
pressure ulcers. Readings from the SEM Scanner 200 can be used to support increased
intervention, but should never be the basis for decreasing intervention.
▪WARNING: This device is not intended to be used for detecting or diagnosis of pressure
ulcers.
▪WARNING: To prevent the spread of infection, the SEM Scanner 200 should be properly
cleaned and disinfected according to the instructions provided in this Instructions for Use
after it is used on a patient.
▪WARNING: Should the device come in contact with non-sterile surfaces (for example, if
it falls on the floor) it should be cleaned and disinfected before obtaining another patient
reading.
▪WARNING: Do not attempt to disassemble or otherwise modify the SEM Scanner 200
as this can result in unintended hazards. The SEM Scanner 200 can only be serviced by
the manufacturer (Bruin Biometrics, BBI) or a BBI Authorized Service Center. Please
contact your BBI Product Specialist or Customer Service regarding any device that is not
functioning correctly.

ENGLISH (EU)
Page 5 of 36
OTH-SEM-IFU-MULTI-LANG-0123 Rev D, January 2018
▪WARNING: To avoid the risk of electric shock, this equipment must only be connected
to a supply main with protective earth.
▪WARNING: To avoid the risk of explosion, the SEM Scanner 200 should not be used in
the presence of flammable anesthetic agents.
CAUTIONS:
▪CAUTION: Examine the SEM Scanner 200 for damage or sharp edges prior to each use.
If any damage or sharp edges are found, please contact Customer Service or your Product
Specialist. Do not attempt to use the device.
▪CAUTION: Check the SEM Scanner 200 is turned OFF before returning to the Charging
Mat for recharging. If the SEM Scanner is not turned OFF, the device may be warmer
than normal to the touch after it is recharged.

ENGLISH (EU)
Page 6 of 36
OTH-SEM-IFU-MULTI-LANG-0123 Rev D, January 2018
2. General
2.1 Nomenclature
Pressure ulcers also are called pressure injuries, decubitus ulcers, bed sores or pressure sores
1
2.2 Indications for Use
The SEM Scanner 200 is intended to be used by healthcare professionals as an adjunct to the
standard of care when assessing the heels and sacrum of patients who are at increased risk for
pressure ulcers.
2.3 Device Description
The SEM Scanner 200 is a hand-held, portable device that consists of a single electrode sensor,
an integrated pressure sensor, and hardware and software to run a user interface device screen
that displays the device status, battery status, SEM Value, and SEM Delta (“SEM ∆”).The SEM
Scanner 200 is pre-calibrated. The SEM Scanner 200 is provided with a charging mat and power
supply for recharging the device unit.
The SEM Scanner 200 assesses changes in electrical capacitance of tissue and expresses the result
in a SEM Value of 0.3 to 3.9. SEM is unitless (not an International System of Units measurement).
The SEM Scanner 200 displays a (delta) value after a minimum of three (3) SEM Values have
been measured. A minimum of four readings were taken to obtain a result during the clinical
study described in Section 3.6. The reported SEM Δis used as an adjunct to the standard of care
when assessing the heels and sacrum of patients who are at increased risk for pressure ulcers.
See Section 3.6 for details of interpretation of the values.
1
https://www.jointcommission.org/assets/1/23/Quick_Safety_Issue_25_July_20161.PDF

ENGLISH (EU)
Page 7 of 36
OTH-SEM-IFU-MULTI-LANG-0123 Rev D, January 2018
2.3.1 SEM Scanner 200 Device
Action button
(turns device on
and off and resets
readings)
Figure 1. SEM Scanner 200 Top View showing
Display and Action Button
Figure 2. The electrode on the bottom
of the SEM Scanner 200
Figure 3. SEM Scanner 200 Side View

ENGLISH (EU)
Page 8 of 36
OTH-SEM-IFU-MULTI-LANG-0123 Rev D, January 2018
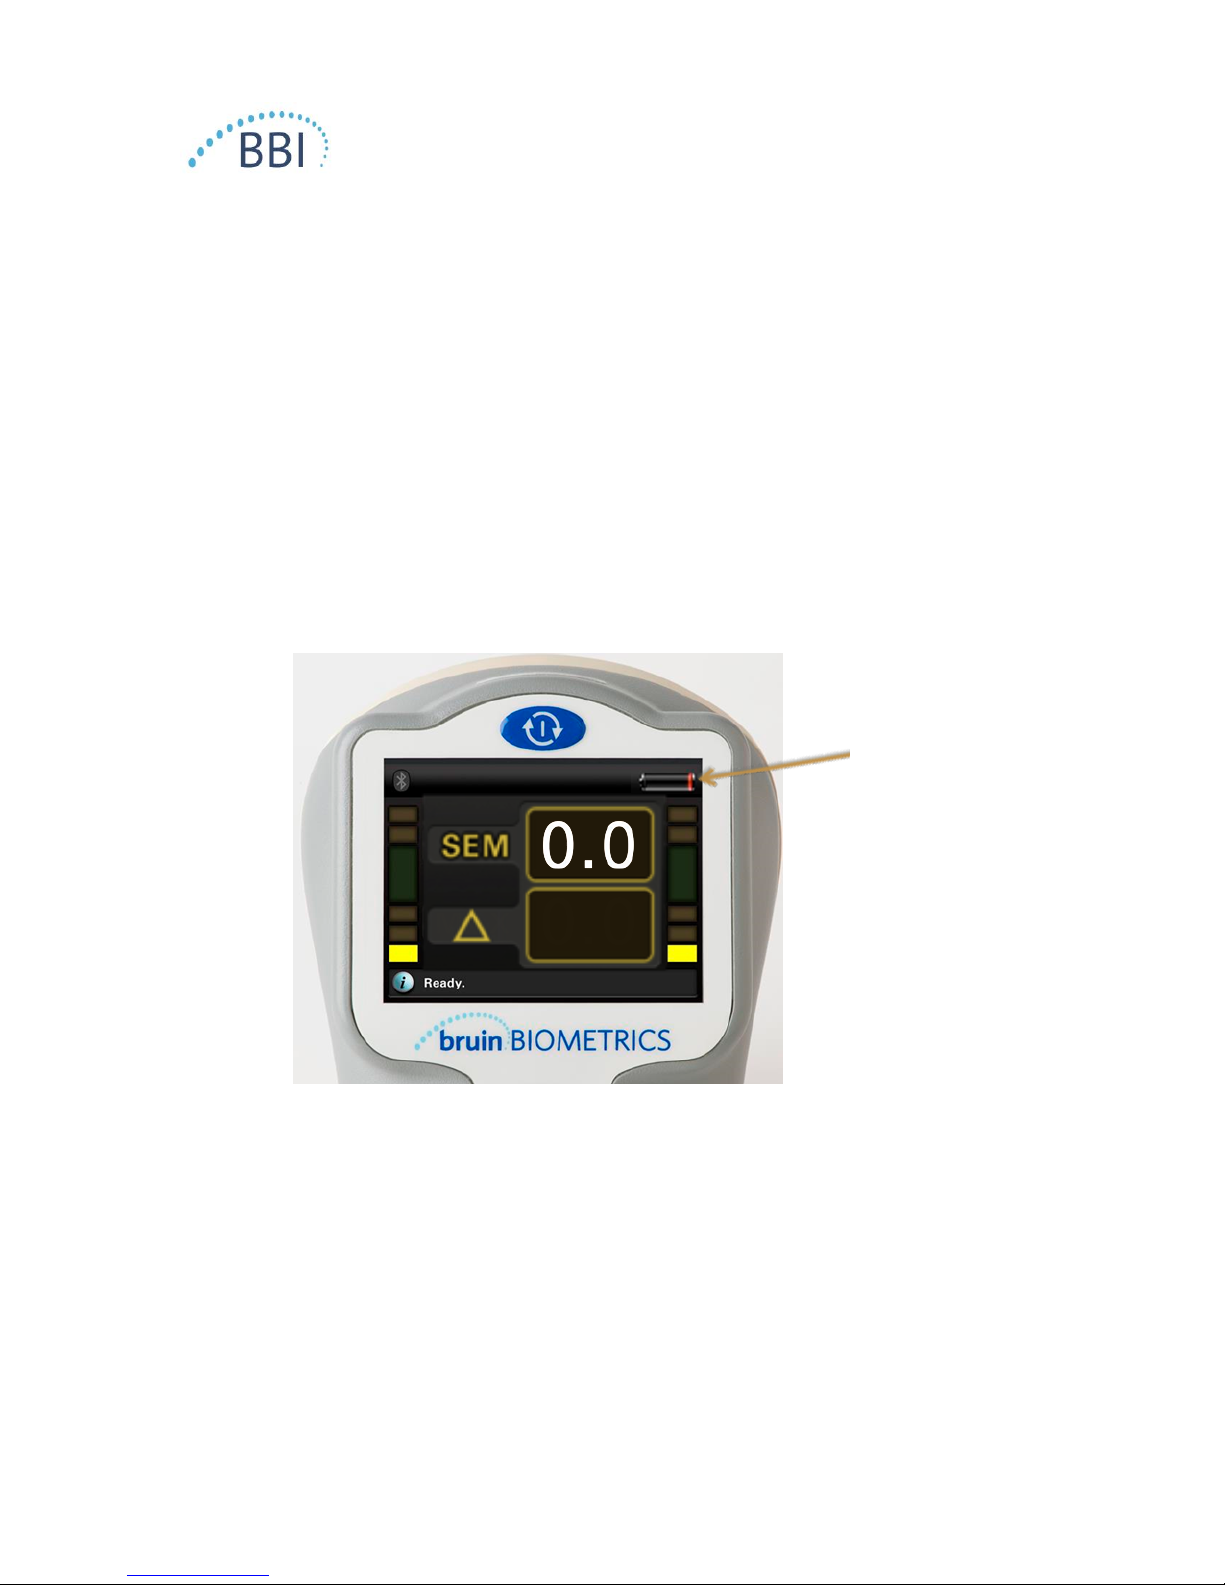
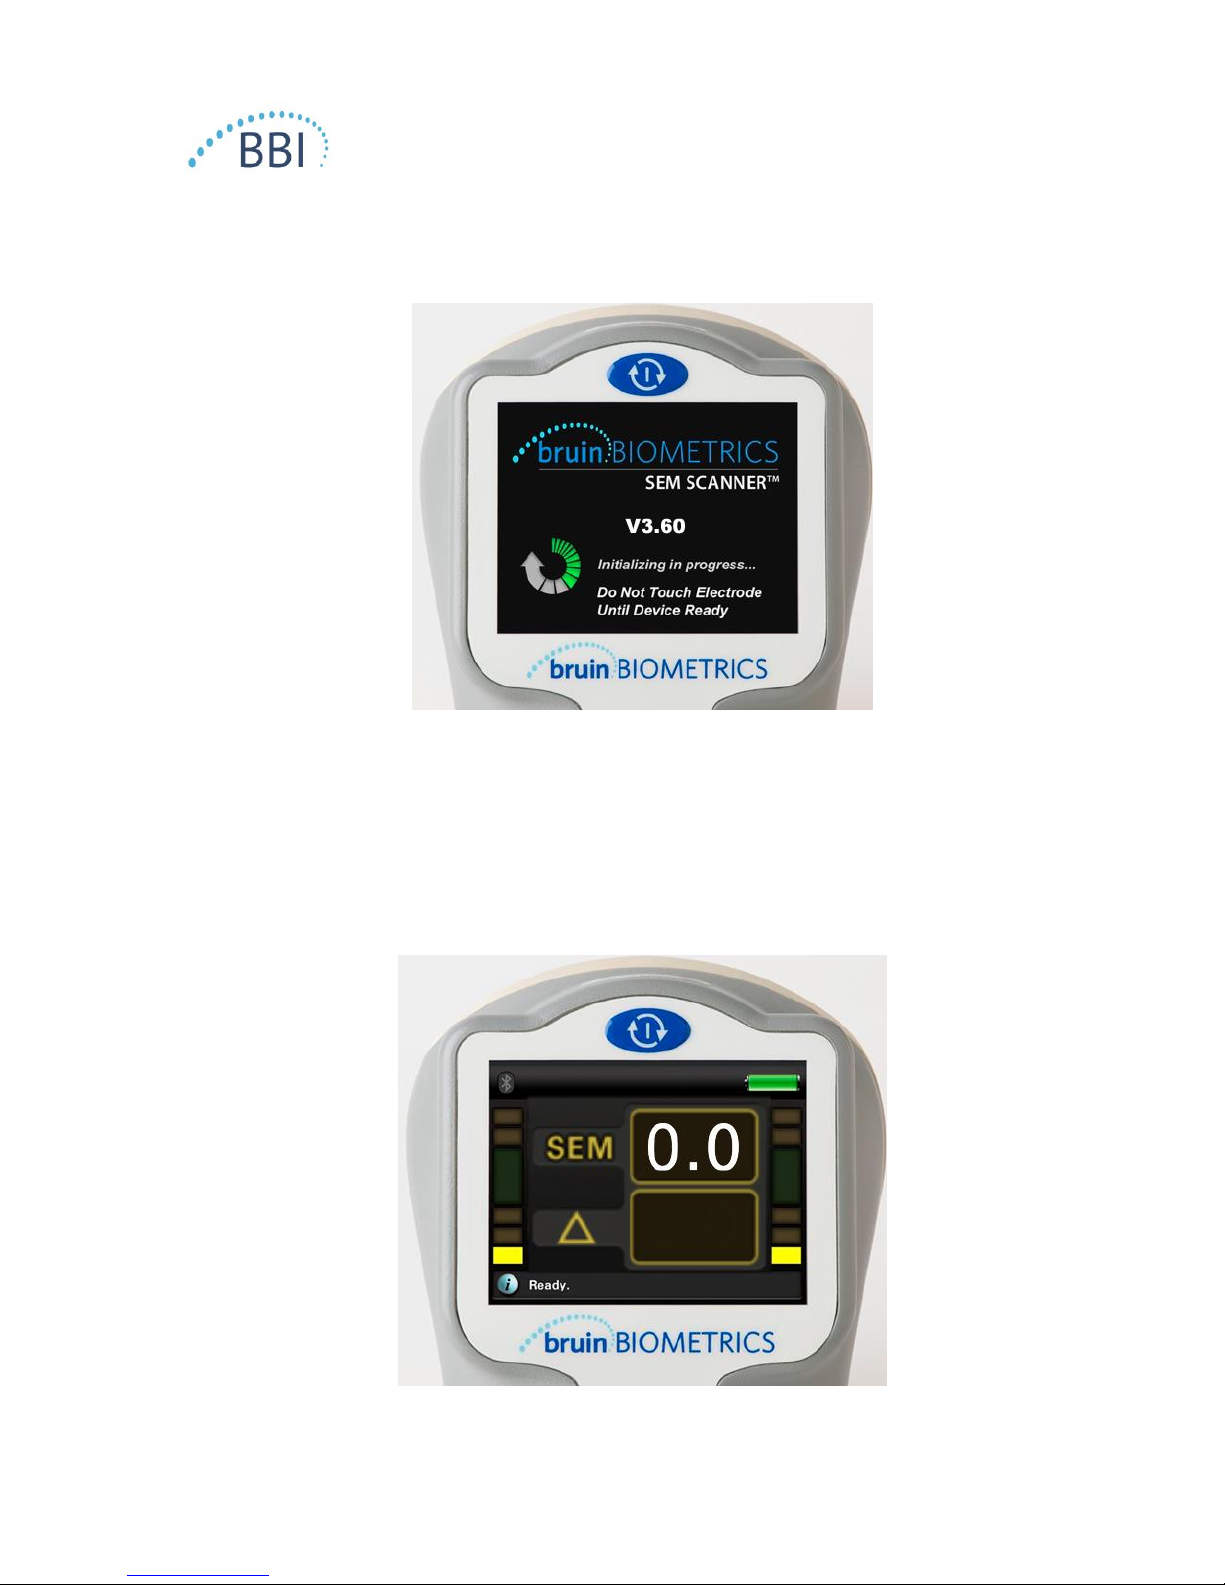
2.3.2 SEM Scanner 200 Display
SEM
Value
(Delta)
Status
indicator
Action button
Battery gauge
Pressure
Indicator
Yellow (top bars)
–too much
pressure
Green (middle bars)
–correct pressure
Yellow (bottom bars)
–too soft pressure
Figure 4. SEM Scanner 200 Display (V3.60)
Item
Function
Action Button
Clears SEM readings and turns the Scanner unit ON/OFF.
Battery Gauge
Battery icon indicating current battery state of charge
(Delta)
Calculated difference between the minimum and maximum SEM
Values in the set of readings taken
SEM
Display of SEM Value for the last completed reading
Pressure Indicator
Bars indicating the applied pressure while taking a SEM reading. The
color changes from yellow to green to yellow as applied pressure
increases. Green bars indicate the correct pressure is applied to take
the SEM reading and the SEM Value will show on the screen.
Status Indicator
Number of acquired readings, status indicator, or error messages
Table 1. Legend for Error! Reference source not found.
A SEM Value of zero (0.0) shown on the display screen represents when the device is not
measuring or when SEM readings are cleared out from the screen.
ENGLISH (EU)
Page 9 of 36
OTH-SEM-IFU-MULTI-LANG-0123 Rev D, January 2018
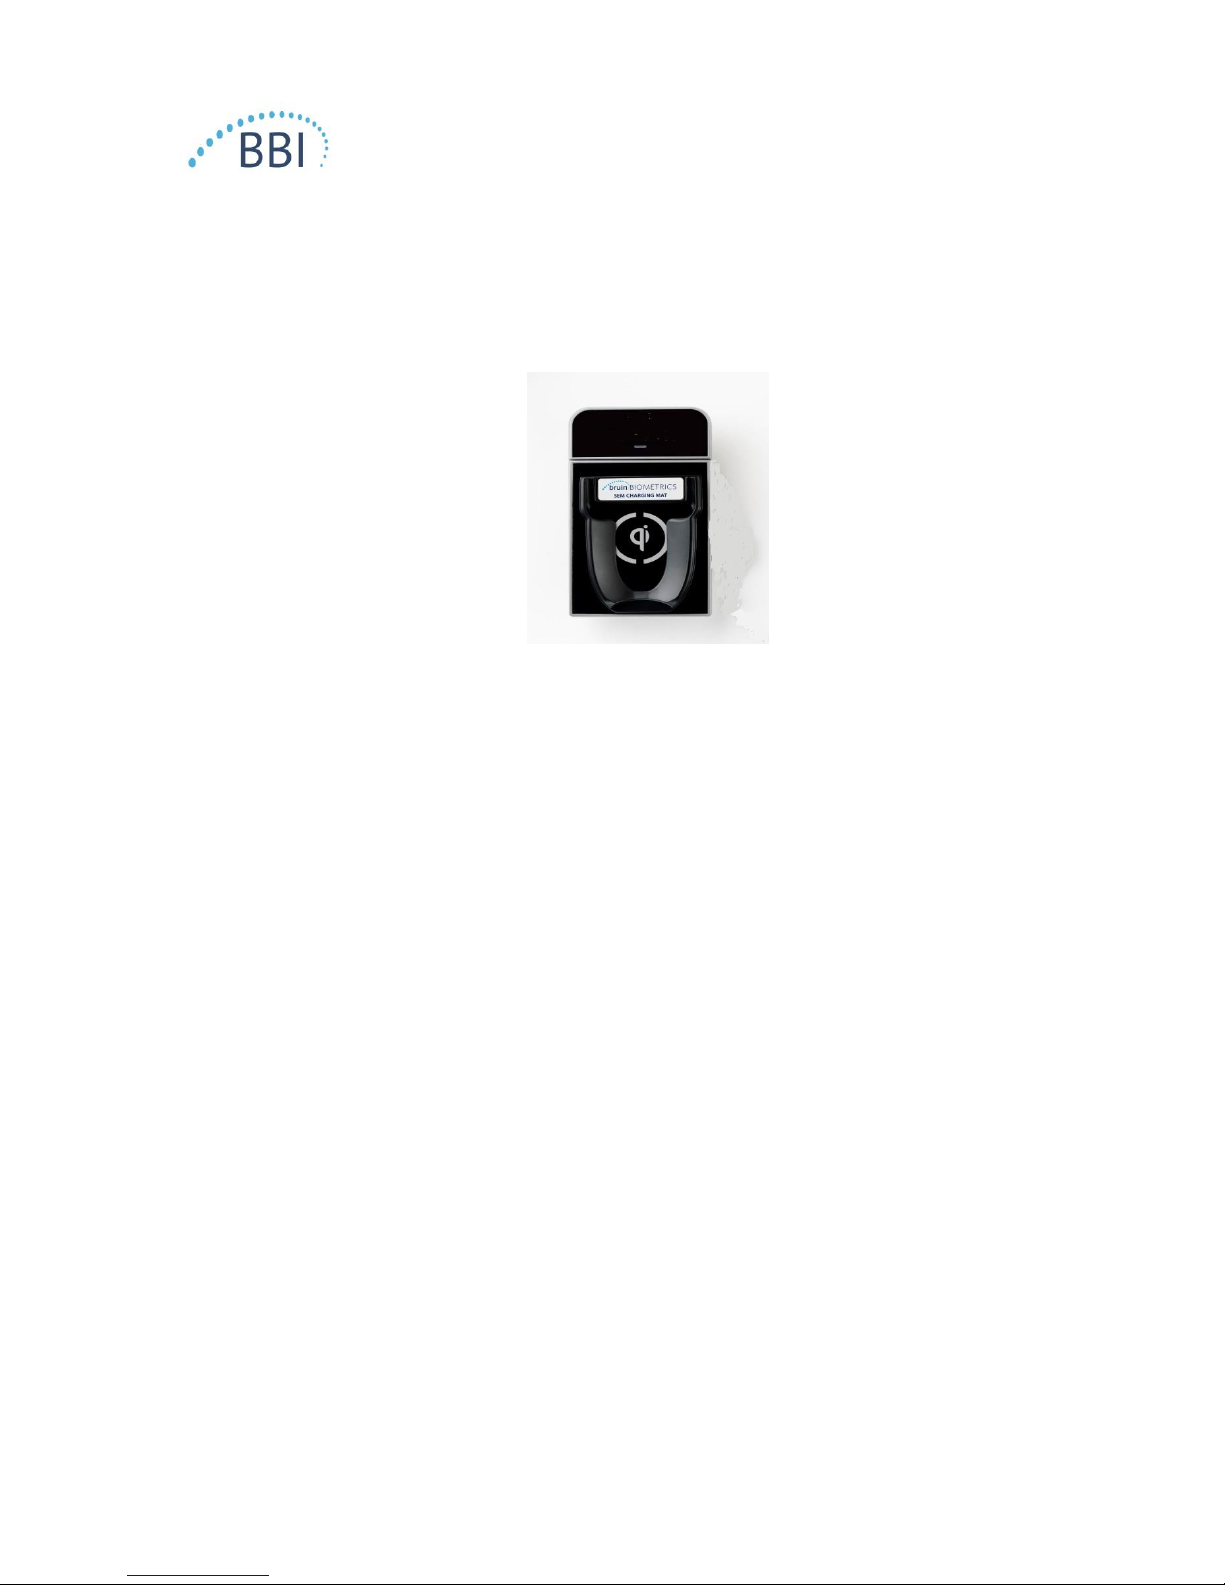
2.4 Additional SEM Scanner 200 Components
The SEM Scanner 200 ships with an Inductive Charging Mat and wall-mount power supply that is
used when charging the device.
Figure 5. Inductive Charging Mat
2.5 Contraindications
Do not use on broken skin.
2.6 Intended User Profile
The system is intended for use by healthcare professionals.
2.7 Adverse Events
No known adverse events.
2.8 Warranty and Disclaimer
Bruin Biometrics LLC (BBI) warrants the SEM Scanner 200 against defects in materials and
workmanship for three (3) years from the date of purchase from BBI or its subsidiaries. This
warranty is given only to the original purchaser of the SEM Scanner 200. BBI’s obligation under
the warranty is to provide for repair, or at its option, to provide a replacement product. No
other remedy is obligated by this warranty. All special, incidental, and coincidental damages are
excluded.
To request repair or replacement under this warranty, purchasers should contact their local
Customer Service provider.
Warranty conditions may differ in some countries. Contact your Customer Service provider for
warranty terms.
ENGLISH (EU)
Page 10 of 36
OTH-SEM-IFU-MULTI-LANG-0123 Rev D, January 2018
Risk of loss or damage during shipments under this warranty shall be borne by the party shipping
the Product. Products shipped by the Purchaser under this warranty shall be suitably packaged
to protect the Product. If Purchaser ships a product to BBI in unsuitable packaging, any physical
damage present in the Product on receipt and inspection by BBI, and not previously reported,
will be presumed to have occurred in transit and will be the responsibility of the Purchaser.
Exclusions
This warranty is limited to defects and materials that can be attributed to a fault or defect within
the SEM Scanner 200.
This warranty does not extend to any Warranted Products or parts thereof: (a) that have been
subject to misuse, neglect or accident, (b) that have been damaged by causes external to the
Warranted Product, (c) that have been used in violation of the BBI Instructions for Use, (d) on
which the serial number has been removed or made illegible, (e) that have been modified by
anyone other than BBI or its authorized service center, unless authorized prior to such service
by BBI, (f) that are equipment sold as used, or (g) that are exposed to agents listed in Table 2,
below. Table 2 is not an exhaustive list of agents which may compromise the integrity of the SEM
Scanner 200.
Severe Effect –NOT Recommended
Benzene
Cyclohexane
Kerosene
Nitric Acid –70%
Carbon tetrachloride
Ethyl Chloride
Trichloroethylene
Perchloroethylene
Chlorobezene
Freon
Lacquer
Toluene
Chloroform
Gasoline, unleaded
Naphtha
Xylene
Table 2. Agents That Should Never Be Used on The SEM Scanner 200
Disclaimer of Additional Warranties
No distributor, dealer or other party is authorized to make any warranty on behalf of BBI, or to
assume for BBI any other liability with respect to the SEM Scanner 200.
The contents of these Instructions for Use do not constitute a warranty.
ENGLISH (EU)
Page 11 of 36
OTH-SEM-IFU-MULTI-LANG-0123 Rev D, January 2018
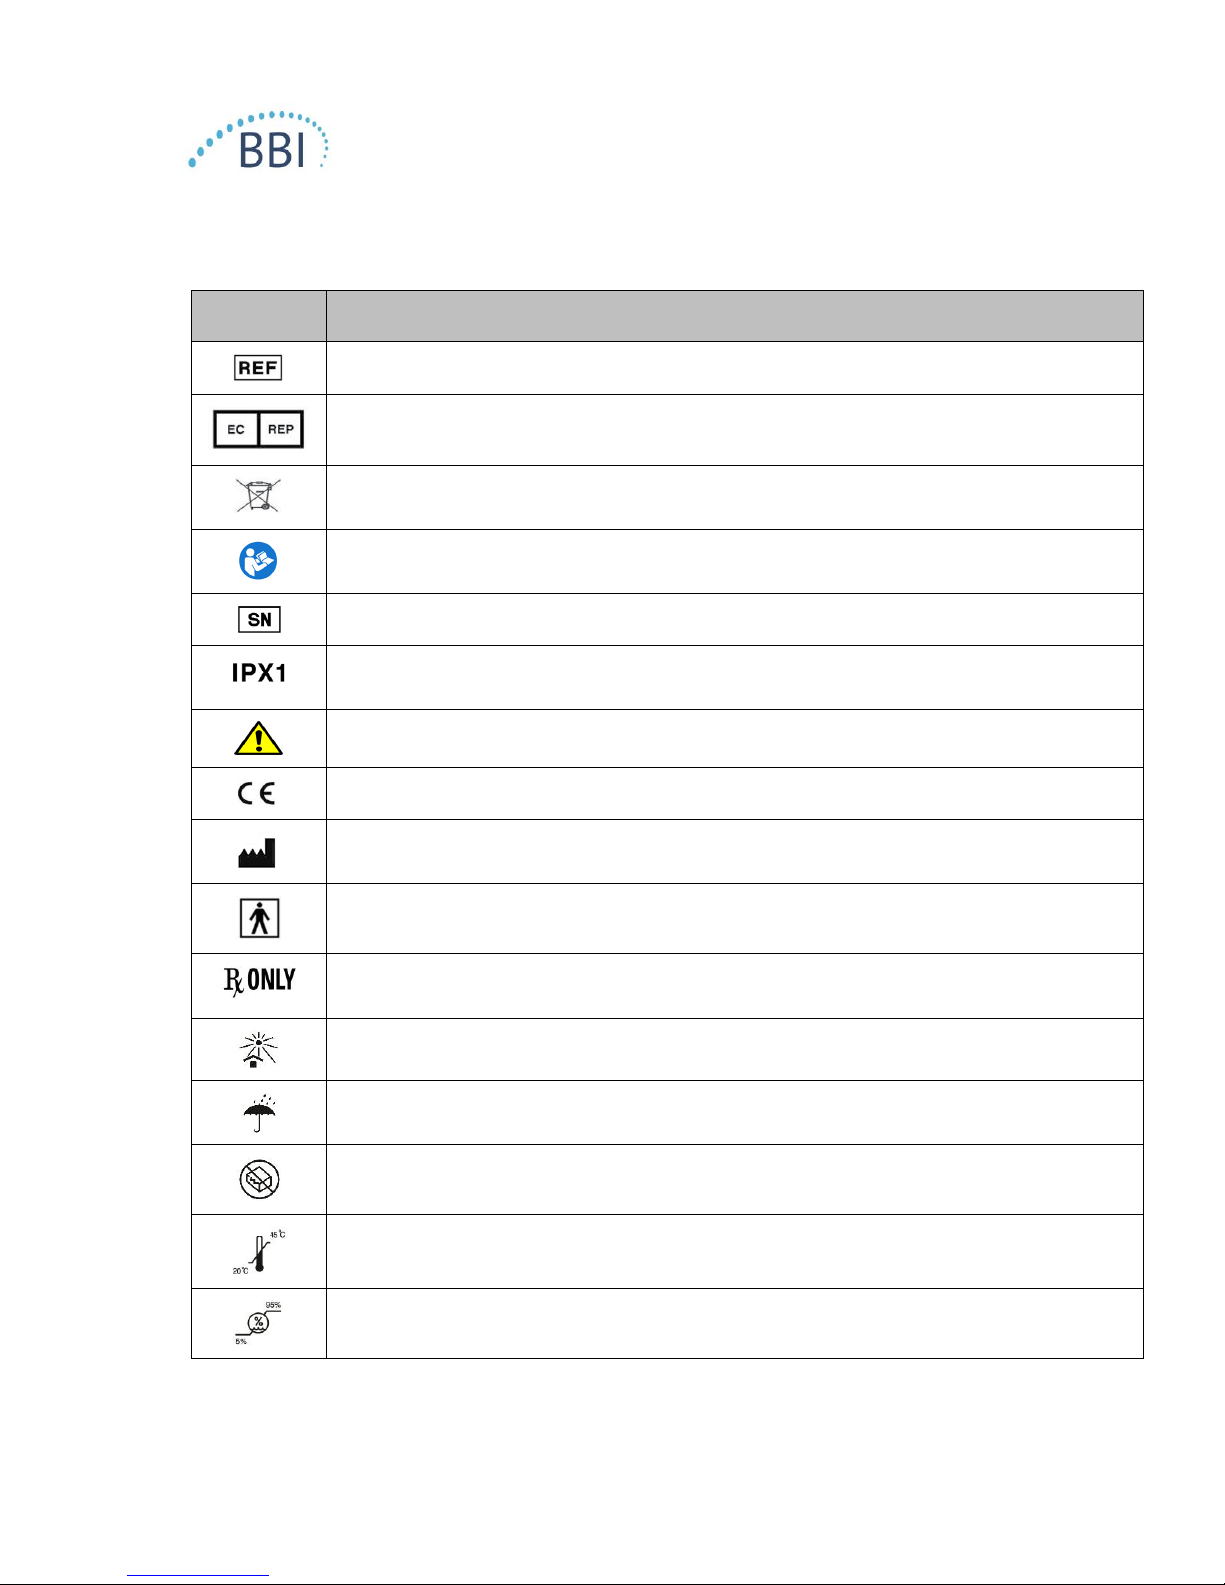
2.9 Table of Symbols
Symbol
Meaning
Manufacturer’s Catalog designation or number
Contact/European Representative of manufacturer
Dispose of this equipment according to local regulations for electrical and electronic
waste disposal
Instructions are included and must be followed
Serial number
Drip Proof Equipment-IPX1: The SEM Scanner 200 enclosure provides protection
against the harmful effects of the ingress of liquids. (IPX1, per IEC 60529)
Caution or warning
CE mark in accordance to the European Medical Device Directive
Manufactured By
Type BF Applied Part with IEC-60601-1
CAUTION: Federal (USA) law restricts this device to sale by or on the order of a
physician or other licensed health practitioner
Keep away from sunlight
Keep dry
Do not use if package is damaged and the device inside appears physically broken,
cracked, or does not charge and initialize following the Instructions for Use
Temperature limit
Humidity limit
Table 3. Table of Symbols
ENGLISH (EU)
Page 12 of 36
OTH-SEM-IFU-MULTI-LANG-0123 Rev D, January 2018
3. Operating Instructions
3.1. Unpacking and Inspection
After the SEM Scanner 200 is unpacked verify that the scanner has no signs of damage. If there
are signs of damage, contact Customer Service.
3.2. Charging the Device
The device must be charged before using it for the first time, leave the device on the charging
mat for at least 6 hours to completely charge the battery prior to initial use.
The device also needs to be charged if the SEM Scanner 200 screen displays a red, low battery
icon (
Low battery
Figure 6).

ENGLISH (EU)
Page 13 of 36
OTH-SEM-IFU-MULTI-LANG-0123 Rev D, January 2018
Low battery
Figure 6. The battery gauge is in the upper-
right corner of the SEM Scanner Display
Follow the steps below to charge the device:
1. Connect the charging mat power adaptor to the power outlet.
2. Ensure that the SEM Scanner 200 is OFF by pressing and holding the Action Button
for 6 seconds until the display screen is blank.
3. Turn the SEM Scanner 200 upside down (so the electrode is on top) and press it firmly
into the cradle on the charging mat (

ENGLISH (EU)
Page 14 of 36
OTH-SEM-IFU-MULTI-LANG-0123 Rev D, January 2018
Exposed
electrode
SEM
cradle
Power
cord
Blue charging
indicator light
4. Figure 7).
5. A blue charging mat indicator light indicates that it is charging the SEM Scanner 200. If the
blue light is not illuminated, then the SEM Scanner 200 may not be positioned securely in
the cradle. Do not press the Action Button to turn the SEM Scanner 200 on while it is
on the charging mat.
When fully charged, the battery provides for approximately three hours of SEM Scanner
200 accumulated operation.
Exposed
electrode
SEM
cradle
Power
cord
Blue charging
indicator light
Figure 7. Correct positioning of the SEM Scanner 200 on the charging mat
ENGLISH (EU)
Page 15 of 36
OTH-SEM-IFU-MULTI-LANG-0123 Rev D, January 2018
3.3. Use of Device
The SEM Scanner 200 should be properly cleaned and disinfected after it is used on a patient.
The SEM Scanner 200 must be fully dry after cleaning and disinfection prior to use. See Section
4 for detailed cleaning and disinfection instructions.
Follow the steps below to start a session:
1. Remove the SEM Scanner 200 from the charging mat.
2. Verify the scanner has no visible damages or sharp edges and that the electrode is sealed
against the base.
Do not use the device if the electrode seal is broken or any damage or sharp edges are
found.
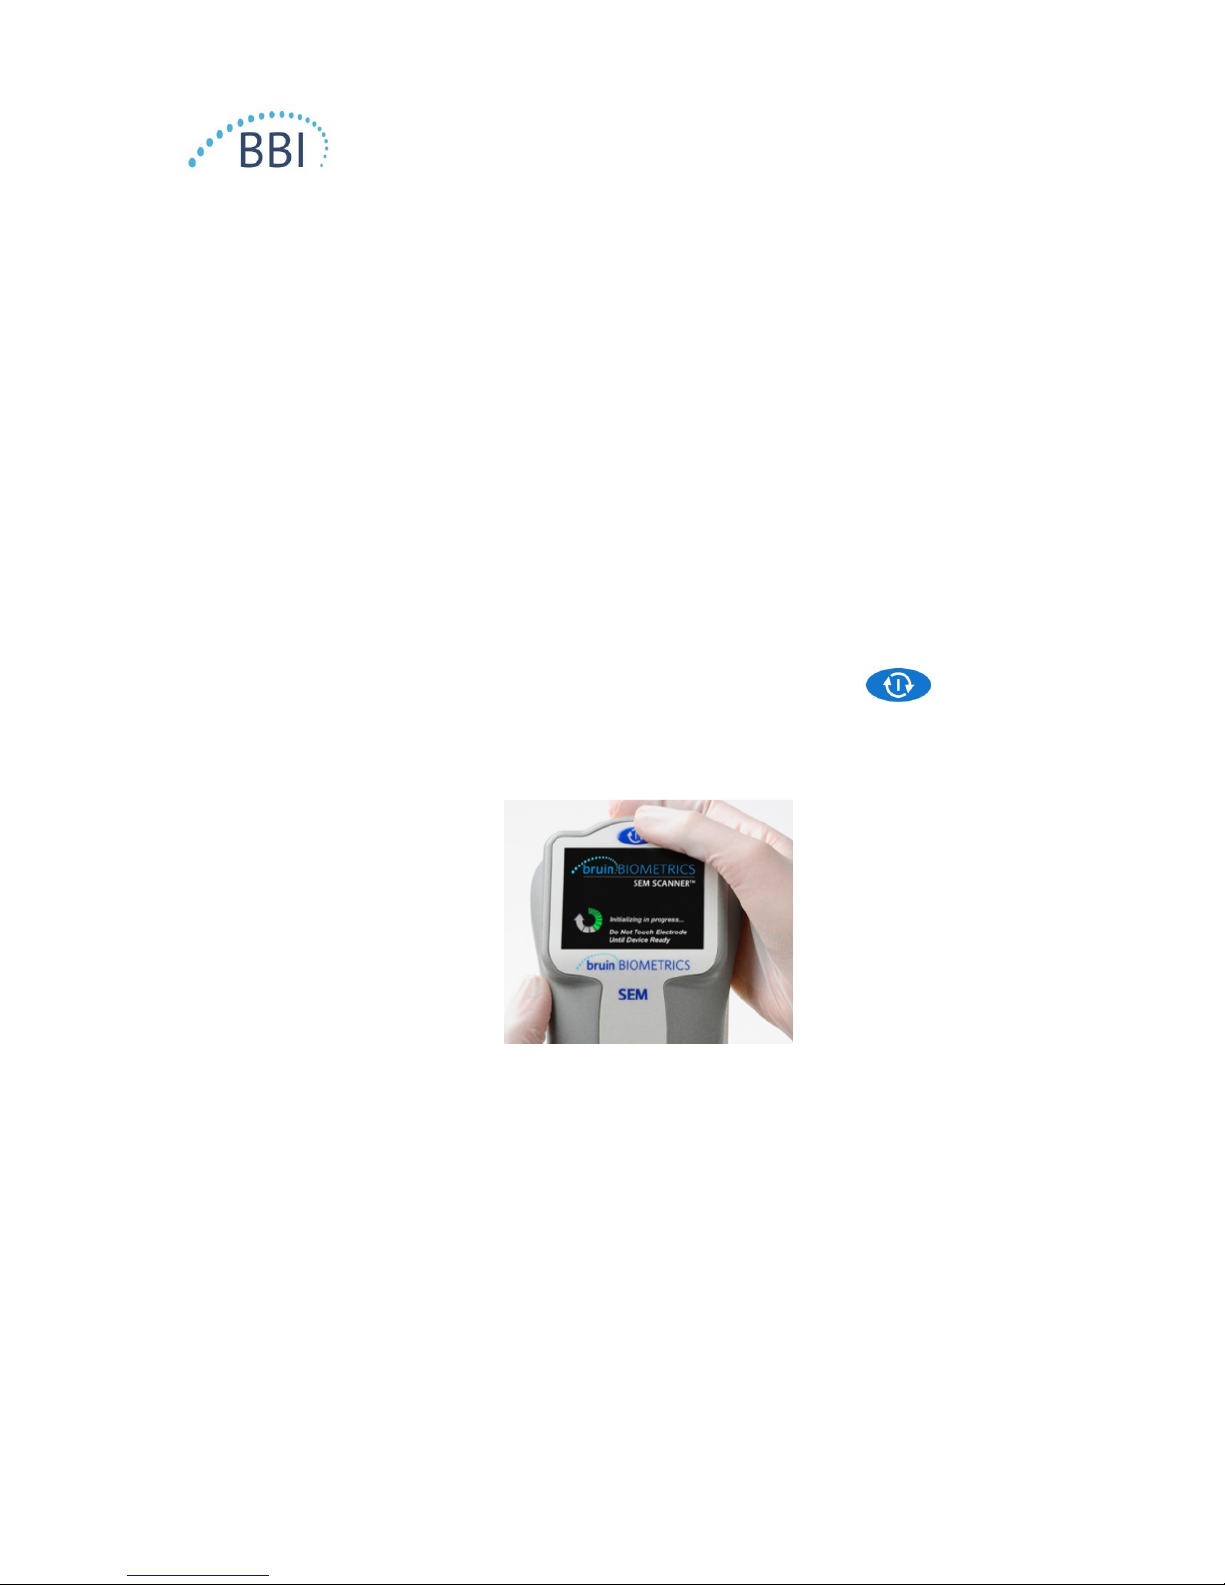
3. Turn the SEM Scanner 200 on by pressing the Action Button for approximately
one second (Figure 8).
Figure 8. Starting a Session
3.1 After turning on the SEM Scanner 200,
➢an audio tone will sound and the initialization screen will be displayed (Figure
9).
➢It is important that the SEM Scanner 200 electrode remains untouched during
initialization. See display, “Do Not Touch Electrode Until Device Ready”.
➢If the electrode is touched during initialization, turn off the device and turn on
the device to re-initialize.
ENGLISH (EU)
Page 16 of 36
OTH-SEM-IFU-MULTI-LANG-0123 Rev D, January 2018
Figure 9. SEM Scanner 200 Initialization Screen
3.2 It will take approximately 45 seconds for the device to finish initialization and be
ready for use.
4. Once initialization is complete, the Status Indicator will display “Ready” (Figure 10).

ENGLISH (EU)
Page 17 of 36
OTH-SEM-IFU-MULTI-LANG-0123 Rev D, January 2018
Figure 10. SEM Scanner 200 is fully charged, initialized and ready for use
3.4. Acquiring SEM Scanner 200 Readings
The SEM Scanner 200 automatically obtains readings when the electrode is applied with
appropriate pressure to an anatomical location (Figure 11).
Follow the steps below to acquire SEM Scanner 200 readings:
1. Ensure that any surface moisture or matter is removed from the area on the skin being
assessed.
2. Apply the electrode to the desired anatomical site with sufficient pressure for
approximately one second as indicated with the green bars on the Pressure Indicator. The
electrode must be in complete contact with the skin to acquire a proper reading. No
readings will display when the Pressure Indicator shows yellow bars.
3. Confirm a reading has been taken by listening for the SEM Scanner 200 to emit a short
audio tone.
4. Upon acquiring the first reading, the Status Indicator on the SEM Scanner 200 Display will
read, “1 Reading Taken.”
5. Repeat steps two and three to obtain additional SEM Scanner 200 readings to complete
an assessment set of readings. With additional readings obtained, the Status Indicator on
the SEM Scanner 200 Display will update to show the total number of readings completed.
6. See Section 3.5 for details on display when completing an assessment set of readings.

ENGLISH (EU)
Page 18 of 36
OTH-SEM-IFU-MULTI-LANG-0123 Rev D, January 2018
7. See Sections 3.7 and 3.8 for recommendations of number of SEM readings to complete
for an assessment.
8. Reset the SEM Scanner 200 between each anatomical location and patient. Pressing the
Action Button for approximately one second will clear the numbers from the
display. The display will show a value of zero (0.0) for the SEM Value (see Figure 10 and
see Section 3.9).
➢If the SEM Scanner 200 is not reset to zero (0.0), the ∆ value from
the previous evaluation (anatomical location or prior patient) could
be used to calculate the ∆ value on the next anatomical location or
patient. This will give you a wrong ∆ value for that evaluation.
9. To minimize skin irritation from exposure to the cleaning and disinfecting agent, users
should use gloves and wear an apron when cleaning and disinfecting the device between
uses. Users should always follow cleaning agent manufacturers’ instructions. Users may
also clean patients’ assessed anatomical locations after scanning in accordance with your
facility’s procedure for cleaning patients skin surfaces.
10. Check that the device has been reset before cleaning and disinfecting the device. Perform
cleaning and disinfection procedure between each patient. See Section 4 for Cleaning and
Disinfection Instructions.
Figure 11. SEM Scanner Acquiring Heel Reading

ENGLISH (EU)
Page 19 of 36
OTH-SEM-IFU-MULTI-LANG-0123 Rev D, January 2018
3.5. Displaying an Assessment from a Set of Readings
The SEM Scanner 200 records values in sample sets according to the number of readings taken
during an assessment. In an assessment set of readings, the difference between the largest (high)
reading and smallest (low) reading is displayed on the SEM Scanner 200 display as a symbol “”
(delta). Each time a new reading is taken the SEM value, value, and the number of readings will
be updated and displayed by the SEM Scanner 200.
The symbol will display a value when a minimum of three (3) SEM Scanner 200 patient readings
are performed. A minimum of four readings were taken to obtain a result during the clinical
study described in Section 3.6. See Section 3.6 for clinical interpretation recommendations.
3.6. Clinical Interpretation
Clinical interpretation of SEM Scanner 200 readings begins by collecting a set of readings
described in Section 3.4 performed on each anatomical site under assessment. After the set of
readings have been collected for the assessment, the symbol will display a value as described in
Section 3.5.
3.6.1. Interpretation of the ∆ Symbol
➢A < 0.6 at an anatomical site may suggest the tissue is at lower risk for pressure ulcers
➢A ≥0.6 at an anatomical site may suggest increased risk for pressure ulcers
WARNING: The standard of care should be followed for reducing the risk of developing
pressure ulcers. Readings from the SEM Scanner 200 can be used to support increased
intervention, but should never be to the basis for decreasing intervention.
WARNING: This device is not intended to be used for detecting or diagnosis of pressure ulcers.
3.6.2. Deriving SEM Scanner Delta (∆) Values –A Prospective Clinical Study
(SEM200-008)
Clinical study (SEM200-008 or “008”) results from 182 study subjects with 437 anatomical
locations were used to derive clinical validity of the SEM Scanner delta values. The 008 clinical
study was a prospective, blinded study comparing the SEM Scanner to the current Standard of
Care, Visual Skin Assessment (VSA), in identifying patients with tissue at increased risk of
developing pressure ulcers at the heels or sacrum. SEM Scanner assesses the electrical
capacitance of skin and tissue below the electrode when placed on the patient’s skin. VSA seeks
to identify PUs (stage 1 and beyond) once they are visible at the skin level.

ENGLISH (EU)
Page 20 of 36
OTH-SEM-IFU-MULTI-LANG-0123 Rev D, January 2018
3.6.3. SEM200-008 –Study Population
The SEM200-008 (008) clinical study was a prospective, blinded study designed to evaluate the
SEM Scanner relative to the current Standard of Care, Visual Skin Assessment (VSA), for
identifying patients with skin and tissue at increased risk of developing pressure ulcers at the
heels or sacrum. In the 008 Study there were 12 unique clinical-trial sites in the United States
and United Kingdom that were included in the study. Each had their own Principal Investigator.
Subjects in the 008-study received standard-of-care interventions for pressure ulcer prevention
and management. These subjects were at varying risk for developing pressure ulcers (PUs) (as
defined by current risk assessment tools) and thus interventions were given.
According to the study protocol’s inclusion criteria, these patients were defined as being “at
risk” if they met one of the following criteria:
•PU Risk Score –Braden < 15; Waterlow ≥ 10; or Norton ≤ 18;
•Poor mobility; e.g., Braden mobility subscore ≤2; Waterlow mobility subscore >2;
Norton mobility subscore ≤2; or poor mobility according to clinical judgment (chair- or
bed-bound);
•Poor nutrition; e.g., Braden nutrition subscore ≤2; Waterlow nutrition subscore >2; or
other indicator of poor nutrition; and/or
•Medical procedure (e.g., surgery, x-ray, etc.) involving immobility and inability to change
position lasting 4 hours or longer.
Specifically, 182 patients were listed as Intent to Treat (ITT). Of those, 170 Patients were
included in the sensitivity and specificity calculations with 48 pressure ulcers forming across 36
Patients.
Within the 12 sites included in the study, the trials were completed in:
1. Orthopaedic Trauma: 14% (n=26 subjects)
2. Medical Surgery: 27% (n=50 subjects)
3. Long Term Care: 32% (n=58 subjects)
4. ICU: 9% (n=17 subjects)
5. Rehab: 4% (n=7 subjects)
6. Neurologic Care: 8% (n=15 subjects)
7. Other/Mixed: 5% (n=9 subjects)
Table of contents
Popular Medical Equipment manuals by other brands


Critical Diagnostics
Critical Diagnostics ASPECT Reader user guide

Edwards
Edwards APG200 instruction manual

Sarstedt
Sarstedt Multi-Safe vario Instructions for use

Mindray
Mindray BeneView T1 Quick reference guide

HEINE
HEINE omega 500 unplugged quick start guide

Inspiration
Inspiration Mini Rythmic PN+ Setup guide