MedRx Avant REM Speech Installation guide

TRAINING MANUAL

AR-I-MREMSW-5 Avant REM Speech Training Manual
Effective Date: 4/07/2014
2
This Page Intentionally Left Blank

AR-I-MREMSW-5 Avant REM Speech Training Manual
Effective Date: 4/07/2014
3
Contents
Introduction …………………………………………………………………………………………......
4
AVANT™ REM Speech ™ Software Overview …………………………………………………….
5
AVANT™ REM Speech ™ Software Options ………………………………………………………
6
Preparing for Testing …………………………………………………………………………………..
9
Live Speech Mapping ………………………………………………………………………………..…
13
Real Ear Measurements ……………………………………………………………………………….
18
Additional Tests and Features ………………………………………………………………………..
20
Printing …………………………………………………………………………………………………..
26
Limited Warranty ……………………………………………………………………………………….
26
#0086
www.medrx-usa.com
1200 Starkey Rd., #105, Largo FL 33771 U.S.A.
Toll Free: (888) 392-1234 • (727) 584-9600
Fax: (727) 584-9602 • Email: medrx@medrx-usa.com
MedRx's Authorized Representative in Europe
(Regulatory affairs only)
Emergo Europe, Molenstraat 15
2513 BH The Hague, The Netherlands

AR-I-MREMSW-5 Avant REM Speech Training Manual
Effective Date: 4/07/2014
4
Introduction
The Avant REM Speech represents a new era of precision in-situ verification for your office. Compact yet
rugged, this PC-Based system is USB powered and supports all ANSI and IEC Real Ear tests. The
software includes targets for DSL i/o 5.0 and NAL NL-1. A unique feature of the REM Speech is Live
Speech Mapping, MedRx’s in-situ method for getting the fitting right the first time, every time.
This manual assumes that the system hardware, software and drivers are installed and working properly.
Please refer to the MedRx Avant REM Speech Installation Manual for assistance.
The scope of this manual is to get you “up and running” with the Avant REM Speech System. Please
consult the interactive Help System within the software for more detailed information of features and
functionality. To access this tool, press the F1 key at any time, or click the Help icon or menu item with
your mouse.

AR-I-MREMSW-5 Avant REM Speech Training Manual
Effective Date: 4/07/2014
5
The AVANT REM Speech
Software
General Overview
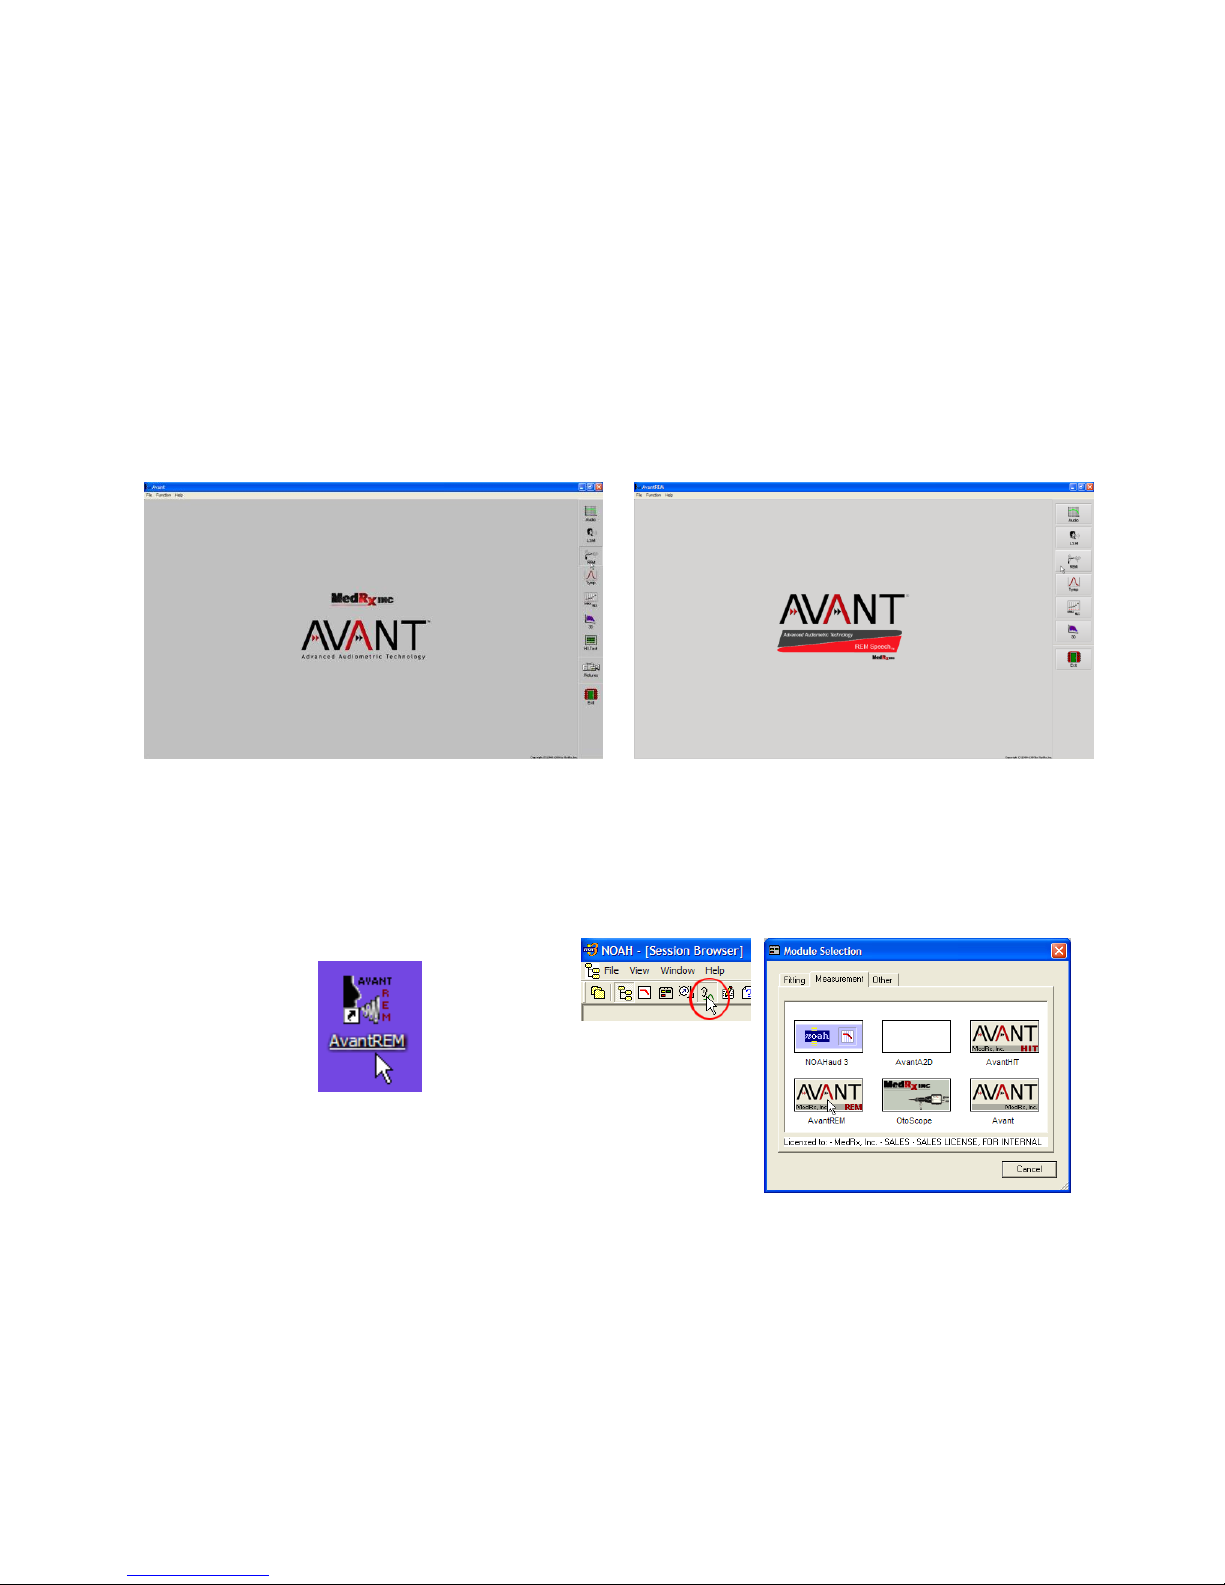
The AVANT REM Speech software will either run as a part of the AVANT Software Suite (figure 1), or as
a stand-alone module (figure 2). The AVANT Software Suite can run stand-alone or from NOAH System
or the TIMS NOAH-Compatible Office System.
The software includes a context-sensitive interactive Help System. To access this tool, press the F1 key
at any time, or click the Help menu with your mouse. This will display additional information and
instructions for the specific section of the software you are working in.
Figure 1 The AVANT Software Suite Main Screen
Figure 2 The AVANT REM Speech Main Screen
Launching the REM Software
Stand Alone
NOAH and TIMS
1. Double click the AVANT REM shortcut
on your Windows Desktop
1. Launch NOAH
2. Click the Real Ear Measurement Toolbar Icon
3. Alternately, from the Module Selection screen,
double click the AVANT REM icon

AR-I-MREMSW-5 Avant REM Speech Training Manual
Effective Date: 4/07/2014
6
Software Options
Basic Options
Several options are available which allow the user to customize the Avant REM Speech Software to
meet their needs.
Access these options from the File Menu on
the Avant REM Speech Main Screen as shown
below.
The Options may also be accessed
from within the Avant REM Speech
main program by clicking on the
Options text menu as shown below
The software allows you to set several default options as described below.
The View tab allows you
to set the default
appearance of the REM
test environment. Values
can be changed by using
the check boxes and pull-
down menus shown
above.
The Live Speech tab sets
the look and behavior of
the Live Speech Mapping
function. Use the Show
Targets pull-down to
underlay DSL 5.0 or NAL
NL-1 targets below your
speech maps.
The REM tab sets the
default look and behavior
of conventional Real Ear
Measurements.

AR-I-MREMSW-5 Avant REM Speech Training Manual
Effective Date: 4/07/2014
7
The MHA/ HLS tab sets
the default look and
behavior of the Master
Hearing Aid and Hearing
Loss Simulator.
If your system has a
Tympanometer connected,
this tab will assist in
configuring the look of the
display
NOTE: Remember, that more information is always available in the Interactive Help System by clicking
the Help Icon or pressing the F1 key.

AR-I-MREMSW-5 Avant REM Speech Training Manual
Effective Date: 4/07/2014
8
Advanced Options
The Advanced Options screen allows you to
configure your system to meet your individual
clinical needs. It also provides MedRx
Technical Support with tools for helping you
troubleshoot problems. Access this screen
from the File Menu on the Avant Main Screen
as shown to the right.
The key features of each tab are described below. For more in-depth information, consult the
interactive Help system within the software.
The General Tab configures the overall Avant
REM Speech behavior with respect to other
Windows programs, specifically NOAH.
Use the Audio Tab to select the proper audio
device for your Avant REM. This tab also
provides access to the Windows Audio
controls.
If your system has a Video Otoscope, the
Video Tab allows you to select the appropriate
device driver
If your system has a Tympanometer
connected, use this tab to configure the
equipment according to the manufacturer’s
instructions.

AR-I-MREMSW-5 Avant REM Speech Training Manual
Effective Date: 4/07/2014
9
Preparing for Testing
Connecting the Probes
3. Connect the probe microphones to the AVANT REM
Speech main unit as shown above. The cables will only
connect when the white mark on the cable connector
aligns with the black mark on the main unit. DO NOT
force the connector on.
1. Locate the Probe Microphone case.
2. Carefully remove the probe microphones.
Note that these are precision instruments
and must be handled with care. Avoid
dropping them or striking them against hard
surfaces such as counter or desktops.

AR-I-MREMSW-5 Avant REM Speech Training Manual
Effective Date: 4/07/2014
10
Bending the Ear Hook
1. Remove the ear
hook from the
package.
2. Place behind the
pinna.
3. Hold wire so the
circular portion sits
just below the ear
lobe.
4. Mark the top of the
helix with your
thumb.
5. Bend the
wire to follow
the contour
of the top of
the pinna as
shown.
Attaching the Probe Microphone Assembly to the Ear Hook
1. Hold the probe
microphone
assembly so that
with the ear hook
facing the front of
the head, the
microphone ports
face away from the
patient.
2. Carefully align the
wire loop of the ear
hook with the
groove in the
microphone
assembly housing
as shown.
3. Carefully
snap the
wire loop
into the
groove and
rotate the
probe
microphone
assembly so
the ear hook
in on top and
the black
microphone
cable is on
the bottom.
4. Connect the probe tube to the silver
metal sleeve of the probe microphone.

AR-I-MREMSW-5 Avant REM Speech Training Manual
Effective Date: 4/07/2014
11
Calibrating the Probe Tube
For reasons of infection control and reliability of results, MedRx recommends that a new probe tube be
used with each patient. To ensure accurate measurements, it is necessary to calibrate the probe
tube each time it is replaced.
1. Place a new probe tube on the probe
microphone port as shown below.
2. Place the probe tube between the calibration nibs as
shown. Be sure that the opening of the probe tube is
centered on the grill of the reference microphone.
In the Avant REM Speech software, click
Function
Calibrate
Probe Tube
Position probe microphone between 19 and 39
inches from the loudspeaker and click Start.
The signal must be at least 70 dB to complete
a valid calibration. If the screen prompt
indicates the signal is too low, increase the
volume on the loudspeaker or moves the probe
microphone assembly closer and re-start the
calibration.
Repeat for the other probe. Valid calibrations
have the same approximate shape as the gray
target curve, but may contain a few spikes in
the very low or very high frequency area of the
response curve. This is acceptable.
If the measured calibration curve differs greatly
in shape or amplitude from the gray target
curve, replace the probe tube and re-calibrate.
If this does not correct the problem, contact
MedRx technical support at (888) 392-1234.

AR-I-MREMSW-5 Avant REM Speech Training Manual
Effective Date: 4/07/2014
12
Using the MedRx Probe Tube Stabilization System
To assist in maintaining proper probe tube position
during Live Speech Mapping and Real Ear
Measurement, MedRx has developed the Probe
Tube Stabilization System.
After bending the ear hook and attaching the probe
assembly and tube, slide the Stabilization System
onto the ear hook as shown. Align the larger hole
with the ear canal and thread the probe tube
through. The black tube depth marker should rest
just inside the larger hole.
Positioning the Speakers
Proper positioning of the
loudspeakers relative to
the patient’s hearing
aids is critical for making
accurate and repeatable
measurements. Seat the
patient so their ear is
between 19 and 39
inches from the
loudspeaker.
Make sure the grill of the loudspeaker is level with and directly in front of the patient’s head.
When using Live Speech inputs, position the patient so the mouth of the person speaking is in the same
position as the loudspeaker shown here.

AR-I-MREMSW-5 Avant REM Speech Training Manual
Effective Date: 4/07/2014
13
Live Speech Mapping
Step-by-Step Guide to Live Speech Mapping
Ensure the Audiogram is Entered
Before making Live Speech Mapping measurements, the patient’s pure tone audiogram must be available
to the software. This can occur several ways:
1. The audiogram was automatically entered by MedRx Avant, Avant Audiometer or Avant A2D
software
2. The audiogram was manually entered into the NOAHaud 3 software and saved
3. The audiogram was entered using another manufacturer’s audiogram module
If none of these have occurred, you may manually enter the audiometric data into the AVANT REM
Speech software as follows:
1. Launch the audiometric module by clicking
on the Audio button on the right side of the
Avant REM Speech main window.
2. Using your mouse, select the test ear
3. Select the test type Air
4. Enter thresholds by clicking the intersection
points with the mouse.
5. Repeat for UCL (Bone and MCL optional)
6. Repeat steps 3-5 for the left ear
After the audiogram is entered, click the Back button to return to the Avant REM Speech Main screen.
1. From the AVANT REM Speech Main screen, click LSM
2. In the next Window. Click LSM again

AR-I-MREMSW-5 Avant REM Speech Training Manual
Effective Date: 4/07/2014
14
Speech Mapping with Live Voice Inputs
The screenshot on the left
shows the Live Speech Mapping
(LSM) window. The system was
designed to capture and display
the human voice in the ear
canal, so we recommend using
the microphone input and peak
measurement.
Using the microphone allows
measurement of both the
professional’s voice and that of
the patient’s significant others.
To improve repeatability of
measurements, it is
recommended that the speaker
read a standard passage such
as the “Rainbow Passage” which
is provided in Appendix A.
NOTE: The screen shot above shows the MedRx Modified Speech Spectrum (Canoe). It is also possible
to underlay DSL i/0 or NAL-NL1 targets on this screen. Click Options in the text menu bar on the top of
the screen to select and configure these underlays to meet the needs of your practice.
Speech Mapping with Recorded Inputs
For those who prefer a standard,
repeatable stimulus for Speech
Mapping, the software provides
several digital audio files. These
are accessed by clicking the File
button on the right and then
selecting the desired track from
the pull-down menu in the audio
player.
Once the desired track is
selected, click the Start button to
begin measuring. When enough
data is collected, click the Stop
button to stop the recording and
measurement.
It is also possible to use an audio CD, such as patient’s favorite music to perform Speech Mapping.
Simply click the CD button and then select a track as above. Using the sound level meter on the upper
right of the screen, adjust the output of the speaker to approximately 65 dB.
NOTE: The screen shot above shows the MedRx Modified Speech Spectrum (Canoe). It is also possible
to underlay DSL i/0 or NAL-NL1 targets on this screen. Click Options in the text menu bar on the top of
the screen to select and configure these underlays to meet the needs of your practice.

AR-I-MREMSW-5 Avant REM Speech Training Manual
Effective Date: 4/07/2014
15
The screen shot below provides an overview of all the tools and controls on the Live Speech Mapping
screen. For more information on these features, please consult the Interactive Help system by pressing
the F1 key or clicking the Help icon.
1. Reference Microphone Level
2. Ear selection
3. Measurement type
a. Peaks
b. LTAS
4. Input Selector
5. Open Fit Function
6. Test Interrupter
7. Discard, Help and Back buttons
8. Legend
9. Reset Button
10. Target area –can be any of the following:
MedRx Modified Speech Spectrum
DSL i/o
NAL-NL1
1
2
3
4
5
6
7
8
10
9

AR-I-MREMSW-5 Avant REM Speech Training Manual
Effective Date: 4/07/2014
16
Running Speech Mapping “On-Top” within NOAH
It is well established that verifying the output of hearing instruments in the patient’s ear will improve the
accuracy of the fitting. In the past, it has been difficult to verify these fittings since many real ear systems
have been disconnected from the fitting system. The Avant REM Speech system is tightly integrated with
NOAH, the industry standard for audiometric and fitting data storage and retrieval. The “on-top” mode of
the REM Speech software allows you to effortlessly alternate between measurement and fitting
adjustments.
Begin by opening the Avant REM
Speech software from within NOAH
as shown above.
From the Avant REM Speech main
screen, click the NOAH LSM button.
The REM Speech window will reduce
in size and “float” on top of the NOAH
screen.
Open the fitting module from the
NOAH Module Selection Screen.
Use the text menus and green and
red buttons in the floating LSM
window to make Speech Mapping
measurements. To make
adjustments to the hearing
instrument, click on the fitting module
window and modify the settings
according to the manufacturer’s
instructions, being sure to activate,
apply or save the settings to the
instrument.
Repeat this measure/adjust/measure
cycle until the fitting is optimized.
Completing the On-Top Mode Process
1. Save the fitting and close the fitting module as usual
2. Click the Back icon
3. Click the Exit icon
4. Click Yes to save the session to NOAH

AR-I-MREMSW-5 Avant REM Speech Training Manual
Effective Date: 4/07/2014
17
MedRx Live Speech Mapping Protocol
Unlike other products, the Avant REM Speech system places full control over the measurement
environment firmly in the hands of the hearing care professional. The system is powerful, yet extremely
flexible, allowing each provider to use Live Speech Mapping in a way that compliments their practice style
rather than compromising it.
In order to get you “up and running” with the Avant REM Speech system, MedRx has developed the
following protocol. This simple procedure has been found to be effective with both audiologists and
hearing instrument specialists. After mastering the basic operation of the system utilized in this protocol,
you are encouraged to further expand your use of Live Speech Mapping in your practice. Feature-
specific help is available by simply pressing the F1 key or clicking on the Help icon or text menu.
1. Basic Diagnostics
a. Using your audiometer and NOAH, measure and record the following values:
b. Pure Tone Air and Bone conduction thresholds
c. Narrow Band Noise or Pure Tone UCL at 500, 2000 and 3000 Hz
d. Other tests if needed in your practice or jurisdiction
2. Complete a careful otoscopic examination as instructed by the manufacturer of your otoscope.
a. For MedRx Video Otoscopes, refer to the Help system within the software by pressing
the F1 key or clicking the Help icon or text menu
3. Position patient as described earlier in this manual.
4. Calibrate Probe Tube as described above.
5. Measure and place the probe tube in the ear canal.
6. Complete a Live Speech Mapping measurement UNAIDED
a. Microphone input
b. Peak Measures
c. 1/3 Octave resolution
7. Carefully place the hearing instrument in the ear without disturbing the probe tube.
8. Complete a Live Speech Mapping measurement AIDED.
9. Using the On Top Mode, make any adjustments needed to the hearing instrument so that:
a. The LSM curve for Quiet Speech (50 to 60 dB) is at the bottom of the white modified
speech spectrum (canoe)
b. The LSM curve for raised vocal effort speech is in the upper third of the space between
threshold and UCL
c. The LSM curve for loud sounds (very loud speech, clapping hands, etc) is approximately
10 dB below the UCL curve.

AR-I-MREMSW-5 Avant REM Speech Training Manual
Effective Date: 4/07/2014
18
Real Ear Measurements
In addition to Live Speech Mapping, the Avant REM Speech supports all conventional Real Ear
Measurements (REM). All these tests are accessed from the main REM screen.
To begin, click the
button on the right of the Avant REM Speech main screen.
In general, REM tasks are performed as follows:
1. Select the REM test you wish
to perform from the top row of
buttons
2. Select the test ear
3. Select the test stimulus
4. Click Start. The test will stop
itself after sufficient data has
been collected and averaged.
5. If you wish to delete a curve,
simply select it with your
mouse and then click the
Discard icon or press the
Delete key.
6. When all measurements are
complete, click the Back arrow
to return to the Avant REM
Speech Main Screen.
To activate specific REM tests, click the buttons as follows:
Opens the audiometry data entry screen. Use this if audiometry has not been previously
measured and entered into NOAH.
Allows the selection of gain-based fitting rules to generate targets. The following rules are
supported: ½ Gain, POGO I, POGO II, Berger, 1/3 Gain, NAL-RP, FIG6, DSL, NAL-NL1
Real Ear Unaided Response - Measures the additive effect of the ear canal’s resonance
to a stimulus. Reported as dB SPL of output.
Real Ear Unaided Gain - Measures the additive effect of the ear canal’s resonance to a
stimulus. Reported as dB SPL of gain. If a real ear unaided response (REUR) curve has
been measured, the corresponding real ear unaided gain curve is automatically plotted to
the REUG screen.
The difference between the REUG and the REAG is called the Real Ear Insertion Gain
(REIG). This Insertion Gain information is used to compare to the target gain curve
selected for the client.
The Real Ear Aided Response (REAR) is the sound pressure level in the ear canal
measured with the probe microphone close to the eardrum and the operating hearing
instrument inserted in the ear and turned on. ANSI defines REAR as the SPL, as a
function of frequency, at a specified measurement point in the ear canal for a specified
sound field, with the hearing aid in place and turned on.
The REAG is simply the REAR expressed as gain rather than SPL. Selecting REAG
allows you to see the gain at each frequency for each of the REAR curves measured.
1
2
3
4
5
6

AR-I-MREMSW-5 Avant REM Speech Training Manual
Effective Date: 4/07/2014
19
REOR measures the effect on the natural external ear effects resulting from inserting an
ear mold or a hearing instrument, before it is turned on, into the ear canal. The REOR I
also referred to as Insertion Loss REOR is also useful for validating the effectiveness of
venting or canal length changes to the mold.
The Real Ear Occluded Gain (REOG) is the difference in decibels, as a function of
frequency, between SPL in the ear canal and SPL at the reference microphone at the
entrance of the ear canal with the hearing aid in the ear and turned off. For each REOR
measurement curve, the corresponding REOG curve is calculated and automatically
plotted to the REOG screen. The REOG function is useful in determining the acoustic seal
of a hearing aid, relative to a sound field outside the ear.
Some clients report they seem like they are “speaking in a barrel” or “feel blocked up”.
These are signs of a build up of low frequency energy in the ear canal. This excessive
occlusion can be measured objectively in the Occlusion Effect task.
The Real Ear to Coupler Difference (RECD) is used to simulate real ear measurements by
coupler measurements and is useful when fitting children or “difficult” to fit patients. See
the section on RECD later in this manual for more detail.
Sample REM Screens
The Avant REM Speech system supports all current ANSI and IEC Real Ear Measurements.
The screenshots below were made using the software defaults. These defaults set the test
parameters for each test according to these standards, however the test environment is fully
configurable to meet individual professional’s needs.
REUR
REUG
REIG
REAR
REAG
REOR
Occlusion Effect

AR-I-MREMSW-5 Avant REM Speech Training Manual
Effective Date: 4/07/2014
20
Additional Tests & Features
Real Ear to Coupler Difference (RECD)
The Real Ear to Coupler Difference (RECD) is used to simulate real ear measurements by coupler
measurements and is useful when fitting children or “difficult” to fit patients. The RECD values are used
as a correction to coupler measures for that client’s hearing instruments. By performing all subsequent
measures in the coupler and applying the RECD corrections to the coupler measures, the “real ear”
factors are incorporated into the results. The resulting simulated measurements provide information to
select and make adjustments to the hearing instrument and verify adjustments in the hearing instrument
test box rather than in the uncooperative client’s ear. This is particularly important in the case of children,
whose small volume ear canals enhance high frequency amplification more so than in average adults.
This is an essential consideration in determining the maximum output of the hearing instrument.
If RECD data is present, the software will display an option to choose between Ear or Coupler
measurement on all Real Ear screens where measurements in a coupler are appropriate.
There are two ways to measure the REAR response: using an insert headphone or a hearing instrument.
If a hearing instrument is used, its volume control setting and other parameters should remain the same
for both REAR and coupler measurements. It is also recommended to set the volume control to
moderate, and turn the compression and noise reduction circuits off.
How to perform the RECD task
First, perform the REAR task to obtain a REAR curve. This can be measured with a hearing instrument
or an insert earphone.
REAR with a hearing instrument
Adjust volume of the hearing instrument to comfortable listening level.
It is also recommended to turn the compression and noise reduction
circuits off.
Position the client less than one meter from the speaker and facing
the speaker.
Place the hearing instrument and the probe microphone tube as for all
REM measurements.
Select START to open the measurement type selection screen.
Choose the REAR with a Hearing Aid option.
Select OK to begin the test and wait until it concludes.
Table of contents
Other MedRx Medical Equipment manuals

MedRx
MedRx Avant User manual

MedRx
MedRx AVANT ARC User manual

MedRx
MedRx AVANT REM Speech+ User manual

MedRx
MedRx Avant A2D+ Installation guide

MedRx
MedRx Video Otoscope User guide

MedRx
MedRx Avant A2D+ User manual

MedRx
MedRx Avant Polar HIT User manual

MedRx
MedRx AVANT TEM Speech User manual

MedRx
MedRx AVANT AIR PLUS User manual

MedRx
MedRx Avant A2D+ User manual
Popular Medical Equipment manuals by other brands

Wohler
Wohler VE 300 operating manual

InterCure
InterCure RESPeRATE user manual

Lifelines
Lifelines trackit Mk3 user manual

KYRA MEDICAL
KYRA MEDICAL k-tek KTEK2602 Instructions for use

AGFA
AGFA Drystar 4500 user manual

ImageWorksVeterinary
ImageWorksVeterinary ImageVet DC Operation, assembly & installation manual