EvoEndo LE User manual
LBL-1 Rev. 4.0
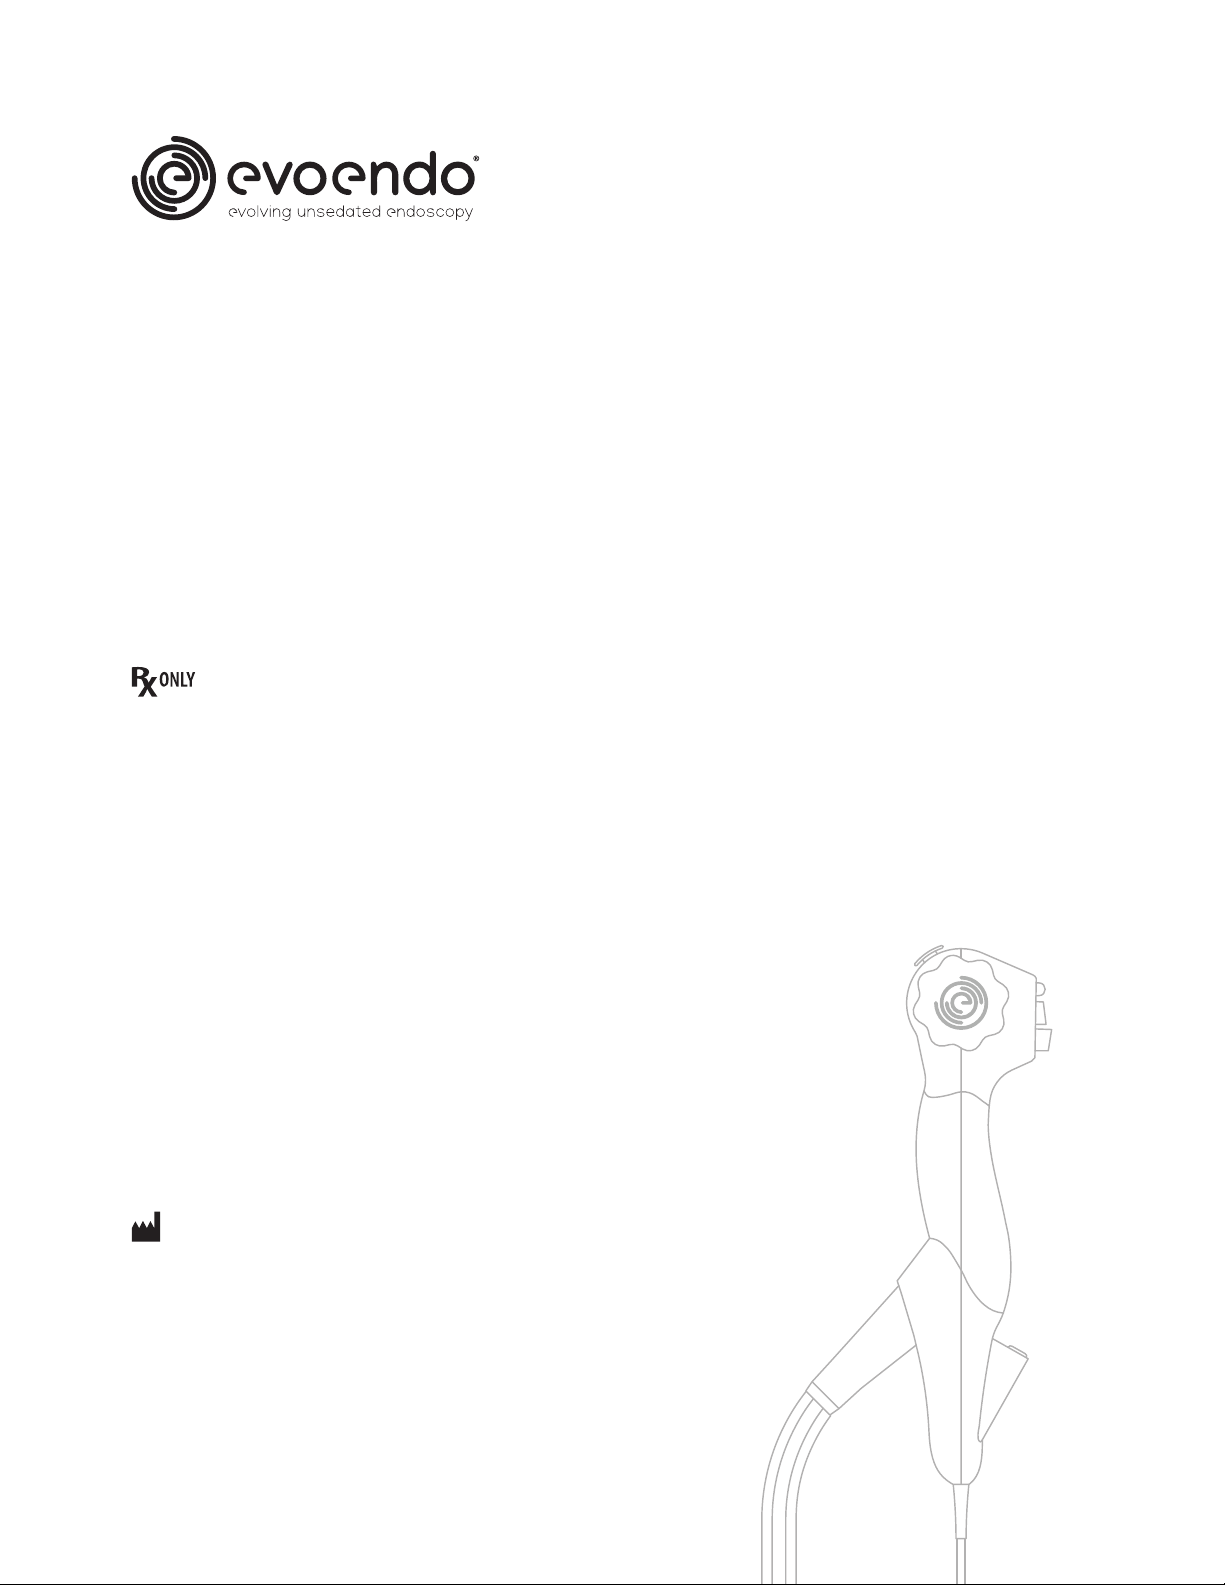
EvoEndo®Model LE
Single-Use Gastroscope
and EvoEndo®Controller (EE-C)
EVOENDO®SINGLE-USE
ENDOSCOPY SYSTEM
EvoEndo®Inc.
Instructions for Use
For use by trained physicians only. For in-hospital use.
EvoEndo®Inc.
12649 East Caley Avenue, Suite 116
Centennial, CO 80111
303.223.7445
www.evoendo.com
2
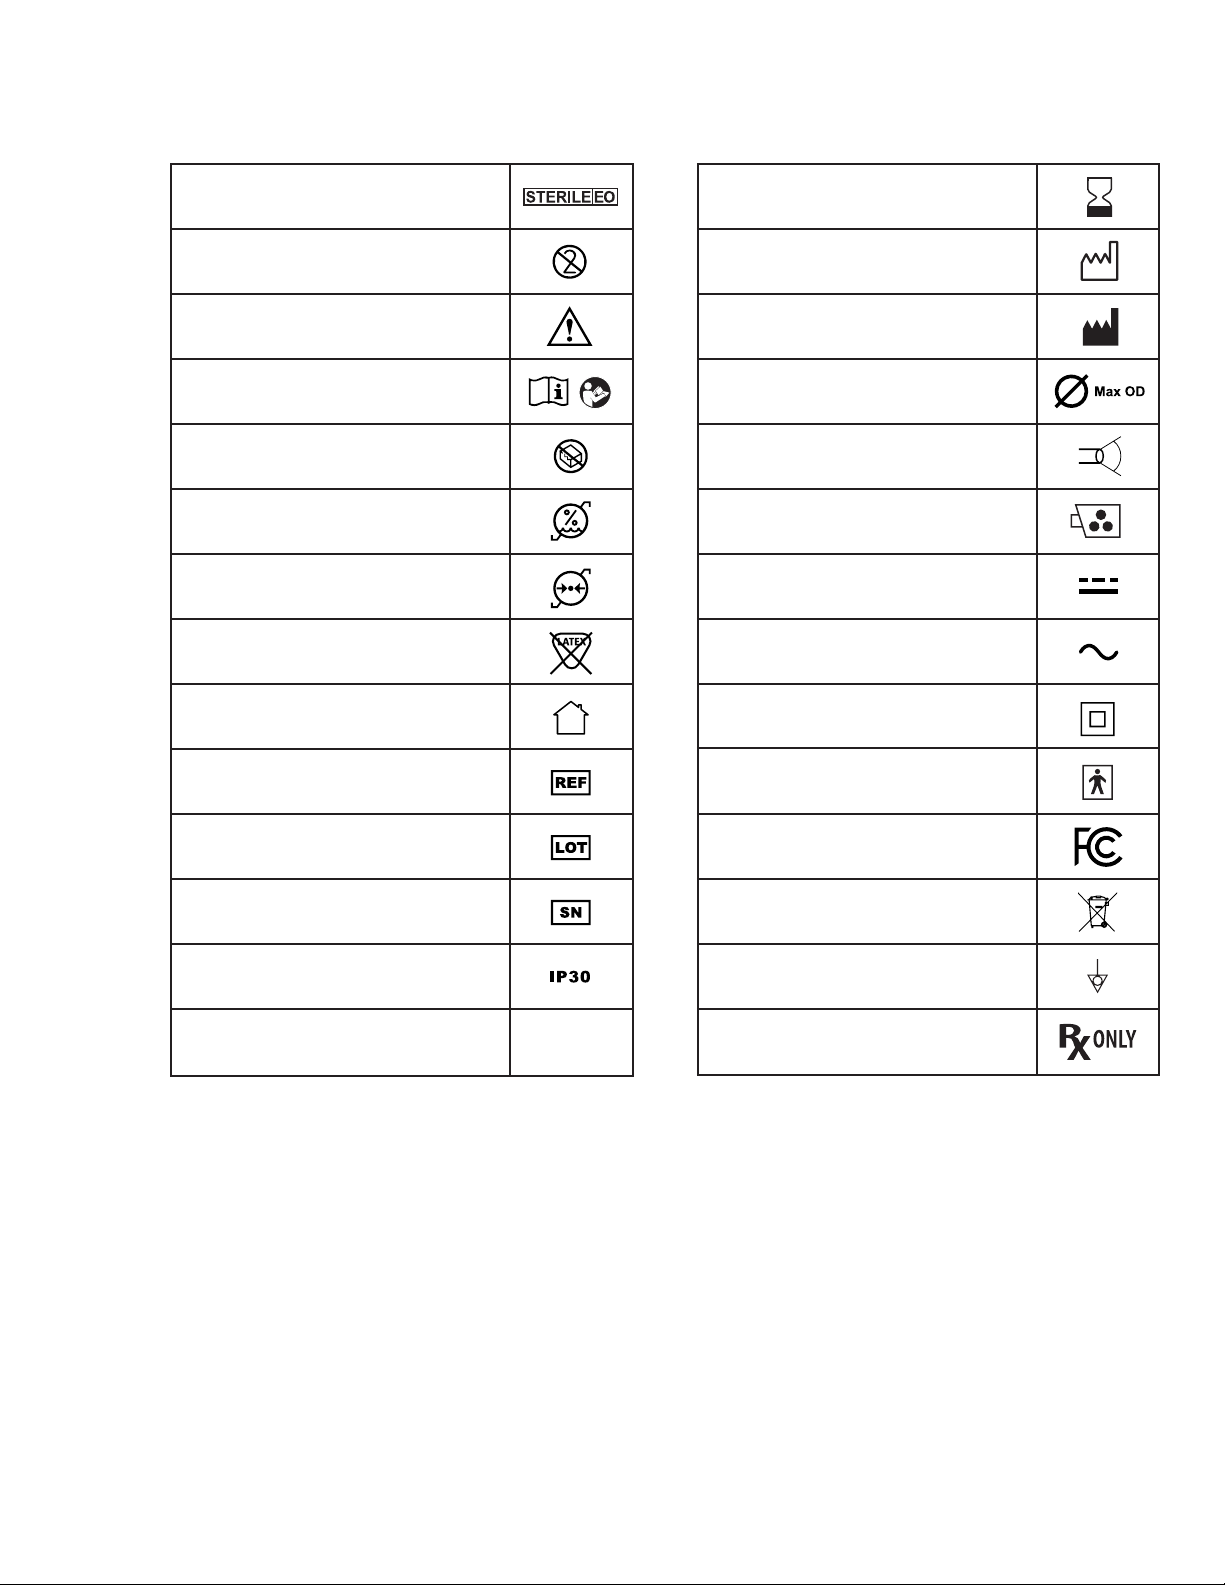
Symbols Used
Sterile Product, Sterilization by ETO
Single use product, do not reuse
Warning
Consult Instructions for Use
Do not use if the product sterilization barrier or its
packaging is damaged
Humidity limitation: relative humidity between 30 and
85% in operating environment
Atmospheric pressure limitation: between 80 and 109
kPa in operating environment
The product does not contain natural rubber latex
Only for Indoor Use
Reference Number
Lot Number, Batch Code
Serial Number
IP30 -Protection against solid objects
DVI output signal utilizing HDMI connector HDMI
Use By
Year of Manufacture,
Company Address
Max OD (3.5 mm).
Field of view (120 degrees)
Video connection for the EvoEndo® Scope
Direct current
Alternating current
Symbol of Class II equipment
Electrical Safety Type BF Applied Part
Tested to comply with FCC Standards - Medical
Equipment
Waste Bin symbol, indicating that waste must be
collected according to local regulation and collection
schemes for disposal of electronic and medical waste.
Potential Equalization (equipotential)
Caution: Federal law restricts this device to sale by or on
the order of a Physician.

3
Contents
1. Important Information – Read Before Use
2. System Parts
3. Use Overview
4. System Setup
5. EvoEndo®Scope Operation
6. EvoEndo®Controller (EE-C) Operation
7. Cleaning and Disinfection of EvoEndo®Controller
8. Troubleshooting
9. Technical Specifications
Appendix 1: Electromagnetic Compatibility
Appendix 2. Standards Applied
Appendix 3. Warranty and Replacement Program
Parts
Overview
Setup
Scope
Controller
Cleaning
Help
Specs
p6
p9
p10
p12
p17
p18
p19
p20

4
1. Important Information – Read Before Use
NOTE Read these safety instructions carefully before using the EvoEndo
®
Single-Use Endoscopy System. The Instructions for Use may be updated
without further notice. Copies of the current version are available on-line and upon request.
WARNING EvoEndo® Model LE Gastroscope is a single-use device and must be handled in a manner consistent with accepted medical practice to avoid
contamination prior to insertion.
WARNING EvoEndo
®
Single-Use Endoscopy System images must not be used as an single-point of diagnosis. Physicians must interpret and substantiate
any finding by additional means and with reference to the patient's clinical characteristics.
1.1. Instructions
Please be aware that these instructions do not explain or discuss clinical procedures. They describe only the basic operation and
precautions related to the operation of the EvoEndo®Single-Use Endoscopy System. Before initial use of the EvoEndo®Single-Use
Endoscopy System, it is essential for operators to have received sufficient training in clinical endoscopic techniques and to be
familiar with the intended use, warnings, cautions, notes, indications and contraindications mentioned in these instructions.
1.2. Intended Use / Indications for Use
The EvoEndo®Model LE Gastroscope is intended for the visualization of the upper digestive tract in adults and pediatric patients,
specifically for the observation, diagnosis, and endoscopic treatment of the esophagus, stomach, and duodenal bulb in patients
over the age of five years. The gastroscope is a sterile single-use device and can be inserted orally or transnasally. The EvoEndo®
Controller is intended for use with an EvoEndo®Endoscope for endoscopic diagnosis, treatment, and video observation.
1.3. Intended Use Conditions
The EvoEndo®Single-Use Endoscopy System is for use in a hospital outpatient environment.
Endoscopic diagnostic accessories designed for a minimum working channel width up to 2.0 mm can be used with the EvoEndo®
Single-Use Endoscopy System.
1.4. Warnings, Cautions and Notes
Throughout these instructions, appropriate warnings, cautions and notes are given describing potential safety hazards associated
with the use of the EvoEndo®Single-Use Endoscopy System.
There is no guarantee that instruments selected solely using this minimum instrument channel width will be compatible in
combination.
WARNING Alerts the user to the possibility of injury, death, or other serious adverse reactions associated with the use or misuse of the EvoEndo
®
Single-
Use Endoscopy System.
CAUTION Alerts the user to the possibility of a problem with the EvoEndo
®
Single-Use Endoscopy System associated with its use or misuse. Such
problems include EvoEndo
®
Single-Use Endoscopy System malfunction, EvoEndo
®
Single-Use Endoscopy System failure, damage to the EvoEndo
®
Single-Use Endoscopy System or damage to property.
NOTE Advises owner/operator about important information on the use of this device.

5
GENERAL WARNINGS
Do not use the EvoEndo
®
Single-Use Endoscopy System if it is damaged in any way.
Perform a functional check before using the EvoEndo
®
Single-Use Endoscopy System (see section 4). Do not use the EvoEndo
®
Single-Use Endoscopy
System if any part of the functional check fails.
Do not attempt to clean and reuse the EvoEndo®Scope on another patient as it is a single-use device.
The EvoEndo®Single-Use Endoscopy System is not to be used when delivering highly flammable anesthetic gases to the patient. This could potentially
cause patient injury.
The EvoEndo®Single-Use Endoscopy System is neither MRI safe nor MRI compatible.
Do not use the EvoEndo®Single-Use Endoscopy System during defibrillation.
When handling the patient do not simultaneously touch the EvoEndo®Controller power socket and docking connector.
Only to be used by skilled physicians trained in clinical endoscopic techniques and procedures.
Excessive force should never be used when operating EvoEndo®Single-Use Endoscopy System.
Patients should be adequately monitored at all times during use.
Always watch the live endoscopic image when advancing or withdrawing the Scope, operating the bending section or suctioning. Failure to do so may
harm the patient.
The EvoEndo®Single-Use Endoscopy System may cause interference or disrupt equipment operations nearby. It may be necessary to adopt procedures
for mitigation, such as reorientation or relocation of the equipment or shielding of the room in which it is used.
Do not use active endoscopic accessories such as laser probes and electrosurgical equipment in conjunction with the EvoEndo®Single-Use Endoscopy
System, as this may result in patient injury or damage to EvoEndo® Single-Use Endoscopy System.
The EvoEndo®Single-Use Endoscopy System should not be used in oxygen rich environments.
The EvoEndo®Single-Use Endoscopy System should not be used in patients with cardiac pacemakers or active implants.
The EvoEndo®Single-Use Endoscopy System should only be used with the Ferric HDMI cable provided with the device.
Discard single-use water bottle after each patient. Do not reuse water bottle between patients.
GENERAL CAUTIONS
Be careful not to damage the shaft or tip when using sharp devices such as needles in combination with the EvoEndo®Single-Use Endoscopy System.
Be careful when handling the distal tip of the insertion tube and do not allow it to strike other objects, as this may result in damage to the equipment.
The lens surface of the distal tip is fragile and visual distortion may occur.
Do not exert excessive force on the bending section as this may result in damage to the equipment. Examples of inappropriate handling of the bending
section include:
- Excessive manual twisting.
- Operating it inside an endotracheal tube or in any other case where resistance is felt.
US federal law restricts these devices for sale only by, or on the order of, a physician.
Keep the EvoEndo®Single-Use Endoscopy System handle dry during preparation and use.
Portable electronic equipment except for tested accessories may affect the normal function of the EvoEndo®Single-Use Endoscopy System.
GENERAL NOTES
Have a suitable backup system readily available for immediate use so the procedure can be continued if a malfunction should occur. EvoEndo®is not
responsible for any damage to the system or patient resulting from incorrect use.
6
2. System Parts
Before you install and use the system please ensure that the following EvoEndo® items are available:
-EvoEndo®Model LE Single-Use Gastroscope - Part Number 1001
-EvoEndo®Controller (EE-C) - Part Number 1002
-Medical-Grade Power Supply - Part Number 1003
-EvoEndo®Instructions for Use - Part Number 1000
-Ferric HDMI Cable - Part Number 1004
You will also need (not supplied by EvoEndo® ):
-Medical-Grade Monitor (minimum size recommended as 27 inch, 1080p HD resolution)
The EvoEndo®Single-Use Endoscopy System consists of a sterile single-use EvoEndo®Scope and reusable Controller (EE-C).
WARNING To avoid the risk of cross-contamination relating to the reusable electronic components ensure EE-C is cleaned and disinfected using
appropriate cleaning solutions to meet hospital cleaning procedures.
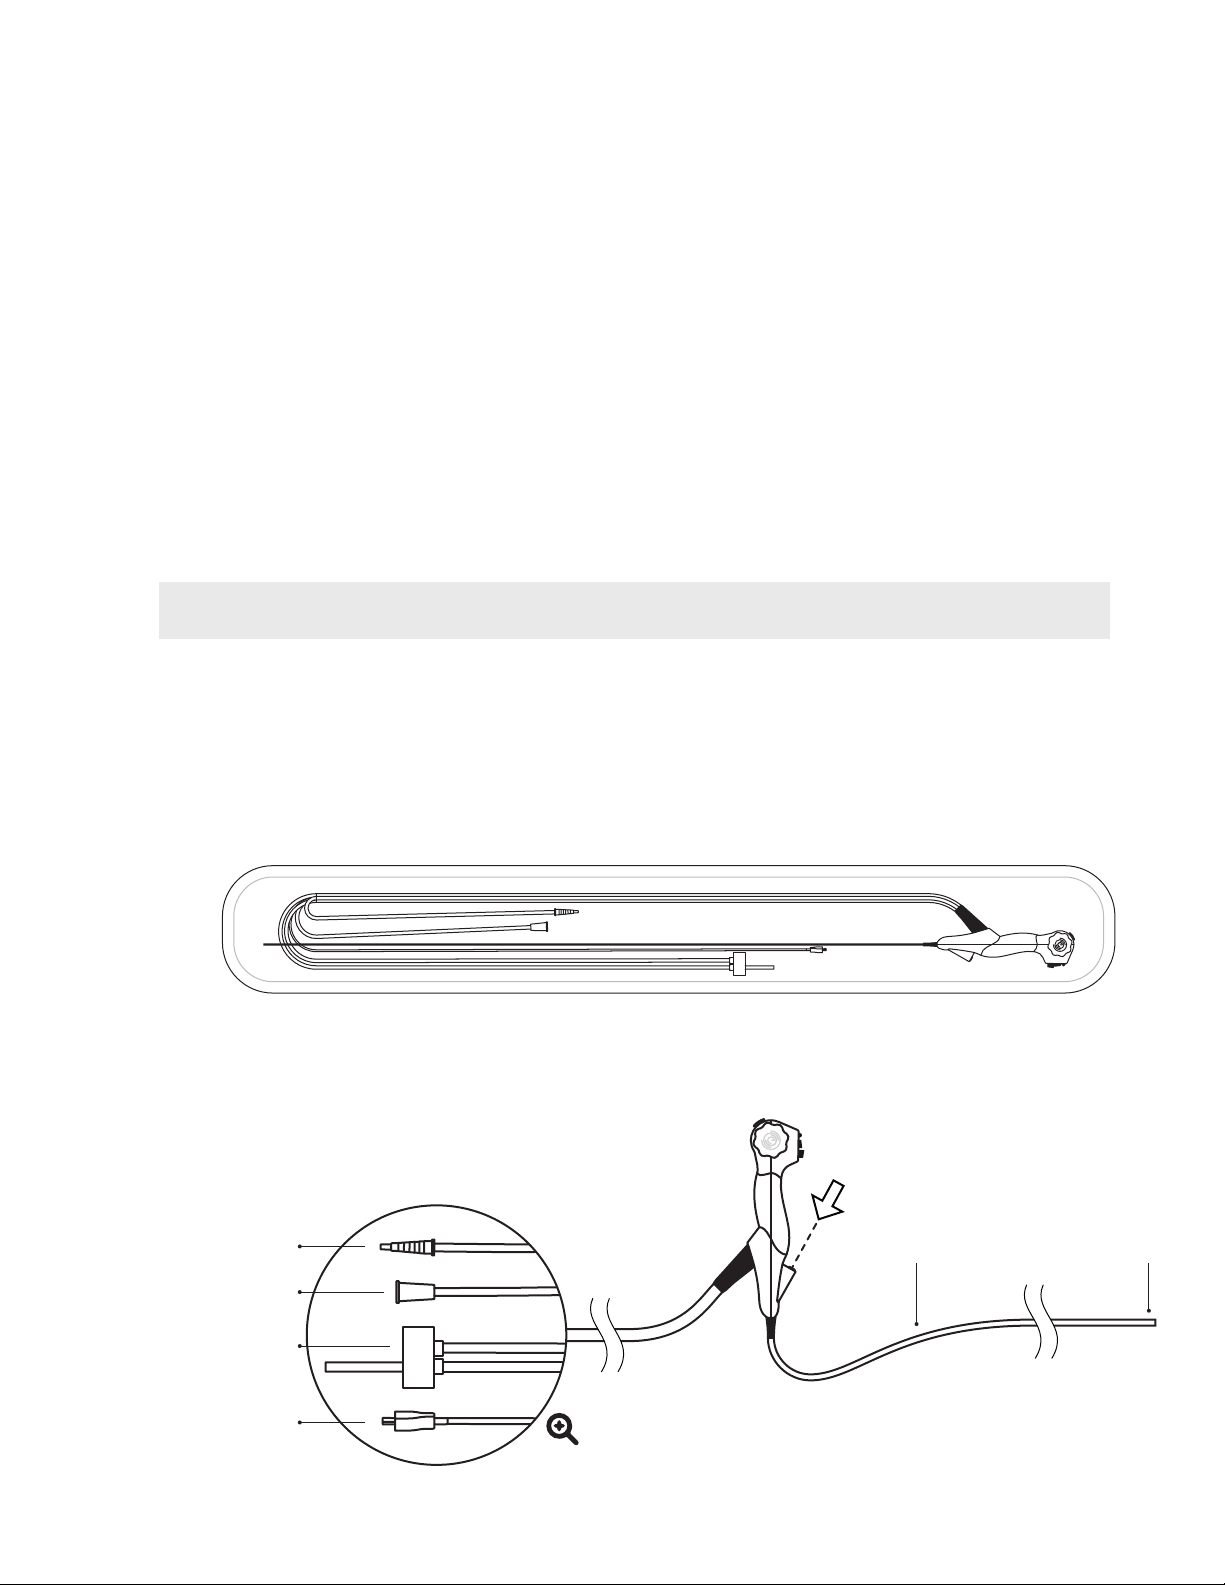
2.1. EvoEndo®Model LE Single-Use Gastroscope
2.1.1 Packaged System
2.1.2 Device Overview & Connections
Suction Line
Water Line
Video Connector
HD CMOS CameraInsertion tube
4-way steering
3.5mm OD
Standard 2mm working channel
Air Line
7
Parts
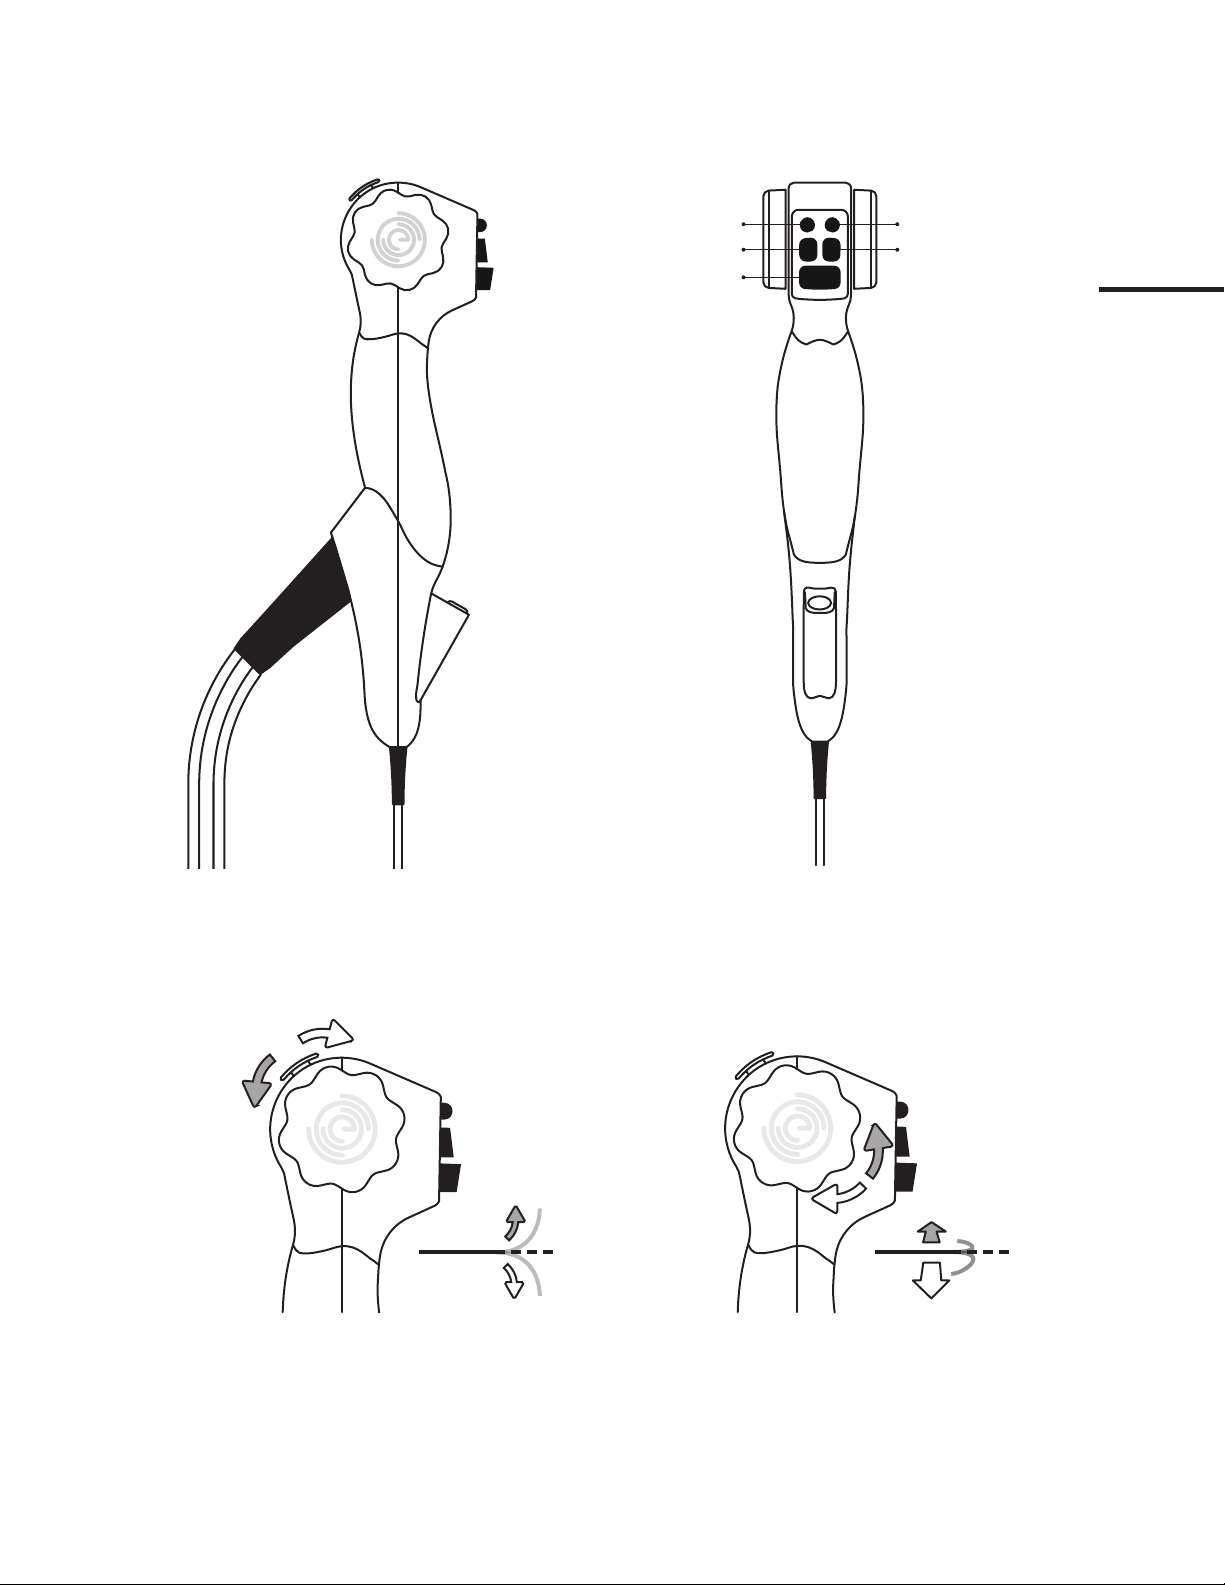
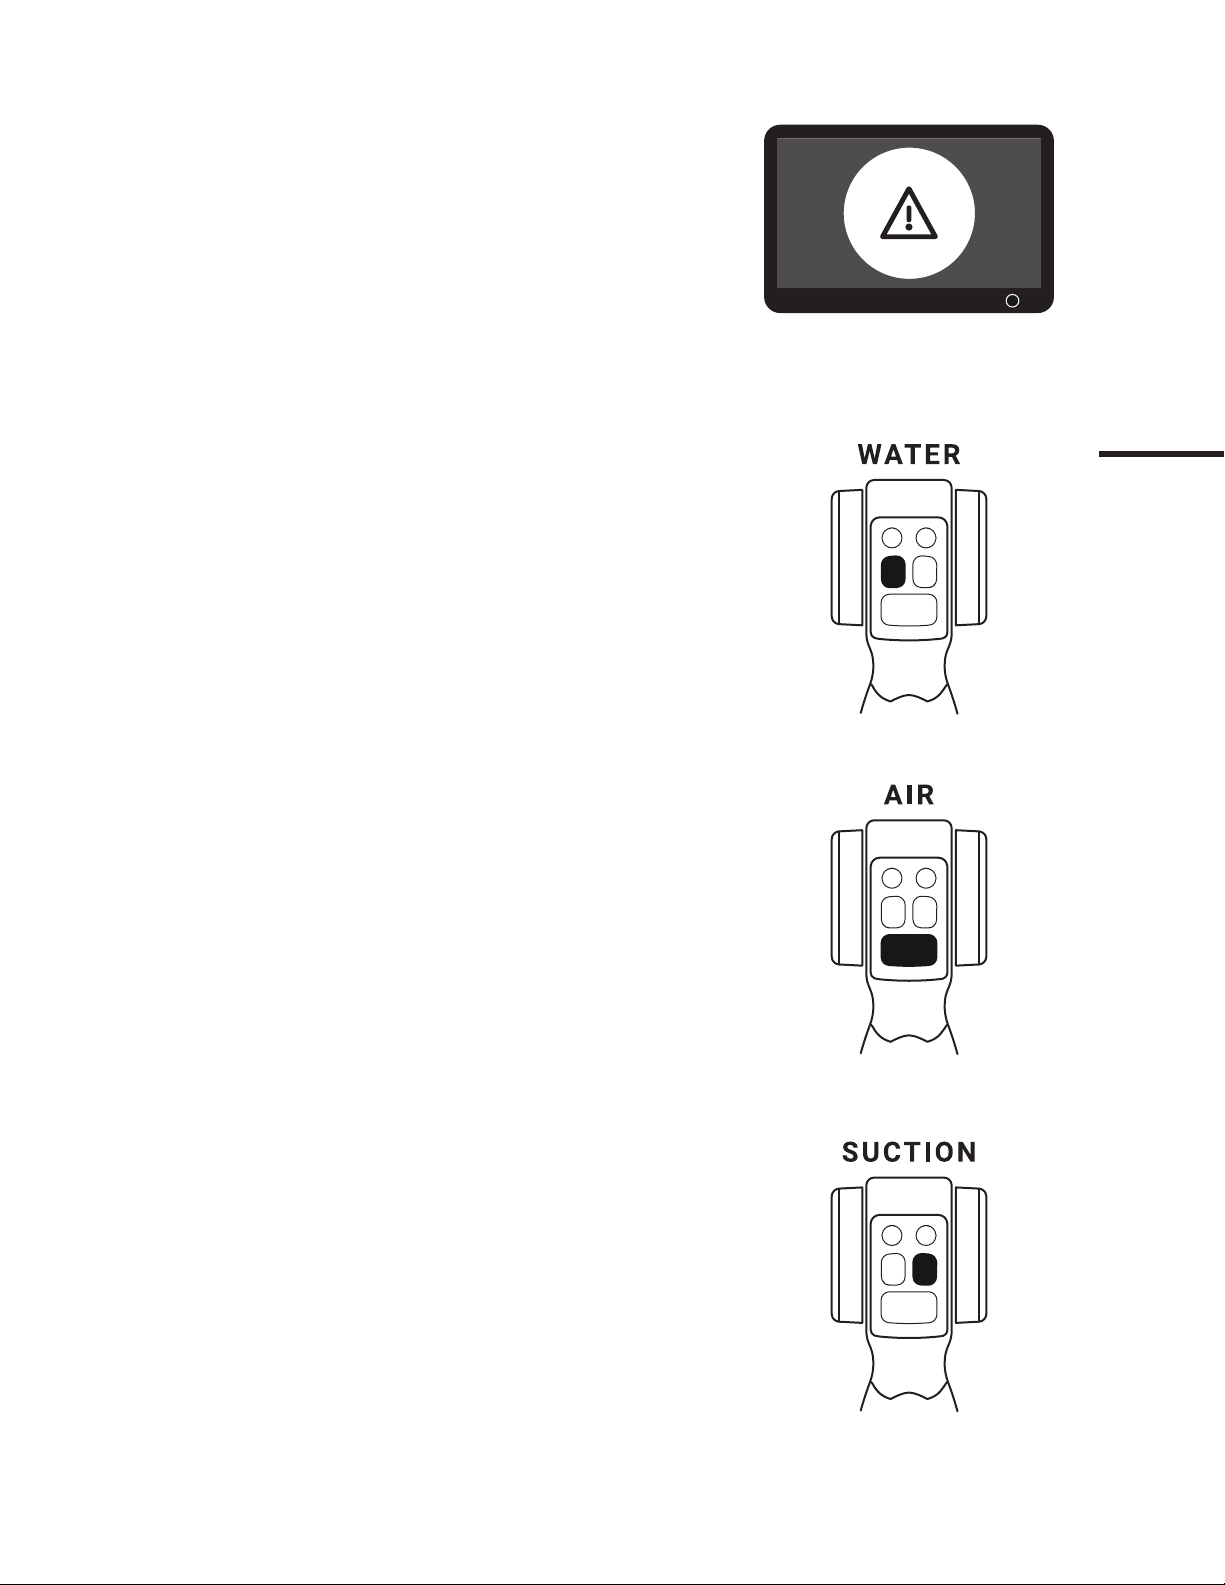
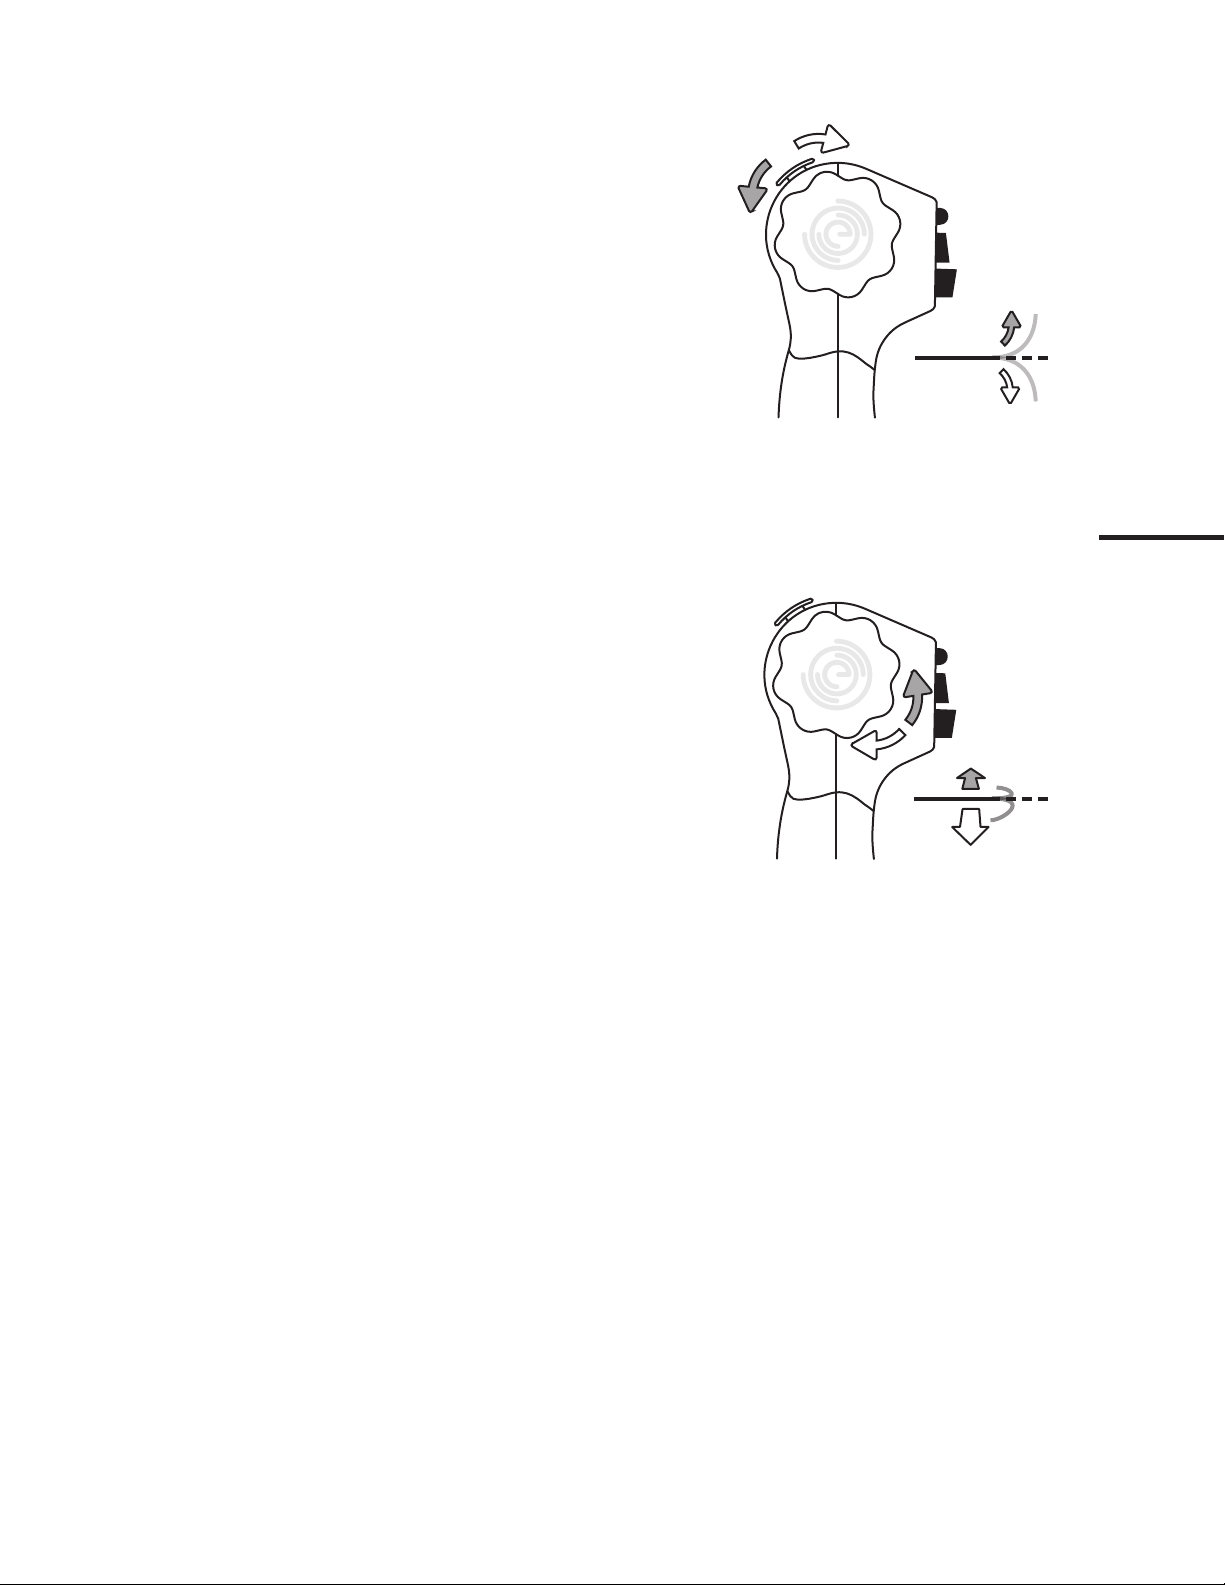
2.1.4 Tip Steering Controls
Thumb lever down = Tip up
Thumb lever up = Tip down
Rotary dial towards = Tip left
Rotary dial away = Tip right
2.1.3 Handle Features
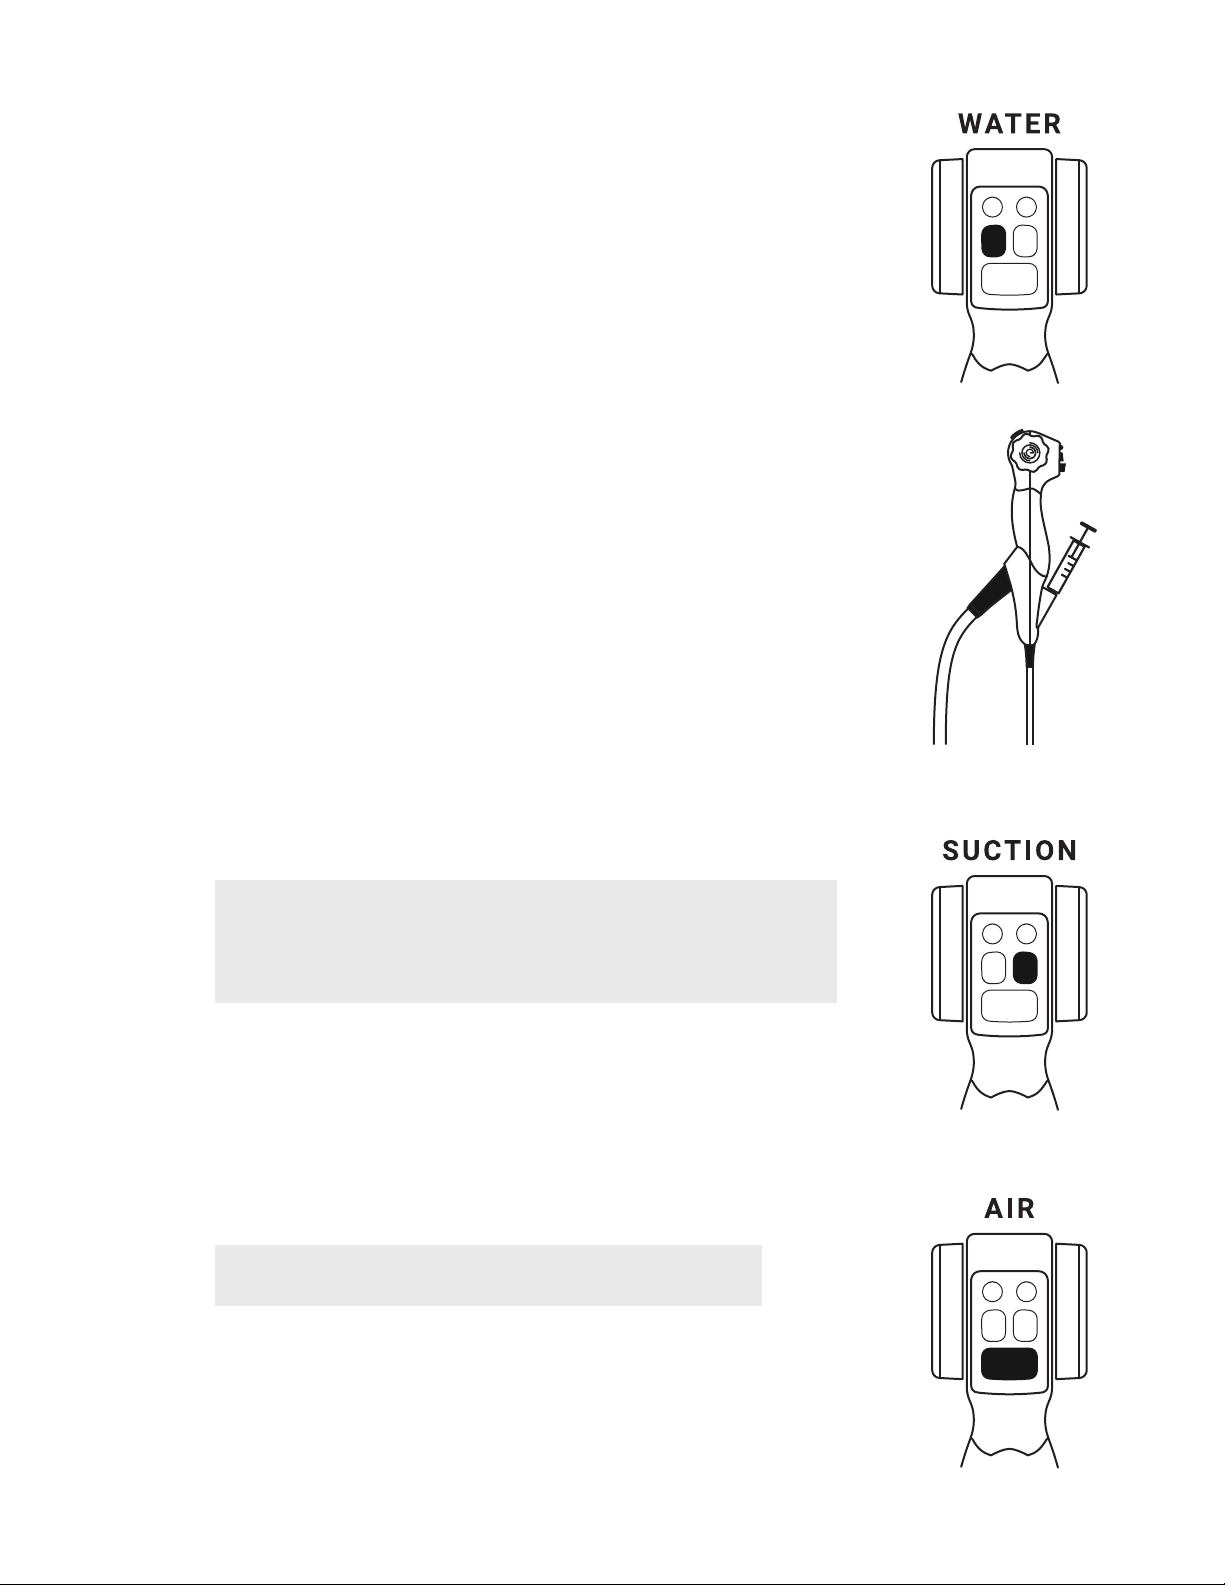
2mm working channel
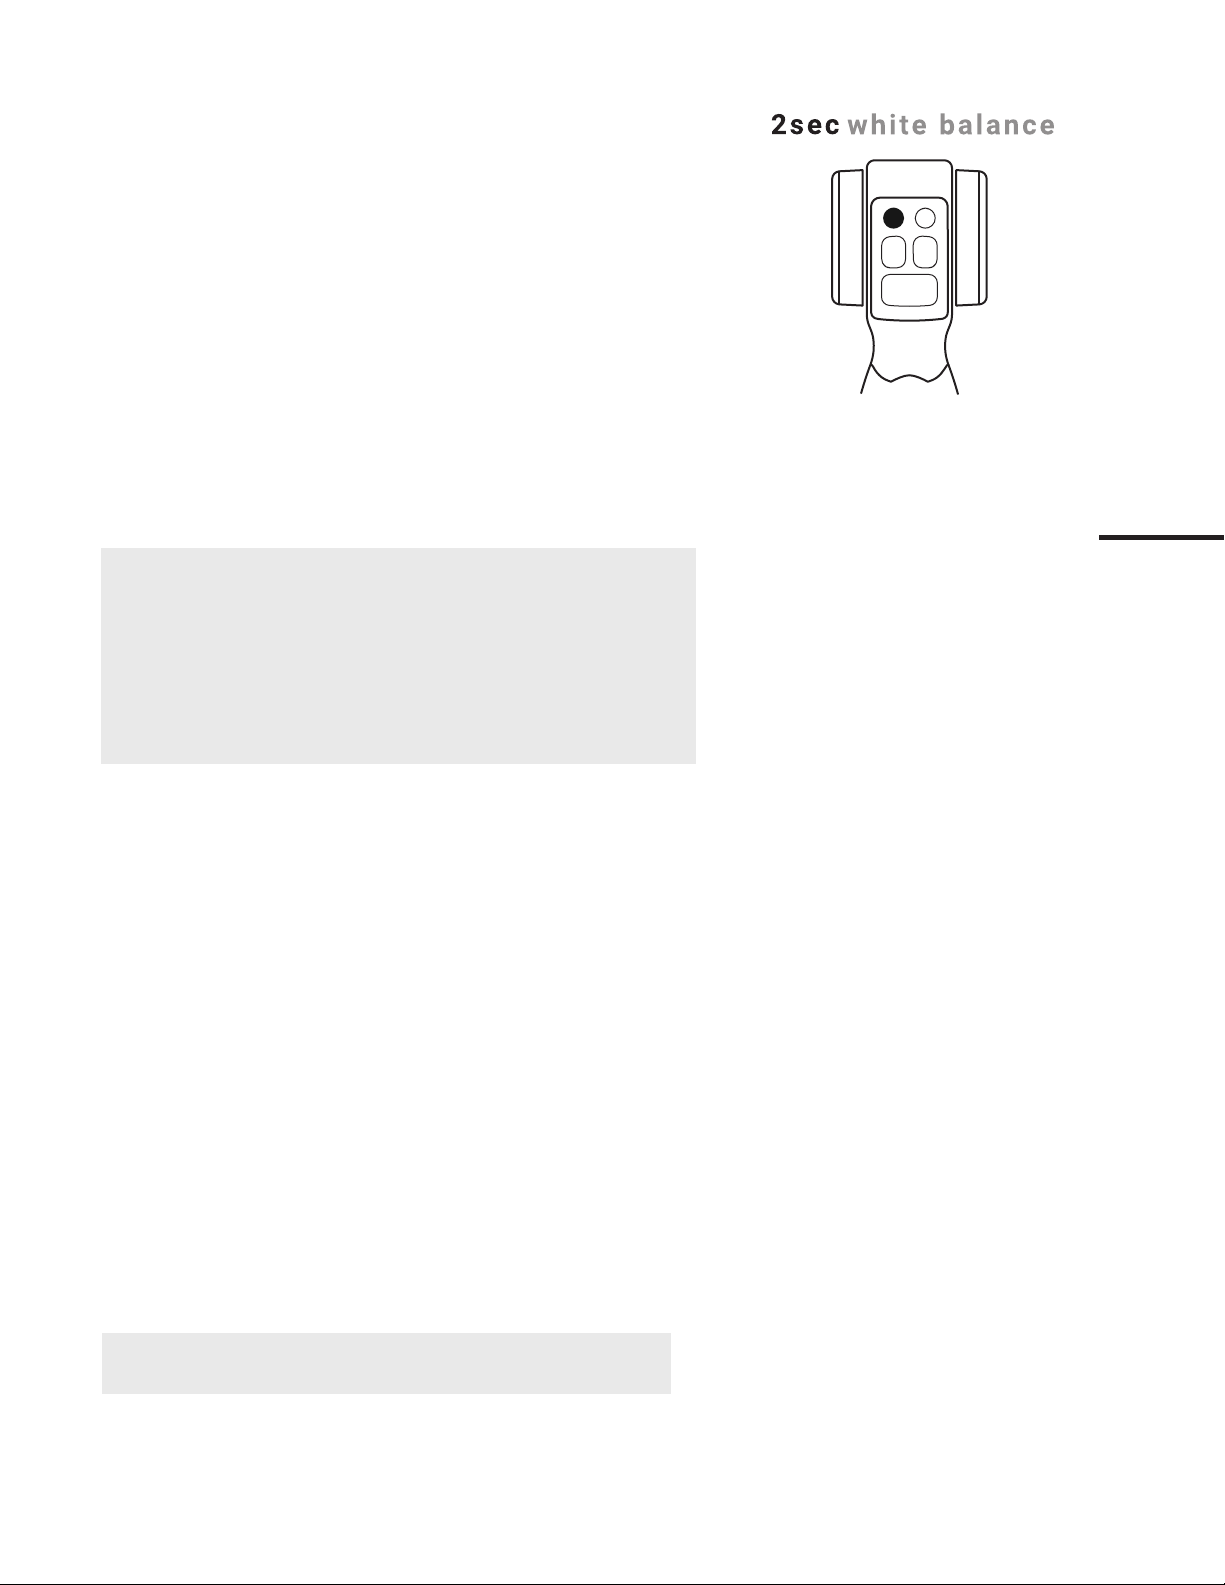
Reset white-balance No function assigned
Apply suctionApply water
Apply air
Insertion tube (3.5mm OD)
L
DOWN
UP
R
Thumb lever
Rotary dial
Supply tube umbilical
8
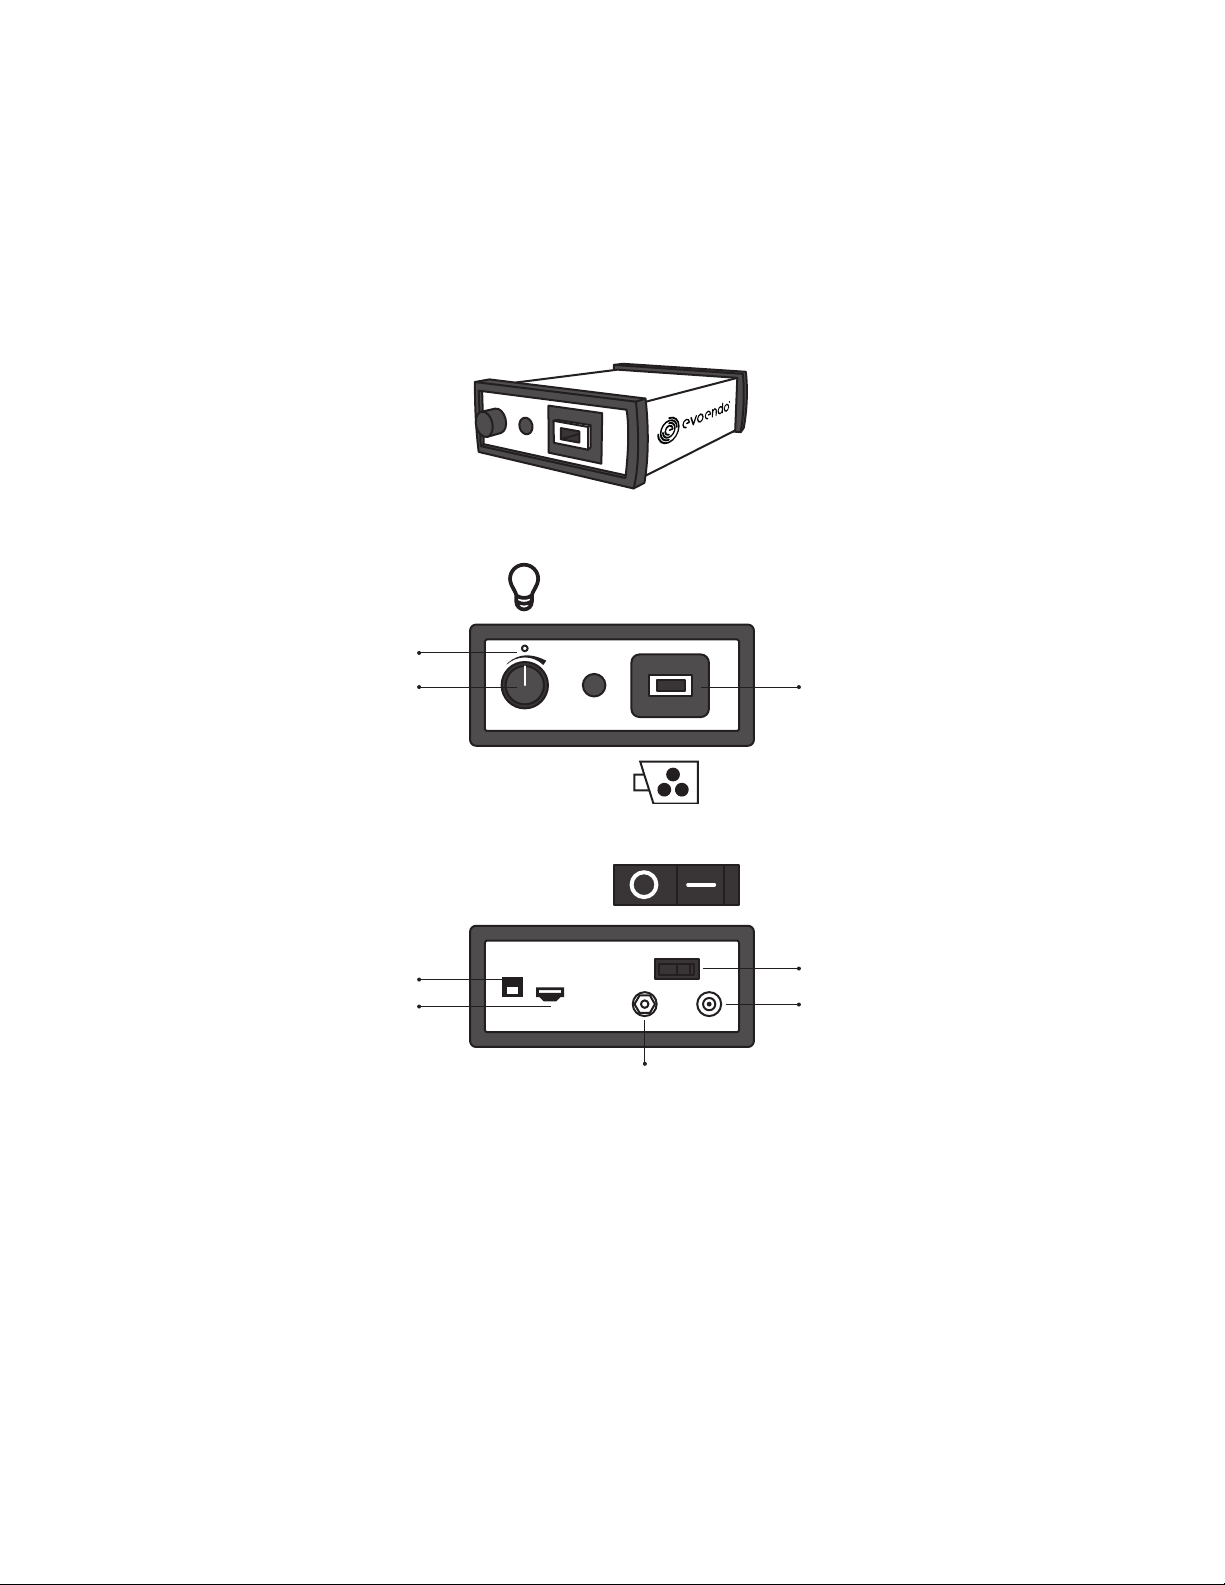
2.2. EvoEndo®Controller (EE-C)
The EvoEndo®Controller (EE-C) processes the live image feed from the EvoEndo®Scope. The device uses standard 110V wall
power via the power supply included. It contains an HDMI port for direct output to a medical-grade monitor and a USB 3.0 port for
connection to third-party software systems. The EvoEndo®Scope includes a video connector which plugs into the Controller at the
Scope Video Input connector.
NOTE Place on a secure table or cart away from water.
NOTE When ON a green LED will illuminate.
2.3. EvoEndo®Controller Power Supply
This power supply is fitted with a country-specific plug and powers the EE-C only.
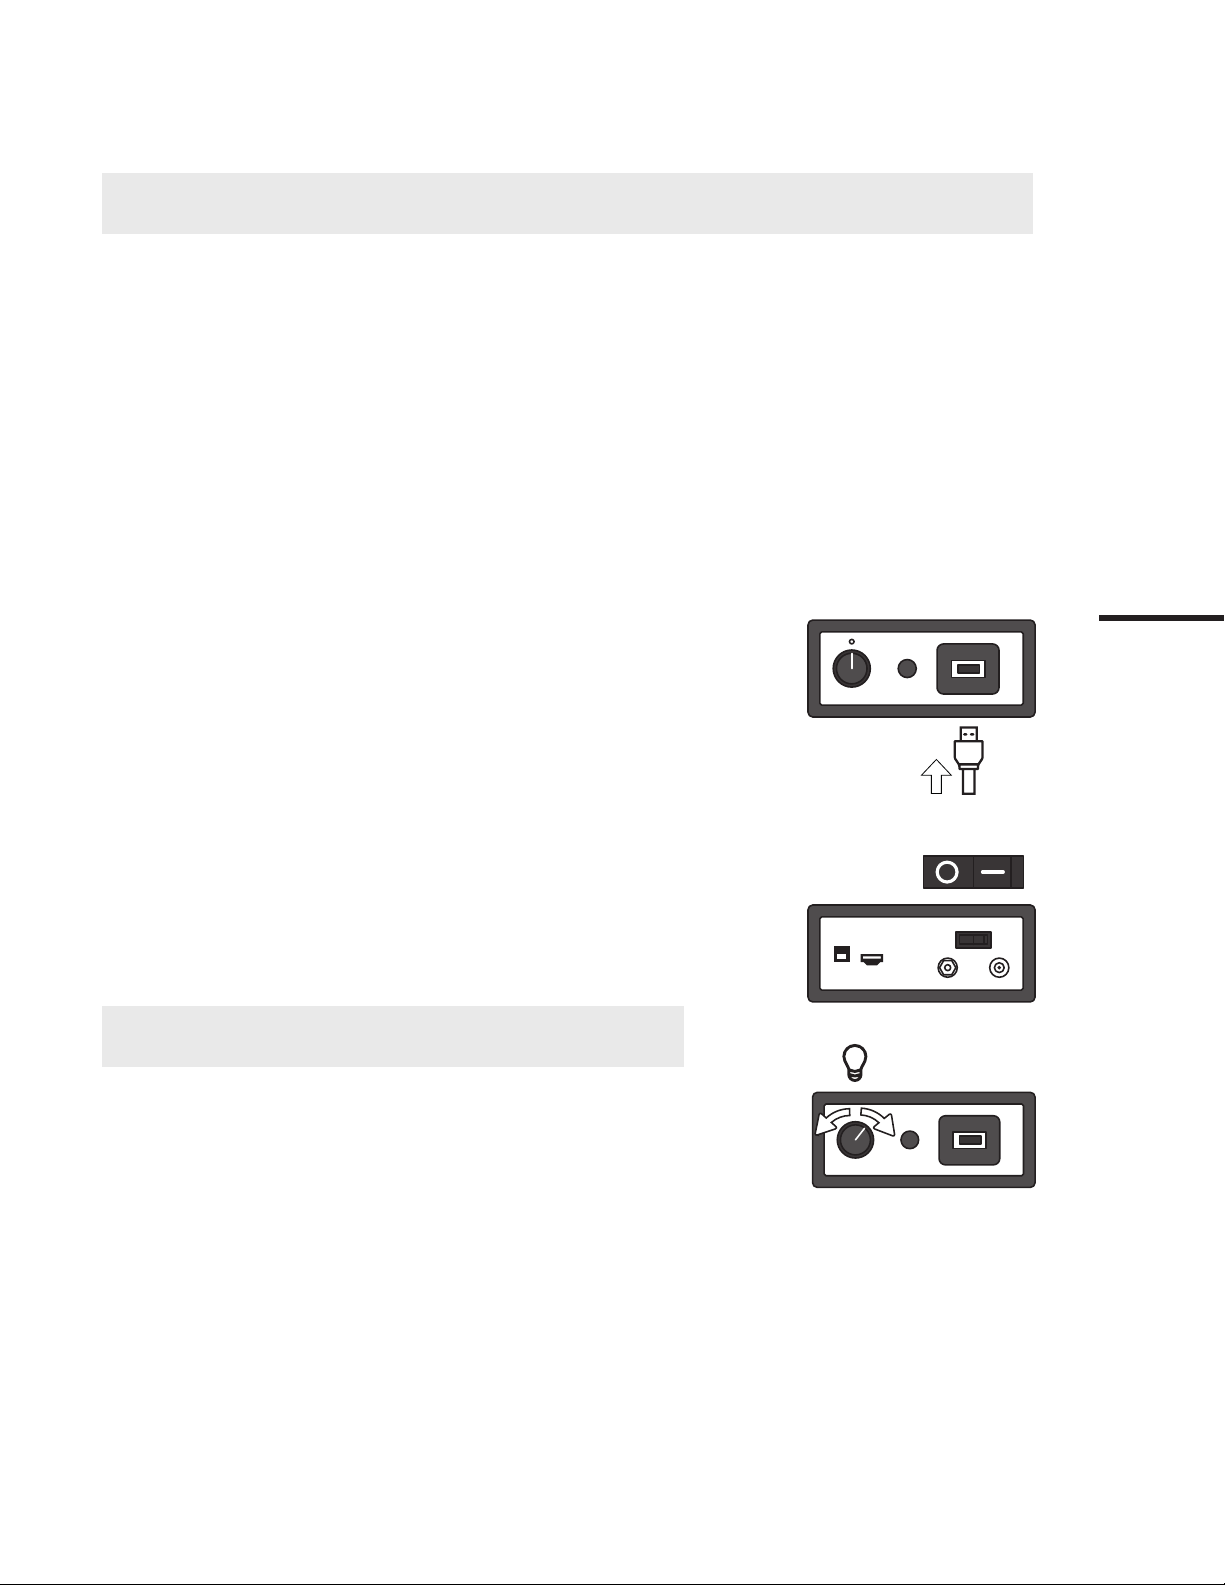
2.2.1 Controller Front
2.2.2 Controller Rear
Brightness control Scope video input
Power switch OFF/ON
Power supply connection
Ground connection
Power indicator
USB 3.0 output
HDMI output

9
3. Use Overview
3.1. Unpack & inspect
Device packaging not damaged?
Device free from defects and not damaged during unpacking?
Controller cleaned from previous use?
3.2. Connect & test
Can make appropriate electrical connections?
Image quality sufficient?
Can make appropriate tube/supply connections?
Successfully ID buttons; air/water/suction?
Air/water/suction functioning correctly?
Successfully ID buttons; white balance?
Visually checked vertical tip control (thumb lever)?
Visually checked horizontal tip control (rotary dial)?
Endoscopic accessories fit the working channel?
3.3. Perform endoscopic procedure
3.4. Withdraw, dispose & clean
Remove any endoscopic accessories
Discard Scope
Recycle plastic packaging tray
Clean and disinfect Controller
Overview
10
4. System Setup
WARNING Do not use the EvoEndo®Scope if it is damaged in any way or if any part of
the functional check described below fails.
WARNING Do not use a knife or sharp instrument to open the pouch or cardboard box.
CAUTION The EvoEndo®Single-Use Endoscopy System consists of the parts
described in section 2. They may only be replaced by EvoEndo®authorized parts.
Failure to comply with this may reduce safety and efficiency.
NOTE Have a suitable backup system readily available for immediate use so the
procedure can be continued if a malfunction should occur.
4.1. Inspect the EvoEndo®Scope
4.1.1. Check that the pouch is not damaged and that the seal is intact.
4.1.2. Unpack the device and check that there are no impurities on the product.
4.1.3. Check that there is no evidence of shipping damage or other damage such
as rough surfaces, sharp edges or protrusions which may harm the patient.
4.2. Inspect and Test the EvoEndo®Controller (EE-C)
4.2.1. Check the power supply is present, and free from damage.
4.2.2. Closely examine the EvoEndo®Controller for any damage.
4.2.3. Find the Equipotential Terminal on rear side of VCU. An Equipotential
Terminal is provided to optionally connect to a hospital ground/earth
system.
4.2.4. Locate the nearest wall socket before start of the procedure. Plug in the
power supply to the wall socket and to the VCU.
CAUTION Position the power supply cable where it does not present a trip-hazard. Do
not place any objects on the power cord.
CAUTION If the EvoEndo®Controller is used adjacent to or stacked with other
equipment, observe and verify normal operation prior to using it. Consult Appendix 1
for guidance on placing the EvoEndo®Controller.
4.2.5. Switch ON by pressing the on/off button. Switch OFF after test.
NOTE When ON a green LED will illuminate.
4.3. Test Live Video Image
CAUTION Ensure the EE-C is powered OFF during all cable connection.
4.3.1. Connect EvoEndo®Scope to the EvoEndo®Controller by plugging the video
connector on the EvoEndo®Scope into the appropriate socket on the front
of the Controller.
4.3.2. Connect the Controller to a HD-rated medical-grade monitor with included
Ferric HDMI cable (Part 1004).
NOTE: The Controller should only be used with the Ferric HDMI cable provided.
ON
11
4.3.3. Power ON the monitor and the Controller.
4.3.4. Point the distal end of EvoEndo® Scope towards an object, e.g. the palm of
your hand.
4.3.5. Verify that a live video image appears on the screen.
NOTE: If the object cannot be seen clearly, wipe the lens at the distal end using a
clean cloth.
NOTE: A medical-grade anti-fog liquid may also be used on the distal end.
4.4. Connect and Test EvoEndo®Scope Supply Lines
4.4.1. Identify the water supply line on the EvoEndo®Scope and connect via
standard screw-top fitting to a standard 250ml (mimimum) single-use
sterile water or saline bottle.
NOTE Bottle must remain upright throughout the procedure.
4.4.2. With the distal tip directed into the packaging tray or similar disposable
vessel, press and hold the water button to check for continuous flow and
expected rate.
4.4.3. Identify the air supply line on the EvoEndo®Scope and connect, using a
push-fit, to an air system (carbon dioxide) rated 2-3 L/Flow (50 psi standard
wall pressure) or 8 psi continuous regulated pressure (recommended).
4.4.4. Place the distal tip in the water previously dispensed into the packaging tray
then press and hold the air button to check flow.
4.4.5. Identify the suction line and connect using a push-fit. Ensuring a suction
vacuum of 200 mmHg or less.
4.4.6. Place the distal tip back into the dispensed water and press the suction
button to check suction function.
Setup
12
4.4.7. Verify that any endoscopic accessories to be used can pass through the
working channel without excessive resistance.
CAUTION Ensure any endoscopic accessory used is less than 2mm outer-diameter
and at least 1.1m working length.
NOTE Add several drops of silicon oil to the channel if resistance is felt.
WARNING Active endoscopic accessories such as laser probes and electrosurgical
equipment are not compatible with the EvoEndo®Scope and should not be used under
any circumstances.
5. EvoEndo®Scope Operation
WARNING Excessive force should never be used when operating EvoEndo®Scope.
WARNING If any malfunction should occur during the endoscopic procedure, stop the
procedure immediately, put the distal tip in its neutral non-angled position and slowly
withdraw the EvoEndo®Scope without touching the bending lever.
WARNING Always observe the live endoscopic image while withdrawing the EvoEndo®
Scope.
WARNING The temperature of the distal end of the endoscope may exceed 41 deg-C
(106 deg-F) and reach up to 43 deg-C (110 deg-F) due to heating of the LEDs. Long,
sustained contact with the mucosal membrane may cause mucosal injury. Avoid long
periods of contact between the tip of the device and the mucosal membrane. Always
maintain a suitable distance necessary for adequate viewing while using the minimum
level of illumination for the minimum amount of time.
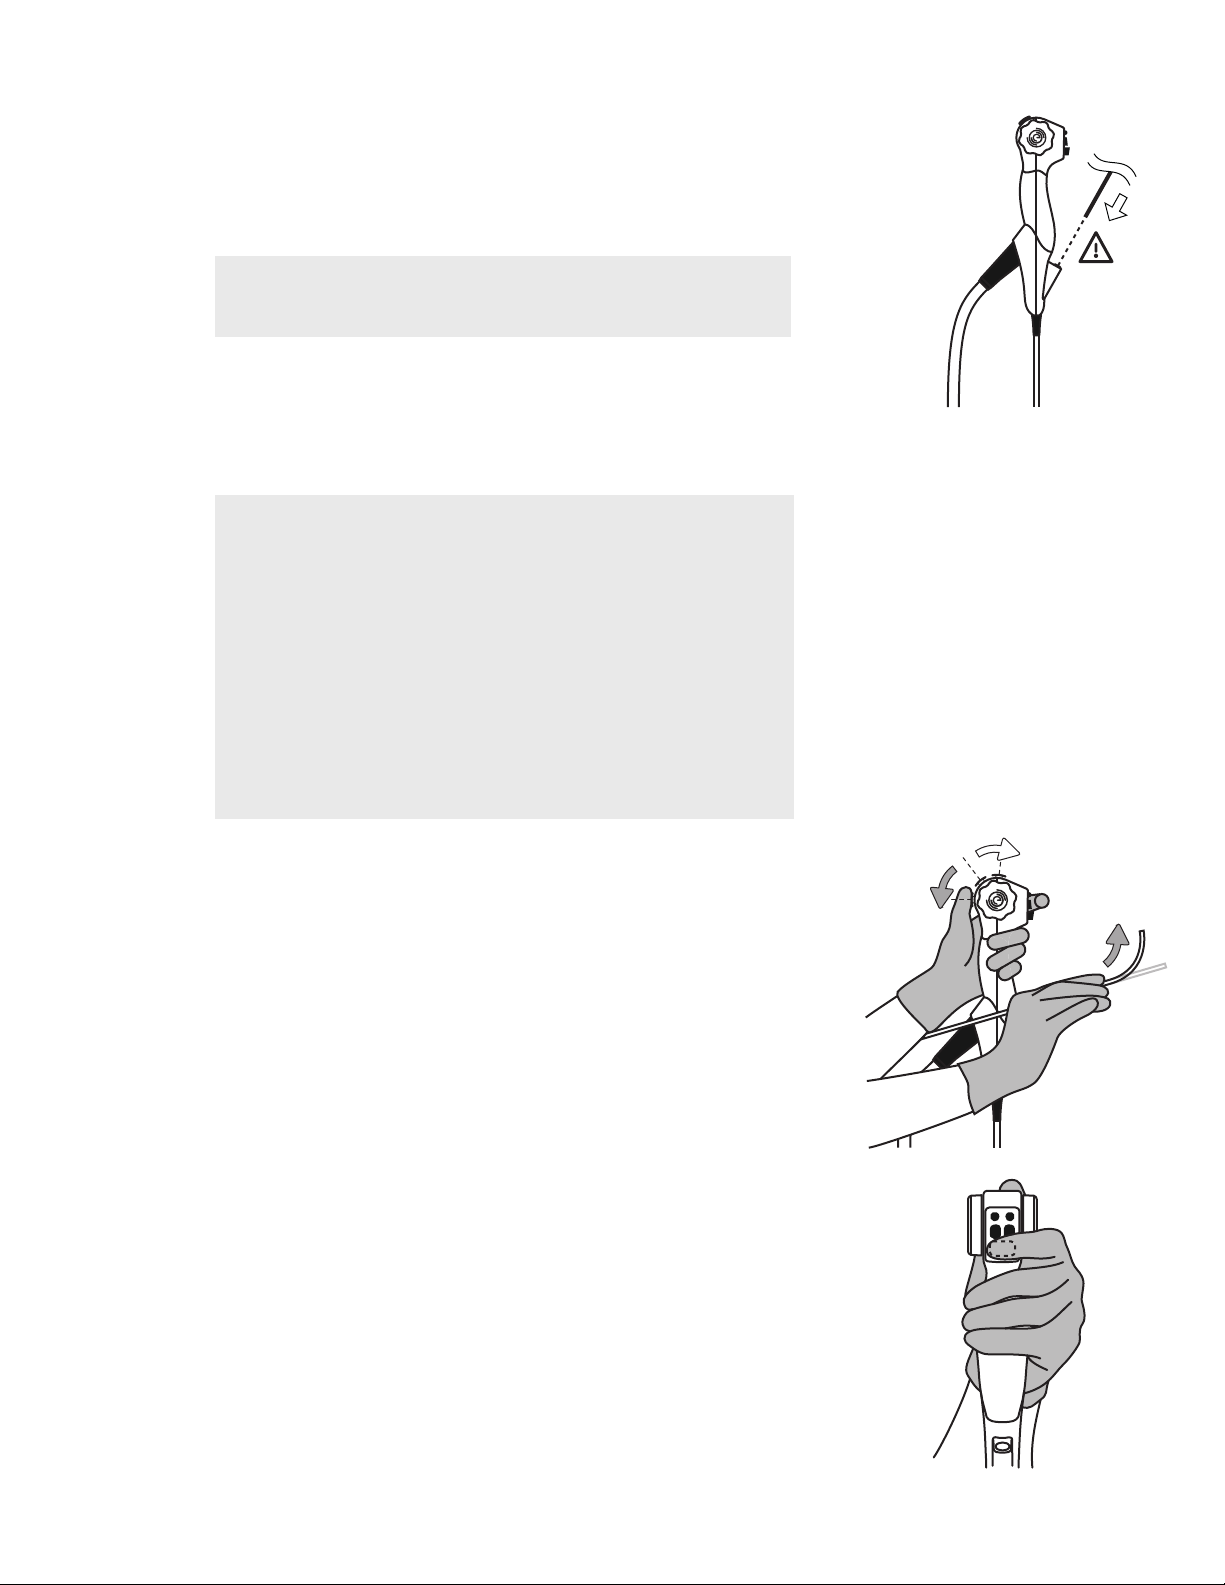
5.1. Holding the EvoEndo®Scope
The handle of the EvoEndo®Scope can be held in either hand.
Use the thumb to move the up/down control lever and the index finger to
operate the air/water/suction/electronic buttons.
The index finger can also be used to apply left right motion of the distal tip
via rotation of the dials while the thumb moves the device tip up/down.
The hand that is not holding the handle can be used to advance the Scope
Insertion Tube into the patient’s mouth or nose using a pencil-like grip.
13
5.2. Manipulating the Tip of the EvoEndo®Scope
The thumb control lever is used to flex and extend the tip of the EvoEndo®
Scope in the vertical plane.
Moving the control lever downward will make the tip bend anteriorly
(flexion).
Moving it upward will make the tip bend posteriorly (extension).
The Index Control Dials (mirror images of each other) are used to flex and
extend the tip of the EvoEndo®Scope in the horizontal plane.
Moving the control dials in either direction will make the tip bend laterally.
CAUTION The endoscope catheter should be held as straight (planar) as possible at
all times in order to maintain optimal tip control.
CAUTION The device will tolerate twisting, but excessive twisting could break the
catheter steering mechanism or decrease efficacy of steering.
CAUTION Do not exert excessive force on the bending section as this may result in
damage to the equipment. Examples of inappropriate handling of the bending section
include:
- Excessive manual twisting along the insertion tube
- Operating it inside an endotracheal tube
- Operation where significant resistance is felt
5.3. Insertion of the EvoEndo®Scope
CAUTION Lubricate the insertion tube with a medical-grade lubricant to ensure the
lowest friction when the EvoEndo®Scope is inserted into the patient.
CAUTION When inserting the EvoEndo®Scope orally, it is recommended to use a
mouthpiece to protect the Scope from damaged.
NOTE If the camera image of the EvoEndo®Scope becomes unclear the tip can be
cleaned by gently rubbing the tip against the mucosal wall or fully withdraw the Scope
and clean the tip with an anti-fog liquid or disinfection wipe.
Scope
Thumb lever down = Tip up
Thumb lever up = Tip down
Rotary dial towards = Tip left
Rotary dial away = Tip right
L
DOWN
UP
R
14
5.4. Instillation of Fluid
With a standard 250ml (minimum) screw-top single-use water container
connected, press and hold the water button to add water to the investigation
site.
In addition to the integrated water supply function, fluids may also be instilled
directly down the working channel by inserting a slip-tip syringe into the working
channel at the top of the EvoEndo®Scope;
5.4.1. Insert the syringe completely into the working channel port or the introducer.
Failure to do so may result in the fluid spilling from the working channel port.
5.4.2. Press the plunger to instill fluid.
CAUTION Make sure you do not apply suction during this process, as this will direct the
instilled fluids into the suction collection system.
5.5. Aspiration
Suction can be applied by pressing the suction button with the index finger.
WARNING Ensure that the suction connector on the EvoEndo®Single-Use Endoscopy System
is only connected to a medical-grade suction apparatus.
WARNING Use a suction vacuum of 200 mmHg or less. Too high a vacuum may lead to
difficulty terminating suction.
5.6. Insufation
To achieve air insufflation, press and hold the air button for continuous flow.
WARNING Ensure the use of short bursts of insufflation to reduce the risk of over
insufflation and the associated risks of gas embolism.
15
5.7. Imaging Buttons
5.7.1. White-Balance Reset
White-balance is factory-optimized for each device. If however, this setting is
adjusted or problematic then press and hold (2 seconds) the button directly
above the water button to reset the white-balance.
5.7.2. No function assigned
No function currently assigned to the button directly above the suction
button.
5.8. Insertion of endoscopic accessories
WARNING Do not use active endoscopic accessories such as laser probes and
electrosurgical equipment in conjunction with the EvoEndo®Single-Use Endoscopy
System, as this may result in patient injury or damage to EvoEndo®Scope.
WARNING To maintain patient safety and the safety of the end user, only medical
approved accessories to be used.
WARNING Do not advance or withdraw EvoEndo®Scope, or operate the bending section,
while endoscopic accessories are protruding from the distal end of the working channel,
as this may result in injury to the patient.
CAUTION Never use excessive force when advancing or withdrawing an endoscopic
accessory inside the working channel. Failure to observe the above may result in
damage to the working channel.
CAUTION Ensure any endoscopic accessory used is less than 2mm outer-diameter and
at least 1.1m working length.
CAUTION Inspect the endoscopic accessory before using it. If there is any irregularity
in its operation or external appearance, replace it.
CAUTION Insert the endoscopic accessory into the working channel port and advance
it carefully through the working channel until it can be seen on the external monitor.
CAUTION Extra care should be taken when steering the EvoEndo® Scope if
accessories are protruding from the distal tip.
NOTE There is no guarantee that instruments selected solely using this minimum
instrument channel width will be compatible in combination.
5.9. Withdrawal of the EvoEndo®Scope
5.9.1. Prior to removal, check the tip position of any endoscopic accessories to
ensure safest possible removal.
5.9.2. Slowly withdraw the EvoEndo®Scope while watching the live image to check
safe extraction.
WARNING While withdrawing the EvoEndo®Scope do not operate the Thumb Lever or
Dials to allow the distal tip to exit in a neutral position.
NOTE If the EvoEndo®Scope is used more than once on the same patient during the
same procedure, place it on a sterile surface in between sessions.
Scope

16
5.10. After Use
5.10.1. Remove the video connector cable to disconnect the EvoEndo®Scope.
5.10.2. Disconnect all supply lines from the EvoEndo®Scope.
5.10.3. Dispose of the EvoEndo®Scope in accordance with local guidelines for collection of infected medical devices with electronic
components.
5.10.4. Dispose of any other single-use components (e.g., water bottle, suction canister, etc.) in accordance with hospital guidelines.
5.10.5. Switch off Controller.
5.10.6. Clean and disinfect the Controller as described in section 7.
WARNING The EvoEndo®Scope is a single use device and must not be reprocessed under any circumstances.
WARNING The EvoEndo®Scope is considered contaminated after use and must be disposed of in accordance with local guidelines for collection
of infected medical devices with electronic components.
17
6. EvoEndo®Controller (EE-C) Operation
WARNING Explosion Hazard Do not use in the presents of flammable anesthetics. Do not store liquids on or above this unit. Type BF Class II
Equipment when used with the EvoEndo® Scope
6.1. EvoEndo®Controller Output Modes
6.1.1. Basic - direct access (HDMI)
Live image available while connected to a medical-grade HDMI compatible monitor.
NOTE For optimal performance use a medical-grade monitor that is minimum 27 inch, HD 1080p or higher resolution and 1000 nits
brightness.
No video recording or image capture is available in direct access mode.
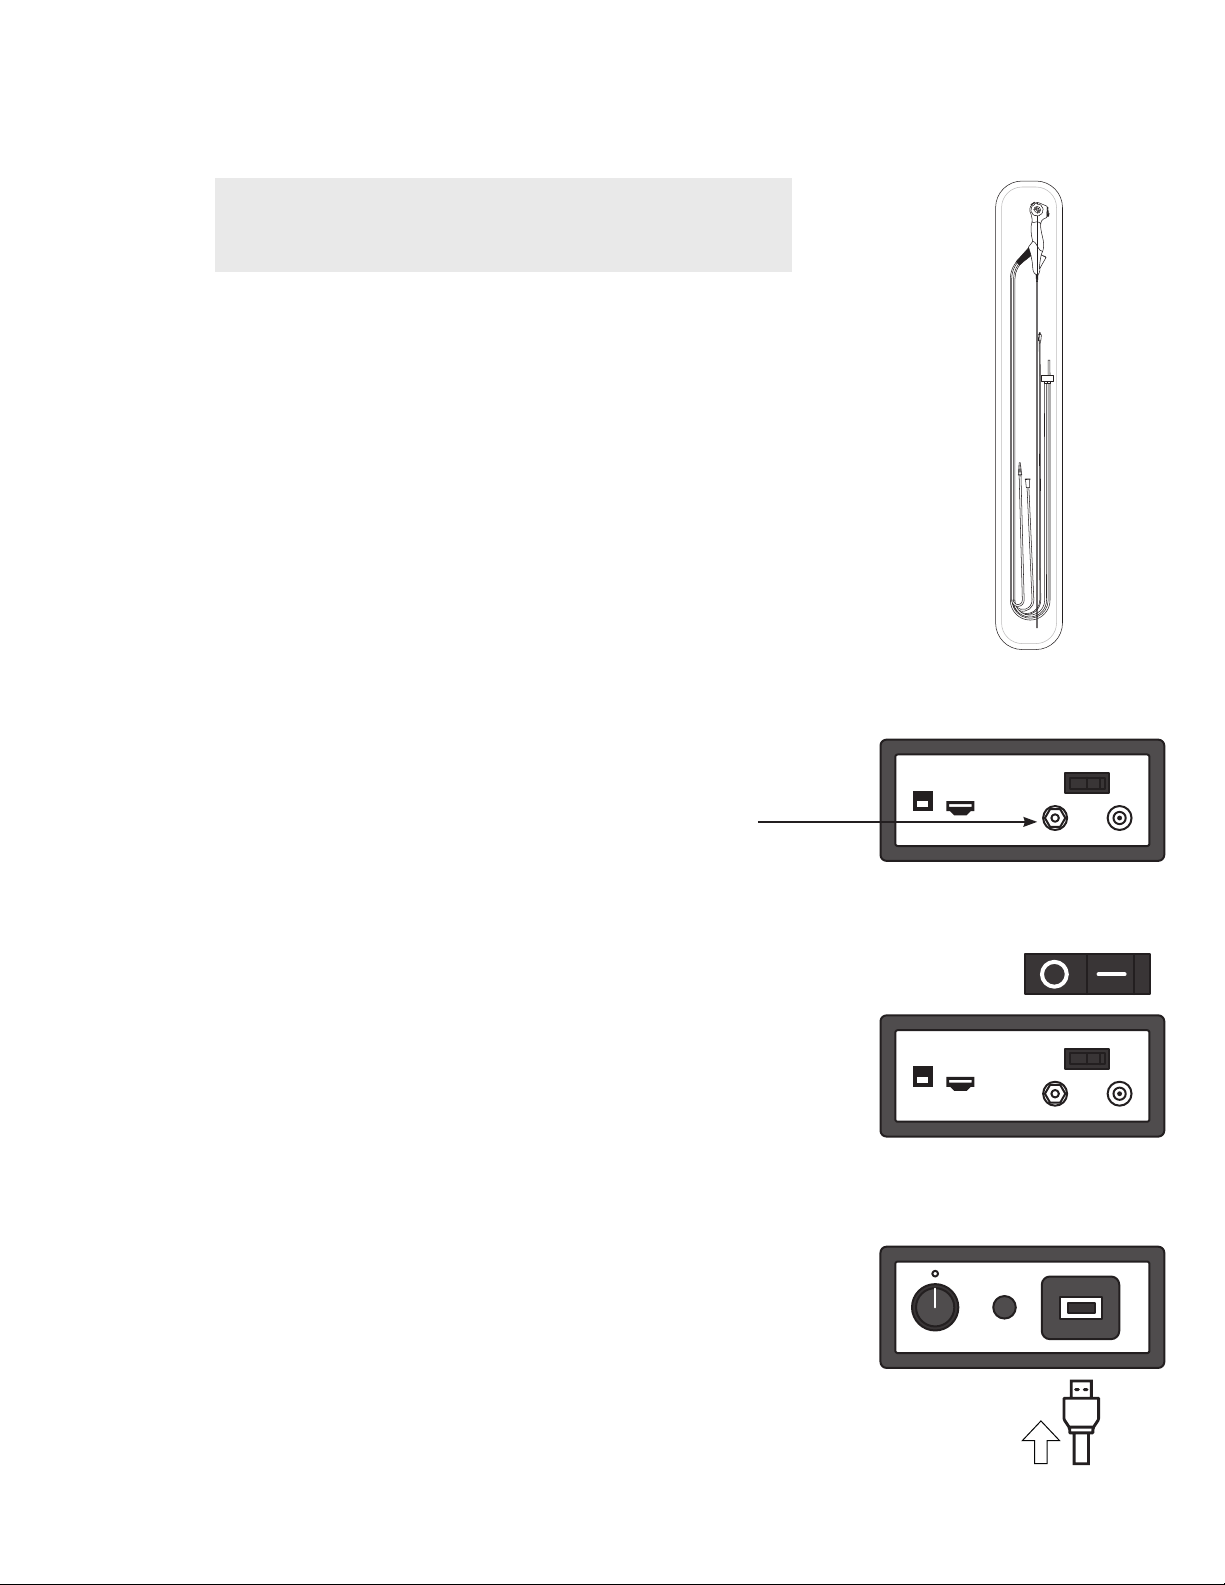
6.2. EvoEndo®Controller Setup
6.2.1. Connect EvoEndo®supplied power supply and supplied Ferric HDMI cable on the rear of the Controller.
Controller
NOTE: The Controller should only be used with the Ferric HDMI cable provided.
6.2.2. Connect the EvoEndo®Scope using the Scope Video Input connector on the
front of the Controller.
6.2.3. Press the power switch on the rear of the Controller to ON position
6.2.4. Conduct procedure, adjusting the image brightness as required using the
rotary dial on the front of the Controller.
NOTE The Controller and live image may be left connected and powered on during
Scope extraction as part of multiple investigations of the same patient within the same
session.
6.2.5. With EvoEndo®Scope removed from patient, press Button to OFF Position
6.2.6. Disconnect the EvoEndo®Scope and process as waste.
6.2.7. Disconnect the HDMI cable.
6.2.8. Clean and disinfect the EvoEndo®Controller as described in Section 7.
WARNING Do not attempt to open or service the EvoEndo®Controller; refer to Warranty
statement in Appendix 3 and contact EvoEndo®for a replacement.
ON

18
7. Cleaning the EvoEndo® Controller
The EvoEndo®Controller must be cleaned and/or disinfected as per hospital policy before and after each use. Ensure the Controller is
cleaned thoroughly prior to first-use.
7.1. Cleaning
7.1.1. Ensuring the Controller is disconnected.
7.1.2. Use a standard cleaning detergent to clean and/or disinfect the EvoEndo®Controller according to hospital policy.
7.1.3. After cleaning and/or disinfection, the EvoEndo®Controller must be submitted to the pre-check procedure described in
section 4.2.
WARNING Avoid getting the device wet to prevent damaging internal electronic components.
WARNING Do not attempt to clean and reuse the EvoEndo®Scope as it is a single-use device.
WARNING Clean and disinfect the medical-grade monitor after each use according to the relevant manufacturer guidelines.
WARNING Disconnect EvoEndo®Controller from any mains power supply, remove any accessories and make sure the Controller is turned off before
cleaning and disinfection.
NOTE Between procedures, the EvoEndo®Controller must be stored in accordance with local guidelines.
Cleaning
19
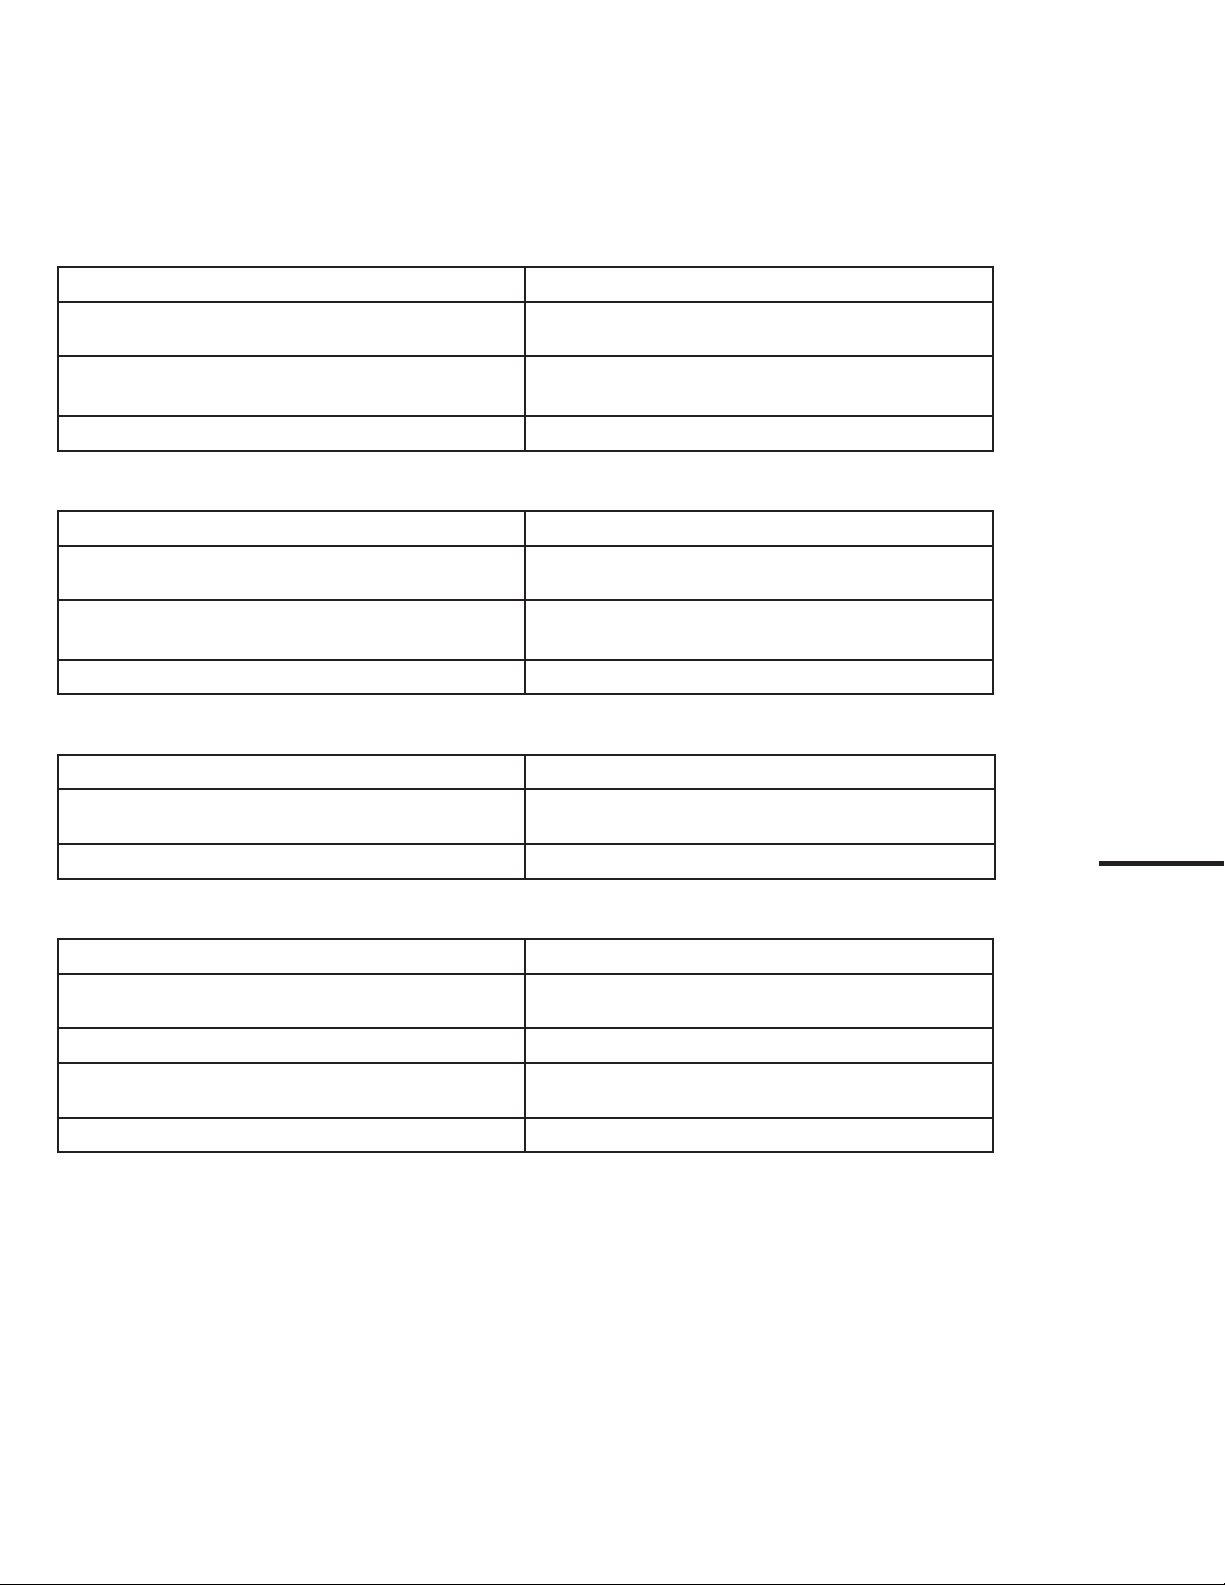
8. Troubleshooting
If problems occur with the system, please use this trouble-shooting guide to identify the cause and correct the error.
8.1. No live image
Cause: Action:
EvoEndo®Scope not connected to EvoEndo®Controller
securely
Check connections of EvoEndo®Scope video connector to
Controller
EvoEndo®Controller and EvoEndo®Scope have
communication problems Check rear connections from Controller to video output
(HDMI)
EvoEndo®Scope or Controller is Damaged Replace EvoEndo®Scope or EvoEndo®Controller
8.2. Low picture quality
Cause: Action:
Dirt or debris on the distal tip of the Scope Clean end of Scope with microfiber sterile cloth, gauze, or
Q-tip
Hardware poor connection Turn EvoEndo®Controller off and on, check connections.
Troubleshoot per third-party system instructions.
Scratched optical mechanism on Scope Replace Scope
8.3. Absent or reduced suction capability
Cause: Action:
Channel blocked Flush channel with 10 ml of sterile water, clean channel
with endoscopic brush of appropriate size or replace Scope
Suction source is malfunctioning Replace or try new suction source of supply tubing
8.4. Difcult to insert endoscopic accessory through the channel
Cause: Action:
Channel blocked Clean Scope channel with 10 ml of sterile water or
endoscopic brush of appropriate size, or replace Scope
Accessory is too big Use proper size accessory for 2 mm channel
Backflow valve is not functioning Attempt puncture of valve with sterile blunt device or
replace Scope
Distal tip not in neutral position Adjust mechanisms to achieve neutral position
Help

20
9. Technical Product Specifications
9.1. EvoEndo® Model LE Single-Use Gastroscope Specications
Optical System
Field of View 120° Diagonal 87.5 ° Horizontal
Depth of Field 2.5mm - 25mm
Illumination method LED
Insertion portion
Bending section 210° Up, 90° Down, 100° Left, 100° Right
Insertion tube diameter 3.5 mm (0.14”)
Distal end diameter 3.5 mm (0.14”)
Maximum diameter of insertion portion 3.5 mm (0.14”)
Working length 1.1 M (43.3”)
Channel
Average inner diameter 2.0 mm (0.078”)
Minimum instrument channel width4 2.0 mm (0.078”)
Suction connector
Connecting tube inner diameter Ø7mm +/- 1mm
Air connector Connects to 1/4”- 3/8” Supply Lines
Water Connector Connects to Bottle with 1.25” Top
Suction Connector Connects to standard 6 mm suction device
Operating environment
Temperature 10 ~ 40°C (50 ~ 104°F)
Relative humidity 30 ~ 85%
Atmospheric pressure 80 ~ 109 kPa
Storage and transportation
Temperature 10 ~ 40°C (50 ~ 104°F)
Relative humidity 30 ~ 85%
Atmospheric pressure 80 ~ 109 kPa
Sterilization
Method of sterilization EtO
Table of contents
Popular Medical Equipment manuals by other brands


Getinge
Getinge Arjohuntleigh Nimbus 3 Professional Instructions for use

Mettler Electronics
Mettler Electronics Sonicator 730 Maintenance manual

Pressalit Care
Pressalit Care R1100 Mounting instruction

Denas MS
Denas MS DENAS-T operating manual

bort medical
bort medical ActiveColor quick guide

AccuVein
AccuVein AV400 user manual


