TO STOP ENGINE
OPERATING HINTS
MAINTENANCE GUIDE
Closethethrottle.
Engageclutchlever.
Locategearleverinneutralposition.
Disengagedrivetothediggingknives.
Releaseclutchlever.
Release engine stop lever completely.
Turn the ignition key to ‘OFF’ position, and the red light will go out.
WARNING: THE EXHAUST COVER MAY BE HOT - DO NOT
TOUCH
LET THE MACHINE DO THE WORK.
Excessive downward pressure on the handlebars may cause the
machine to jump. Apply gentle pressure and the machine will find its
own digging depth according to the type of ground. If the ground is
hard, position the depth adjuster centre knife on the top hole and
makeseveralpassesuntilthedesireddepthisachieved.
If the speed or digging knives lever does not engage immediately,
release clutch lever slightly and 'feel in' with the engine on tick-over.
DONOT‘RIDE’THECLUTCH.
If one wheel begins to lose traction engage the differential lock by
pullingtheblackleverontopoftheright-handhandlebartowardsyou
toengagedrivetobothwheels.
Always pull in the clutch lever before engaging any gear, digging unit
orchangingforward/reverse.
Theclutchlevermustbefullyreleasedwhenworking. Donotoperate
the machine with the clutch lever partially engaged as serious
damagemayoccur.
DONOTWORKONSLOPESMORETHAN20°
If working on a slope, work across the slope pointing the machine
slightlyuphill.
DONOTATTEMPTCULTIVATIONON:
(i) Frozen or waterlogged ground as this will destroy the soil
structureresultinginpoorfuturedrainage.
(ii) Groundthatiscoveredwiththickfoliageorhighgrass. Removeit
byburningorcuttingdown.
After every hour of operation stop the engine (turn the ignition key to
‘OFF’position)andremovethesparkplugcap. Checkengineoillevel
(recommendedoilSAE10w/40).
Remove all foreign matter from the digging knives assembly e.g.
wire,string,grassetc.
Replacethesparkplugcap.
Donotturnthemachineonitssideforcleaning.
Whenthe machineisnotinuse alwaysleavetheclutchlever pulledin
andsecuredwithlockingclip.
For engine maintenance please refer to engine manufacturers
manual.
Check the oil level in the gearbox by removing the plug on top of the
housing and ensure the level is within 1½” of the hole. If necessary,
topupwithEP90gearoil.
S A F E T Y
TO START ENGINE
ALWAYSstarttheengineintheopenair
DONOTsmokewhenrefuelling
DONOTmixOILwiththefuel
ALWAYS stop the engine before making any adjustments,
refuelling, moving or cleaning, or when the unit is
unattended
USE ONLY diesel from fuel containers designed for this purpose
-refueloutdoorsonlyandreplacethetankcapsecurely
DONOTremoveanysafetyguardsthatarefitted
DO NOT touch any moving parts or attempt any maintenance
whilst the machine is running - KEEP HANDS AND FEET
AWAY
BEFORE starting work clear the work area of any objects that
coulddamagethemachine
DO NOT allow children or anyone uninstructed to operate the
machine-KEEP ANIMALS AWAY o
DONOTuseonslopesorbanksofmorethan20
ALWAYS wear suitable clothing to give personal protection
includingfootwearthatoffersagoodgrip
AVOIDwearingloosegarmentsthatmaycatchinmovingparts
KNOWhowtostopthemachineinanemergency
NEVERinterferewithanycontrolsettingsontheengine
NEVER select reverse gear with your back to a wall or other
immovableobject
IF A FAULT develops DO NOT attempt any repair - immediately
contactthesupplierfromwhomthemachinewasobtained
VISUALLY INSPECT the machine before use - ensure all tines,
nuts and bolts are tight and not worn or damaged and
replacetinesifnecessary
KEEP IN MIND the operator is responsible for accidents or
hazardsoccurringtopeopleorproperty
Using the dipstick provided, check the engine oil level. Top up with
10w/40oilifnecessary(ifthedipstickisclearofoil).
Check fuel level. Only use diesel from a clean container. Never re-
fuel when the engine is hot or running. Leave 1” air space in the fuel
tank.
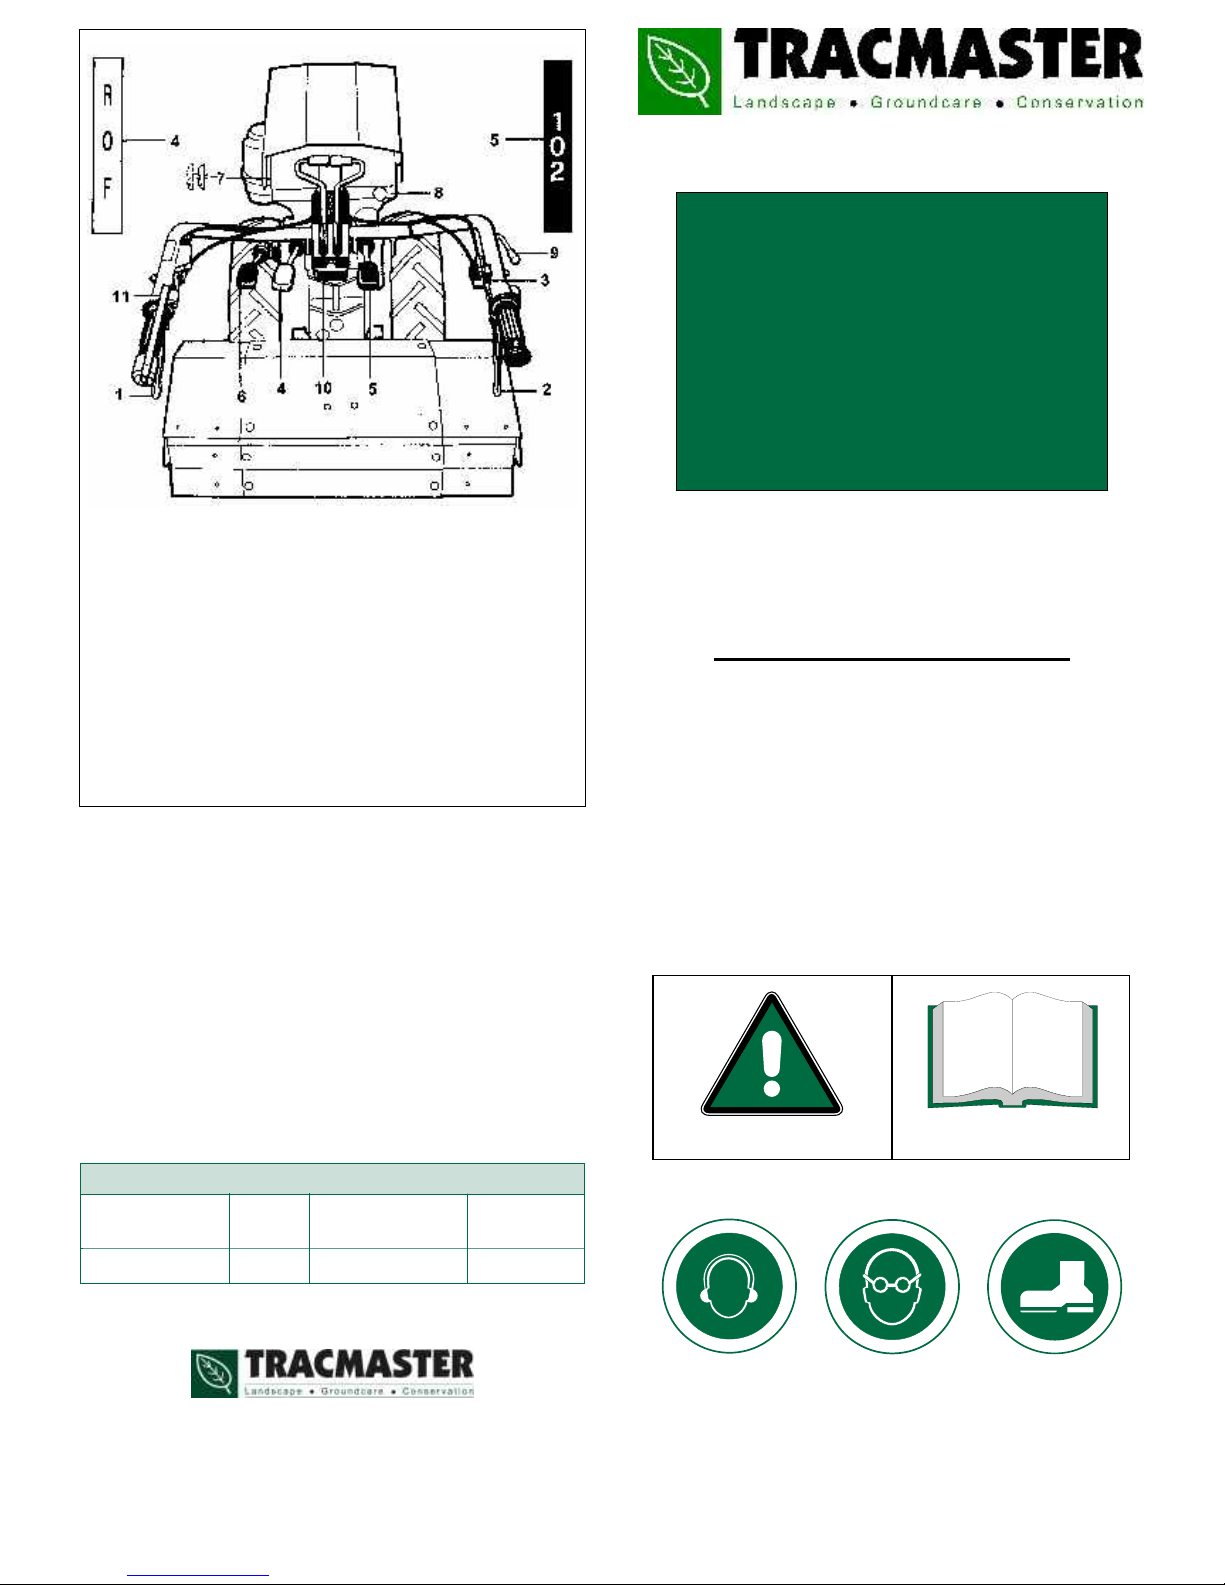
Depress the engine stop lever (the red lever on the left handlebar)
thenpulluptheclutchleverandsecurewithlockingclip.
Ensurethewheelspeedleverisinneutral‘O’position.
Applyhalfthrottle(theleverontherighthandlebar).
Turn the ignition key fully clockwise to start the engine then release
thekeyandallowittoreturntothe‘RUN’position.
Whentheenginehasstartedreturnthethrottlelevertoidleposition.
OPERATION
Usehandlebaradjustertosethandlebarheight.
Engage clutch lever (located on left handlebar). This will
automaticallyreleasestopleverlockingclip.
Selectforwardmotionleverandensureitisinposition‘F’.
Select working speed one. NEVER select a higher wheel speed for
work.
Engage drive to the digging knives by pushing the lever forward, this
willgiveslowrotationwhilstpullingtheleverbackgivesfastrotation.
Release clutch lever slowly and fully,keeping the red engine stop
leverdepressedasenginewillstopifreleased.
Commencework.