Beam Platinum SC335 User manual

PLATINUM
OWNER’S MANUAL

2
BEAM Platinum
Operating & Maintenance Instruction Manual
CONTENTS
Introduction 3 How To Use 7
Important Safeguards 4 Maintenance 9
Grounding Instructions 5 Troubleshooting 10
Installation 6 Service Information 11

3
1. Central Vacuum
Pipe installation
2. Wall Inlet
3. Power Unit
4. Filtered Separator
5. External Exhaust
Congratulations on your purchase of a new
BEAM Central Vacuum System. It is the built-in
cleaning appliance designed to help you clean
your home efficiently and effectively. Unlike
conventional vacuums that can recirculate dust,
a BEAM system lifts dirt, dust mites, pollen,
dander and other allergens from oors, curtains,
furniture and other surfaces, and carries them
away from living areas to help improve indoor
air quality. It has been clinically proven to relieve
allergy symptoms.
To obtain the maximum benet from your BEAM
System, please read this manual carefully prior
to use. Then enjoy cleaner, healthier living and
years of trouble-free performance.
For more information on BEAM Central Vacuum
Systems and other innovative BEAM products,
visit www.beam.com.
Components of a BEAM Central
Vacuum System
Power Unit/Dust Collection Receptacle:
Mounted in the utility room, basement or
garage, it removes dust, dirt and allergens from
living areas.
Tubing: Dust and dirt are carried through tubing
from “inlet valves” to the power unit/receptacle.
Inlet valves: Installed in the wall, each inlet valve
connects the power brush and exible cleaning
hose to the tubing in your home.
Cleaning tools: Flexible hose and tools make
whole-house cleaning easy.
INTRODUCTION

4
IMPORTANT SAFEGUARDS
When using an electronic appliance, basic precautions should always be followed, including the
following: READ ALL INSTRUCTIONS BEFORE USING THIS VACUUM SYSTEM.
SAVE THESE INSTRUCTIONS
Waste of Electrical and Electrical Equipment (WEEE). The symbol on the product or on its packaging indicates
that this product may be treated as household waste. Instead it should be handed over to applicable collection
point for the recycling of electrical and electrical equipment. By ensuring this product is disposed of correctly, you
will help prevent potential negative consequences for the environment and human health, which could otherwise
be caused by inappropriate waste handling of this product. For more detailed information about this product,
please contact your local waste disposal service or the shop where you purchased the product.
WARNING
To reduce the risk of re, electric shock or injury:
Do not use outdoors or on wet surfaces.r
Do not block the motor hood or ventilation openings and duct on the top of the power unit. Lack ofr
ventilation airow will cause the motor to overheat.
Do not locate the power unit in a high temperature area or where it is inaccessible, for example, anr
attic or crawl space.
Mount the power unit no less than 30cm from the ceiling or any adjacent wall and at least 70cmr
from the oor. Additionally, review any local codes and regulations that may apply.
Do not allow to be used as a toy. Close attention is necessary when used by or near children.r
This appliance is not intended for use by persons (including children) with reduced physical,r
sensory, or mental capabilities, or lack of experience and knowledge, unless they have been given
supervision or instruction concerning use of the appliance by a person responsible for their safety.
Use only as described in this manual. Use only manufacturer’s recommended attachments.r
Do not use with damaged cord or plug. If vacuum cleaner is not working as it should, has beenr
dropped, damaged, left outdoors or dropped in water, return it to a service center.
Connect to a properly grounded outlet only (refer to grounding instructions).r
Do not use extension cords or outlets with inadequate current carrying capacity.r
Turn off all controls before unplugging.r
Do not unplug by pulling on cord. To unplug, grasp the plug, not the cord.r
Do not handle plug or cord with wet hands.r
Do not put any object into openings. Do not use with any openings blocked; keep free of dust, lint,r
hair and anything that may reduce airow.
This vacuum cleaner creates suction. Keep hair, loose clothing, ngers and all parts of body awayr
from openings and moving parts.
Do not pick up anything that is burning or smoking, such as cigarettes, matches, or hot ashes.r
Use extra care when cleaning on stairs.r
Do not pick up ammable or combustible liquids such as gasoline, or use in areas where they mayr
be present.
Keep your work area well lighted.r
Unplug electrical appliances before vacuuming them.r
If the supplied power cord is damaged, it must be replaced by a special cord available from ther
authorized local dealer/distributor.
Do not use without dust bag and/or lter in place.r

5
GROUNDING INSTRUCTIONS - WARNING
Place Holder
1 07 52 3 2 000001
Year
Week
Assembly Line
Module Number
Weeks Sequential
10,000 units max
XXXXXXXXX 1075232000001
MODEL SERIAL
NUMBER
XXX VOL
T S X X H z X X X
WATTS
Figure 1
WARNING
This appliance must be grounded, if it should malfunction or
breakdown, grounding provides a path of least resistance
for electric current to reduce the risk of electric shock. This
appliance is equipped with a cord having an equipment-
grounding conductor and ground plug. The plug must be
inserted into an appropriate outlet that is properly installed
and grounded in accordance with all local codes and
ordinances.
WARNING:r Improper connection of the equipment -
grounding conductor can result in a risk of electric shock.
Check with a qualied electrician or service person if you
are in doubt as to whether the outlet is properly grounded.
Do not modify the plug provided with the appliance – if
it will not t the outlet; have a proper outlet installed by a
qualied electrician.
WARNING:r If the supply cord is damaged, it must be replaced by a special cord available
from your local authorized dealer/distributor.
Grounded
Outlet
Grounding
Pin
Grounded Pin
Receptacle
GENERAL INFORMATION
The central vacuum system is designed for dry pick up of household dirt and dust. Avoid picking up
hard or sharp objects with the system to prevent hose and plastic pipe damage or clogs. This central
vacuum system is intended for Household Use.
Service Information
The instructions in this booklet serve as a guide to routine maintenance. For additional information,
contact your nearest authorized dealer/distributor.
DO NOT OIL THE MOTOR AT ANY TIME. IT IS PERMANENTLY LUBRICATED AND
SEALED.
Rating Plate
The model, type and serial numbers are indicated on the
rating plate located on the control panel or motor hood (refer to
gure 1). For prompt and complete service information, always
refer to these numbers when inquiring about service.

6
Planning
If your home already has the system of plastic
pipes and inlet valves, you are ready to install
the power unit (refer to Install Power Unit
section below). If not, you can contract to
have the system installed by a professional or
you may choose to do-it-yourself. If you plan
to install the system yourself, it is important
to carefully plan the location of each inlet
valve, the power unit, and the network of
plastic pipes. This booklet only deals with the
installation of the power unit; “How-To” booklets
are generally included with installation kits.
Careful planning will help you determine the
installation kits to buy. The kits should contain
enough plastic pipe and ttings, and inlet valves
for your needs. Check with your local dealer/
distributor if you have any questions.
Power Unit Location
NOTE: Mount power unit at least 30cm from
the ceiling and any adjacent wall, at least 70cm
from the oor and within 1.8m of an electrical
outlet. Review any local regulations that may
apply.
The power unit should be located as far
away from the general living are as possible,
yet accessible so you can remove the dirt
receptacle, reach the lter, and inspect the
power unit. A typical location would be in a
garage where you could vacuum your car
or garage area and where emptying the dirt
receptacle and cleaning the lter would be
more convenient. Other suitable locations are
in the basement, laundry room, or ventilation
storage room.
Install Power Unit
You are now ready to install the power unit.
Be sure the power unit will be located at
least 30cm from the ceiling and any adjacent
walls and at least 70cm from the oor. The
motor hood ventilation should never be
obstructed. Check to be sure you will be able to
occasionally remove the dirt receptacle, reach
the lter, and inspect the power unit.
In the chosen mounting location, compare the
distance between the wall studs and the power
unit mounting bracket. If the mounting bracket
cannot mount on one of the wall studs, mount
the two boards horizontally between the studs
and then attach the mounting bracket to these.
Once the bracket is on the wall, you can now
hang the power unit. With the unit on the wall,
align the power unit intake tting with the main
pipe projecting from the wall and connect these
together. DO NOT GLUE.
INSTALLATION
WARNING
WARNING:r Do not block the hood
ventilation openings on the top of the
power unit. Lack of ventilation will
cause the motor to overheat.
WARNING:r Do not locate the power
unit in a high temperature area where it
is inaccessible for example, an attic or
crawl space.
Figure 2

7
Locate the two low-voltage wires near the main
pipe. Remove the insulation from the low-volt
wire. Insert the low-volt wire into the spring-
loaded low-volt connectors (refer to gure 3).
Be certain you comply with your local electrical
codes and regulations.
The power cable has a three prong style
connector on one end. This connector must be
plugged into the matching connector on the
power unit. Plug the other end of the power
cable into the wall electrical outlet.
You are now ready to check the installation of
the unit:
Plug the hose into each inlet valve to
•
be sure the electrical contacts operate
properly.
Check the inlet valve for air leaks.•
Check each pipe connection for air leaks.•
Be sure the dirt receptacle is properly•
secured to the power unit.
Be sure the lter is properly installed in the•
power unit.
Your cleaning system is ready to use.
Your central vacuum
system starts and
stops automatically.
To turn the system on,
plug the hose into a
wall inlet valve. To turn
it off, remove the hose
from the valve (refer to
gure 4).
Electrical Fault Protection
The central vacuum system employs features
that monitor the following operating levels:
AC voltage, current draw and circuit board
temperature. If the voltage is below or above
standard operating voltage, high current
draw or locked rotor, the power unit will not
operate. In this case the LED next to the On/
Off button will blink or go out until the problem
ceases. In the event any one of these problems
happening, make sure all low-volt switches
are in the OFF position, then press the on/off
button, unplug hose, or wait for temperature
to lower. If problems persist, contact the
authorized service center nearest you.
In the case of power failure, the power unit
will return to its previous state when power
returns. For example, if a hose is plugged in
with the hose switch on, or a straight air hose
is plugged into a wall valve, then the power unit
will turn back on. If the power unit was turned
on at the unit prior to power loss then the unit
will not turn back on.
Inlet valves
Plugging the hose into an inlet valve complete
a low-voltage electrical circuit which activates
a relay and turns on the power unit. To turn off
the power unit, unplug the hose from the inlet.
When unplugging the hose, hold the inlet cover
open for a few seconds to allow suction to
decrease and protect the inner seal.
An obstruction in the inlet valve may cause the
power unit to continue to run after the hose
has been removed from the inlet. To shut down
Figure 3
HOW TO USE
Figure 4

8
the power unit, check all the inlet valves and
remove obstructions.
The hose handle may
be equipped with an
optional on-off switch
or variable speed
switch. It is used to
control the start and
stop of the power
unit while the hose is
plugged into an inlet
valve. This allows you
to control the system without unplugging the
hose.
Motor Protection Shutoff
In the unlikely event that something causes the
unit to turn on, or if the unit is unintentionally
left on, your central vacuum has been
developed with a motor protection shutoff.
After 30 minutes of continual operation the
power unit will automatically shutoff, preventing
damage to the motor. To restart, remove the
hose from the wall inlet and reinsert, the power
unit should come back on.
Cleaning tools
The BEAM hose and attachment set comes
with a telescopic wand and a variety of
cleaning tools allowing you to clean virtually
any surface from oor to ceiling. The tools can
be used with the wand or directly on the hose
handle.
The combo tool is
used for all-around
oor and general
cleaning and is used
about 80% of the time.
It allows you to move
from carpets to hard
oor surfaces without
stopping by switching
the convenient toe
switch on top of the
tool.
The round dusting
brush makes dusting
quick and easy. It can
be used for furniture,
counters, wall
decorations, window
areas, lamp shades,
or wherever dusting is
needed.
The upholster nozzle
with slip-on brush
is convenient when
cleaning walls,
furniture, curtains, or
mattresses. It can be
used with or without
the slip-on brush.
The crevice tool is
ideal for tight spaces
and corners, such
as in the kitchen
and beneath/around
cabinets. It is designed
for narrow spaces,
crevices, along edges
or other hard-to-clean
areas.
The snap-on, three-
tool caddy allows you
to carry our most-used
tools directly on the
wand.
The hose hanger is
used to easily coil and
store the hose in a
closet.
Figure 5

9
Instructions provided in the booklet serve as
a guide to routine maintenance. Proper airow
and suction can be maintained by keeping the
dirt receptacle and lter clean and the plastic
tubing and hose free from clogs.
Dirt Receptacle and Filter
Reduced airow or suction indicates the central
vacuum system is not operating at maximum
efficiency. If the dirt receptacle is full and the
lter is clogged, no air can pass through the
unit and no cleaning can take place.
CAUTION: Disconnect power cord from
electrical outlet before removing the dirt
receptacle.
Some models feature see-through windows
on the receptacle to tell at a glance when the
receptacle should be emptied. To remove the
receptacle, grasp the handles and turn the
receptacle to the left. Remove and empty the
contents. Return the receptacle and turn it to
the right (refer to gure 6). To avoid suction
leakage make sure the receptacle is securely
attached.
Filter maintenance
BEAM’s exclusive lter is permanent and self-
cleaning. However, if cleaning is desired, follow
the steps listed below:
NOTE: Do not operate this unit without the
lter in place.
CAUTION: Disconnect power cord from
electrical outlet before removing the dirt
receptacle.
Remove the dirt receptacle.1.
Wrap a large plastic bag around the lower2.
portion of the power unit and hold rmly in
place.
Grasp the sewn-in weight at the bottom3.
of the lter through the plastic bag. Shake
vigorously. Dirt will fall into the bag.
Carefully remove the bag from the unit.4.
Place the empty dirt receptacle on the
power unit.
Cleaning Instruction Notice: Do not brush lter
Hint: Spilled dirt can be easily be vacuumed
by attaching the hose to the utility inlet on the
power unit and activating the manual switch.
MAINTENANCE
Figure 6

10
Optional disposable paper bag
Your Platinum Power Unit can be equipped
with a convenient paper bag, which can be
simply discarded when full. A full paper bag
will deprive the power unit of proper suction
and minimizes the performance of the
machine. Depending on how much use your
central vacuum system it is recommended
that you empty the paper bag 2-3 times per
year. Replacement bags can be purchased
through your authorized central vacuum dealer/
distributor.
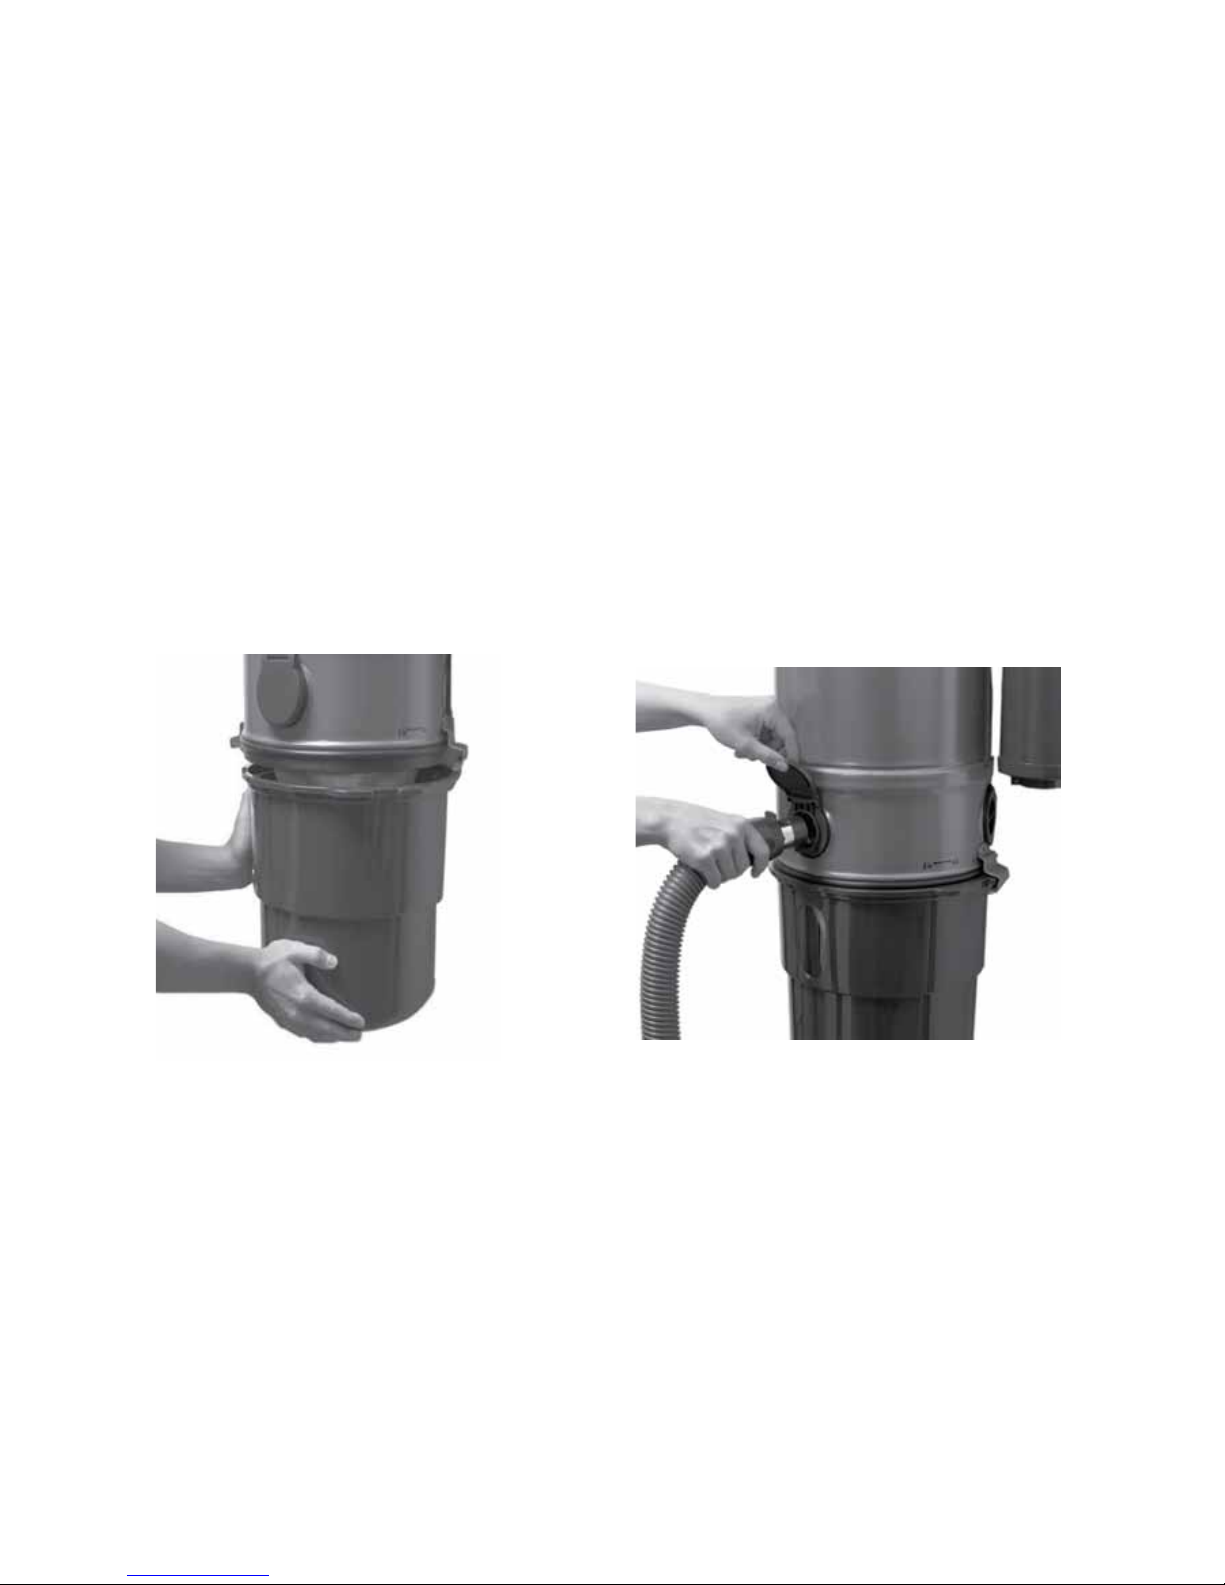
How to change the Paper Bag:
Unplug the power unit from all electrical1.
sources.
Remove the bucket.2.
Remove the paper bag from the intake3.
valve.
Place and press the new bag into place.4.
Turn the bag’s opening to lock it into place.
Place the bucket back on the power unit.5.
TROUBLE-SHOOTING
If you experience trouble with your central
vacuum system, follow the suggestions below
before calling for service.
Partial loss of suction
Clean out dirt receptacle. Inspect and clean1.
lter (see Filter Maintenance). Replace dirt
receptacle.
Turn ON power unit with on/off button. Then2.
check the suction at each inlet. If it is not
the same at each one, the line is partially
clogged. To locate the clogged area in the
system, start with the inlet closest to the
power unit and check the suction. Continue
to check each successive inlet until you
locate the inlet where a loss in suction is
occurring. The clog will be between that
inlet and the previous one you checked.
To remove the clog, carefully insert an
electrician’s sh tape in the inlet and push
the obstruction through. Or, with another
vacuum, you can reverse the suction in
the system to remove the clog. If neither
method is successful, call your BEAM
dealer/distributor.
Have your authorized BEAM dealer/3.
distributor check the gasket under the
motor and the gasket located where the dirt
receptacle attaches to the upper cylinder.
Total Loss of Suction
(with motor running)
Check the hose for obstruction.1.
Turn on the power unit with the on/off button2.
and follow the same procedure as in step
#2 above. However, with a total loss of
suction at all inlets, if the problem is a clog
in the system, it would be located between
the power unit and rst inlet.
Motor Refuses to Start
Check fuses or breakers (trip switches) in1.
the electric panels in your house.
If your power unit has a control light, the2.
solid green light will indicate when the unit
has proper voltage and the low-voltage
circuit is supplying power to the inlets.
If the green light is ashing, or does not3.
light up, and the motor does not start, the
power unit could have experienced a fault
due to excessively high or low standard
operating voltage, high current draw, or a
locked rotor. If it also possible that the unit
was powered on with a low-volt connection
(i.e. Handle, vac pan, etc) in the ON
position. To resolve this issue:
Ensure all handles and vac pans area.
in the OFF position.
Unplug the power unit cord from theb.
wall outlet, and then plug in again.
Press the on/off button on the powerc.
unit.
Should the light be on, but the motor starts4.
only with the on/off button and not at the
inlets, the problem is broken low-voltage
wiring to the wall inlets. Call your authorized
BEAM dealer/distributor.

11
SERVICE
INFORMATION
The instructions in this booklet serve as a
guide to routine maintenance. For further
information contact your nearest authorized
BEAM dealer/distributor.
Service Warranty
Warranty is managed by our local dealer/
distributor.

SOLD AND SERVICED BY:
WWW.BEAM.COM
© 2009 Electrolux Home Care Products Ltd.
#460393
This manual suits for next models
6
Table of contents
Other Beam Vacuum Cleaner manuals