Becx Machines OBKS90-45 User manual

Weedbrush-Edgecutter
Type: BECX OBKS90-45
Version: 2
November 2019
Weedbrush-Edgecutter
OBKS90-45
User Manual

Weedbrush-Edgecutter
Type: BECX OBKS90-45
Version: 2
November 2019
Page 2 of 27
Manufacturer Becx Machines B.V.
De Sonman 35
5066 GJ Moergestel
Tel: +31 (0) 13 2070760
info@becxmachines.com
http://www.becxmachines.com
© Copyright 2019
Nothing in this publication may be reproduced and/or made public in any form by print, photocopy,
microfilm, recording tape, electronically or by any other means without prior written permission
from Becx Machines B.V.
Becx Machines B.V. reserves the right to modify parts of the system, including the contents of this
manual, at any moment, without prior or direct notification to the buyer.
Although Becx Machines B.V. has taken the greatest care to make sure that individual parts have
been described correctly and in full where necessary, it accepts no liability for damage as a result of
inaccuracies or incompleteness of this manual.

Weedbrush-Edgecutter
Type: BECX OBKS90-45
Version: 2
November 2019
Page 3 of 27
Preface
The Becx weed brush - edge cutter (in short: weed brush) has been specially developed for quick and
efficient removing of grass growing over the edge of the roadway
The combination of coulter blade and brush makes for a clean sweep in one run.
•Carefully read this manual before using the weed brush. Always
follow the safety instructions set out in chapter 3.
•One copy of this manual must be kept with the weed brush and
must be available to the user. All important servicing sessions and
any comments must be recorded and retained by the servicing
company.
•The user is responsible for selecting a suitable tool carrier for the
weed brush and for ensuring that the weed brush is properly
attached and connected.

Weedbrush-Edgecutter
Type: BECX OBKS90-45
Version: 2
November 2019
Page 4 of 27
Table of Contents
PREFACE ...................................................................................................................................... 3
TABLE OF CONTENTS .................................................................................................................... 4
FIGURES:...................................................................................................................................... 4
CERTIFICATE OF CONFORMITY (IIA) (COPY) ................................................................................... 5
1TECHNICAL SPECIFICATIONS................................................................................................... 7
2SAFETY.................................................................................................................................. 8
2.1 GENERAL...................................................................................................................................... 8
2.2 IN USE ......................................................................................................................................... 8
2.3 OPERATING PERSONNEL.................................................................................................................. 9
3COMPONENT DESCRIPTION ................................................................................................. 10
3.1 MECHANICAL COMPONENTS TOOL CARRIER ATTACHMENTS................................................................. 11
3.2 MECHANICAL COMPONENTS COULTER BLADE ................................................................................... 12
3.3 MECHANICAL COMPONENTS BRUSH................................................................................................ 13
3.4 HYDRAULIC COMPONENTS ............................................................................................................ 14
4OPERATIONS ....................................................................................................................... 16
4.1 ASSEMBLY AND ADJUSTMENT OF THE WEEDBRUSH ............................................................................ 16
4.2 CARRY OUT BRUSH-AND CUTTING WORK......................................................................................... 17
5MAINTENANCE.................................................................................................................... 19
6FAILURE ANALYSES .............................................................................................................. 21
7REMOVAL............................................................................................................................ 22
8LOGBOOK............................................................................................................................ 23
Figures:
FIGURE 1: OVERVIEWPHOTO................................................................................................................... 10
FIGURE 2: OVERVIEWPHOTO MECHANICAL COMPONENTS TOOL CARRIER ASSEMBLY ......................... 11
FIGURE 3: OVERVIEWPHOTO MECHANICAL COMPONENTS COULTER BLADE ........................................ 12
FIGURE 4: OVERVIEWPHOTO MECHANICAL COMPONENTS BRUSH........................................................ 13
FIGURE 5: OVERVIEWPHOTO HYDRAULIC COMPONENTS....................................................................... 14

Weedbrush-Edgecutter
Type: BECX OBKS90-45
Version: 2
November 2019
Page 5 of 27
Certificate of conformity (IIa) (copy)
We:
Becx Machines B.V.
De Sonman 35
5066 GJ Moergestel
declare entirely under our sole responsibility, that this product:
Description : Becx weed brush - edge cutter.
Type : BECX OBKS90-45
serial number : .....................
to which this declaration applies, complies with the provisions of the Directives:
Machinery Directive 2006/42/EC
Complies with the following standards:
NEN-EN-12100-1 Safety of machinery. Basic definitions, general design principles.
Part 1: Basic terminology, methodology
NEN-EN-12100-2 Safety of machinery. General design principles. Part 2:
Technical principles and descriptions
NEN-EN 982 Safety of machines –Safety requirements for hydraulic and
pneumatic systems and their components: Hydraulics
NEN-EN 14121-1 Safety of machines –Risk assessment –Part 1: Principles
Director; Erwin Hommen
Netherlands, Moergestel,
Date: .........................

Weedbrush-Edgecutter
Type: BECX OBKS90-45
Version: 2
November 2019
Page 6 of 27
List of symbols
This manual uses the following symbols for all actions and situations where the safety of the operator or
technician is at stake and where it is necessary to act with caution:
Warning!
Explanation.

Weedbrush-Edgecutter
Type: BECX OBKS90-45
Version: 2
November 2019
Page 7 of 27
1Technical specifications
Description
Value
Unit
General
Noise pressure
See manual tool
carrier
dB(A)
Vibration level in normal use
Na
Dimensions and weights
Coulter blade
Width min.
1100
mm
Width max
1750
mm
Length
1850
mm
Height
850
m
Own weight
+/- 270
kg
Attachment information
Front
Depends on carrier
-
-
Force on attachment point
3.000
N
Hanging moment
+/- 1600
Nm
Connection data
Maximum operating pressure
250
bar
Maximum speed brush
450
-/min
Normal speed
+/-225
-/min
Maximum Oil flow
60
L/min
Needed oil flow for good result
30
L/min
Line attachments brush motor
Pressure line attachment: with rapid flat seal attachment
3/4”
Return line connection: with rapid flat seal attachment
3/4”
Drain line connection: with rapid flat seal attachment
3/8”
Maximum pressure on drain line
Non-pressurized
bar
Line attachments swivel main-arm
Attachments in/out-lines (2*)
3/8”
Line attachments tilting brush-head
Attachments in/out-lines (2*)
3/8”
Line attachments control valve (rotate brush-head, height coulter
blade, swivel cutting-knife)
Line attachment in/out-lines (2*)
3/8”
Hydraulic oil filtering requirements
10
microns
Oil for the drive
HV-46 or
equivalent

Weedbrush-Edgecutter
Type: BECX OBKS90-45
Version: 2
November 2019
Page 8 of 27
2Safety
2.1 General
•No modifications must be made to the weed brush.
•The user is responsible for making sure that the correct tool carrier and
adapter are used (see chapter 3). The following are important points in this
regard:
•The maximum pressure and number of revolutions (oil flow) must not be
exceeded. Excess pressure and excess revving can damage the machine and
cause injury.
•The tool carrier must be strong and stable enough to absorb the forces and
moments exerted by the weed brush safely and under all circumstances.
2.2 In use
•Consult the tool carrier manual for the noise rating. Because this is
considerably louder than the weed brush itself, the noise load of the tool
carrier determines the rating.
•The machinery must only be used for the activities for which it is designed.
•Persons or animals who are present in or who approach the danger zone must
be stopped immediately and the weed brush must be switched off .
•If passers-by disrupt the brushing and cutting work too much, the operator
can consider temporarily cordoning off the site.
•If the weed brush starts to make a different sound and/or starts to vibrate,
work must stop immediately and the weed brush has to be switched off. Work
can only continue after the source of the noise has been identified and
resolved.
•Always complete inspection and maintenance jobs.
•The machinery must not be used for any other purposes during inspection and
maintenance.
•The hydraulic feed to the weed brush must be disconnected during inspection,
maintenance or cleaning to prevent accidental operation.
•Always comply with local work regulations and safety rules.
•If the machinery is used in the dark, use sufficient lighting (approx. 50 lux at
the work site).
•To prevent damage to the machine, switching on and off the machine should
be done at low speeds. Depending on the tool carrier this is done at idle speed
or minimal oil-flow.

Weedbrush-Edgecutter
Type: BECX OBKS90-45
Version: 2
November 2019
Page 9 of 27
2.3 Operating personnel
•Operating personnel must be over 18.
•Only persons who have received permission from the owner are allowed to
operate the system.
•Persons must only carry out jobs for which they are trained. This applies to
both maintenance work and normal operations.
•Personnel who operate equipment must be familiar with all possible
situations that could arise.
•The owner or person in charge must be told if personnel operating machinery
identify faults or hazards or do not agree with safety measures.
2.4 Safety-symbols on the machine
1.
Read the manual before use!
2.
Safety zone
Weedbrush-Edgecutter
Type: BECX OBKS90-45
Version: 2
November 2019
Page 10 of 27
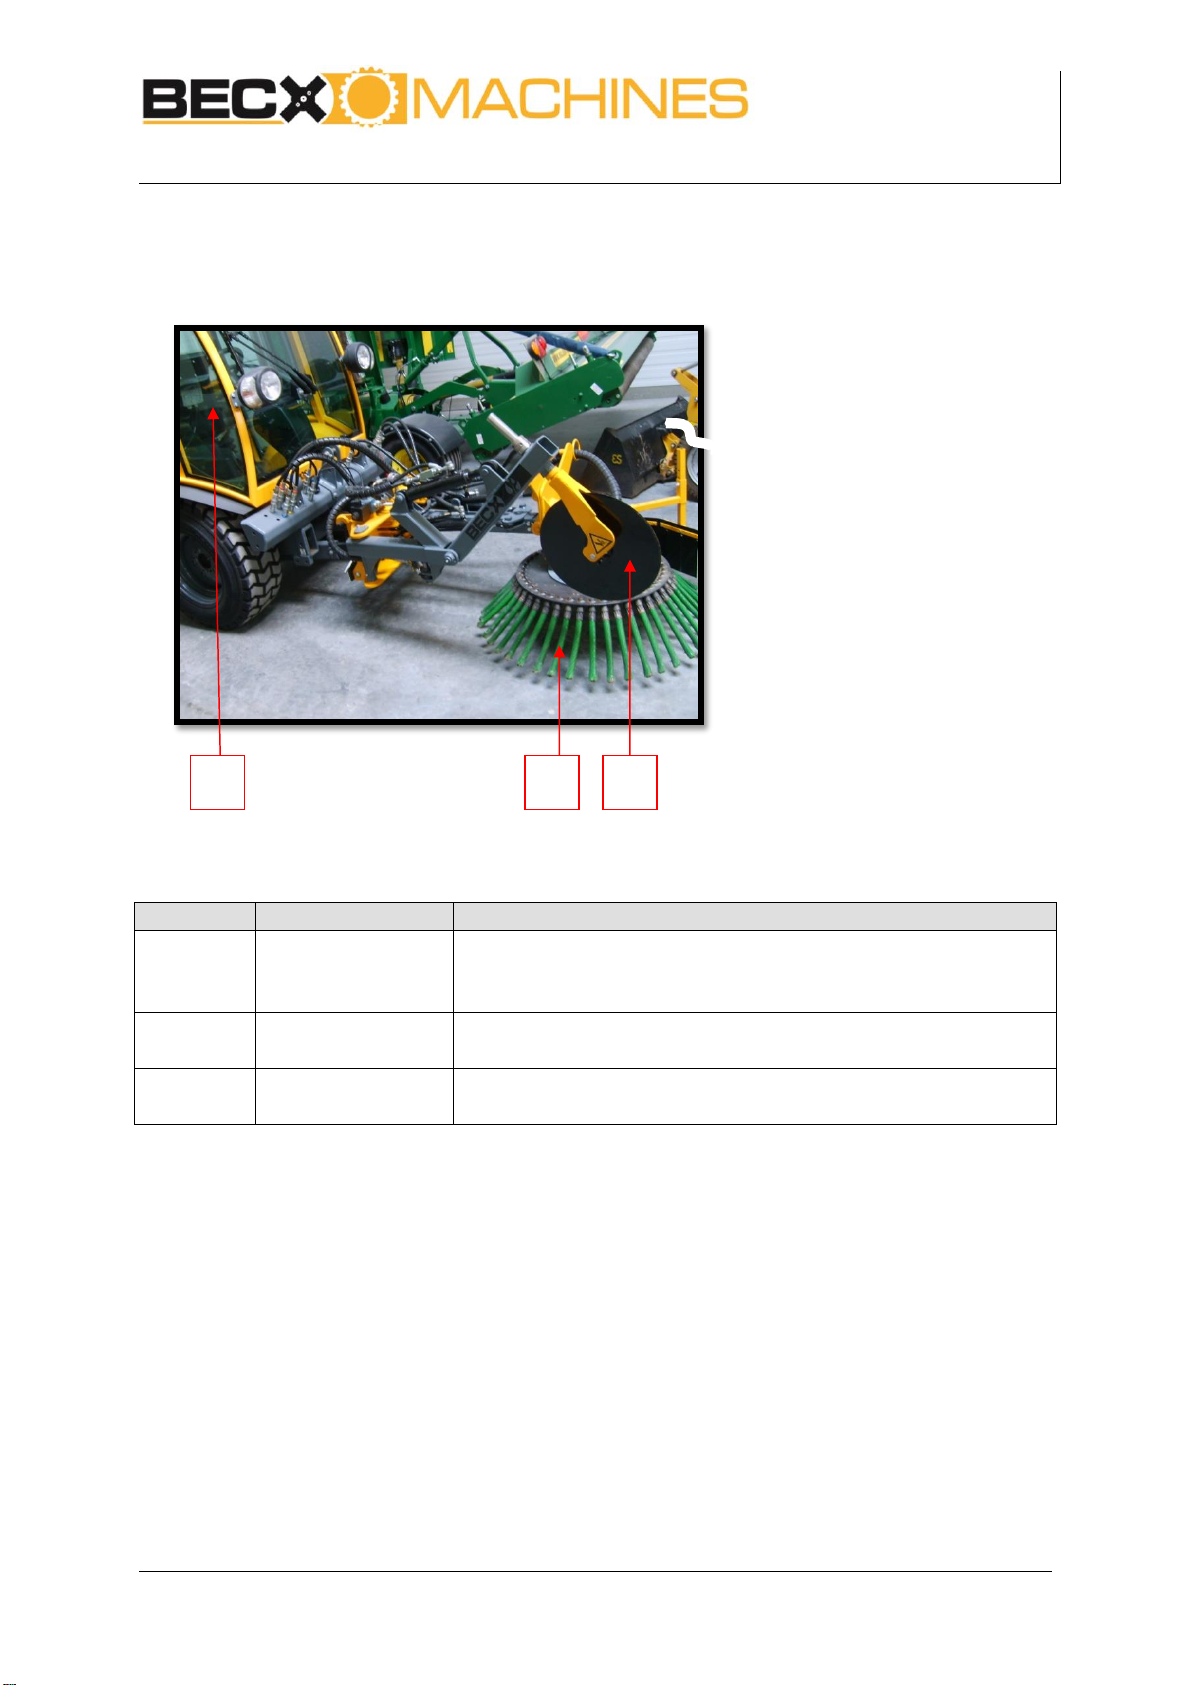
3Component description
Figure 1: Overview
Figure 1
Part
Explanation
1
Coulter blade
•The coulter blade cuts through the grass directly next to the
pavement so it cuts the grass which grows over the
pavement.
2
Brush
•The brush brushes the weed and cut loose grass entirely from
the pavement.
3
Tool carrier
•The tool carrier is not supplied. The user is responsible for
using a tool carrier that is suitable for the weed brush.
1
2
3

Weedbrush-Edgecutter
Type: BECX OBKS90-45
Version: 2
November 2019
Page 11 of 27
3.1 Mechanical components tool carrier attachments
Figure 2: General overview of the mechanical components
Figure 2
Part
Explanation
1 t/m 5
Tool carrier
attachment
•The unit is attached by an adapter (figure 2:2) attached to the
tool-attachment-point (figure 2:1) of the tool carrier.
•The attachment off the weed brush to the adapter consists of
2 mounting-pins (figure 2:5) and 2 locking pins (figure 2:3)
•When the unit is in the right position it can be locked with the
lever (figure 2:4).
•The implementation of the adapter and its attachment to the
tool carrier is dependent on the type of tool carrier.
•The up and down movement is realized by the fixture to be
tool carrier. This is not part of the weed brush, it’s controlled
by the tool carrier.
6
Support legs
•Two support legs are attached to the weed brush (figure 2.6)
•The support legs have to be completely raised or removed.
•If the unit is dismounted from the tool the support legs can be
installed to put the unit down and stable on the ground.
6
1
3
4
5
2

Weedbrush-Edgecutter
Type: BECX OBKS90-45
Version: 2
November 2019
Page 12 of 27
3.2 Mechanical components coulter blade
Figure 3: Overview mechanical components
Figure 3
Part
Explanation
1 + 3
Left/right
•From the tool-carrier the blade-position can be adjusted in the
width direction. The tube (figure 3.1) on which the blade
(figure 3:3) is mounted is then hydraulically moved to left or
right.
2
Height
•The tube (figure 3.2) on which the blade is mounted can be
adjusted up or down from within the tool carrier.
•While cutting the edges the blade must be in a downward
position. While driving to next location it must be pulled up.
1
3
2

Weedbrush-Edgecutter
Type: BECX OBKS90-45
Version: 2
November 2019
Page 13 of 27
3.3 Mechanical components brush
Figure 4: Overview mechanical components brush
Figure 4
Part
Description
4
Width adjustment
•The width-position of the brush from the blade can be
hydraulically adjusted (figure 4:4)
2
Mud guard
•The protective mudguard (figure 4.2) makes sure the debris
from the brush don’t get thrown in the wrong direction.
•The right position can be achieved by different adjustment-
points.
5
Tilt-adjustment
•The brush-head can be hydraulically tilted to make sure the
brush brushes in the right position (figure 4:5)
3
Angle adjustment
brush
•The angle in which the brush brushes the pavement can be
hydraulically adjusted (figure 4:3)
1
Brush-mounting
•When the brush is worn out it can be easily replaced by
unbolting the mounting bolts from the holder-plate (figure
4:1)
4
2
5
1
3

Weedbrush-Edgecutter
Type: BECX OBKS90-45
Version: 2
November 2019
Page 14 of 27
3.4 Hydraulic components
Figure 5: Overview hydraulic components
Figure 5
Part
Explanation
1
Hydraulic motor
brush
•The hydraulic has 3 attachments; in –out and a leak line. (figure
5:1)
4
Cylinders swivel
main brush-arm
•The cylinders for the swivel-adjustment of the main-brush-arm are
equipped with 2 lines which are routed in a way these cylinders get
the right in or out flow of oil. (figure 5:4)
3
Cylinder tilting
brush-head
•The cylinder for tilting the brush-head is a double-acting cylinder,
equipped with 2 lines (figure 5:3).
•Depending on the movement direction, the oil flows on one of the
lines.
8
Control valve
•The control valve sends the oil-flow to the desired function. The
control valve is attached via 2 rapid flat seal attachments to the
tool carrier (figure 5:8).
•Functions: turning brush-head, height-adjustment blade, swivel
function blade.
2
Control valve –
turning brush-
head
•When control valve is in right position it sends the oil flow to the
cylinder for turning the brush-head .
•Depending on the movement direction, the oil flows on one of the
lines. (figure 5:2)
5
Control valve –
height-adjusting
blade
•When control valve is in right position it sends the oil flow to the
cylinder for the height-adjusting of the blade.
1
7
4
2
3
5
6
8

Weedbrush-Edgecutter
Type: BECX OBKS90-45
Version: 2
November 2019
Page 15 of 27
Figure 5
Part
Explanation
•Depending on the movement direction, the oil flows on one of the
lines. (figure 5:5)
6+7
Control valve –
swivel
adjustment
blade
•When control valve is in right position it sends the oil flow to the
cylinder for swivel adjustment of the blade
•Depending on the movement direction, the oil flows on one of the
lines. (figure 5:6)
•The attached pressure gauge gives an indication of the pressure on
the blade from the pavement at falsely set settings or skewed trail
of the tool carrier (figure 5.7)

Weedbrush-Edgecutter
Type: BECX OBKS90-45
Version: 2
November 2019
Page 16 of 27
4Operations
4.1 Assembly and adjustment of the weed brush
Nr.
What to do
Action
Result
1
Select the correct tool
carrier and lifting arm
•make sure that the tool carrier and lifting
arm are sufficiently strong and stable for
the weed brush (see chapter 1 for the load
when lifting and the exerted moment of
the lifting).
•Make sure that the maximum pressure and
number of revolutions (oil flow) are not
exceeded.
•Make sure that the correct rapid
attachment connections are installed for
the feed line, return line and drain line.
•Make sure that the correct clasp is used.
Ignoring the stated
values can result in
damage to
equipment and
injury to persons.
2
Connect the hoses
•Connect the rapid attachment connections
for the feed line, return line and drain line .
3
Adjust the hydraulic
system
•Adjust the setting of the hydraulic
aggregate so that the maximum pressure
and number of revolutions cannot be
exceeded.
•This will depend on the type of tool carrier
that is used. Please refer to the manual of
the tool carrier.
4
Adjust the positions
for the blade and
brush
•With help of the different hydraulic
functions the blade and brush can be
adjusted to achieve the correct result with
the weed brush.

Weedbrush-Edgecutter
Type: BECX OBKS90-45
Version: 2
November 2019
Page 17 of 27
4.2 Carry out brush- and cutting work
•At driveways or other obstacles in the cutting-lane the blade needs to be lifted
in time, to prevent damage to the pavement and machine
No.
What to do
Action
Result
1
Check the machinery
•Check the following points:
•Check the blade on cracks or damages
•Check the speed of the brush-motor
(50% of the capacity (30 liter)) is usually
enough for a good result
•Check whether the brush-motor runs
without excessive shaking and without
abnormal sounds.
•Check the control of the width and
height-adjustment of the blade.
•If a defect is identified in one of the above
points, this must first be remedied before it
is allowed to put the weed brush back into
operation.
2
Drive to the site
where the work will
take place.
•Always switch off the weed brush if you are
not doing any brushing.
3
Switch on brush-
motor
•Please refer to the detailed instructions in
the manual for the tool carrier.
•It is important always to switch on and off
at a low revolution speed to prevent
damage to the machinery. The revolution
speed can be increased after switching on
the brush-engine.
Switching on and off
at a high speed of
revolutions will
result in system
overload.
4
Setup the blade in
desired position
•The knife can be adjusted in width-position
and in height, make sure it is in desired
position. For detailed instruction, see
manual of tool carrier.
•Watch for people or animals in near
working area.
5
Cut and brush the
edges
•Drive the tool carrier along the edge of the
pavement.

Weedbrush-Edgecutter
Type: BECX OBKS90-45
Version: 2
November 2019
Page 18 of 27
No.
What to do
Action
Result
6
Stop in following
situations!!
•The operator must stop immediately in
the following situations and switch off the
weed brush:
•Persons or animals being or coming
directly into the working area.
•The weed brush begins making
abnormal sounds or excessive shaking
Serious injury could
result if the
machinery is not
stopped in time.
7
Switch off the weed
brush
•switch off the weed brush once the area to
be cleaned had been brushed and cut.
Please refer to the detailed instructions in
the manual for the tool carrier.
•It is important always to switch on and off
at a low revolution speed to prevent
damage to the machinery.
Switching on and off
at a high speed of
revolutions will
result in system
overload.

Weedbrush-Edgecutter
Type: BECX OBKS90-45
Version: 2
November 2019
Page 19 of 27
5Maintenance
•Only components supplied or approved by the manufacturer must be used for
replacement or repair of parts.
•Always disconnect the weed brush from the feed line when work is carried out
on the machinery. This is done by disconnecting the rapid attachment.
•Only persons who can show that they have adequate knowledge of
mechanical and hydraulic machinery through their training and experience are
allowed to carry out maintenance work.
•The installation can be cleansed with a high pressure cleanser, never point
directly at hydraulic components.
Weekly maintenance
No.
What to do
Action
Result
1
Grease the pivot
points
•Squeeze grease into the grease nipples.
These are located at all pivot points
2
Tightening bolts
•Check and tighten all bolts
3
Visual check
•Visually check the construction, the
hydraulic aggregate and the cutter blades
for damage and cracks.
•Check cylinder-rods for damages and dirt.
4
Retighten adjusting
bolts
•Whitin 4 working hours, tighten the set
screws of the clamping sleeve mounting on
the motor shaft and then check it regularly!
( 48NM) See image on page 20.

Weedbrush-Edgecutter
Type: BECX OBKS90-45
Version: 2
November 2019
Page 20 of 27
Image of clamping sleeve bottom of brush head.
Annual maintenance
No.
What to do
Action
Result
1
Inspecting the drive
•Check following parts for damage, cracks
and looseness:
•Tubes + bushings of the width and
height directional adjusting
installation
•Bearings and seals
Table of contents


