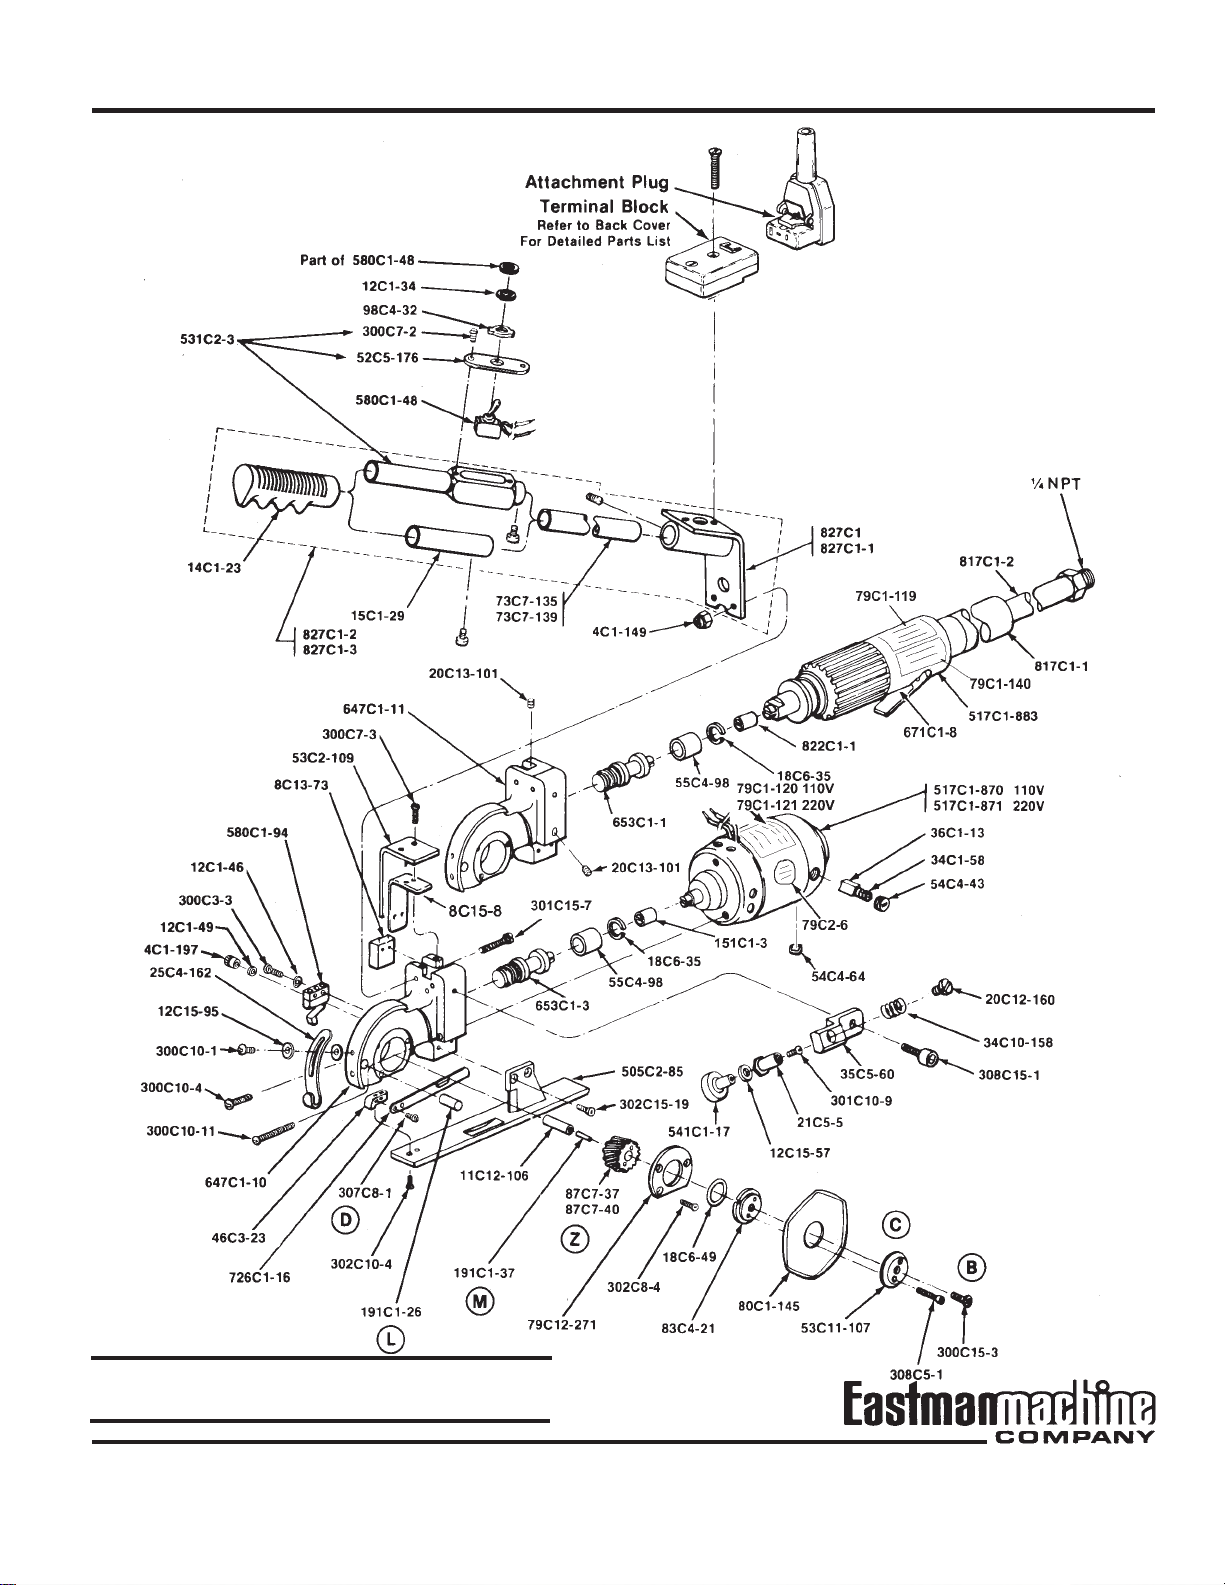
EASTMAN Falcon FAL-A User manual

EASTMAN
®
Falcon End Cutter
WARNING
This machine is equipped with a very sharp knife.
Keep hands, arms, and hair away from the knife
area at all times.
Misuseofthismachineorfailuretofollowallsafety
instructions on this machine and in the instruction
manual may result in serious personal injuries.
Please read completely before attempting
to operate your
Falcon End Cutter.
779 Washington St., Buffalo, N.Y. 14203-1396 U.S.A. • (716)856-2200 • Fax (716)856-1140 or (716)856-2068
Manufacturers of Eastman Cloth Cutting and Cloth Spreading Machines
Website: www.EastmanCuts.com
Instruction Manual and Parts List
Models:
FAL-A
FAL-E
with Lifting Mechanism

EASTMAN
2
Limited Warranty. Eastman warrants to the buyer that the Falcon End Cutter shall be free from defects in materials
or workmanship for a period of 90 days commencing on the date of invoice. Any goods or parts claimed by the buyer
tobedefective must be returned to Eastman, freight chargesprepaid,within the 90–day warranty period. If Eastman
determines that the goods or parts are defective in materials or workmanship, Eastman's sole obligation under this
warrantyshallbe,atEastman'ssoleoption,torepairorreplacethedefectivegoodsorpartsortoprovidetothebuyer
a credit equal to the portion of the purchase price allocable to the defective goods or parts. This warranty shall not
apply if defects are caused by product misuse or neglect, if the machine has been altered or modified by the buyer,
orifotherthangenuineEastmanbelts, emery wheels, knives or parts are used in the machine. THIS WARRANTY IS
THE ONLY WARRANTY APPLICABLE TO THIS PURCHASE. SELLER DISCLAIMS ALL OTHER WARRANTIES,
EXPRESS OR IMPLIED, INCLUDING, BUT NOT LIMITED TO, THE IMPLIED WARRANTIES OF MERCHANT-
ABILITY AND FITNESS FOR A PARTICULAR PURPOSE.
Limitation of Liability. Eastman's liability to the buyer, and the buyer's remedies from Eastman, whether in con-
tract, negligence, tort, under any warranty or otherwise, shall be limited to the remedies provided in the foregoing
Limited Warranty. In no event shall Eastman have any responsibility or liability to the buyer for (a) any special,
indirect, incidental, or consequential damages, including, but not limited to, loss of use, revenue, or profit, even if
Eastman has been advised of the possibility of such damages, or (b) any claim against the buyer by any third party.
The price stated for the product sold is a consideration for limiting Eastman's liability.

3
Patents Statement
Some parts of this manual and the equipment it describes
maybeprotectedbythefollowingU.S.patents:4,609,244,
4,761,878 and D281,416. Other patents pending.
Trademarks Statement
The names Eastman and Uni-Safe are registered trade-
marks of the Eastman Machine Company.
Thismanualcontainsinstructionsandpartnumbersforthe
Falcon End Cutter machine. If you contact Eastman Ma-
chine Company for information or to order parts, always
specify the machine name and model number.
If you are ordering electrical components, specify the volt-
age, frequency (Hz), and speed (RPM) of your machine.
You can find this information on a label attached to your
machine.
IMPORTANT
Table of Contents
General Safety Precautions...........................................................4
Safety Information .........................................................................4
Operating Instructions ................................................................... 5
End Cutter, Track & Lifting Mechanism Installation.......................5
Operation....................................................................................... 6
Maintenance .................................................................................. 6
Knife Replacement--(see Page 9) .................................................6
Shear Plate--(see Page 9)............................................................. 6
Lubrication--(See page 9).............................................................. 6
Knife Sharpening ...........................................................................6
Motor Maintenance........................................................................6
Microswitch (Electric Motor) - (See page 9) ..................................6
Switch in Operating Handle - (See page 9)................................... 6
Optional Parts and Supplies .......................................................... 7
Falcon End Cutter..........................................................................8
Track & Lifter Assembly...............................................................10
Cloth Alignment Bar.....................................................................10
Electrical Connections ................................................................. 12

EASTMAN
4
Safety and Indemnification
Duringthelifeofthemachine,thepurchaseragreestopro-
videtoallmachineusers(includingitsownemployeesand
independentcontractors)allrelevantsafety information, in-
cluding warning labels and instruction manuals. The pur-
chaseralso agreestomaintainthesafetyfeaturesandwork-
ing condition of the machine, and to adequately train all
users in the safe use and maintenance of the machine.
The purchaser agrees to defend, protect, indemnify, and
hold Eastman Machine Company harmless from and
against all claims, losses, expenses, damages, and liabili-
ties to the extent that they have been caused by the
purchaser’s failure to comply with the terms and instruc-
tions of this manual.
Safety Information
• Thepurchasermustprovide appropriate safety mea-
sures and equipment as recommended in this
manual. Observeallstatutoryrequirementsconcern-
ing the use of hazardous machinery that apply to
your location.
• Donot modifythismachineor disablesafetyfeatures.
Unauthorizedmodificationmayresultinseriousper-
sonal injuries to the user. Electrical connections to
thismachinemustbemadebya qualified electrician
familiar with applicable codes and regulations. To
prevent electrocution, a ground lead must be con-
nected to terminal “E” on the attachment plug.
• This machine is intended ONLY for hand-held op-
eration. Misuse of this machine or use of this ma-
chine as part of another machine may result in seri-
ous personal injuries to the user.
• Safety labels must be kept clean and legible at all
times. Call the Eastman Machine factory to order
replacement labels.
WARNING
• Thismachineis equipped withaverysharpand dan-
gerousknife. Keephands, arms,andhairawayfrom
the knife area at all times. When the machine is not
in use, keep the knife guard lowered at all times.
Safety glasses and appropriate clothing may pre-
vent serious personal injuries.
• Disconnectthe powersupplyfrom themachinewhen
it is not in use or during routine maintenance, in-
cluding lubrication.
• Thepurchasermustensurethatthe electrical power
supplylinecomplies withallthelocal electricalcodes
andregulations.
• The purchaser must instruct all operators in the
proper use of the machine according to the instruc-
tions on the machine and in this manual. This train-
ing must include instruction on the potential safety
hazards arising from the use or misuse of the ma-
chine. In addition to such training, the purchaser
should provide written work instructions as neces-
sary to ensure correct use of the machine for spe-
cific cutting applications.
Throughout this manual, safety information is presented
by use of the terms
Warning, Caution,
and
Note.
These
terms have the following meanings:
WARNING
A warning contains critical information regarding poten-
tial safety hazards that can occur during proper use or
misuse of the machine. Failure to follow these proce-
dures may result in serious personal injury to the user.
CAUTION
A caution contains instructions for the use or mainte-
nance of the machine. Failure to follow these proce-
dures may result in damage to the machine.
Supplementary information may be given in a Note.
General Safety Precautions

5
Falcon
End Cutter
Operating Instructions
Description
The Falcon End Cutter Rotary Shear is designed for use
withalifting mechanism for cutting across a width ofmate-
rial while it compensates for the height of the lay. It cuts
material squarely, accurately, quickly, and eliminates ex-
cessive waste throughout the height of the lay. The Rotary
Shear Cutter is available with an electric or pneumatic
motor. The electric motor is available in either 110 or 220
volts. The electric machine has a motor speed of 12,000
rpm while the pneumatic unit should be operated at 90 psi
andwillattaina motorspeedof18,000rpm.Aflexible handle
attached to the cutter provides for a simple and easy ex-
ecution of the cutting operation. Additional length handles
canbemade availabledependingonthe lengthofthetrack.
Warning
This machine is equipped with a sharp knife. Keep hands
away from knife area at all times. Use handle and control
leverwhenoperatingorhandlingthemachine.Knifeguard
should be raised only enough to clear the material being
cut. When not in use, knife guard should be set at the low-
est position..
DONOT OPERATETHISMACHINE WITHKNIFEGUARD
REMOVED.
Caution
Read instructions carefully before starting motor. Be sure
that voltage is the same as stamped on nameplate.
End Cutter, Track & Lifting Mechanism Installation
Remove your Falcon End Cutter from the shipping pack-
age. Locate and loosen the lift belt clamping screws (A).
Mountthefront lift assembly (B) and back lift assembly(C)
to the cutting table. Pull the lift belt (D) tight and secure the
clamping screws (A). Place the track in place and secure
to the lifting mechanism. The track should be mounted
squarely to the table.
Loosenthetracklatchscrews(E)andswinglatchup.Slide
theswitchcaminthetrackas shown. Slide the Falcon End
Cutter in the track. Swing down the latch and secure in
place. Connect Electric or Air line. The Falcon End Cutter
is ready for operation.

EASTMAN
6
Operation
Load the roll of material on a roll rack. Pull the material
over the falcon track and to the desired length. Pull the
Falcon End Cutter across to cut the material and return to
the home position. Lift the track using the lift handle. The
cut end of the material will lay under the track. The track
will hold the material in position. The next ply can now be
spread.
Maintenance
The Falcon End Cutter is designed to provide many years
of trouble free service. The following information will aid in
keeping your equipment running at its top efficiency.
Warning
Before performing any of the following procedures, make
sure that the attachment plug or air line has been disen-
gaged from the machine.
Knife Replacement--(see Page 9)
To replace knife (80C1-145HS), insert screwdriver in lock
screw "B". Turn counter clockwise and remove screw. Re-
move knife flange cover "C" and replace blade. Be sure
that when installing the new knife the name Eastman is
shown outward. To reinstall the knife locknut, reverse pro-
cedure.
Shear Plate--(see Page 9)
When replacing shear plate (726C1-16), remove blade as
outlinedonpage5.Removescrews"D".Installshearplate
by reversing procedure.
Lubrication--(See page 9)
Knife gear "Z" should be removed and filled with special
Eastman libriko grease every three months (excessive
grease with cause overheating). Felt wicking "L" and "M"
should be oiled monthly.
Knife Sharpening
To obtain a fine, keen edge on the blade, press lightly
against the sharpener button (20C12-160) with a constant
pressure. To replace sharpener stone, remove screw
(308C15-1) on sharpener bracket (35C5-60) and remove
sharpenerbracketfrom standard. Insert screwdriverinslot-
tedbutton(20C12-160) andholdbushing (21C5-5)inplace.
Turn counter clockwise. Remove spring (34C10-158) and
set aside for later reassembly. Remove screw (301C10-9)
by turning screw counter clockwise. The emery wheel
(541C1-17)will disengagefromsharpenerbracket.Remove
spring washer (12C15-57) and replace emery wheel. To
resecure emery wheel to sharpener bracket, reverse pro-
cedure and relocate sharpener bracket on standard.
Motor Maintenance
Electric Motor-(Recommended for light weight material)
the only maintenance required for the electric motor is the
brushreplacement.Witha screwdriver, remove slottedcap
screws on rear of motor. Remove brush (36C1-13) from
slot. Install new brushes and replace brush caps.
Pneumatic Motor-
(Recommended for heavy weight material)
For best performance, an air pressure of 90 psi is recom-
mended. An air line oiler and filter delivering two to three
drops per minute of SEA5 weight spindle oil is recom-
mended. * This air line filter and lubricator is mounted in
line with the air inlet hose. Check your air line for presence
of any foreign particles before installing machine.
*Not sold with machine.
Microswitch (Electric Motor) - (See page 9)
Remove two screws (300C3-3) securing the microswitch
(580C1-94)tostandard and removetwoleads.Microswitch
is wired in series and it is not necessary to mark the leads
thatmounttothisswitch. Replace the new microswitch and
reverse procedure.
Caution
Excessive soldering heat will damage switch.
Switch in Operating Handle - (See page 9)
Removethe twoscrews(300C7-2) securingtheswitch plate
(52C5-176) to handle and remove the switch (580C1-48).
This switch is wired in series and it is not necessary to
mark the leads that mount to this switch. Replace the new
switch and reverse procedure.

7
Optional Parts and Supplies
534 BK 4" TC
2" Cutting Capacity
Fits Regular Falcon Track
Heavy Duty Electric Motor
Part Number Description
73C7-135 36" Extra Length Handle
73C7-140 Variable Length Handle
80C1-84 H.S. Knife (High Speed) Round
80C1-145 Knife (High Speed) Hexagon
523C2-27 Coil Cord & Plug (Single Phase)
580C1-93 Pressure Switch
644C1-169 Push Pull Handle Bracket & Terminal Block (Electric)
644C1-171 Rear Handle
644C1-172 Push Pull Handle Bracket & Connector Block (Pneumatic)
823C1-12 Variable length Falcon Track (Specify Table Width)
823C1-22 Variable length C.A.B. (Specify Table Width)

EASTMAN
8
Falcon End Cutter
Illustrated Parts List
Air
110v
220v
Part Number Description
12C1-49 2 2 2 Washer
12C15-57 1 1 1 SpringWasher
12C15-95 4 4 4 Washer,#6Flat
14C1-23 1 1 1 HandleGripPlastic
15C1-29 1 0 0 StudHandle
18C6-35 1 1 1 SnapRing
18C6-49 1 1 1 OilSealRing
20C12-160 1 1 1 SharpenerScrew,ButtonHead
20C13-95 1 1 1 Screw, 6-32 x 1/4 Self TapScrew
20C13-101 3 0 0 Setscrew
21C5-5 1 1 1 SharpenerBushing
25C4-162 1 1 1 KnifeGuard
34C1-58 0 2 2 BrushSpring
34C10-158 1 1 1 SharpenerSpring
35C5-60 1 1 1 SharpenerBracket
36C1-13 0 2 2 Brush
46C3-23 1 1 1 SpringBlock
52C5-176 0 1 1 SwitchBase
53C2-109 0 1 1 SwitchCover
53C11-107 1 1 1 KnifeFlangeCover
54C4-43 0 2 2 BrushCap
54C4-64 0 1 1 HolePlug
55C4-98 1 1 1 SpacerBearing
73C7-135 0 1 1 TubeHandle36"
73C7-139 1 0 0 TubeHandle39"
79C1-119 1 0 0 FalconAirDecal
79C1-120 0 1 0 FalconDecal,110v
79C1-121 0 0 1 FalconDecal,220v
79C1-140 1 0 0 CautionDecal
79C2-6 0 1 1 CautionDecal
79C12-271 1 1 1 GearRetainingPlate
80C1-145 1 1 1 Knife(Hex)
83C4-21 1 1 1 KnifeFlange
87C7-37 1 0 0 2-LeadKnifeGear
87C7-40 0 1 1 4-LeadKnifeGear
98C4-32 0 1 1 On-OffSwitchClip
151C1-3 0 1 1 MotorCHKCoupling
191C1-26 1 1 1 KnifePadWipe
191C1-37 1 1 1 FeltWick
300C3-3 0 2 2 Screw,2-56x1/2RoundHead
300C7-2 0 2 2 Screw,4-36x3/16RoundHead
300C7-3 0 4 4 Screw,4-36x1/4RoundHead
300C10-1 2 2 2 Screw,6-32x3/16RoundHead
300C10-4 0 1 1 Screw,6-32x3/8RoundHead
300C10-11 0 2 2 Screw,6-32x1-1/8RoundHead
300C15-3 1 1 1 Screw,10-32x3/8RoundHead
301C10-9 1 1 1 Screw,6-32x3/16FillisterHead
301C15-7 2 2 2 Screw,10-32x1-1/4FillisterHead
302C8-4 3 3 3 Screw,4-40x3/8SocketFlatHead
302C10-4 2 2 2 Screw,6-32x5/16FlatHead
302C15-19 2 2 2 Screw,10-32x1"SocketFlatHead
307C8-1 2 2 2 Screw,4-40x1/4ButtonHead
308C5-1 2 2 2 Screw,3/48x1/2SocketHead
308C15-1 1 1 1 Screw,10-32x1/2SocketHead
309C12-2 1 1 1 Setscrew,8-32x5/16
505C2-85 1 1 1 BasePlateAssembly
517C1-870 0 0 1 MotorAssembly110v
517C1-871 0 1 0 MotorAssembly220v
517C1-883 1 0 0 MotorAssembly,Pneumatic
531C2-3 0 1 1 CompleteAssembly
541C1-17 1 1 1 EmerywheelAssembly
580C1-48 0 1 1 ToggleSwitch
580C1-94 0 1 1 SwitchforCam
647C1-10 0 1 1 Standardw/Shaft&FeltWick
647C1-11 1 0 0 Standardw/Shaft&FeltWick
653C1-1 1 0 0 WormShaft(Pneumatic)
653C1-3 0 1 1 WormShaft(Electric)
671C1-8 1 0 0 MotorValve
726C1-16 1 1 1 ShearPlatewithBlank
817C1-1 1 0 0 ExhaustOverHose
817C1-2 1 0 0 AirIntakeHose
822C1-1 1 0 0 AirMotorCoupling
827C1 0 1 1 HandleBracketAssembly
827C1-1 1 0 0 HandleBracketAssembly
827C1-2 0 1 1 HandleBracketAssemblyComplete
827C1-3 1 0 0 HandleBracketAssemblyComplete
Air
110v
220v
Part Number Description
4C1-149 2 2 2 ElasticStopNut
4C1-197 2 2 2 AllenNut
8C13-73 0 1 1 MicroSwitchInsulation
8C15-8 0 1 1 SwitchCoverInsulation
11C12-106 1 1 1 GearShaft
12C1-34 0 1 1 Lockwasher
12C1-46 0 2 2 Lockwasher

9
NOTE: Please specify model and serial number of
machine when ordering parts.

EASTMAN
10
Track & Lifter Assembly
ITEM PART NO. DESCRIPTION QTY. ITEM PART NO. DESCRIPTION QTY.
Cloth Alignment Bar
823C1-22-TS (Straight CAB)
823C1-39-TS (Bias CAB)
ITEM PART NO. DESCRIPTION QTY.
1 300C18-4 Screw, Round Head 1/4-20 x 5/8 *8
2 136C1-24 Bar Weight 2
3 78C3-2 Cloth Alignment Bar 1
78C3-5 Cloth Alignment Bar, Bias Cut only 1
4 302C10-10 Screw, Flat Head 6-32 x 7/16 8
5 211C1-2 Foam Tape A/R
6 185C1-227 Scale, Inches 1
185C1-240 Scale, 240 cm *1
185C1-236 Scale, Units *1
A/R - As Required
TS - Table Size
* -Not Included
Please specify Table Width when ordering
1 760C1-2 Switch Bracket, Pneumatic "only" 1
2 300C15-3 Screw, Round Head 10-32 x 3/8 1
3 17C15-134 Roll Pin 2
4 64C1-11 Switch Cam, Air Valve 1
5 46C3-20 Clamp Block 1
6 760C1-3 Switch Bracket, Electric "only" 1
7 64C1-12 Switch Cam, Electric "only" 1
8 300C15-3 Screw, Round Head 10-32 x 3/8 1
9 17C15-134 Roll Pin 2
10 119C4-42 Support Plate 1
11 46C3-20 Clamp Block 1
12 302C15-3 Screw, Flat Head 10-32 x 1/2 2
13 823C1-12-TS Falcon Track Assembly 1
823C1-33-TS Falcon Track Assembly, 96" & larger 1
823C2-1-TS Falcon Track Assembly, Bias "only" 1
14 20C12-156 Latch Screw 4
15 97C3-38 Track Latch 2
15A 67C6-1 Latch Mount, 96" & larger 2
16 300C18-4 Screw, Round Head 1/4-20 x 5/8 4
17 193C1-14-TS Falcon Track, Solid 1
193C1-19-TS Hollow Falcon Track, 96" & larger 1
193C1-25-TS Bias Falcon Track 1
18 C9-27 Q Track Wear Strip A/R
19 211C1-2 Foam Tape A/R
20 840C1-1 Lifter Assembly 1
840C1-2 Bias Lifter Assembly 1
21 4C2-58 Nut, Hex 1/4-20 4
22 18C6-47 Grip Ring 6
23 763C1-27 Lift Tube 2
24 11C2-54 Shaft, Belt Roller 3
25 12C15-108 Washer, Flat 1/4 6
26 41C5-12 Belt Roller, Front 1
26A 41C5-14 Belt Roller, Back 1
26B 41C5-15 Belt Roller, Lower 1
27 181C4 Lift Belt A/R
28 311C14-2 Screw, Shoulder, 1/4 x 1-1/4 4
28A 311C14-1 Screw, Shoulder, 1/4 x 3/4 4
29 70C4-45 Roller Guide 8
30 55C4-118 Roller Spacer 4
31 15C13-59 Stud, Lift Spring, Long 2
31A 15C13-56 Stud, Lift Spring, Short 2
32 79C12-295 Main Frame, Lift Assembly 2
33 20C13-4 Setscrew 8-32 x 3/16 2
34 191C2-1 Swivel Pad 2
35 50C11-34 Clamp Base 2
36 302C18-2 Screw, Flat Head 1/4-20 x 1/2 4
37 17C15-126 Roll Pin 1/8 x 1/2 2
38 57C7-49 Clamp Lever 2
39 20C5-22 Clamp Screw 2
40 33C10-59 Belt Holder 2
41 302C15-3 Screw, Flat Head 10-32 x 1/2 2
42 34C10-181 Spring 4
43 18C6-65 Grip Ring, Large 4
44 35C7-35 Plate, Spring Mount 2
45 300C18-4 Screw, Round Head 1/4-20 x 5/8 4
46 62C16-265 Roller Bracket 1
47 55C4-117 Spacer, Front Belt Clamp 1
48 302C15-7 Screw, Flat Head 10-32 x 1 2
49 4C2-119 Square Nut, 1/4-20 2
50 22C3-9 Lift Handle 1
51 12C15-14 Spacer, Short 8
52 302C18-2 Screw, Flat Head 1/4-20 X 1/2 2
53 79C12-296 Slider Plate, Bias Track "only" 1
A/R - As Required
TS - Table Size

11

Form C-1149 © 2001 Eastman Machine Company Printed in U.S.A. 10/2003
Electrical Connections
PLEASE SPECIFY
VOLTAGE WHEN
ORDERING PARTS
Description Part No.
Attachment Plug 523C1-99 523C1-100 523C1-101 523C1-102 523C1-103
Cord Sleeve 1C13-27 1 1111
U-Lock Sleeve 20C13-103 4 4333
Spring 34C10-170 1 1111
Terminal Sleeve 47C3-19 1 1111
Terminal Sleeve (current) 47C3-20 2 3111
Terminal Sleeve (current) 47C3-21 1 — 1 1 1
Cord Clamp 50C7-27 1 1111
Attachment Plug Cover 53C3-19 53C3-20 53C3-21 53C3-22 53C3-23
Attachment Plug Body 82C1-45 1 ————
Attachment Plug Body 82C1-46 — 1 — — —
Attachment Plug Body 82C1-47 — — 1 — —
Attachment Plug Body 82C1-48 — — — 1 —
Attachment Plug Body 82C1-49 — — — — 1
Rivet 91C4-22 1 1111
ThumbClip 98C4-37 1 1111
Screw #4-40 x 3/8 Round Head 300C8-1 — — 2 2 —
Screw #4-40 x 1/2 Round Head 300C8-2 2 2 — — 2
Screw #4-40 x 7/8 Round Head 302C8-8 1 1111
TerminalBlock 508C1-99 508C1-100 508C1-101 508C1-102 508C1-103
U-Lock Screw 20C13-103 4 4333
Terminal Block Bottom 51C1-61 1 1111
Terminal Block Top 51C1-63 51C1-64 51C1-65 51C-66 51C1-67
Screw #10-32 x 1-1/8 Flat Head 302C15-8 2 2222
Terminal Contact w/Pin E 667C1-22 1 1111
Terminal Contact w/Pin L1,N 667C1-23 1 1 1 — —
Terminal Contact w/Pin L2 667C1-24 1 1 — 1 —
Terminal Contact w/Pin L3 667C1-25 — 1 — — 1
Terminal Contact w/Pin L1,N 667C1-26 — — — 1 1
Terminal Contact w/Pin L2 667C1-27 — — 1 — —
Terminal Contact w/Pin L3 667C1-28 1 ————
EASTMAN
25A
42V ~
EASTMAN
15A
120V ~
EASTMAN
10A
220V ~
EASTMAN
10A
220V 3~
EASTMAN
10A
380V 3~
,E
L1,N
L2
L3
,E
L1,N
L2
L3
,E
L1,N
L2
,E
L1,N
L2
,E
L1,N
L3
WARNING
Electricalconnections to thismachine mustbemade byaqualified electricianONLY.
Failure to follow applicable codes and regulations and conduct a ground lead to
terminal "E" on the attachment plug may result in serious personal injuries.
For user safety, connect a ground lead to terminal “E” on the attachment plug.
Always unplug the machine before performing maintenance, adjustment or repairs.
EASTMAN
779 Washington St., Buffalo, N.Y. 14203-1396 U.S.A. • (716) 856-2200 • Fax (716) 856-1140 or (716) 856-2068
Website:www.EastmanCuts.com
This manual suits for next models
1
Table of contents
Other EASTMAN Cutter manuals

EASTMAN
EASTMAN Raptor User manual

EASTMAN
EASTMAN BLUE JAY-5H Setup guide

EASTMAN
EASTMAN BLUE STREAK 2 629X User manual

EASTMAN
EASTMAN Plastic Master 627PM Datasheet

EASTMAN
EASTMAN MPC 5000 User manual

EASTMAN
EASTMAN Robin User manual

EASTMAN
EASTMAN BLUE STREAK II User manual

EASTMAN
EASTMAN FALCON IV User manual

EASTMAN
EASTMAN RS2 User manual

EASTMAN
EASTMAN BRUTE 627VS User manual