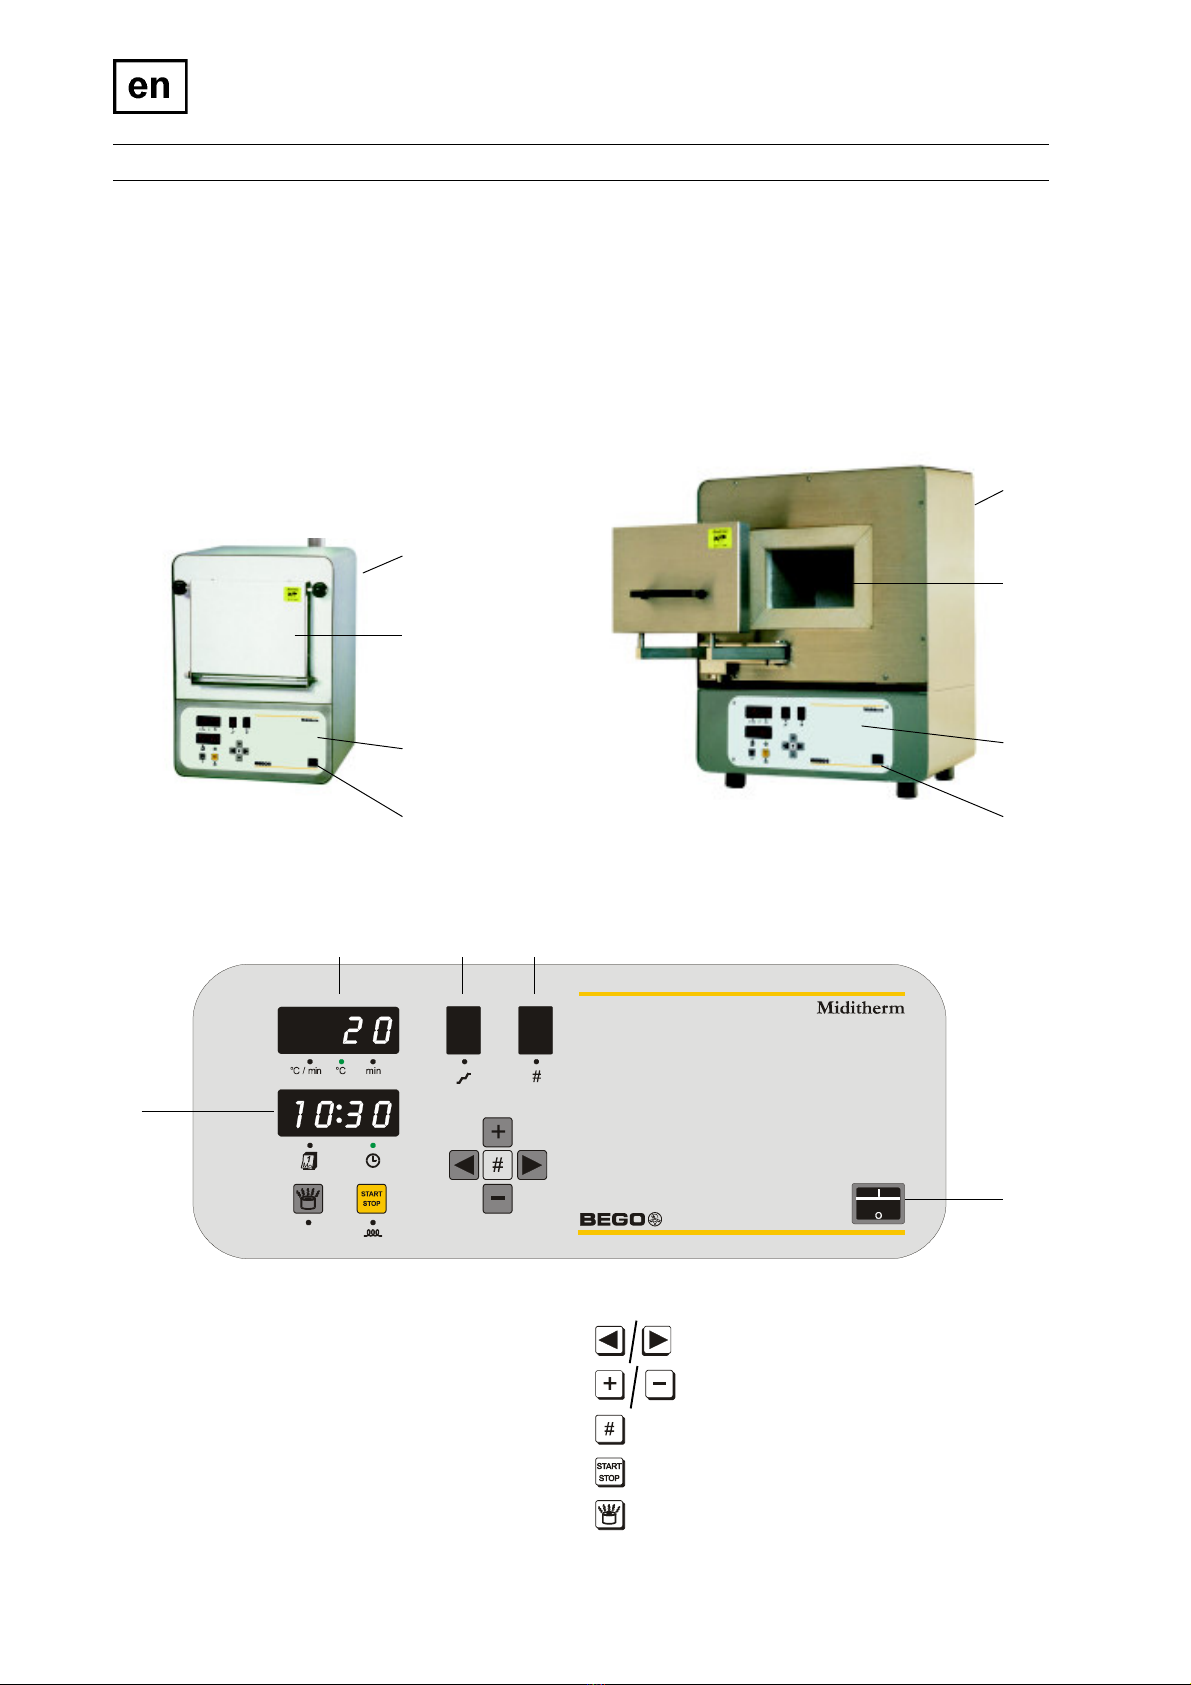
Bego Miditherm 100 MP User manual

Miditherm 100MP
Miditherm 200MP
BA 85 818 / 06 306.00831... / 307.00544...
English
Translation of the original instructions

2
Miditherm MP
This unit documentation is part of the unit and must be enclosed when
selling or passing on the unit.
•The unit has been designed solely for use in dental laboratories and
comparable establishments for research, commercial and training purposes.
The unit must only be operated by dental professionals, or they must provide
supervision if trainees or other persons operate unit.
•The operating instructions must be read and understood before the device is
used. This particularly applies to the Safety information. The warranty is
void in cases of damage which is caused by non-observance of the operating
instructions. We will also not accept liability for any resulting consequential
damages.
•Symbols used
This symbol indicates very important information. Failure to comply with it may
result in personal injury.
This symbol warns against hot parts.
This symbol indicates hazards caused by shock heat investment materials (do not
open door – risk of darting flame).
This symbol means: use a breathing protective mask (FFP2 – EN 149:2001).
BEGO Bremer Goldschlägerei Wilh. Herbst GmbH & Co • Wilhelm Herbst-Straße 1 • D-28359 Bremen
Telefon +49 421 2028-0 • Telefax +49 421 2028-100 • www.bego.com

3
Miditherm MP
Contents
Page
Instruction manual
Safety instructions --------------------------------------------------------------------------- 4
About the unit Unit description ------------------------------------------------------- 6
Scope of delivery, Wearing parts and extras---------------------- 7
Technical data --------------------------------------------------------- 7
Operation Installation ------------------------------------------------------------- 8
Basic principles ------------------------------------------------------- 9
Creating a new program ------------------------------------------- 11
Creating a new program
for shock heat investment materials ----------------------------- 12
Checking a program------------------------------------------------ 13
Starting a program-------------------------------------------------- 14
Starting a program with Finished time -------------------------- 15
Reducing or increasing temperature
in running program ------------------------------------------------ 16
Settings:
day and time / acoustic signal /
cut-out temperature of extraction system----------------------- 17
Care ------------------------------------------------------------------- 19
Faults Eliminating faults --------------------------------------------------- 20
Program table
Maintenance
Spare parts list
Circuit diagram
Certificate of conformity
Labels and stickers
Disposal advice -------------------------------------------------------------------- Appendix

4
Miditherm MP
Miditherm is designed exclusively for wax
removal from and preheating of dental
objects, such as duplicate models and casting
moulds made of commercially available
investment materials. Any other use is
considered to be improper. We shall not assume
liability for damage resulting from improper use.
The safety instructions must be followed in order to
avoid personal injury or damage to equipment. We
shall not be liable for failure to comply with the
safety instructions.
General safety instructions
lPlace of use
The unit has been designed solely for use in
dental laboratories and comparable
establishments for research, commercial and
training purposes. • The unit may only be
installed on an adequately stable surface. • The
unit must only be used in dry rooms.
lOperator and operating personnel
The unit must only be operated by dental
professionals, or they must provide supervision if
trainees or other persons operate unit. • Wear
the protective clothing prescribed for use in
dental laboratories and observe the rules of
conduct. • The unit may only be operated by staff
members who are familiar with and follow the
instructions of this operating manual. • The
operating manual must be easily accessible when
the machine is operated. • Observe the national
accident prevention regulations in addition to
this operating manual.
lHandling the machine
Prior to connection to the power supply check
whether the specifications on the rating plate
correspond to the supply network. In the case
of uncertainty, consult an electrician. • The
unit is categorised under protection class 1
and may only be connected to properly earthed
power sources (earth contact sockets). •
Modifications of the machine are not
permitted. • Always keep signs and stickers such
that they are easy to read. They must not be
removed. • Check the machine and leads for
damage regularly. The machine must not be
operated if it has any defects that may result in
risks for the employees or third persons. • Protect
the leads against heat, oil and sharp edges. The
leads must not be used to carry the machine or to
pull out the mains plug.
lCare and maintenance
Always switch off the machine and pull out the
mains plug before performing care, cleaning or
maintenance work. • Only use dry or slightly
moist cloths for cleaning. Do not spray the
machine with water or immerse it in water.
lRepairs
Repairs may be carried out solely by BEGO
customer service or by persons authorised by
BEGO customer service. • Metallic housings
must be grounded properly so as to prevent them
from carrying current. Otherwise they are
extremely dangerous because the housings may be
live due to damage to the machine! Since a check
to ensure that the housing is in a de-energized
state is mandatory every time the machine has
been opened (Germany: check in accordance with
DIN VDE 0701-1), only qualified electricians may
open the machine! • Only BEGO replacement and
wearing parts may be used.
Safety instructions

5
Miditherm MP
Special safety instructions regarding this unit
lInstallation, site of installation and start-up
•Install unit only on adequately stable and non-combustible surface.
•Because of the wax vapours, install the furnace under a chimney stalk as far as possible. Always
discharge vapours outdoors.
•Only use the furnace in dry rooms.
•There must not be any combustible objects in the area near the furnace.
•There must not be any highly flammable or explosive gas, liquids or solid material in the same room as
the furnace.
•Always connect the furnace to a separate circuit with 16-ampere fuse protection.
•The unit is subject to safety class I and may only be connected to properly grounded power sources.
•Use the rear plug only for connecting the Regulus furnace suction extraction unit (200-240 V).
•Remove transport protection device from the mould chamber prior to start-up!
lRisk of burns due to hot parts
•Wear protective clothing (safety apron), safety shoes, safety goggles and safety gloves.
•Only touch the hot furnace door at the handle.
•Move hot moulds only with sufficiently long tongs.
•Let the unit cool down until it is warm to the touch before carrying out any care, maintenance or
cleaning work.
lShock heat investment materials
So-called shock heat investment materials are not heated up slowly, but are placed in a furnace that has
been preheated to the final temperature. As a result, the modelling material burns atypically, i.e., if the
furnace door is opened, inflowing oxygen can cause a darting flame!
•Place all moulds in the furnace within 10 seconds - then keep the furnace door closed for 15 minutes!
•For shock heat investment materials, the Regulus furnace extraction system (Ref. 25750) must be
installed.
•Regulus must be set to continuous operation (see page 12).
lServicing work
Parts of the insulation contain carcinogenic ceramic fibres that may be released during servicing work.
Use gas mask type FFP2 – EN 149:2001 for servicing work with dust generation.

6
Miditherm MP
Unit description
Miditherm laboratory ovens serve for waxing and pre-
heating of casting flasks and duplicate models. They
provide users with the facility for using both shock-
heating and conventional embedding materials. The
required finishing time, even for longer periods, can
be programmed with the aid of a micro-controller.
1Mains cable(rear)
2Exhaust outlet (rear)
3Flask chamber
4Control panel
5Main switch
1
1
2
2
3
3
4
5
4
5
Miditherm 100 MP Miditherm 200 MP
Control panel
1Combined display: Heating rate / Oven
temperature / Duration of holding stage
2Holding stage display
3Program display
4Combined display: Time / Finishing time/ Day
5Main switch
Function of the keys
Call-up parameters
Change values
Program
Start / stop program
Start / stop program with Finished time
1 2 3
4
5

7
Miditherm MP
Scope of delivery
Wearing parts and extras
Technical data
•Ceramic base plate
•Documentation
Miditherm 100 MP
200 .... 240 V Ref. 26 150
100 .... 120 V Ref. 26 151
Miditherm 200 MP
200 .... 240 V Ref. 26 155
Miditherm 100 MP Miditherm 200MP
Height / width / depth (mm) 480 / 350 / 420 600 / 470 / 550
Mould chamber (mm) 100 / 150 / 170 110 / 200 / 250
Weight (empty) ca. 28 kg ca. 56 kg
Rated voltage 200 .... 240 V, 50/60 Hz (Ref. 26 150) 200 .... 240 V, 50/60 Hz (Ref. 26 155)
100 .... 120 V, 50/60 Hz (Ref. 26 151)
Power input 1600 VA (230 V) 2700 VA (230 V)
Temperature (maximum) 1150 °C 1150 °C
Wearing parts:
see spare part list
Extras:
1pair of 55 cm Ref. 39754
mould tongs 64 cm Ref. 11599
1Regulus furnace suction extraction unit
200 .... 240 V Ref. 25750
(also for Miditherm 100 MP, 100....120V!)

8
Miditherm MP
1Install unit only on adequately stable and non-
combustible surface. • Because of the wax
vapours, install the furnace under a chimney
stalk as far as possible. Always discharge
vapours outdoors. • Only use the furnace in
dry rooms. • There must not be any combustible
objects in the area near the furnace. • There
must not be any highly flammable or explosive gas,
liquids or solid material in the same room as the
furnace.
2Prior to power connection check whether the
data on the rating plate correspond to the power
supply network. In the case of lack of clarity,
consult a qualified electrician. • Always connect
the furnace to a separate circuit with 16-ampere
fuse protection. • The unit is subject to safety
class I and may only be connected to properly
grounded power sources. • Use the rear plug
only for connecting the Regulus furnace suction
extraction unit (Ref. 25750, 200....240 V). This
also applies to the plug on Miditherm 100 MP /
100....120 V (Ref. 26151)!
If moulds are to be preheated using the shock
heat method, the Regulus furnace extraction
system must be installed!
3Remove transport protection device from the
mould chamber prior to start-up!
Miditherm 100 MP:
28 .... 33 kg
Miditherm 200 MP:
56 .... 65 kg
BEGO Regulus
Ref. 25750
Installation

9
Miditherm MP
Basic principles
Explanation of the symbols
in these operating instructions
Press button
Lamp lights up
Lamp flashes
Displays after unit is switched on
0 .... 3 sec: parameter of the controller
> 3 sec: current furnace temperature
Furnace care
Prior to first use, start program #9 (see “Starting
a program” on page 14): The furnace heats up to
1050°C and maintains this temperature for 60
minutes. This results in the formation of a
protective oxide layer on the heating wire.
Always use the ceramic base.
Place the moulds in the chamber so there is no
contact to the walls as far as possible.
Software

10
Miditherm MP
Basic principles
Up to 9 programs can be stored with Miditherm
(#1 to #9).
Up to 4 temperature holding levels can be set in each
program ( 1 to 4).
The following must be set at each holding level:
-heating-up speed (0 to 9°C/min.),
-temperature of the holding level (max. 1150°C),
-duration of the holding level (max. 99 min.).
The cut-out temperature of the connected Regulus
furnace extraction system can be set for each program.
The factory setting (600°C) is adequate for customary
investment materials that are heated up slowly. For
shock heat investment materials, the Regulus furnace
extraction system must be set to continuous operation
(see page 12).
Five standard programs are factory-set for BEGO al-
loys. The programs can be overwritten as required.
Your own programs should be noted. The tables in this
documentation (please make copies) serve this pur-
pose.
Notes
•In programs with fewer than 4 temperature
holding levels set all values of the following
holding levels to “0”.
•The furnace heats up at maximum speed when
the heating-up speed is set to “0°C/min.”.
•In seldom cases of lower power supply and
above 800 °C, the heating-up speed may not be
achieved.

11
Miditherm MP
Creating a new program
•Switch on unit. The current temperature of the
furnace is displayed after approx. 3 seconds.
‚Select program:
•Press as often until LED lights up.
•Press / until desired
program number appears.
ƒCall up programming mode:
keep button depressed until
LED “°C/min.” flashes.
„Call up and set the parameters at holding level 1:
Press / to call up the following
parameters (the relevant LED flashes)
•heating-up speed (°C/min),
•temperature of the holding level (°C),
•duration of the holding level (min).
Press / to set the values
of the parameters.
…To set the next holding level, go to the field
using the / buttons and call up the next
holding level using the / buttons.
Set the parameters at this holding level as
described in point „.
†Exit the programming mode:
Keep button depressed until
LED “°C” lights up.
‚
•
3 x
55
55
5
Notes
•Always set all holding levels! All values in the
unused holding levels of a program must be set
to “0”.
•Heating-up speed “0°C/min.”
= maximum heating-up speed!
Tips
• You should keep a note of your own programs.
The tables in this documentation are provided
for this purpose.
•Set up the “care program” at program location
9 (see section entitled “Care”): Heating-up
speed “0°C/min.”, temperature of holding level:
1050°C, duration of holding level: 60 minutes.
(Holding levels 2 to 4: all values = 0!)
ƒ
. . . .

12
Miditherm MP
Creating a new programfor shock heat investment materials
So-called shock heat investment materials are not
heated up slowly, but are placed in a furnace that has
been preheated to the final temperature. As a result,
the modelling material burns atypically, i.e., if the
furnace door is opened, inflowing oxygen can cause a
darting flame!
Place all moulds in the furnace within 10
seconds; then keep the furnace door closed
for 15 minutes!
The cut-out of the Regulus furnace extraction system
is set to 600°C at the factory. Shock heat investment
materials are placed in the furnace at a higher
temperature and produce concentrated smoke gases
in a short space of time.
For shock heat investment materials, the
Regulus furnace extraction system (Ref.
25750) must be installed.
Regulus must be set to
continuous operation (see below).
•to ƒsee “Creating a new program”
„Call up and set the parameters at holding level 1:
•heating-up speed: 0°C/min. (= max.)
•temperature of the holding level:
see investment material
•duration of the holding level:
see investment material
Set the parameters of holding levels 2, 3 and 4
to zero.
…Press to set the extraction system to
continuous operation. The display shows “SH”
(shock heat).
(Press again to deactivate.)
†Exit programming mode:
keep depressed until the LED “°C” lights up.
SHOCK HEAT
0 to 15 mins
START
STOP
SHOCK-
HEAT
#
…

13
Miditherm MP
Checking a program
•Switch on unit. The current temperature of the
furnace is displayed after approx. 3 seconds.
‚Select program:
•Press as often until LED lights up.
•Press / until desired
program number appears.
ƒCheck values:
Press / to check the values of
•heating-up speed (°C/min),
•holding temperature (°C) and
•holding time (min.).
„To check the next holding level, go to the field
using the / buttons and call up the next
holding level using the / buttons.
Check the settings at this holding level as
described in point ƒ.
…The current furnace temperature is displayed
again approx. 10 seconds after the last button was
pressed. The check is now finished.
‚
•
3 x
22
22
2
Notes
•The current furnace temperature is displayed
again approx. 10 seconds after the last button
was pressed. This also happens when hesitating
too long before pressing the next key.
•Always check all holding levels! All values in the
unused holding levels of a program must be set
to “0”.
•Changing values: see “Creating a new program”.

14
Miditherm MP
Starting a program
‚
•
3 x
22
22
2
•Switch on unit. The current temperature of the
furnace is displayed after approx. 3 seconds.
‚Select program:
•Press as often until LED lights up.
•Press / until desired
program number appears.
ƒStart program:
Press .
•LED lights up.
•LED „°C“ lights up, display shows
increasing furnace temperature.
•LED lights up, display shows
time of end of program.
When a holding temperature is reached, the
LED “min” lights up and the remaining minutes
of the holding time are displayed..
„At the end of the program an acoustic signal
sounds and LED flashes.
•End program (furnace cools down):
press .
•Hold furnace temperature:
do not press .
ƒ
Notes
Only with shock heat investment materials:
Risk of injury during shock heating!
Place all moulds in the furnace within
10 seconds - then keep the furnace door
closed for 15 minutes!
•After program start it takes around 5 minutes
for the furnace temperature to rise.
•Information on next holding temperature:
press (only during heating-up process).
•Turn off acoustic signal after end of program:
open and close furnace door.
To turn off permanently: see page 18.
•After short power failures the program remains
stored and is resumed. Thus, the program
cannot be ended by means of the master switch.

15
Miditherm MP
Starting a program with Finished time
•Switch on unit. The current temperature of the
furnace is displayed after approx. 3 seconds.
‚Select program:
•Press as often until LED lights up.
•/ drücken bis zur gewünschten
Programm-Nummer.
ƒCall up Finished time:
Press (LED flashes).
„Set weekday:
Press / .
1 = Monday, 2 = Tuesday, .... , 7 = Sunday
…Set time
Hours:
•Press (LED flashes).
•Press / for Finished time (hours)
Minutes:
•Press (LED flashes)
•Press / for Finished time (minutes)
†Exit Finished time mode:
Press once (LED lights up).
Notes
•Setting the current time and date: see the
“Settings” section.
•The furnace will start automatically so the
selected program is completed at the set
Finished time.
•Information on the time of the automatic start:
press .
•Delete a Finished time (LED lights up):
press .
•If the calculated and the actual Finished time
deviate significantly from each other (over 30
minutes), a correction program can be
started: when switching on the unit, keep the
button depressed (display shows P).
Attention: The correction program lasts approx.
8 hours!
‚
•
3 x
55
55
5
ƒ

16
Miditherm MP
Reducing or increasing temperature in running program
Example
After the end of the program (LED flashes)
the furnace temperature is 800°C. Further heating
to 900°C is desired.
•Keep depressed until LED “°C/min.” flashes.
‚Press (LED „°C“ flashes).
ƒPress / until desired temperature
appears.
„Keep depressed until LED “°C” lights up.
Notes
•To change the temperature during the running
program, never press the button!
Pressing this button ends the program. Pressing
it again would restart the program, beginning
with holding level 1.
•The temperature of the furnace can be changed
at every time of a running program. The change
will not be stored permanently in the program.
•
. . . .

17
Miditherm MP
Settings
P1 = weekday setting
P2 = time setting (hours)
P3 = time setting (minutes)
•
…
The time must be set after installation and when
changing between summer and winter daylight sav-
ing time.
•When switching on, keep button depressed:
display shows “P1” (after approx. 3 seconds)
and acoustic signal sounds.
‚Set weekday with / buttons:
1 = Monday, 2 = Tuesday, .... , 7 = Sunday.
ƒPress button to call up “P2” and set time
(hours) with / buttons
„Press button to call up “P3” and set time
(minutes) with / buttons.
…Press button 4 times:
Display shows the current furnace temperature
(after approx. 7 seconds).
“Day and time” setting is finished.
Notes
•For setting P4 (acoustic signal) and P5 (cutout
temperature of the suction extraction unit) see
page 18.
•P6 has no function.
Day and time

18
Miditherm MP
Settings
•
†
At the end of a program an acoustic signal sounds.
If desired, the signal can be switched off permanently.
The Regulus extraction system can be connected to
the rear socket. You can set up to what furnace tem-
perature the suction extraction unit is supplied with
power.
•When switching on unit, keep depressed:
display shows “P1” (after approx. 3 seconds)
and acoustic signal sounds.
‚Press 3 times: display shows „P4“.
ƒPress / : 1 = signal on
0 = signal off
„Press : display shows „P5“.
…Press / to set the cut-out temperature
of the Regulus extraction system. The factory
setting (600°C) is adequate for customary
investment materials that are heated up slowly.
For shock heat investment materials, the Regulus
furnace extraction system must be set to
continuous operation (see page 12).
†Press twice:
display shows the current furnace temperature
(after approx. 7 seconds).
Notes
•Setting from P1 to P3 (weekday, time):
see „Setting day and time“.
•P6 has no function.
P 4
P 5
Acoustic signal /
cut-out temperature of
extraction system

19
Miditherm MP
Care
Only use dry or slightly moist cloths for external
cleaning.
If necessary, sweep out or vacuum-clean the cooled-
down mould chamber.
To burn residues of modelling materials, heat up the
empty furnace to 1050°C regularly every 4 weeks and
maintain this temperature for 60 minutes. This is par-
ticularly necessary if the furnace is used exclusively at
700°C.
Always use the ceramic base.
Place the moulds in the chamber without touching the
walls as far as possible.
•Switch off the unit and pull out the plug prior to
any care, cleaning or maintenance work.
•Let the unit cool down until warm to the touch
prior to any care, cleaning or maintenance work.
•Do not spray the unit with water or immerse in
water.

20
Miditherm MP
Fault Cause Elimination
Always first switch off the unit
and pull out the plug!
(* = exceptions)
After switching on unit, • No power • Check in-house power network / socket.
display is blank • Check installation ( 8).
•Check fuses ( appendix).
- - : - - (signal „door open“) • Door switch is stuck or • Check door switch.
when door is closed defective. • Call after-sales service.
Er01, Er02, Er03 • Thermocouple defective • Replace thermocouple ( appendix).
• Thermocouple connections loose • Tighten connections.
• Defective electronics • Call after-sales service.
Er04 • Thermocouple connected incorrectly • Change connections ( appendix).
•Heater defective • Check heater for continuity. If necessary,
replace heating mould ( appendix).
Er06 • Furnace heats unprompted. • Call after-sales service.
Incorrect time *Set time ( 17).
Time and/or program are • Controller defective • Replace controller.
no longer stored
LED lights up, but •Heater defective • Check heater for continuity. If necessary,
furnace does not get warm replace heating mould ( appendix).
•Controller defective • Replace controller.
Furnace does not get warm when • Long power failure • Check in-house power network for
„Set Finished time“ has been set time switching.
„Increase/reduce temperature“ • The „Start/Stop“ button *Create new program with desired final
does not function in was pressed temperature. Start program.
running program
Calculated and actual Finished time Voltage fluctuations in the power *Carry out correction program ( 15).
deviate significantly from each other network
If an error message occurs (Er XX), an acoustic signal sounds for 3 minutes.
Eliminating faults
This manual suits for next models
1
Table of contents
Other Bego Laboratory Equipment manuals