Behlen Country MX-V User manual

ASSEMBLY INSTRUCTIONS
THANK YOU FOR PURCHASING THIS PRODUCT
For questions about this product, or for parts inquiries, please contact our Customer Service Center listed below.
MX-V CHUTE Hardware Pkg.
62900292
F-19927-1 TECHNICAL INFORMATION 70 090 Rev. 2-1-03 10-14-02
CUSTOMER SERVICE CENTER
PO Box 569
Columbus, NE
68602-0569
Ph: 1-800-447-2751
Fax: (402) 563-7447
www.behlencountry.com
6.1 Side Exit Chute
The side exit allows the animal to
exit out one side of the chute in a
quick and safe manner. The side
chute has a latch with a rope
attached to it extending over the
top to the other side. This allows
the operator to open the side exit
from the opposite side.
The gate will swing open by itself
due to the slant of the side panel
and will remain open on its own.
The side gate can be closed from
the opposite side by returning the
chute to the squeezed position.
This causes the gate to lean inward
toward the chute and will firmly
engage the latch, properly
securing the gate. (View 6A).
View 6A
Side Chute
Rope
7.1 Drop Down Access Panels
These panels (on each side) allow
full access to the lower portion of
the animal. Two latch plates (view
7B) can be easily rotated upward
allowing the panel to rotate
downward toward the ground.
This also provides for a clean
working surface when open. To
close the panel, rotate the panel
back upward and let the latch
plates swing down over them to
lock them into place. (Views 7A &
7B)
View 7A
Side Panels Open
Side
Panels
View 7B
Rotate Latch
Plate to Open.
It normally
hangs down in
the closed
position.
F-19930-1 Rev. 2-1-03 10-14-02
Side Exit Latch
is adjustable by
turning eyebolt.
MX-V SQUEEZE CHUTE OPERATING INSTRUCTIONS
1.1 Headgate Mounting Instructions
Any Behlen Country Headgate will mount quickly
and easily to the MX-V Squeeze Chute. Use the
bolts and nuts supplied with the headgate you
choose to mount (View 1A).
Headgate Mount Locations
2.1 Floor Adjustment
The floor of the MX-V Squeeze Chute can be set at any
combination of 9 different settings. You may change the
position of the sides by lifting up on the 4 floor adjustment
lockdown plates (two each per end). Place the sides on
the desired spacing and set the lockdown plates back
into position (View 2A).
View 1A
View 2A
Lockdown Plates
3.1 Tailgate Operation
The tailgate has a latch on it
to lock it in place. This latch
is released by pulling on the
rope attached to it. As the
gate is released from the
pull of the rope, the gate will
rise to allow access into the
squeeze chute. The gate
can be locked in either the
open or closed position. In
either position, pulling on
the rope will unlock the latch
and allow it to move up or
down.
(Views 3A & 3B)
F-19928 10-14-02
View 3A
Closed
Tailgate
View 3B
Open
Tailgate
Tailgate Rope Tailgate
Rope
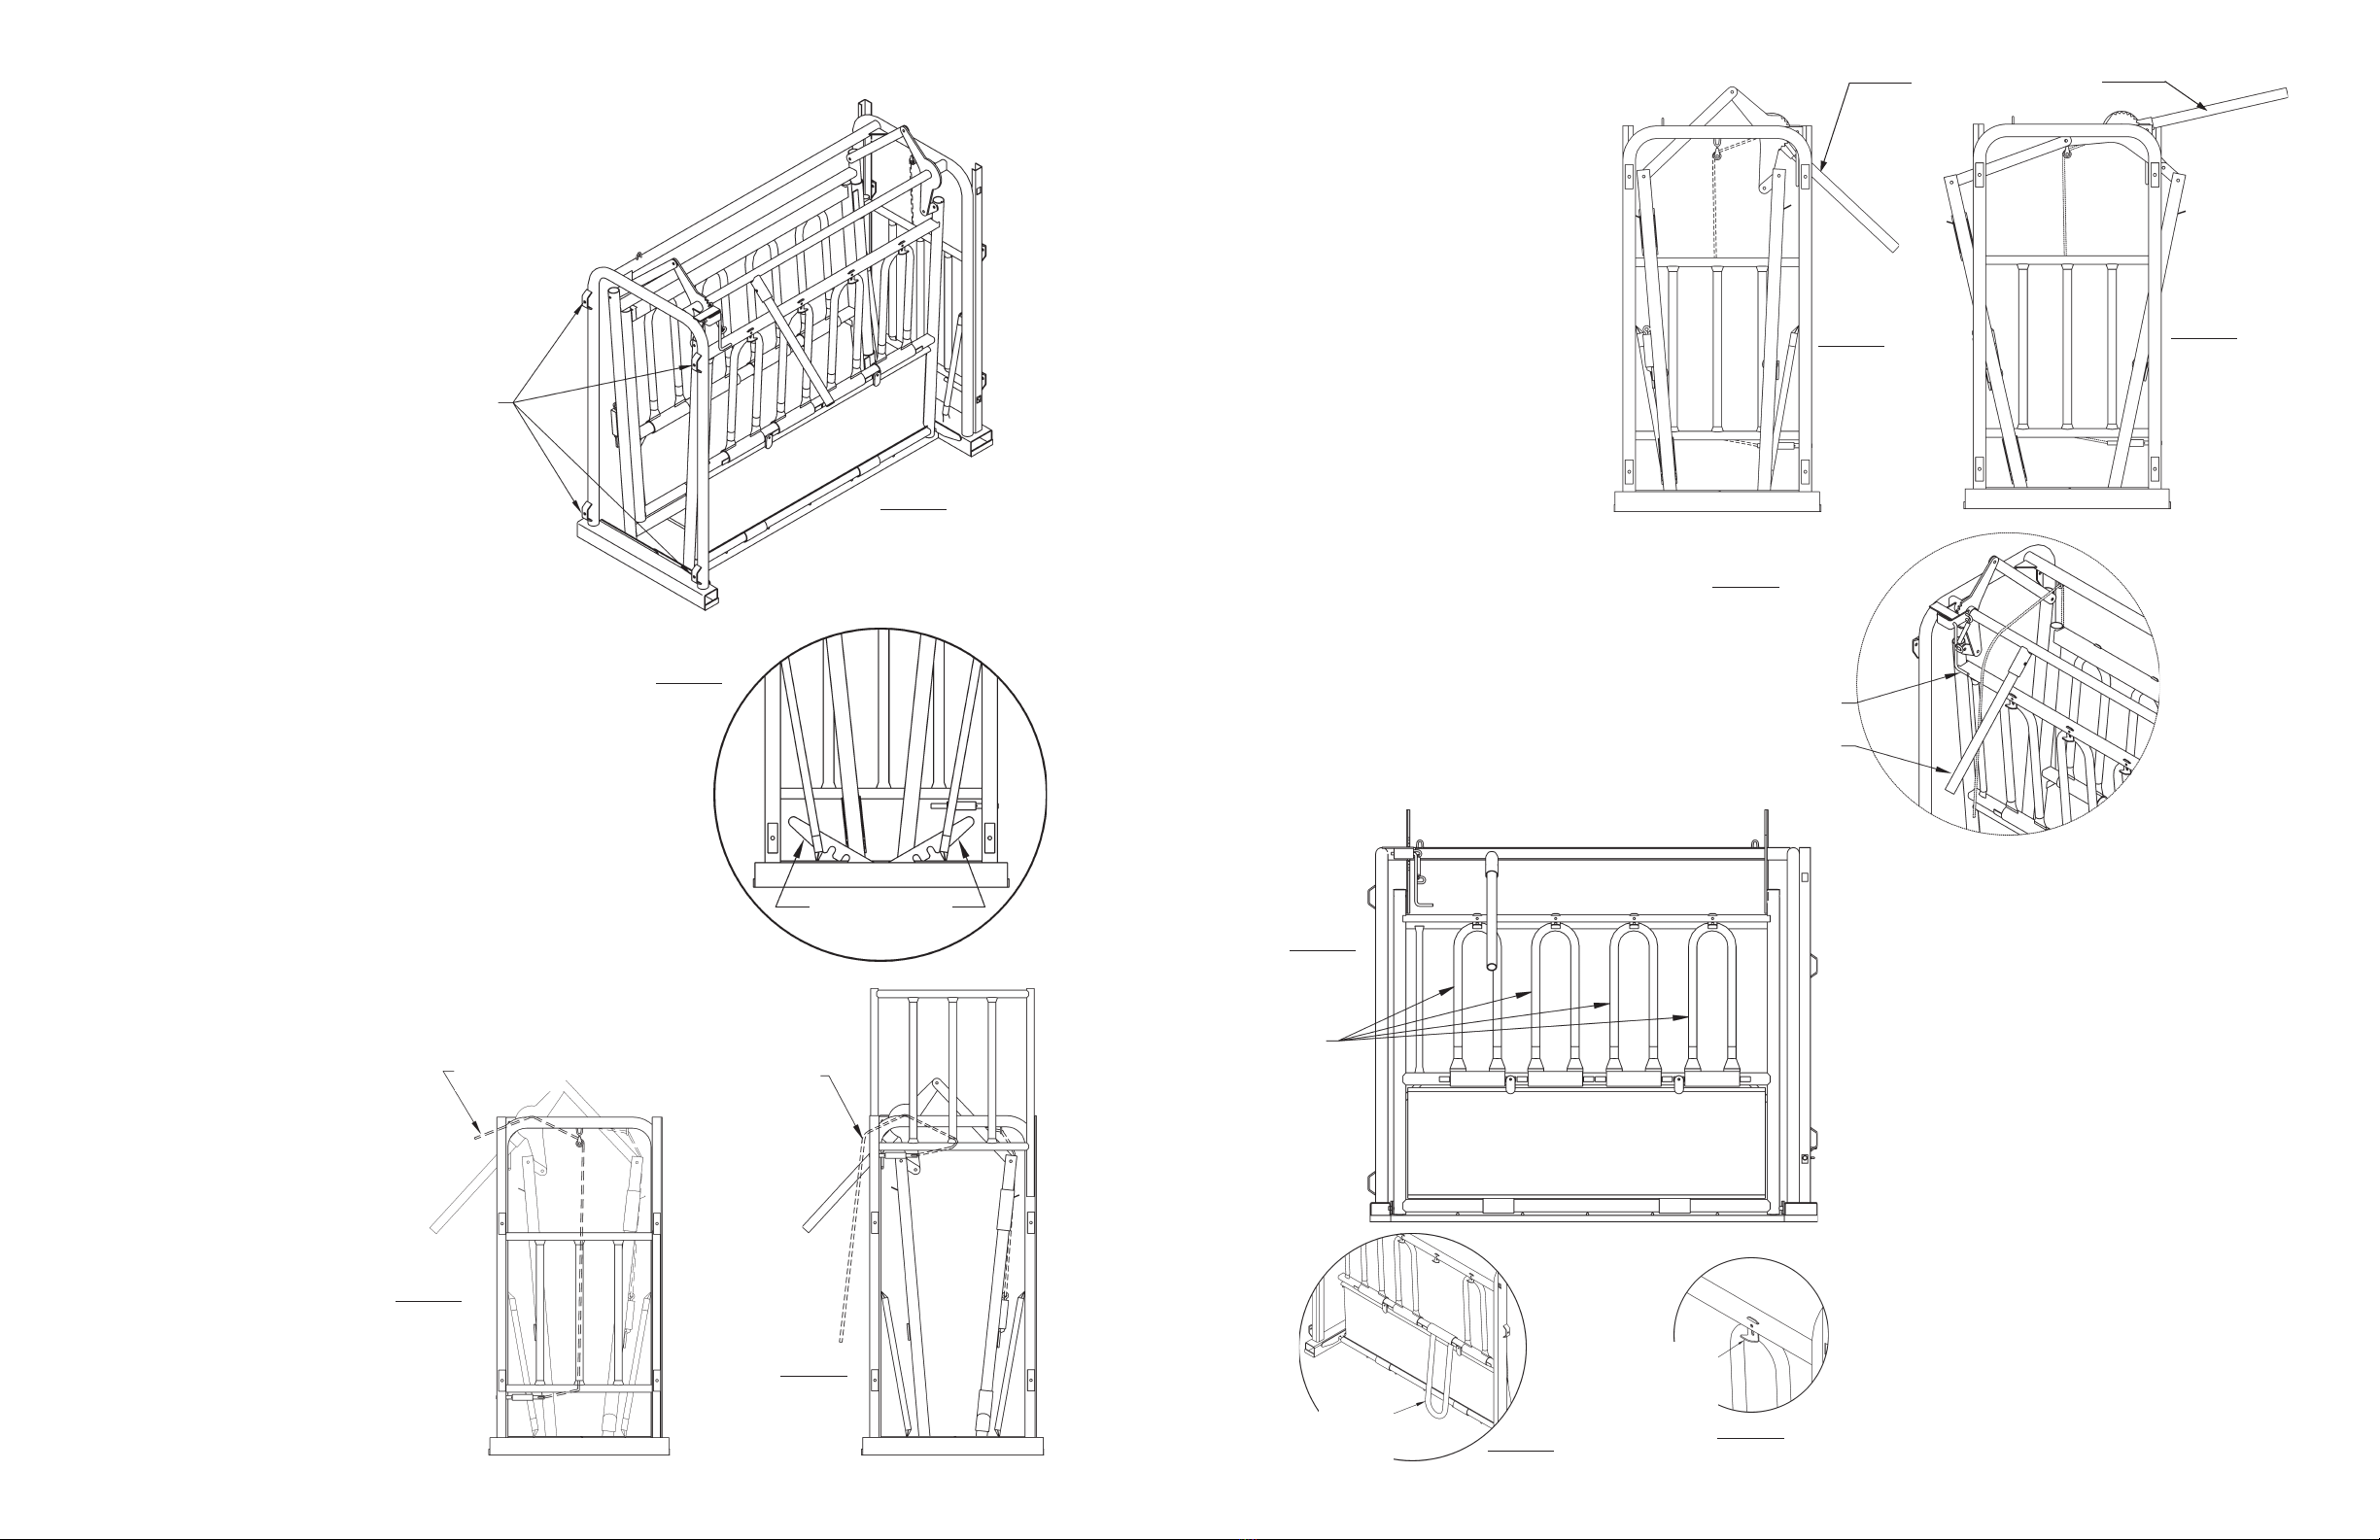
4.1 Squeeze Operation
Pulling down on the overhead
handle performs the squeeze
operation. The sides of the
chute will move inward together
and evenly. When you achieve
the desired squeeze on the
animal, set the Ratchet Release
Handle back to its normal
resting position. This will lock
the sides in place.
To release the animal from the
squeeze chute, apply a small
amount of pressure to the
Overhead Handle, pull outward
on the Ratchet Handle, and then
fully raise the Overhead Handle
to its full open position. Set the
Ratchet Handle back to its
normal resting position. (Views
4A & 4B)
Squeeze Chute Handle
Ratchet Handle
Squeeze Chute Handle
View 4B
Open
Squeeze
Chute
View 4A
Closed
Squeeze
Chute
View 4C
Ratchet & Squeeze Chute
Handle Detail
5.1 Drop Down Bars
The drop down bars allow for a larger
access point to the animal from the side.
Each side has 4 drop down bars all of
which can be dropped down individually.
The drop down bars rotate downward
onto the bar directly below them. To
open these drop down bars, lift upward
on the Drop Bar Latch (view 5C). To
close, simply rotate upward back to their
original position and push firmly into the
latch and it will automatically lock into
place. (View 5A,5B & 5C.)
Drop
Bars
(4 each
side)
View 5A
Drop Bars
View 5C
Drop
Bar
Latch
Drop Bar
Open
Position View 5B
F-19929 10-14-02
This manual suits for next models
1
Other Behlen Country Farm Equipment manuals

Popular Farm Equipment manuals by other brands


Kunz
Kunz AcrEase MR55VE owner's manual

Gaspardo
Gaspardo COMBINATA 250 Use and maintenance / spare parts

Kerbl
Kerbl RotaBrush Classic Instructions for use

Finn
Finn T90S MR Operator Instructions And Parts Manual

Croplands
Croplands PEGASUS 4000 PARTS & OPERATORS MANUAL

Landoll
Landoll Brillion 3631-25 instruction sheet


