Pinnacle Fowl House Series User manual

FOWLHOUSE
1.51W x 1.51D x 1.82Hm
Tools required: Drill, measuring tape, Phillips-head screw driver, rivet gun, rubber mallet, sturdy ladder, shifting spanner, 2 saw horses, 3mm
steel drill bit, 4mm steel drill bit and a 10mm masonry drill bit.
Assembly instructions
Fowl House Series
Congratulations on purchasing your new Pinnacle fowl house. Before assembling, we recommend
you read the instructions thoroughly. Your new fowl house comes with pre-drilled holes to make
assembly quicker. We recommend you assemble it using a trestle table or sawhorses and planks.
This will ensure that you are working o the ground and make it easier for you.
Assembly of this fowl house is a two-person job and should not be attempted in windy conditions.
Check out our
shed building
tips on Youtube!
AU: 1800 349 776
NZ: 09 276 4071
www.pinnacle.net.au

FOWLHOUSE1.51W x 1.51D x 1.82Hm
2
Dimension overview:
Outer base dimensions 1515 x 1515 mm
Inner base dimensions 1470 x 1470 mm
Wall height 1800 mm
Peak height 1825 mm
Roof width 1601 mm
Door opening dimensions 1740 x 746 mm

Build your fowl house in 7 easy steps!
Step 1: Check all parts against the component list
Step 2: Assemble the rear wall panels
Step 3: Assemble the side wall panels
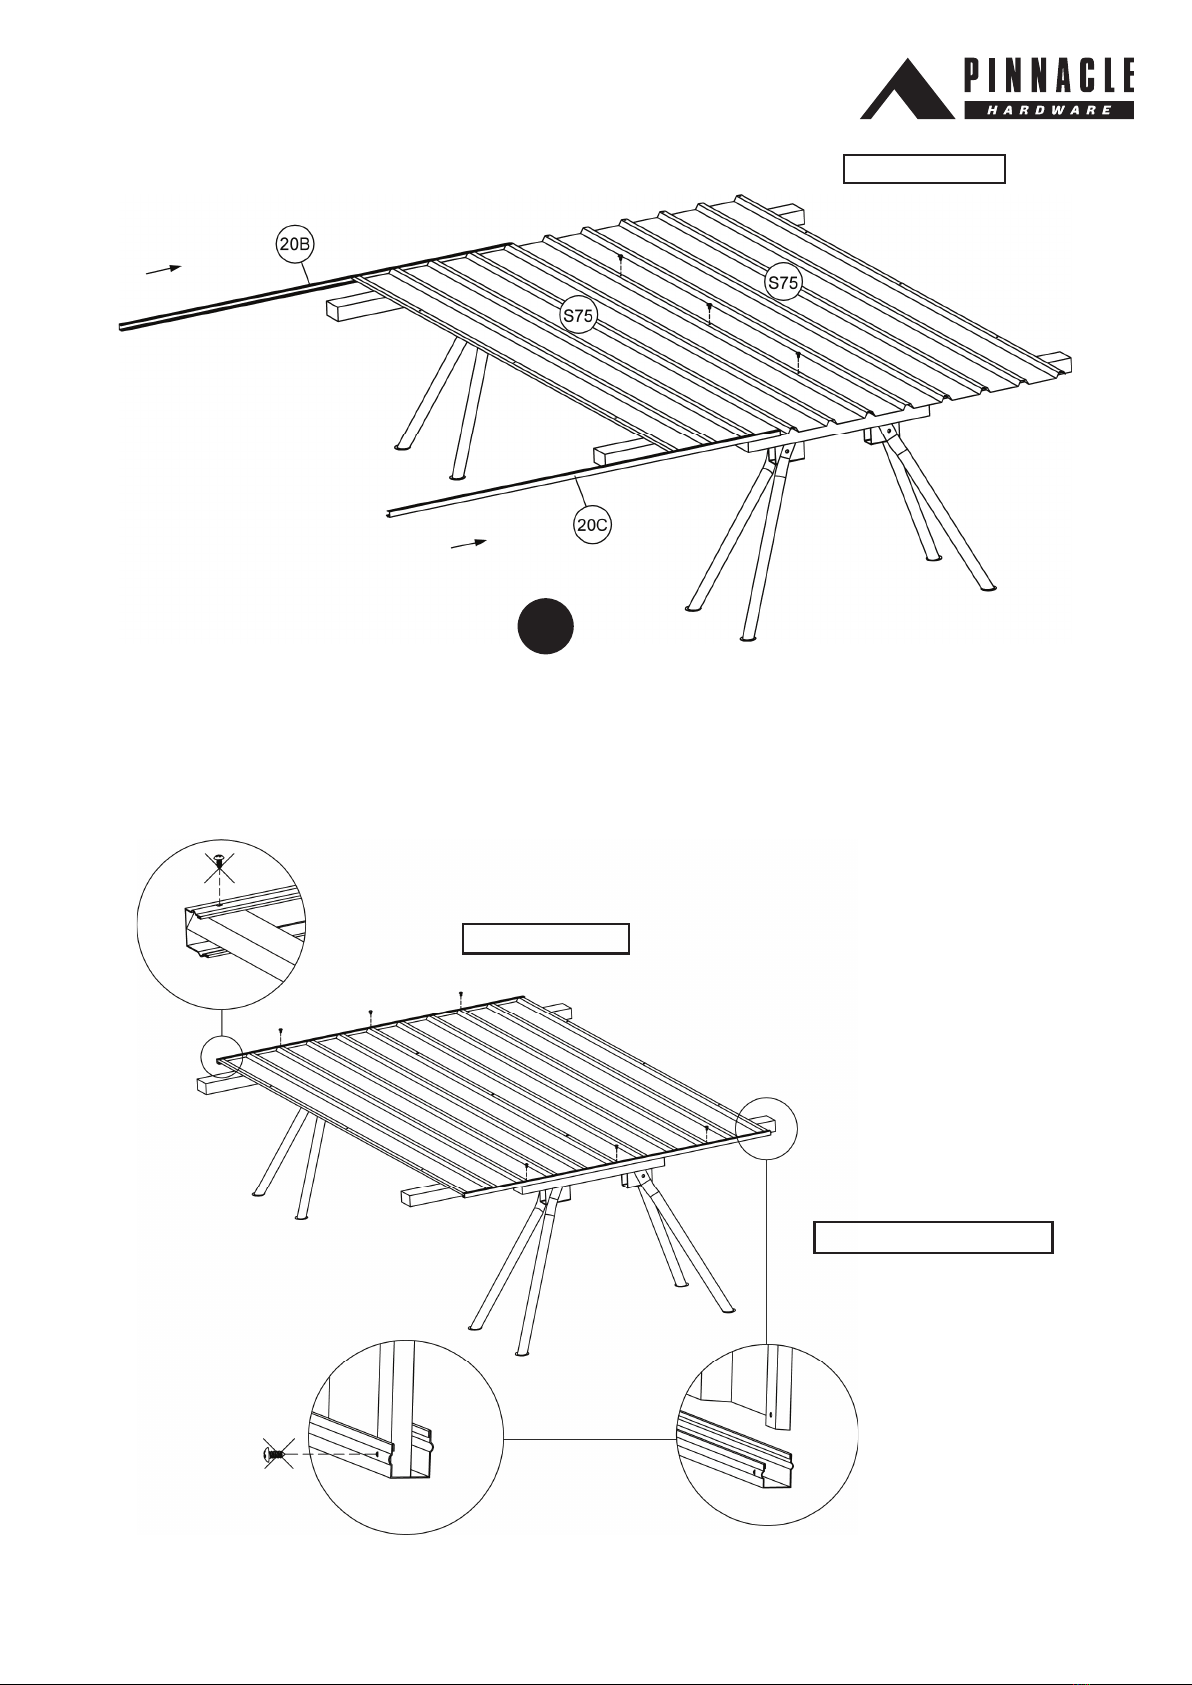
Step 4: Assemble the roof panels
Step 5: Assemble the front wall panel
Step 6: Assemble the front door
Step 7: Fit the panels together
Warning: Do not assemble this fowl house on a windy day.
Warning: This fowl house must be fully assembled and anchored to a concrete slab using a bolt down kit in one session/day.
This fowl house must not be left partly assembled.
Assembly recommendations: We recommend a minimum of two people are needed to assemble this fowl house.
Concrete slab: Please ensure that your site is level. It is recommended that your slab is
100mm thick and you use builder’s plastic and F52 reinforcing mesh. We recommend that
you make your slab 100mm bigger than the base dimensions of your fowl house. This will
allow for a 50mm edge around your fowl house. We recommend that you slope the 50mm
edges downward by 10mm so that rainwater can drain away from your fowl house.
1615mm
CONCRETE SLAB: 1615mm

FOWLHOUSE1.51W x 1.51D x 1.82Hm
4
Picture Description Component Location Part
No. QTY Check
Sheet Sheet 1800x770mm Rear wall S75 2
Sheet Sheet 1800x770mm Side wall S76 4
Sheet Sheet 1600x770mm Roof 8A 2
Front Wall
Sheet Sheet 1800x708mm Front 17A 1
Door Sheet 1745x770mm Door 18A 1
Channel Channel 1508mm Roof / side
wall 20A 4
Channel Channel 1508mm Rear wall 20B 1
Channel Channel 1508mm Real wall 20C 1
Channel Channel 1508mm Front 20E 1
Channel Channel 1508mm Front 20F 1
Channel Channel 1508mm Side wall 20H 2
Step 1: Check all parts against the component list
Lay out all parts with number facing outwards and check o against parts list.

5
Picture Description Component Location Part
No. QTY Check
Channel Channel 655mm Front 86 1
Channel Channel 775mm Front 23 1
Jamb Jamb 1798mm Front J32 1
Jamb Jamb 775mm Front 42 1
Corner Brace Brace 1798mm Corners Z32 2
Corner Brace Brace 1898mm Corners Z33 1
Lip Lip 1601mm Roof 51A 2

FOWLHOUSE1.51W x 1.51D x 1.82Hm
6
Picture Component QTY Picture Component QTY
Self-tapping screws (10mm) 130 Self-tapping screws (16mm) 20
4.0 x 10mm Rivet 6 3.0 x 10mm Rivet 15
Pad bolt (Part 70) 1 Keeper (Part 71) 1
Qty checking date: ____ / ____ / _____
Qty checking personal badge number: _______________
Signature: _________________________________________
In the unlikely event that you nd you are missing a part, Australian customers please contact Pinnacle on 1800 349 776. New Zealand customers
please contact Harco (Harkness & Young Ltd) on: 09 276 4071. A copy of proof of purchase may be requested.
Fittings part list:
CAUTION: Birds can be susceptible to heavy metal poisoning from zinc/galvanised coatings. Please check that our metal fowl
houses are suitable for your pet. Refer to your local vet for further information.
IMPORTANT: Scrub the mesh with a mild solution of vinegar (2 cups in a bucket of water) and then rinse with clean water. This will
remove excess zinc that could potentially cause harm to pets.

7
Fowl house overview:

FOWLHOUSE1.51W x 1.51D x 1.82Hm
8
Step 2: Assemble the rear wall panels
For easier assembly of your fowl house use sawhorses with timber studs as per diagram below (timber needs to be the same length
as the fowl house (1.5 M)) or alternatively, a trestle table.
Place 2 x part S75 (sheets) on your worktable and join together with the self-tapping screws as per the diagram below.
Now t parts 20B (top channel) and 20C (bottom channel) to the sheeting by tapping (diagram A) or sliding them in (diagram B). Make
sure the small lip of the channel is always facing out. This ensures rainwater cannot build up inside your fowl house.
A
RIDGES FACING UP
ROOF TOP EDGE

9
ROOF TOP EDGE
Step 2: Assemble the rear wall panels (continued)
Please note the groove should face downwards. Position the top and bottom channels with self-tapping screws as well. NOTE: All screws
marked with a cross should not be xed at this stage.
Tip: If panel and screw holes do not line up, try pulling panel to match up holes.
B
RIDGES FACING DOWN
ROOF TOP EDGE

FOWLHOUSE1.51W x 1.51D x 1.82Hm
10
Step 3: Assemble the side wall panels
Place 2 x part S76 (sheets) on your worktable and tap or slide on part 20H (top channel) and part 20A (bottom channel). Fix part 20A
(bottom channel) with self-tapping screws but not part 20H (top channel) at this stage. Make sure the small lip of the channels is
always facing out. This ensures rain water cannot build up inside your fowl house. NOTE: All screws marked with a cross should not
be xed at this stage.
RIDGES FACING UP
ROOF TOP EDGE

11
Step 4: Assemble the roof panel
Place 2 x part 8A (sheets) on your worktable and join together with the self-tapping screws as per the diagram below.
Now tap or slide 2 x part 20A (channels) onto the sheeting and x them to the top and bottom with self-tapping screws. Make sure the
small lip on both channels are facing out. This ensures rainwater cannot build up inside your fowl house. Now t 2 x part 51A (side
lips) to the sheeting and x them with the self-tapping screws provided.

FOWLHOUSE1.51W x 1.51D x 1.82Hm
12
Step 4: Assemble the roof panel (continued)

13
Step 5: Assemble the front wall panels
Place part 17A (front wall) on the worktable then t parts 20F (top channel) and 20E (bottom channel) to the front wall sheeting and
x with self-tapping screws. NOTE: Fix parts 20F (top channel) from the centre hole rst. Secure the iron mesh by riveting part 86
(channel) onto part 20F (top channel). It’s recommended you x part 86 (channel) from the inside rst followed by the front. Make sure
the small lip on both channels (20F & 20E) is facing out. This ensures rainwater cannot build up inside your fowl house.
FIX WITH 3.0 X 10MM RIVETS
INSIDE
FRONT
FIX WITH 16MM SCREWS
Please note:
Large lip on part 86
(channel) should be
facing out!

FOWLHOUSE1.51W x 1.51D x 1.82Hm
14
Step 6: Assemble the front door
Fit parts J32 (jamb), 42 (jamb) and part 23 (bottom channel) to the front wall and x with self-tapping screws. Make sure the joints are
xed as per the below diagrams. NOTE: Screws marked with a cross should not be xed at this stage.

15
Step 6: Assemble the front door (continued)
Fix part 18A (pre-assembled door) to the front wall panel using a rivet gun and the provided 4.0 x 10mm rivets.
FIX WITH 4.0 X 10MM RIVETS

FOWLHOUSE1.51W x 1.51D x 1.82Hm
16
Step 6: Assemble the front door (continued)
Now x part 70 (pad bolt) using the pre-drilled holes with self-tapping screws or 3.0 x 10mm rivets.
FIX WITH 10MM SCREWS FIX WITH 3.0 X 10MM RIVETS

17
Step 7: Fit the panels together
Attach the two side walls to the back wall, then t the front wall by xing 2 x parts Z32 and part Z33 (corner bracing) followed by
the roof. Fix all of these components together using the provided self-tapping screws. NOTE: Fix the pad bolt keeper (71) with the
provided 16mm self-tapping screws or 3.0 x 10mm rivets at this stage as well.
FIX WITH 16MM SCREWS FIX PADBOLT KEEPER
WITH 3.0 X 10MM RIVETS
FIX PADBOLT KEEPER
WITH 16MM SCREWS

FOWLHOUSE1.51W x 1.51D x 1.82Hm
18
Step 7: Fit the panels together (continued)
A bolt down kit can be purchased from your local Bunnings store and attached to this fowl house. Please refer to diagram
below for installation.
DOOR
SLEEVE ANCHOR BOLT
SLAB
STEEL ANGLE
BOLT & NUT WALL SHEET

19
Warranty statement:
This warranty against defects is given by:
Pinnacle Hardware
Business Address: 28 Hudson Court, Keysborough VIC 3173
Ph: 1800 349 776
New Zealand customers please contact:
HARCO (Harkness & Young Ltd)
Ph: 09 276 4071
Email: [email protected]
Details of Manufacturer’s Warranty
This product comes with a 15 year limited structural warranty (“the Warranty Period”) from the date of purchase. This warranty
also applies where there are missing or damaged parts identied in the parts list referred to in the instruction kit within the
product packaging.
Please ensure that you keep this warranty form in a safe place along with your proof of purchase.
Product: ………………………………………………………….
Place of purchase & Postcode: ...........................................
Date of Purchase: ........ /........ /........
The benets of this warranty are in addition to your rights under the Australian Consumer Law (ACL) or Consumer Guarantees
Act 1993 (NZ) and in particular, the guarantees implied under the ACL or Consumer Guarantees Act 1993 (NZ) and any other
rights and remedies of the consumer under a similar law in relation to the goods and services to which this warranty relates.
Process of claiming Warranty:
To make a claim under the Warranty within the Warranty Period, you will need to contact the manufacturer directly by
phone or email:
Australian Customers please contact Pinnacle Hardware on:
Claims Department contact number: 1800 349 776
New Zealand Customers contact Harco (Harkness & Young) on:
Claims Department contact number: 09 276 4071
You will be required to produce proof of purchase (this is at discretion of the manufacturer) at the time of the claim.
The manufacturer bears the cost of replacing the products or spare parts or repairing the products and reasonable direct
expenses of claiming under this warranty:
– Where parts are replaced, the manufacturer will bear the cost of sending the spare part and will endeavour to deliver it to
the customer’s nearest reseller within 10 working days for the customer to pick up. At such time the customer may be required
to return the alleged faulty parts.

FOWLHOUSE1.51W x 1.51D x 1.82Hm
20
– Where assessment is required in case of replacing or repairing the product, the manufacturer will appoint an assessor within
10 working days to identify the alleged defect. The manufacturer will bear the repair costs by appointing a local tradesman. The
manufacturer may choose to replace the product if the repair or the cost of repair is not feasible. The replacement product will
be available for collection from the nearest reseller within 10 working days. The customer will bear the cost of assembly for the
replacement product.
IMPORTANT
1. Manufacturer’s Disclosure
This warranty against defects shall not apply in the following situations:
A) Where the product is not assembled in accordance with the instructions provided in the product kit.
B) Where the product is used to store corrosive materials such as fertilizer, chlorine etc;
C) Where the damage to the product is caused by storms.
2. Weatherproong
This product is weatherproof to a certain level; however driving windy rain may cause the product to leak. Condensation may also
occur in some weather conditions such as extreme heat or cold. We strongly recommend you use a waterproof sealant to ll any
gaps or joins in order to minimise the risk of water entering.
3. Major Defects
If the manufacturer is satised that the defect is a major defect, the purchase price may be refunded in lieu of providing a
replacement product or repairing the product.
Our goods come with guarantees that cannot be excluded under the Australian Consumer Law or Consumer Guarantees
Act 1993 (NZ). You are entitled to a replacement or refund for a major failure and for compensation for any other reasonably
foreseeable loss or damage. You are also entitled to have the goods repaired or replaced if the goods fail to be of acceptable
quality and the failure does not amount to a major failure.
Other manuals for Fowl House Series
1
This manual suits for next models
1