Beijer Electronics Korenix JetNet 7612G User manual
Interface Introduction
JetNet 7612G/5612G supports 8 ports Gigabit Ethernet RJ-45, and 4 ports
swappable 100/1000 Ethernet SFP socket for fiber connection.
Mounting the DIN Rail
The DIN Rail clip on the rear of JetNet 7612G/5612G, and supports 35mm
DIN rail.
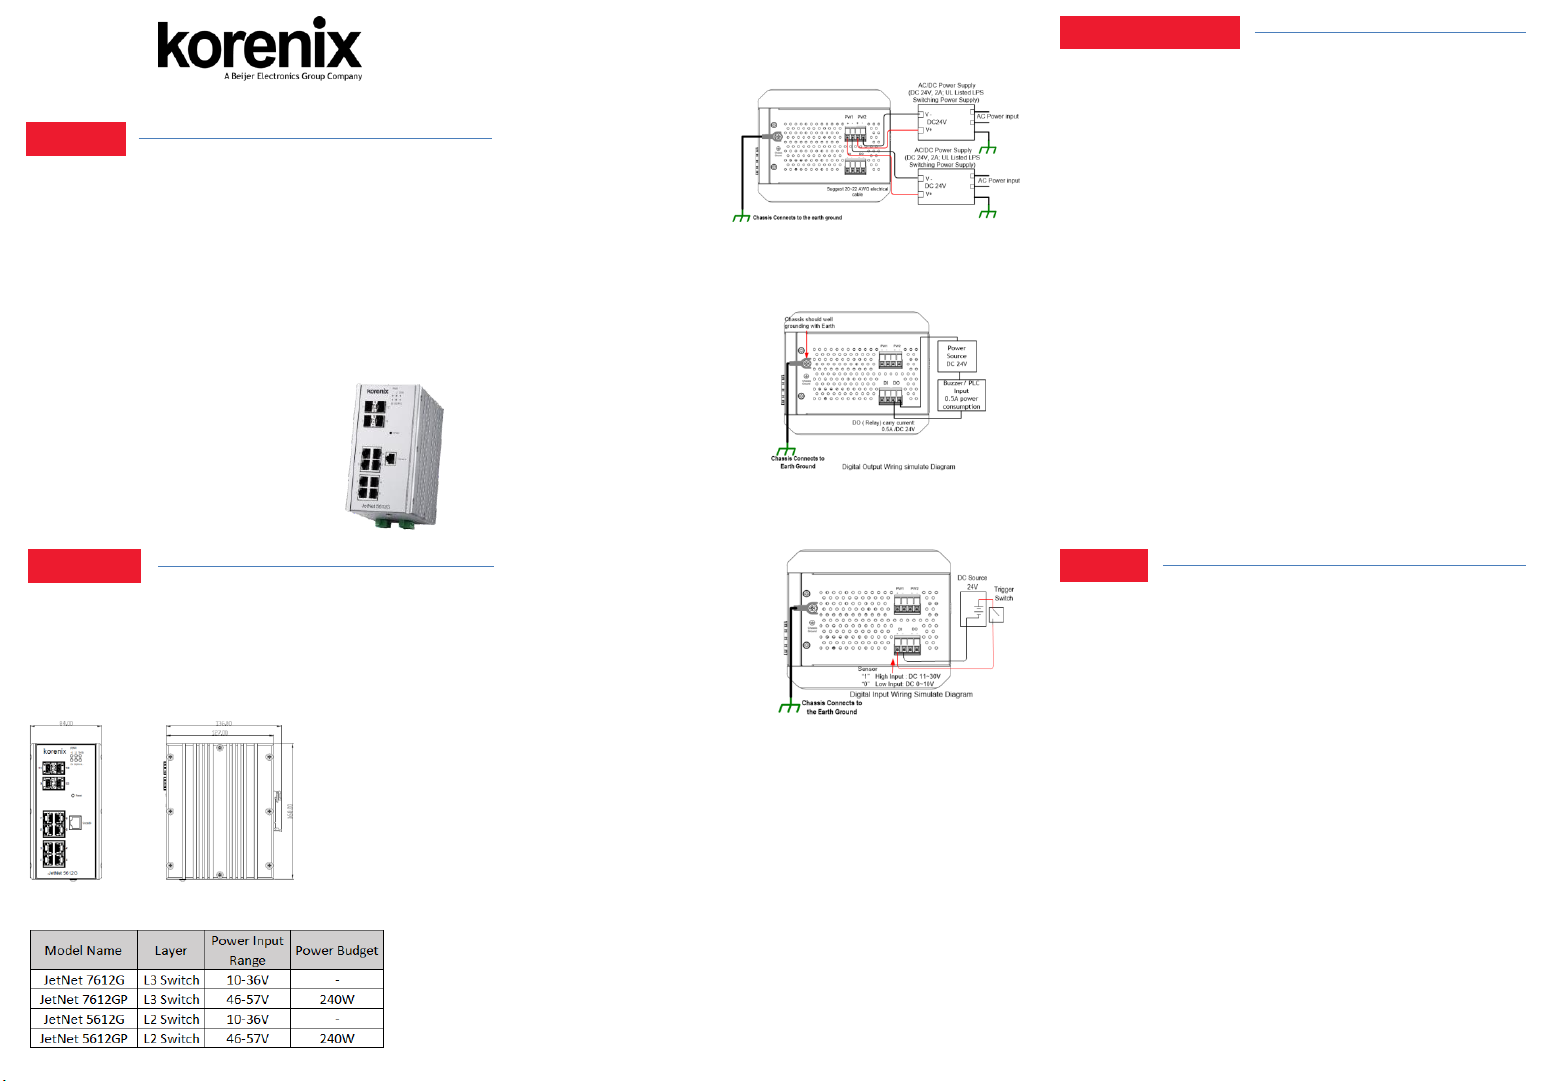
Power Details
You can configure JetNet 7612G/5612G Series via the RS-232 console with
the attached console cable. Or you can remotely manage the switch via
network. You can choose Telnet/SSH, Web/HTTPS management.
Preparation for console management
Attach the RS-232 DB9 connector to your PC’s COM port. Connect the RJ-45
connector to the console port of the JetNet Switch.
1. Go to Start ►Program ►Accessories ►Communication ►Hyper
Terminal
2. Give a name to the new console connection.
3. Choose the COM name and select the correct serial settings. The serial port
settings are as below: Baud Rate:115200/Parity: None/Data Bit: 8/Stop Bit: 1
4. After connected, you will see the Switch login request. Type the username
and password and then you can login. The default username is “admin”,
password is “admin”.
5. Follow the manual to configure the software features.
Preparation for Web management
1. Launch the web browser on the PC.
2. Type http://JetNet Managed Switch_IP_Address (The default IP address is
192.168.10.1.), then press Enter.
3. The login screen will appear next. Type in the user name and password and
click “OK” button. The default user name and password is admin/admin.
4. At the left column of the web management interface are the software
features, where ring column will list the available settings.
JetNet 7612G/7612GP/5612G/5612GP
Quick Installation Guide V1.0
Overview
Installation
Device Management
Wiring the Power Inputs & Earth Grounding
1. Insert the positive and negative wires into the V+ and V- contact on the
terminal block connector.
2. Connect the Chassis
Grounding to Earth Ground
system to obtain electromagnetic
immunity to resist lighting,
electro static discharge and
electric fast transient.
3. Tighten the wire-clamp screws to prevent the power wires from being
loosened.
Notes: The recommended working voltage is listed in “Power Details”
Wiring the Relay Output
The relay output contacts are
in the bottom side. The relay
output (DO) is controlled by
the pre-defined operating
rules. To activate relay output
function, please refer to the
User’s Manual for more relay
output management information.
Notes: The relay contact only supports 0.5 A current, DC 24V. It is not
recommended to apply voltage and current higher than the specifications.
The JetNet 7612G/5612G Series is an pure Gigabit Managed Switch
with 8 ports Gigabit Ethernet plus , and 4 100/1000 SFP for optical
fiber connection It adopts high efficiency Ethernet MAC controller
with 24Gbps Switch fabric bandwidth, 9K jumbo frame forwarding and
powerful capability. The robust system design makes the JetNet
7612G/5612G Series survive under harsh outdoor environment with
extreme electric magnetic interference and the variation of environment
temperature. The hardware switching with high performance, low
latency and security. It provides your network infrastructure with great
performance and safety with network access control, and handle burst
packet with smart buffer management for IP surveillance in real
infrastructure.
Package Check List
JetNet 7612G/7612GP/5612G/5612GP
DIN Mounting kit
DB-9 to RJ-45 (RS-232) Console Cable
Quick Installation Guide
Wiring the Digital Input
The Digital Input (DI) contacts are
in the bottom. It accepts one external
DC type signal input and can be
configured to send alert message
through Ethernet when the signal
is changed. The signal may trigger
and generated by external power
switch, like as door open trigger switch for control cabinet.
Note: the DI accepts DC type signal and supports isolated input circuit with
Digital High Level input DC 11V~30Vand Digital Low Level input DC
0V~10V. Do not apply voltage higher than the specification; it may cause
internal circuit damage or a wrong action of DI.
Connect to Network
1. Connect the Ethernet Port: Connect the Ethernet port of JetNet
7612G/5612G Series with the other Ethernet device by Cat-5/Cat-6
UTP or STP cable, and then the LNK/ACT LED will turn on and start
flashing to indicate the communication is occurred between 2 device.
2. Connect the SFP Port: Plug in SFP fiber transceiver. We recommend
using Korenix certificated SFP mini GBIC transceiver. Cross-connect
the transmit channel at each end to the receive channel at the opposite
end.
5 Years Warranty
Each of Korenix’s product is designed, produced, and tested with high
industrial standard. Korenix warrants that the product(s) shall be free from
defects in materials and workmanship for a period of five (5) years from the
date of delivery provided that the product was properly installed and used.
This warranty is voided if defects, malfunctions or failures of the warranted
product are caused by damage resulting from force measure (such as floods,
fire, etc.), other external forces such as power disturbances, over spec power
input, or incorrect cabling; or the warranted product is misused, abused, or
operated, altered and repaired in an unauthorized or improper way.
Attention! To avoid system damage caused by sparks, please DO NOT
plug in power connector when power is on.
The product is in compliance with Directive 2002/95/EC and 2011/65/EU of
the European Parliament and of the Council of 27 January 2003 on the
restriction of the use of certain hazardous substances in electrical and
electronics equipment (RoHS Directives & RoHS 2.0)
Korenix Customer Service
KorenixCARE is Korenix Technology’s global service center, where our
professional staffs are ready to answer your questions at any time.
Support

界面介绍
JetNet 7612G/5612G 系 列 支 持 8端口 千兆 以 太 网 RJ-45 及4个
100/1000 SFP插口支持 SFP光收发器光纤传输。
轨道安装
该导轨卡夹已经收紧锁定在后侧面板,请采用并支持EN50022标准
35mm 寬工业轨道以便安装交换机。
电源指南
JetNet 7612G/5612G 系列工业管理型交换机提供了带内和带外配置
方法。您可以通过RS-232控制面板的连接控制面板电缆配置交换机。
你也可以选择的Telnet/ SSH,网络/ HTTPS进行远程网络管理交换机。
准备控制面板界面软件
将RS-232 串口DB9连接到PC的串口。串口线的RJ-45连接器连接到
JetNet交换机的Console口。
1. 计算机开始 ►程序集 ►附属应用程序►通讯►超级终端机界面
2. 建立一个超级终端机联机名称
3. 选择COM串口名称,并选择正确的串口设置。JetNet交换机的
串口端口设置如下:115200bps, N, 8,1
4. 连接后,你会看到交换机登录请求。输入用户名和密码,然后就
可以登录。默认用户名为“admin”,密码为“admin”。
5. 连接后,你会看到交换机登录请求。输入用户名和密码,然后就
可以登录。默认用户名为“admin”,密码为“admin”。
在网络管理上准备
1. 启动PC上的网页浏览器
2. 键入http://JetNet Managed Switch_IP_Address (默认IP地址
是192.168.10.1),然后按Enter键。
3. 登录屏幕窗口待会将出现。在用户名和密码,键入单击“确定”
按钮。基于Web的管理界面的欢迎页面将出现即可。默认的用户
名和密码是admin/admin。
4. 在Web管理接口的左侧栏的是交换机软件功能,其中点击环圈将
列出可用的相关设置细项。
安装
管理接口
接線的電源輸入與系統接地
1.将正和负导线插入V +和V-
接触端子台连接器上。
2. 连接机箱接地与系统大
地以便获得获得优良的电磁
干扰保护,如静电,浪涌放电,
快速脉冲放电。
3.拧紧丝钳螺丝,以防止
电源线发生松弛。
注意:请采用国家核可具备安全规范的电源共应器,输出电压范围请
参考电源指南。
连接继电器输出
继电器输出触点处于底侧
上。继电器输出(DO)
是通过预先定义的操作
规则来控制。要激活继
电器输出功能,请参阅
用户手册,了解详细继
电器输出的管理信息。
注意:继电器触点只支持0.5 A电流,直流24V。不建议施加高于规格
的电压和负载电流。
JetNet 7612G/5612G系列是具有8端口千兆以太网口以及4个
100/1000 SFP光纤口的工业型网络管理交换机。JetNet
7612G/5612G系列具备24Gbpsel 高速网络数据交换能力并支持
9KBytes大封包。 优异的工业结构设计使其具备耐受恶劣环境能力,
适合应用于工业现场,轨道交通以及道路数据通讯应用,如 影像视
频安防,道路交通控制信号。JetNet 7612G/5612G具有完善的网络
管理及增进网络传输效益功能。除网络效益外其辉煌的电磁敏感性检
测水平,亦实现了铁路轨道及道路边 抗电磁辐射干扰及优良耐候特
性,能满足各项交通安防需求。
产品清单
JetNet 7612G/7612GP/5612G/5612GP
轨道夹扣
DB-9 to RJ-45 串口线
快速安装向导
连接数字输入
数字输入(DI)接触是在该装置
的底侧。它接受一个外部直流
信号输入,并且可以配置为通过
以太网发送警报消息时当信号
改变时。该信号可以触发并通过
外部电源开关产生的,就像是
开门触发开关控制柜。
注意:DI接受DC型信号隔离输入
电路,并支持使用数字高电平输入直流11V~30V和数字低电平输入
DC0V~10V。不要施加电压超过规格更高;它可能会造成内部电路损坏
或造成DI的一个永久性错误动作。
连接到网络
1. 连接以太网端口:以Cat-5e/ CAT-6 UTP或STP电缆连通
JetNet7612G/5612G 系列的以太网端口到 其他以太网设备,
LNK/ ACT指示灯将亮起并开始闪烁,表示2设备之间正在通信。
2. 连接SFP端口:插上SFP光纤收发器。我们建议使用科洛理思认
证的SFP GBIC迷你 收发器。传输信道需交叉连接到另一端的接
收信道。
客户服务
导言
5年质保
所有科洛理思产品的设计、制造及测试都是采用较高的工业标准。科
洛理思保证自产品出货日起提供最高5 年之免费保修服务,保修期间
如因零件损坏或制程不良而导致产品故障,我们提供免费维修服务。
自然外力 (火、水、雷灾)所造成的产品故障,或其它外部因素如电
源干扰、不当电源输入、不当接线等造成的损坏,不列入产品保固范
围;此外,产品被误用、未经授权的修理及修改等行为将造成保固条
款失效。
注意! 请勿于电源开启时插拔接线端子,避免产生火花造成系统损坏。
此产品保证完全符合欧盟2003年1月27日电气和电子设备危害物质限
制委员会限用指令2002/95/EC (RoHS)及2011/65/EU(RoHS 2.0)。
Korenix售后服务
KoreCARE 是科洛理思科技全球服务中心,將有技术人员随时解答您的疑问。
科洛理思全球服务中心 EMAIL: [email protected]
详细文件下载: www.korenix.com.cn/support_downloads.htm
业务服务: [email protected]
官网: www.korenix.com.cn
JetNet 7612G/7612GP/5612G/5612GP
快速安装指南V1.0
Korenix Technology Co., Ltd.
(A Beijer Electronics Group Company)
Tel:+886-2-89111000
Fax:+886-2-29123328
Business service:s[email protected]
Customer service:[email protected]
www.korenix.com
CPQ000N7612000
Patent No. (Taiwan):
Granted Invention: I 313547
Granted Invention: I 321415
Granted Invention: I 344766
Granted Invention: I 346480
Granted Invention: I 356616
Granted Invention: I 364684
Granted Invention: I 376118
Granted Invention: I 393317
Granted Invention: I 398066
Granted Invention: I 398125
Granted Invention: I 459757
Utility Model: M 339841
Utility Model: M 339840
This manual suits for next models
3
Other Beijer Electronics DC Drive manuals

Beijer Electronics
Beijer Electronics SUEN00403 User manual

Beijer Electronics
Beijer Electronics BFI-P2 Installation manual

Beijer Electronics
Beijer Electronics BFI-H3 Installation manual

Beijer Electronics
Beijer Electronics X2 pro User manual

Beijer Electronics
Beijer Electronics BFI-E3 Series Installation and operation manual
Popular DC Drive manuals by other brands


GEZE
GEZE E 170 /230 V AC Wiring diagram

Motor Power Company
Motor Power Company DUET AD installation guide

Knauer
Knauer Azura V 2.1S user manual

ABB
ABB ACS250 Technical Instruction

Danfoss
Danfoss FC 300 Programming guide

Rockwell Automation
Rockwell Automation Allen-Bradley PowerFlex 20P Hardware Service Manual