Beijing Hongdee Coroporation EyePad 10 User manual

Handheld Video Magnifier
User Manual
(EyePad 10)
Beijing Hongdee Coroporation

- 1 -
Content
Content.......................................................................................... 1
Product description....................................................................2
Parts and accessories.................................................................2
Using Guide.................................................................................. 5
1、Normal mode................................................................ 6
2、OCR mode...................................................................... 9
Troubleshooting.......................................................................... 13
Safety Guide................................................................................. 14
Technical Specifications.......................................................... 15

- 2 -
1.Description
EyePad 10 Handheld Video Magnifier is of integrated design for close view
and distance view with high resolution. The 10 inch LED HD screen brings
magnificent viewing experience, while HDMI output offer the option of
wider screen vision. The working distance from 11cm to 800cm satisfies
the end user’s close view and distance view requirements. The special
HD camera means excellent viewing conformity. With excellent functions
and special color technology, this magnifier brings you outstanding
vision enjoyment.
2. Parts & Accessories
Name
Number
Video magnifier
1
Power adapter
1
User manual
1
Cloth
1
HDMI
1
Warranty card
1
- 3 -
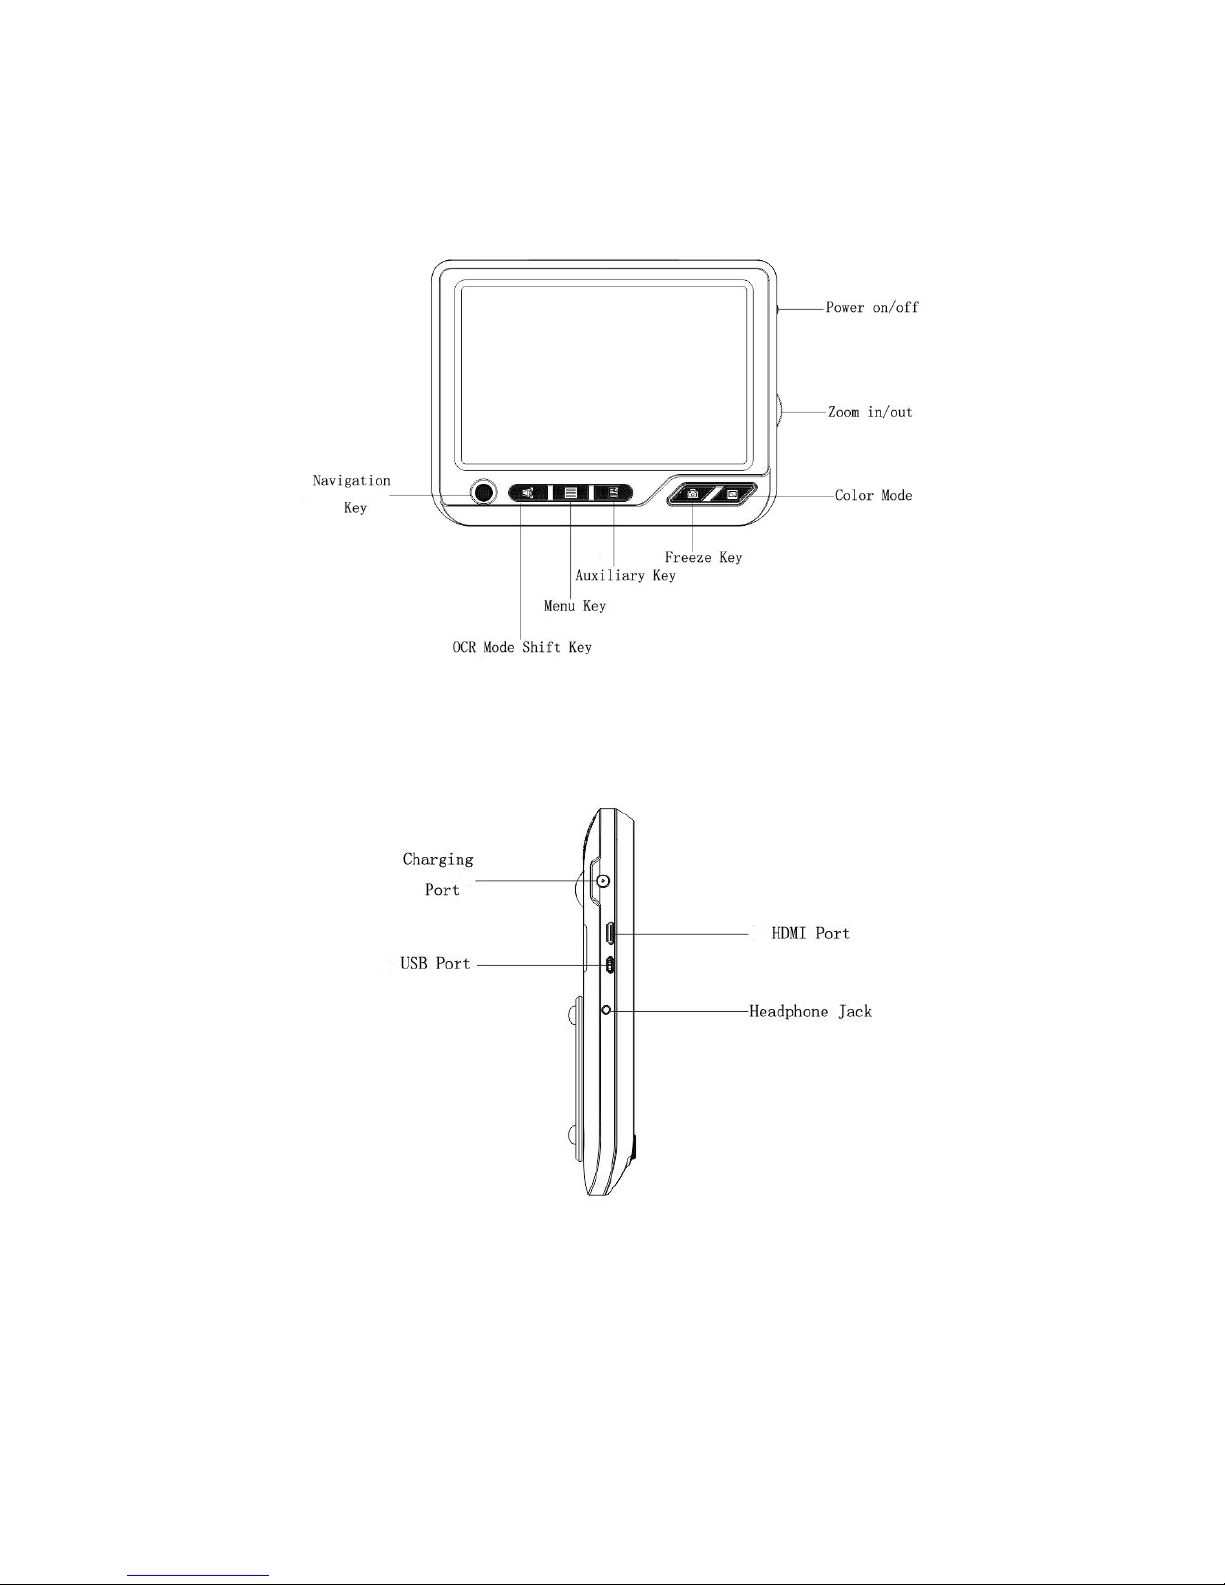
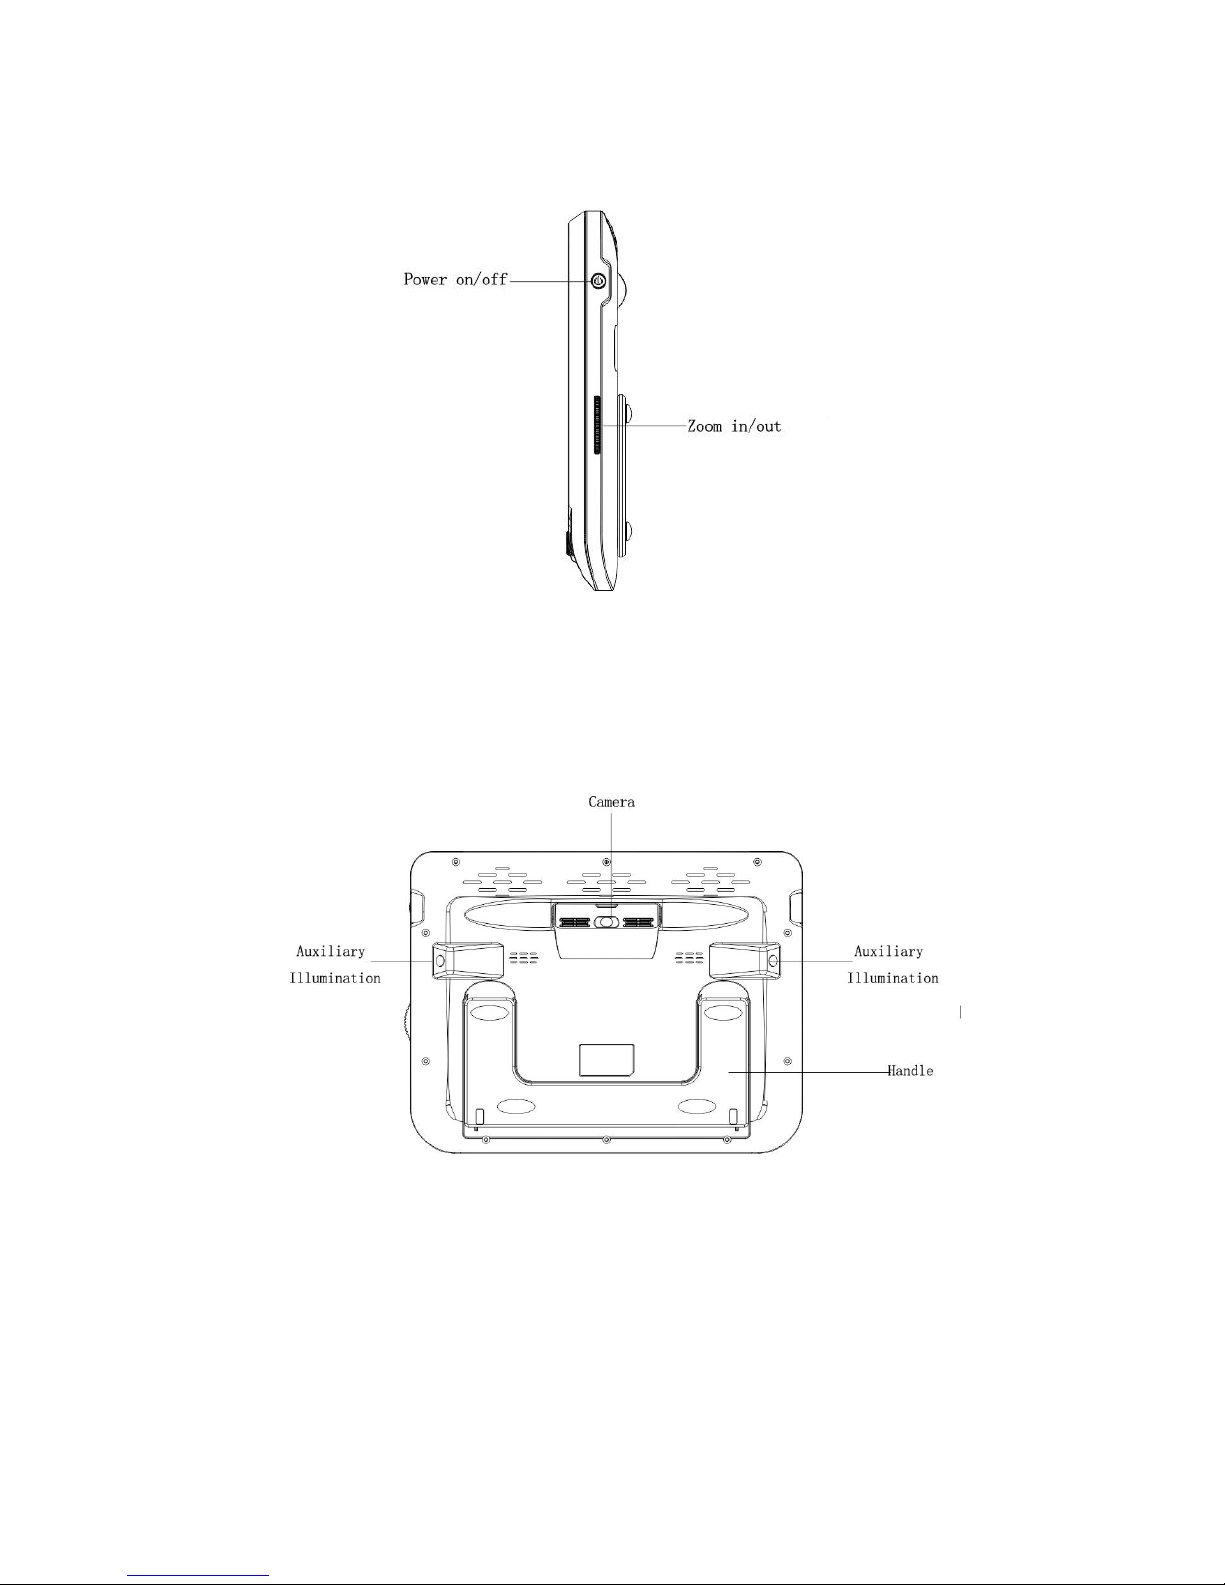
3. Structure
- 4 -

- 5 -
4. Using Guide
4.1 Basis function
4.1.1 Power on/off/standby mode
Long press the power button for 5 seconds, the machine starts up, the screen
lights up and the machine enters normal mode automatically.
When the machine is on, press the power button to turn the machine into
standby mode and the screen is off. Press the power button again to end
standby and run the machine.
Long press the power button for 5 seconds when the machine is on and the
machine is shut down.
4.1.2 Mode switching function
Press the mode switch button to switch between normal mode and OCR mode.
The icon in the lower left corner with the horn logo is OCR mode, and the one
without horn is normal mode.
4.1.3 Zoom in and zoom out function
The zoom in and out knob controls the size of the camera's collection area.
Clockwise rotation makes the image smaller, while counterclockwise rotation
makes the image larger.
4.1.4 Interface functions
Headset: connected headset can listen to text and paragraphs identified by
OCR.
HDMI: use the HDMI cable to connect to the external display screen to view the

- 6 -
images collected by the machine.
USB: data can be transmitted via USB and video and pictures can be copied to
the storage area of the machine.
4.1.5 Focus function
Long press the camera button for 3 seconds in any mode to focus
automatically.
4.2.Normal mode
4.2.1 Auxiliary line function
Press the auxiliary line button to select your favorite mode in normal mode.
Vertical auxiliary line mode: Left-right joystick to control the movement of the
auxiliary line left and righ.
Horizontal auxiliary line mode: up-down joystick to control the movement of
the auxiliary line up and down.
Vertical auxiliary box mode: the initial size of the vertical auxiliary box is
one-tenth of the width of the screen. Left-right joystick is used to adjust the
position of the auxiliary box, and up-down joystick is used to adjust the size of
the auxiliary box..
Horizontal auxiliary box mode: the initial size of the horizontal auxiliary box is
one-tenth of the width of the screen. up-down joystick is used to adjust the
position of the auxiliary box, and Left-right joystick is used to adjust the size of
the auxiliary box.
4.2.2 Freeze screen and picture saving function

- 7 -
Freeze screen mode: in normal mode, click the camera button to freeze the
screen. In this mode, auxiliary line mode and color can be used.
Exit the frozen screen mode: in the frozen screen mode, press the camera
button again to exit the frozen screen mode.
Picture saving after freezing: in the frozen screen mode, long press the camera
button to save the picture . At this time, the screen will appear an icon that is
being saved. The picture is stored in the album, you can view the saved image
again in the album.
4.2.3 Contrast color mode
Color mode: the function can only be used in normal mode. Press the change
color button and the machine enters the change color mode. Support 17 color
modes:
Full color mode
High contrast white text on black background
High contrast black text on white background
High contrast blue text on yellow background
High contrast yellow text on blue background
High contrast green text on black background
High contrast black text on green background
High contrast yellow text on black background
High contrast black text on yellow background
High contrast white text on red background

- 8 -
High contrast red text on white background
High contrast white text on blue background
High contrast blue text on white background
High contrast yellow text on red background
High contrast red text on yellow background
High contrast green text on white background
High contrast white text on green background
Exit color mode: long press the change color button for 3 seconds to exit the
change color mode and enter the true color mode.
4.2.4 Menu functions in normal mode
Enter menu: in normal mode, press the menu button to enter the menu
interface. The menu includes three functions: adjustment of screen brightness,
adjustment of volume, and album function.
Selection function: in the menu interface, left-right joystick is used to select the
function of adjusting screen brightness, adjusting volume and album, yellow
and black images are selected, and orange and white images are not selected.
Exit menu: long press the color button for 3 seconds to exit the menu interface.
4.2.5 Album function in normal mode
Enter album function: in normal mode menu interface, press the photo button
to enter album.
Picture browsing function: in the photo album interface, press joystick to
browse pictures. Image orange represents the current image selected state,

- 9 -
and yellow represents the unselected state.
Picture view function: when the picture is selected, press the picture button to
start the full screen view. In this mode, press the color change button to
preview in 17 color modes.
Image deletion function: after entering full screen browsing mode, long press
the photo button for 3 seconds to delete the current image.
Exit image view: in the image preview mode, long press the color button for 3
seconds to exit.
Exit album function: long press the color button in the album interface for 3
seconds to exit album.
4.2.6 Screen brightness function
Adjust the screen brightness: select the brightness function on the menu
interface, and up-down joystick to adjust the screen brightness. up to increase
the screen brightness and down to reduce the screen brightness.
4.2.7 System sound function
Adjust the system volume: select the sound adjustment function in the menu
interface. and up-down joystick to adjust the volume. up to increase the
volume and down to reduce the volume.
4.2.8 Photo copy
Open the album storage path of the machine, as shown in the figure below. All
images saved in normal mode are stored in the image folder, and all images
saved in OCR mode are stored in the ocrimage folder. Select the image you want

- 10 -
to copy, can be directly copied to the computer, all images save format JPG.
4.3. OCR mode
4.3.1 OCR identify
Enter OCR mode: press the OCR mode button, enter OCR mode, and press the
camera button in OCR mode to start identification. OCR recognition now
supports automatic recognition, partition block recognition. When partitioning
block recognition, users can choose the text block they want to identify. After
the user selects a text block that needs to be identified, press the camera
button to start the recognition.
Operation in OCR mode: after reading, you can pause, start, select the last
sentence, select the next sentence and start reading from scratch. Press the
joystick up, pause reading, then press up again and start reading again. Press
down and start reading from the beginning. Press the joystic right to start the
next sentence read, Press the joystic left to start the last sentence read.
Support languages: currently available in 20 languages and more are coming,

- 11 -
users can choose the languages they want, including the following 20
languages:
English(US) 、English(UK) 、English(AUS) 、English(IND) 、Dansk、 Français、
Français(CA) 、Español、Español(US) 、Norsk、Deutsch、Svenska,Português、
Português (BR) 、Türkdili、Русский, Nederlands、Polski、Italiano、Limba română
4.3.2 OCR menu function
Access menu: click the menu button in OCR mode to enter the OCR menu
interface. The menu includes five functions: language function selection,
reading speed adjustment, male voice and female voice selection, reading
volume adjustment and album function.
Menu function Settings: in the menu interface, scroll the joystick to select the
function you want to set, The yellow-black diagram indicates the selected state,
and the orange-white diagram indicates the unselected function.
Exit menu: long press the color button for 3 seconds to exit the menu.
4.3.3 Language selection function
Enter the language selection function: in the OCR menu interface, press the
camera button to start language selection.
Select language: in the language selection interface, Press the joystick to select
languages. The current language used by the user is black words on the yellow
background, and the white words on the orange background are not selected.
Exit language selection: long press the color button for 3 seconds to exit the
language selection interface.

- 12 -
Support language: OCR text recognition supports 20 languages. Users can
choose the language they want to recognize from the OCR menu interface,
including the following 20 languages:
English(US) 、English(UK) 、English(AUS) 、English(IND) 、Dansk、 Français、
Français(CA) 、Español、Español(US) 、Norsk、Deutsch、Svenska,Português、
Português (BR) 、Türkdili、Русский, Nederlands、Polski、Italiano、Limba română
4.3.4 OCR Speed selection function
Enter speed selection function: in the OCR menu interface, press the camera
button to enter the language speed recognition interface. Move the joystick
button to select speed. Speed supports three modes: slow, medium and fast.
The selected state is yellow bottom, there is a tick icon in the lower right corner,
not orange bottom.
Exit speed selection: long press the color button for 3 seconds to exit the speed
interface.
4.3.5 Choose male and female voices
Enter speed selection function: in the OCR menu interface, press the
camera button to enter the male and female voice selection interface.
Select the sound you want by press the joystick. Press the photo button to
set the OCR sound. The selected state is yellow bottom, a tick icon is in the
lower right corner, and the unselected state is orange bottom.
Exit speed selection: long press the color button for 3 seconds to exit the
male and female voice selection interface.

- 13 -
4.3.6 OCR mode volume Settings
Volume setting function: in the OCR Menu interface, press the camera button
to enter the volume setting interface and adjust the volume by moving the
joystick left and right.
Exit the volume setting: long press the change color button for 3 seconds to
exit the volume setting.
4.3.7 OCR album function
Enter album function: in the OCR Menu interface, press the photo button to
enter album. In the album interface, browse photos by moving the joystick. The
orange color tag of the photo album indicates the current selected state of the
image, and yellow indicates the unselected state.
Picture view function: select the picture you want to view, press the camera
button, then the selected picture will be displayed in full screen. In full screen
preview mode, press the camera button to enter OCR recognition, and the text
and paragraph in the picture will be recognized automatically.
Image deletion function: in full preview mode, long press the camera button
for 3 seconds to delete the current image.
Exit album function: long press the color button for 3 seconds to exit album.

- 14 -
5. Troubleshooting
Troubles
Solutions
Black screen
to check if it is on or off
To check if the camera is covered by dirty spot.
Decrease the magnification
Unable to turn on
To check if the battery is in or if the battery has the power.
Try to use the power adapter to turn on.
Press the power button together with color mode button
for 3 seconds to turn on
Image darkness and twist on
the screen
To check if the reading material is laid flat.
To check if the camera lights are off.
No display after connected to
TV
To check if the TV is on.
To check if the wire is correctly TV output and connected
to TV.
To check if it is the correct TV output mode.
Unable to recharge
To check if the power adapter is connected well.
Image blurring
Long press the Freeze button for 6 seconds to make
autofocus.
If the above project cannot help you solve the problem, please contact the local
dealer.

- 15 -
6. Safety Guide
To keep the video magnifier in good conditions, please read the following safety guide
carefully:
Do not expose Apollo X to excessive heat or direct sunlight to avoid the risk of fire.
Do keep away from the humidity, rain, liquid and chemicals.
Do not use this magnifier near inadequately shielded medical devices.
Do use this magnifier under the temperature between 10°C and 40°C
Do not try to repair the magnifier by yourself or open the its shell as it will void the
warranty. Contact your dealer to service this equipment if necessary
Always unplug the system before cleaning. Use a soft damp cloth to clean the
exterior. Do not use cleaning agents or abrasive materials as they will damage your
unit.
Do use its matched adapter to recharge, otherwise it will damage the unit.

- 16 -
7. Technical Specifications
2x -16x continuous zoom.
Colore mode: total 17 color modes.
Camera: 1300w pixel.
10-inch full color LED screen.
HDMI output.
Battery: rechargeable lithium battery 8 hours continuous use.
Storage capacity: 8G.
One button standby mode.
Working distance: 11-800cm.
Charging time: About 4 hours.
Functions: Freeze image, Switch color mode, Zoom in/out ,OCR.
Settings saved after power-off.
Power supply: Input:110-240V, Output: 5V, 2.5A.
Size: 260x200x30mm.
Weight:920g.
Version:YCJ.SM.0001
Table of contents


