Beka-Mak BMSO 320 User manual

FULL AUTOMATIC
HORIZONTAL
BANDSAWING
MACHINES
BMSO 320
2019
14-11-19

Manufacturer / İmalatçi : Beka-Mak Makina Sanayi ve Tic. A,ş.
Address / Adres: İzmir Yolu Caddesi No:698 - 16370 Başköy-Nilüfer -Bursa/Türkiye
Telefon : 022444 0361 (4 hat )
Fax : 022444 0360 Nilüfer / Bursa
Http : // www.bekamak.com.tr
E-mail : bekamak@bekamak.com
Warranty
- T e firm guarantees t e mac ine described ereby, designed in compliance wit all regulations
in force, in particular safety and ealt regulations; t e mac ine as undergone successful
testing.
- T e warranty covers a period of 12 mont s. İt doesn’t cover electrical motors and tools.
- T e purc aser is entitled ‘replacement of faulty parts’. S ipping and packing costs are at is
expense.
- T e warranty doesn’t cover t e parts damaged by falls or careless andling of t e mac ine,
incorrect operation, non-compliance wit t e maintenance rules. Any tampering wit t e
mac ine, especially wit t e safety devices automatically expires t e warranty and t e
manufacturer will be freed from any responsibility.
- Any kind of alteration on t e mac ine ends t e warranty and t e manufacturer becomes free
from every kind of responsibility.
- No claim for damages s all be accepted in case t e mac ine lays idle for a long period of time.
- Mac ine is designed to be run indoors. İt is not recommended to run t e mac ine outdoors.
T e serial number on t e mac ine is a ‘main reference for t e warranty’, instructions manual, after
sale service and identify t e mac ine in case of need.
Important
Upon t e delivery of t e mac ine, t e consumer must make imself sure t at all
t e devices indicated in t e paragrap of t e safety manual are present and working
correctly. Furt ermore, e must mount in conformity wit t e instructions indicated t ose
devices w ic are not mounted at t e time of delivery to facilitate transport.
W en ordering spare parts
İt is necessary to state:
Mac ine model
Serial number and year of production
İtem reference number
Without serial number no spare parts will be delivered

General
İ
nformation
- T e mac ines are manufactured in compliance wit t e accident prevention rules in
force.
- Strictly comply wit t e instructions contained in t is manual to obtain t e best
performance from t e mac ine. Strict compliance wit t e rules contained erewit will
ensure optimum results and avoid any inconvenience caused by t e non-compliance of
operation and maintenance instructions.
- Closely follow t e instructions given below to avoid contacting t e manufacturer for t e
problems w ic can be easily solved..
- If after aving strictly compliance wit t e given instructions, t e purc aser still needs
t e elp of our tec nical assistance service, e must supply all t e tec nical indications
necessary to determine t e type of problem and/or t e parts w ic are not functioning
correctly. T is will enable our tec nical assistance service to intervene quickly and
efficiently on t e mac ine.
Copies of t e instruction manual may be requested upon indication of t e mac ine serial
number.
General
Safety Notes
All installation work including t e electrical connection must only be carried out by qualified
personnel.
T e mac ine must only be operated by a tec nically trained and experienced operative w o is
also instructed in ‘safety at work ’ procedures.
Any adjustments, cleaning, repairs or c anging of t e saw blade must under no circumstances be
performed unless t e mac ine is fully isolated from t e electrical power supply. Ensure t e
emergency stop button on t e control binnacle is pressed and t e power supplies at t e mains are
disconnected.”
T e band saw must be regularly inspected and maintained in good serviceable condition. Eye
protection, ear protection, gloves and protective clot ing must be worn w en any of t e above
procedures are being carried out, as well as w en cutting fluid is prepared, introduced or displaced
from t e band saw mac ine (t e relevant environmental regulations must be observed in case of
t e use and disposal of cutting fluid etc.)
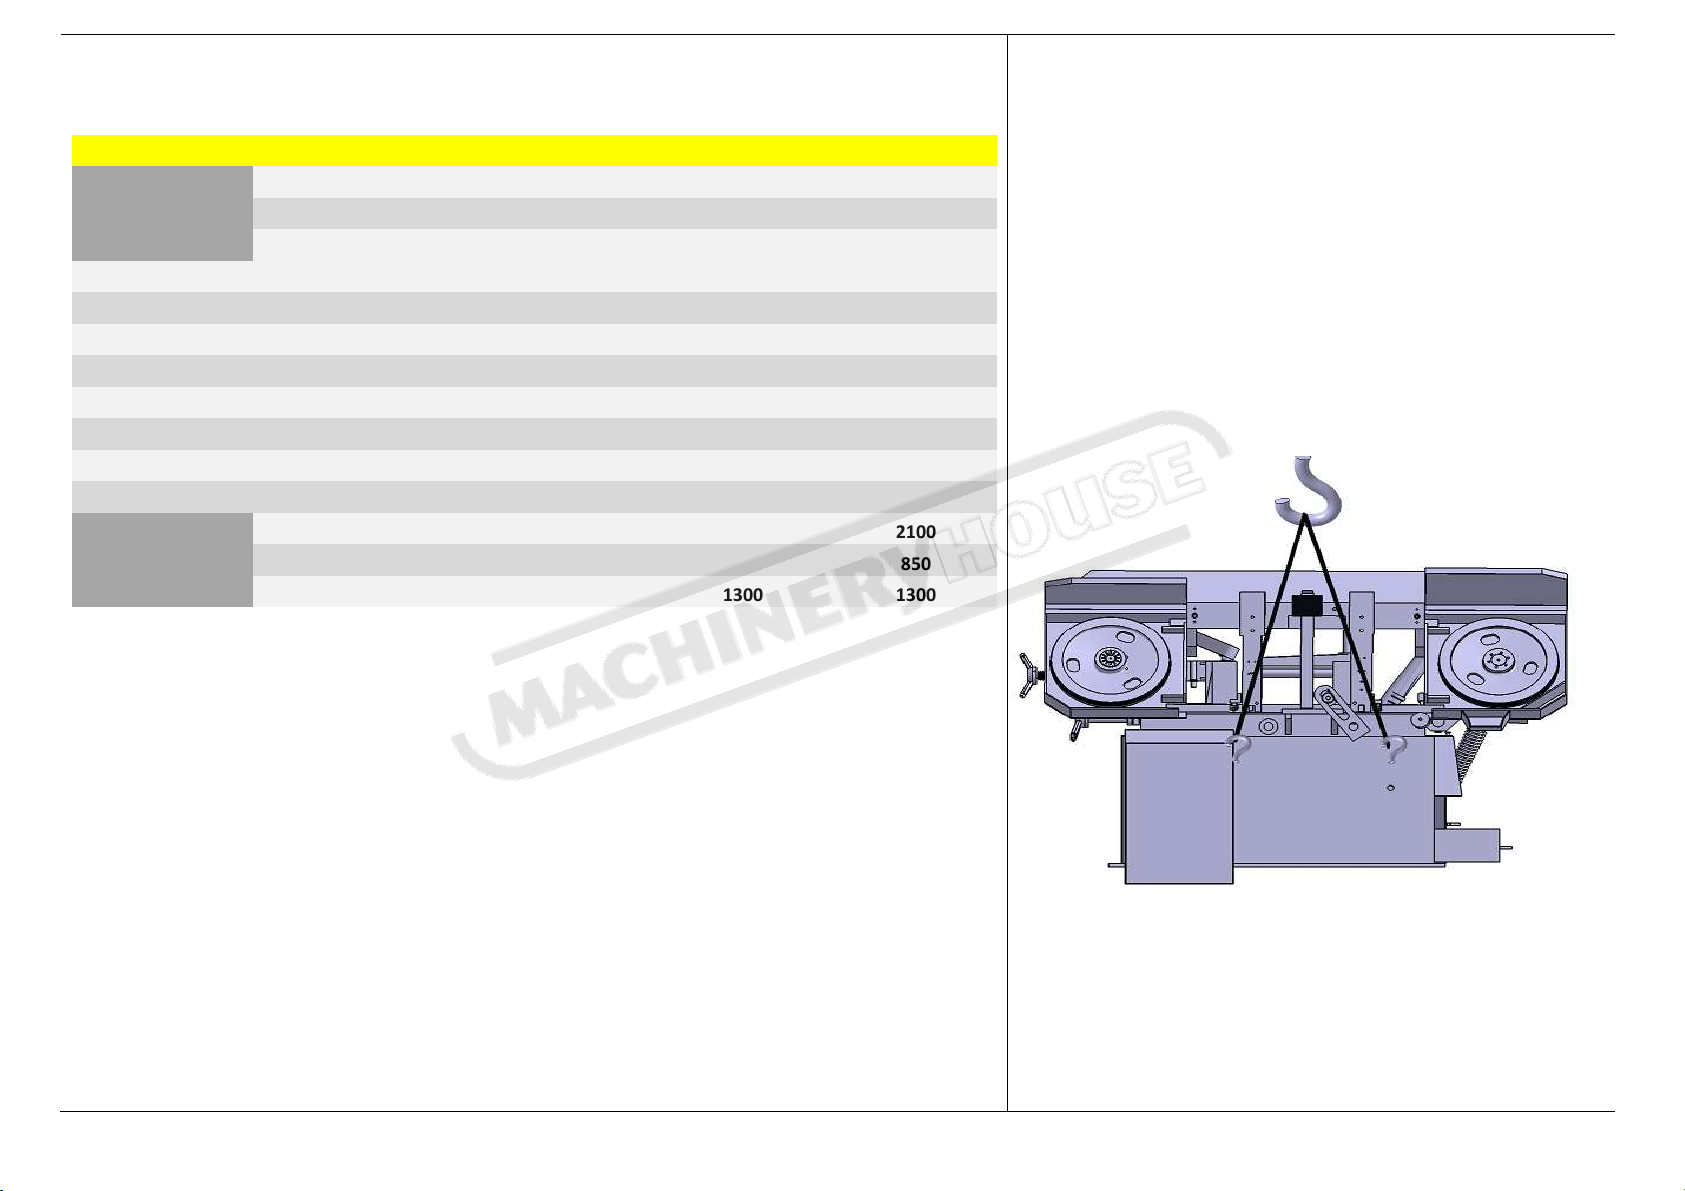
T e band saw must be installed on ground. Observe t e permissible floor load. T an t e band
saw mac ine as been properly bolt to ground securely.
Allow sufficient working space around t e band saw of at least 1 meter. İnstallations of stock roller
conveyors require additional space and possibly a lifting mec anism for eavy work pieces.
Always ensure t at t e working area around t e band saw is well lit.

Safety
İ
nstructions
Be sure t at electrical connection is made carefully. To avoid unwanted situations like electrical s ock, protect t e main supply cable wit a olster.
Before running t e mac ine, be sure t at all of t e protections are mounted properly and all t e covers are closed.
Avoid from smoke and moisture.
Please use t e parts and equipments w ic are recommended. Usage of unsuitable parts and materials w ic are bigger t an t e capacity of t e mac ine can cause unwanted situations.
C eck t e mac ine and inform t e defects everyday.
Don’t leave any material after c ancing t e band.
Do not old t e material w ile t e mac ine is cutting. Always tig ten t e material by using essential parts.
Please pay attention to c oose t e area of t e mac ine w ic doesn’t include anyt ing t at creates difficulties to control t e mac ine
Please be sure t at t e teet of t e band are looking to correct direction.
•Don’t leave t e band on t e ground or any place t at is dangerous for ot er people.
•Be careful w en using t e mac ine and keep t e working area clean ( clean t e saw dusts and oil traces )
•Pay attention to security instructions w en using t e mac ine.
•Don’t wear loose clot s w en using t e mac ine.
•Regardless use t e protective gloves w en using t e mac ine.
•Don’t get close too muc to t e mac ine w en running.
•Before carrying out any cleaning or maintenance procedure, disconnect t e mac ine from main supply.
•İn some conditions, noise level can be about 80 db. Band c oice and cutting speed is important factor for noise level.
•İllumination is an important factor for security.
•Ratio of coolant liquid is important for obtaining optimum lubrication.
•Never use t e mac ine if you notice any fault of t e mac ine or absence of any part of t e mac ine.
- Control t e emergency button at least once a week and be sure t at it is working properly.

Definitions
(EN ISO 12100:2010)
User: t e person, body or company w o as boug t or rented t e mac ine and intends to employ it for t e uses contemplated.
Operator: t e p ysical person aut orized by t e user to operate t e mac ine after aving been suitable trained on t e use and specific risks of t e mac ine..
Authorized person: t e skilled person, w o is aut orized by t e user to carry out maintenance or setting-up operation of t e mac ine.
Dangerous zone: anyw ere inside and/or near a mac ine, w ic t e presence of an exposed person represents a risk for is safety and ealt .
Exposed person: any person w o finds imself in dangerous zone, eit er entirely or partially
Purpose of machine
T is mac ine as been designed to be mainly used by lig t and medium structural steel industries.
T is mac ine as been designed for t e cutting of ferrous material and t e ot er lig t materials wit solid, ollow or cross section. Any ot er material use differing from t e above mentioned
materials is to be considered inappropriate and pro ibited.
T e mac ine operator must be trained and informed of risks and must ave t e instruction manual at is disposal.
T e operator must not work in t e vicinity of t e danger zone (cutting area) wit any ot er people.
During the cutting process, the operator must never put hands or use tools in the cutting area

RELATED D
I
RECT
I
VES AND STANDARDS
DIRECTIVES
MACHINERY DIRECTIVE- 2006/42/EC
LOW VOLTAGE DIRECTIVE- 2006/ 5/EC
ELECTROMAGNETIC COMPATIBILITY DIRECTIVE- 2004/108/EC
STANDARDS
EN ISO 13857:2008; SAFETY OF MACHINERY-SAFETY DISTANCES TO PREVENT DANGER ZONES BEING REACHED BY UPPER LOWER LIMBS
EN ISO 4413:20106: HYDRAULIC FLUID POWER – GENERAL RULES AND SAFETY REQUIREMENTS FOR SYSTEMS AND THEIR COMPONENTS
EN ISO 1384 -1:2008/AC:200 ; SAFETY OF MACHINERY - SAFETY-RELATED PARTS OF CONTROL SYSTEMS - PART 1: GENERAL PRINCIPLES FOR DESIGN
EN 138 8:2003+A1:200 /AC:2010: MACHINE TOOLS - SAFETY - SAWING MACHINES FOR COLD METAL
EN ISO 12100:2010; SAFETY OF MACHINERY - GENERAL PRINCIPLES FOR DESIGN – RISK ASSESMENT AND RISK REDUCTION.
EN 60204-1:2006/A1:200 ; SAFETY OF MACHINERY - ELECTRICAL EQUIPMENT OF MACHINES - PART 1: GENERAL REQUIREMENTS

Residual Risks
Do Not Touch Below Mentioned Moving Or Movable Parts Of The Machine While İt Runs.
Mechanical Dangers
Residual Risks
There might be hand/arm jam and
crushing between the wheel cover and
control panel.
Downfeed speed is designed to be less than 10mm/s.
There are the warnings in manual and on machine.
There might be finger jamming between
the piston shaft and block.
Piston closing time is designed to be less than
10mm/s.
To reduce the probability of piston jams wedge is
designed to be substantially close to the plunger
shaft diameter.
There is warning label.
.
There is hand jam possibility between the
lower swich and vice plate.
Downfeed stops when the switch touches the screw.
hen there is finger jam the swich will be pressed
and the movement will stop.In this way movement
stops without harm.
The swich which limits the downfeed
presses on the plate, there is finger jam
risk.
Downfeed speed is adjusted to less than 10mm/s,
which helps running away faster.
There is hand jam possibility between the
upper swich and bow head.
Downfeed speed is adjusted to less than 10mm/s,
which helps running away faster.
There is jam possibility when you put
your finger to the chip brush.
Brushes to provide sufficient clearance in accordance
with EN 294 was closed by the stationary casing.
There are warning at related sections.
hen the bow approaches down the gap
between the piston and vice closes.
Finger jam warning.
There are warnings in user manuals. There are
warning signs on the machines.
hen the bow goes up the gap between
the movable part and vice plates closes.
Finger jam warning.
There are warnings in user manuals. There are
warning signs on the machines.

Gap under the cover may let get to the
blade.
The chip exit hole under the cover is narrowed
according to EN294 for protection.(check calculation
part)
.
There is possibility to get to the out of
cutting part of the blade from front and
back.
There are warnings in user manuals. There are
warning signs on the machines.
(optional)
arning for the end of chip conveyor
which may cause jamming.
There are warnings in user manuals. There are
warning signs on the machines.
arning for jamming from the chip
conveyor grid to chip conveyor.
There are warnings in user manuals. There are
warning signs on the machines.
arning for reaching to the chain under
the chain cover.
Under the cover is closed to prevent reaching to the
chain.
arning for finger jamming between the
roller and materail.
Feeding mechanism cover is designed to prevent
jamming. There are warning signs on the machines.

Statement of Noise
Conditions for measurement
Tested Mac ine: BMSO 320– Blade size: 3660 x 27 x 0,9mm
Material in use: ø250 Solid Material
A Nominal sound pressure level in warehouse
Lpfa,1m=77dB(A) Coefficient of uncertainty k:4 db (testing appropriate to en 11202)
A nominal sound power level
Power level lwa= 5dB(A) (mesaured value)
Coefficient of uncertainty k:4 db (testing appropriate to en iso 3746)
Values for noise are level of issue and it doesn’t state it’s on safe working level. Even t ere is a connection betweeen İssue and
exposure levels, t is can not be used safely to decide if advanced precautions are needed. Factors t at effect t e real level of exposure
t at effects work force are depending on featuress of ware ouse,(ot er sourses of noise, ot er works nearby, and quantity of mac ines)
including exposure time
Allowed level of exposure may c ange from country to anot er. Beside t ese, t is information lets t e operator to consider t e dangers
and risks.

Warning
T is c apter outlining t e safety devices and norms was drawn up bearing in mind t e normal use
of t e mac ine as stated in t e c apter on t e operation of t e mac ine and t e adequate
preparation of t e operators as regards t e specific risks linked to t e operation of t e mac ine.
İf t e mac ine isn’t used according to instruction given in t e ‘purpose of t e mac ine’ c apter in
t is manual, t e manufacturer isn’t responsible for any damage caused to people and t ings.
Furt ermore, t e manufacturer isn’t responsible for any damage to people and t ings and t ings
resulting from t e non-compliance wit t e following warnings.
A) Adopt all t e necessary precautions during loading, calibration, part replacement,
cleaning, and repair or maintenance operations to prevent someone else from turning
t e mac ine on.
B) Do not temper wit t e safety devices and guards on t e mac ine.
C) Do not remove any of t e safety devices and guards on t e mac ine.
Always make sure t at safety devices and guards are remounted after t eir temporary removal for
tec nical reasons ordered by t e boss
Connection
To The Electrical System
Control panel is mounted on t e electric panel. Mac ine is connected to t e main
supply in t e electrical panel. R, s and t shows the phases, n is neuter and pe is
grounding. Connection will be from t e 13(l1) klemens w ic is at rig t klemens group.
C eck t e voltage w ic is mentioned at t e first page of t e manuel before setting t e
electrical connection of t e mac ine.
İf t e cable p ase line is correct p ase control led lig tens in t at way it is prevented to
motors move on wrong ways. Be sure t at t e out-put voltage at t e power supply is 22 ~ 28
vdc.
T e mac ine is protected against s ort circuit wit interrupters and against ig voltage wit
t ermal relays. Grounding and neutralizing ave to be done to protect t e mac ine .

Techn
i
cal Data
TECNICAL DATA/TECHNISCE DATEN BMSO 320 BMSO 320 BMSO 320L
Cutting Capacity
Schnittbereich
0
Round/Rund mm 280 320 330
Flat/Flach mm 280 x 250 320 x 300 500 x 320
Square/Vierkant mm 270 300 330
Main Drive Motor/Hauptmotor kW 1,5 1,5 2,2
Hydraulic Motor/Hydraulikmotor kW 0,37 0,37 0,37
Coolant Motor/Kühlmittelpumpe kW 0,12 0,12 0,12
Feed Motor/Kühlmittelpumpe kW 0,25 0,25 0,25
Cutting Speeds/Schnittgeschwindigkeit m/min
20 - 100 20-100 20-100
Band Dimensions/Sagebandabmessung mm 3400 x 27 x 0,9 3660 x 27 x 0,9 4160 x 34 x 1,1
Working Height/Arbeitshöhe mm 640 640 640
Weight/Gewicht Kg 736 765 860
Dimensions/Masse
Length/Länge mm 1800 1900 2100
Width/Breite mm 850 850 850
Height/Höhe mm 1300 1300 1300
Transportation And Carrying Of Machine
İmportant
Carry well-balanced wit a strong rope w ic will be ooked to carrying
rings
Bekamak may change the properties of the product without
notice.

F
i
x
i
ng
Area t at mac ine will be fixed s ould be flat and bowless. Mac ine
base s ould be placed properly , linear and diagonal way . Get t e
mac ine to balance wit 4pcs M10 screws t at are on t e legs, you
s ould fix it wit Ø10,5steel pins.

Operatıng ınstructıon
Counter:
w en automatıc posıtıon,
s ows ow many pıeces wıll be cut
and ow many pıeces ave been cut.
Upper lıne ıs preset t e of cuts
requered. Lower lıne s ows t e
number of cut materıal. W en t e
counter reac es t e present number,
t e saw automatıcally stops. After
t ıs, t e reset button must be presset
and made a new program for next
cuttıng
Emergency stop button:prevents
accıdents at unexpectıng sıtuatıons.
Start button : start t e cuttıng
Stop button :stops t e cuttıng
Sıgnal button : s ow sıf t ere ıs a
problem at t e mac ıne.
Start (ready) button: energıses power cırcuıt
of t e mac ıne
Bow up button: moves t e bow up
manually and stops cuttıng.
Bow down button: moves down
t e bow manually.

Coolant button : ıt ıs used tol et t e
coolant lıquıd flow.
Vıce pres buton:ıt ıs used to press
t e mat erıal
Blade tıghtenıng button: tıg ten t e
blade.
Speed control potmeter : controls
t e ınverter to adjust t e turnıng
speed of blade
Manual-automatıc select.
Feeding material: it is used to
feed forward (1) or backward (2)
manuelly, when the bow is on top
(e2 swich pressed). (controls the
feeding motor)
Chıp conveyor
Down feed speed adjustment:
adjust speed accordıng to ardness
of materıal to be cut. W en blade
becomes blunt c oose a lower
speed to ave a better cut.
Area I : t is s ows t at t e tension of t e blade is less t an it must be. Adjust t e blade
tension.
Area II : t is s ows t at t e tension of t e blade is normal
Area III : t is s ows t at t e tension of t e blade is more t an it must be. T is may break
t e blade. Reduce t e tension.
Hydraulıc vıce: 22 bar
hydraulıc blade tensıon:35 bar(34 saw)
Hydromecanıc blade tensıon: mın.1 0 / max.210 bar(27 saw)
Hydromecanıc blade tensıon: mın.280 / max.300 bar(34 saw)
Maın pressure:40bar

Manuel Cuttıng Operatıon
1) Swıtc on t e maın swıtc .
2) Select t e manual-automatıc selector to posıtıon 2.
3) Adjust s3 lımıt swıtc accordıng to t e materıal’s dıameter or eıg t.
4) Press b3 pus button to go up t e bow. ( s2 lımıt swıtc must be ın cırcuıt ot erwıse t e mac ıne does not work. )
5) Adjust t e leng t of t e materıal to requıred leng t. (by usıng s4 swıtc .)
6) Press start pus button. ( ın manual posıtıon, start pus button must be kept presed untıl t e bow left s2 lımıt swıtc .)
7) Regulate t e cuttıng pressure by t e t rottınlıng valve.
8) Because of counter, t e mac ıne could be locked. In t ıs sıtuatıon t e mac ıne does not work. Upper lıne of counter must be preset
after t at t e reset button must be pressed.
) For t e next cuttıng, follow t e some way.
Automatic cutting operation
1.Switc on t e main switc .
2.Sealet B6 selector to position 2.
3.Adjust S2 limit switc according to t e materials diameter or eig t.
4.Press B3 pu button to t e bow up.
5.Select B6 selector to position 1.
6.Slide t e leng t-stop on t e spindle until reac ing required leng t and t e tig ten.
7.Preset t e number of cuts reqoired and press t e reset button on t e counter.
8.Press start button t e cutting operation.
.Regulate t e cutting pressure by t rotting valve.
After starting t e cutting operation, you do not need any operation else, but according to t e grade of meterial you switc on t e
coolantpump or not.
P.s. If t e mac ine stopped wit out reac ing preset number, t e blade could be broken or t e material leng t could be s ortened.

Cutting in
a wrong way
Cutting in a rig t way
You s ould make fence like on t e t e picture wit t e same lengt
of material to be cut, to avoid sliding danger of material
T ere is a warning plate on mac ine aganist danger of material’s
falling.
.

Limit Switches
Upper limit switch: after cutting, t e bow is raised by ydraulic cylinder up to t e adjusted level on t e spindle. It can be adjusted by
sliding t e limit up or down.
Lower limit switch: after cutting t e material, t is switc provides t e control valve switc ed off and rises t e bow up.
P.s. Its place is adjusted by manufacturer, do not c ange if unnecessary.
Blade breaks out limit switch: w en t e blade as broken or not tig tened, it prevents t e drive motor working.
Pulley cover open limit switch (optional): t is limit switc stops t e mac ine w en t e protection cover at t e back of t e bow is
opened.
- The Adjustment Of Cutting Pressure
According to t e grade of material, it provides to regulate cutting pressure. T e cutting pressure s ould be reduced w en t e blade is
being dull. After t at t e blade must be c anged.
- Adjustment Of Upper Limit Switch Before Cutting
Bring down t e bow till it approac es to t e material about 5mm.
For preventing t e bow go up more t an necessary;
Loose t e part w ic presses to t e switc ,
Turn it towards t e switc and tig ten it w en it touc es t e switc .
The indicator of manometer must be in the green area (area ii). If the indicator is in one of the red area, this means that the
tension of the blade is not in the acceptable level and it may cause unwanted results.
1-W eel motor
2-W eel reductor
3-Feed motor
4-Feed reductor
Swıtch
5-Upper swıtc (on flat)
6-Blade break swıtc
7-Lengt stop swıtc
8-Materıal fınıs swıtc (be ınd t e vıce)
9-Lower swıtc

Blade Guıdance
For an accurate guıdance of t e bandsaw blade t ere are two rıgıd and precıse vertıcal guıde arms fıtted wıt rollers for twıstıng
pretwıstıng and carbıde ınserted plates for t e fınal and exact blade gııde. Put t e blade guıde arms always as close as possıble to t e
materıal to be cut and tıg ten t em.
T e play of t e blade can be re-set by alterıng t e posıtıon of a carbıte ınserted guıde plate.
T e mınumum play s ould be 0,04 mm.
Trouble Shootıng
T e bow comes down out of control;
T e seals ınsıde of t e ydrolıc pıstons mıg t be worned out; replace.
C eck valve mıg t be bunged up wıt dırt ; clean.
Center of t e dırectıon valve mıg t be bunged up wıt dırt ; clean.
T e o-rıngs of pressure adjustıng valvemıg t be worned out; replace.
Sounds comıng from t e front pulley
T e bearıngs mıg t be worned out; replace.
T e blade ıs leanıng to one sıde w ıle cuttıng
Carbıdes must be worned out; replace,
Blade guıdıng bearıngs mıg t be worned out; replace
t e warnıng lamp on t e control panel ıs on,
C eck t e blade t ıg enıng swıtc
C eck t e drıve swıtc
C eck t e upper lımıt swıtc

REGULATIONS
DEFECT SYMPTOMS CAUSE OF DEFECT TYP OF REPAIR
AFTER SWITCHING ON THE MAIN A) FUSE IS OFF. A) RESET FUSE.
SWITCH, THE LAMP ON CONTROL
PANEL DOES NOT WORK. B) BUMT BULB. B) REPLACE BULB.
AFTER GOING THE BOW DOWN A) THE BOW DOES NOT TOUCH A) RE-ADJUST S3 LIMIT SWITCH.
COMPLATELY, DOES NOT GO UP. S3 LIMIT SWITCH.
B)REVERSE DIRECTION PUMP B)TAKE THE COVER OFF AT THE
ROTATION. BACSIDE OF THE MACHINE
AND CHECK IF DIRECTION OF
ROTATION AGREE WITH THE
ARROW. IN CASE OF DISCRE-
PACY, PHASES IN THE
PUMP SUPPLY.
AFTER PRESING START BUTTON A)S2 LIMIT SWITCH DOES NOT A) PRESS BOW-UP BUTTON.
THE MOTOR DOES NOT WORK. GET IN TOUCH WITH THE BOW.
B) COUNTER IS LOCKED. B) PRESET THE COUNTER AND
PRESS RESET BUTTON.
C) THERMAL PROTECTION HAS C) WAIT A FEW MINUTES UNTIL
WORKED
. THERMAL RELAY COOL. IF THE
MOTOR STILL DOES NOT WORK.
PRESS RESET BUTTON.
PUMP DOES NOT SUPPLY A) REVERSE DIRECTION OF A) EXCHANGE PHASES IN THE
COOLANT. PUMP ROTATION. PUMP S SUPPLY.
B) LACK OF COOLANT. B) POUR IN COOLANT.
C) SHUT VALVES THAT CUM OFF C) OPEN VALVE S.
COOLANT.
D) THERNAL PROTECTION HAS D) WAIT A FEW MINUTES UNTIL
WORKED. RELAY COOL. IF THE MOTOR
STILL DOES NOT WORK PRESS
KEY.
IF THE ABOVE DEFECTS HAVE BEEN REMOVED AND IF THE MACHINE STILL DOES NOT WORK, CHECK APPROPRIATE ELECTRIC CIRCUITS
AND THEN CALL A CREW TRAINED TO REPAIR FOR THIS PURPOSE.

MACHINE MAINTENANCE INSTRUCTIONS
1)Daily Maintenance
1) Clean the chips behind the wheels. 1.2. a) How the chip conevyor removes the chips
1.2 b) Chip conveyor cover 1.2 c) Coolant oil tank
1.2 d) How to remove the chips from oil tank. 1.3) Clean the chips from the vice block
1.4) Lubricate the upper clamping blocks. 1.5) Clean the vice clamping shaft.
Table of contents
Other Beka-Mak Saw manuals