Beko WKM6246W User manual

WKM6246W
Kettle
User Manual
01M-8832913200-1517-06
EN EE LT

Please read ths user manual frst!
Dear Customers,
Thank you for selectng an Beko product. We hope that you get the best results from
your product whch has been manufactured wth hgh qualty and state-of-the-art
technology. Therefore, please read ths entre user manual and all other accompanyng
documents carefully before usng the product and keep t as a reference for future
use. If you handover the product to someone else, gve the user manual as well. Follow
all warnngs and nformaton n the user manual.
Meanngs of the symbols
Followng symbols are used n the varous secton of ths manual:
C
Important information and useful
hints about usage.
AWARNING:
Warnings for
dangerous situations concerning
the safety of life and property.
Materials are intended to be in
contact with food.
WARNING:
Warning for hot
surfaces.
Do not immerse the appliance,
power cord or power plug in water or
in other liquids.
Ths product has been produced n envronmentally-frendly, state-of-the-art facltes.
Comples wth the WEEE Drectve. It does not contan PCB.
Made n P.R.C.

3 / 21 EN
Coffee Maker / User Manual
CONTENTS
ENGLISH 4-9
DEUTSCH 10-17
FRANÇAIS 18-25
TÜRKÇE 16-33
ESPAÑOL 34-43
POLSKI 44-55
ROMANIAN 56-65
ITALIANO 66-73

4 / 21 EN Kettle / User Manual
This section contains safety
instructions that will help protect
from risk of personal injury or
property damage.
Failure to follow these instructions
invalidates the granted warranty.
1.1 General safety
• This appliance complies with the
international safety standards.
• This appliance can be used by
children aged from 8 years and
above and persons with reduced
physical, sensory or mental
capabilities or lack of experience
and knowledge if they have been
given supervision or instruction
concerning use of the appliance
in a safe way and understand the
hazards involved.
• Children shall not play with the
appliance. Cleaning and user
maintenance shall not be made by
children unless they are older than
8 and supervised.
• Do not use it if the power cable or
the appliance itself is damaged.
Contact an authorised service.
• This appliance is intended to be
used in household only. It is not
designed for professional use in:
-staff kitchen areas in shops,
offices and other working
environments;
-farm houses;
-by clients in hotels, motels,
and other residential type
environment
-bed and breakfast type
environment.
• Your mains power supply should
comply with the information
supplied on the rating plate of the
appliance.
• For additional protection, this
appliance should be connected
to a household faulty current
protection switch with no more
than 30 mA.
• Use the appliance with a grounded
outlet only.
• Do not use the appliance with an
extension cord.
• Do not squeeze or bend the power
cord and do not rub it on sharp
edges in order to prevent any
damage.
1Important nstructons for safety and
envronment

5 / 21 EN
Kettle / User Manual
• Do not touch the appliance or
its plug with wet or damp hands
when the appliance is plugged in.
• Do not pull the power cable when
unplugging the appliance.
• This appliance is intended for
private domestic use only and
is not suitable for professional-
catering purposes.
• Never fill the appliance above the
maximum level indicator, boiling
water may splash out.
• Do not fill the kettle below the
minimum level indicator.
• Do not open the lid while the
water is boiling.
• Position the lid so that the hot
steam is directed away from you.
• Hold the appliance by the handle
only.
• Never operate the appliance
without any water inside it.
• Do not fill the kettle when it is
fitted on its base.
• Operate the appliance with its
original base.
• Always use the appliance on a
stable and flat surface.
• Do not attempt to dismantle the
appliance.
• Only use the original parts or
parts recommended by the
manufacturer.
• Unplug the appliance before
cleaning. After cleaning, dry the
appliance and all parts before
connecting it to mains supply.
• Do not immerse the appliance, or
power plug in water or any other
liquids.
• Never use the appliance in or near
to combustible or inflammable
places and materials.
• If you keep the packaging
materials, store them out of the
reach of children.
1Important nstructons for safety and
envronment

6 / 21 EN Kettle / User Manual
1.2 Compliance with the WEEE
Directive and Disposing of the
Waste Product:
This product complies with EU WEEE Directive
(2012/19/EU). This product bears a classification
symbol for waste electrical and electronic
equipment (WEEE).
This product has been manufactured
with high quality parts and materials
which can be reused and are suitable
for recycling. Do not dispose of the
waste product with normal domestic
and other wastes at the end of its service life. Take
it to the collection center for the recycling of
electrical and electronic equipment. Please
consult your local authorities to learn about these
collection centers.
1.3 Compliance with RoHS
Directive
The product you have purchased complies with EU
RoHS Directive (2011/65/EU). It does not contain
harmful and prohibited materials specified in the
Directive.
1.4 Package information
Packaging materials of the product are
manufactured from recyclable
materials in accordance with our
National Environment Regulations. Do
not dispose of the packaging materials together
with the domestic or other wastes. Take them to
the packaging material collection points
designated by the local authorities.
1Important nstructons for safety and
envronment

7 / 21 EN
Coffee Maker / User Manual
2 Kettle
2.1 Overview
The values whch are declared n the markngs axed on your applance or the other prnted documents suppled wth t repre-
sent the values whch were obtaned n the laboratores pursuant to the pertnent standards. These values may vary accordng
to the usage of the applance and ambent condtons.
1. Spout
2. Water filter (inside)
3. Lid
4. Lid release button
5. Handle
6. Water level indicator
7. On/Off switch
8. Base
9. Cable coil
2.2 Technical data
Power supply: 220-240 V~, 50/60 Hz
Power: 2000-2400 W
Technical and design modifications reserved.
1
23
4
5
6
7
8
9

8 / 21 EN Coffee Maker / User Manual
3.1 Preparation
1. Remove all packaging and sticker materials and
dispose of them according to the applicable
legal regulations.
2. Before using the appliance for the first time,
clean all parts which come into contact with
water carefully. (See the “Cleaning and care”
section).
3. Completely roll out the power cord from the
cable coil (9) on the bottom of the base (8). Pass
the power cord through the slot on the base.
4. Clean the kettle well before initial use and
discard water of first two boiling cycles.
3.2 Operation
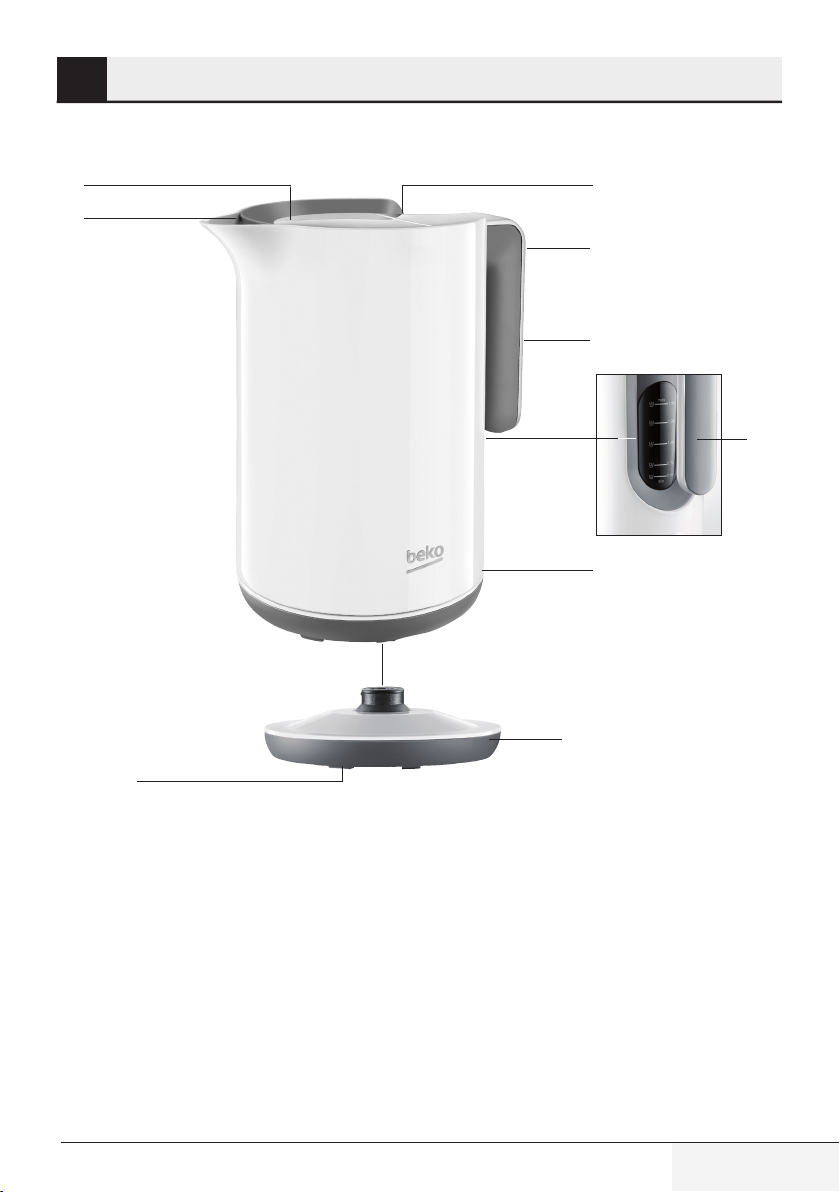
1. Push the lid release button (4) on the kettle to
open the lid (3).
‒ The lid (3) opens automatically.
2. Fill the water tank with water.
C
Do not place the water tank on the
base (8) while filling it with water.
C
Never fill the water tank above the
maximum level indicator or below
the minimum level indicator.
3. Close the lid (3) until it clicks into place.
4. Place the water tank on the base (8). Make
sure that it is sitting in an upright and stable
position.
5. Insert the plug into the wall socket.
6. Press down On/Off switch (7).
‒ On/Off switch (7) illuminates and boiling
process begins.
C
Lid (3) should always be closed
during the boiling process;
otherwise the kettle will not switch
off automatically.
7. After a few minutes, the water will start to boil.
The kettle switches off automatically and On/
Off switch (7) moves upwards.
‒ The function indicator goes off.
C
If you want to stop the heating
manually, push the On/Off switch
(7) upwards.
8. Disconnect the plug from the wall socket.
9. Take the water tank from the base (8). Only
hold it by the handle (5).
AWARNING
: Do not open the lid (3)
as hot water could splash out. Make
sure that no water splashes onto
the base (8).
10. Pour the water from the spout (1) to the cup
or glass you want to use.
C
If you want to continue the boiling
process, repeat the procedure from
1 to 10.
C
Let the kettle cool down between
each heating process.
Hints and Tips
•The kettle is equipped with a water filter (2)
which filters out limestone and other residues
when the water is being poured out.
•Use softened or filtered water to prevent lime
build-up.
3 Operation

9 / 21 EN
Coffee Maker / User Manual
4 Informaton
4.1 Cleaning and care
AWARNING
: Never use petrol
solvents, abrasive cleaners, metal
objects or hard brushes to clean the
appliance.
AWARNING
: Never put the
appliance, base (8) or power cord in
water or any other liquid.
1. Turn the appliance off and disconnect it from
wall socket.
2. Let the appliance cool down completely.
3. Use a damp soft cloth and a little mild cleanser
to clean the exterior of the appliance.
4. Water filter (2) can be removed for cleaning
purposes. To do this:
‒ – Press the release downwards and
take out the filter.
‒ – Depending on the level of lime
build-up, clean the filter with water and a
little lemon juice or white vinegar. Use a soft
brush.
‒ – Insert the filter again from above
until it clicks into place.
C
Before using the appliance after
cleaning, dry all parts carefully using
a soft towel.
4.2 Descaling the kettle
Descaling extends the life of your kettle. Descaling
period depends on the water hardness of your
area.
1. Fill the heater with water up to the maximum
level and boil.
2. After the heater is switched off, unplug the
appliance.
3. Add 2 cups of white vinegar or 1 tablespoon of
citric acid into the boiled water.
4. Keep the solution in the heater for a few hours.
5. Then pour it and rinse the inner part of the
heater thoroughly.
6. Fill the heater with clean water and boil it.
7. Then empty the heater and rinse with water
again.
4.3 Storage
•If you do not plan to use the appliance for a long
period of time, please store it carefully.
•Make sure the appliance is unplugged, cooled
down and completely dry.
•Store the appliance in a cool, dry place.
•Make sure the appliance is kept out of the reach
of children.
•Wind up the power cord around the cable coil (9)
on the bottom of the base (8).
4.4 Handling and
transportation
•During handling and transportation, carry
the appliance in its original packaging. The
packaging of the appliance protects it against
physical damages.
•Do not place heavy loads on the appliance or the
packaging. The appliance may be damaged.
•Dropping the appliance will render it non-
operational or cause permanent damage.

Veekeedukann / Kasutusjuhend
10 / 21 EE
Seepeatükksisaldabohutusjuhiseid,
mis aitavad kaitsta kehavigastuste
või vara kahjustamise eest.
Nende juhiste mittejärgimine
muudab antud garantii kehtetuks.
1.1Üldine ohutus
• Seade vastab rahvusvahelistele
ohutusstandarditele.
• Seda seadet võivad kasutada
8-aastasedjavanemadlapsedning
piiratud füüsiliste, sensoorsete
või vaimsete võimetega isikud
või vastavate kogemuste ja
teadmisteta isikud juhul, kui nad
tegutsevad järelevalve all või neid
on juhendatud seadme ohutu
kasutamise osas ja nad saavad aru
sellega kaasnevatest ohtudest.
• Lapsed ei tohi selle seadmega
mängida. Lapsed ei tohi teostada
puhastus- ega hooldustöid kui nad
ei ole vanemad kui 8-aastased ja
neid ei juhendata.
• Ärge kasutage kui toitejuhe või
seade ise on kahjustatud. Võtke
ühendust volitatud hooldusega.
• Seade on mõeldud ainult
kodumajapidamises
kasutamiseks. See ei ole mõeldud
professionaalseks kasutamiseks:
- kauplustes olevates töötjate
köökides, kontorites ja muudes
töökeskkondades;
- taluhoonetes;
- klientidele hotellides, motellides
ja teistes majutuskohtades;
- B&B tüüpi asutustes.
• Teie põhitoiteallikas peaks
vastama seadme märgistusel
antud teabele.
• Lisakaitsejaokspeaksseadeolema
ühendatud kodumajapidamise
rikkevoolukaitse lülitiga, mis ei ole
üle 30 mA.
• Kasutage seadet ainult
maandatud pistikupesaga.
• Ärge kasutage seadet
pikendusjuhtmega.
• Kahjustuste vältimiseks ärge
pigistage ega väänake toitejuhet
ja ärge hõõruge seda vastu
teravaid ääri.
• Ärge puudutage seadet või selle
pistikut märgade või niiskete
kätega kui seade on sisse lülitatud.
• Ärge tõmmake seadet lahti
ühendades toitejuhtmest.
1Olulsed ohutus- ja keskkonnaalased
juhsed

Veekeedukann / Kasutusjuhend 11 / 21 EE
• Seade on mõeldud ainult
kodukasutuseks ja ei sobi
professionaalseks toitlustuse
jaoks.
• Ärge täitke seadet kunagi
maksimaalse tasemenäidikuni,
keev vesi võib välja pritsida.
• Ärge täitke veekeedukannu alla
minimaalse tasemenäidiku.
• Ärge avage kaant kui vesi keeb.
• Paigutage kaas nii, et kuum aur
suunatakse teist eemale.
• Hoidke seadet ainult käepidemest.
• Ärge kasutage seadet kunagi ilma
selles oleva veeta.
• Ärge täitke veekeedukannu kui
see on alusel.
• Kasutage seadet koos
originaalalusega.
• Kasutage seadet alati stabiilsel ja
ühetasasel pinnal.
• Ärge üritage seadet osadeks
võtta.
• Kasutage ainult originaalosasid
või tootja poolt soovitatud osasid.
• Enne puhastamist võtke seade
pistikupesast välja. Pärast
puhastamist kuivatage seade ja
kõik osad, enne kui ühedate selle
elektriga.
• Ärge kastke seadet või
toitepistikut vette ega muudesse
vedelikesse.
• Ärge kasutage seadet kunagi
kergesti süttivates või tuleohtlikes
kohtades ega selliste materjalide
läheduses.
• Kui hoiate pakkematerjali alles,
säilitage seda laste käeulatusest
eemal.
1Olulsed ohutus- ja keskkonnaalased
juhsed

Veekeedukann / Kasutusjuhend
12 / 21 EE
12 Vastavus WEEE direktiivile
ja tootejääkide kõrvaldamise
eeskirjale.
Seade on vastavuses EL WEEE
direktiiviga (2012/19/EL). Tootel on
elektri- ja elektroonikaseadmete
jäätmete klassifitseerimissümbol
(WEEE).
Seade on toodetud kõrge kvaliteediga osadest ja
materjalidest, mida saab taaskasutada ja mis on
sobivad ümbertöötlemiseks. Ärge visake seadet
selle kasutusea lõppedes
ära koos tavaliste olmejäätmetega. Viige need
elektri- ja elektroonikajäätmete ümbertöötlemise
kogumispunkti. Küsige kohalikelt ametivõimudelt
nende kogumispunktide kohta.
1.3 Vastavus RoHS
direktiivile.
Ostetud toode on vastavuses EL RoHS
direktiiviga (2011/65/EL). See ei sisalda direktiivis
määratletud kahjulikke ja keelatud materjale.
1.4 Pakendi teave
Toote pakkematerjalid on toodetud
ümbertöödeldavatest materjalidest
vastavalt riiklikele
keskkonnamäärustele. Ärge
visake pakkematerjale ära koos olme- või muude
jäätmetega. Viige nad kohalike võimude poolt
määratud pakkematerjali kogumispunktidesse.
1Olulsed ohutus- ja keskkonnaalased
juhsed

13 / 21 EE
Veekeedukann / Kasutusjuhend
2 Veekeedukann
2.1 Ülevaade
Tee tootel olevate märgste väärtused võ muud trüktud dokumendd, ms on seadmega kaasas, esndavad väärtused, ms
on saadud laboratoorumtes kooskõlas asjakohaste standardtega. Need väärtused võvad vastavalt seadme kasutusele võ
ümbrtsevatele tngmustele olla ernevad.
1. Tila
2. Veefilter (sees)
3. Kaas
4. Kaane avamisnupp
5. Käepide
6. Veetaseme näidik
7. Toitelüliti
8. Alus
9. Juhtmepool
2.2 Tehnilised andmed
Toiteallikas: 220-240 V~, 50/60 Hz
Võimsus: 2000-2400 W
Tehniliste ja disaini muudatuste õigused on
kaitstud.
1
23
4
5
6
7
8
9

14 / 21 EE Veekeedukann / Kasutusjuhend
3.1 Ettevalmistus
1. Eemaldage pakendi- ja kleepmaterjalid ja visake
nad ära vastavalt kohalduvatele eeskirjadele.
2. Enne seadme esmakordset kasutamist
puhastage hoolikalt kõik veega kokku puutuvad
osad. (Vt osa „Puhastamine ja hooldus“).
3. Kerige toitejuhe täielikult alusel (8) olevast
juhtmepoolist (9) välja. Viige toitejuhe läbi
aluses oleva ava.
4. Enne esmakordset kasutamist puhastage
veekeedukann hoolikalt ja visake esimese kahe
keedukorra vesi ära.
3.2 Kasutamine
1. Kaane (3) avamiseks vajutage kaane
avamisnuppu (4).
‒ Kaas (3) avaneb automaatselt.
2. Täitke veepaak veega.
C
Ärge asetage veepaaki alusele (8)
sel ajal kui seda veega täidate.
C
Ärge täitke seadet kunagi üle
maksimaalse tasemenäidiku või alla
minimaalse tasemenäidiku.
3. Sulgege kaas (3) nii, et see kohale klõpsataks.
4. Asetage veepaak alusele (8). Veenduge, et see
on püstises ja stabiilses asendis.
5. Sisestage pistik seinakontakti.
6. Vajutage toitelüliti (7) alla.
‒ Toitelüliti (7) süttib ja keetmisprotsess algab.
C
Kaas (3) peaks keetmisprotsessi ajal
alati suletud olema; muidu ei lülitu
veekeedukann automaatselt välja.
7. Mõne minuti möödudes hakkab vesi keema.
Kann lülitub automaatselt välja ja toitelüliti (7)
liigub ülespoole.
‒ Funktsiooninäidik kustub.
C
Kui soovite kuumutamise käsitsi
peatada, lükake toitelüliti (7)
ülespoole.
8. Lahutage pistik seinakontaktist.
9. Võtke veepaak aluselt (8). Hoidke seda ainult
käepidemest (5).
A
HOIATUS! Ärge avage kaant (3),
sest kuum vesi võib välja pritsida.
Vaadake, et vett ei pritsiks alusele
(8).
10. Kallake ves tlast (1) tass võ klaas, mda
kastada kavatsete.
CKuisoovitekeetmistjätkata,korrake
protseduurisammust1sammuni
10.
CIgakuumutamisprotsessivahellas-
keveekannulmahajahtuda.
Vihjed ja nõuanded
•Veekeedukann on varustatud veefiltriga (2), mis
filtreerib vee väljakallamisel katlakivi ja muud
jäägid.
•Katlakivi tekke vältimiseks kasutage
pehmendatud või filtreeritud vett.
3 Kasutamine

15 / 21 EE
Veekeedukann / Kasutusjuhend
4 Informaton
4.1 Cleaning and care
AWARNING
: Never use petrol
solvents, abrasive cleaners, metal
objects or hard brushes to clean the
appliance.
AWARNING
: Never put the
appliance, base (8) or power cord in
water or any other liquid.
1. Turn the appliance off and disconnect it from
wall socket.
2. Let the appliance cool down completely.
3. Use a damp soft cloth and a little mild cleanser
to clean the exterior of the appliance.
4. Water filter (2) can be removed for cleaning
purposes. To do this:
‒ Press the release downwards and take out
the filter.
‒ Depending on the level of lime build-up, clean
the filter with water and a little lemon juice or
white vinegar. Use a soft brush.
‒ Insert the filter again from above until it clicks
into place.
C
Before using the appliance after
cleaning, dry all parts carefully using
a soft towel.
4.2 Descaling the kettle
Descaling extends the life of your kettle. Descaling
period depends on the water hardness of your
area.
1. Fill the heater with water up to the maximum
level and boil.
2. After the heater is switched off, unplug the
appliance.
3. Add 2 cups of white vinegar or 1 tablespoon of
citric acid into the boiled water.
4. Keep the solution in the heater for a few hours.
5. Then pour it and rinse the inner part of the
heater thoroughly.
6. Fill the heater with clean water and boil it.
7. Then empty the heater and rinse with water
again.
4.3 Storage
•If you do not plan to use the appliance for a long
period of time, please store it carefully.
•Make sure the appliance is unplugged, cooled
down and completely dry.
•Store the appliance in a cool, dry place.
•Make sure the appliance is kept out of the reach
of children.
•Wind up the power cord around the cable coil (9)
on the bottom of the base (8).
4.4 Handling and
transportation
•During handling and transportation, carry
the appliance in its original packaging. The
packaging of the appliance protects it against
physical damages.
•Do not place heavy loads on the appliance or the
packaging. The appliance may be damaged.
•Dropping the appliance will render it non-
operational or cause permanent damage.

Virdulys / Vartotojo vadovas
16 / 21 LT
Šiame skyriuje yra saugumo
instrukcijos,kuriospadėsapsisaugoti
nuo kūno sužalojimų ir žalos turtui.
Jeigu šių instrukcijų yra nesilaikoma
suteikta garantija nebegalioja.
1.1 Bendrosos sau-
gos tasyklės
• Prietaisas atitinka tarptautinius
saugumo standartus.
• Šiuo įrenginiu leidžiama naudotis
vaikams virš 8 metų ir asmenims,
turintiems fizikinių, jutiminių ar
psichinių sutrikimų neturėdami
pakankamai patirties, jei tokie
asmenys yra prižiūrimi ir jiems
yra suteikiama pakankamai
informacijos apie šio įrenginio
naudojimą, siekiant išvengti žalos
padarymo.
• Vaikams draudžiama žaisti su
šiuo įrenginiu. Vaikai, neprižiūrimi
suaugusiųjų, negali atlikti darbų
su šiuo įrenginiu.
• Nenaudokite pažeisto įrenginio
kabelio arba pačio įrenginio, jei jis
sugedęs. Susisiekite su įgaliotu
atstovu.
• Šisprietaisasyraskirtasnaudotitik
buitinėmis sąlygomis. Jis neskirtas
profesionaliam panaudojimui:
-personalo virtuvėse, kurios
yra parduotuvėse, biuruose ir
kitokioje darbinėje aplinkoje;
- žemės ūkio pastatuose;
-kurį atliktų patys klientai
viešbučiuose, moteliuose ir
kitose apgyvendinimui skirtose
įstaigose
- nakvynės namų tipo įstaigose.
• Jūsų elektros energijos tiekimo
šaltinis turėtų atitikti informaciją,
pateikiamą ant įrenginio nominalo
plokštelės.
• Siekiant užtikrinti papildomą
apsaugą, šį prietaisą reikėtų jungti
į lizdą apsaugotą nuo buitinės
srovės gedimų, kurio stipris
neviršija 30 mA.
• Prietaisą junkite tik į įžemintą
rozetę.
• Nenaudokite įrenginio su laido
ilgintuvu.
• Nespauskiteir nelenkitemaitinimo
laido bei nebrūžinkite jo į aštrias
1Svarbos nstrukcjos skrtos
saugumu r aplnkos apsauga

Virdulys / Vartotojo vadovas 17 / 21 LT
briaunas, kad jo nepažeistumėte
• Nelieskite įrenginio arba jo kištuko,
kai jis yra įjungtas, jei jūsų rankos
yra drėgnos arba šlapios.
• Netraukite paėmę už pačio laido,
atjungdami įrenginį.
• Šis prietaisas yra skirtas tik
privačiam buitiniam naudojimui
ir nėra skirtas naudoti
profesionaliais maitinimo tikslais.
• Niekada nepilkite į prietaisą
daugiau vandens nei nurodo
maksimalaus lygio indikatorius,
verdantis vanduo gali išsitaškyti.
• Pripildykite virdulį tik aukščiau
minimalaus kiekio indikatoriaus.
• Neatidarinėkite dangtelio kol
vanduo verda.
• Nukreipkite dangtį taip, kad
karštas garas būtų nukreiptas nuo
jūsų.
• Laikykite prietaisą tik už rankenos.
• Niekada nenaudokite prietaiso,
jeigu jame visai nėra vandens.
• Nepildykite virdulio, kai jis yra
pastatytas ant pagrindo.
• Naudokite prietaisą su jo originaliu
pagrindu.
• Visada naudokite prietaisą ant
stabilaus ir plokščio paviršiaus.
• Nebandykite ardyti įrenginio.
• Naudokite tik originalias dalis
arba gamintojo rekomenduojamas
dalis.
• Prieš valant prietaisą išjunkite iš
tinklo. Prieš jungiant prietaisą į
rozetę po nuplovimo visas jo dalis
ir patį prietaisą nušluostykite.
• Nemerkite prietaiso, maitinimo
laido ir kištuko į vandenyje ar kitą
skystį.
• Niekada nenaudokite įrenginio
degiose vietose.
• Jei saugote pakuotės
medžiagą, laikykite ją vaikams
nepasiekiamoje
1Svarbos nstrukcjos skrtos
saugumu r aplnkos apsauga

Virdulys / Vartotojo vadovas
18 / 21 LT
1.2 Atitinka EEĮ direktyvą ir
atliekų šalinimo reikalavimus:
Jūsų produktas atitinka EU WEEE Direktyvą
(2012/19/EU). Šiame gaminyje pateikiamas
elektros ir elektroninės įrangos (EEĮA) atliekų
klasifikavimo simbolis.
Šis gaminys pagamintas iš aukštos
kokybės dalių ir medžiagų, kurios gali
būti pakartotinai panaudotos ir
tinkamos perdirbimui. Neišmeskite
likutinio produkto kartu su buitinėmis
ar kitomis atliekomis tarnavimo laiko pabaigoje.
Nuvežkite atliekas į surinkimo centrą elektroninės
įrangos perdirbimui. Prašome pasitarti su savo
vietinėmis organizacijomis dėl atliekų surinkimo
centrų.
1.3 Atitiktis su RoHS
Direktyva
Jūsų produktas atitinka EU RoHS Direktyvą
(2011/65/EU). Jame nėra pavojingų ir draudžiamų
medžiagų, nurodytų šioje Direktyvoje.
1.4 Pakuotės informacija
Produkto pakavimo medžiagos
pagamintos iš perdirbamų medžiagų
pagal mūsų nacionalinius
aplinkosaugos reikalavimus. Pakuotės
medžiagų kartu su buitinėmis atliekomis.
Nuvežkite atliekas į surinkimo taškus, kuriuos
įsteigė vietos organizacijos.
1Svarbos nstrukcjos skrtos
saugumu r aplnkos apsauga

19 / 21 LT
Virdulys / Vartotojo vadovas
2 Kettle
2.1 Bendras aprašymas
Vertės, kuros yra nurodytos ant gamno prtvrtntame ženklnmo arba ktuose pre jo prdedamuose šspausdntuose doku-
mentuose attnka vertes, kuros buvo pasektos laboratorjose lakants susjusų standartų. Prklausoma nuo aplnkos sąlygų r
pretaso naudojmo šos vertės gal skrts.
1. Snapelis
2. Vandens filtras (viduje)
3. Dangtelis
4. Dangtelio atidarymo mygtukas
5. Rankena
6. Vandens lygio indikatorius
7. Įjun./Išjun. mygtukas
8. Pagrindas
9. Laido suktuvas
2.2 Techniniai duomenys
Maitinimas: 220-240 V~, 50/60 Hz
Galia: 2000-2400 W
Pasiliekama teisė konstrukcijos ir techninių
duomenų pakeitimui.
1
23
4
5
6
7
8
9

20 / 21 LT Virdulys / Vartotojo vadovas
3.1 Paruošimas
1. Nuimkite visą įpakavimą, lipdukus ir išmeskite
juo pagal galiojančias teisės nuostatas.
2. Prieš pirmą šio prietaiso panaudojimą reikia
švariai išvalyti visas dalis, kurios turi sąlyti su
vandeniu. (Žr. skyrių „Valymas ir priežiūra”).
3. Visiškai išvyniokite maitinimo laidą iš pagrindo
apačios (8). Pertraukite maitinimo laidą per
angą esančia pagrinde.
4. Prieš pirmą panaudojimą reikia švariai išvalyti
virdulį, ir pakeiskite vandenį po dviejų užvirimo
kartų.
3.2 Naudojimas
1. Paspausti mygtuką atidarantį dangtelį (4), kad jį
atidarytumėte (3).
‒ Dangtelis (3) atsidaro automatiškai.
2. Pripildykite vandens talpyklą vandeniu.
C
Vandens pripildymo metu nestatykite
virdulio ant pagrindo (8).
C
Negalima pilti vandens į talpyklą virš
maksimalaus lygio rodiklio ir žemiau
minimalaus lygio rodiklio.
3. Uždarykite dangtelį, (3) kol jis atsiras savo
vietoje.
4. Padėkite talpyklą su vandeniu ant pagrindo (8).
Įsitikinkite, kad jis stovi stabiliai ir lygiai.
5. Įkiškite maitinimo kištuką į elektros lizdą.
6. Paspauskite žemyn Įjun./Išjun. jungiklį (7).
‒ Įjun./Išjun. jungiklis (7) užsižiebia ir prasideda
virimo procesas.
C
Virimo metu (3) dangtelis turėtų būti
uždarytas, priešingu atveju, virdulys
neišsijungs automatiškai.
7. Praėjus kelioms minutėms, vanduo pradės virti.
Virdulys išsijungs automatiškai, o Įjun./ Išjun.
jungiklis (7) pasikels.
‒ Veikimo indikatorius išsijungia.
C
Jeigunorite rankiniubūdusustabdyti
šilimą, patraukite Įjun./Išjun. jungiklį
(7) į viršų.
8. Išimkite maitinimo kištuką iš elektros lizdo.
9. Nuimkite virdulį nuo pagrindo (8). Laikykite jį tik
už rankenos (5).
A
ĮSPĖJIMAS: Neatidarykite dangtelio
(3), nes iš virdulio gali ištrykšti karštas
vanduo. Žiūrėkite, kad vanduo
nenutekėtų ant pagrindo (8).
10. Vandenį plkte per snapelį (1) į pasrnktą
puodelį arba stklnę
C
Jeigu norite tęsti virimo procesą,
pakartokite žingsnius nuo 1 iki 10.
C
Prieš sekantį virimą leiskite virduliui
atvėsti.
Praktiniai patarimai ir
nurodymai
•Virdulys turi filtrą, (2) kuris vandens pripildymo
metu filtruoja kalkakmenį ir kitas liekanas.
•Naudokite suminkštintą arba filtruotą vandenį,
kad apsaugotumėte nuo akmens atsiradimo.
3 Naudojimas
Other manuals for WKM6246W
2
Table of contents
Languages:
Other Beko Kettle manuals

Beko
Beko BKK 3005 KL User manual

Beko
Beko WKM6306W User manual

Beko
Beko BKK 2105 User manual

Beko
Beko WKM1226W User manual

Beko
Beko WKM4226R User manual

Beko
Beko WKM 7306 I User manual

Beko
Beko WKM 4226 B User manual

Beko
Beko BKK 2210 C User manual

Beko
Beko WKM 8307 CR User manual

Beko
Beko WKM 8306 B User manual