Belkin F1PG111EN User manual

F1PG111EN
Save money by making calls over your
broadband Internet connection
User Manual
Message Manager
P74577_F1PG111EN_man.indd 2 5/28/04 5:12:19 PM

1 Introduction . . . . . . . . . . . . . . . . . . . . . . . . . . . . . . . . . . . . . . 1
2 Product Overview . . . . . . . . . . . . . . . . . . . . . . . . . . . . . . . . . . 2
Key Features. . . . . . . . . . . . . . . . . . . . . . . . . . . . . . . . . . . . . 2
3 Knowing your Message Manager. . . . . . . . . . . . . . . . . . . . . . . 5
Package Contents . . . . . . . . . . . . . . . . . . . . . . . . . . . . . . . . 5
System Requirements. . . . . . . . . . . . . . . . . . . . . . . . . . . . . . 5
Easy Install Wizard Software System Requirements . . . . . . . 5
Product Specifications . . . . . . . . . . . . . . . . . . . . . . . . . . . . . 6
4 Connecting and Configuring your Router. . . . . . . . . . . . . . . . 10
Connecting your Message Manager to a Router/Gateway . 11
5 Alternate Setup Method . . . . . . . . . . . . . . . . . . . . . . . . . . . . 18
6 Using the Web-Based Advanced User Interface . . . . . . . . . . 32
Changing LAN Settings. . . . . . . . . . . . . . . . . . . . . . . . . . . . 33
Configuring the Firewall . . . . . . . . . . . . . . . . . . . . . . . . . . 36
Setting MAC Address Filtering . . . . . . . . . . . . . . . . . . . . . . 39
Enabling the DMZ . . . . . . . . . . . . . . . . . . . . . . . . . . . . . . . 40
Utilities Tab. . . . . . . . . . . . . . . . . . . . . . . . . . . . . . . . . . . . 42
Restarting the Message Manager . . . . . . . . . . . . . . . . 43
Updating the Firmware . . . . . . . . . . . . . . . . . . . . . . . . 48
7 Manually Configuring Computer Network Settings . . . . . . . . 56
8 Recommended Web Browser Settings . . . . . . . . . . . . . . . . . 62
9 Using your Router with AOL Broadband . . . . . . . . . . . . . . . . 64
10 Troubleshooting . . . . . . . . . . . . . . . . . . . . . . . . . . . . . . . . . 75
11 Information . . . . . . . . . . . . . . . . . . . . . . . . . . . . . . . . . . . . . 82
1
Table of Contents
P74577_F1PG111EN_man.indd 3 5/28/04 5:12:19 PM

Thank you for purchasing the Belkin Message Manager (the Message
Manager). This User guide provides instructions for installing and
configuring the Message Manger. In minutes you will be able to lift up
your phone and make phone calls to anywhere in the world using your
broadband Internet connection. The following is a list of features that
make your new Message Manager an ideal solution for your home or
small office network.
Introduction
1
2
1
3
4
5
6
7
8
9
10
11
12
section
P74577_F1PG111EN_man.indd 1 5/28/04 5:12:20 PM

32
32
Key Features
Easy Install Wizard
The Easy Install Wizard takes the guesswork out of setting up your
Message Manager. This automatic software determines your network
settings for you and sets up the Message Manager for connection
to your Internet Service Provider (ISP). In a matter of minutes, your
Message Manager will be up and running on the Internet.
NOTE: Easy Install Wizard software is compatible with Windows
98SE, Me, 2000, XP. If you are using another operating system,
the Message Manager can be set up using the Alternative Method
described in this manual.
Voice over Internet Phone dialing
New and exciting technology that allows you to place calls over your
existing broadband Internet connection, with the same quality and
functionality as your standard telephone service.
Routing Capabilities
The Message Manager features an integrated 10/100Base-Tx Ethernet
port that allows you to connect a switch or wired computers for all the
advantages of networking. It makes sharing files and peripherals, such
as hard drives, printers, CD-ROMs, DVDs-and more-easier than ever.
The Message Manager offers advanced features for the highest level of
flexibility. Using its firewall, the Message Manager protects your network
from outside intrusions by hackers. Its IPSec pass-through allows you to
work from another location using Virtual Private Networking (VPN). DMZ
hosting lets you play accelerated games over the Internet.
Compatible with Both PCs and Mac® Computers
The Message Manager supports a variety of networking environments
including Mac OS® 8.x, 9.x, X v10.x, Linux®, Windows® 95, 98,
Me, NT®, 2000, and XP, and others. All that is needed is an Internet
browser and a network adapter that supports TCP/IP (the standard
language of the Internet).
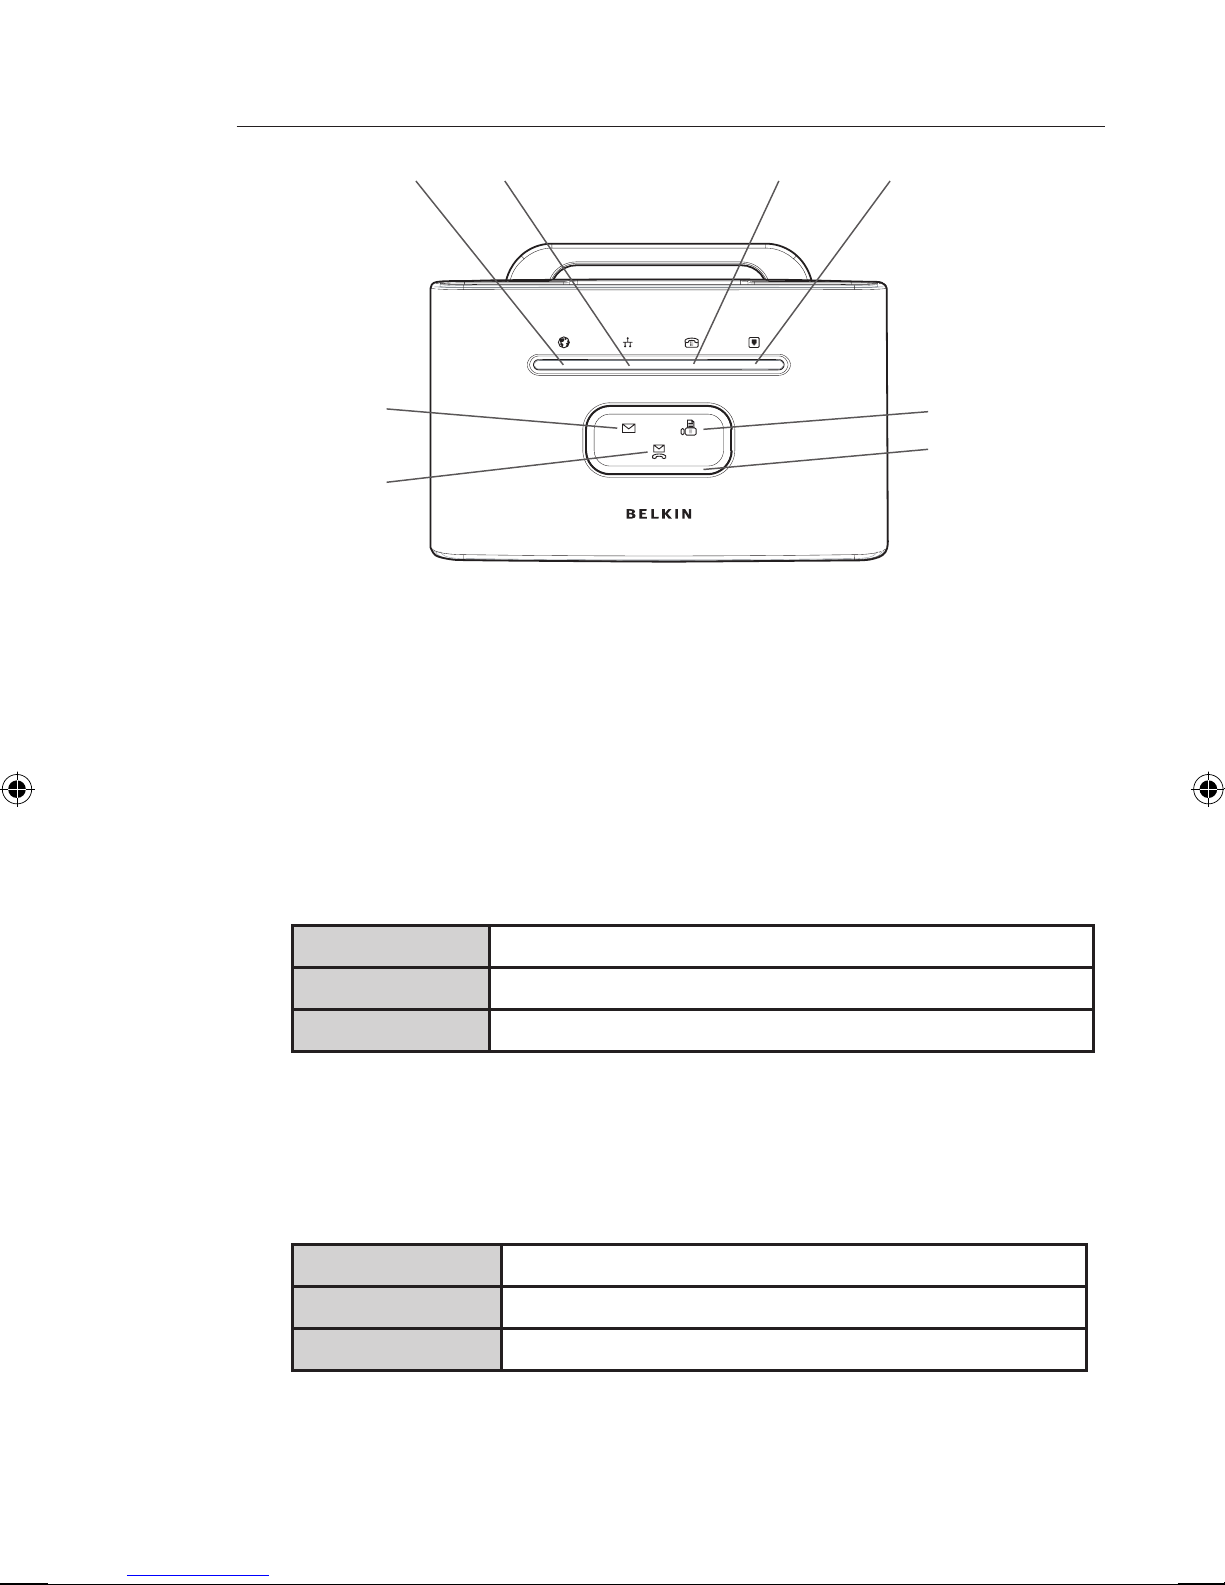
Front-Panel LED Display
Lighted LEDs on the front of the Message Manager indicate
which functions are in operation. You’ll know at-a-glance whether
your Message Manager is connected to the Internet. This feature
eliminates the need for advanced software and
status-monitoring procedures.
Web-Based Advanced User Interface
You can set up the Message Manager’s advanced functions easily
Product Overview
P74577_F1PG111EN_man.indd 2 5/28/04 5:12:20 PM

3
3
2
1
3
4
5
6
7
8
9
10
11
12
section
Product Overview
through your web browser, without having to install additional
software onto the computer. There are no disks to install or keep
track of and, best of all, you can make changes and perform setup
functions from any computer on the network quickly and easily.
NAT IP Address Sharing
Your Message Manager employs Network Address Translation (NAT) to
share the single IP address assigned to you by your Internet Service
Provider while saving the cost of adding additional IP addresses to
your Internet service account.
Router Features
SPI Firewall
Your Message Manager is equipped with a firewall that will protect
your network from a wide array of common hacker attacks including
IP Spoofing, Land Attack, Ping of Death (PoD), Denial of Service
(DoS), IP with zero length, Smurf Attack, TCP Null Scan, SYN flood,
UDP flooding, Tear Drop Attack, ICMP defect, RIP defect, and
fragment flooding.
Integrated Ethernet Port
The Message Manager has a built-in, Ethernet Port to allow you
to connect a computer, a network switch or a wireless to share
printers, data and MP3 files, digital photos, and much more. The
switch features automatic detection so it will adjust to the speed of
connected devices. The switch will transfer data between computers
and the Internet simultaneously without interrupting or
consuming resources.
Universal Plug-and-Play (UPnP) Compatibility
UPnP (Universal Plug-and-Play) is a technology that offers seamless
operation of voice messaging, video messaging, games, and other
applications that are UPnP-compliant.
Support for VPN Pass-Through
If you connect to your office network from home using a VPN
connection, your Message Manager will allow your VPN-equipped
computer to pass through the Message Manager and to your
office network.
Built-In Dynamic Host Configuration Protocol (DHCP)
Built-In Dynamic Host Configuration Protocol (DHCP) on-board makes
for the easiest possible connection of a network. The DHCP server
will assign IP addresses to each computer automatically so there is
no need for a complicated networking setup.
P74577_F1PG111EN_man.indd 3 5/28/04 5:12:20 PM

54
54
Product Overview
Calling Features
Belkin callEverywhere™ to Belkin callEverywhere™ Calling
All calls placed between a Belkin callEverywhere subscriber and any
other current Belkin callEverywhere subscriber is absolutely FREE
and does not count against your monthly minutes. This allows friends
and family to gain additional savings. It’s perfect for long distance or
International users who want to talk for as long as they want.
Note: Requires both callers to have a current Belkin
callEverywhere subscription.
Benefits of Message Manager
• Call to any local number or long distance throughout the US and
Canada with callEverywhere service.
• Easy dialing. The dialing format for your Message Manager is the
same as with your standard POTS line (Plain Old
Telephone Service).
• Low cost
• Personal storage
• Choose any Phone Number
• Unified Messaging
• Easy to use
• No Commitment
International Calling Rates
• Add international calling capabilities to make calls throughout
the world.
• One phone provides all of the functionality of your local
phone service.
• Pick up the phone and dial 011-(3 digit country code)-phone number.
• Review your Broadband Phone Service plan to see how many
minutes your account is limited to: 500, 1000, or is unlimited.
Note: The Message Manager requires you to register with
our service.
For more information regarding this product visit our website at
www.everywhere.net or call us at 888-542-2207.
P74577_F1PG111EN_man.indd 4 5/28/04 5:12:21 PM

5
5
section
2
1
3
4
5
6
7
8
9
10
11
12
Package Contents
• Message Manager
• RJ45 Ethernet Networking Cable
• RJ11 Phone Cord
• 12V Power Supply
• Easy Install Wizard Software CD
• User Manual
• Quick Installation Guide
• Voice Feature overview
• Warranty Card
• Registration Card
System Requirements
• Broadband Internet connection such as a cable or DSL modem
with RJ45 (Ethernet) connection
• At least one computer with an installed network interface adapter
• TCP/IP networking protocol installed on each computer
• RJ45 Ethernet networking cable
• Internet browser
• One Telephone handset
Easy Install Wizard Software System Requirements
• A PC running Windows 98SE, Me, 2000, or XP
• Minimum 64MB RAM
• Internet Browser
Knowing Your Belkin Message Manager
P74577_F1PG111EN_man.indd 5 5/28/04 5:12:21 PM

76
Knowing Your Belkin Message Manager
76
Knowing Your Belkin Message Manager
Specifications:
Standards
IEEE 802.3u 10/100Base-Tx Fast Ethernet (WAN &LAN)
Protocol Supported
SIP, CSMA/CD, TCP/IP, UDP, PPPoE, DHCP (client and server)
VPN Support
PPTP, IPSec pass-Through
Voice Compression
G.711, G.729
Management
Browser Based User Interface
Ports
1 10/100Base-Tx auto sensing RJ-45 Port, WAN
1 10/100Base-Tx auto sensing RJ-45 Port, LAN
1 FXS Voice Port (Telephone)
1 FXO Phone Line Pass thru (Line)
LEDs
Network: WAN, LAN
Voice: Telephone, Line
Message: Voicemail, Email, Fax
Dimensions and Weight
176mm x 129mm x 45mm
10oz.
Power
12VDC, 1 A
The Message Manager was designed to be placed on a desktop next
to your telephone or mounted to a wall. All of the cables exit from the
rear of the Message Manager for better organization and utility. The
LED indicators are easily visible on the front of the Message Manager
to provide you with information about your call and network activity
and status.
P74577_F1PG111EN_man.indd 6 5/28/04 5:12:22 PM

7
Knowing Your Belkin Message Manager
7
section
2
1
3
4
5
6
7
8
9
10
11
12
(a) FXO (POTS) Phone
This port is for connection to your existing Phone Line. Use an RJ-11
cable to connect to and exiting PSTN analog telephone service. It is
recommended you connect this port to provide 911 emergency support
and in the rare case that your Broadband service or electricity go down.
(b) FXS (TEL) Phone Line
This port is for connection to your telephone Handset. Use the RJ-11
cable that was provided with the Message Manager to connect the
telephone to this port.
(c) Reset Switch
The “Reset” button is used in rare cases when the Message Manager
may function improperly. Resetting the Message Manager will restore the
Message Manager’s normal operation while maintaining the programmed
settings. You can also restore the factory default settings by using the
Reset button. Use the restore option in instances where you may have
forgotten your custom password.
1. Resetting the Belkin Message Manager
Push and release the Reset button. The lights on the Belkin Message
Manager will momentarily flash while the unit reboots.
2. Restoring the Factory Defaults
Press and hold the Reset button for at least five seconds then
release it. The lights on the Message Manager will momentarily flash
while the unit reboots.
(d) LAN port
Connect your wired (non-wireless) computers to this port or use it to
connect a wireless Access Point. This port is RJ45, 10/100
auto-negotiation, auto-uplinking ports for standard UTP category 5 or
6 Ethernet cable. This port corresponds to the LAN LED on the front
of the Message Manager.
(e) WAN port
This port is for connection to your cable or DSL modem. Use the
cable that was provided with the Message Manager to connect the
modem to this port. Or you may use it to connect to your existing
router setup. Use of a cable other than the cable supplied may not
work properly.
(f) Power Jack
Connect the included 12V DC, 1A power supply to this jack.
(a)
(b)
(c)
(d) (e) (f)
P74577_F1PG111EN_man.indd 7 5/28/04 5:12:22 PM

98
Knowing Your Belkin Message Manager
98
Knowing Your Belkin Message Manager
When you apply power to the Message Manager or restart it, a short
period of time elapses while the Message Manager boots up (about 30
seconds). During this time, you will see all the LED flash on then off.
When the Message Manager has completely booted up, the LEDs will
light, indicating the Message Manager is ready for use.
1. WAN LED
This LED lights in GREEN to indicate that your modem is
connected properly to the internet. It blinks rapidly when
information is being sent over the port between the Message
Manager and the modem.
Solid Green Internet is connected; Phone service is registered
Blinking Green Internet is connected; Phone service is registered
Solid Amber Router is Ready
2. LAN Port Status LED
This LED lights in GREEN to indicate that your modem is
connected properly to the internet. It blinks rapidly when
information is being sent over the port between the Message
Manager and the modem.
Solid Green Cable is connected
Blinking Green Data Traffic
Solid Amber Cable is not connected
(1) (2) (3) (4)
(5) Email (5) Fax
(5) Ring LEDs
(5) Voice Mail
P74577_F1PG111EN_man.indd 8 5/28/04 5:12:24 PM

9
Knowing Your Belkin Message Manager
9
section
2
1
3
4
5
6
7
8
9
10
11
12
3. FXS LED
This LED lights in GREEN when you go off hook to indicate
that your Message Manager is ready to make or accept a call.
It blinks rapidly voice data is being sent over the phone and
through the Message Manager .
Solid Green Phone is off hook
Blinking Green Voice Traffic
Solid Amber Phone is on hook
4. FXO LED
This LED lights in GREEN when you connect the Belkin Message
Manager to a telephone line. The LED lights in RED when there
is no Telephone line connection. This notifies the user that 911
Emergency calls are not supported.
Red On No cable connected for 911 calling
Green On Cable connected for 911 calling
5. Message Wait Indicator Lights (MWI)
The message wait indicator lights are a quick and easy way to
check for new messages. The LED lights in GREEN when you
have a message waiting in your mailbox. The LED lights in the
ring around the Message LED light AMBER when you have an
urgent message.
Email MWI Green On New Email message waiting in Inbox
Fax MWI Green On New Fax message waiting in Inbox
Voice Mail
MWI
Green On
Amber on
New Voice message waiting in Inbox
Urgent message waiting
Ring LEDs Green
Rotation
Amber
Rotation
VoiP Call ringing
PSTN call ringing
P74577_F1PG111EN_man.indd 9 5/28/04 5:12:25 PM

1110
Connecting and Configuring Your Message Manager
1110
Connecting and Configuring Your Message Manager
Modem Requirements
Your cable or DSL modem must be equipped with an RJ45 Ethernet
port. Many modems have both an RJ45 Ethernet port and a USB
connection. If you have a modem with both Ethernet and USB, and
are using the USB connection at this time, you will be instructed to
use the RJ45 Ethernet port during the installation procedure. If your
modem has only a USB port, you can request a different type of
modem from your ISP, or you can, in some cases, purchase a modem
that has an RJ45 Ethernet port on it.
IMPORTANT: Run the Easy Install Wizard from the computer that is
directly connected to the cable or DSL modem. DO NOT CONNECT
THE MESSAGE MANAGER AT THIS TIME.
ALWAYS INSTALL YOUR MESSAGE MANAGER FIRST! IF YOU
ARE SETTING UP YOUR NETWORK FOR THE FIRST TIME, IT IS
IMPORTANT THAT YOUR MESSAGE MANAGER IS CONNECTED AND
RUNNING BEFORE ATTEMPTING TO INSTALL OTHER NETWORK
COMPONENTS SUCH AS NOTEBOOK CARDS AND DESKTOP CARDS.
Determining your current Network and Connection
The Message Manager can function as your primary gateway/router or
as a client in an existing network configuration.
For example, if you currently have broadband access and a gateway/
router installed in your location you may add the Message Manager as
a client to you network.
If you currently have broadband and do not have a router, then you
may install your Message Manager as the primary router for
your network.
This is the simplest and fastest method to install your Message
Manager.
Ethernet USB
P74577_F1PG111EN_man.indd 10 5/28/04 5:12:26 PM

11
Connecting and Configuring Your Message Manager
11
section
2
1
3
4
5
6
7
8
9
10
11
12
Connecting your Message Manager to a Router/Gateway
Option 1 – Installing the Message Manger as a client to a router
that already exists. (Select this option if you already have a router
connected to your cable/DSL broadband modem.)
1. Identify an available LAN port on your exiting router or
home gateway.
2. Using the Cat-5 Ethernet cable that is included with your
Message Manager, take one end of the Cat-5 cable and connect
it to the available LAN port on your Router. Connect the opposite
end to the WAN port on the Message Manager.
3. Connect a standard analog phone to the Phone Port of the
Message Manager. You may also connect the Message Manager
to your Telephone line if desired. This is optional and is
not required.
4. Locate the power supply that is included with your Message
Manager. Plug the power supply’s small connector into the DC
power jack the Message Manager. Plug the power supply into an
empty power outlet.
5. The Message Manager automatically connects to the Internet.
The WAN LED will blink green to indicate that there is and
Internet connection.
6. Wait up to 5 minutes while the Belkin Message Manager
automatically registers to the Belkin callEverywhere center.
7. Once a connection to our callEverywhere center is established,
the phone connected the Message Manager will ring confirming a
connection was established.
8. Answer the call and follow the on-phone instructions. You will
be directed to go to the following website to sign up for your
service: www.everywhere.net
P74577_F1PG111EN_man.indd 11 5/28/04 5:12:26 PM

1312
Connecting and Configuring Your Message Manager
1312
Connecting and Configuring Your Message Manager
Connecting your Message Manager to a Router/Gateway
Option 2 - Installing the Belkin Message Manger as the Primary
router in your Network (recommended). (Select this method if your
cable/DSL modem is currently connected directly to your computer)
Easy Install Wizard
Belkin has provided the Easy Install Wizard software to make installing
your Message Manager a simple and easy task. You can use it to get
your Message Manager up and running in minutes. The Easy Install
Wizard requires that your Windows 98 SE, Me, 2000, or XP computer
be connected directly to your cable or DSL modem and that the
Internet connection is active and working at the time of installation.
If it is not, you must use the “Alternate Setup Method” section of this
manual to configure your Message Manager. Additionally, if you are
using an operating system other than Windows 98 SE, Me, 2000, or
XP, you must set up the Message Manager using the “Alternate Setup
Method” section of this manual.
Step 1 Run the Easy Install Wizard Software
1. Shut down any programs that are running on your computer at this time.
2. Make sure you have the following items at the computer that is
now directly connected to the cable or DSL modem. DO NOT
CONNECT THE MESSAGE MANAGER AT THIS TIME.
• The Message Manager
• The Easy Install Wizard CD-ROM
• The power supply
• RJ45 Ethernet networking cable
• This User Manual
3. Turn off any firewall or Internet connection sharing software on
your computer.
4. Insert the Easy Install Wizard software CD into your CD–ROM
drive. The Easy Installation Wizard screen will automatically
appear on your screen within 15 seconds. If it does not, select
your CD-ROM drive from “My Computer” and double-click on the
file named “Setup.exe” on the CD-ROM.
P74577_F1PG111EN_man.indd 12 5/28/04 5:12:26 PM

13
Connecting and Configuring Your Message Manager
13
section
2
1
3
4
5
6
7
8
9
10
11
12
Welcome Screen
After you insert the CD into your
CD-ROM drive, the Wizard’s welcome
screen will appear. Make sure you have
not connected the Message Manager at
this point. If you have connected your
Message Manager, please reconnect
your computer directly to the modem.
Click “Next” when you are ready to
move on.
Progress Screen
Easy Install will show you a progress
screen each time a step in the setup
has been completed. Each time you see
the progress screen, click “Next” when
you are ready to move to the next step.
Examining Settings
The Wizard will now examine your
computer’s network settings and gather
information needed to complete the
Message Manager’s connection to the
Internet. When the Wizard is finished
examining your computer, click “Next”
to continue.
Multi-NICs Screen
If you have more than one network
adapter installed in your computer a
Multi-NIC Screen will appear. If you
have more than one network adapter
installed in your computer, the Wizard
will need to know which adapter is
connected to your modem. Select the
network card that is connected to your
modem from the list and click “Next”.
If you are not sure which adapter to
choose, select the adapter at the top
of the list. If you mistakenly choose the
wrong adapter now, you will be able to
choose a different one later.
P74577_F1PG111EN_man.indd 13 5/28/04 5:12:30 PM

1514
Connecting and Configuring Your Message Manager
1514
Connecting and Configuring Your Message Manager
2.2 This step instructs you to locate
the Cat-5 Ethernet cable that
is included with your Message
Manager. Plug one end of this
cable into the LAN port on your
Message Manager. Plug the
other end of the cable into the
networking port on your computer.
Click “Next” to continue.
2.3 This step instructs you to connect
your analog phone to Phone Port
of your Message Manager. Plug the
Phone line from your wall outlet
to the Phone Line Port on the
Message Manager. Click “Next”
to continue.
Step 2 Hardware Setup
The Wizard will walk you through connecting your Message Manager
to your computer and modem. Follow the steps on the screen using
the pictures as a guide.
2.1 This step instructs you to locate
the cable connected between your
modem and the networking port on
your computer. Unplug this cable
from the computer and plug it into
the WAN port on the Message
Manager. Click “Next” to continue.
P74577_F1PG111EN_man.indd 14 5/28/04 5:12:33 PM

15
Connecting and Configuring Your Message Manager
15
section
2
1
3
4
5
6
7
8
9
10
11
12
2.4 This step instructs you to locate
the power supply that is included
with your Message Manager. Plug
the power supply’s small connector
into the power jack on the Message
Manager. Plug the power supply
into an empty power outlet. Click
“Next” to continue.
2.5 This step instructs you to look
at the lights on the front of your
Message Manager. Make sure the
appropriate lights are ON. Refer to
the Easy Install software on your
computer’s screen for more details.
Click “Next” to continue.
P74577_F1PG111EN_man.indd 15 5/28/04 5:12:35 PM

1716
Connecting and Configuring Your Message Manager
1716
Connecting and Configuring Your Message Manager
Step 3 Checking the Connection
3.1 Once you have completed
connecting the Message
Manager, the Wizard will check
the connection to the Message
Manager and then go on to
determine what type of Internet
connection you have.
3.2 User Name and Password Needed
If you have a connection type that
requires a user name and a password,
the Wizard will ask you to type in
your user name and password. If your
connection type does not require a
user name and password, you will not
see this screen.
Your user name and password is
provided to you by your Internet
Service Provider. If you have to type
in a user name and password to
connect to the Internet, then type that
same user name and password in
here. Your user name looks something
like “[email protected]” or simply
“jsmith”. The service name is optional
and is very rarely required by your ISP.
If you don’t know your service name,
leave this blank. When you have
entered your information, click “Next”
to move on.
P74577_F1PG111EN_man.indd 16 5/28/04 5:12:37 PM

17
Connecting and Configuring Your Message Manager
17
section
2
1
3
4
5
6
7
8
9
10
11
12
Step 4 Configuring the Message Manager
4.1 The Wizard will now transfer all of
the configuration information to
the Message Manager. This will
take approximately one minute.
During this time, do not turn off the
Message Manager or computer. The
Message Manager will restart itself
at the end of this step.
4.2 Checking Internet
The Wizard will now check for an
Internet connection. This can take
a few minutes. The Wizard may not
detect a connection right away. If
not, it will retry a number of times.
The “Connected” light on the front
panel of the Message Manager will
flash during this time. Please be
patient through this process.
4.3 Finished
When the Internet connection is
complete, the Wizard will tell you
that you are finished. The “WAN”
LED on the front of the Message
Manager will be solid GREEN,
indicating that the Message
Manager is now connected to
the Internet.
Wait up to 5 minutes while the Message manager automatically registers
to the callEverywhere center. The phone connected to the Message
Manager will ring, confirming a connection was established. Answer the
call and follow the on-phone instructions. You will be directed to go to
www.everywhere.net to sign up for your service.
Note: if you do not receive a call, check whether your Internet settings
are correct. The Message Manager is pre-configured to obtain an IP
address automatically through DHCP. Verify that your DHCP function
is enabled.
Congratulations! You have finished installing your new Message Manager!.
P74577_F1PG111EN_man.indd 17 5/28/04 5:12:40 PM

1918
Alternate Setup Method
1918
Alternate Setup Method
The Advanced User Interface is a web-based tool that you can use
to set up the Message Manager if you don’t want to use the Easy
Install Wizard. You can also use it to manage advanced functions of
the Message Manager. From the Advanced User Interface, you can
perform the following tasks:
• View the Message Manager’s current settings and status.
• Configure the Message Manager to connect to your ISP with the
settings that they provided you.
• Change the current network settings such as the Internal IP
address, the IP address pool, DHCP settings and more.
• Set the Message Manager’s firewall to work with specific
applications (port forwarding).
• Set up security features such as client restrictions, and MAC
address filtering.
• Enable the DMZ feature for a single computer on your network.
• Change the Message Manager’s internal password.
• Enable/Disable UPnP (Universal Plug-and-Play).
• Reset the Message Manager.
• Back up your configuration settings.
• Reset the Message Manager’s default settings.
• Update the Message Manager’s firmware.
Step 1 Connecting your Message Manager
1.1 Turn off the power to your modem by unplugging the power
supply from the modem.
1.2 Locate the network cable that is connected between your modem
and your computer and unplug it from your computer, leaving the
other end connected to your modem.
1.3 Plug the loose end of the cable you just unplugged into the port
on the back of the Message Manager labeled “WAN”.
1.4 Connect a new network cable (not included) from the back of the
computer to one of the ports labeled “LAN”.
1.5 Connect a standard analog phone to the phone port. You may
also connect the Message Manager to your telephone line,
if desired.
P74577_F1PG111EN_man.indd 18 5/28/04 5:12:40 PM
Other manuals for F1PG111EN
2
Table of contents
Other Belkin Gateway manuals
Popular Gateway manuals by other brands

Sangoma
Sangoma Vega 3050G installation manual

TelcoBridges
TelcoBridges TMG3202 Quick installation guide

DCB
DCB Ether Series user guide

Planet Networking & Communication
Planet Networking & Communication WPG-200N Quick installation guide

RTA
RTA 460ESMRS-NNA4 Product user guide

AMX
AMX NXR-ZRP quick start guide

Polytron
Polytron HDI 256-8 T user manual

SIEB & MEYER
SIEB & MEYER 0362151 Original instructions

Robustel
Robustel EG8001 Installation quick guide

H3C
H3C Voice Gateway H3C VG 10-10 Safety manual

Lucent Technologies
Lucent Technologies PacketStar PSAX 4500 user guide

DELTA GROUP
DELTA GROUP EnOcean O3-DIN Application guide