Belkin F8V7D007-SS User manual

Get online anywhere
CellSync™Manager
F8V7D007-SS
User Manual
Web Access

TABLE OF CONTENTS
Introduction........................................................................................2
Interactive Dial-Up Menu............................................................3
Samsung SPH-A500, SPH-N400
CellSync Software Installation..................................................................5
Samsung USB Driver Installation Guide for Windows 98 ..........................8
Samsung USB Driver Installation Guide for Windows Me ..........................9
Setup Guide for Windows 98, Me, 2000 & XP ........................................10
Uninstall Instructions
Uninstall Modem for Windows 98 & Me..................................................13
Uninstall Driver for Windows 98 & Me ..................................................14
Uninstall Modem for Windows 2000 & XP..............................................16
Uninstall Driver for Windows 2000........................................................18
Uninstall Driver for Windows XP ............................................................20
CellSync Uninstall Guide........................................................................22
Helpful Hints....................................................................................25
Information ......................................................................................26
1

INTRODUCTION
Congratulations on your purchase of this innovation from Belkin
Mobility. To ensure you get the most out of this great new product,
please read and follow these simple setup instructions carefully.
Check us out at belkin.com for a full sampling of our accessories and
enhancements for your cellular phone and PDA, including a wide
array of cases, power, and connectivity solutions.
Visit www.belkin.com for the latest upgrades, download manuals and
drivers, troubleshooting, and more!
2
3
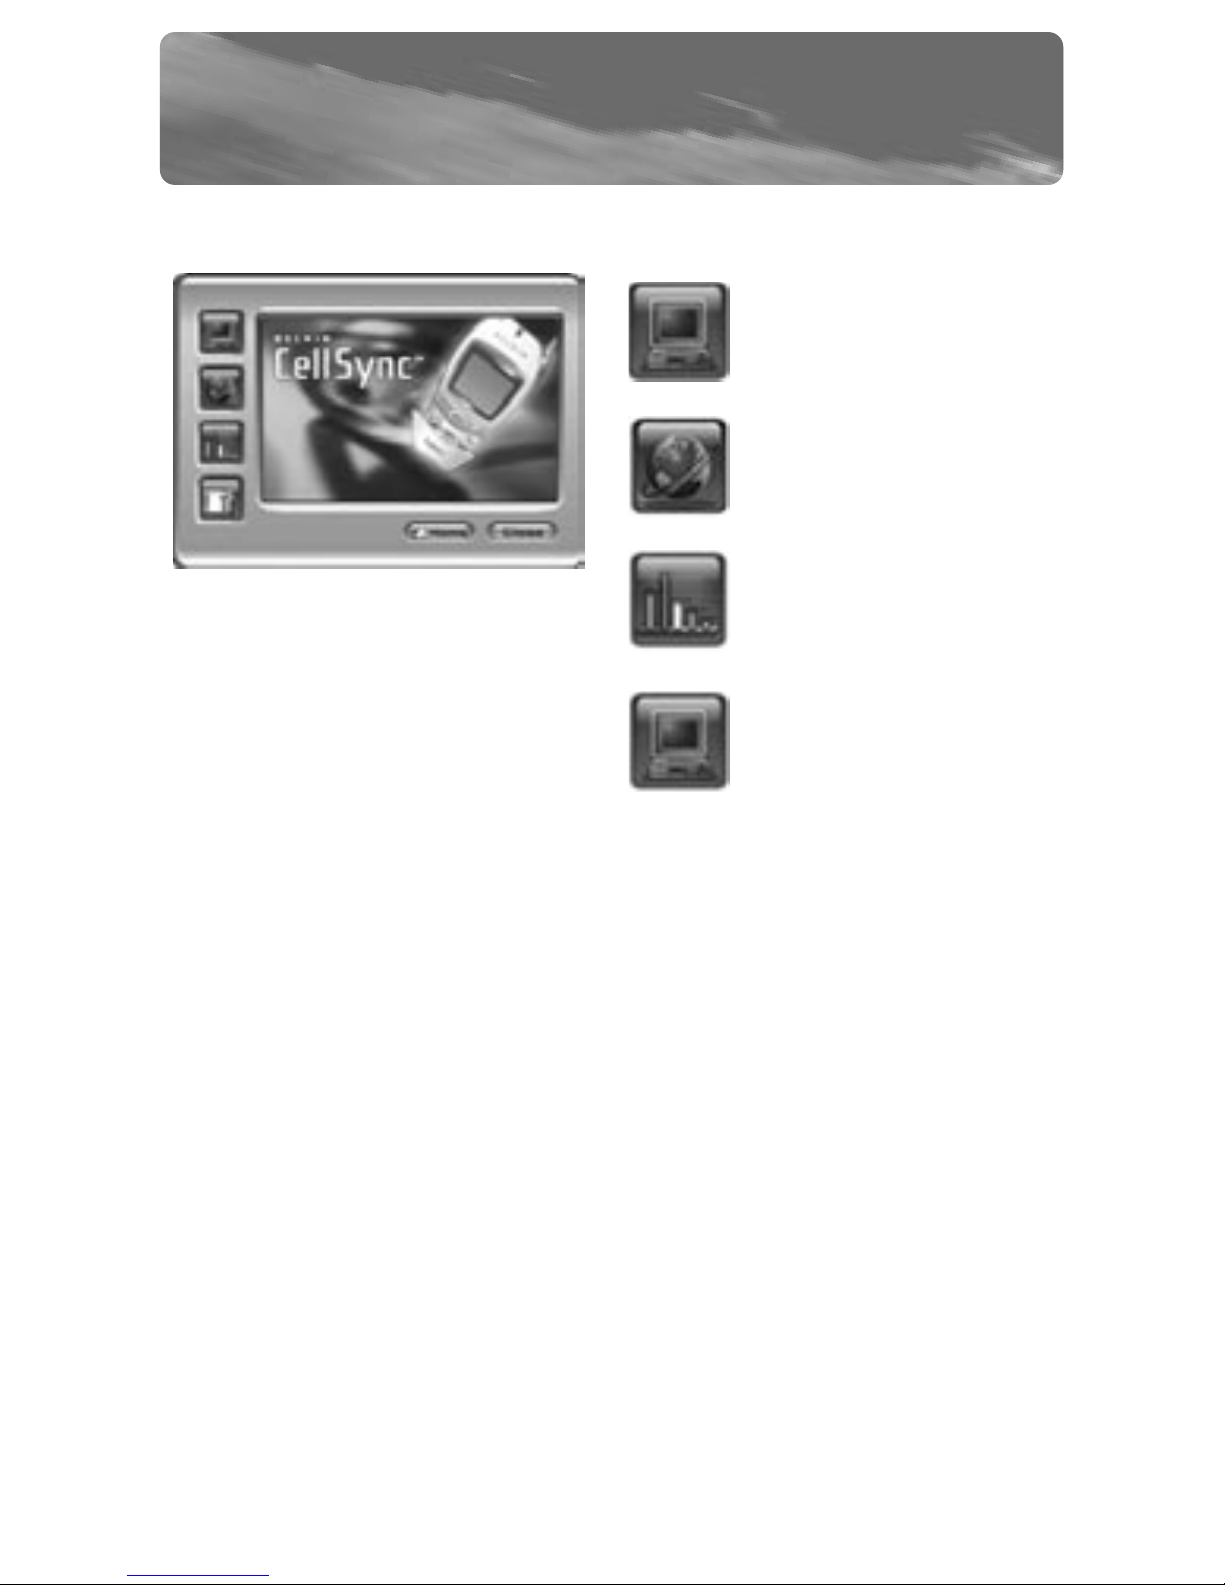
INTERACTIVE DIAL-UP MENU
Functional Buttons Menu System Information
Shows information for
the connected phone.
Connect to Internet
Opens the connection
window.
Call Statistics
Lets you see statistics
on the current
connection.
Options
Displays call history and
setup connection
options.
Dial-Up Window

INTERACTIVE DIAL-UP MENU
Dial-Up Options Menu
Provides easy access to modem and network settings.
Call History
Lists your call history. If you
have Microsoft®Excel
installed, you may export
this list by clicking on the
“Export to Excel” button.
Network and Dialup
Connections
Opens the connection
setting (Internet Properties).
Modem
Opens the modem setting
(Modem Properties).
Open the internet
browser on connection
Opens Microsoft Internet
Explorer once connected.
4
Select an application to start
on connection
Launches the selected application
once connected.
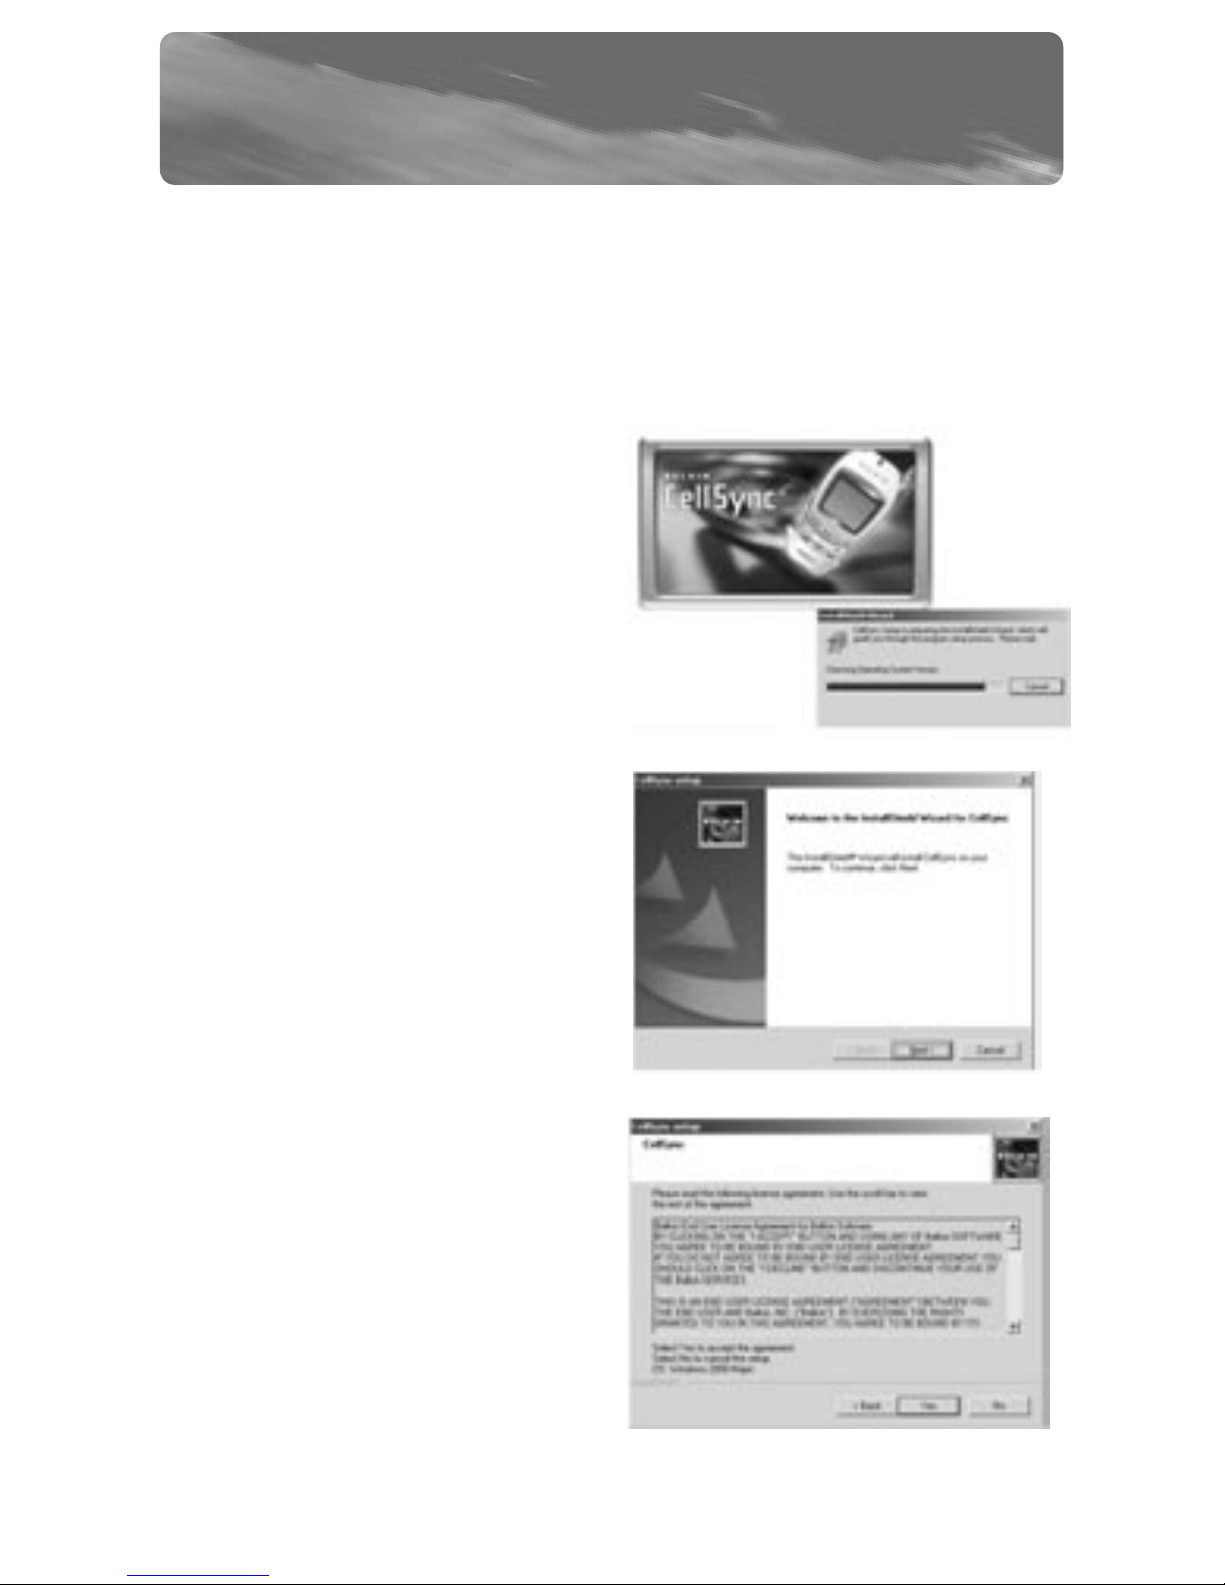
CELLSYNC SOFTWARE INSTALLATION
FOR SAMSUNG SPH-A500, SPH-N400
WARNING: DO NOT connect the USB data cable included in the
CellSync Manager to your computer until the software is
installed. For Windows 2000 and XP, please disregard the
Windows “digital signatures” or “Windows Logo Testing” warning
that may appear and continue with the installation.
1. Insert the CD-ROM. CellSync
setup will automatically prepare
installation. You will then see
this welcome dialog box. If it
does not automatically start,
click on “My Computer”, select
compact disk, and then
double-click on the
“Setup.exe” file.
2.You will then see this welcome
dialog box. Click “Next” to
continue.
3.The CellSync License Agreement
dialog box will appear. Read the
license agreement. When you
are done, click “Yes” to
continue.
5

CELLSYNC SOFTWARE INSTALLATION
FOR SAMSUNG SPH-A500, SPH-N400
4. The “Select your data cable”
dialog box will appear. You should
have received a cable with your
software based on your phone
model. Select the cable option
that relates to the phone
you’re installing.
5. The “Choose Destination
Location” dialog box will appear.
CellSync will install the files in
the default folder. If you do not
want to use this folder, click
“Browse” to select the folder
where you want to install
CellSync. Click “Next” to continue.
6.The “Setup Status” dialog box
will appear. CellSync will start to
copy all the necessary files. If
you click “Cancel”, you will STOP
the setup process.
NOTE: Digital signature prompts will appear. Please ignore and continue
with installation.
6

CELLSYNC SOFTWARE INSTALLATION
FOR SAMSUNG SPH-A500, SPH-N400
7. The “InstallShield Wizard
Complete” dialog box will
appear. If you want to review
the “Read Me” file immediately
after the installation is complete,
check “Display Read Me”. If you
want to launch the CellSync
application immediately after the
installation is complete, check
“Launch CellSync”. Otherwise,
uncheck both and click “Finish” to
complete the installation.
8. For Windows 98, Me, and 2000, you will be prompted to restart
your computer. Select “Yes, I want to restart my computer now”
and click “Finish”.
7
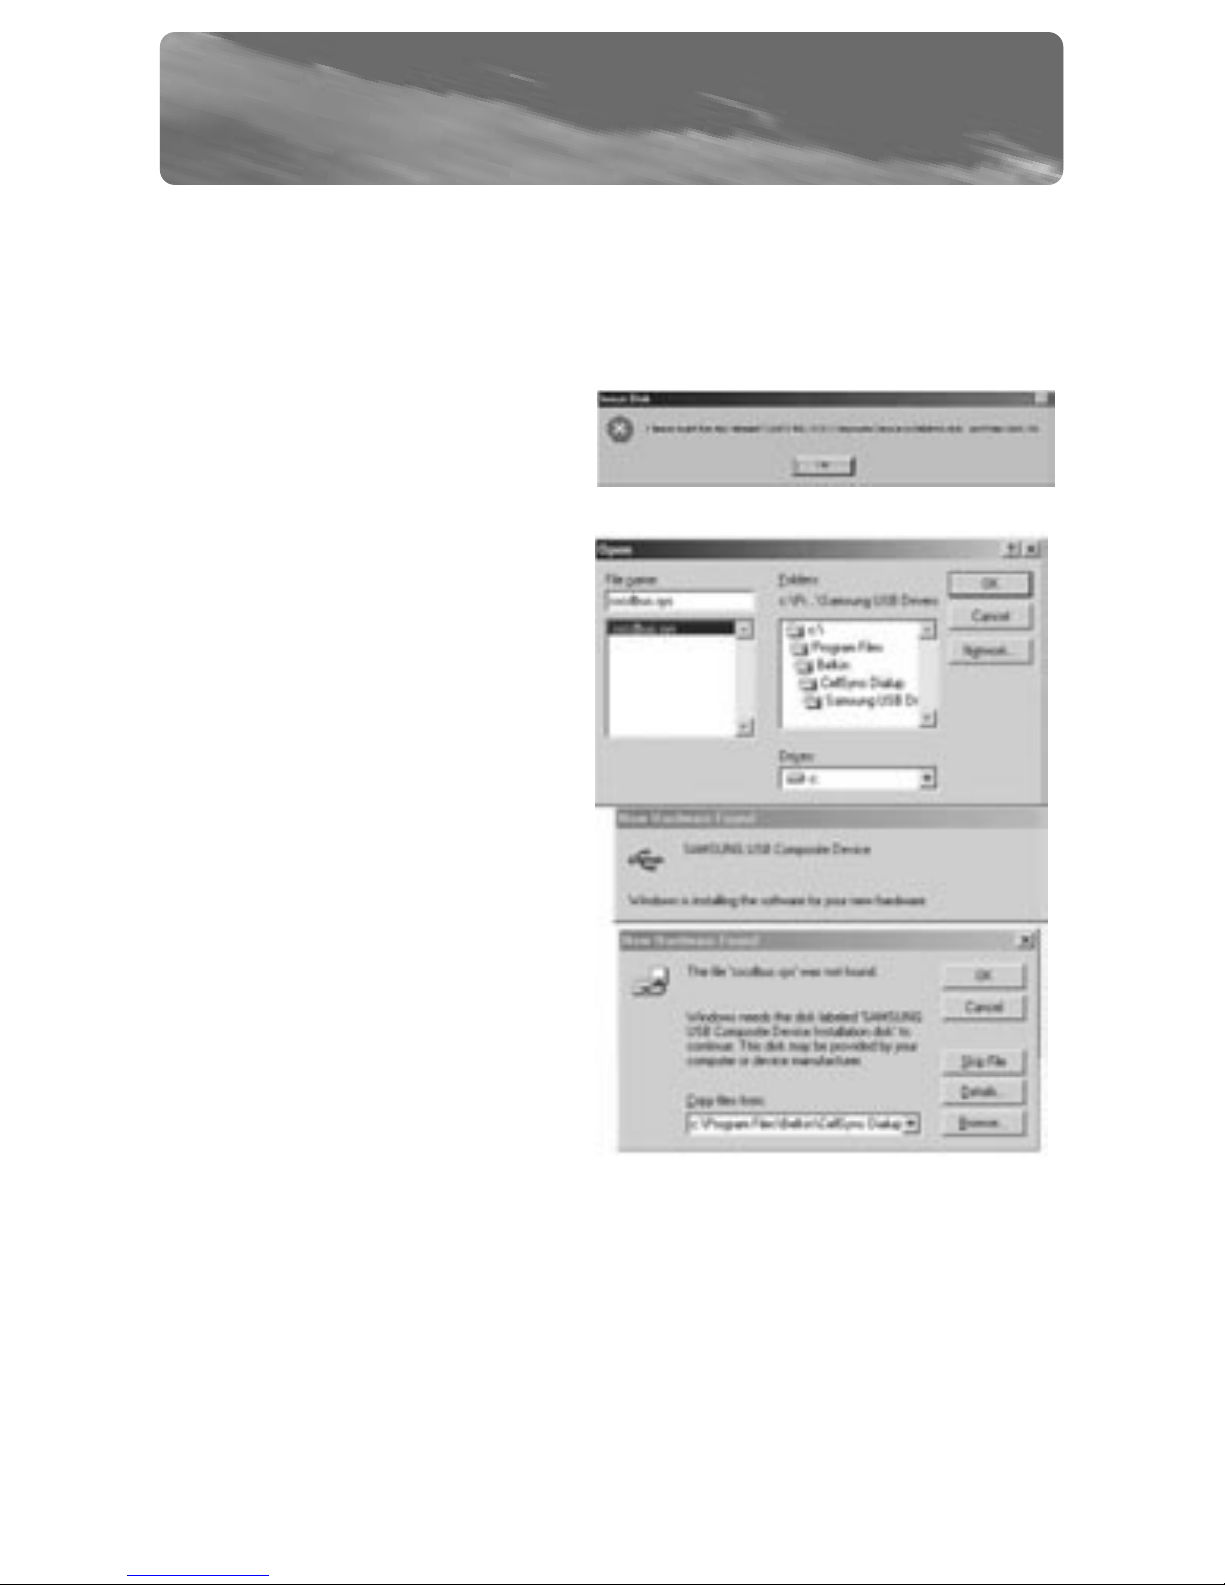
SAMSUNG USB DRIVER
INSTALLATION GUIDE FOR WINDOWS 98
8
1. After CellSync dial-up installation using the Samsung USB driver
install option, plug in the USB cable with the phone connected
and turned on.
2. Click “OK” when the “Insert
Disk” dialog box appears.
3. Browse to the folder named
“Samsung USB Driver”. The
default install location is
“c:\Program Files\Belkin\
CellSync Dialup\
Samsung USB Driver”.
4. Click “OK” when the
“New Hardware Found” dialog
box appears.
5. Repeat steps 2 through 3. Driver installation is now complete

SAMSUNG USB DRIVER
INSTALLATION GUIDE FOR WINDOWS ME
1. After CellSync dial-up installation using the Samsung USB driver
install option, plug in the USB cable with the phone connected
and turned on.
2. Browse to the folder named
“Samsung USB Driver” and
click “OK”. The default install
location is “c:\Program
Files\Belkin\CellSync
Dialup\Samsung USB Driver”.
3. Click “OK” when the “New
Hardware Found” dialog box
appears.
4. Repeat step 2. Driver installation is now complete.
9
Table of contents
Other Belkin Software manuals

Belkin
Belkin SMROUTERUPDATINGFIRMWARE Quick start guide

Belkin
Belkin WIRELESSINT User manual

Belkin
Belkin F8GBPC002 Mounting instructions

Belkin
Belkin F8V7D006-SS User manual

Belkin
Belkin BULLDOG PLUS User manual

Belkin
Belkin CONNECTION PPPOA User manual

Belkin
Belkin RESEAU EN MODE AD HOC WIFI-SANS INTERNET Assembly instructions

Belkin
Belkin USB 2.0 RELEASE NOTES Instruction Manual

Belkin
Belkin OmniGuard F6C110-RKM-2U User manual

Belkin
Belkin n52te - Nostromo SpeedPad Game Pad User manual


