Bell HP7 User manual

auto racing helmet
OWNER'S MANUAL


Important: Read carefully this manual before using your helmet! . . . . . . . . . . . . . . . . page 2
Importante: Leer atentamente éste manual antes de usar su casco! . . . . . . . . . . . . . página 16
Important: Lisez attentivement ce manuel avant d'utiliser votre casque! . . . . . . . . . page 30
Importante: Leggere con attenzione il manuale prima di usare il vostro casco! . . . . pagina 44
Wichtig: Lesen Sie dieses Handbuch sorgfältig durch, bevor Sie Ihren Helm mit! . . . seite 58
中文
:
在使用您的头盔前,请仔细阅读本手册
. . . . . . . . . . . . . . . . . . . . . . . . . . . .
第72页
日本語: ヘルメットを使用する前にこのマニュアルをよくお読みください . . . . . . . . . . . . . . . . . 86ページ 1

WARNING
All forms of motorized transportation are dangerous. No product can protect the user against all possible or
foreseeable accidents, even ones at low speed. No warranty is expressed or implied regarding the products
ability to prevent users from injury or death. The user assumes all risks.Take the time to learn what kind of
protection you can reasonably expect from your helmet and how to use it properly. For the best possible
protection, a helmet must fit properly, be worn properly positioned, and be properly fastened.
ALL PROTECTIVE EQUIPMENT HAS LIMITS
Some very low speed accidents can result in serious injury or death, EVEN WHILE WEARING A HELMET.
How low is low speed? Cases of death and serious brain injury have been documented at accident speeds below
20 miles per hour / 32 kilometers per hour.
Some head injuries cannot be prevented by any helmet. In fact, death or serious brain injury can occur even
without a blow to the head, just like scrambling an egg without breaking the shell.
HELMET PERFORMANCE
Each accident scenario is unique. There are too many variables in a collision to predict the outcome.
Although no one can accurately predict which helmets will prevent injury in which accidents, studies have
repeatedly shown that you are much better off with a helmet than without one. An unprotected head, exposed
to a blow from as little as a three foot or one meter fall, can result in a fatal injury.
2

The helmet only protects areas of the head which are covered. No helmet can protect the neck, body, or
areas of the head not covered by the helmet. A helmet is designed to help absorb the force of a blow, by
spreading it over as wide an area of the outer shell as possible, and then by crushing the non-resilient
energy absorbing inner liner. Damage to the helmet such as shell fracturing or liner compression, caused
by an impact is not a sign of a defect in its design or construction. In fact, it is exactly what the helmet is
designed to do. If the blow is severe enough, it can overcome the helmet’s protective capabilities,
resulting in injury or death.
For more information on helmet performance, or to find out what to do if your helmet is significantly
impacted, visit our website at www.bellracing.com.
DO’S AND DON’T’S
DO NOT attach anything to your helmet, except helmet accessories authorized by Bell Racing or head and
neck restraint systems approved by the FIA or SFI in countries where SFI is approved. Attachments can
focus a blow in a small area. Rigid attachments can cause twisting of your head and neck in an accident,
which might result in serious injury or death.
Rigid objects attached to the outside of the helmet shell, other than those applied or authorized by the
manufacturer, will concentrate the force, increasing the probability of injury.
DO NOT make any modifications to the helmet. To maintain the full efficiency of this helmet, there should
not be any alterations to the structure of this helmet or its component parts.
DO use a helmet which is specifically designed for your chosen activity.
3
english

DO wear your helmet properly positioned and securely fastened at all times.
DO store your helmet in a cool, dry place. Exposure to temperatures in excess
of 140 degrees Fahrenheit or 60 degrees Celsius can cause damage to the
inner liner, resulting in a loss of the helmet’s protective capabilities.
4
2
3
1PROPER USE OF THE HELMET
Step 1: POSITIONING THE HELMET ON YOUR HEAD
Put the helmet on by grasping the chin strap halves in each hand and pull the
helmet on over your head.
See Illustration 1.
Step 2: FITTING THE HELMET
When properly positioned, the helmet should be worn low on the brow, eyes
near the center of the eye opening, touching the top of the head with uniform
and firm pressure all around – tight without excessive pressure points.
See Illustration 2.
To fasten the chin strap, thread the end of the strap through both d-rings, loop
the strap end back through the inner d-ring and pull it comfortably tight
against the throat. Make sure the chin strap is snug against the throat.
See Illustration 3.

5
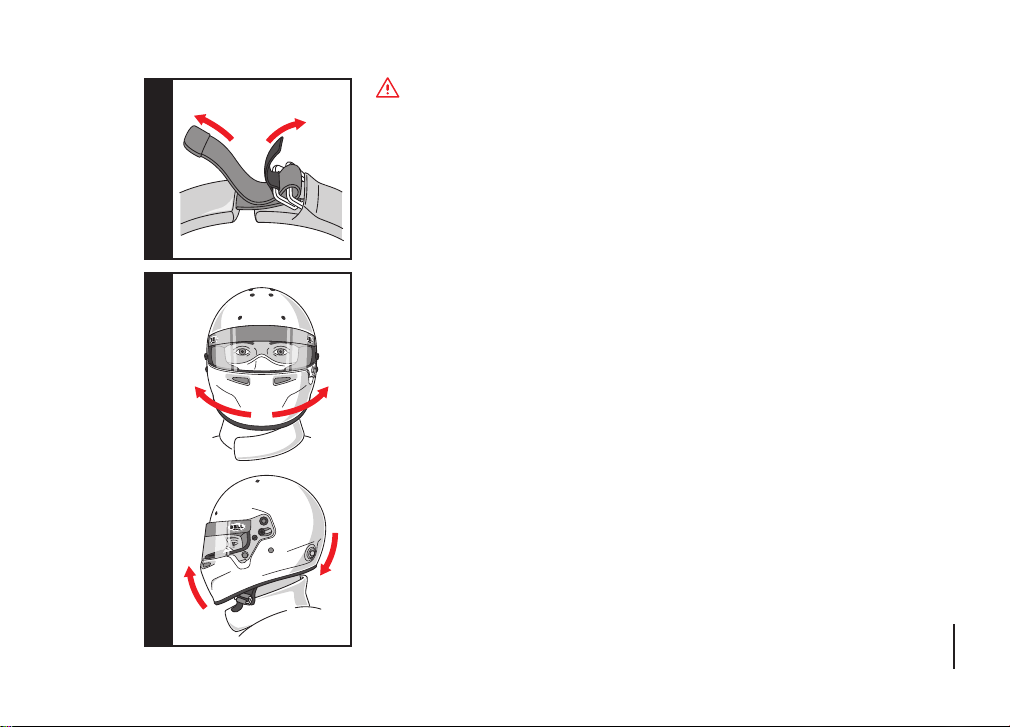
WARNING CORRECTLY USING THE CHIN STRAP
A good fit and a properly fastened chin strap are all that keep the helmet on
your head during an accident. Make sure the chin strap is correctly fastened
and pulled snugly up against your throat each time you wear your helmet. To
correctly fasten the strap, buckle the chin strap as shown in Illustration 4,
then adjust the side strap until the strap is snugly against your throat.
Step 3: CHECKING THE FIT
Correctly position the helmet on your head and stand in front of a mirror.
Gently rotate the helmet first from left to right and then from front to back, as
in Illustration 5. If the skin on your brow moves with the helmet as it is
rotated, the fit is proper. If the skin on your brow does not move when the
helmet is rotated in either direction, the fit is too loose. Try various sizes until
you find one that fits correctly. With the helmet properly positioned, and the
chin strap fastened, try to remove the helmet from your head. Grasp it
securely and make a serious effort to roll it off your head in both the forward
and backward directions. If you can remove the helmet or are able to roll the
helmet backward far enough to expose your forehead or forward far enough
to block your vision, the helmet either fits too loosely or the straps are not
properly adjusted.
If the helmet is too large or if you can still remove the helmet, DO NOT use it
and replace with a smaller size.
Repeat steps 1 through 3
If you cannot remove the helmet and it does not roll either backward far
enough to expose your forehead or forward far enough to block your vision,
you have a proper fit. We recommend fitting the helmet with a head sock or
balaclava if you intend to wear one in competition.
5
4

TO REMOVE THE HELMET
To remove your helmet, unfasten the chin strap by pulling the red “D” ring tab outward (away from your face) to
release the strap tension. See Illustration 4.
To remove your helmet, grasp the chin strap halves in each hand and while pulling outward, lift the helmet from
your head. See Illustration 1. Pull outward and lift from your head.
Step 4: TEST DRIVE
Steps 1 through 3 are critical to getting the most out of your helmet.Spend as much time as necessary to satisfy
yourself that you have a good fit. Only after successfully completing steps 1 through 3, put on your helmet and
wear it for an extended period or take a test drive. If the helmet feels comfortable, remaining firmly in place and
the straps remained properly adjusted, your helmet is ready to use. If the helmet feels uncomfortable or moves
excessively, go through steps 1 through 3 as necessary to correct the problem. If you are unable to successfully
complete all 3 steps, or if the helmet does not fit and feel comfortable, DO NOT continue to use the helmet.
Either: Return to the dealer for assistance, or contact Bell Racing for further instructions.
Do not use chin cups or wear the strap on the point of the chin. This will increase the risk of the helmet coming
off in an accident.
OPERATION & REPLACEMENT OF FACE SHIELDS
OPERATION
The shield should be opened by placing the thumb of your left hand against the left side edge of the shield
(some Bell shields have a molded in flare or tab, others may not) and simultaneously lifting upward on the shield
to lift it over the adjustable eccentric button. Practice several times to become familiar with this operation before
actual use. To close, simply push downward on the top center of the shield until it comes down as far as possible
and snaps into place over the eccentric button. Always check to be sure it has locked in place over the eccentric
button.
6

ADJUSTMENT
Adjustment of the eccentric button on the lower left side of the eye opening is possible to fine tune the closing
action of the shield. Using a Hex Wrench (included in the box for all full face helmets), loosen the set screw and
rotate the button so that the shield latches easily but securely over the button when is it pulled down by the top
center edge with one hand. When adjusted to your preference, tighten the set screw.
The shield opens and closes using a using an SV friction tension system that controls how much pressure is
needed to open or close the shield.
To adjust the tension on the shield, use the Hex Wrench, 3/32” or 2.4 mm hex wrench to tighten or loosen the
set screw to the desired level of tension.
7

SHIELD REPLACEMENT
8
6A
6B
Helmet Model
HP7
RS7
KC7 CMR
HP5
GT.5
SPORT 5
GP3
GTX.3
BR1
SPORT
R1
Dominator.2
K.1 PRO287 SRV
281 SVR
SE03
SE05
SE07-2
SE07
3
GP2 YOUTH
SPORT EV288 SRV
VADOR289 SRV
M8SRV8
Shield TypeParts DescriptionAssembly
3
1
1
3
1
2
2
2
4
2
3
3
1 2 3
1
13
23
13
24
13
24
1
2
2
4
41

1•Remove the left and right side shield pivot screws using the Hex Wrench, 5/16” or 8mm.
2•Remove the left and right side SV friction screws using the Hex Wrench, 3/32” or 2.4mm.
3•Remove the old shield and if necessary replace and install new pivot and friction washers.
New washers have a self-adhesive side to be applied on the helmet shell – make sure the washers do not
cover any of the inserts.
4•Place the new shield over the well centered friction washers and screw in the pivot screws until snug.
DO NOT OVERTIGHTEN as this may damage the screw threads or pivot inserts. Repeat this procedure on the
other side.
5•Put the SV friction screw and brake washers back in place.
Adjust the friction tension to the desired level, and then close the shield. Adjustment of the eccentric button
may be required.
6•Check the action and function of the replaced shield prior to use, assure the installation was correct.
Other Bell models may have a different shield pivot mechanism than the type listed in this manual. Please
refer to bellracing.com if your helmet has a different mechanism or if you need additional assistance.
9

10
ADJUSTABLE TEAR-OFF POSTS
Using the Bell Hex Wrench, a coin or a flat head screwdriver, turn the
adjustable tear-off posts so the widest part of the posts are toward the center
of the face shield. See Illustration 7. Stack the tear-offs to your preference.
Rotate the adjustable tear-off posts until the tear-offs are tight, as shown in
Illustration 7.
Some models come with tear-off posts pre-installed, while others may require
installation (instructions provided). Do not use thread lock under any
circumstances especially if using aftermarket tear-off posts as the chemicals
can damage the shield.
VISOR PEAK
Open face models come with the visor peak attached and some full face
models can be used with a visor peak that attaches to the helmet using the
shield pivot screws and SV friction screws. Check the visor peak for even
alignment. Use the Hex Wrench to loosen and adjust the peak as needed.
DO NOT OVERTIGHTEN
the screws. Illustration 8.
It is the wearer’s responsibility to determine if this helmet affords adequate
vision and hearing. We recommend the use of earplugs to reduce the
likelihood of permanent damage to your hearing.
8
7

EXTERIOR
Your Bell helmet is finished with a tough, high-gloss polyurethane coating which resists scratching
(note: some Bell models may have a matte or graphic finish). It can be cleaned with any high quality product used
for the care of automotive finishes. We recommend the use of the products contained in Bell’s helmet cleaning
kit.
INTERIOR
The interior surface of the helmet should only be cleaned with mild soap and water.
WARNING Do not use solvents or any petroleum based cleaners, as they will damage the helmet’s energy
absorbing liner. Do not attempt to force dry your helmet with excessive heat. Temperatures in excess of 60
degrees Celsius or 140 degrees Fahrenheit can cause damage.
VENTILATION
Some Bell auto racing helmets have vents for air intake. Some of these vents may be able to be opened and
closed externally to maximize or minimize air exchange. To maximize air exchange of any vent, do not block the
vent openings. Illustration 9.
WARNING Some helmets may have air vents which may act as a conduit for vapor, heat or flames in the
event of a fire, which could result in severe injury or death.
11
9

PAINTING
Paint can react with helmet shell and affect its protective capacity. Although the outer shell of the helmet is
constructed of thermoset composite materials and finished with polyurethane coating and although it can
rhetorically be repainted with high quality air drying acrylic or polyurethane enamel, we recommend caution if the
helmet is decorated by an independent painter. Bell acknowledges that helmets are often decorated by
independent painters but there are instances of helmets being damaged during the painting process.
WARNING Paint penetrating into the interior of the helmet can affect the performance of the helmet liner
and other components. In no case(s) should the helmet be dismantled during painting or should paint that
requires heat curing be used. Only paint your helmet once you have determined your proper size. Custom painted
helmets cannot be returned or exchanged. Custom paint services are available through Bell Racing and specific
information is available on the Bell Racing website.
HEAD AND NECK RESTRAINT ANCHOR HARDWARE
Select Bell models come equipped with anchor hardware for specific head and neck restraint systems.
Bell models homologated to certain Snell, SFI, and FIA standards have M6 terminal hardware installed in the
shell and have been tested and homologated so they are compatible with approved head and neck restraint
device anchor systems. If the Bell model you select does not have M6 terminal hardware installed in the shell or
is not pre-drilled for anchor installation, it is not compatible for use with a head and neck restraint device. The
proper installation and selection of the head and neck restraint device anchor system is the responsibility of the
consumer and they assume all risks.
12

RADIO INSTALLATION
On select full face models, Bell has designed recessed areas into the face
piece assembly installed in the front chin bar area of the helmet to allow for
the installation of radio boom microphones without damaging the interior.
Bell recommends installing the radio boom microphone on the back side of
the face piece (side facing the shell). There is a specific area in the front of
the face piece designed to accommodate the radio microphone by removing
the soft foam piece in the center of the face piece assembly. Proper
installation of radio equipment is the responsibility of the consumer and they
assume all risks.
Illustration 10.
INSPECTION SERVICE
Helmets should at a minimum be inspected closely after an accident. On the outside of the helmet, you should
look for signs of delamination or surface cracking and exposed composite material under the paint finish. On
the inside of the helmet, you should look under the foam fit pad to determine if you see any signs that the
helmet’s inner liner has been damaged or compressed. However, even the most through self-inspection can fail
to detect signs of damage. Since helmet damage is not always visible following an accident, it is always best to
replace your helmet once it has been subject to a significant impact. If you lose consciousness, suffer a
concussion, or sustain other internal or external head injury from a racing accident, we recommend replacing
the helmet. If you’ve owned your helmet for less than five (5) years, Bell Racing will examine the helmet at no
cost and provide you with a written report of the damage and an estimate of the cost to repair the helmet and
return it to a like new condition. Repairs will only be performed with your approval and only if the helmet can be
returned to its original condition. Bell reserves the right to refuse to repair helmets which have been altered by
the owner or any third party.
10
13

All returns for inspection or repair must be authorized and approved by Bell Racing in advance. Even if your
helmet has not been impacted, we recommend that it be replaced every five (5) years to take advantage of
advances in helmet design and construction.
LIMITED WARRANTY
Any Bell Racing auto racing helmet determined by Bell Racing to be defective in materials or workmanship within
two (2) years from the date of original retail purchase, will be repaired or replaced, at Bell’s option, free of
charge when received at Bell Racing, freight prepaid, together with proof of purchase.
This warranty is expressly in lieu of all other warranties. Any implied warranties of merchantability or fitness for a
particular purpose are limited to the same duration as this express warranty. Bell Racing shall not be liable for
any incidental or consequential damages. Some countries / states do not allow the exclusion or limitation of
implied warranties, incidental or consequential damages, so the above limitations and exclusions may not apply
to you.
This warranty does not cover damage resulting from misuse, abuse, neglect, alteration, failure to perform
maintenance as instructed or unauthorized repair or service. This warranty does not cover any representation or
warranty made by dealers beyond the provisions of this warranty. You must establish proof of purchase to obtain
warranty service or replacement. This warranty gives you specific legal rights, and you also have other rights,
which vary from country to country or state to state. All product returns must be approved and authorized by Bell
Racing in advance. Please contact Bell Racing if you have any questions about your Bell auto racing product.
www.bellracing.com
14

15

ADVERTENCIA
Todas las formas de transporte motorizado son peligrosas. Ningún producto puede proteger al usuario contra
todos los accidentes posibles o previsibles, incluso a baja velocidad. Ninguna garantía se expresa o implica con
respecto a la capacidad de los productos para prevenir a los usuarios de lesiones o muerte. El usuario asume
todos los riesgos. Tómese el tiempo de aprender qué tipo de protección puede razonablemente esperar de su
casco y cómo usarlo correctamente. Para la mejor protección posible, un casco debe ajustarse apropiadamente,
debe ser usado en la posición apropiada correctamente y estar bien sujeto.
TODOS LOS EQUIPOS DE PROTECCIÓN TIENEN LÍMITES
Algunos accidentes de muy baja velocidad pueden resultar en lesiones graves o la muerte, INCLUSO MIENTRAS
SE LLEVA UN CASCO. ¿Cuán baja es la baja velocidad? Casos de muerte y lesiones cerebrales graves se han
documentado a velocidades de accidentes por debajo de 20 millas por hora / 32 kilómetros por hora. Algunas
lesiones en la cabeza no pueden ser prevenidas por ningún casco. De hecho, la muerte o lesión cerebral grave
puede ocurrir incluso sin un golpe en la cabeza, al igual que revolver un huevo sin romper la cáscara.
FUNCIONAMIENTO DEL CASCO
Cada situación de accidente es única. Hay demasiadas variables en una colisión para predecir el resultado.
Aunque nadie puede predecir con exactitud qué cascos evitarán lesiones en los accidentes, los estudios han
demostrado en repetidas ocasiones que usted está mucho mejor con un casco que sin uno. Una cabeza despro-
tegida, expuesta a un golpe de tan sólo tres pies o un metro de caída, puede resultar en una lesión mortal.
16

El casco sólo protege áreas de la cabeza que están cubiertas. Ningún casco puede proteger el cuello, el
cuerpo o las áreas de la cabeza no cubiertas por el casco. Un casco está diseñado para ayudar a absorber
la fuerza de un golpe, extendiéndolo sobre una superficie tan amplia como sea posible, y luego aplastando
el revestimiento interno de absorción de energía no resiliente. El daño al casco, tal como la fractura de la
cubierta o la compresión del revestimiento, causado por un impacto no es un signo de defecto en su
diseño o construcción. De hecho, es exactamente lo que el casco está diseñado para hacer. Si el golpe es
lo suficientemente severo, puede superar las capacidades protectoras del casco, resultando en lesiones o
la muerte.
Para obtener más información sobre el funcionamiento del casco, o para averiguar qué hacer si su casco
está significativamente afectado, visite nuestra página web www.bellracing.com.
NORMAS
NO fije nada a su casco, excepto accesorios para el casco autorizados por Bell Racing o sistemas de
fijación de cabeza y cuello aprobados por la FIA o SFI en países donde SFI es aprobado. Los accesorios
adjuntos pueden enfocar un golpe en un área pequeña.
Los accesorios rígidos pueden causar torsión de su cabeza y cuello en un accidente, que podría resultar
en lesiones graves o la muerte.
Los objetos rígidos adheridos al exterior de la cubierta del casco, distintos de los aplicados o autorizados
por el fabricante, concentrarán la fuerza, aumentando la probabilidad de lesión.
NO realice ninguna modificación en el casco. Para mantener la eficiencia total de este casco, no debe
haber alteraciones en la estructura de este casco o de sus componentes.
Utilice un casco que esté diseñado específicamente para la actividad que usted haya seleccionado.
17
español

Lleve el casco correctamente colocado y firmemente sujeto en todo
momento.
Guarde su casco en un lugar fresco y seco. La exposición a temperaturas de
más de 140 grados Fahrenheit o 60 grados centígrados puede causar daños
en el revestimiento interior, lo que resulta en una pérdida de las capacidades
de protección del casco.
18
2
3
1
USO CORRECTO DEL CASCO
Paso 1: COLOCACION DEL CASCO EN LA CABEZA
Póngase el casco, sujetando las correas del mentón en cada mano y jale el
casco sobre su cabeza.
Vea la Ilustración 1.
Paso 2: AJUSTE DEL CASCO
Cuando se coloca correctamente, el casco debe ser puesto bajo la frente, los
ojos cerca del centro de la abertura del ojo, tocando la parte superior de la
cabeza con una presión uniforme y firme todo alrededor - apretado sin
puntos de presión excesivos.
Vea la ilustración 2.
Para abrochar la correa del mentón, introduzca el extremo de la correa a
través de ambos anillos D, vuelva a enrollar el extremo de la correa hacia
atrás a través del anillo d interno y jale cómodamente contra la garganta.
Asegúrese de que la correa del mentón esté ajustada contra la garganta.
Vea la ilustración 3.
This manual suits for next models
16
Table of contents
Languages:
Other Bell Motorcycle Accessories manuals
Popular Motorcycle Accessories manuals by other brands

R&G
R&G DG0030 Fitting instructions

hepco & becker
hepco & becker 5064571 00 01 quick start guide

hepco & becker
hepco & becker SOLID 5089529 00 01 quick start guide

Jackson
Jackson SureWerx WH30 ALBATROSS manual

Keis
Keis Heated Hi-Power BodyWarmer operating instructions

hepco & becker
hepco & becker INDIAN Scout manual