manuals.online logo
Brands
  1. Home
  2. •
  3. Brands
  4. •
  5. Belmont Garden
  6. •
  7. Outdoor Fountain
  8. •
  9. Belmont Garden Plume 3-In-1 Bird Feeder, Bird Bath &... User manual

Belmont Garden Plume 3-In-1 Bird Feeder, Bird Bath &... User manual

Bottom Bowl
Top Bowl
Dancing Water
Attachments
Center Post
Hanging
Cables
Hook
Battery
Covers
CONTENTS:
Assembly
Bottom
Bow
Hanging
Cable
Hook
Water Level
Dancing
Water
Attachment
Battery
Compartment
(4AA Cell
Batteries
Not Included) Center
Post
Top
Bowl
Water
Pump
Diagram 1a:
OWNERS MANUAL
Please note, images of parts are
not to scale with one another.
Plume 3-In-1 Bird Feeder, Bird Bath & PlanterTM
INSTALLING BATTERIES:
(1) Squeeze tabs, (2) lift off battery cover
(Figure 3a).
2. Orient the Batteries in the Battery Compartment
(Figure 4a, 4b, 4c, 4d and 4e).
3. Insert 2 batteries with the (+) side facing up in
Battery Compartment and 2 batteries with the (-)
facing up in Battery Compartment (Figure 4e).
4. Reinstall the Battery Covers by aligning the tabs
with the rectangular openings on the battery covers
and pushing down until you hear a click and battery
tabs lock into place (Figure 3b).
1.
Take the Center Post and slide it into the bottom of the Bottom Bowl aligning the notch in the Bottom Bowl and the notch in the Center
Post. Push in until the center post snaps into place. (Figure 1a, 1b, 1c and 1d).
2. Screw the center post into the screw in the center of the bottom of the Top Bowl (Figure 2a).
3. Attach the 3 cables to the 3 attachment spots on the Top Bowl (Figure 2b). Take the other end of the 3 cables and slide them onto the
small end of the hook (Figure 2c). You may need to close the small end of the hook to prevent the cables from coming loose in the future.
4. Choose a Dancing Water Attachment and place it on the water outlet on the top side of the water pump (Diagram 1a)
5. Fill the Top Bowl with water, the water level should cover the top of the Water Pump (Diagram 1a). Fill Bottom Bowl with
bird seed.
6. Hang the Hanging Bird Feeder in your favorite location.
7. Fill the bottom bowl with bird seed or soil and plants, turn on and enjoy!
OPERATING YOUR HANGING BIRD FEEDER'S WATER FOUNTAIN:
Turning the Water Fountain on: The Water Fountain is programmed to run for one hour at a time and then turn off automatically. Press the button once to turn the Water Pump
on; the LED light will flash to indicate the Water Pump has been turned on (Figure 5a and 5b). The Water Fountain will automatically turn off after one hour. Next time you're ready to turn
on the Water Fountain, simply press the button and enjoy.
Selecting a Water Fountain pattern: There are 6 patterns programmed into the Hanging Bird Feeder's Water Fountain. Press the button once to turn the Water Fountain on; push the
button again to change to the next pattern; repeat again to change, for a total of 6 pattern options. The LED light will flash with each button push to confirm the next pattern has been
selected.
Turning the Water Fountain off: To stop the Water Fountain, manually press and hold the button for over 2 seconds (Figure 5a and 5b).
*PLEASE READ THESE INSTRUCTIONS COMPLETELY BEFORE ATTEMPTING TO ASSEMBLE YOUR NEW Hanging Bird Feeder
Figure 4eFigure 4d
Figure 1b
Figure 1a
Figure 3a
Figure 3b
Figure 1c Figure 1d
Figure 4c
Figure 2a
2.
3.
Figure 4a
Figure 4b
CHANGING BATTERIES:
1. When changing batteries you may find it easier to remove water
and bird seed that is in the Hanging Bird Feeder and unscrew/
disassemble the Bottom Bowl from the rest of the Hanging Bird
Feeder and lay on its side for easy access to the battery
compartments (Figure 2a). During the battery changing
process, it is important to ensure Battery Compartment
remains completely dry. It is important that no water enters
the Battery Compartment.
2. See Installing Batteries Section above on how to reinstall
batteries and reassemble.
Figure 5b
Figure 5a
LED
Light
LED
Light ButtonButton
Press
Button
Press
Button
Need Help?
Call us for assistance at:
+1 (619) 449-2392
or you can email us at:
customercare@
belmont.garden
Our Customer Care Department is available:
Monday - Friday 8:30am to 4:00pm PST
11:30am - 7:00pm EST
Alignment
Notch
Alignment
Notch
Alignment
Notch
Alignment
Notch
Dancing Water Attachments
Figure 6a Figure 6b Figure 6c
Button
& LED
Light
Figure 2b Figure 2c
Troubleshooting Troubleshooting Guide
OWNERS MANUAL
4.
Care and Maintenance
5.
001172 BGP3I1BFBBP rev 3e us
Santee, California 92071 | World Wide Patents Pending | Email: [email protected] | On the web: www.belmont.garden
Facebook & Pinterest: Belmont Garden | Instagram: @belmontgarden Twitter: @yrdllc
© Yeiser Research & Development, LLC; 2019. All rights reserved.
Made in China | Designed in the USA
Please read first before returning:
Please call us for assistance or any questions you have at +1 (619) 449-2392 or email us at [email protected]den. Our Customer Care Department is available: Monday - Friday 8:30am to
4:00pm PST, 11:30am to 7:00pm EST. If you have any questions regarding assembly, parts, or operation, please visit our website at www.belmont.garden. You will find instructional videos on how
to assemble and operate your fountain, and keeps you up to date on our newest products. This product comes with a one year limited warranty against materials and workmanship.
LIMITED ONE YEAR WARRANTY
This warranty gives you specific legal rights and you may also have other rights which vary from state to state. This product has a one year limited warranty on all materials and workmanship.
Belmont Garden
TM warrants the original purchaser of this product that the product will be free from manufacturing defects in workmanship and material for a period of one (1) year from the date of
original purchase. If within one (1) year this product fails due to defect in material or workmanship, Belmont GardenTM will repair, replace or supply any defective part at their discretion. The
purchaser must contact Belmont GardenTM and provide a description of the defective part, including digital pictures if requested, with this original purchase documentation as validation of warranty
coverage. This warranty does not cover or apply to: (a) damage to the product due to misuse, mishandling, and abuse, (b) products not used in accordance with instructions, (c) product not
assembled or installed according to instructions, and (d) normal wear and tear. Call us for assistance at +1 (619) 449-2392 or you can email or mail us at: 9545 Pathway Street, Santee, CA 92071,
[email protected]den. Our Customer Care Department is available: Monday - Friday 8:30am to 4:00pm PST / 11:30am - 7:00pm EST
IMPORTANT BATTERY SAFETY INSTRUCTIONS:
PROPOSITION 65 WARNING: Battery posts, terminals and related accessories contain lead and lead compounds, chemicals known to the State of California to cause cancer and reproductive harm. Wash
hands after handling.
WARNING: When using electric devices, basic safety precautions should always be followed to reduce the risk of fire, electric shock and personal injury, including the following:
WARNING: 1. Do not incinerate the battery even if it is severely damaged or is completely worn out. The battery can explode in a fire. Check with municipal codes in your area for possible special disposal
Instructions.
2. If liquid leaks from the battery cell, discontinue use immediately and dispose of properly.
3. Use only 4-1.5V AA cell batteries.
4. Do not attempt to disassemble, remodel or destroy the batteries, as it may cause battery leakage, fire, or bursting; and could also create sulfuric acid spills from the battery resulting in possible burns to
person and damage to the immediate environment.
5. Never dispose of batteries in the garbage. Disposal of batteries in the garbage is unlawful under state and federal environmental laws and regulations. Always take used batteries to your local battery-re-
cycling center.
CLEANING YOUR FOUNTAIN
In order to keep your Hanging Bird Feeder in tip-top shape and for a prolonged life, it is best if your Hanging Bird Feeder Top Bowl and Lower Bowl be cleaned periodically. To clean your Hanging
Bird Feeder, drain all water and bird seed, then disassemble. Use a mild soap and a soft cloth to clean the parts of your Hanging Bird Feeder.
COLD STORAGE
Turn power off, clean and dry the Hanging Bird Feeder of all water and bird seed. Remove the batteries for long-term storage and bring it indoors. (Now is a great time to clean the pump to remove
any debris that may have accumulated throughout the year).
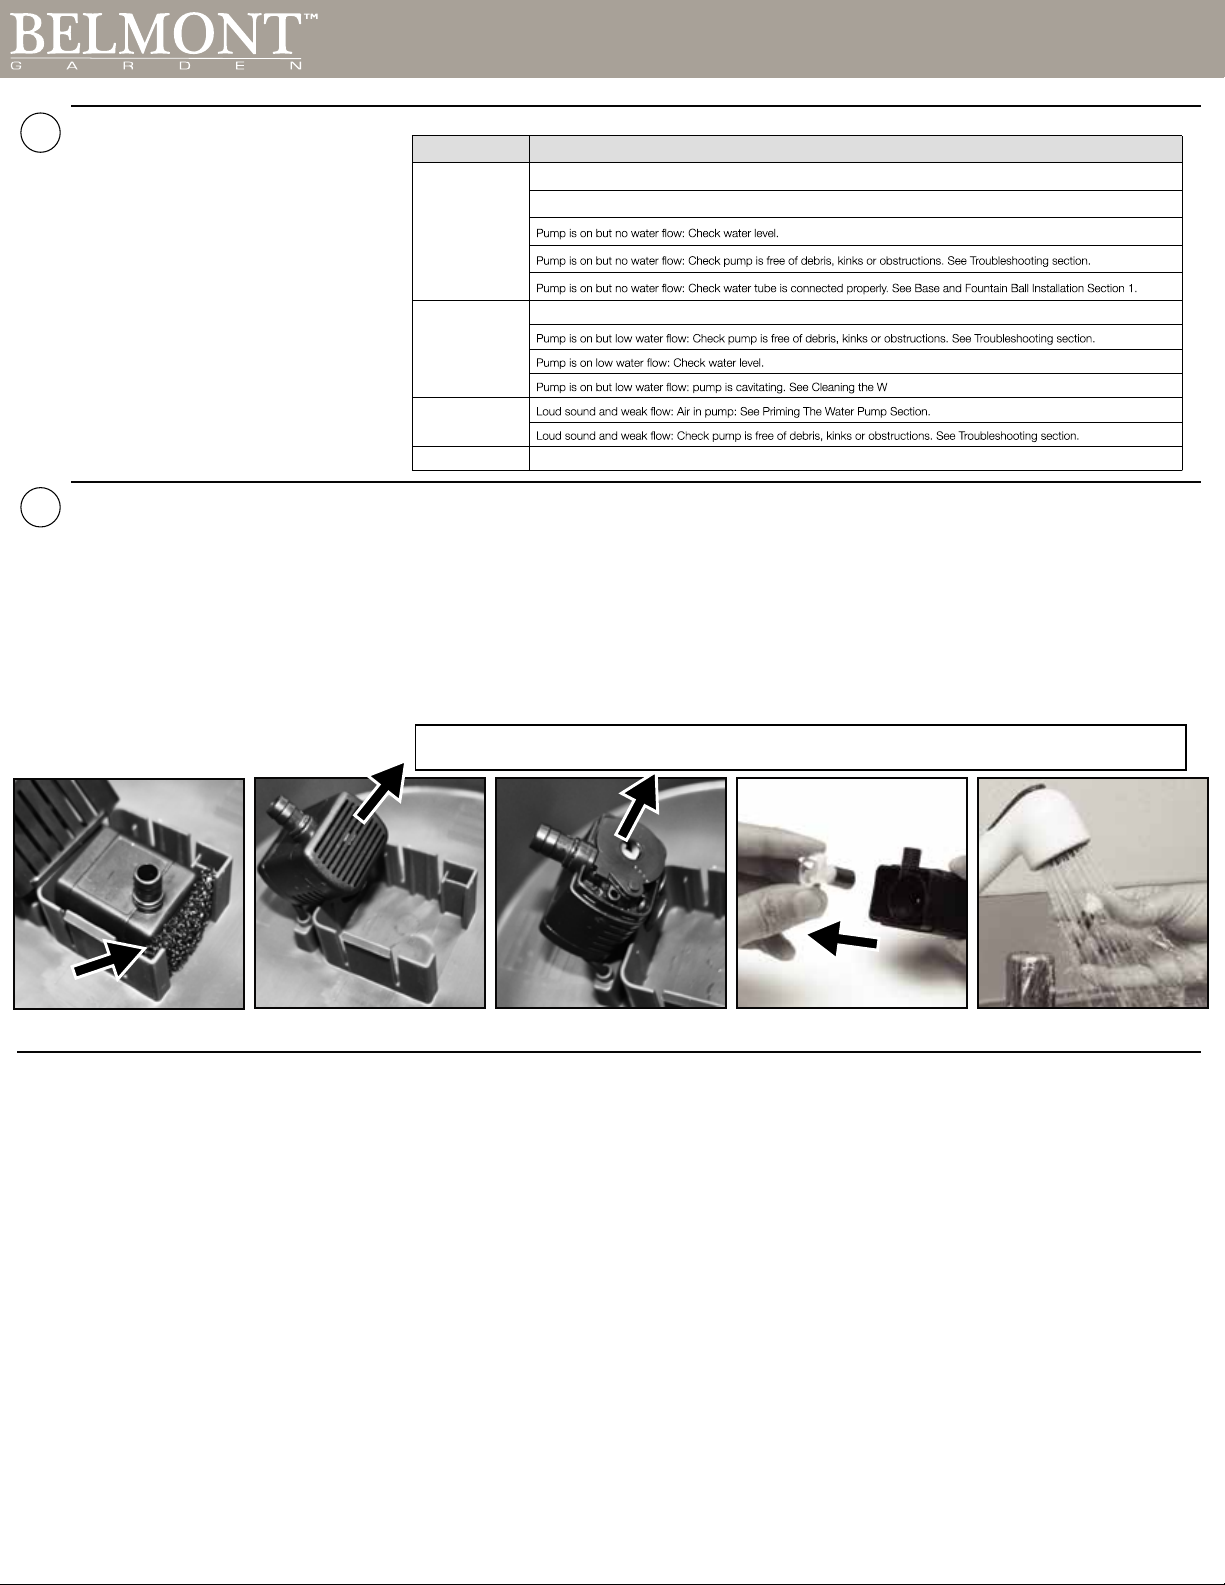
CLEANING THE WATER PUMP’S PARTS
The impeller inside of the Water Pump is what pushes water up through your Hanging Bird Feeder, allowing you to enjoy the soothing sounds and wonderful sights of your Hanging Bird Feeder. After
long periods of usage, this part will need to be cleaned to make sure your Hanging Bird Feeder runs optimally.
Step 1: Remove the pump cover panel off the Water Pump by grabbing the sides of the cover and pulling it up off the unit. The Pump Filter is under this cover, rinse off all debris.
Step 2: The Water Pump is secured with suction cups and lifts up easily. Remove the pump cover. This fits tightly, but will come off.
Step 3: Remove the impeller chamber cover. This is tightly fitted but will come off.
Step 4: Remove the impeller from its chamber.
Step 5: Rinse the impeller until all debris has been removed.
PLEASE NOTE: IF PUMP IS CAVITATING AND OR WATER IS NOT FLOWING OR NOT FLOWING PROPERLY, CHECK THAT THE WATER
PUMP IMPELLER CHAMBER COVER IS PRESSED ON ALL THE WAY (STEP 3 OF THE CLEANING THRE WATER PUMP’S PARTS).
PRIMING THE WATER PUMP
If you find the Water Pump is running, but water is
not flowing from your Hanging Bird Feeder, you can
try priming the Water Pump:
Turn off Fountain, grab both sides of the Hanging
Bird Feeder and quickly shake your Hanging Bird
Feeder for ten seconds. This is to dislodge any air
bubbles that may be caught in your Water Pump.
Press the button to turn your Hanging Bird Feeder
on. Water should be flowing from your Hanging Bird
Feeder. If water is not flowing, press and hold
button for over 2 seconds again to turn your
Hanging Bird Feeder off, and repeat the step
above.
Step 1 Step 2 Step 3 Step 4 Step 5
Plume 3-In-1 Bird Feeder, Bird Bath & PlanterTM
PROBLEM SOLUTION
Water Not Flowing
Check battery is installed correctly: See installing battery section.
Check that battery is fully charged: See charging battery section.
Low Water Flow
Check that battery is fully charged: See charging battery section.
ater Pump’s Parts under Care and Maintenance Section.
Loud Sound
Suddenly Stops Pump suddenly stops: Check pump is free of debris, kinks or obstructions. See Troubleshooting section.

Other Belmont Garden Outdoor Fountain manuals

Belmont Garden Lorraine Fountain User manual

Belmont Garden

Belmont Garden Lorraine Fountain User manual

Belmont Garden Mini Create A Fountain User manual

Belmont Garden

Belmont Garden Mini Create A Fountain User manual

Belmont Garden Ellie Elephant Fountain User manual

Belmont Garden

Belmont Garden Ellie Elephant Fountain User manual

Belmont Garden Fleur Deluxe 3-In-1Bird Feeder, Bird Bath &... User manual

Belmont Garden

Belmont Garden Fleur Deluxe 3-In-1Bird Feeder, Bird Bath &... User manual

Belmont Garden Rustique Bird Feeder & Bath User manual

Belmont Garden

Belmont Garden Rustique Bird Feeder & Bath User manual

Belmont Garden Juliette Cordless/ Hybrid Fountain User manual

Belmont Garden

Belmont Garden Juliette Cordless/ Hybrid Fountain User manual

Belmont Garden Louise Cordless Bird Feeder, Fountain &... User manual

Belmont Garden

Belmont Garden Louise Cordless Bird Feeder, Fountain &... User manual

Belmont Garden Stella Fountain User manual

Belmont Garden

Belmont Garden Stella Fountain User manual

Belmont Garden Create-A-Fountain User manual

Belmont Garden

Belmont Garden Create-A-Fountain User manual

Popular Outdoor Fountain manuals by other brands

Campania M-Series Assembly instructions

Campania

Campania M-Series Assembly instructions

Elkay SWIRLFLO ENOBM28RAK Installation, care & use manual

Elkay

Elkay SWIRLFLO ENOBM28RAK Installation, care & use manual

Hagen Laguna Quick start instructions

Hagen

Hagen Laguna Quick start instructions

Harbor Freight Tools 41637 Assembly & operating instructions

Harbor Freight Tools

Harbor Freight Tools 41637 Assembly & operating instructions

Elkay EZWS-EDFPBM117K Installation & use manual

Elkay

Elkay EZWS-EDFPBM117K Installation & use manual

Campania International 144530-01 Series Assembly instructions

Campania International

Campania International 144530-01 Series Assembly instructions

Sunnydaze Decor QZC-366 quick start guide

Sunnydaze Decor

Sunnydaze Decor QZC-366 quick start guide

EasyPro EFB26 installation instructions

EasyPro

EasyPro EFB26 installation instructions

A&B Home D69517 Assembly instruction

A&B Home

A&B Home D69517 Assembly instruction

Halsey Taylor 4520-68 Mounting instructions

Halsey Taylor

Halsey Taylor 4520-68 Mounting instructions

Laser Corporation Pty Tech Pets T4P-WATER-F2L user manual

Laser Corporation Pty

Laser Corporation Pty Tech Pets T4P-WATER-F2L user manual

Gardena FP 1000 operating instructions

Gardena

Gardena FP 1000 operating instructions

Sunnydaze Decor SSS-619 quick start guide

Sunnydaze Decor

Sunnydaze Decor SSS-619 quick start guide

Profi-pumpe FELS-ZAUBER operating instructions

Profi-pumpe

Profi-pumpe FELS-ZAUBER operating instructions

Otterbine/Barebo Sunburst owner's manual

Otterbine/Barebo

Otterbine/Barebo Sunburst owner's manual

Campania International Fonthill FT-271 Assembly instructions

Campania International

Campania International Fonthill FT-271 Assembly instructions

Blumfeldt Ayana manual

Blumfeldt

Blumfeldt Ayana manual

PEAKTOP POL-0001A Use and care guide

PEAKTOP

PEAKTOP POL-0001A Use and care guide

manuals.online logo
manuals.online logoBrands
  • About & Mission
  • Contact us
  • Privacy Policy
  • Terms and Conditions

Copyright 2025 Manuals.Online. All Rights Reserved.