Belmont Garden Juliette Cordless/ Hybrid Fountain User manual

Juliette Cordless/
Hybrid Fountain
Owner’s Manual

LIMITED ONE YEAR WARRANTY
This product has a one year limited warranty on all materials and workmanship. Belmont GardenTM
warrants the original purchaser of this product that the product will be free from manufacturing defects
in workmanship and material for a period of one (1) year from the date of original purchase. If within
one (1) year this product fails due to defect in material or workmanship, Belmont GardenTM will repair,
replace or supply any defective part at their discretion. The purchaser must contact Belmont GardenTM
and provide a description of the defective part, including digital pictures if requested, with this original
purchase documentation as validation of warranty coverage. This warranty gives you specic legal
rights and you may also have other rights which varies from state to state.
This warranty does not cover or apply to: (a) damage to the product due to misuse, mishandling, and
abuse, (b) products not used in accordance with instructions, (c) product not assembled or installed
according to instructions, and (d) normal wear and tear.
Call us for assistance at 1+ (619) 449-2392 or you can email us at:
customercar[email protected]
Our Customer Care Department is available:
Monday - Friday 8:30am to 5:30pm PST / 11:30am - 8:30pm EST

Welcome to Belmont GardenTM new Hybrid System! The Hybrid System is
designed to prolong the run time of your fountain between recharging your
battery. The Hybrid System is a combination of Belmont GardenTM BA-
152 high-capacity rechargeable battery and a computer controlled, high-
capacity solar assist system. For best results, start with a fully charged
battery.
The Hybrid System will continually top o your battery in between uses. The
battery will still need to be recharged, however the time between recharges
can now be prolonged. Please note, the time between recharges will vary
based on the amount of sun exposure and how often you use your fountain.
When the battery runs out of charge, simply follow the battery charging
instructions to continue enjoying your Belmont GardenTM Hybrid Fountain.
On behalf of Belmont GardenTM Fountains, thank you for your purchase of a
new Belmont GardenTM Hybrid Fountain. Simply follow these instructions for
the assembly of your new fountain and if you have any problems or issues
please don’t hesitate to call our Customer Care Team at 1+ (619) 449-2392.
How The Hybrid System Operates
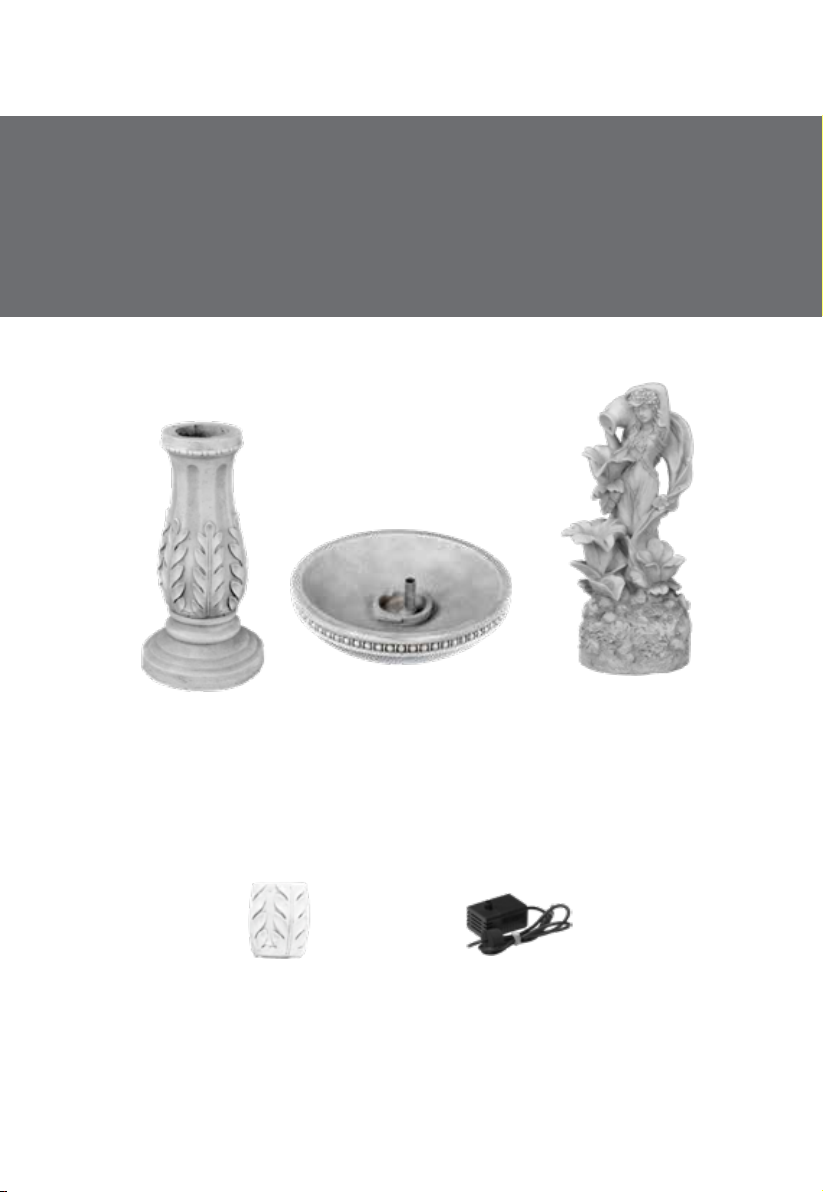
Base
Battery
Compartment
Door
Water Pump
Assembly
Large Bowl Maiden Topper
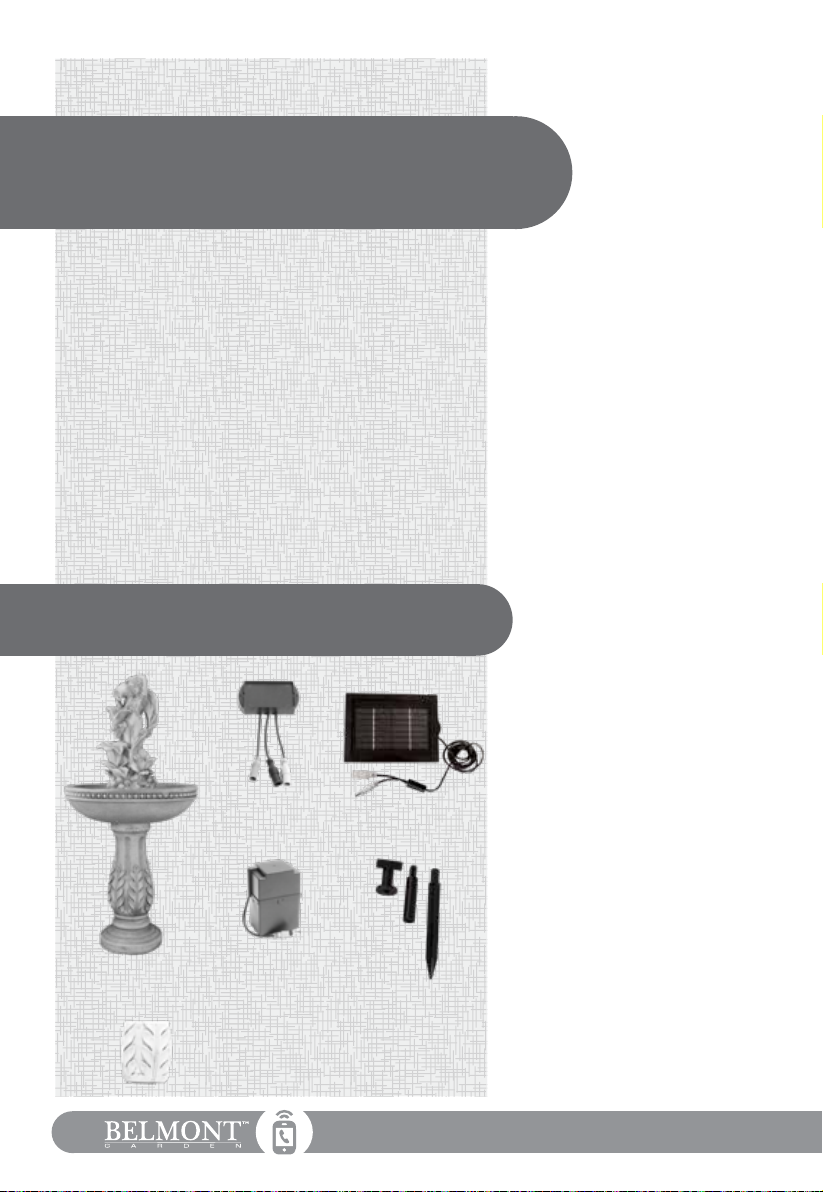
Parts to your Belmont
Garden™Fountain:
Parts to your Belmont
Garden™Fountain:
Rechargeable
Battery
Leveling Shim
Connection Port Battery Charger
Solar Panel
Solar Panel
Stakes

CONTENTS
Step 1: Base & Large Bowl
Bowl Locking System
Step 2: Maiden Topper Installation
Installing e Maiden Topper
Step 3: Battery & Solar Panel Installation
Connecting e Battery and Solar Panel
Solar Panel Assembly
Solar Panel Installation
Inserting Battery Compartment Door
Removing Battery Compartment Door
Step 4: Setting Up Your Fountain
Fill Your Fountain
Operating Your Fountain
Troubleshooting and Maintenance
Cleaning Your Fountain
Cold Storage
Recharging e Battery
Cleaning the Water Pump’s Parts
Water Pump Air Filters
Water Pump Impeller
Priming the Water Pump
Using Leveling Shims
Weighing Down Your Fountain
Water Pump Connection
1
2
3
4
6
7
9
9
10
10
11
12
12
14
14
14
14
15
15
15
16
17
17
18

Remember if you need help contact Customer Care: 1+(619) 449-2392 |1
Step 1:
Base &
Large Bowl
You will need:
Step 1:
Base
Large Bowl
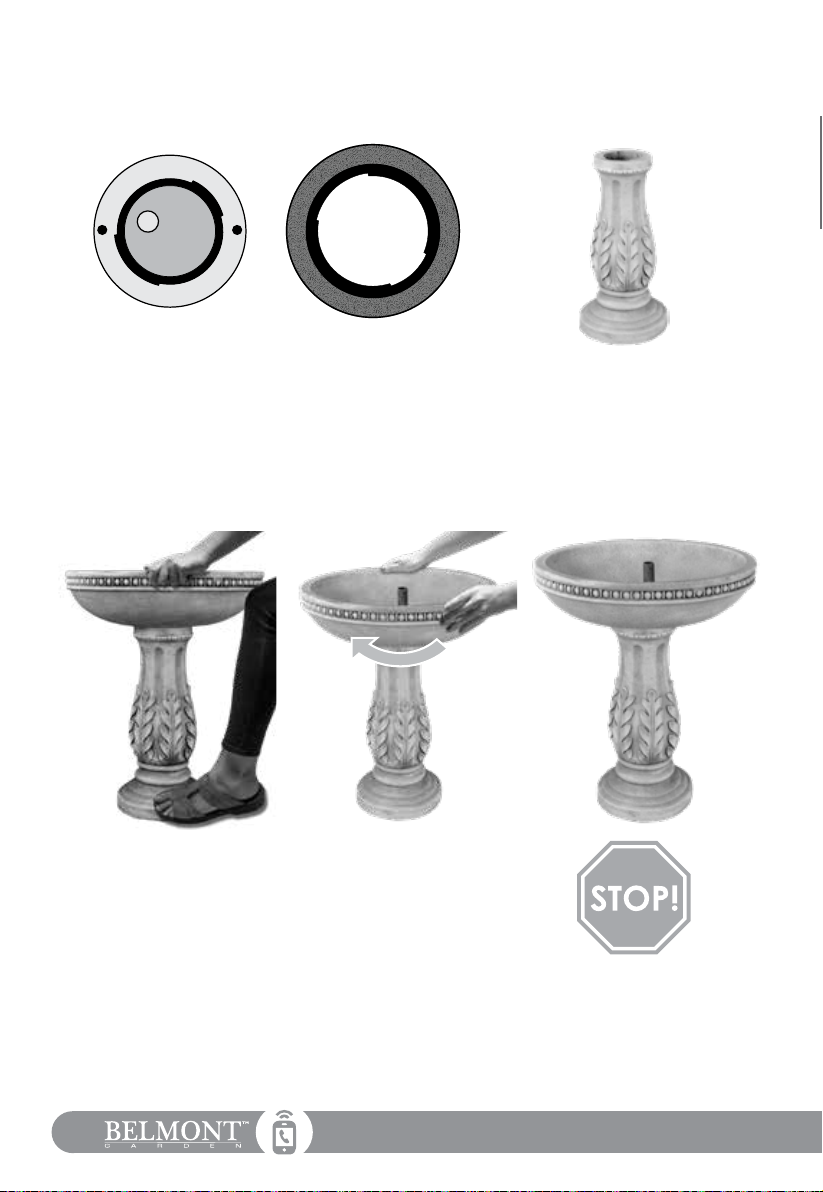
Remember if you need help contact Customer Care: 1+(619) 449-2392
2|
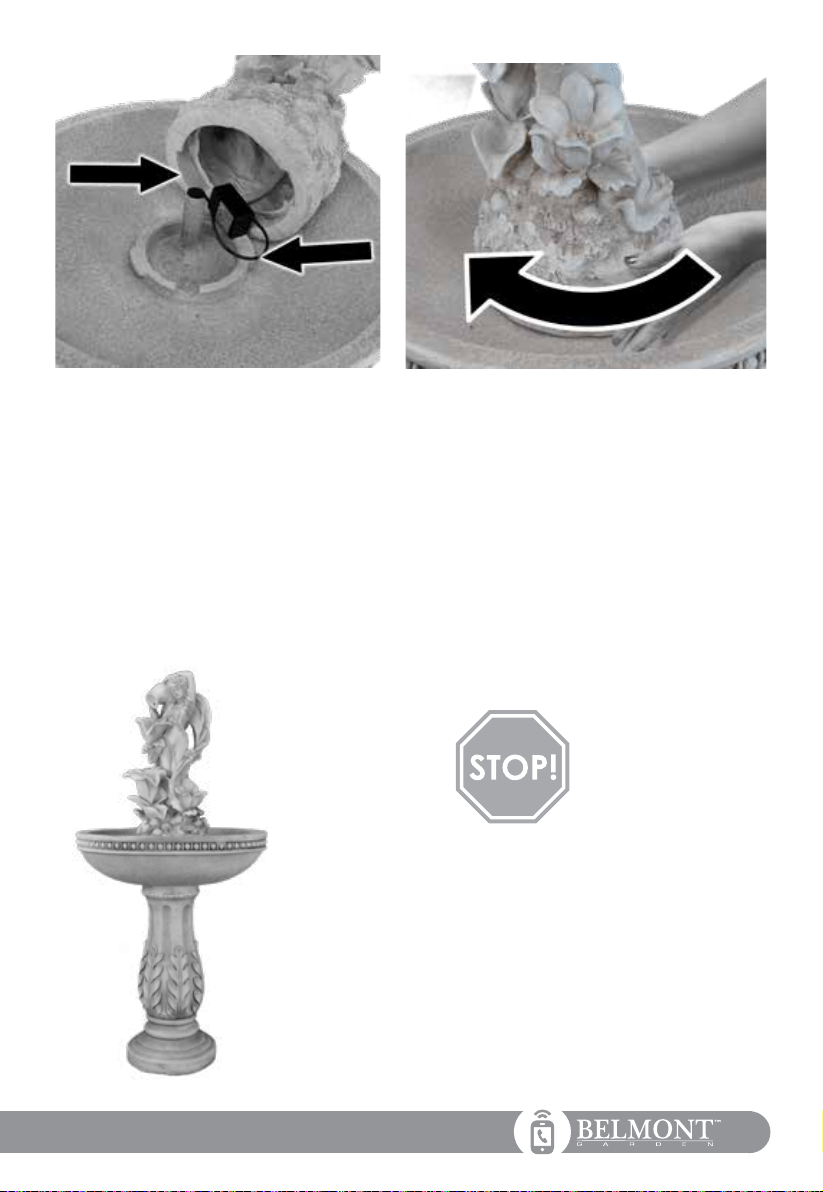
Step 3: Turn the Large
Bowl a quarter turn clock-
wise to lock it into place.
Step 2: Align and connect
the Large Bowl to the base.
At this point, your fountain
should look like the image above.
Go to the next page to contin-
ue setting up your new Juliette
Fountain.
Note: You will notice that there are two dierent
sized tabs on the bottom of the Large Bowl and
there are two corresponding grooves in the top
of the Base. These tabs t together and lock
when turned clockwise.
Bottom of Large Bowl Top of Base
Bowl Locking System
A look at how the bowl locking system works on your Fountain.
Step 1: Be sure to
place the Base of your
fountain on a at, rm
surface.

Remember if you need help contact Customer Care: 1+(619) 449-2392 |3
You will need:
Step 2:
Maiden
Topper
Installation
Maiden Topper
Assembled Base &
Large Bowl
Water Pump
Assembly
Remember if you need help contact Customer Care: 1+(619) 449-2392
4|
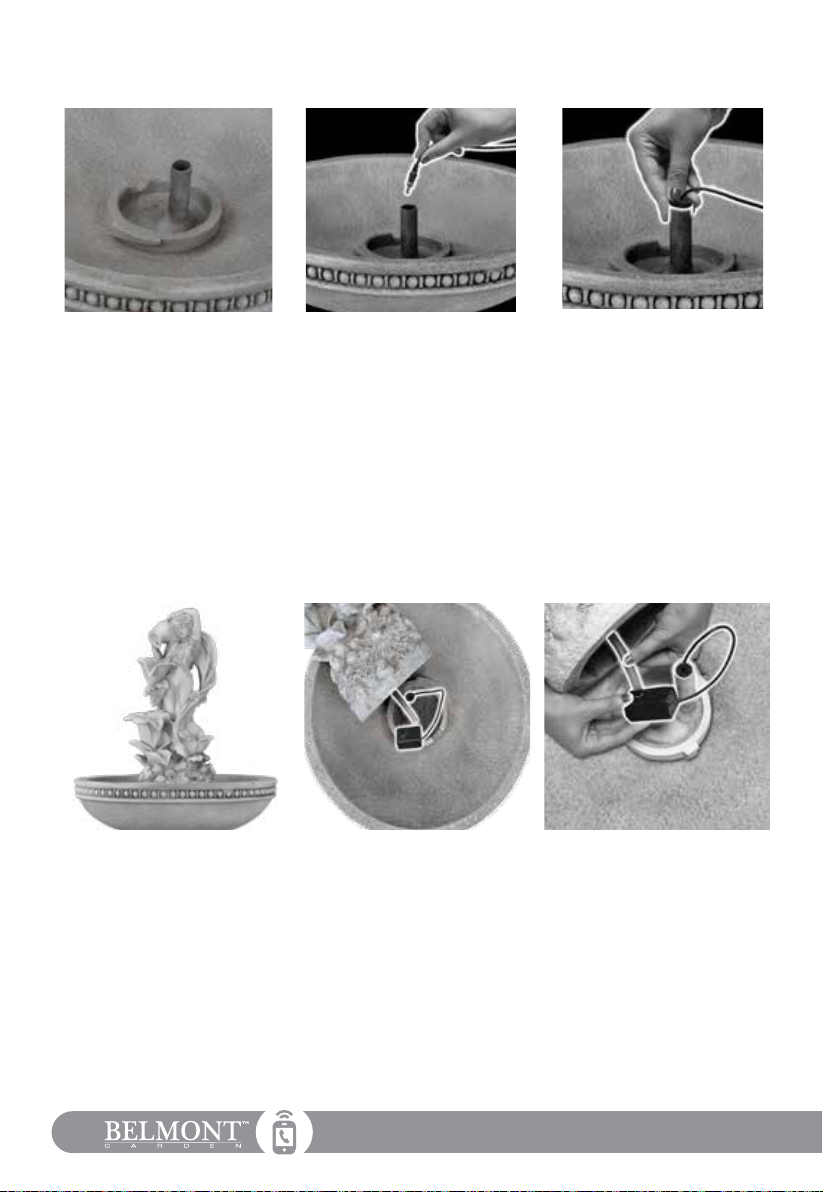
Step 1: Rest the Maiden Topper
carefully and securely on the
side of the large bowl careful
not to let it fall. Feed the water
pump cable (connector has a
green-stripe) down into the pipe
in the middle of the Large Bowl.
In the next step, you will
install the Maiden Topper into
the Large Bowl.
Step 2: Firmly press the plug
into the pipe in the middle of
the Large Bowl to ensure a
water-tight seal.
NOTE: If you are having trouble pressing the plug into the pipe, you can rub a
small amount of soapy water on the plug to help it slide into place.
If your fountain did not come with the Water Pump already connected to the tube
inside of the Maiden Topper or if the Water Pump gets disconnected from the Maiden
Topper, use these instructions to reconnect your Water Pump.
Step 1: Unlock and lift the
Maiden Topper out of the
large bowl.
Step 2: Rest the Maiden
Topper carefully and securely
on the side of the large bowl
careful not to let it fall.
Step 3: Connect the male
outlet on the top of the Water
Pump to the tube inside of
the Maiden Topper. Make
sure this connection is snug.
Installing The Maiden Topper
Remember if you need help contact Customer Care: 1+(619) 449-2392 |5
Note: Be sure to leave approximately 6 to 7 inches (15 to 17 cm) of slack in the cord coming
from the Water Pump so the pump will sit on the bottom of the Large Bowl and can be
covered by water when the Fountain is assembled and running in later steps.
Step 4: Like the Large Bowl and Base,
the Maiden Topper uses a key-lock sys-
tem to connect to the Large Bowl. The
square notches in the groove of the Large
Bowl will align with the square gaps in the
bottom of the Maiden Topper.
Step 5: Align and connect the Maiden Topper
to the Large Bowl.
At this point, your fountain should look like the image on
the left. Go to the next page to continue setup for your new
Juliette Fountain.
Remember if you need help contact Customer Care: 1+(619) 449-2392
6|
You will need:
Step 3:
Fountain
Assembled
Battery
Compartment
Door
Rechargeable
Battery
Connection Port
Battery &
Solar Panel
Installation
Solar Panel
Solar Panel
Stakes
Remember if you need help contact Customer Care: 1+(619) 449-2392 |7
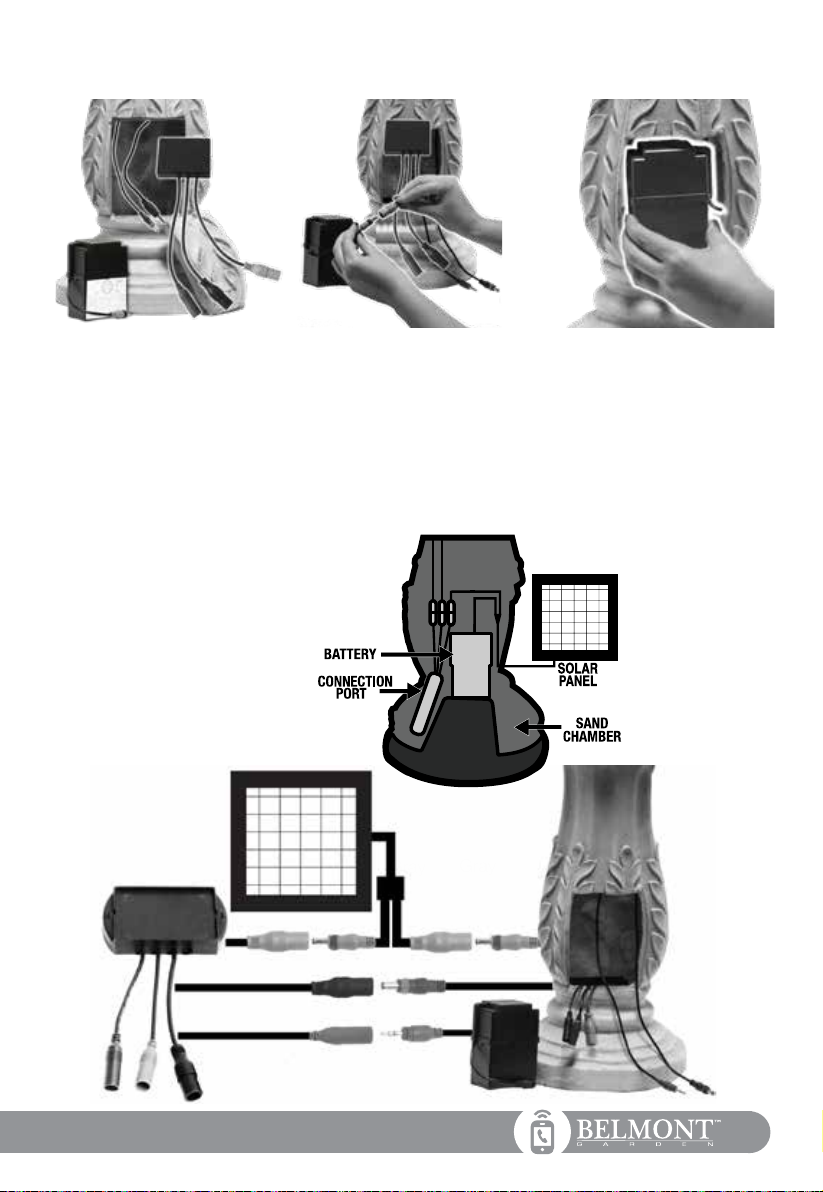
Connecting The Battery
Step 2: Using the cords from
inside the Base and the cord
from the Battery, connect the
color coded cords to their
corresponding receptacles on
the Connection Port.
Use the diagram below for more
help on connecting the Battery.
Step 3: Place the Connection
port into the back of your Base,
then place your Battery inside of
the compartment in front of the
Connection Port. (See illustration
below)
DO NOT PLACE BATTERY
UPSIDE DOWN INSIDE OF
BATTERY COMPARTMENT.
Step 1: In the open battery
compartment, you will see
two cords hanging down
that you must connect to the
Connection Port.
If you do not see the two
cables inside the battery
compartment, you will need
to reach up into the Base and
gently pull them down until they
are hanging inside the battery
compartment.
Note: Be careful there may
be rough edges.
Gray Gray
Battery
Black
Gray Gray
Water Pump
Black
Blue ABCD Button
Blue
A A
BB
CC
Diagram 1.
Solar Panel
Battery
Connection Port

Remember if you need help contact Customer Care: 1+(619) 449-2392
8|
Step 3: Place your Connection Port inside the designated angled area located at the back of your
Fountain Base. (Diagram 2)
Diagram 3.
Diagram 2.
Step 4: Place the Battery inside of the compartment in front of the Connection Port (Diagram 2). There
is a notch in the lower corner of the Battery Compartment Door for the Solar Panel wire to extend
out from the battery compartment door (Diagram 3). DO NOT PLACE BATTERY UPSIDE DOWN
INSIDE OF BATTERY COMPARTMENT. Note: Installing the Battery Door will be shown in a later
step.
Remember if you need help contact Customer Care: 1+(619) 449-2392 |9
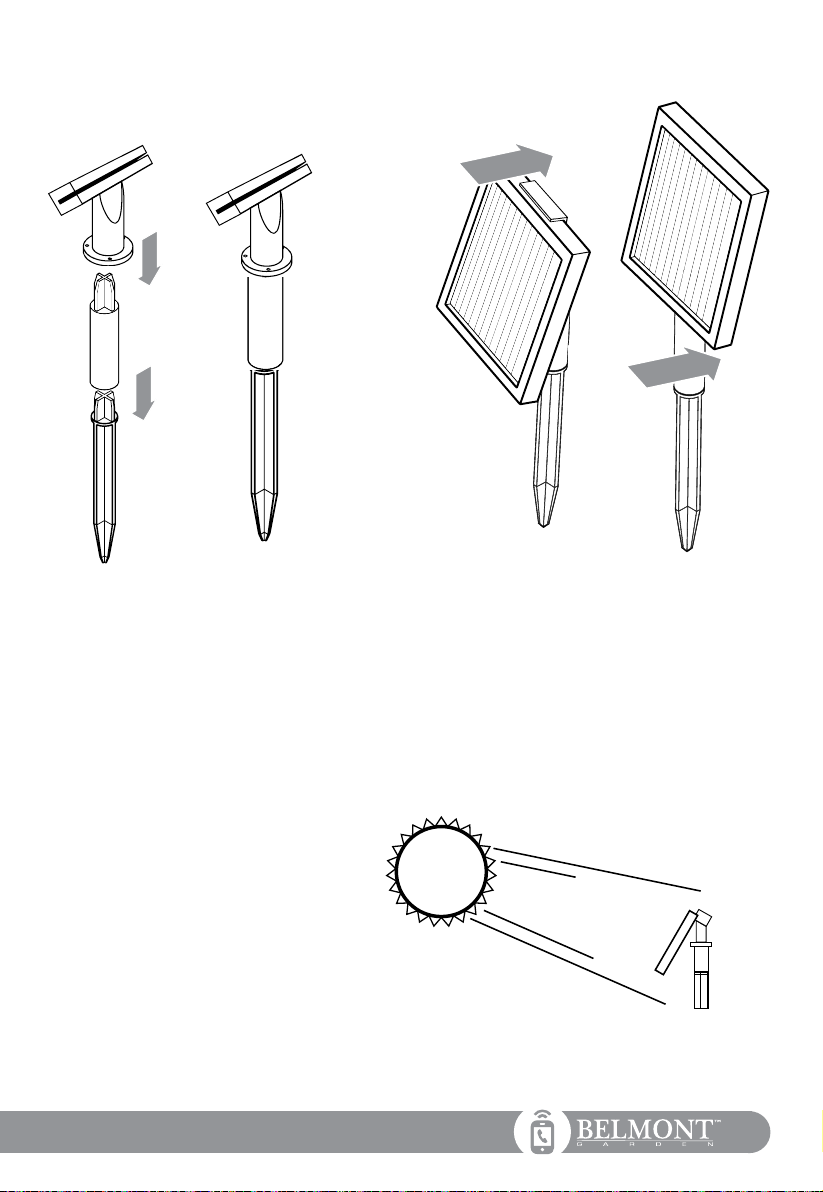
Note: The Solar
Panel Stake can be
connected to the top
or bottom of the Solar
Panel. Select a mount
that best ts your
fountains location.
Step 1: Assemble the 3 sections of
the Solar Panel Stakes as shown
in gure 1a. Slide the 3 sections
together tightly as shown in gure 1b.
Step 2: Slide the top section of the stake onto the edge
of the Solar Panel as shown in gure 2, This is a slip t
and will rmly hold the Solar Panel into place.
Solar Panel Installation
Make sure to place the solar panel in a spot that gets plenty of sun to power your
fountain.
Push the stake assembly into soft dirt
until the stake assembly, with solar pan-
el attached, can securely stand upright.
Always angle the solar panel towards
the sun to maximize exposure to sun-
light required to power the fountain.
To ensure optimal power and sunlight
hitting your fountain’s solar panel, you
may need to rotate or turn the solar
panel towards the sun as necessary.
Solar Panel Assembly
Step 1
Figure 1a
Figure 2
Figure 1b Top Mount Bottom Mount
Step 2
Note: The installation of the Solar Panel can be located
approximately up to 6 ft away from your fountain or the
length of the cord.
Remember if you need help contact Customer Care: 1+(619) 449-2392
10|
Step 1: Start by lining up the
notch on the bottom of the
Battery Compartment Door
with the notch in the bottom
of the battery opening.
Step 2: Then push the
battery compartment door
in toward the base. You will
know it is in place when the
magnet connects the battery
compartment door to the
base.
Step 3: Once the Door is
in place, you may notice a
small notch in the bottom
left corner of the battery
compartment door. This is
for the Belmont GardenTM
Solar Panel cord.
Inserting Battery Compartment Door
After you have connected the cables inside your fountain to the Rechargeable Battery,
you should then place the Battery Compartment Door on the Base of the fountain.
At this point, your fountain should look like the image on
the left. Go to the next page to continue setting up your
new Juliette Fountain.
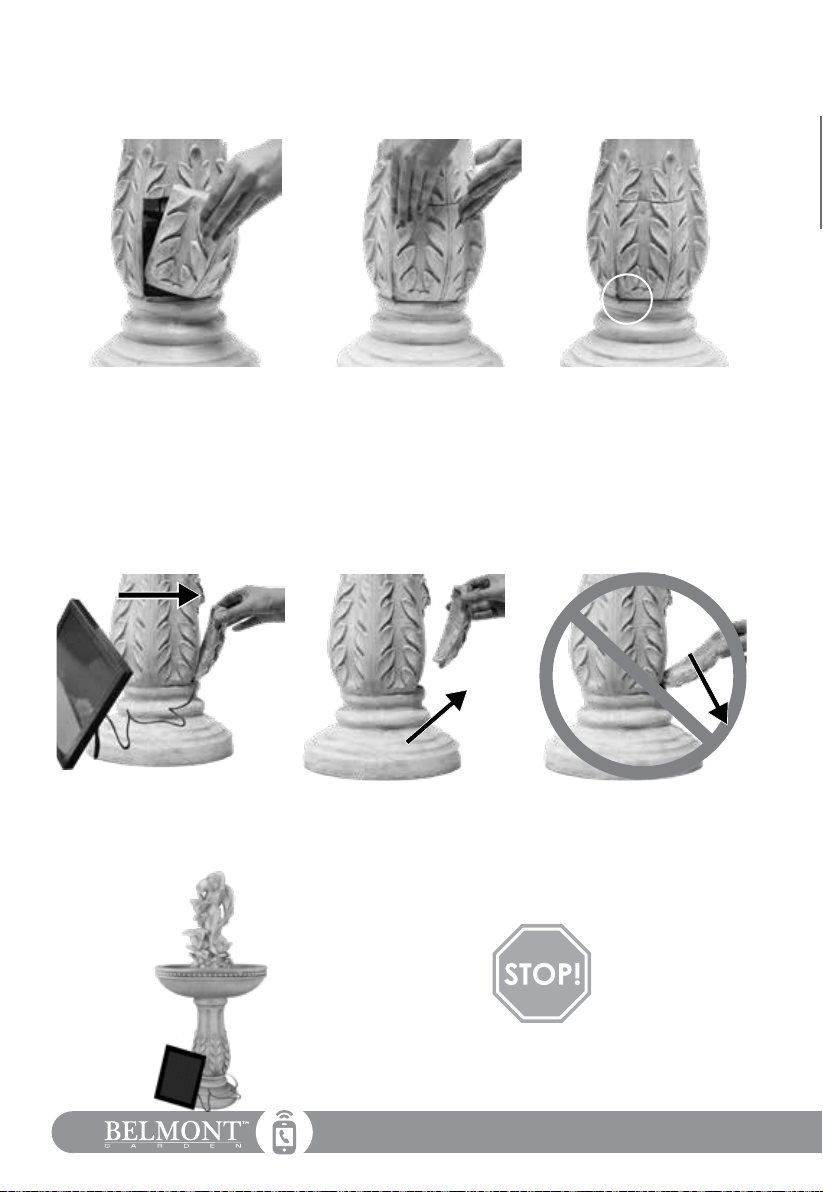
Step 1: Carefully disconnect
the Battery Compartment
Door from the Base by gently
pulling outward from the top.
Step 2: Then, pull the
Battery Compartment Door
up and out to remove from
the Base.
DO NOT OVEREXTEND THE
BATTERY COMPARTMENT
DOOR BY PULLING DOWN!
This may cause damage to
your new Enchanted Maiden
Fountain.
Removing Battery Compartment Door

Remember if you need help contact Customer Care: 1+(619) 449-2392 |11
You will need:
Setting
Up Your
Fountain
Step 4:
Fountain
Assembled
Water To
Fill Your
Fountain
Remember if you need help contact Customer Care: 1+(619) 449-2392
12|
Operating Your Fountain
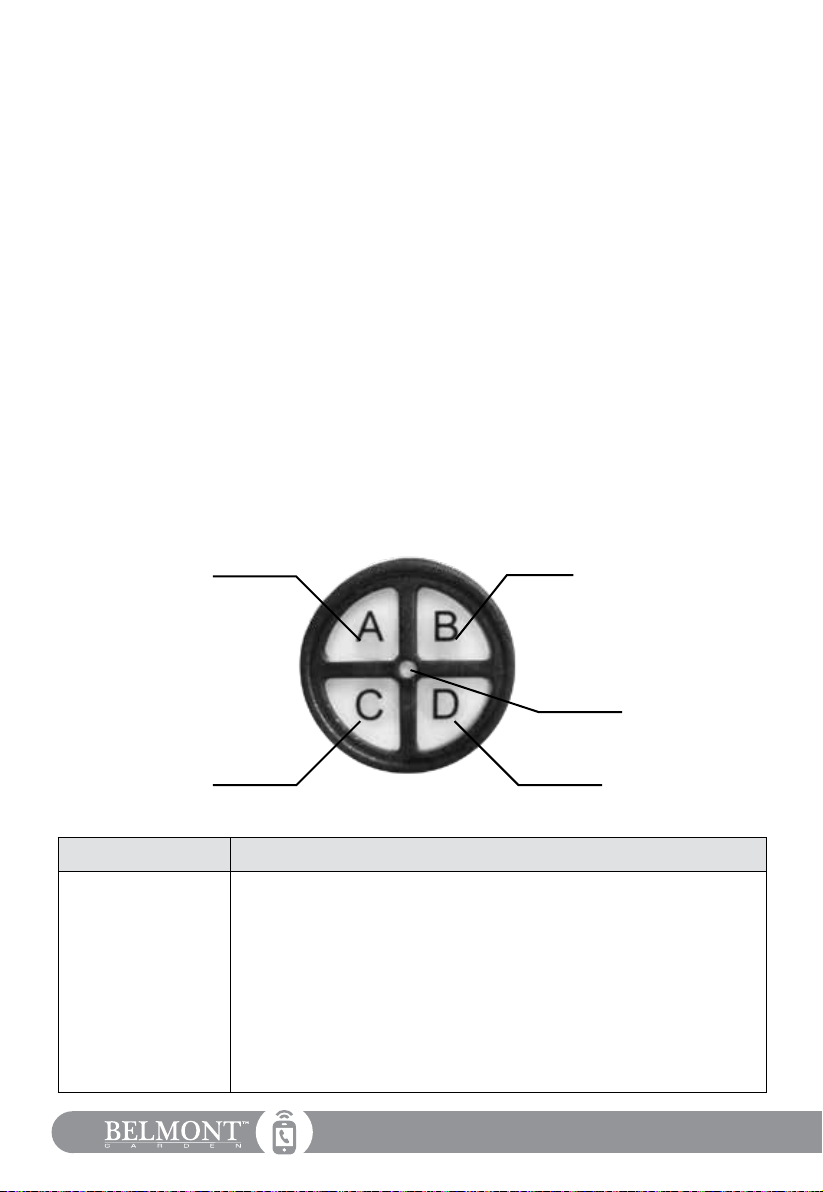
The on-board control panel is located near the top of the base, just below the small built-in bowl.
See the diagram below to see how the all-new on-board controls work for your Belmont Garden™
Fountain.
IF YOUR FOUNTAIN IS MAKING A LOUD NOISE, DON’T PANIC!
This just means that there are air bubbles stuck in the water pump. Your pump will not be harmed
and you can easily x this issue. You can try priming the fountain again by repeating the steps in
the previous “Fill Your Fountain” section, however, if the problem still persists, you can nd the
solution in the “Try Priming The Water Pump” section.
Fill the large bowl until the water is about 1 inch (2.5 centimeters) from the top of the
bowl.
After you have lled your fountain, grab both sides of the large bowl and quickly shake
your fountain for ten seconds. This is to dislodge any air bubbles that may be caught
in your water pump. Press the C button once to turn your fountain on. Water should be
owing from the top of your fountain. If water is not owing, press the C button once
more to turn your fountain o, and repeat the step above.
Manual On/O
1-4 Hour Timer
Status Light
1-4 Hour Daily Timer
(Repeats Every Day)
This Feature Is
Not Used On
This Model.
BUTTON DESCRIPTION
A (1-4 Hour Timer)
Runs the fountain for 1-4 hours with automatic shut o.
One hour operation: press the A button once for your fountain to turn on
with an automatic shut-o after one hour of operation.
Two hour operation: press the A button twice and your fountain will auto-
matically shut-o after two hours of operation.
Three hour operation: press the A button three times and your fountain
will automatically shut-o after three hours of operation.
Four hour operation: press the A button four times and your fountain will
automatically shut-o after four hours of operation.
Fill Your Fountain

Remember if you need help contact Customer Care: 1+(619) 449-2392 |13
BUTTON DESCRIPTION
A (1-4 Hour Timer)
(Cont.)
How To Use This Function:
1. Press the A button one, two, three or four times to turn your fountain on
for the desired automatic run time.
2. The Status Light will blink once for each hour you have selected to con-
rm your fountain’s 1-4 Hour Timer, up to four hours.
3. At the end of the desired interval, your fountain will automatically turn o.
B(1-4 Hour Daily
Timer)
This function is the same as the 1-4 Hour Timer (button A) except
with the added feature of automatically turning your fountain on at
the same time the next day for the interval you selected.
One hour operation: press the B button once for your fountain to turn on
with an automatic shut-o after one hour of operation. This will repeat daily
at the same time each day.
Two hour operation: press the B button twice and your fountain will
automatically shut-o after two hours of operation and repeat daily at the
same time.
Three hour operation: press the B button three times and your fountain
will automatically shut-o after three hours of operation and repeat daily at
the same time.
Four hour operation: press the B button four times and your fountain will
automatically shut-o after four hours of operation and repeat daily at the
same time.
How To Use This Function:
1. Select the amount of time you would like the fountain to run by press-
ing the B button one, two, three or four times.
2. Your fountain will then run for the selected amount of time and at the
end of the selected duration it will automatically turn o. Then your
fountain will automatically turn on at the same time the next day for
the run time duration you selected.
Example: If you turn on your fountain, choose a two hour run time by
pressing the B button twice at 5pm, your fountain will turn o at 7pm
and turn on again the next day at 5pm and run for two hours automati-
cally.
C (Manual On/O)
Turns the fountain on and o without any timer. Can be used when
extended run times are desired.
Note: Fountain will run until the battery loses its charge.
DThis feature is not used on this model.
Status Light Status light will blink for the number hours you have selected when
using the timer functions (buttons A and B).
Operating Your Fountain ( Continued)
Remember if you need help contact Customer Care: 1+(619) 449-2392
14|
You can now try your Belmont Garden™ fountain to see if everything is working
correctly! Turn your fountain on and you should see water owing from the outlet
in the vase at the top of the Maiden Topper. If water is not owing, please refer
to the “Try Priming The Water Pump” section.
The following section covers any Troubleshooting and Maintenance issues as
needed.
Operating Your Fountain ( Continued)
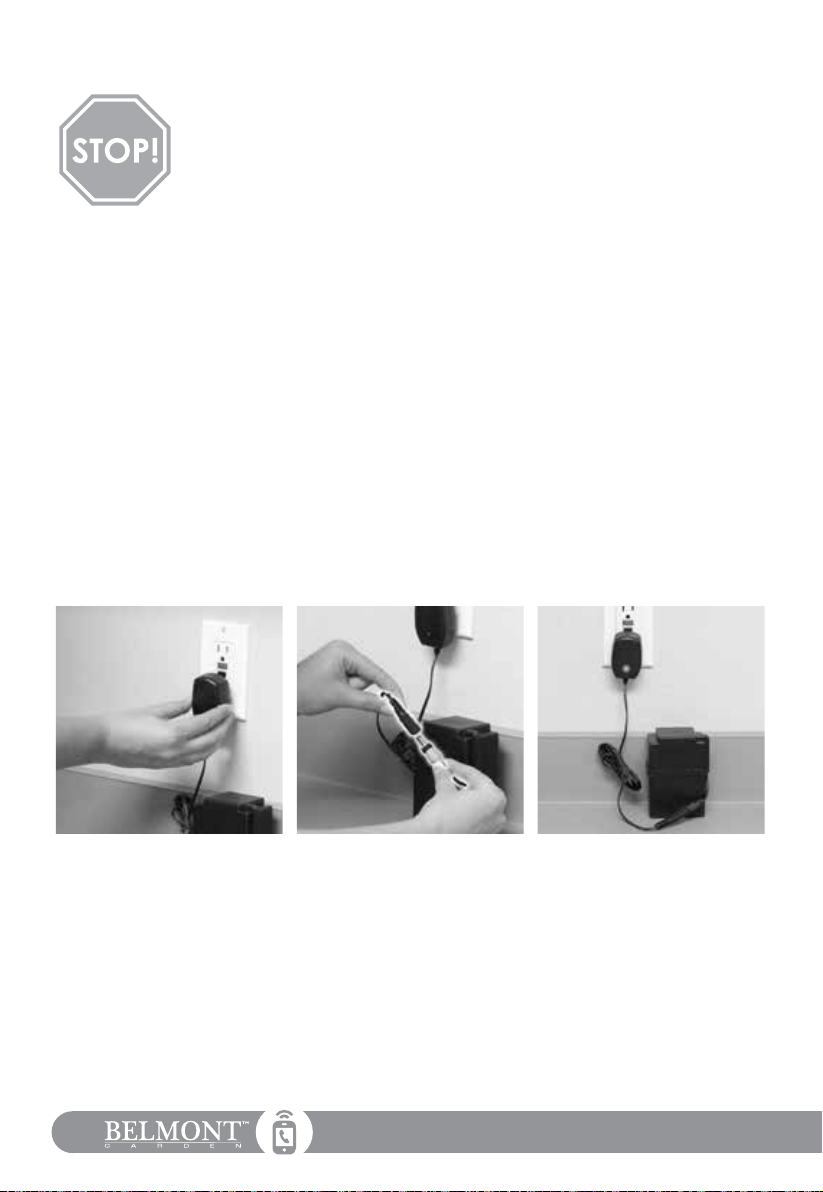
Recharging The Battery
If you connect your battery to the charger before you plug into your outlet, the chargers’ light will
glow a solid green to signify connection to the battery. Once plugged into the outlet, the light will
glow a solid red until charged. Then it will turn green.
Cleaning Your Fountain
In order to keep your fountain in tip-top shape and free of algae, you should clean your fountain
every two months. To clean your fountain, drain of all water and disassemble. Use a mild soap and
a soft cloth to clean the parts of your Belmont Garden™ Fountain. Your fountain bowl will form
a natural patina nish which with time may appear lighter or whiter than the original color. This is
normal. DO NOT SCRUB YOUR FOUNTAIN, AS THIS COULD CAUSE DAMAGE TO THE FINISH
Cold Storage
Drain the water from fountain prior to the rst freeze of the season. Clean and dry the fountain of
all water. Remove the rechargeable battery and the water pump and bring it indoors. Be sure to
store the battery upright. Now is a great time to clean the pump to remove any debris that may
have accumulated throughout the year. See “Cleaning The Water Pump” section. Store in a warm
Troubleshooting & Maintenance
Begin by disconnecting the
battery from the Connection Port
and remove from the base of
your fountain.
Step 1: Plug the battery charger
into an electrical wall outlet.
Step 2:
Take the gray cord that
is connected to your battery and
plug it into battery charger cord.
While the battery is charging,
the light on the charger will be
solid red.
Step 3: Charge the battery for
12-14 hours. When the battery
is reaching it’s fully charged
capacity, the light will blink for
several minutes. Once the light
is a solid green, the battery is at
it’s full charge. At this point, you
can detach the battery from the
charger and plug the battery into
your fountain.
IMPORTANT
DO NOT CHARGE ON COUNTER TOPS, CARPETS OR OTHER FINISHED SURFACES. IT IS RECOMMENDED
THAT THE BATTERY BE PLACED ON A CONCRETE OR A SAFE SURFACE WHILE CHARGING.
Table of contents
Other Belmont Garden Outdoor Fountain manuals

Belmont Garden
Belmont Garden Louise Cordless Bird Feeder, Fountain &... User manual

Belmont Garden
Belmont Garden Plume 3-In-1 Bird Feeder, Bird Bath &... User manual

Belmont Garden
Belmont Garden Ellie Elephant Fountain User manual

Belmont Garden
Belmont Garden Stella Fountain User manual

Belmont Garden
Belmont Garden Mini Create A Fountain User manual

Belmont Garden
Belmont Garden Create-A-Fountain User manual

Belmont Garden
Belmont Garden Rustique Bird Feeder & Bath User manual

Belmont Garden
Belmont Garden Fleur Deluxe 3-In-1Bird Feeder, Bird Bath &... User manual

Belmont Garden
Belmont Garden Lorraine Fountain User manual


