BERG CYCLES SPORTCROSS SERIES User manual

EN] USER’s MANUAL
PT] MANUAL DO UTILIZADOR
ES] MANUAL DEL USUARIO
EN] USER’s MANUAL
PT] MANUAL DO UTILIZADOR
ES] MANUAL DEL USUARIO
IMPROVE YOUR NATURE

WARNING / IMPORTANT
Please note this symbol throughout the manual and pay special attention to statements preceded.
ENGLISH

3
ENGLISH
www.bergcycles.com
INDEX
1. MODEL SERIES AND STANDARDS
2. WARRANTY REGISTRATION
• FRAME SIZE GUIDE
3. PARTS IDENTIFICATION
• MOUNTAIN BICYCLES
• LEISURE/TREKKING BICYCLES
• ROAD BICYCLES
• BMX/JUNIOR/KID BICYCLES
• NECESSARY TOOLS
4. BEFORE USING THE BICYCLE
• BICYCLE ADJUSTMENTS
SADDLE HEIGHT
REACH
HANDLEBAR HEIGHT
• MAINTENANCE AND SAFETY CHECKS PLAN
BRAKES
TIRES/INNER TUBES
WHEELS
STEERING
BRACKETS/PEDALS
GEARS
FRAME/FORK
CHAIN/DERAILLEUR/BRAKE LEVERS
GEAR LEVERS
HUBS/SPROCKETS
BRACKETS/PEDALS/BEARINGS
HEADSET
SUSPENSION/SHOCK
• HELMETS
• RIDING SAFETY
NIGHT RIDING
PEDALLING TECHNIQUE
MOUNTAIN TECHNIQUE
CURVING TECHNIQUE
RULES FOR CHILDREN
GEAR OPERATION
DERAILLEURS OPERATING PRINCIPLES
• GEARS RECOMMENDED COMBINATIONS
KNOBS HANDLE OPERATION
THUMB SHIFTERS
SHIFTERS UNDER THE HANDLEBAR
5. ASSEMBLY
• PEDALS AND CRANKS
• FRONT/REAR WHEEL
• CORRECT PLACEMENT OF THE QUICK RE-
LEASE LEVER
• BRAKES
• V-BRAKES
• INSPECT BRAKES
• DISC BRAKES
• DERAILLEUR
REAR DERAILLEUR
FRONT DERAILLEUR
• DUAL SUSPENSION
• FINAL INSPECTION
• CHILD AND BMX (ASSEMBLY AND AJUST-
MENTS)
• HANDLEBAR
• SADDLE
• FRONT WHEEL
• PEDALS AND CRANKS
• FRONT BRAKE
• SIDE BRAKE
• V-BRAKE
• U BRAKES
• INSPECT BRAKES
• INSTRUCTION FOR ASSEMBLY THE FOOT
PLATE
• TRAINING WHEELS
• FINAL CHECK
• QUICK RELEASE LEVERS
6. MAINTENANCE
• RECOMMENDED PRESSURE FOR THE TIRES
• HOW TO REPAIR A FLAT TIRE
• HANDLEBAR AND STEM
STEM
HANDLEBAR
• GRIP SHIFT
• HEADSET
• SADDLE AND SEATPOST
• BRAKES
• DRIVETRAIN
PEDALS
CRANKSET
CHAIN
DERAILLEUR SYSTEMS
7. HOW THE COMPONENTS WORK
• SEAT POST CAM ACTION CLAMP
• BRAKES
• GEARS
• TOE CLIPS AND STRAPS
• CLIPLESS PEDALS
• TIRES AND TUBES
• BICYCLE SUSPENSION
8. INSPECTIONS
4
8
9
11
11
12
13
14
15
16
16
16
16
17
17
17
17
17
17
17
17
17
18
18
18
18
18
18
18
19
19
20
20
20
20
20
21
21
22
22
23
23
23
24
24
25
25
27
27
28
28
29
29
30
31
31
32
32
32
33
33
33
34
35
36
37
39
39
40
40
40
41
41
41
42
42
43
44
45
45
46
47
48
49
51
52
53
54
55
55
56
171

4
// USER’S MANUAL
ENGLISH
is manual covers all range and models of bicycles made by Berg Cycles. e models of Berg Cycles
meet the requirements set out in European Directives and conferred by the CEN (European Committee
for Standardization). Below are described the model series of bicycles belonging to Berg Cycles and
respective European Standards associated with each:
MOUNTAIN BICYCLES:
SPORTCROSS SERIES – EN 14766
TRAILROCK SERIES – EN 14766
SIERRA SERIES – EN 14766
COUNTRY SERIES – EN 14766
VERTEX SERIES – EN 14766
TRAIL SERIES – EN 14766
STUKA SERIES – EN 14766
VOSTOK SERIES – EN 14766
LEISURE/TREKKING BICYCLES:
CROSSTOWN URBAN SERIES – EN 14764
CROSSTOWN EASY SERIES – EN 14764
CROSSTOWN PARK SERIES – EN 14764
CROSSTOWN CLASSIC SERIES – EN 14764
CROSSTOWN FITNESS SERIES – EN 14764
CROSSTOWN TREKKING SERIES – EN 14764
CROSSTOWN TANDEM SERIES – EN 14764
ELECTRIC BICYCLES:
CROSSTOWN E-BIKE SERIES – EN 15194
ROAD BICYCLES:
FUEGO SERIES – EN 14781
BMX/JUNIOR/KID BICYCLES:
BLAST SERIES – EN 14765
CHARM SERIES – EN 14765
TRIBE SERIES – EN 16054
MODEL SERIES AND STANDARDS

5
ENGLISH
www.bergcycles.com
EN 14764: 2005 CITY AND TREKKING BICYCLES - SAFETY REQUIREMENTS AND TEST METHODS
is European Standard specifies safety and performance requirements for the design, assembly, and
testing of bicycles and sub assemblies intended for use on public roads, and lays down guide lines for
instructions on the use and care of such bicycles.
is European Standard applies to bicycles that have a maximum saddle height of 635mm or more and
that are intended for use on public roads.
is standard does not apply to mountain bicycles and racing bicycles, tradesman’s delivery bicycles,
recumbent bicycles, tandems and bicycles designed and equipped for use in sanctioned competitive
events.
NOTE: For bicycles with a maximum saddle height of 435mm see EN 71 and with a maximum saddle
height of more than 435mm and less than 635mm see EN 14765.
EN 14765: 2005 BICYCLES FOR YOUNG CHILDREN - SAFETY REQUIREMENTS AND TEST METHODS
is European Standard specifies safety and performance requirements and test methods for bicycles for
Young children, in respect of the design, assembly and testing of bicycles and sub-assemblies. Guide-
lines for instructions on the use and care of bicycles are also provided.
is European Standard applies to bicycles with a maximum saddle height of more than 435mm and
less than 635mm (typical rider weight of 30 kg), and propelled by a transmitted drive to the rear wheel.
is European Standard does not apply to special bicycles intended for stunting (e.g. BMX bicycles).
NOTE: For bicycles with a maximum saddle height of 435mm see EN 71 and for bicycles with a saddle
height of 635mm or more see EN 14764.
EN 14766: 2005 MOUNTAIN BICYCLES - SAFETY REQUIREMENTS AND TEST METHODS
is European Standard specifies safety and performance requirements for the design, assembly, and
testing of bicycles and sub-assemblies intended for off-road, rough-terrain use, and lays down guide
lines for instructions on the use and care of such bicycles.
It applies to bicycles on which the saddle can be adjusted to provide a maximum saddle height of 635mm
or more.
It does not apply to racing bicycles and specialised types of bicycle such as tandems or bicycles de-
signed and equipped for use in severe applications such as sanctioned competition events, stunting, or
aerobatic manoeuvres.
No requirements on lighting equipment, reflectors and warning devices are specified in this European
Standard, due to the existence of several different national regulations applicable in the European Coun-
tries.
NOTE: For bicycles with a saddle height of less than 435mm see EN 71 and with a maximum saddle
height of more than 435 mm and less than 635mm see EN 14765.
STANDARDS

6
// USER’S MANUAL
ENGLISH
EN 14781: 2005 RACING BICYCLES - SAFETY REQUIREMENTS AND TEST METHODS
is European Standard specifies safety and performance requirements for the design, assembly and
testing of racing bicycles and sub-assemblies, and lays down guidelines for manufacture’s instructions
on the use and care of such bicycles.
is European Standard applies to racing bicycles intended for high-speed amateur use on public roads,
and on which the saddle can be adjusted to provide a maximum saddle height of 635mm or more.
is European Standard does not apply to mountain bicycles and to specialised types of racing bicycle
such as tandems or bicycles designed and equipped for use in sanctioned competitive events.
NOTE: For bicycles with a saddle height of ≤ 435mm see EN 71 and with a maximum saddle height of
more than 435mm and less than 635mm see EN 14765.
EN 15194: 2009 CYCLES - ELECTRICALLY POWER ASSISTED CYCLES - EPAC BICYCLES
is European Standard is intended to cover electrically power assisted cycles of a type which have a
maximum continuous rated power of 0,25kW, of which the output is progressively reduced and finally
cut off as the vehicle reaches a speed of 25km/h, or sooner, if the cyclist stops pedalling.
is European Standard specifies safety requirements and test methods for the assessment of the de-
sign and assembly of electrically power assisted bicycles and sub-assemblies for systems using battery
voltage up to 48VDC or integrated a battery charger with a 230V input.
is European Standard specifies requirements and test methods for engine power management sys-
tems, electrical circuits including the charging system for the assessment of the design and assembly of
electrically power assisted cycles and sub-assemblies for systems having a voltage up to and including
48VDC or integrated a battery charger with a 230V input.
EN 16054: 2012 BMX BICYCLES - SAFETY REQUIREMENTS AND TEST METHODS
is European Standard specifies safety and performance requirements for the design, assembly and
testing of BMX bicycles and sub-assemblies intended for use in any type of location such as roads and/
or tracks and/or ramps. It applies to specialised types of bicycle designed and equipped for activities
such as acrobatic ground manoeuvres, stunting and aerobatic manoeuvres and lays down guidelines for
instructions on the use and care of such BMX bicycles. It applies to BMX bicycles on which the saddle
height can be adjusted to provide a minimum saddle height of 435mm or more.
It applies to:
a) category 1, BMX designed for a rider mass of 45kg or less;
b) category 2, BMX designed for a rider mass more than 45kg.
It does not apply to BMX bicycles for use in sanctioned competition events.
No requirements on lighting set, reflectors and warning devices are specified in this European Standard
due to the existence of several different national regulations applicable in the European countries.
STANDARDS

7
ENGLISH
www.bergcycles.com
BERG CYCLES
SDSR – SPORTS DIVISION SR, S.A.
Rua João Mendonça, 505
4464 – 503 Matosinhos – Portugal
NIPC – 503646776
Based on the EN safety requirements checklist documentation, the following products below are conform
with EN standards and therefore comply with Directive 2001/95/CE and (CEE) 399/93.
SPORTCROSS SERIES / TRAILROCK SERIES / SIERRA SERIES / COUNTRY SERIES / VERTEX SERIES / TRAIL
SERIES / STUKA SERIES / VOSTOK SERIES / CROSSTOWN URBAN SERIES / CROSSTOWN EASY SERIES /
CROSSTOWN PARK SERIES / CROSSTOWN CLASSIC SERIES / CROSSTOWN FITNESS SERIES / CROSSTOWN
TREKKING SERIES / CROSSTOWN TANDEM SERIES / CROSSTOWN E-BIKE SERIES / FUEGO SERIES / BLAST
SERIES / CHARM SERIES / TRIBE SERIES
e following harmonized standards have been applied:
DIN EN 14764: 2005 CITY AND TREKKING BICYCLES - SAFETY REQUIREMENTS AND TEST METHODS
DIN EN 14765: 2005 BICYCLES FOR YOUNG CHILDREN - SAFETY REQUIREMENTS AND TEST METHODS
DIN EN 14766: 2005 MOUNTAIN BICYCLES - SAFETY REQUIREMENTS AND TEST METHODS
DIN EN 14781: 2005 RACING BICYCLES - SAFETY REQUIREMENTS AND TEST METHODS
DIN EN 15194: 2009 CYCLES - ELECTRICALLY POWER ASSISTED CYCLES - EPAC BICYCLES
DIN EN 16054: 2012 BMX BICYCLES - SAFETY REQUIREMENTS AND TEST METHODS
Technical documentation filed at:
BERG CYCLES
SDSR – SPORTS DIVISION SR, S.A.
Estrada Nacional 13, km 6,78
4470-179 Maia – Portugal
NIPC – 503646776
Susana Trigo Barros
Brand Development Director
BERG CYCLES
DECLARATION OF CE CONFORMITY

8
// USER’S MANUAL
ENGLISH
Owner:
Brand and model of the bicycle:
Fork: Suspension:
Frame serial number:
Date of purchase: Color:
e Berg Cycles warranty covers the frame of Berg Cycles new bicycles against defects in workmanship
and materials for a period of two years. e Berg Cycles warranty also covers all the original parts for
a period of two years. Components mounted on bicycles are covered by the respective manufacturers’
warranties. e paint and decals have a one year warranty. is warranty is expressly limited to repair
and replacement of defective frames, fork, or defective parts.
Claims for this guarantee must be made through an authorized Berg Cycles dealer, where the proprietary
has duly completed the purchase invoice with the serial number and model of the framework and the
data itself. Alert to the fact that, in the absence of the original invoice duly legible and respectful of the
points above, the warranty is immediately invalid.
e warranty does not cover normal wear parts (cables, coils, brake pads, plates of pedals, bottom
bracket, chain, rims, gears / cassette, tires, inner tubes).
e warranty does not cover the use or improper maintenance, or installation of bearings or accessories
not put originally or not compatible with the bicycle.
e warranty does not apply to damage or damage caused by accidents, misuse, abuse, inadequate
transportation, neglect, or when the bicycle frame, or any of the components have not been used ac-
cording to their mode of employment. e modification of the frame or bicycle components will void the
warranty.
Berg Cycles does not take responsibility for damage or accidental damage and consequents. e costs of
manual labor due to the exchange of parts are not covered by this guarantee.
e warranty shall not be applied in cases of inappropriate storage or prolonged exposure to the outside
(more than 12h) or to cases of lack of maintenance.
In cases of total replacement of the claimed product, Berg Cycles guarantees replacement for an item
of equal or greater range to the original, with its color and / or model are subject to availability and will
be made in accordance with the existing stock. e shock absorbers and suspensions have a warranty
against manufacturing defects for 2 years from the date of original purchase. is warranty is void if
there are no records of proper maintenance and servicing carried out by suppliers, and does not cover
wear materials like oil seals, o-rings, bearings or oil.
NEVER FORGET THAT:
All the bicycles must have periodic revisions.
e good maintenance of the bicycle allows preserving his original qualities of use and security.
IN ORDER TO RIDE THIS BICYCLE, BERG CYCLES RECOMMENDS:
You complete a thorough check-up of the bicycle before riding so as to guarantee it is in perfect usage
conditions.
WARRANTY REGISTRATION

9
ENGLISH
www.bergcycles.com
M (17”)
M (17”)
M (17”)
M (17”)
M (17”)
M (16,5”-17”)
M (17”)
M (16,5”-17”)
M (17”)
M (47-50cm)
M (44cm)
M (18”)
M (17”)
M (18”)
M (18”)
L (19”)
L (19”)
L (19”)
L (19”)
L (18”-19”)
L (19”)
L (18,5”-19”)
L (50-53cm)
L (48cm)
L (20”)
L (19”)
L (20”)
L (20”)
XL (21”)
XL (21”)
XL (21”)
XL (21”)
L (19”)
XL (19,5”-21”)
XL (21”)
XL (21”)
L (19”)
XL (53-56cm)
XL (53cm)
XL (21”)
S (15”)
S (15”)
S (15”)
S (15”)
S (15”)
S (15”)
S (15”)
S (44-47cm)
S (16”)
S (16”)
S (16”)
24” wheel (One Size)
24” wheel (One Size)
20” wheel (One Size)
20” wheel (One Size)
20” wheel (One Size)
20” wheel (One Size)
COUNTRY SERIES
DUNE SERIES
SIERRA SERIES
SPORTCROSS SERIES
STOCHI SERIES
STUKA SERIES
TRAIL SERIES
TRAILROCK SERIES
VERTEX SERIES
VIPER SERIES
FUEGO SERIES
FUEGO CX SERIES
E-BIKE SERIES
EASY SERIES
CLASSIC SERIES
FITNESS SERIES
PARK SERIES
TREKKING SERIES
URBAN SERIES
TRIBE SERIES
360 SERIES
FRISK SERIES
BLAST/CHARM SERIES
RACE SERIES
VORTEX SERIES
PRETTY SERIES
MOUNTAIN
ROAD
ELECTRIC
FOLDABLE
LEISURE
TREKKING
BMX
JUNIOR
Always wear gloves and put on your helmet, of the appropriate size and duly homologated, in the correct
position (horizontal) in order to protect your hands and head in case you should fall.
Always use your lighting system and reflectors between sundown and sunrise, and whenever the weath-
er conditions don’t allow for sufficient visibility, users should act in accordance with the national laws in
force in the country where the bicycle will be used.
Try to always remain visible to drivers and motorcyclists wearing convenient, bright-coloured apparel (fit
and comfortable) for cycling with reflectors, always riding on the righ side of the lane (or left for the UK),
following the highway code applicable in the country where you intend to ride your Berg Cycles bicycle.
Whenever the ground is wet please increase the stopping distance from the vehicle ahead.
Measurement guide to choose the frame:
USE
USE
<165
From 9 Years
165-175
RIDER HEIGHT (cm)
JUNIOR RIDER (Years)
175-185
From 7 Years
185-195
WARRANTY REGISTRATION
S (14”-15,5”)
M (18”) L (20”)
ONE SIZE
ONE SIZE
ONE SIZE
ONE SIZE
ONE SIZE

10
// USER’S MANUAL
ENGLISH
Authorized and recommended maximum weight (Cyclists, bicycles and accessories):
WARRANTY REGISTRATION
12” wheel (One Size)
VERTEX/TRAILROCK/STUKA/TRAIL
SPORTCROSS/VOSTOK/SIERRA/ COUNTRY
FUEGO/FUEGO CX
E-BIKE
EASY
TREKKING/CLASSIC/PARK/URBAN/FITNESS
TRIBE
BLAST/CHARM (WHEEL 20” AND 24”)
BLAST/CHARM (WHEEL 12”, 14” AND 16”)
MOUNTAIN BICYCLES
ROAD BICYCLES
ELECTRIC BICYCLES
FOLDABLE BICYCLES
LEISURE/TREKKING BICYCLES
BMX BICYCLES
JUNIOR BICYCLES
KID BICYCLES
128 kg
120 kg
135 kg
110 kg
135 kg
100 kg
85 kg
55 kg
14” wheel (One Size) 16” wheel (One Size)
BLAST/CHARM SERIESKIDS USE
TYPE OF BICYCLE SERIES MAXIMUM WEIGHT
(BICYCLE+CYCLIST+ACCESSORIES)
3-5 Years 4-6 Years 5-7 Years
KID RIDER (Years)
11
ENGLISH
www.bergcycles.com
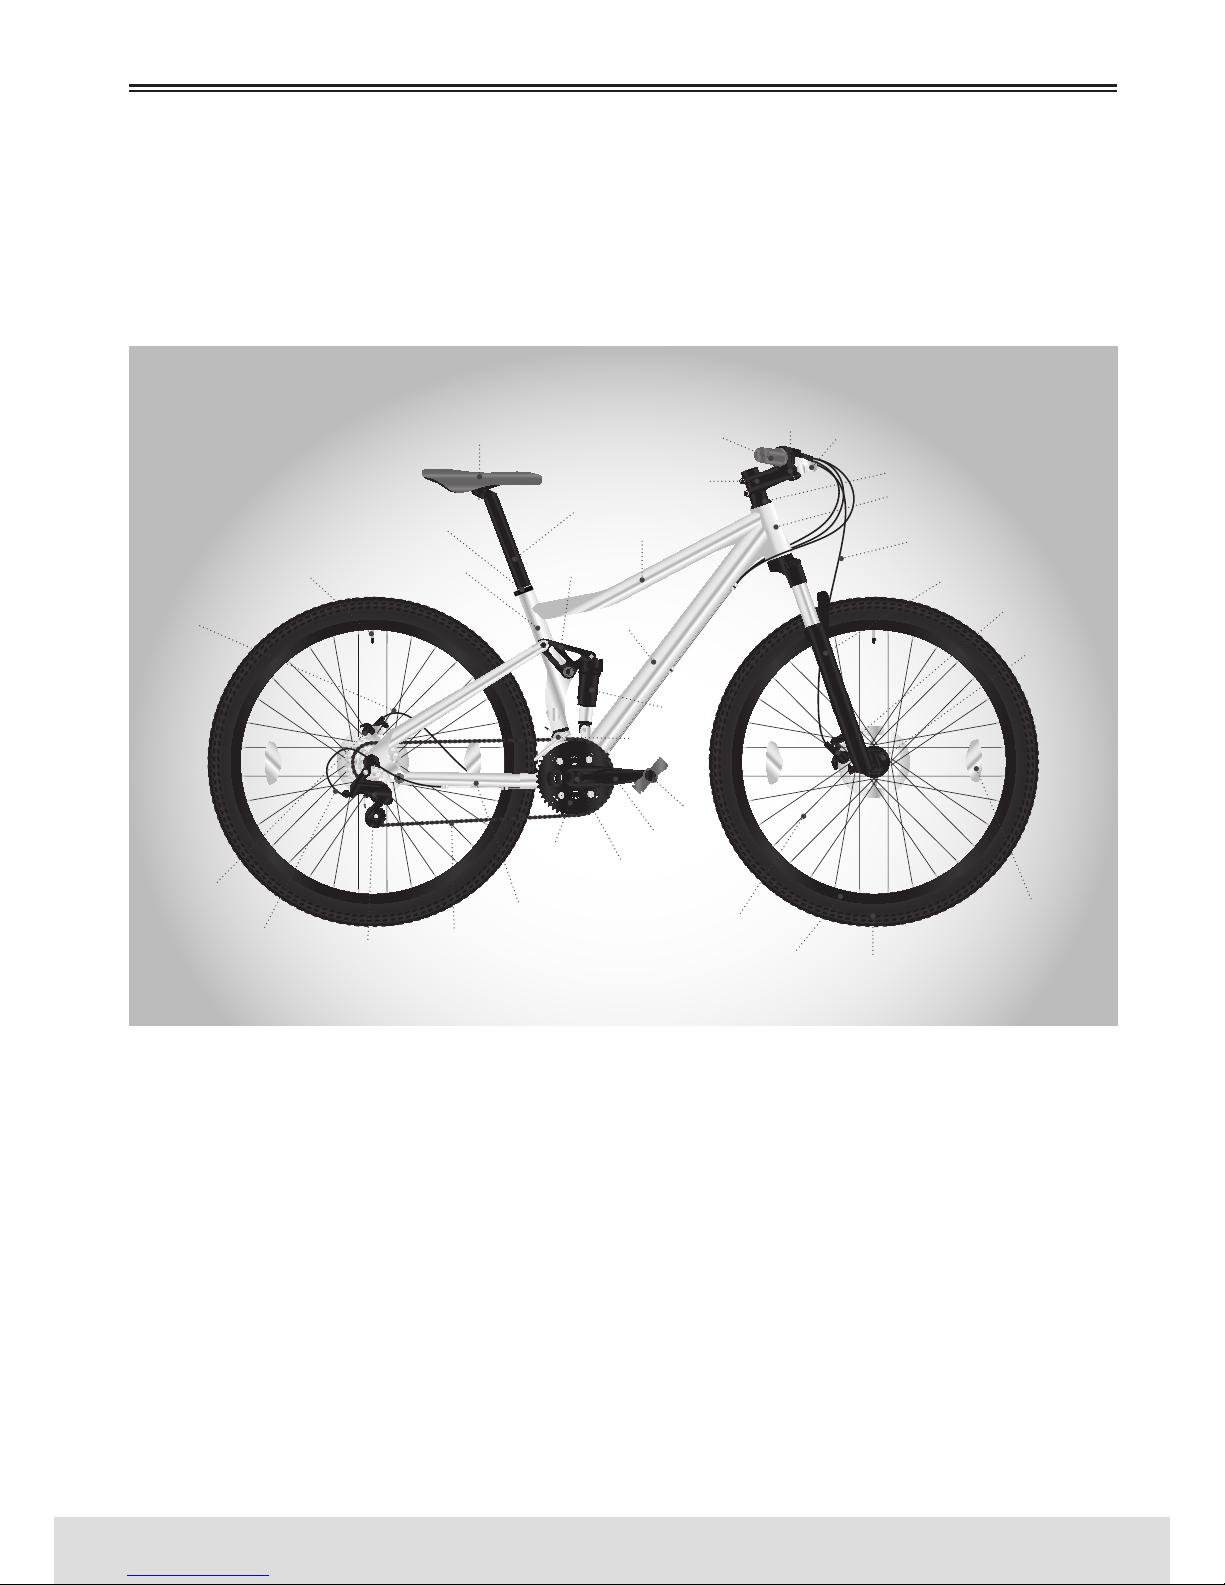
MOUNTAIN BICYCLES
Mountain bikes are designed to provide maximum comfort over a wide variety of surfaces paths. Wider
handlebars and a well positioned shift lever make them very easy to control. e wider rims and tires
give you a smoother ride and better traction on rough surfaces. e frame and fork on mountain bikes
are generally more robust than the ones on race bicycles.
PARTS IDENTIFICATION
GRIP HANDLEBAR BRAKE LEAVERS
HEADSET
HEAD TUBE
BRAKE CABLE
FORK
STEM
TOP TUBE
LINK
DOWN TUBE
REAR
SHOCK
FRONT
DERAILLEUR
SADDLE
SEATPOST
SEATPOST CLAMP
SEAT TUBEVALVE
WHEEL
REFLECTOR
TIRERIM
SPOKE
REAR
BRAKE
FRONT
BRAKE
FRONT
HUB
GEAR CONTROL
CABLE
BRAKE
CABLE
REAR
DERAILLEUR
CHAIN
CHAINSTAY
CHAINRING
CRANKSET
CRANK
PEDAL

12
// USER’S MANUAL
ENGLISH
LEISURE / TREKKING BICYCLES
In general, these bikes must have 28/700C sized wheels, although some have narrower tires (26’’ mod-
els), and have 21-27 speed. ey combine a road/mountain with comfort saddle and handlebar position
with wider tires and wheel diameters of road bikes. ey are excellent for use on muddy trails or smooth
pavements, but it is not intended to be great road bikes or great mountain bikes. By having the seat
cushions and generally more comfortable handles they provide a more comfortable drive. ese bikes
are preferred by professional riders and amateurs who ride more often on the road, but want a greater
agility and speed than the wide tires on the 26’’ offer.
PARTS IDENTIFICATION
STEM HANDLEBAR
HEADSET
HEAD TUBE
FRONT REFLECTOR
FORK
TOP TUBE
DOWN TUBE
FRONT
DERAILLEUR
SADDLE
SEATPOST
SEATPOST CLAMP
REAR REFLECTOR
SEAT TUBE
VALVE
WHEEL
REFLECTOR
TIRE
RIM
SPOKE
REAR
BRAKE
FRONT
BRAKE
FRONT
HUB
GEAR CONTROL
CABLE
BRAKE
CABLE
REAR
DERAILLEUR
CHAIN
CHAINSTAY CRANKSET
CRANK
PEDAL
13
ENGLISH
www.bergcycles.com
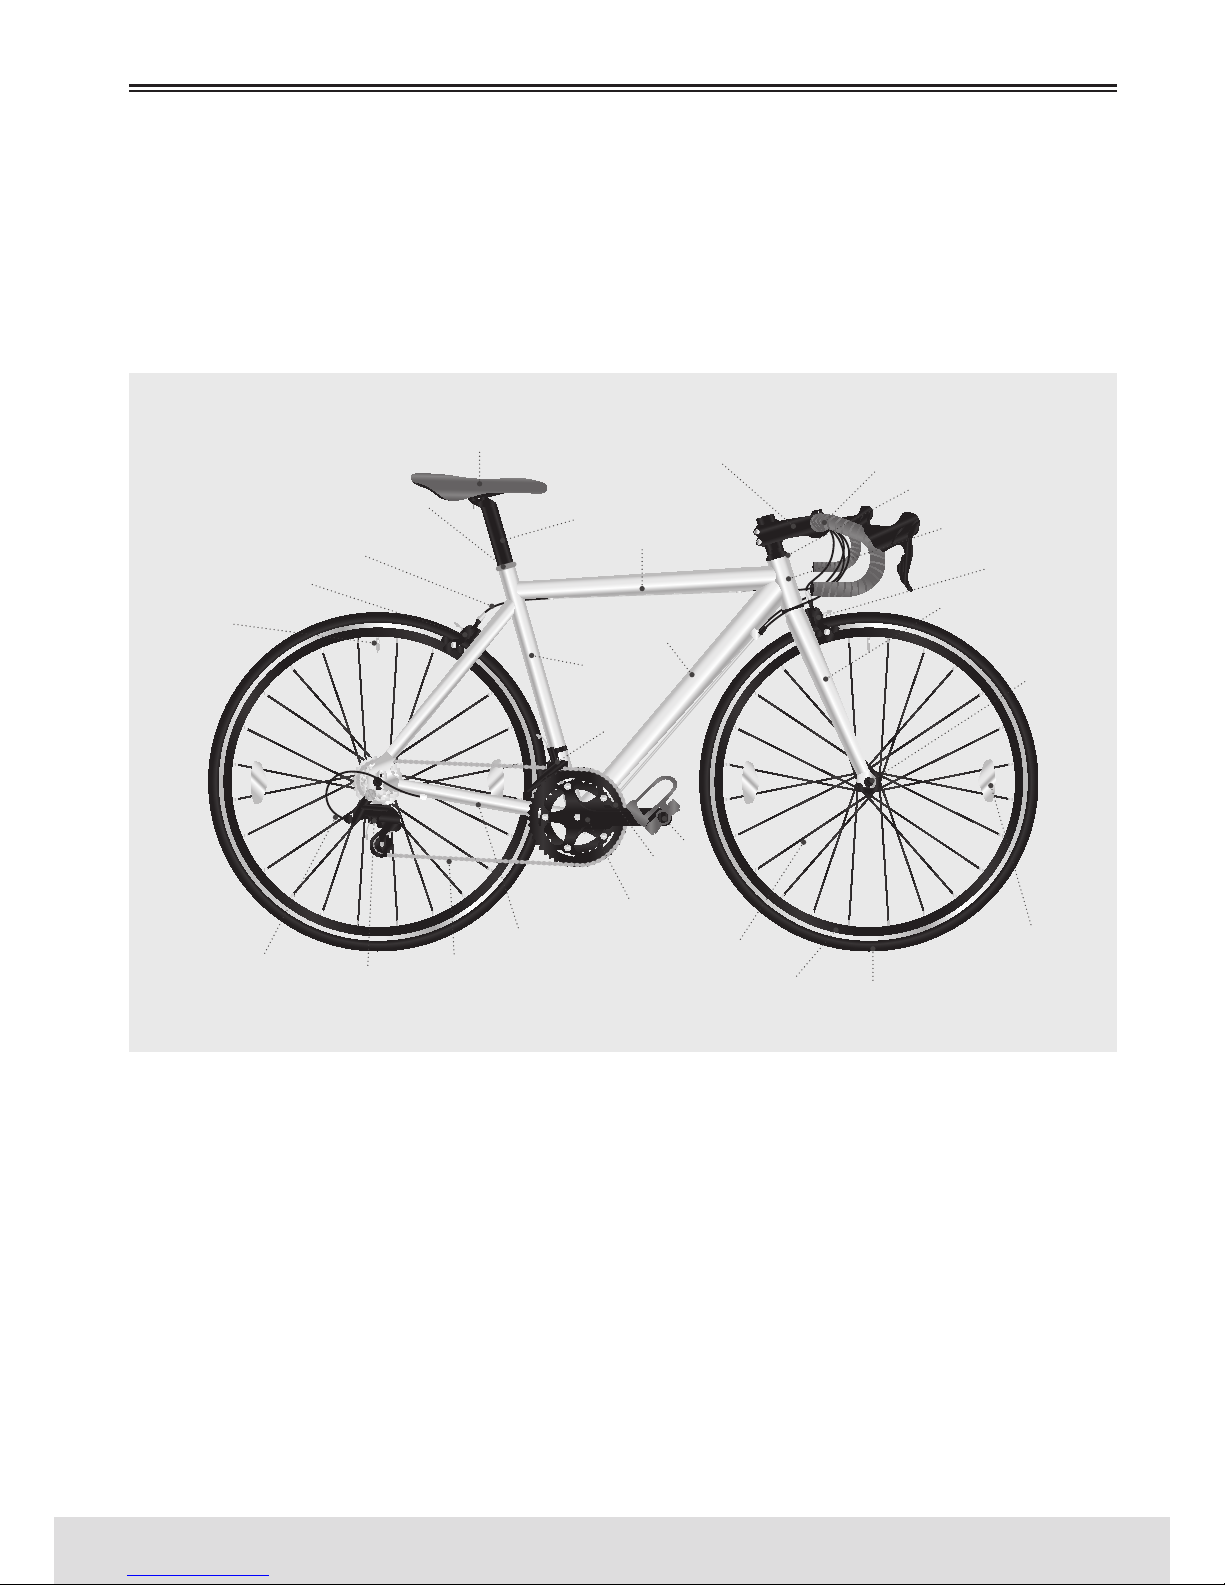
ROAD BICYCLES
In general, these bikes must have 28/700C sized wheels and 16-30 speeds. ey are designed for road
surfaces, increased aerodynamics and speed. ey have softer and narrow tires and “face down” handle-
bar extenders, and often have fine saddles. ese bikes are for riders who want more speed, go longer
distances, or a more intense aerobic performance, road models are usually lighter and have a slightly
shorter wheel base for a more agile and faster response.
PARTS IDENTIFICATION
STEM HANDLEBAR
HEADSET
HEAD TUBE
FORK
TOP TUBE
DOWN TUBE
FRONT
DERAILLEUR
SADDLE
SEATPOST
SEATPOST CLAMP
SEAT TUBE
VALVE
WHEEL
REFLECTOR
TIRERIM
SPOKE
REAR
BRAKE FRONT
BRAKE
FRONT
HUB
GEAR CONTROL
CABLE
BRAKE
CABLE
REAR
DERAILLEUR
CHAIN
CHAINSTAY
CRANKSET
CRANK
PEDAL

14
// USER’S MANUAL
ENGLISH
BMX/JUNIOR/KID BICYCLES
ese bikes are very popular for general use, and they fit perfectly the young. ey are highly valued for
their simple but solid construction, and because of their lower need for maintenance.
PARTS IDENTIFICATION
STEM
HANDLEBAR
BRAKE CABLES
HEADSET
HEAD TUBE
FORK
TOP TUBE
DOWN TUBE
SADDLE
SEATPOST
SEATPOST CLAMP
SEAT TUBE
VALVE
WHEEL
REFLECTOR
TIRE
RIM
SPOKE
REAR
BRAKE
FRONT
BRAKE
FRONT
HUB
BRAKE
CABLE
TRAINING
WHEELS
CHAIN
CHAINSTAY CRANKSET
CRANK
PEDAL

15
ENGLISH
www.bergcycles.com
NECESSARY TOOLS
Your new bike was assembled and tuned at the factory and then partially disassembled for shipping. It’s
probable that you’ve bought the bike completely assembled and ready to use or in a box and partially
disassembled. e following instructions allow you to assemble the bike in order to enjoy it for years.
For more details of the inspection, lubrication, maintenance and adjustments in any area, please consult
the respective sections of this manual. If you have any uncertainty regarding your ability to properly
assemble this unit, please consult a qualified expert before using it. If you need any replacement parts
or if you have any questions concerning the assembly of your bicycle please contact us.
To prevent injury, this product should be mounted properly before being used.
If you bought the bike pre-assembled, we recommend that you review all the assembly instructions and
perform the checks specified in this manual before using.
NECESSARY TOOLS
Mouth Wrench
Philips Screwdriver
Allen Wrench 4mm, 5mm, 6mm and 8mm
Adjustable wrench or combination
wrench, 9mm, 10mm, 14mm and 15mm
Pliers to cut wires
ABOUT THIS
It is important for you to understand your new bicycle. By reading this manual before you go out on your
first ride, you’ll know how to get better performance, comfort, and enjoyment from your new bicycle.
It is also important that your first ride on your new bicycle is taken in a controlled environment, away
from cars, obstacles, and other cyclists.
GENERAL WARNING
Bicycling can be a hazardous activity even under the best of circumstances. Proper maintenance of your
bicycle is your responsibility as it helps reduce the risk of injury. is manual contains many “Warnings”
and “Cautions” concerning the consequences of failure to maintain or inspect your bicycle. Many of the
warnings and cautions say “you may lose control and fall.” Because any fall can result in serious injury
or even death, we do not repeat the warning of possible injury or death whenever the risk of falling is
mentioned.
SPECIAL NOTE FOR PARENTS
It is a tragic fact that most bicycle accidents involve children. As a parent or guardian, you bear the re-
sponsibility for the activities and safety of your minor child. Among these responsibilities are to make
sure that the bicycle which your child is riding is properly fitted to the child; that it is in good repair
and safe operating condition; that you and your child have learned, understand and obey not only the
applicable local motor vehicle, bicycle, and traffic laws, but also the common sense rules of safe and
responsible bicycling. As a parent, you should read this manual before letting your child ride the bicycle.
Please make sure that your child always wears an approved bicycle helmet when riding.
PARTS IDENTIFICATION
1
2
3
4
5
1 2 3 4 5
16
// USER’S MANUAL
ENGLISH
When choosing a new bicycle, the selection of the frame size is an important security aspect to be taken
into account. Most bike sizes are in a range of frame sizes.
ese sizes usually refer to the distance between the centre of the bracket and the top of the saddle
tube.
For a safe and comfortable cycling, there must be a clearance of at least 1 to 2 inches between the area
between the rider’s legs and the top tube of the bicycle frame, and the rider must place his feet on the
floor while holding the bike with one leg on each side.
e ideal distance varies between types of bicycles and cyclists ‘preferences. is will make it easier and
safer to stay on the bike frame when you must get off the saddle in certain situations, such as when
traffic suddenly stops. Women can use men bicycles.
BICYCLE ADJUSTMENTS
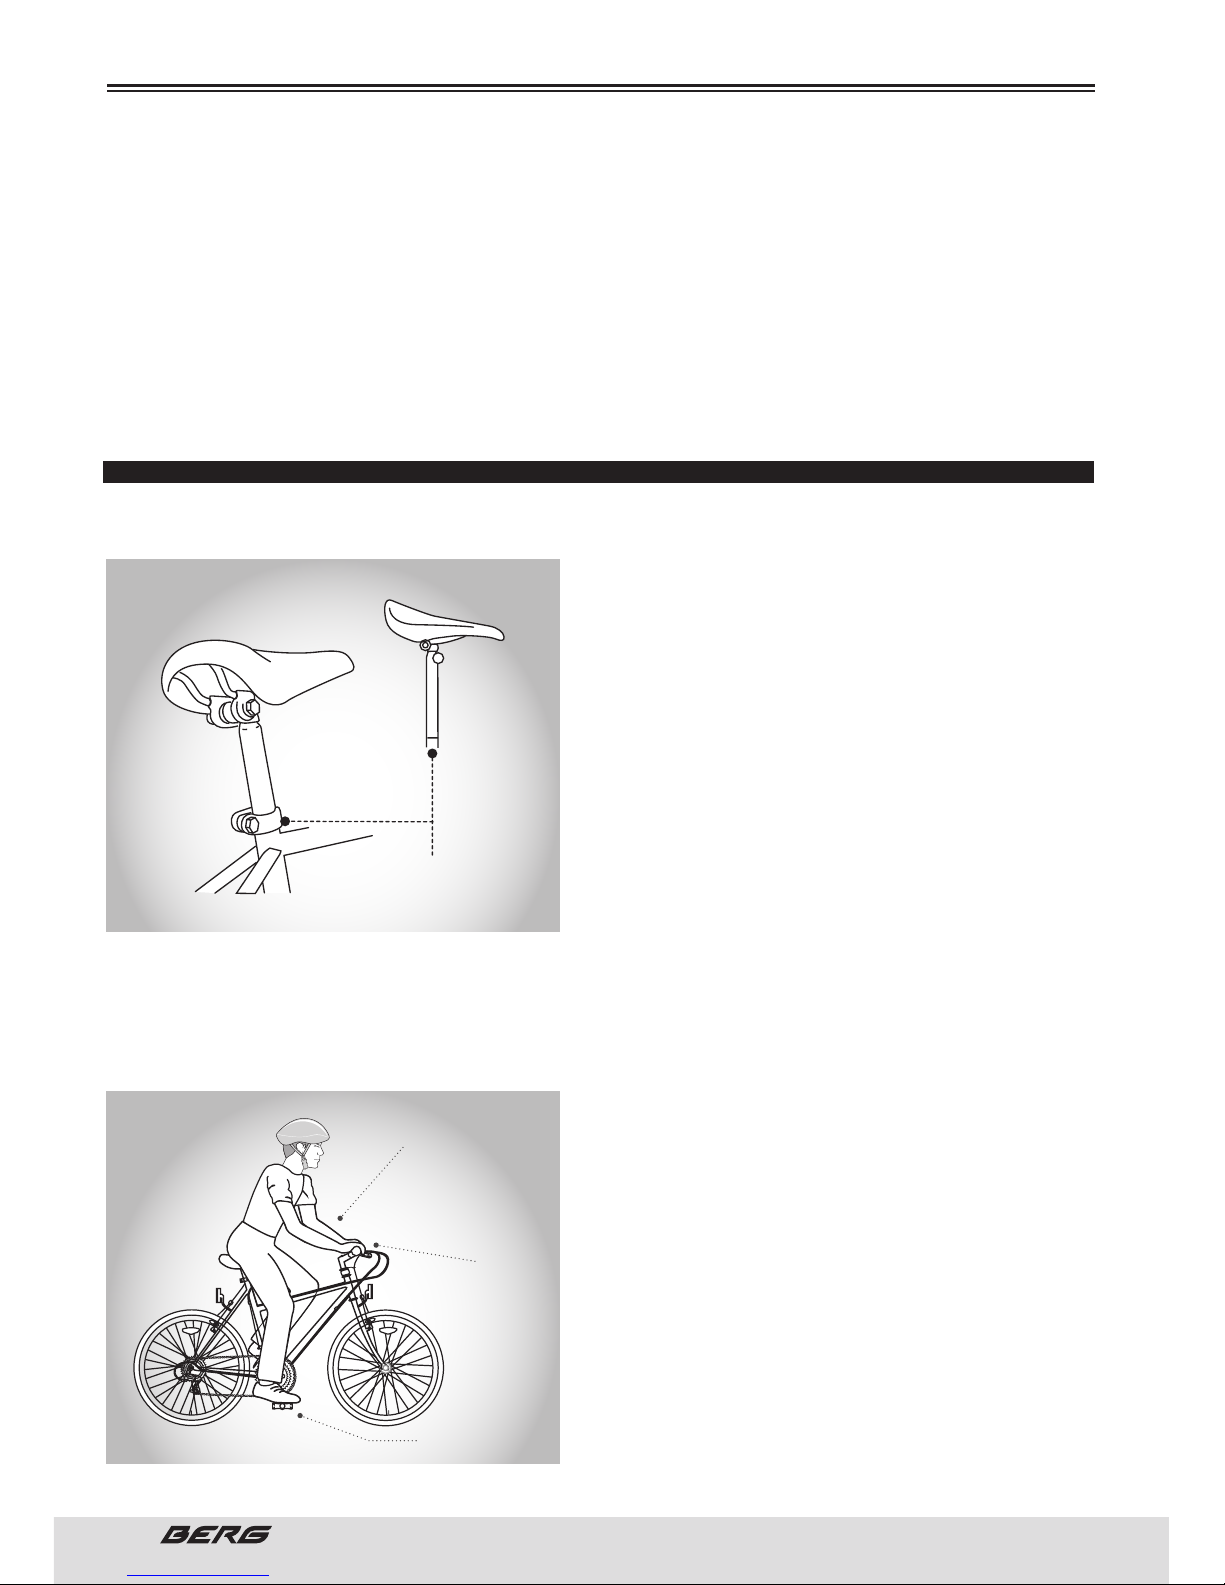
SADDLE HEIGHT
In order to obtain the most comfortable riding position
and offer the best possible pedalling efficiency, the seat
height should be set correctly in relation to the rider’s
leg length. e correct saddle height should not cause
leg strain from over-extension, and the hips should not
rock from side to side when pedalling.
While sitting on the bicycle with one pedal at its low-
est point, place the ball of your foot on that pedal. e
correct saddle height will allow the knee to be slightly
bent in this position. If the rider then places the heel of
that foot on the pedal, the leg should be almost straight.
Under no circumstances should the seat post extend
from the frame beyond its “Minimum Insertion” or
“Maximum Extension” mark. If your seat post extends
from the frame beyond these markings, the seat post or frame may break, which could cause you to lose
control and fall. Prior to your first ride, be sure to tighten the saddle adjusting mechanism properly.
A loose saddle clamp or seat post binder can cause damage to the bicycle or can cause you to lose con-
trol and fall. Periodically check to make sure that the saddle adjusting mechanism is properly tightened.
For more information see page 43.
REACH
To obtain maximum comfort, the rider should not over-
extend his or her reach when riding. To adjust this dis-
tance, the position of the seat can be altered in relation
to the seat post.
(See page 43 how to adjust the saddle clamp).
BEFORE USING THE BICYCLE
HANDLEBAR HEIGHT
MORE OR LESS AS THE
SEAT HEIGHT
PEDAL IN
LOWEST POSITION
ARMS NOT TOO MUCH
EXTENDED
MAXIMUM HEIGHT
MINIMUM INSERTION MARK
(SHOULD NOT BE VISIBLE)
17
ENGLISH
www.bergcycles.com
Make sure the front and rear brake function
perfectly. Make sure that the brake control
cables are lubricated and have no obvious
wear.
Make sure your tires are inflated to
recommended pressure as indicated at the
side of the tire and do not shows excessive
wear.
Make sure that the rims of the wheel
running normally and that pose no obvious
twist. Make sure they have the correct
tension and in the closed position.
Make sure you are properly fitted and
adjusted.
Make sure the pedals are securelly at-
tached to the brackets. Make sure that the
cranksets are tight to the bracket motion.
Verify that the front and rear gears work
properly.
Verify that the frame and fork are not bent
or broken.
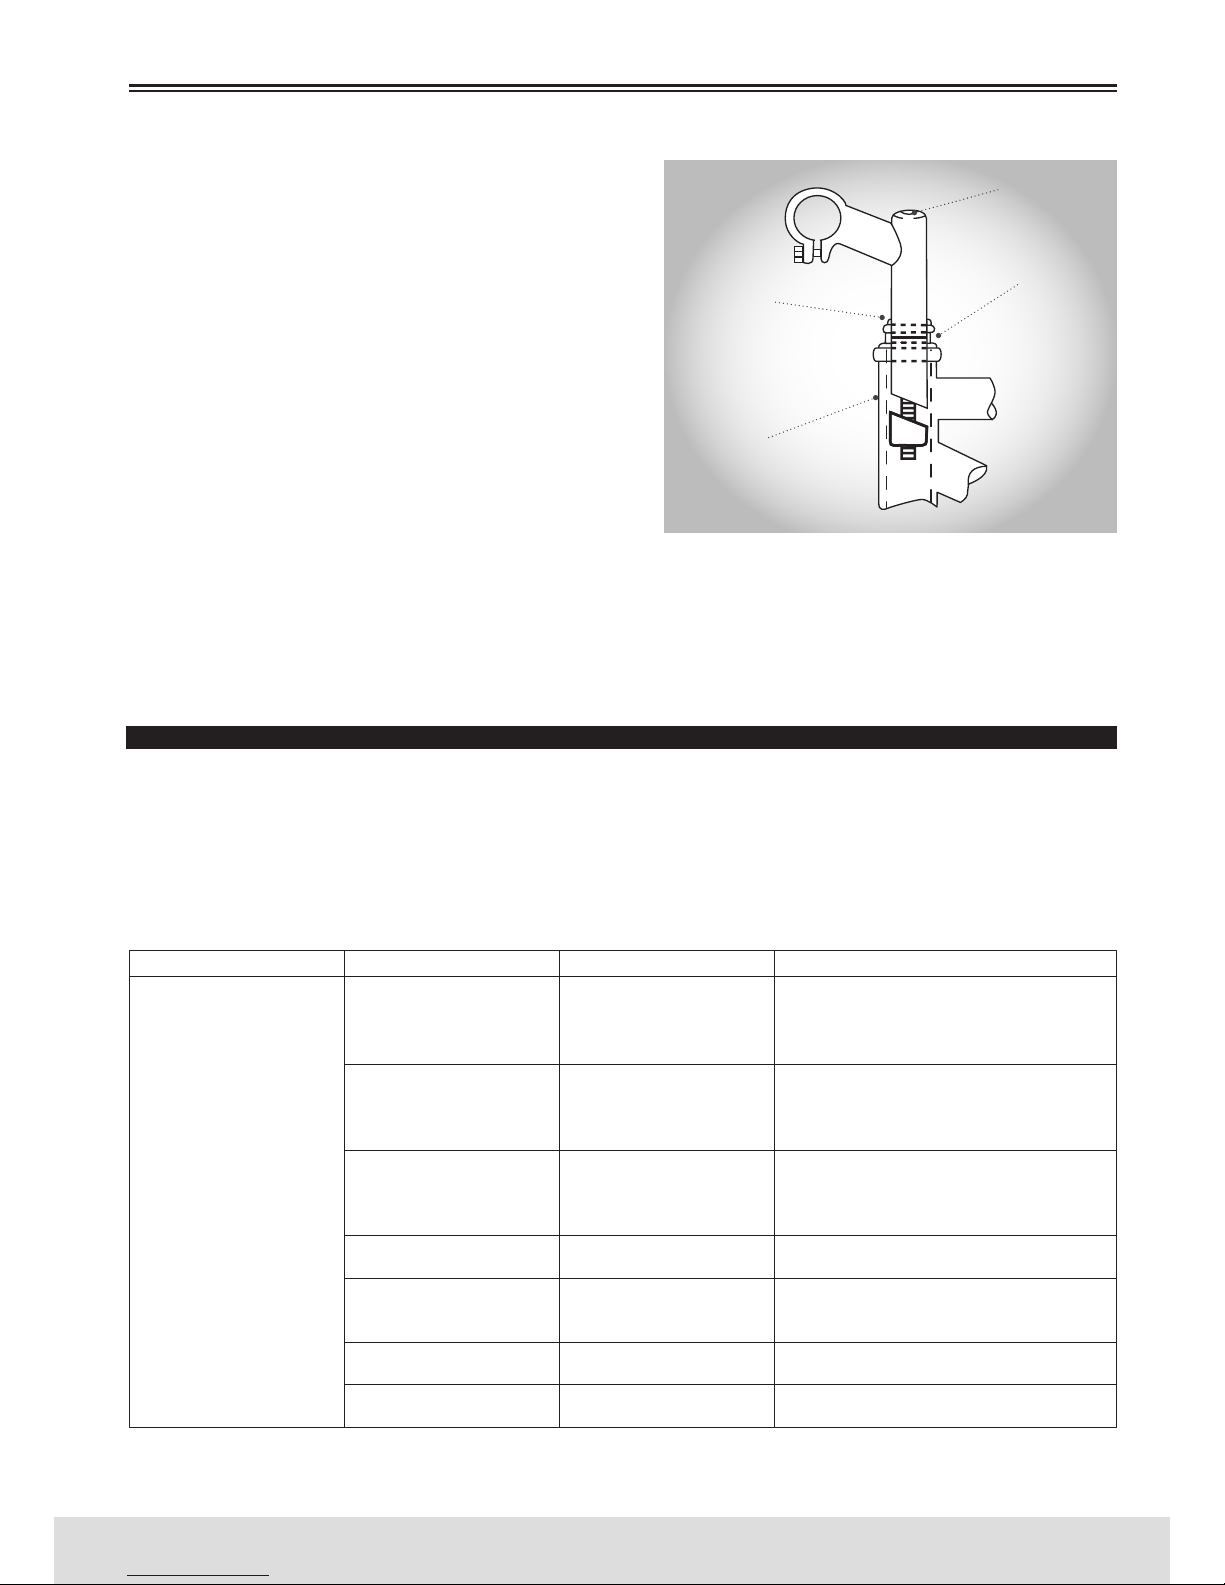
HANDLEBAR HEIGHT
Maximum comfort is normally achieved when the han-
dlebar height is levelled with the saddle height. You can
experiment different heights until you find the most
comfortable position.
NOTE: e Aheadset steering does not let you to adjust
the height in the stem.
e stem’s “Minimum Insertion” mark must not be visi-
ble above the top of the headset. If the stem is extend-
ed beyond this mark, the stem may break or damage
the fork’s steer tube, which could cause you to lose
control and fall.
Failure to properly tighten the stem binder bolt, the
handlebar binder bolt, or the bar end extension clamp-
ing bolts may compromise steering action, which could cause you to lose control and fall. Place the
front wheel of the bicycle between your legs and attempt to twist the handlebar/stem assembly using a
reasonable amount of force. If you can twist the stem in relation to the front wheel, turn the handlebars
in relation to the stem, or turn the bar end extensions in relation to the handlebar, you must tighten the
appropriate bolts accordingly.
For more information see page 41.
MAINTENANCE AND SAFETY CHECKS PLAN
Local distributor offers the first full revision to the bike. is review should be done after the first five hours
of use and up to a limit of two months after the date of purchase. e review may not be done on time.
e maintenance and safety checks plan should be carried out according to the following schedule:
SCHEDULE 1:
BEFORE USING THE BICYCLE
FREQUENCY COMPONENT VERIFICATION PROCEDURE
Before
using the
bicycle
Brake
Tires/ Inner tubes
Wheels
Steering
Brackets and pedals
Gears
Frame and Fork
Braking and broken
Cables
Pressure
Rim and spokes
Wheel clamping
Handlebar and stem
Pedals and brackets
Gears and broken wires
Cracks or creases
STEM TIGHTENING SCREW
MAXIMUM HEIGHT
MINIMUM INSERTION MARK
HANDLEBAR FIXING BOLT
2 ½ (64mm)
SURPLUS

18
// USER’S MANUAL
ENGLISH
SCHEDULE 2:
SCHEDULE 3:
NOTICE:
Whenever anything unusual should happen proceed with the repairs.
All bikes must be subject to periodic revisions.
A good bicycle maintenance can preserve their unique qualities of safety and usage.
Do not forget to store your bike in a dry sheltered place and away from saline environments.
Do not forget to regularly clean the heads of all bolts and spokes of your bicycle. Manufacturers usually
use steel that ensures the adequate strength of the components.
HELMETS
It is strongly advised that a properly fitting, ASTM or SNELL approved, bicycle safety helmet be worn at
all times when riding your bicycle. In addition, if you are carrying a passenger in a child safety seat, they
must also be wearing a helmet.
e correct helmet should: be comfortable - have good ventilation - fit
correctly - cover forehead
Always wear a properly fitted helmet which covers the forehead when
riding a bicycle. Many countries require specific safety devices. It is
your responsibility to familiarize yourself with the laws of the state
where you ride and to comply with all applicable laws, including prop-
erly equipping yourself and your bike as the law requires. Reflectors are
important safety devices which are designed as an integral part of your
bicycle. ese reflectors are designed to pick up and reflect street lights
and car lights in a way that helps you to be seen and recognized as a
moving bicyclist. Check reflectors and their mounting brackets regular-
ly to make sure they are clean, straight, unbroken and securely mount-
ed. Ask your dealer to replace damaged reflectors and straighten or tighten those who are bent or loose.
BEFORE USING THE BICYCLE
Clean and then brush or sprinkle
3 drops of oil
Disassemble and Lubricate
Lubricate
Disassemble and Lubricate
Clean/lubricate
Tighten
Lubricate with Teflon oil
Cleaning and lubrication at general supplier
Oil Change and lubrication with Teflon oil
at supplier
Full inspection and replacement
(seals / oil) at supplier
FREQUENCY
FREQUENCY
COMPONENT
COMPONENT
LUBRICANT
AREA
PROCEDURE
PROCEDURE
Weekly
Montly
Every 6 months
Annually
After any use
After 25 hours
After 50 hours
After 100 hours
Chain/Derraileur
Brake levers
Gears levers
Brake and gears cables
Hubs and sprockets
Brackets/Pedals
Wheel bearings
Headset
Saddle seatpost
Suspension
Shock
Lubricant or light oil for
chains
Lithium based grease
Lubricant or light oil for
chains
Lithium based grease
Legs and sealing zone
Screws tightening
Sealing zone
Suspension functioning
Blocking or travel adjust
below the cover
Suspension functioning

19
ENGLISH
www.bergcycles.com
RIDING SAFETY
GENERAL RULES
When riding obey the same road laws as all other road vehicles, including giving way to pedestrians,
and stopping at red lights and stop signs. For further information, contact the Road Traffic Authority in
your State.
Ride predictably and in a straight line. Never ride against traffic.
Use correct hand signals to indicate turning or stopping.
Ride defensively. To other road users, you may be hard to see.
Concentrate on the path ahead. Avoid pot holes, gravel, wet road markings, oil, curbs, speed bumps,
drain grates and other obstacles.
Cross train tracks at a 90 degree angle or walk your bicycle across.
Expect the unexpected such as opening car doors or cars backing out of concealed driveways.
Be extra careful at intersections and when preparing to pass other vehicles.
Familiarize yourself with all the bicycle’s features. Practice gear shifts, braking, and the use of toe clips
and straps, if installed.
If you are wearing loose pants, use leg clips or elastic bands to prevent them from being caught in the
chain.
Wear proper riding attire and avoid open toe shoes.
Don’t carry packages or passengers that will interfere with your visibility or control of the bicycle.
Don’t use items that may restrict your hearing.
Do not lock up the brakes. When braking, always apply the rear brake first, then the front.
e front brake is more powerful and if it is not correctly applied, you may lose control and fall.
Maintain a comfortable stopping distance from all other riders, vehicles and objects.
Safe braking distances and forces are subject to the prevailing weather conditions.
WET WEATHER
WE DO NOT RECOMMEND RIDING IN THE RAIN
In wet weather you need to take extra care.
Brake earlier, you will take a longer distance to stop.
Decrease your riding speed, avoid sudden braking and take corners with additional caution.
Be more visible on the road.
Wear reflective clothing and use safety lights.
Pot holes and slippery surfaces such as line markings and train tracks all become more hazardous when
wet.
NIGHT RIDING
WE DO NOT RECOMMEND RIDING AT NIGHT
Ensure bicycle is equipped with a full set of correctly positioned and clean reflectors.
Refer to page 39 of this manual.
Use a properly functioning lighting set comprising of a white front lamp and a red rear lamp.
If using battery powered lights, make sure batteries are well charged.
Some rear lights available have a flashing mechanism which enhances visibility.
Wear reflective and light coloured clothing.
Ride at night only if necessary. Slow down and use familiar roads with street lighting, if possible.
BEFORE USING THE BICYCLE

20
// USER’S MANUAL
ENGLISH
PEDALLING TECHNIQUE
Place the front of the foot in the pedal centre.
When riding, make sure that your knees are parallel with the bicycle frame.
To reduce the impact, keep your elbows slightly bent.
Learn how to use the gears appropriately.
For more information see page 21 to 23.
MOUNTAIN TECHNIQUE
Place a lower gear before going up and continue to reduce the gears as necessary to maintain the ped-
alling speed.
If you are in the lowest gear and you are struggling, put your feet on the pedals. is will give you more
power each time you pedal.
In downhill, use the higher gears to avoid pedalling fast.
Do not exceed a comfortable speed, maintain control and be particularly careful.
CURVING TECHNIQUE
Slightly brake before making the curves and get ready to lean forward on the curve.
Keep the pedal on the inside of the curve in a 12 hours position, and place the knee of this leg slightly
turned in the direction you’re turning.
Keep the other leg right, not pedal fast or tight curves.
RULES FOR CHILDREN
To avoid accidents, teach children good riding skills with an emphasis on safety from an early age.
Children should be supervised by an adult.
1. Many states require that children wear a helmet while cycling. Always wear a properly fitted helmet.
2. Do not play in driveways or the road.
3. Do not ride on busy streets.
4. Do not ride at night.
5. Obey all the traffic laws, especially stop signs and red lights.
6. Be aware of other road vehicles behind and nearby.
7. Before entering a street: Stop, look left, right, and left again for traffic. If there’s no traffic, proceed
into the roadway.
8. If riding downhill, be extra careful. Slow down using the brakes and maintain control of the steering.
9. Never take your hands off the handlebars, or your feet off the pedals when riding downhill.
e Consumer Protection Safety Commission advises that the riding of small wheel diameter bicycles at
excessive speeds can lead to instability and is not recommended.
Children should be made aware of all possible riding hazards and correct riding behaviour before they
take to the streets.
Do not leave it up to trial and error.
GEAR OPERATION
e majority of existing multispeed bikes are equipped with what is known as gears or derailleur. Op-
erate using a system of levers and mechanisms to divert the drive chain and sprockets between gears
of different sizes. e purpose of speed gears is to allow you to maintain a regular and steady ride in
various conditions. is means that you will be less tired during cycling, without exerting undue pres-
sure or pedalling to quickly when descending a slope. Bikes have a wide variety of settings, speed gears
from 3 to 30 speeds. A bike with 5 or 6 speeds has only one front crankset (plate), a rear derailleur and
sprockets 5 or 6 in the rear hub.
BEFORE USING THE BICYCLE
This manual suits for next models
19
Table of contents
Languages:


