manuals.online logo
Brands
  1. Home
  2. •
  3. Brands
  4. •
  5. Berner
  6. •
  7. Water Filtration System
  8. •
  9. Berner Claire pro User manual

Berner Claire pro User manual

CLAIRE® PURE / PRO
Aufstellanleitung / Assembly instructions
Seite 1 von 10 / Page 1 of 10
Berner International GmbH
Werner-von-Siemens-Str. 19
D-25337 Elmshorn
Kontakt / Contact
Tel +49 4121 4356-0
Fax +49 4121 4356-20
Web
www.berner-safety.de
[email protected]
Claire pro and pure Aufstellanleitung
D&GB_Änderungen-hier-einarbeiten.docx
Erstellt / Prepared: S. Gragert
Genehmigt / Approved: R. Wörl
Gültig ab / Valid from 24. Mai/May 2019
Aufstellanleitung / Assembly instructions
Claire pure & pro
2- & 3-Filtersysteme / 2- & 3-filter system
Claire pro
Claire pure
CLAIRE® PURE / PRO
Aufstellanleitung / Assembly instructions
Seite 2 von 10 / Page 2 of 10
Berner International GmbH
Werner-von-Siemens-Str. 19
D-25337 Elmshorn
Kontakt / Contact
Tel +49 4121 4356-0
Fax +49 4121 4356-20
Web
www.berner-safety.de
[email protected]
Claire pro and pure Aufstellanleitung
D&GB_Änderungen-hier-einarbeiten.docx
Erstellt / Prepared: S. Gragert
Genehmigt / Approved: R. Wörl
Gültig ab / Valid from 24. Mai/May 2019
1Claire pro 2 Filtersystem / Claire® pro 2 filter system
1.1 Montage Untergestell / Assembly base frame
Benötigte Teile / Parts list:
+1x linkes Seitenteil / 1x left side panel
+1x rechtes Seitenteil / 1x right side panel
+1x Rückwand / 1x rear panel
+4x M8 Sechskantmutter / 4x M8 hex-nut
M 8 Sechskantmutter
M8 hex-nut
CLAIRE® PURE / PRO
Aufstellanleitung / Assembly instructions
Seite 3 von 10 / Page 3 of 10
Berner International GmbH
Werner-von-Siemens-Str. 19
D-25337 Elmshorn
Kontakt / Contact
Tel +49 4121 4356-0
Fax +49 4121 4356-20
Web
www.berner-safety.de
[email protected]
Claire pro and pure Aufstellanleitung
D&GB_Änderungen-hier-einarbeiten.docx
Erstellt / Prepared: S. Gragert
Genehmigt / Approved: R. Wörl
Gültig ab / Valid from 24. Mai/May 2019
1.2 Zusammenbau / Assembly
Benötigte Teile / Parts list:
+1x Sicherheitswerkbank / 1x safety cabinet
+1x Untergestell / 1x base frame
+6x Schrauben M6 x 30 / 6x screw M6 x 30
Die Werkbank mit einem Hubwagen auf das Untergestell setzen
Put the safety cabinet on top of the base frame and fix the screws
CLAIRE® PURE / PRO
Aufstellanleitung / Assembly instructions
Seite 4 von 10 / Page 4 of 10
Berner International GmbH
Werner-von-Siemens-Str. 19
D-25337 Elmshorn
Kontakt / Contact
Tel +49 4121 4356-0
Fax +49 4121 4356-20
Web
www.berner-safety.de
[email protected]
Claire pro and pure Aufstellanleitung
D&GB_Änderungen-hier-einarbeiten.docx
Erstellt / Prepared: S. Gragert
Genehmigt / Approved: R. Wörl
Gültig ab / Valid from 24. Mai/May 2019
Benötigte Teile / Parts List:
+2x PIR-Sensor / 2x PIR-Sensor
Rückwand entfernen
Disassemble the rear panel
PIR Sensor einsetzen
Assemble the PIR-sensor
CLAIRE® PURE / PRO
Aufstellanleitung / Assembly instructions
Seite 5 von 10 / Page 5 of 10
Berner International GmbH
Werner-von-Siemens-Str. 19
D-25337 Elmshorn
Kontakt / Contact
Tel +49 4121 4356-0
Fax +49 4121 4356-20
Web
www.berner-safety.de
[email protected]
Claire pro and pure Aufstellanleitung
D&GB_Änderungen-hier-einarbeiten.docx
Erstellt / Prepared: S. Gragert
Genehmigt / Approved: R. Wörl
Gültig ab / Valid from 24. Mai/May 2019
B
A
A
Kabel durchziehen
Pull the cable through the hole
CLAIRE® PURE / PRO
Aufstellanleitung / Assembly instructions
Seite 6 von 10 / Page 6 of 10
Berner International GmbH
Werner-von-Siemens-Str. 19
D-25337 Elmshorn
Kontakt / Contact
Tel +49 4121 4356-0
Fax +49 4121 4356-20
Web
www.berner-safety.de
[email protected]
Claire pro and pure Aufstellanleitung
D&GB_Änderungen-hier-einarbeiten.docx
Erstellt / Prepared: S. Gragert
Genehmigt / Approved: R. Wörl
Gültig ab / Valid from 24. Mai/May 2019
+Sensorkabel zusammenstecken und mit Kabelbindern fixieren / Connect the plug and fix the cable with the cable-straps
+Die Durchführungslöcher gasdicht mit Silikon versiegeln / Seal the holes where you implement the cable to the base frame gas tight with silicone
+Rückwand und Seitenabdeckung montieren / Assembly the rear panel and side cladding from the base frame
CLAIRE® PURE / PRO
Aufstellanleitung / Assembly instructions
Seite 7 von 10 / Page 7 of 10
Berner International GmbH
Werner-von-Siemens-Str. 19
D-25337 Elmshorn
Kontakt / Contact
Tel +49 4121 4356-0
Fax +49 4121 4356-20
Web
www.berner-safety.de
[email protected]
Claire pro and pure Aufstellanleitung
D&GB_Änderungen-hier-einarbeiten.docx
Erstellt / Prepared: S. Gragert
Genehmigt / Approved: R. Wörl
Gültig ab / Valid from 24. Mai/May 2019
2Claire pure 2 Filtersystem / Claire® pure 2 filter system
2.1 Montage Untergestell / Assembly base frame
Benötigte Teile / Parts list:
+1x linkes Seitenteil / 1x left side panel
+1x rechtes Seitenteil / 1x right side panel
+1x Rückwand / 1x rear panel
+4x M8 Sechskantmutter / 4x M8 hex-nut
M8 Sechskanntmutter
M8 hex-nut
CLAIRE® PURE / PRO
Aufstellanleitung / Assembly instructions
Seite 8 von 10 / Page 8 of 10
Berner International GmbH
Werner-von-Siemens-Str. 19
D-25337 Elmshorn
Kontakt / Contact
Tel +49 4121 4356-0
Fax +49 4121 4356-20
Web
www.berner-safety.de
[email protected]
Claire pro and pure Aufstellanleitung
D&GB_Änderungen-hier-einarbeiten.docx
Erstellt / Prepared: S. Gragert
Genehmigt / Approved: R. Wörl
Gültig ab / Valid from 24. Mai/May 2019
2.2 Zusammenbau / Assembly
Benötigte Teile / Parts list:
-1x Sicherheitswerkbank / 1x safety cabinet
-1x Untergestell / 1x base frame
-6x Schrauben M6 x 12 / 6x screw M6 x 12
Die Werkbank mit einem Hubwagen auf das Untergestell setzen und mit 6
Schrauben M6 x 12 fixieren
Put the safety cabinet on top of the base frame and fix with 6x M6 x 12 screws
SchraubeM6 x 12
Screw M6 x 12
CLAIRE® PURE / PRO
Aufstellanleitung / Assembly instructions
Seite 9 von 10 / Page 9 of 10
Berner International GmbH
Werner-von-Siemens-Str. 19
D-25337 Elmshorn
Kontakt / Contact
Tel +49 4121 4356-0
Fax +49 4121 4356-20
Web
www.berner-safety.de
[email protected]
Claire pro and pure Aufstellanleitung
D&GB_Änderungen-hier-einarbeiten.docx
Erstellt / Prepared: S. Gragert
Genehmigt / Approved: R. Wörl
Gültig ab / Valid from 24. Mai/May 2019
3Claire pro 3 Filtersystem / Claire® pure 3 filter system
3.1 Montage Untergestell / Assembly base frame
Benötigte Teile / Parts list:
+1x linkes Seitenteil / 1x left side panel
+1x rechtes Seitenteil / 1x right side panel
+1x Hauptfilterkasten/ 1x main filter box
+8 x gummierte Unterlegscheibe / 8x rubber - steel washer
+8x M8 Sechskantmutter / 8x M8 hex-nut
M 8 Sechskantmutter
M8 hex-nut
P Dichtung
P Gasket
CLAIRE® PURE / PRO
Aufstellanleitung / Assembly instructions
Seite 10 von 10 / Page 10 of 10
Berner International GmbH
Werner-von-Siemens-Str. 19
D-25337 Elmshorn
Kontakt / Contact
Tel +49 4121 4356-0
Fax +49 4121 4356-20
Web
www.berner-safety.de
[email protected]
Claire pro and pure Aufstellanleitung
D&GB_Änderungen-hier-einarbeiten.docx
Erstellt / Prepared: S. Gragert
Genehmigt / Approved: R. Wörl
Gültig ab / Valid from 24. Mai/May 2019
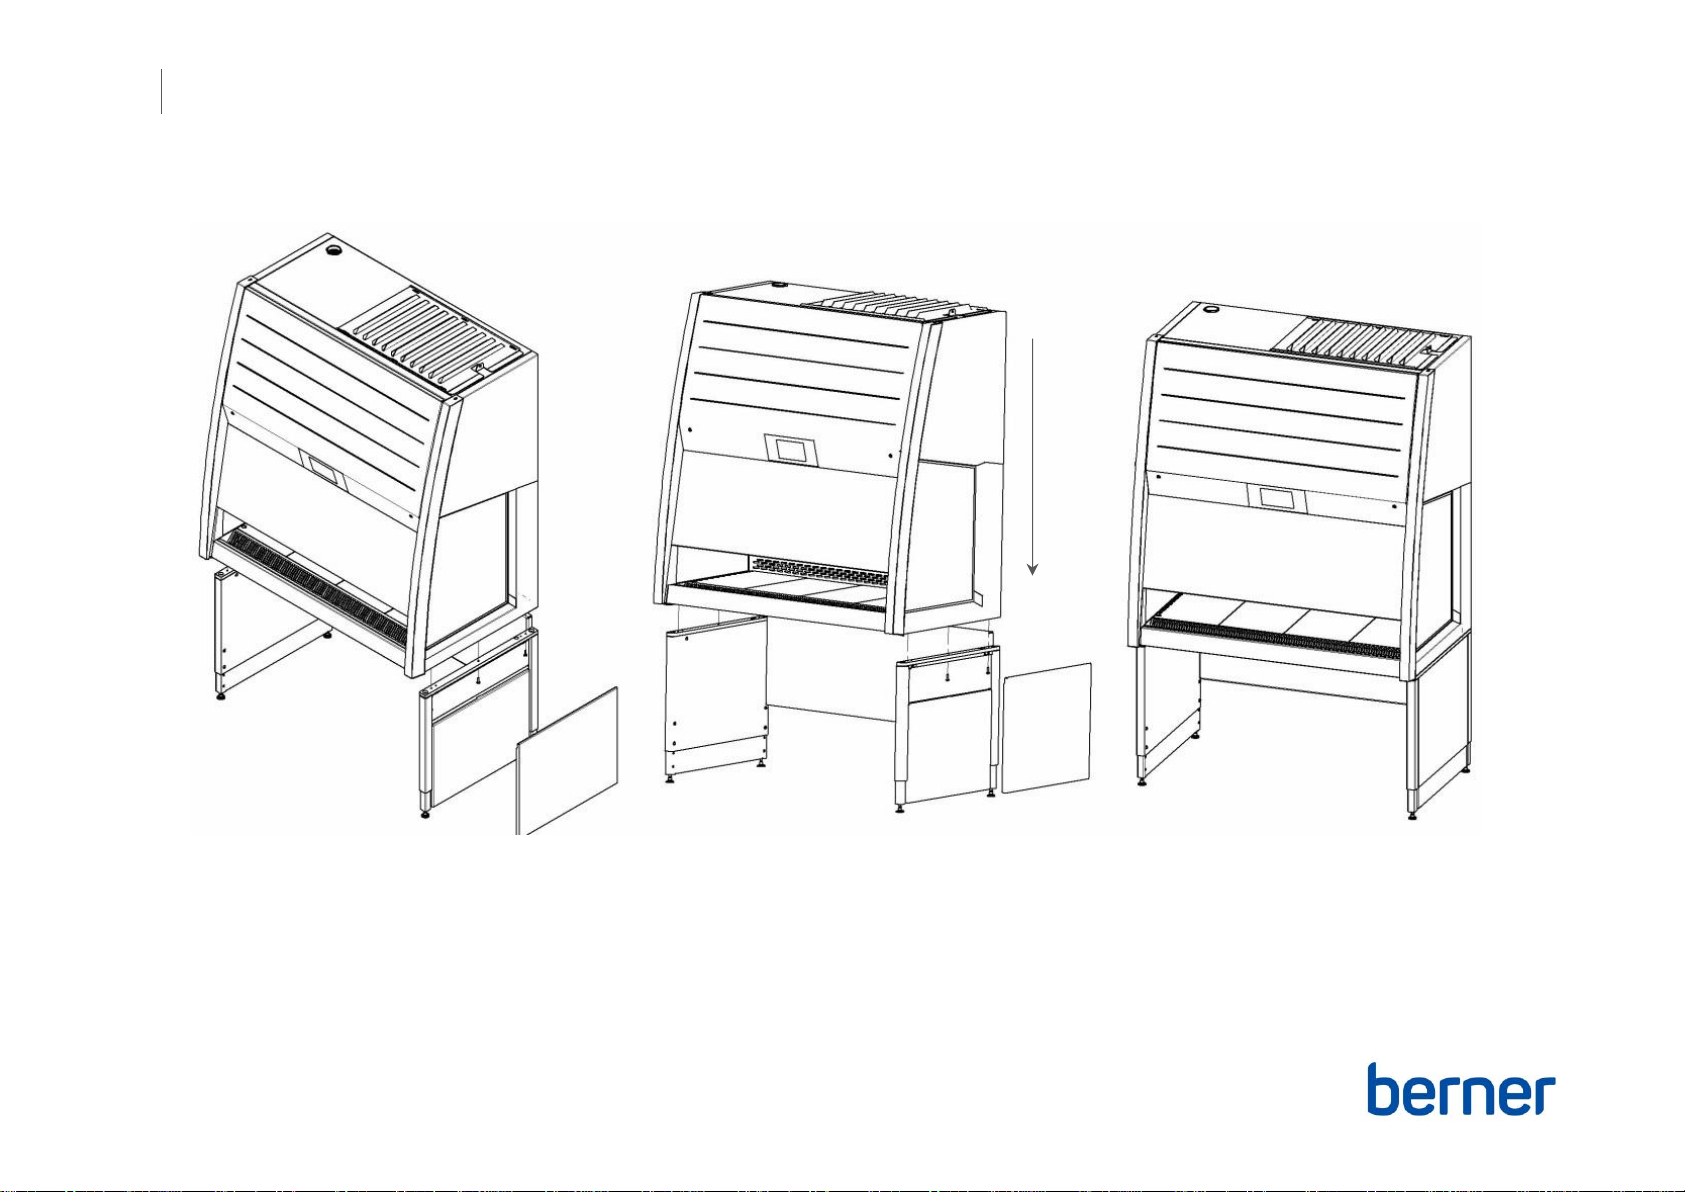
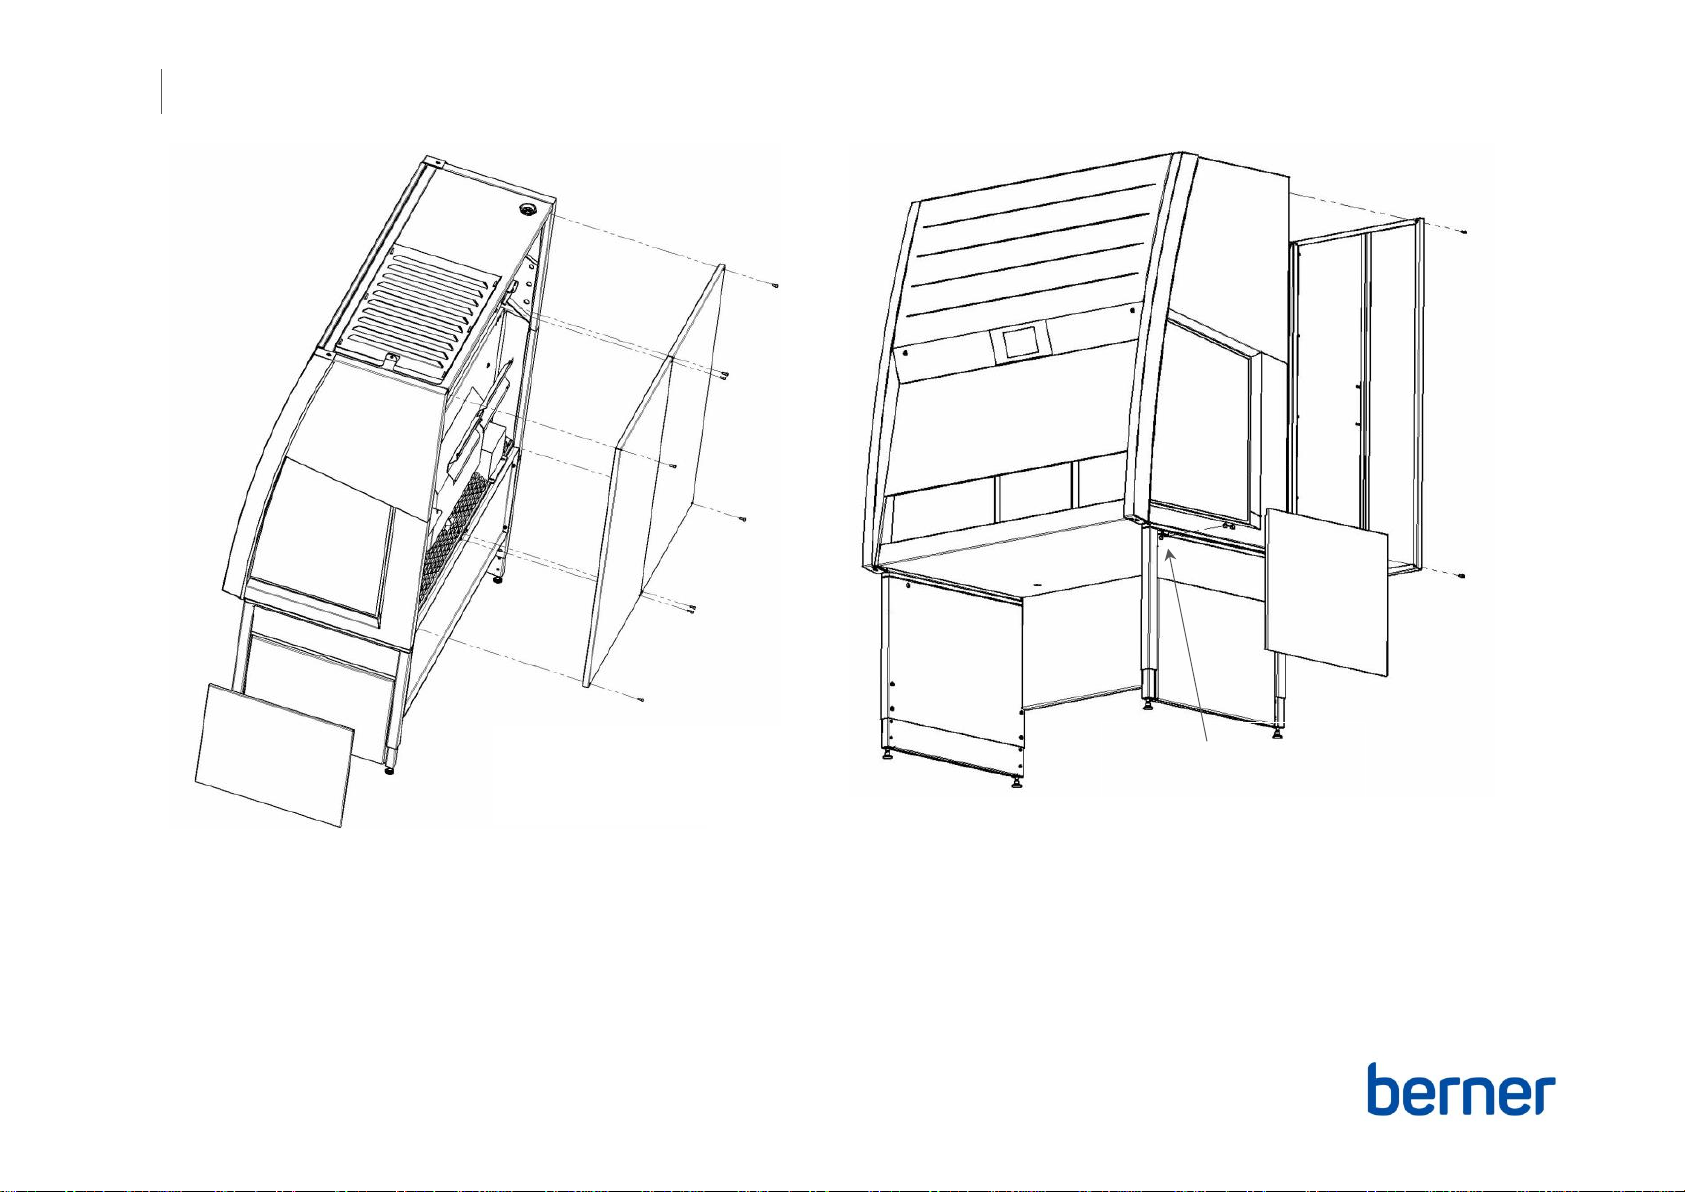
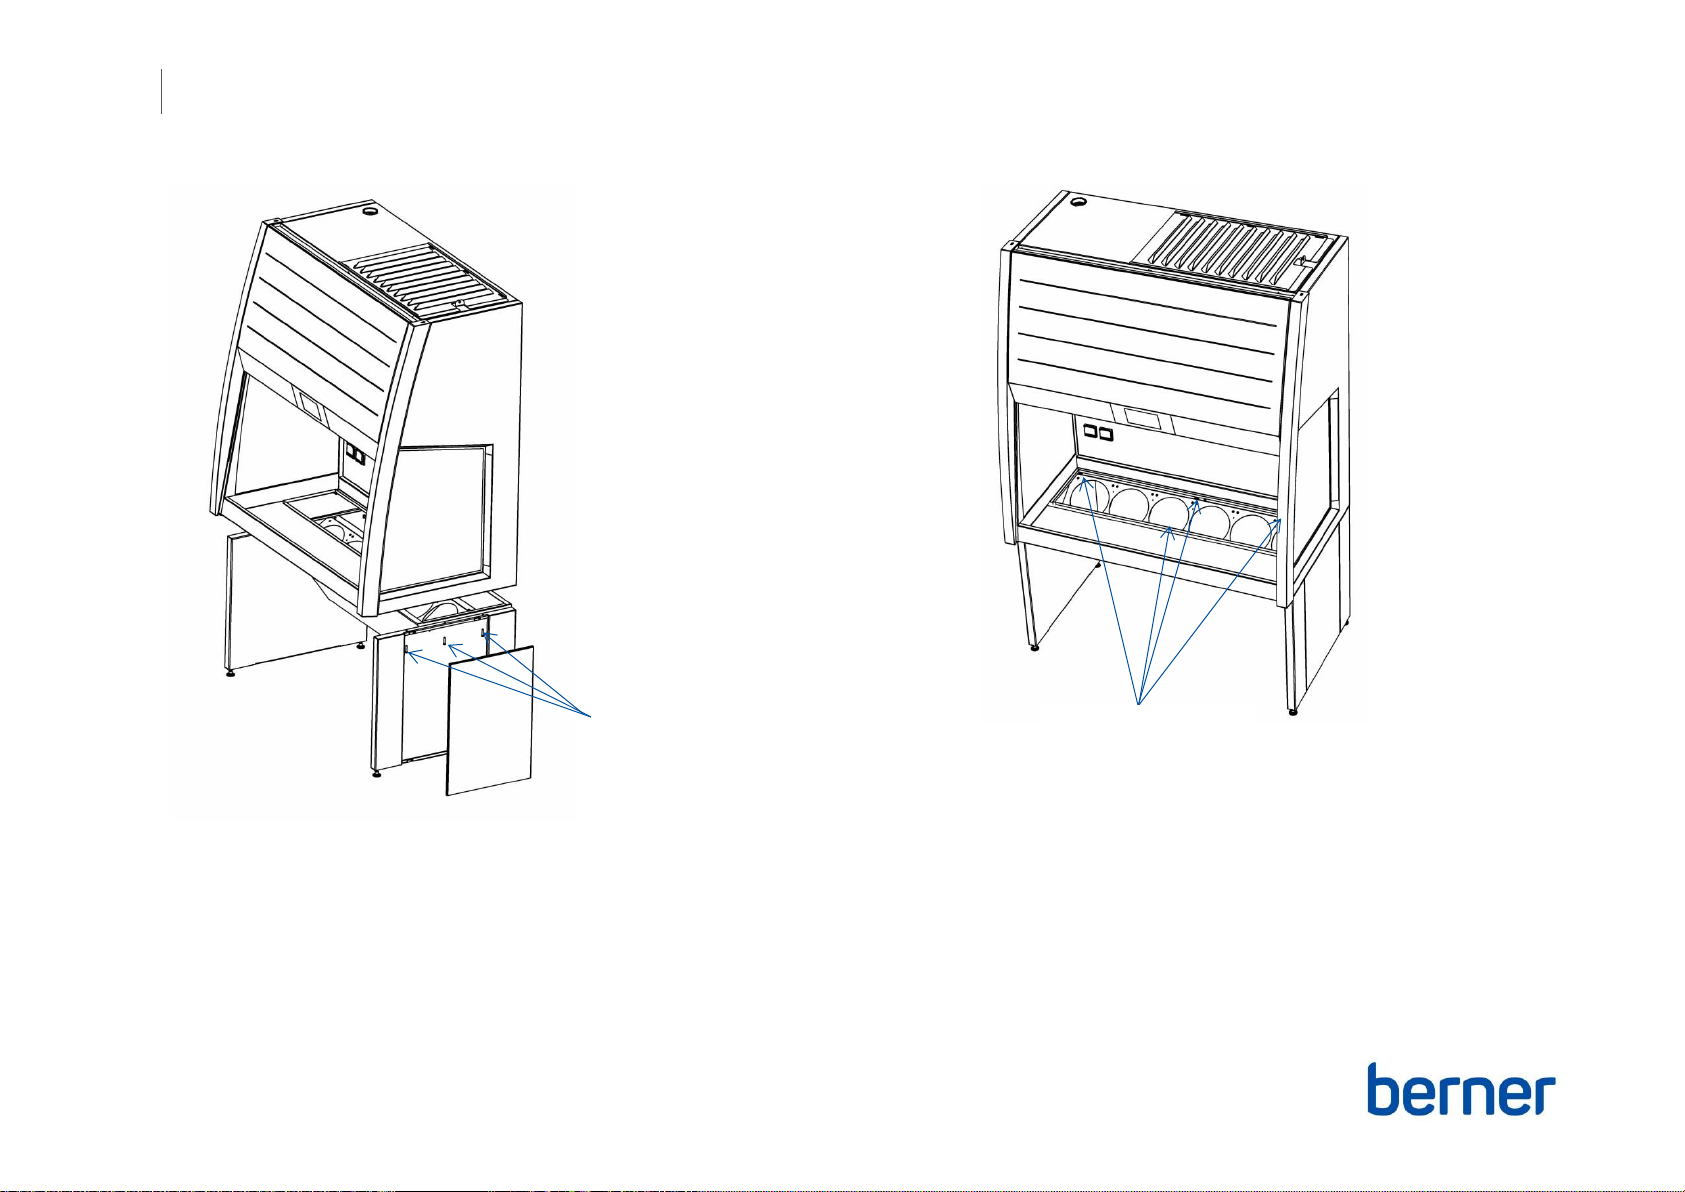
3.2 Zusammenbau / Assembly
+Sicherheitswerkbank mit einem Hubwagen anheben und auf das Untergestell schieben. / Use a lifter to bring the safety cabinet on top of the base frame.
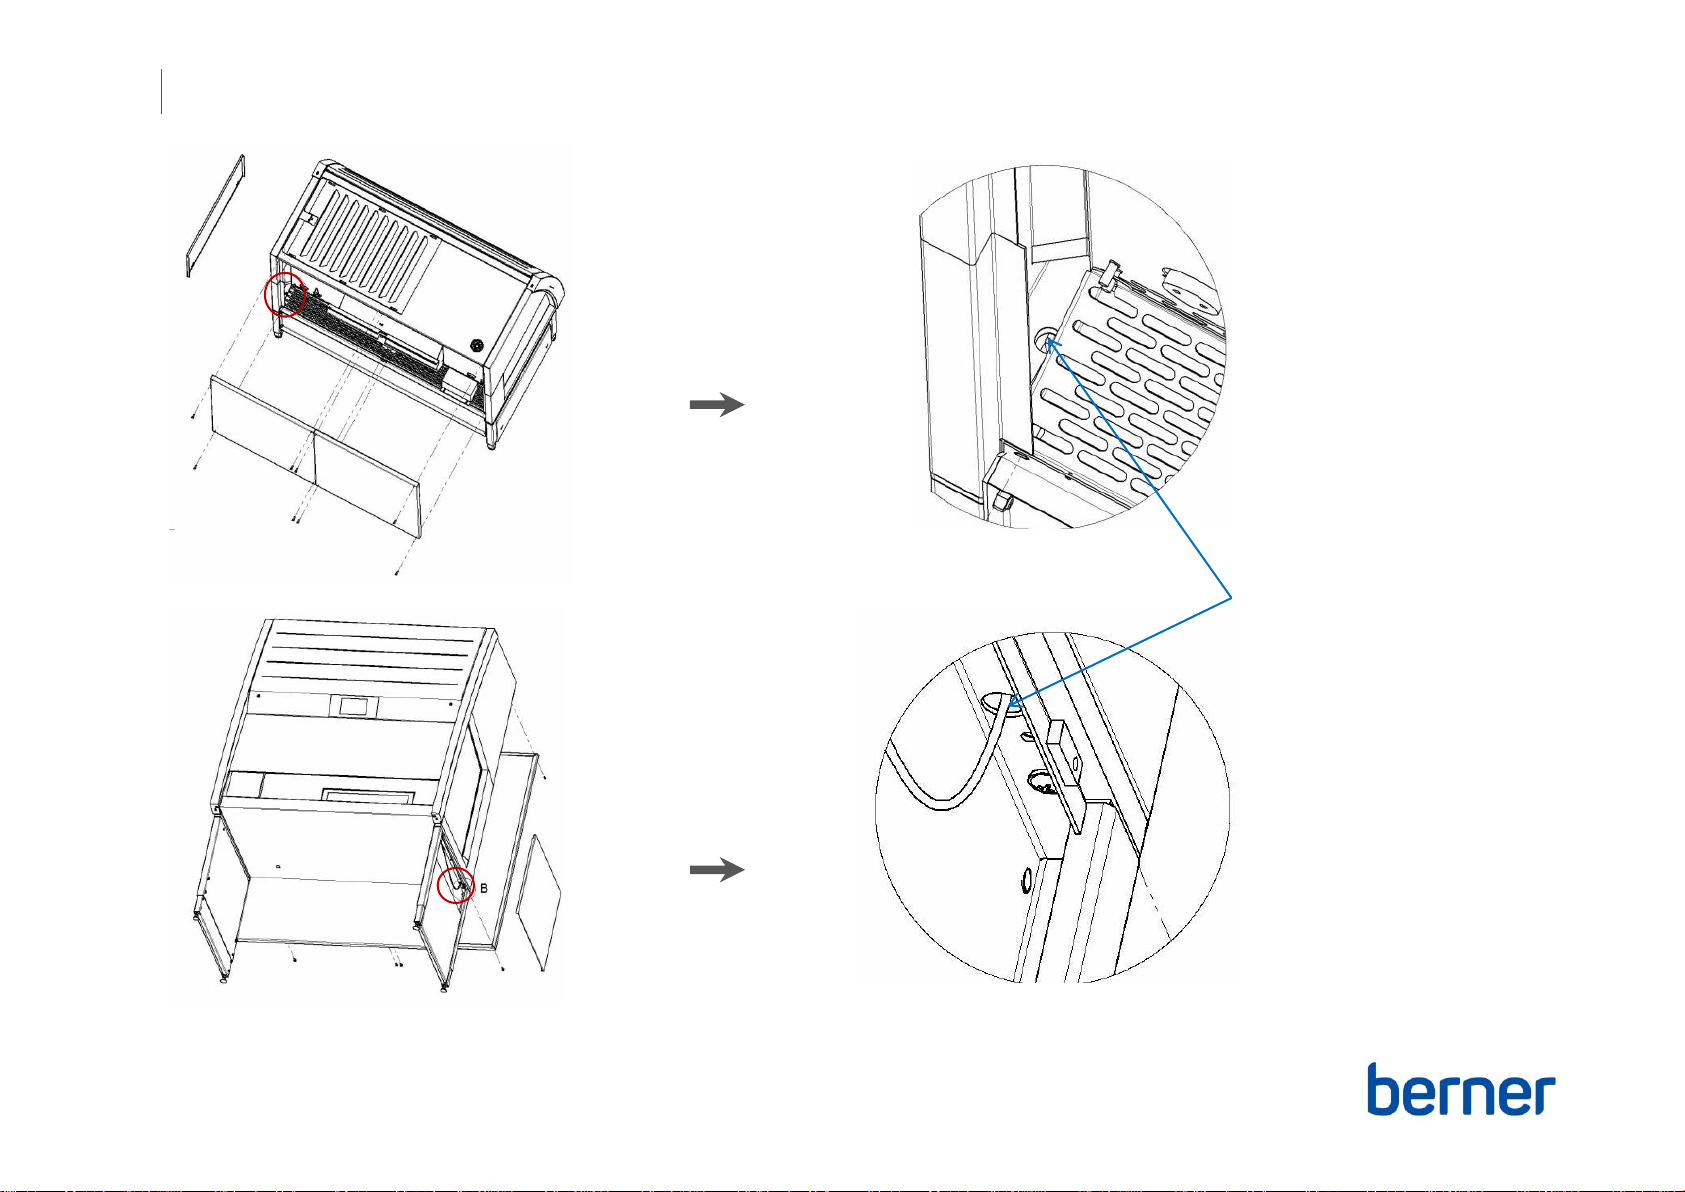
+Die 8 Sechskantmuttern im Hauptfilterkasten ein wenig lösen, und den Hauptfilterkasten über die Schrauben im Arbeitsraum festziehen. / Losen the 8 hex nuts
inside the main filterbox slightly and tighten the main filter box over the the screws in the working area.
+Die Sechskantschrauben im Hauptfilterkasten festziehen. / Tighten the hex nuts inside the main filter box.
+Übergang zwischen Filterkasten und Sicherheitswerkbank mit Silikon (RAL 9002) versiegeln / Seal gap between cabinet and main filter box with silicone (RAL
9002)
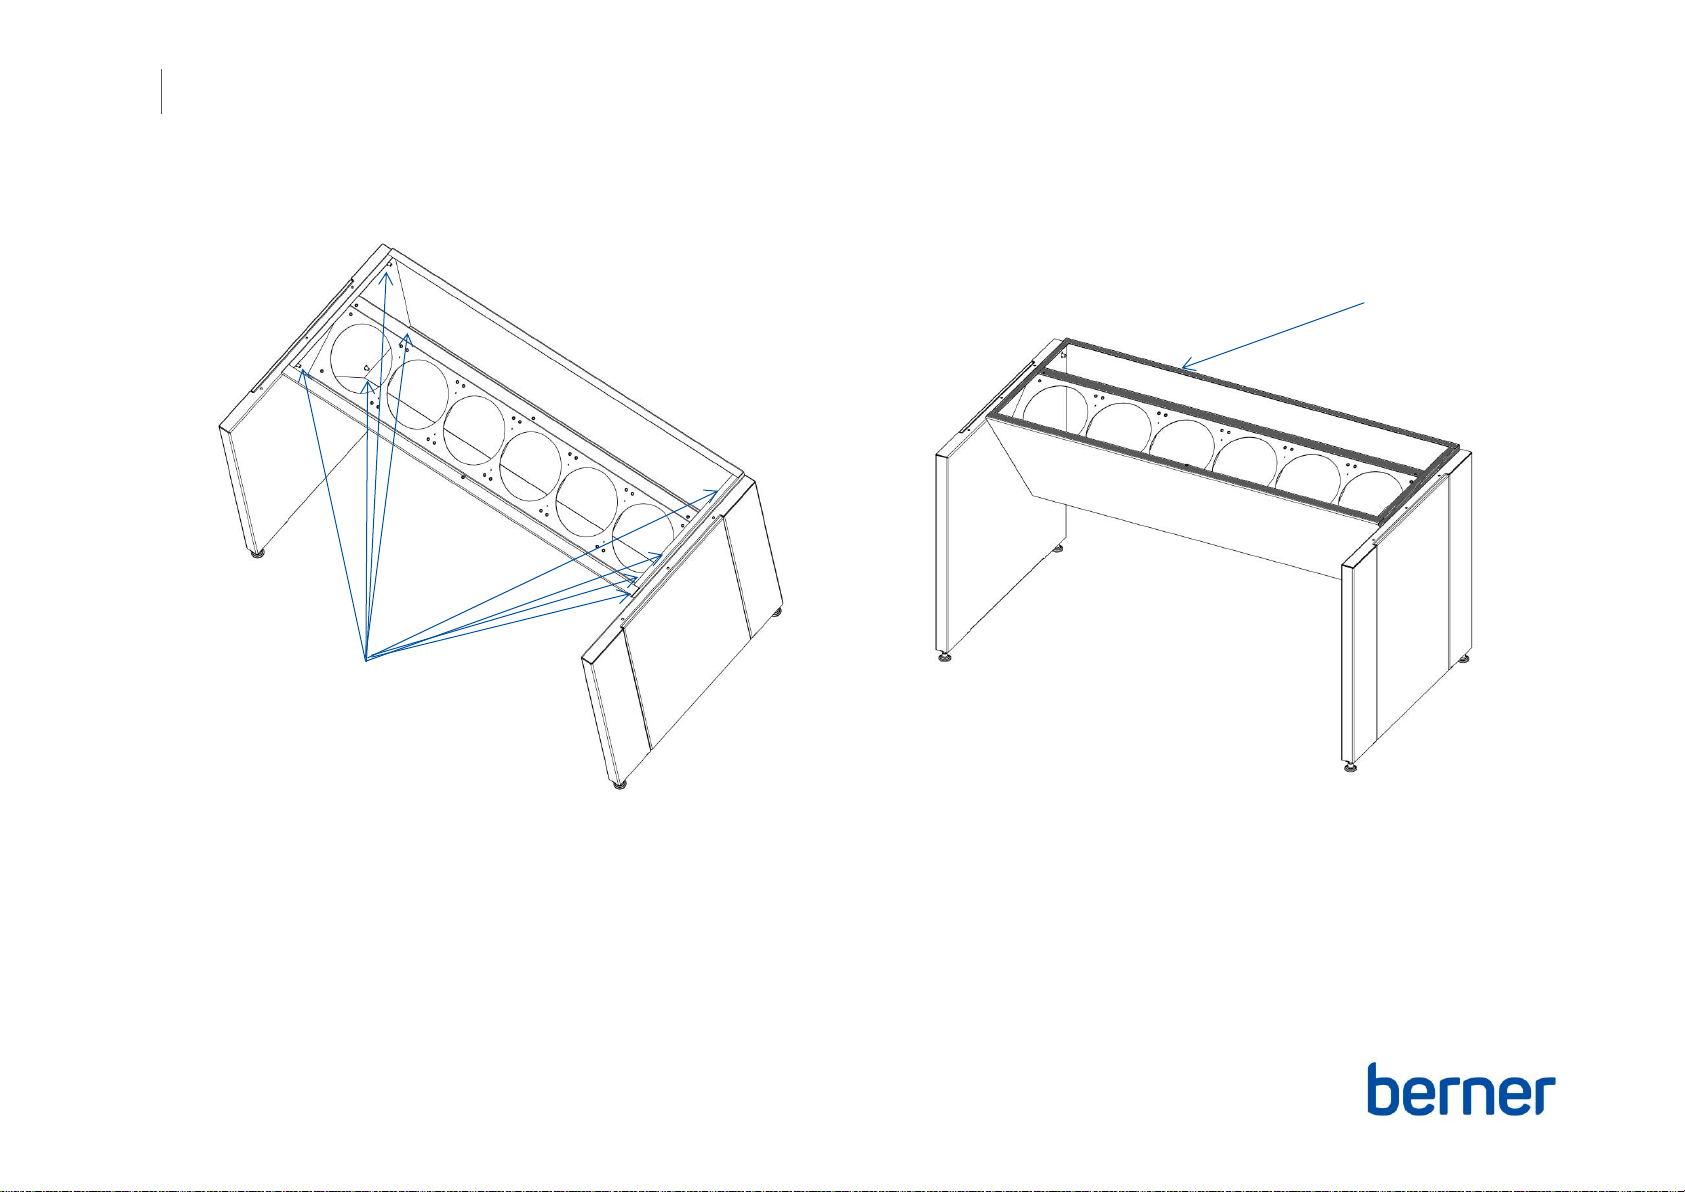
+Filter einsetzen und Filterintegitätstest durchführen. / Insert the filter cardridges and perform filter leak test.
SchraubeM6 x 12
Screw M6 x 12
SchraubeM6 x 16
Screw M6 x 16

This manual suits for next models

1

Popular Water Filtration System manuals by other brands

Sundstrom SR 99-1 User instruction

Sundstrom

Sundstrom SR 99-1 User instruction

Teka filtoo operating instructions

Teka

Teka filtoo operating instructions

Pall UR329 Series Service instructions

Pall

Pall UR329 Series Service instructions

Rainfresh CBF1 Installation & operation manual

Rainfresh

Rainfresh CBF1 Installation & operation manual

Mex MPC-1054-FV Installation/operation instruction manual

Mex

Mex MPC-1054-FV Installation/operation instruction manual

Oase Biotec 18 operating instructions

Oase

Oase Biotec 18 operating instructions

Oase BioSmart30000 operating instructions

Oase

Oase BioSmart30000 operating instructions

Waterdrop WD-FC-01 owner's manual

Waterdrop

Waterdrop WD-FC-01 owner's manual

Hitachi PQF Quick start up guide

Hitachi

Hitachi PQF Quick start up guide

Sullair SCD300 user guide

Sullair

Sullair SCD300 user guide

Fluval UVC instruction manual

Fluval

Fluval UVC instruction manual

Atlantic Ultraviolet Eco-Logic Operation manual

Atlantic Ultraviolet

Atlantic Ultraviolet Eco-Logic Operation manual

RAFTEC SAFE Series instruction manual

RAFTEC

RAFTEC SAFE Series instruction manual

Zepter AqueenaPro WT-100 instruction manual

Zepter

Zepter AqueenaPro WT-100 instruction manual

BRITISH BERKEFELD SS Gravity Assembly, Operating and Maintenance Instruction

BRITISH BERKEFELD

BRITISH BERKEFELD SS Gravity Assembly, Operating and Maintenance Instruction

Acuva Arrow 5 Owner's Product Manual

Acuva

Acuva Arrow 5 Owner's Product Manual

Parker Racor RK11868 manual

Parker

Parker Racor RK11868 manual

Brita Mypure Instructions for use

Brita

Brita Mypure Instructions for use

manuals.online logo
manuals.online logoBrands
  • About & Mission
  • Contact us
  • Privacy Policy
  • Terms and Conditions

Copyright 2025 Manuals.Online. All Rights Reserved.