Bessey EBH Series User manual

© Bessey Tools - 22.11.R02
USER MANUAL
Bessey Easy Induction Heaters
EBH series
FR
EN


© Bessey Tools
Contact
Address Bessey Tools North America
Canada: Cambridge, ON N1R 7J4
USA: Lithia Spring, GA 30122
Tel 1.800.828.1004
Web www.besseytools.com
Mail [email protected]
Machine ID and certication: See machine plate
Warning!
Read the manual and safety instructions before operating the device
• Check all parts for possible damage during transportation. In case of damage, please
contact the forwarder immediately.
• Because our products are continuously subject to improvements, we reserve the right
to make changes.
Vor Inbetriebnahme die Betriebsanleitung und die Sicherheitsvorschriften
aufmerksam lesen
• Alle Teile auf möglichen Transportschaden kontrollieren. Eventuelle Schäden umgehend
der Spedition melden.
• Da unsere Produkte ständig verbessert werden, behalten wir uns Änderungen vor.
Antes de la primera puesta en marcha, lea atentamente el manual de uso y las
instrucciones de seguridad
• Revise todos los elementos para detectar posibles daños sufridos durante el transporte.
En caso de observar algún daño, avise inmediatamente a la empresa de transporte.
• Debido a que nuestros productos están continuamente sujetos a mejoras, nos
reservamos el derecho de realizar cambios.
Lisez le mode d’emploi et les consignes de sécurité avant la mise en service
• Vériez pour l’ensemble des pièces que celles-ci n’ont pas été endommagées pendant
le transport. En cas de dommages, avertissez immédiatement le transporteur.
• Nos produits étant constamment améliorés, nous nous réservons le droit d’apporter
des modications.
Lees voor ingebruikname eerst de gebruiksaanwijzing en de veiligheidsvoorschriften
• Controleer alle onderdelen op mogelijke transportschade. Waarschuw bij schade
onmiddellijk het transportbedrijf.
• Omdat onze producten voortdurend worden verbeterd, behouden wij ons het recht
voor om wijzigingen aan te brengen.

4© Bessey Tools
ENGLISH
Contents
1. About the user manual �������������������������������������������������������������������������������������������������������������������� 5
1.1 Availability .................................................................................................................................................. 5
1.2 Legal guidelines ........................................................................................................................................ 5
1.3 Original user manual ............................................................................................................................... 5
2. Safety, warnings and potential hazards ��������������������������������������������������������������������������������������� 6
2.1 Explanation of the pictograms ............................................................................................................... 6
2.2 Description of potential hazards ........................................................................................................... 7
2.3 Safety measures to be taken ................................................................................................................. 9
2.4 Safety provisions .................................................................................................................................... 10
3. Introduction �������������������������������������������������������������������������������������������������������������������������������������� 11
3.1 Application ................................................................................................................................................ 11
3.2 Operating conditions ............................................................................................................................ 11
3.3 Principle of operation ............................................................................................................................ 11
4. Installation ���������������������������������������������������������������������������������������������������������������������������������������� 12
5. Method of operation ����������������������������������������������������������������������������������������������������������������������� 13
5.1 Heating a hanging workpiece ............................................................................................................... 14
5.2 Heating a horizontal workpiece ........................................................................................................... 14
5.3 Maximum weights on supports and crossbars ............................................................................... 15
6. Operation ������������������������������������������������������������������������������������������������������������������������������������������ 15
6.1 Workpiece installation ........................................................................................................................... 15
7. Cleaning, maintenance and troubleshooting ���������������������������������������������������������������������������� 15
8. Technical data and accessories ���������������������������������������������������������������������������������������������������� 16
8.1 Technical specications ......................................................................................................................... 16
8.2 Machine ID and certication ................................................................................................................ 16
8.3 Crossbars .................................................................................................................................................. 17
8.4 Scope of delivery ..................................................................................................................................... 17
9. Miscellaneous ����������������������������������������������������������������������������������������������������������������������������������� 18
9.1 Warranty conditions ............................................................................................................................... 18
9.2 Disclaimer ................................................................................................................................................. 18
9.3 Waste disposal ........................................................................................................................................ 18

© Bessey Tools 5
EN
FR
1. About the user manual
1�1 Availability
This user manual is supplied with each device and can also be ordered retrospectively.
1�2 Legal guidelines
The information in this manual corresponded to the most recent status at the close of editing.
The illustrations and descriptions cannot be used as grounds for any claims relating to
devices that have already been delivered. Bessey Tools accepts no liability for any damage or
malfunctions if the device or accessories have been modied or used in an incorrect manner.
1.3 Original user manual
The original user manual is taken to be a user manual in the Dutch language. A user manual
in another language is to be taken as a translation of the original user manual.
Foreword
The Bessey induction heating devices give rapid, clean operation. Their high eciency level
allows energy-ecient heating and shorter mounting times. This reduces the operating costs.
Heating by induction removes the need for oils, thus eliminating environmental concerns.
This heater ts all scopes of application including heating the loose inner rings of cylindrical
or needle roller bearings, as well as sealed and greased bearings.
The robust and durable construction of this heater provides the reliability required for
demanding industrial operations.

6© Bessey Tools
2. Safety, warnings and potential hazards
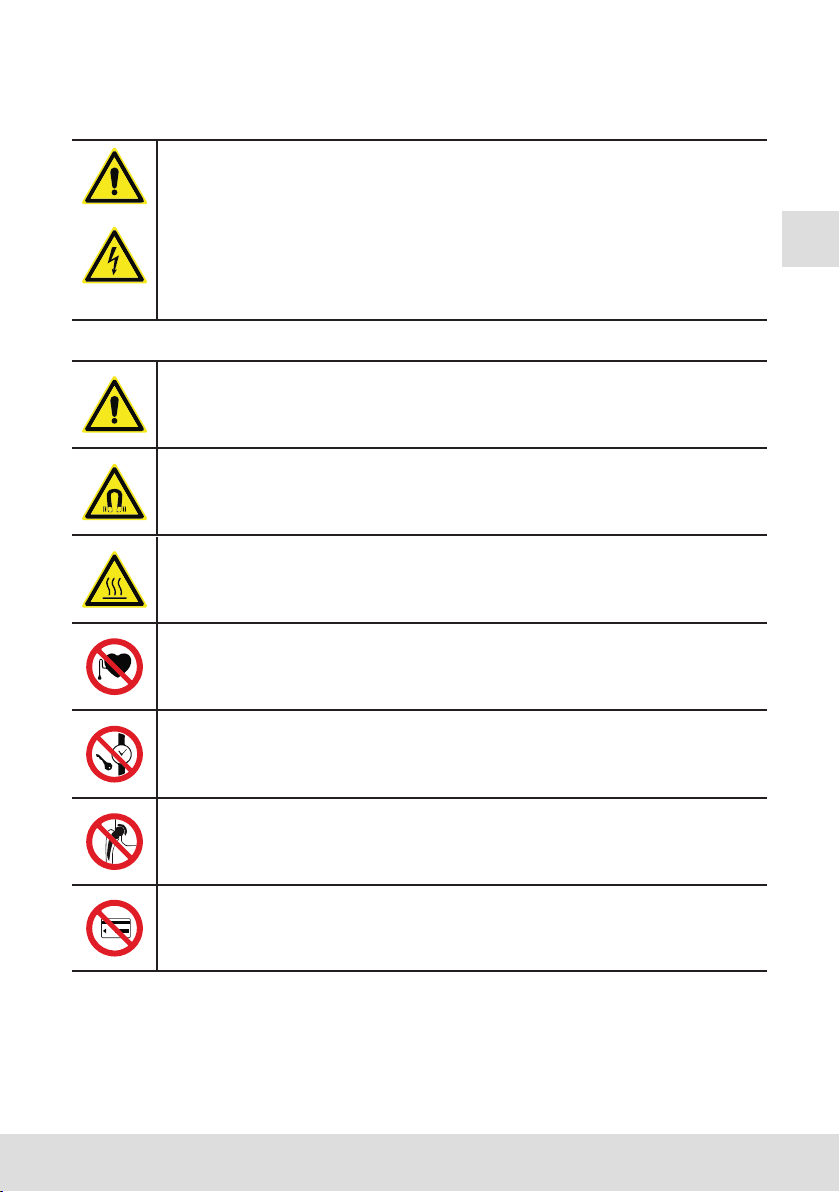
2�1 Explanation of the pictograms
Forbidden for persons with pacemaker or other sensitive implants.
Wearing of metal parts, watches and jewellery forbidden.
Forbidden for persons with metal implants.
Forbidden for magnetically sensitive data media.
Read the user manual!
Wear heat-resistant gloves!
Wear safety shoes!
Warning of danger.
Electric shock hazard.
Warning of magnetic elds.
Warning of hot surface.
Warning of heavy object.
© Bessey Tools 7
EN
FR
2�2 Description of potential hazards
Warning! Voltage
Be aware that you are working with an electrical device. On the mains side as
well as internally, voltages occur that can lead to serious injury and death if
used inexpertly or improperly.
• Connect the unit to the power according to the information on the rating plate.
• Before each use, check the power supply cable for damage.
• Safe disconnection from the power supply must be ensured at all times
before starting maintenance and repair work. This can be achieved by
removing the power plug from the socket.
Warning! Electromagnetic eld
Be aware that you are working with an device that generates electro-magnetic
elds. Keep a distance of 1 metre from the unit after switching on.
These elds can be harmful for persons with active medical aids such
as pacemakers.
These elds can be harmful for persons with passive medical aids such as joint
prostheses. The wearing of jewellery can also result in injuries due to burns.
It is forbidden for persons with active medical aids to be in the immediate
vicinity of the unit when it is in operation. The generated electromagnetic eld
may inuence the proper function of such medical aids.
It is forbidden to wear jewellery when working with the generator and
inductors. There is a risk of the jewellery being heated by the electromagnetic
eld and resulting in injuries due to burns.
For this reason, persons with passive implants are recommended not to enter
the immediate vicinity of the induction heater when it is in operation.
Furthermore, it cannot be ruled out that the electromagnetic elds could
cause damage to electronic and magnetic data media. Keep such equipment
away from the induction heater.

8© Bessey Tools
Caution! Tripping hazard
Limit the risk of injury due to tripping as far as possible.
• Keep your place of work tidy. Remove any loose and superuous objects
from the immediate vicinity of the unit.
• Position any cables, including the power supply ones, as low as possible to
minimize the risk of tripping.
Caution! Risk of burns
The workpiece becomes warm to very hot during heating.
Parts of the unit may also become hot due to contact with the workpiece or
the heat radiated by the workpiece.
Therefore always wear heat-resistant gloves when handling workpieces in
order to avoid injury due to burns.
Caution! Risk of injury during lifting
A number of units in the Bessey heater range weigh more than 23 kg and may
therefore not be lifted by one person alone. (see technical specs)
If a unit weighs more than 23 kg, lift it with two persons or use suitable
lifting equipment.
Wear safety shoes to prevent injury from unintentionally falling workpieces
and/or machine parts.

© Bessey Tools 9
EN
FR
2�3 Safety measures to be taken
• The user must carefully read this manual and be familiar with the safety standards in the
work practice.
• Follow the instructions in the manual at all times.
• Check the connection voltage against the rating plate on the unit. If the power cord does
not have one, make sure it is tted with the proper plug. This must be tted by a
qualied electrician.
• Never use or store an induction heater in a damp environment.
• Only use Bessey induction heaters indoors.
• Use suitable lifting equipment according to the weight of the crossbar or component.
• Never use a metal strap to support workpieces or suspend them in the magnetic eld.
High currents could start running through the strap, causing it to heat up.
• Do not hold metal objects near crossbar and poles.
• Whilst heating, observe a minimum distance of 1 metre from the heater.
• Never remove the induction crossbar during heating.
• Do not modify the heater. Never use home-made crossbars.
• Always check that the induction crossbar is positioned correctly against the poles, so
excessive vibration cannot cause personal injury or damage to the device.
• Do not switch on the heater until the core is closed with a crossbar.
Hazard area
The hazard area of the heating device can represent a danger of death.
WARNING!
Danger of heart stoppage in persons tted with a pacemaker due to the strong
electromagnetic eld. Ensure that persons tted with a pacemaker remain
outside the hazard area of the heating device. Erect barriers and attach clearly
visible warning signs, Figure 1.
WARNING!
Danger of death for persons with articial heart valves made from metal,
hazard of severe burns due to heating of implants by the electromagnetic eld,
see chapter 2.2. Ensure that persons with a ferromagnetic implant remain
outside the hazard area of the heating device. Erect barriers and attach clearly
visible warning signs, Figure 1.

10 © Bessey Tools
1 m
2
1
3
1. Hazard area, 1 m.
2 Barrier.
3 Flat work surface capable of
supporting load.
Figure 1
2�4 Safety provisions
An induction heater operates by means of a magnetic eld. At a distance of 1 metre, the
magnetic eld has been reduced to such an extent that it is below the applicable standard
of 0.5mT.

© Bessey Tools 11
EN
FR
3. Introduction
3�1 Application
Bessey induction heaters are intended for heating bearings, so they can be assembled easily
by means of a shrink t. Subject to professional assessment, they can also be used to heat
bushings, cogwheels, couplings and metal objects that form a closed circuit.
Bearings and workpieces can be heated to a maximum temperature of 240ºC (464°F), except
for the EBH 2412 type where the maximum temperature is set at 150ºC (300°F).
Bessey induction heaters are suitable for continuous use. However, when heating to 240°C
(464°F), don’t do so for more than half an hour. The EBH 2412 has a duty cycle of 1,5 hour.
CAREFUL!
• Bearings may be heated to a maximum of 120°C (248°F).
• Precision bearings may be heated to a maximum of 70°C (158°F). Higher temperatures
can aect metallurgical structure and lubrication, resulting in instability and failure.
• Do not use a heater for bearings and workpieces that are outside the minimum and
maximum dimensions specied in the technical specications.
• We recommend to use an external thermometer to monitor the workpiece temperature.
3.2 Operating conditions
• Only use the device indoors.
• Fit for use in an industrial environment, at an ambient temperature of 0ºC (32°F) to 50ºC
(120°F) and humidity of 5 to 90% – non-condensing.
3�3 Principle of operation
The operation of the heater is based on inducing a (low frequency)
current in the bearing. This is achieved by incorporating the bearing
as a secondary winding in a transformer.
The primary winding is connected to the mains by means of an
electronic controller. The magnetic eld induces a high current
(short-circuit current) through the bearing, which then becomes hot.

12 © Bessey Tools
4. Installation
• Remove the packaging and place the induction heater on a non-ferrous, stable and level
surface.
• Check the connection voltage against the rating plate on the unit.
• Each heater is equipped with a plug. C-US plug types are:
120V/240V 1 phase heaters
Black Phase
White Zero
Green Ground
• Ensure that the power supply cable cannot come into contact with the workpiece to be
heated. Insert the plug in a grounded socket outlet with connection.
• As there is a wide variety of plug types, the provided plug may not t. In such cases, obtain
a proper plug. It must be tted by a qualied electrician. There are dierent tting options
depending on the type of cable on the heater:
120V
(nema 5-15)
120V
(nema 5-20)
240V
(nema 6-20)
240V
(nema 6-15)
Type 120V
(nema 5-15)
120V
(nema 5-20)
240V
(nema 6-15)
240V
(nema 6-20)
EBH 2412 X X
EBH 201 X X
EBH 202 X X
EBH 203 X
© Bessey Tools 13
EN
FR
5. Method of operation
WARNING!
• Use suitable lifting equipment for heavy crossbars and workpieces. Prevent
personal injury by improper handling.
• The weight of the workpiece may not exceed the value given in section 5.3
and in the technical specications. This can cause failure of the device and
personal injury.
• Ensure that the power supply cable cannot come into contact with the
workpiece to be heated. Damage to the cable can cause electrocution!
• Never use a metal strap to support workpieces or suspend them in the
magnetic eld. High currents could start running through the strap, causing
it to heat up.
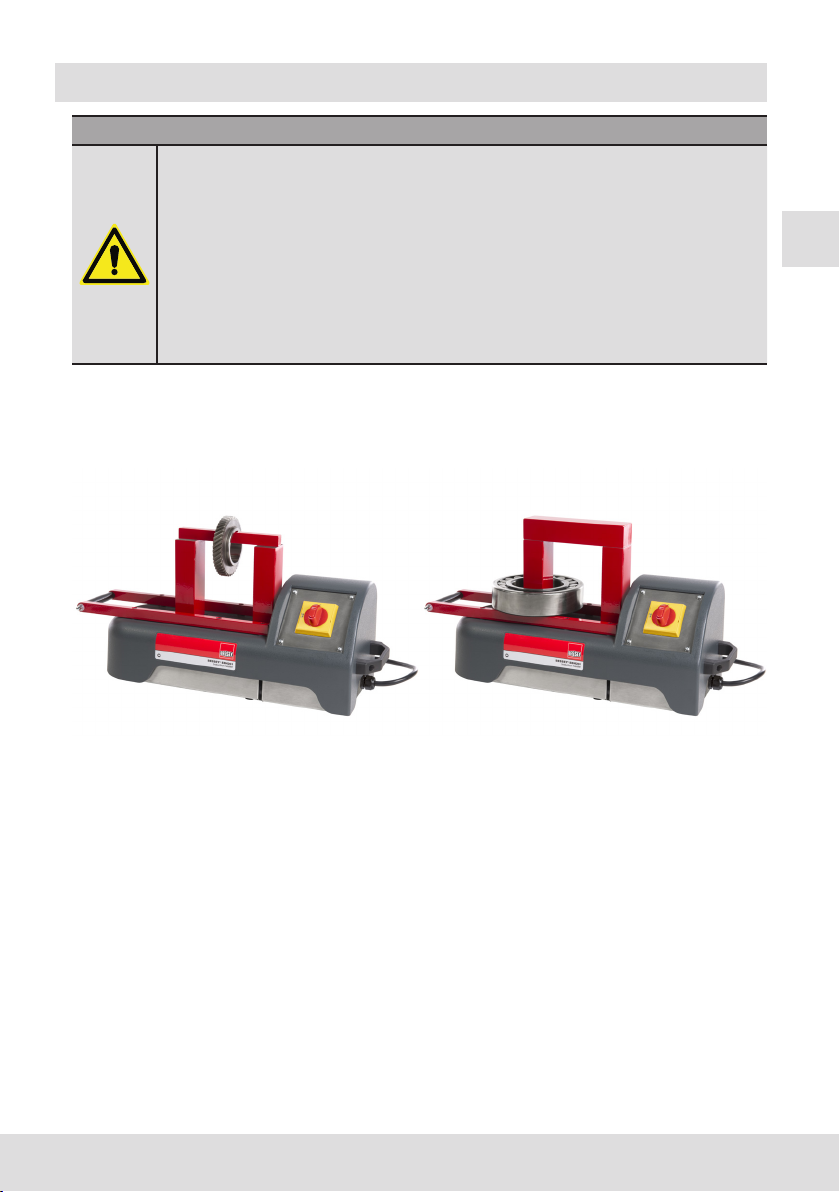
A workpiece can be placed in dierent ways:
Hanging, with crossbar through
the workpiece
Horizontal, with workpiece
around the pole
Large workpieces can be thermally insulated by wrapping them in insulating material, such as
a welding blanket. This ensures that the heat stays in the workpiece and does not dissipate.

14 © Bessey Tools
5.1 Heating a hanging workpiece
• Place the induction crossbar with the bearing on the poles. Make sure that the bare metal
side is positioned straight on the poles.
• Always choose an induction crossbar that lls the bore of the bearing as much as possible.
You can even use 2 crossbars at the same time. This promotes optimal, fast and even heating.
• Make sure that the bare-metal sides are suciently coated with acid-free grease to ensure
optimal contact and avoid vibration.
• Always make sure that the workpiece does not come into contact with the plastic casing
of the heater. When the heating is nished, follow the instructions in reverse order. Use
heat-resisant gloves to move the heated workpiece.
5.2 Heating a horizontal workpiece
• This is only possible if the bore of the workpiece is large enough to t over the pole.
• Place the workpiece as centrally as possible around the pole on the horizontal supports.
• The workpiece may not be wider than the horizontal supports.
• Always choose the largest induction crossbar.
• Make sure that the bare-metal sides are suciently coated with acid-free grease to ensure
optimal contact and avoid vibration.
• Always make sure that the workpiece does not come into contact with the plastic casing of
the heater.
• When the heating is nished, follow the instructions in reverse order. Use heat-resistant
gloves to move the heated workpiece.

© Bessey Tools 15
EN
FR
5.3 Maximum weights on supports and crossbars
Table for maximum permitted weights on the horizontal support and the crossbars:
Type On
supports
Size of crossbars (mm)
7 10 14 20 30 40 50 60 70
EBH 2412 -1 kg 2 kg 3 kg 5 kg - 20 kg - - -
EBH 201 50 kg 1 kg 2 kg 3 kg 5 kg 10 kg 15 kg - - -
EBH 202 100 kg -2 kg 3 kg 5 kg 15 kg 20 kg - - -
EBH 203 150 kg - - - 10 kg 15 kg 25 kg 40 kg 45 kg 50 kg
• Keep to these maximum weights and avoid tilting the heater or damaging the supports,
crossbars or hinge.
CAREFUL!
Always handle induction crossbars with care. They are damaged easily when dropped,
knocked against something, etc. Store them immediately after use.
6. Operation
6.1 Workpiece installation
• Position the workpiece and crossbar (according to chapters 5 & 6).
• Switch on the main switch. The heating starts, you will hear a slight humming noise.
• It is advised to monitor the temperature rise of the workpiece with an external
thermometer.
• Wear heat-resistant gloves. Place the crossbar with the workpiece on a clean surface.
Install the workpiece without delay and prevent it from cooling down.
• Switch o the main switch when heating is ready.
7. Cleaning, maintenance and troubleshooting
• Store in a dry place, free from frost and damp.
• Clean with a dry cloth. Never clean with water.
• Keep the bare parts of the poles clean. Lubricate regularly with acid-free grease for better
contact with the crossbars and to prevent corrosion.
WARNING!
• Carrying out the right maintenance and following the instructions is important.
• Contact your supplier if in doubt about the correct functioning of the device.
• Repairs must be carried out by the manufacturer or a specialist approved
by the manufacturer.
16 © Bessey Tools
8. Technical data and accessories
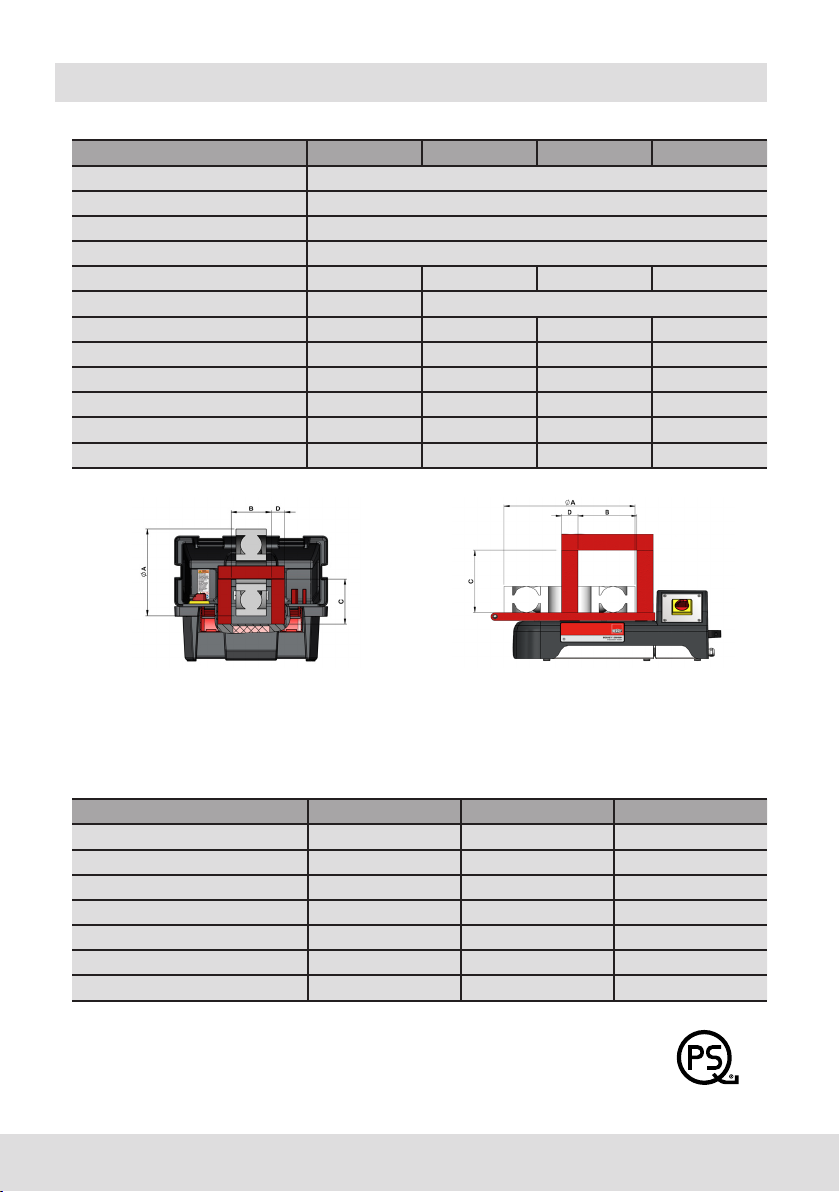
8.1 Technical specications
Type EBH 2412 EBH 201 EBH 202 EBH 203
Key pad -
Frequency 50-60Hz
Temperature measurement -
Operating modes -
Weight in kg 21 21 31 52
Max� temperature 150°C / 302°F 240°C / 464°F
Max� bearing weight in kg 20 50 100 150
Max� outside Ø mm A 240 400 500 600
Space between poles mm B 130 120 180 210
Pole height mm C 130 130 185 205
Pole surface mm D 40x40 40x50 50x50 70x80
Dimensions mm (LxWxH) 460x240x280 600x226x272 702x256x392 788x315x456
EBH 2412 EBH 201 - 203
Type Voltage/Amp kVA Certication
EBH 2412 C-US 120V/10A 1,2 QPS
EBH 2412 C-US 240V/10A 2,4 QPS
EBH 201 C-US 120V/13A 1,5 QPS
EBH 201 C-US 240V/13A 3,2 QPS
EBH 202 C-US 120V/15A 1,8 QPS
EBH 202 C-US 240V/16A 3,8 QPS
EBH 203 C-US 240V/16A 3,8 QPS
8.2 Machine ID and certication
See machine plate on the machine.
Available models
US
CERTIFIED
ELECTRICAL SAFETY
C
LR1601

© Bessey Tools 17
EN
FR
8�3 Crossbars
EBH 2412
Art� no� Min. bore diam. (mm) Size mm Weight
kg
Swivel
arm
Scope of
delivery Optional
42000707 10 7x7x200 0,08 No ✓
42001010 15 10x10x200 0,15 No ✓
42001414 20 14x14x200 0,32 No ✓
42002020 30 20x20x200 0,61 No ✓
42004040 60 40x40x200 2,42 No ✓
EBH 201
Art� no� Min. bore diam. (mm) Size mm Weight
kg
Swivel
arm
Scope of
delivery Optional
42002020 30 20x20x200 0,61 No ✓
42014050 65 40x50x200 3,02 No ✓
EBH 202
Art� no� Min. bore diam. (mm) Size mm Weight
kg
Swivel
arm
Scope of
delivery Optional
42022020 30 20x20x280 0,84 No ✓
42025050-1 72 50x50x280 5,28 No ✓
EBH 203
Art� no� Min. bore diam. (mm) Size mm Weight
kg
Swivel
arm
Scope of
delivery Optional
42037080 110 70x80x350 15,90 No ✓
8�4 Scope of delivery
Scope of delivery EBH
Induction heater ✓
Standard crossbar(s) ✓
Heat protection gloves (up to 250°C) ✓
Acid-free lubricant ✓
Printed manual (English, French) ✓

18 © Bessey Tools
9. Miscellaneous
9�1 Warranty conditions
1. A defect or fault must be reported immediately in order to avoid possible consequential
damage. Warranty claims will be voided if the defect or fault is not reported immediately.
2. The warranty does not cover defects resulting from failure to observe the installation,
safety and operating instructions given in the user manual.
3. The warranty does not apply to damage resulting from:
• Contact with aggressive substances,
• Exposure to water,
• Abnormal ambient or environmental conditions,
• Inappropriate operating conditions or conditions of use.
4. Unauthorised modications or modications by third parties will void the warranty. The
replacement of parts with non-OEM parts will also void the warranty.
5. The product must be sent to the manufacturer’s Service department for repair.
6. A repair by Bessey within the warranty period will not result in a commencement of a
new warranty period nor in a prolongation of the original warranty period.
7. Other claims for damages, such as damage occurring outside the product, will not
be accepted.
8. Wear and tear parts are not covered by the warranty.
9. For further provisions, refer to the General Conditions of Sale and Delivery of Bessey.
9�2 Disclaimer
The manufacturer and/or supplier cannot be held liable for any damage to workpieces or
consequential damage resulting from incorrect use of the device or damage to workpieces
and any consequential damage resulting from a defect in the device.
9�3 Waste disposal
Power tools, accessories and packaging must be reused at the end of their life cycle in an
environmentally sound manner. Do not dispose of used power tools as
residual waste, but bring them to a recycling company that complies with the
applicable environmental requirements.

© Bessey Tools 19
EN
FR

20 © Bessey Tools
FRANÇAIS
Table des matières
1. Préface ����������������������������������������������������������������������������������������������������������������������������������������������� 21
1.1 Disponibilité ............................................................................................................................................ 21
1.2 Informations légales ............................................................................................................................... 21
1.3 Notice d’utilisation originale ................................................................................................................. 21
2. Sécurité, avertissements et dangers potentiels ����������������������������������������������������������������������� 22
2.1 Explication des pictogrammes ............................................................................................................. 22
2.2 Descriptions de dangers potentiels .................................................................................................... 23
2.3 Mesures de sécurité à prendre ................................................................................................. 25
2.4 Dispositifs de sécurité ............................................................................................................................ 26
3. Introduction �������������������������������������������������������������������������������������������������������������������������������������� 27
3.1 Utilisation visée ....................................................................................................................................... 27
3.2 Conditions d’utilisation .......................................................................................................................... 27
3.3 Principe de fonctionnement ................................................................................................................. 27
4. Installation ���������������������������������������������������������������������������������������������������������������������������������������� 28
5. Mode de fonctionnement �������������������������������������������������������������������������������������������������������������� 29
5.1 Chaue à la verticale .............................................................................................................................. 30
5.2 Chaue à l’horizontale ........................................................................................................................... 30
5.3 Poids maximum sur les supports et les barreaux ........................................................................... 31
6. Utilisation ������������������������������������������������������������������������������������������������������������������������������������������ 31
6.1 Installation de la pièce à usiner ............................................................................................................ 31
7. Nettoyage, maintenance et guide de dépannage �������������������������������������������������������������������� 31
8. Spécications techniques et accessoires ������������������������������������������������������������������������������������ 32
8.1 Spécications techniques .................................................................................................................... 32
8.2 Identication et certication de la machine ...................................................................................... 32
8.3 Barreaux ................................................................................................................................................... 33
8.4 Livraison .................................................................................................................................................... 33
9. Autres informations ������������������������������������������������������������������������������������������������������������������������ 34
9.1 Conditions de garantie .......................................................................................................................... 34
9.2 Avis de non-responsabilité ................................................................................................................... 34
9.3 Élimination des déchets ........................................................................................................................ 34
This manual suits for next models
4
Table of contents
Languages:
Other Bessey Heater manuals


Popular Heater manuals by other brands


baxiroca
baxiroca EPOCA Assembly instructions

Radialight
Radialight HALOS Instructions for use

Generac Power Systems
Generac Power Systems MIH1.2 owner's manual

VonHaus
VonHaus 2514074 instruction manual

Triad
Triad SuperLight VI Installation and operation manual

Coopers of Stortford
Coopers of Stortford H765 Assembly instructions/Instructions for use


