Bessey PV Series User manual
USER MANUAL
Induction Bearing Heaters
(PV, PVH, SV & SVH Models)
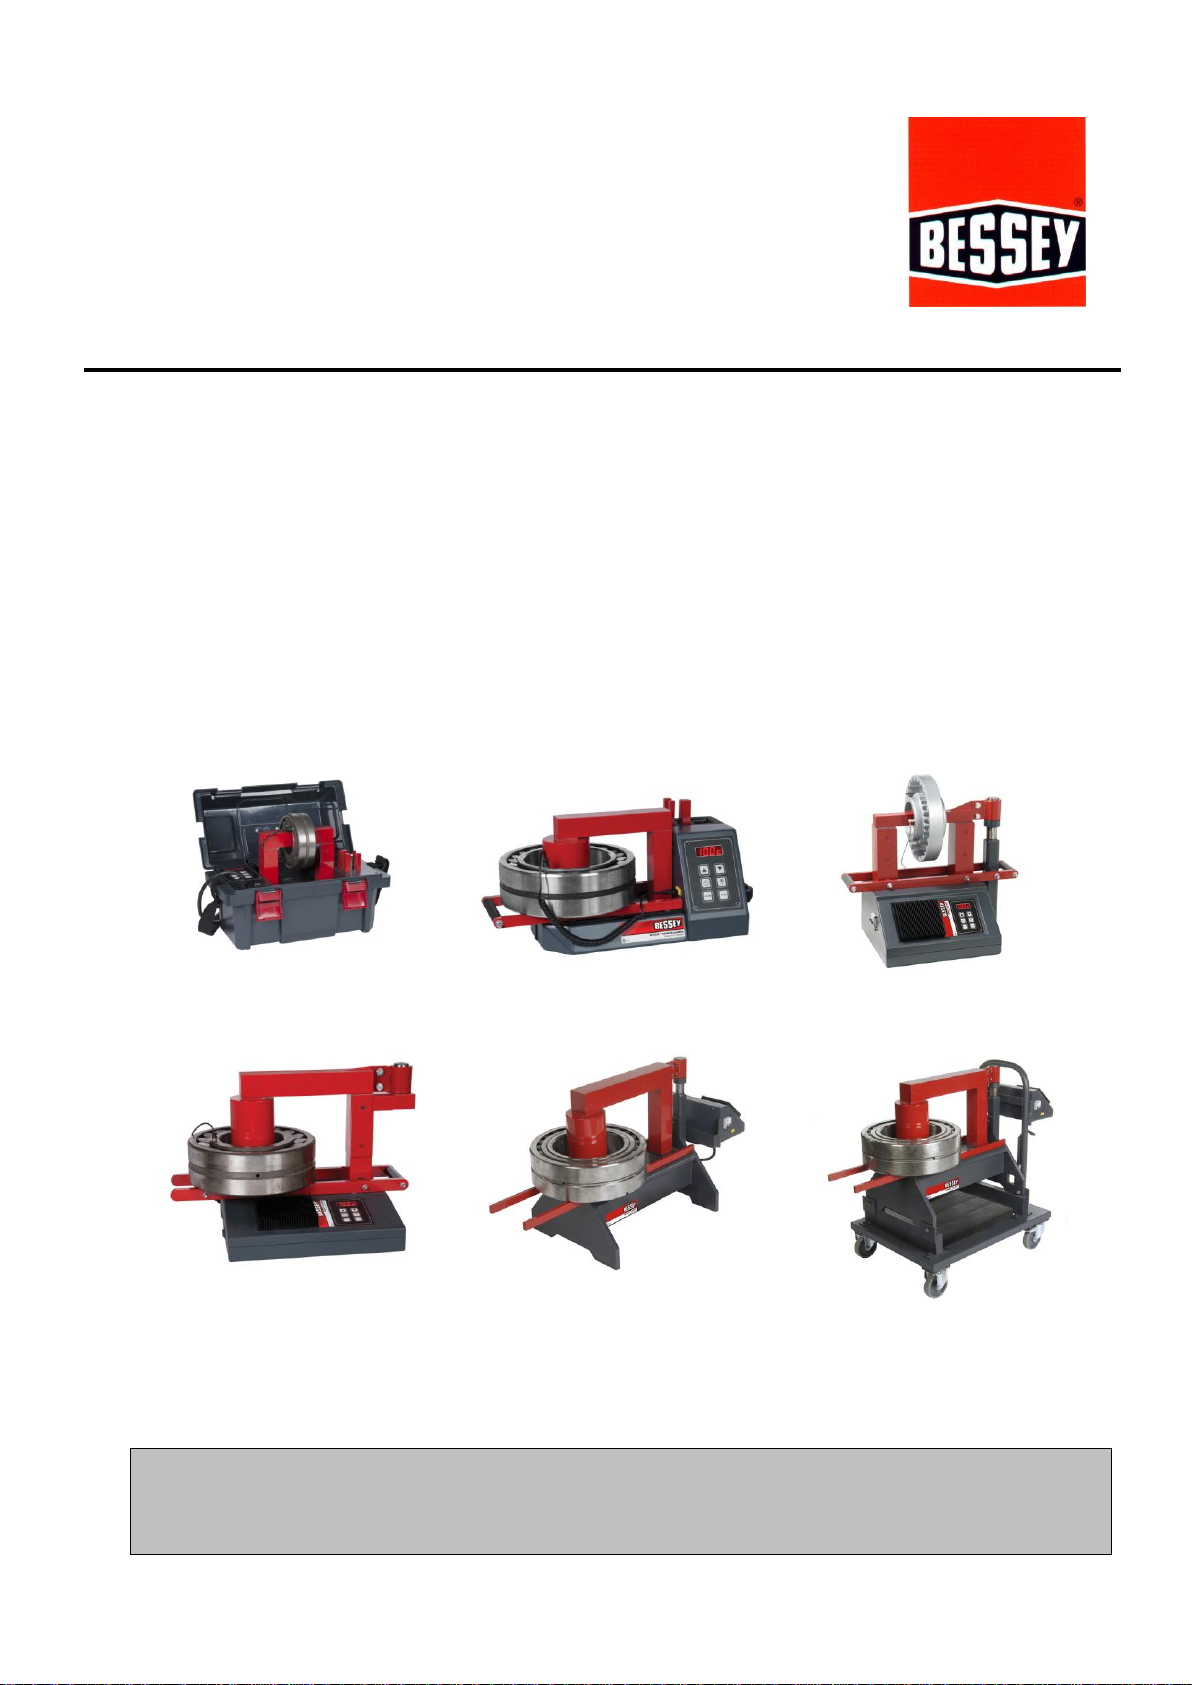
PV2412
PVH3813
SV5020
SVH5223
SVH7931
SVH7931M
READ THE MANUAL AND SAFETY INSTRUCTIONS
Check all parts for possible transport damage.
If any damage is apparent, inform carrier immediately.
June 2018 © BESSEY

1. User manual……………………………………………………
2. Manuel de l‘utilisateur………………………………………..
READ THE MANUAL AND SAFETY INSTRUCTIONS
Check all parts for possible transport damage.
If any damage is apparent, inform carrier immediately.
VEUILLEZ LIRE LE MANUEL EN CONSIGNES DE SÉCURITÉ
Vérifier le bon état de tous les éléments afin de s’assurer qu’ils ne sont pas endommagés.
En cas de dommage, veuillez informer immédiatement à réception le transporteur.
GB
F

3
Table of Contents
1. Safety Instructions
2. Introduction
2.1 Application
2.2 Operating conditions
2.3 Principle of operation
3. Installation
4. Symbols & Display
5. Setting up the Work piece
5.1 Setting up the Work piece
5.2 Maximum weights for swing-arm models
6. The Magnetic Temperature Probe
7. Operation
7.1 Using Temperature mode
7.2 Using Time mode
7.3 Work piece removal
7.4 Malfunctioning
7.5 Switch between Celsius and Fahrenheit
8. Cleaning & Maintenance
4
5
6
7
8
10
11
12
GB

4
1. Safety Instructions
WARNING! = potential risk of serious personal injury
CAUTION! = danger of damaging the heater or work piece
WARNING!
Induction heaters generate a magnetic induction field, which may affect or impair
medical devices such as pacemakers or hearing aids, resulting in a high risk of serious
bodily harm. Do not operate, or be within a suggested minimum distance of 5m (16ft)
of the machine while wearing such devices.
Hot work pieces may burn. Use supplied protective gloves when handling such work
pieces (suitable up to 150ºC (302ºF).
Do not operate an Induction heater in areas where there is a risk of an explosion.
Do not use the induction heater if the cord is damaged.
Proper maintenance and handling practices are critical. Failure to follow the user
manual instructions can result in equipment failure, creating a risk of serious bodily
harm.
CAUTION!
Sensitive electronic equipment (e.g. portable telephones, computers, watches, etc.) may be
affected by the magnetic field and should not be used within the vicinity of the heater.
Safety precautions
The user should have an appreciation of the contents of this manual, and be familiar with safe
workshop practices.
Follow the User Manual at all times.
Ensure that the machine operates at the correct supply voltage. If the heater has been
supplied without a plug, the connection to a power supply should only be made by a suitably
qualified person.
Do not use or store the heater in humid environments. Induction heaters are designed for
indoor use only.
On mobile models, always apply the brake when in a stationary position.
If the heater is equipped with sliding horizontal supports, always secure these with the
designated safety pin, either in the “in” or “out” position.
Use proper handling equipment, appropriate for the weight of the work piece or yoke.
Never support parts with a metal cable or have anything metallic hanging in the proximity of
the magnetic field. Extremely high currents can flow through the cable, causing the cable to
heat up.
Do not hold metal objects near the yokes and poles.
While heating keep at least 1 metre (3,3ft) distance from the heater.
Never remove the yokes during the heating cycle.
Do not modify the heater and do not use self-fabricated yokes.
Always check that the yoke is correctly adjusted to the poles otherwise excessive vibration
may occur.
Only switch the machine on when the yoke is positioned correctly –on models equipped with a
swing arm (or swivelling yoke), the arm should always be closed.
Note: Since our products are subject to continuous improvement, we reserve the right to make
changes.

5
Safety features
The heater will switch off automatically if the ambient temperature exceeds 70ºC (158ºF).
When using the temperature mode, the heater will switch off automatically if the rate of
temperature rise is too low.
On models equipped with a swing arm, the arm can be fixed in the open position.
Caution:
Induction bearing heaters work due to a magnetic field. Please always keep at least a meter
(39 IN) from the unit during operation. Bear in mind that this can influence electronic
equipment, e.g. watches, magnetic charts etc.
2. Introduction
2.1 Application
Induction Heaters are designed to heat bearings, bushings, gear wheels, couplings or other
metallic work pieces which form a closed electrical loop. This will facilitate mounting where an
interference fit is required.
The heaters are designed to heat the work piece up to a maximum temperature of 240ºC (464ºF),
with the exception of the PV2412 model where the temperature is limited to a maximum of 150ºC
(302ºF) and special custom-designed heaters where the maximum temperature can be as high as
480ºC (896ºF).
Induction heaters PV/PVH/SVH can be used on continuous basis. There is however a limitation;
do not operate heater at a temperature of 240°C (464°F) or more for more than half an hour. By
heating with the time function this has to be checked with an external temperature meter.
Caution:
Bearings generally should only be heated up to a maximum temperature of 120ºC (248ºF).
Precision bearings should only be heated up to a maximum temperature of 70ºC (158ºF).
Heating to higher temperatures may affect the metallurgical structure and dimensional stability
resulting in premature bearing failure or loss of bearing performance.
Do not use induction heaters for bearings or work pieces, which are outside the minimum, or
maximum dimensions as specified in the sales data sheet
Do not switch off the heater with the main switch while heating cycle is running
2.2 Operating conditions
Designed to be used in an industrial environment with an ambient temperature of 0ºC to 50ºC
(32ºF to 122ºF), and an atmospheric humidity of between 5% to 90%. The induction heater is
meant for indoor use only.
2.3 Principle of operation
The heater works in the same way as a transformer. The primary coil is the
heater and the secondary coil is the work piece.
When the heater is switched on, a high voltage, low alternating current passes
through the numerous windings of the primary coil. This induces a low voltage,
high current in the work piece acting as the secondary coil. This high current
results in the heating up of the work piece.
The current is only flowing in the work piece, hence it is only this which starts to
heat up. The work piece is automatically demagnetised at the end of each heating cycle.

6
3. Installation
Remove packing material and place the induction heater on a non-ferrous, stable, flat surface.
The box will normally contain the heater, a yoke or a set of yokes, the temperature probe, a
pair of heat-resistant gloves and a small container of lubricant.
Check that the supply voltage and current meet the specifications on the type plate to be found
on the back of the machine.
When the heater is not provided with a plug, a suitable plug has to be affixed by a qualified
electrician.
The wires should be connected as follows, there are 3 options depending on what type of
cable the heater is supplied with:
230V/120V induction heaters
Brown
Phase
Black
Phase
Blue
Neutral
White
Neutral
Green/yellow
Ground
Green
Ground
Black “1”
Neutral
Black “2”
Phase
Green/yellow
Ground
400, 450, 500V induction heaters
Brown
Phase
Brown
Phase
Blue
Phase
Black
Phase
Green/yellow
Ground
Green/yellow
Ground
Black “1”
Phase
Black “2”
Phase
Green/yellow
Ground
Make sure that the supply cable cannot come into contact with the bearing that is to be heated.
Insert the plug into a shockproof wall socket.
Make sure that the bright sides of the yoke are lubricated sufficiently (improve contact, avoid
excessive vibration) and are aligned on the top of poles. Use supplied lubricant.
Use the main switch to switch on the current. The machine will emit a short bleep and the
display will show a “pre-set goal temperature” set by the manufacturer.
Connect the temperature probe by inserting the plug in the socket. Make sure that –and +
correspond on both plug and socket
The induction heater is now ready to be used in the temperature function mode.

7
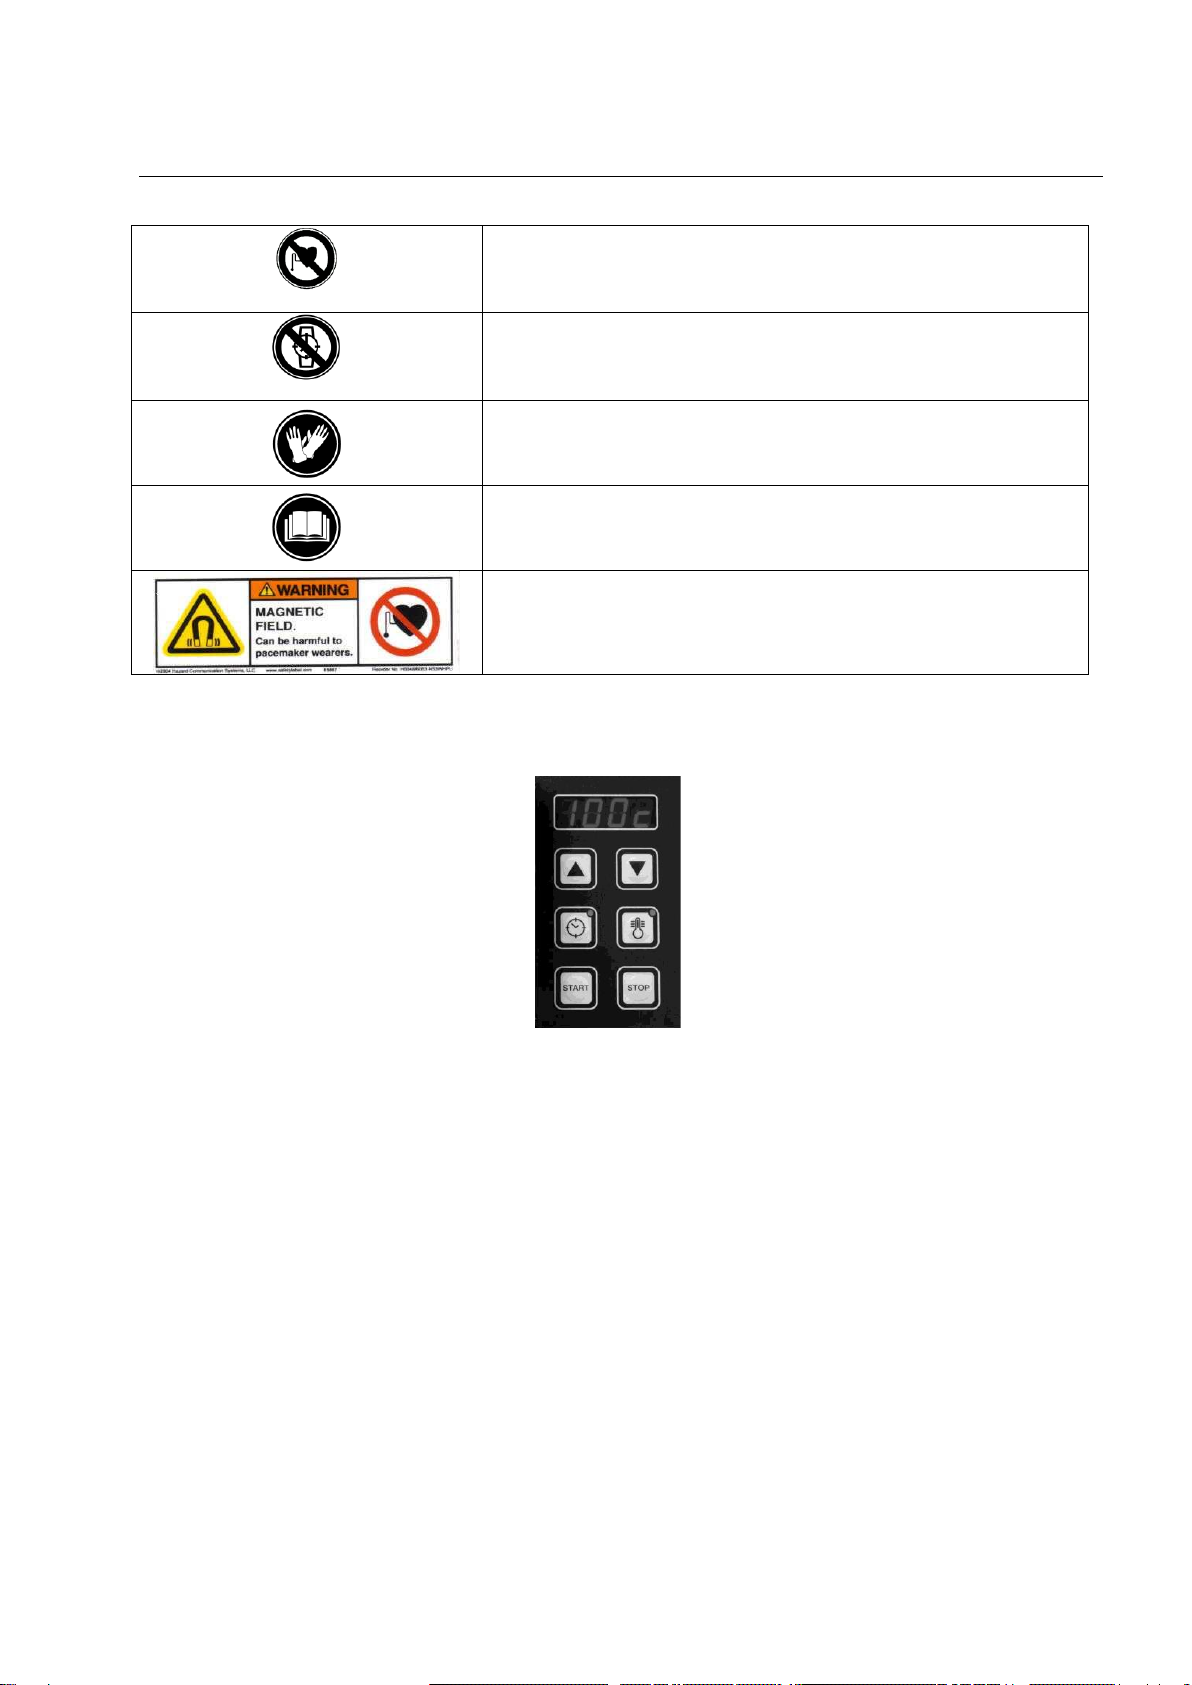
4. Symbols and Display
Symbols shown on the heater:
Prohibited for people with a pacemaker. Magnetic field may
have influence.
No watches or other metal objects allowed. Magnetic field
may have influence.
Use heat-resistant gloves
Read the instructions
Warning of Magnetic Field
Display:
Increase time/temperature -
Operate using Time Mode -
Start operation -
- Display: time or temperature
- Reduce time/temperature
- Operate using Temperature Mode
- Stop operation/automatic
demagnetisation
8
5. Setting up the Work Piece
WARNING!
Use appropriate hoisting equipment for heavy components and yokes. The manual
lifting of heavy objects is a common cause of injury.
The weight of the work-piece should not exceed the maximum weight shown in section
5.2 below. Exceeding these limits may result in catastrophic equipment failure leading
to personal injury.
If heater is equipped with sliding horizontal supports, always secure these with the
designated safety pin, in either the ‘in’ or the ‘out’ position. Unexpected movement of
the work piece may lead to personal injury.
Ensure that the power supply cable cannot come into contact with the work piece.
Damage to the cable may result in electrocution.
Never support components with a metal cable or have any cables hanging in the
proximity of the magnetic field. Extremely high currents can flow through the cable
causing it to heat up quickly, resulting in a risk of burning.
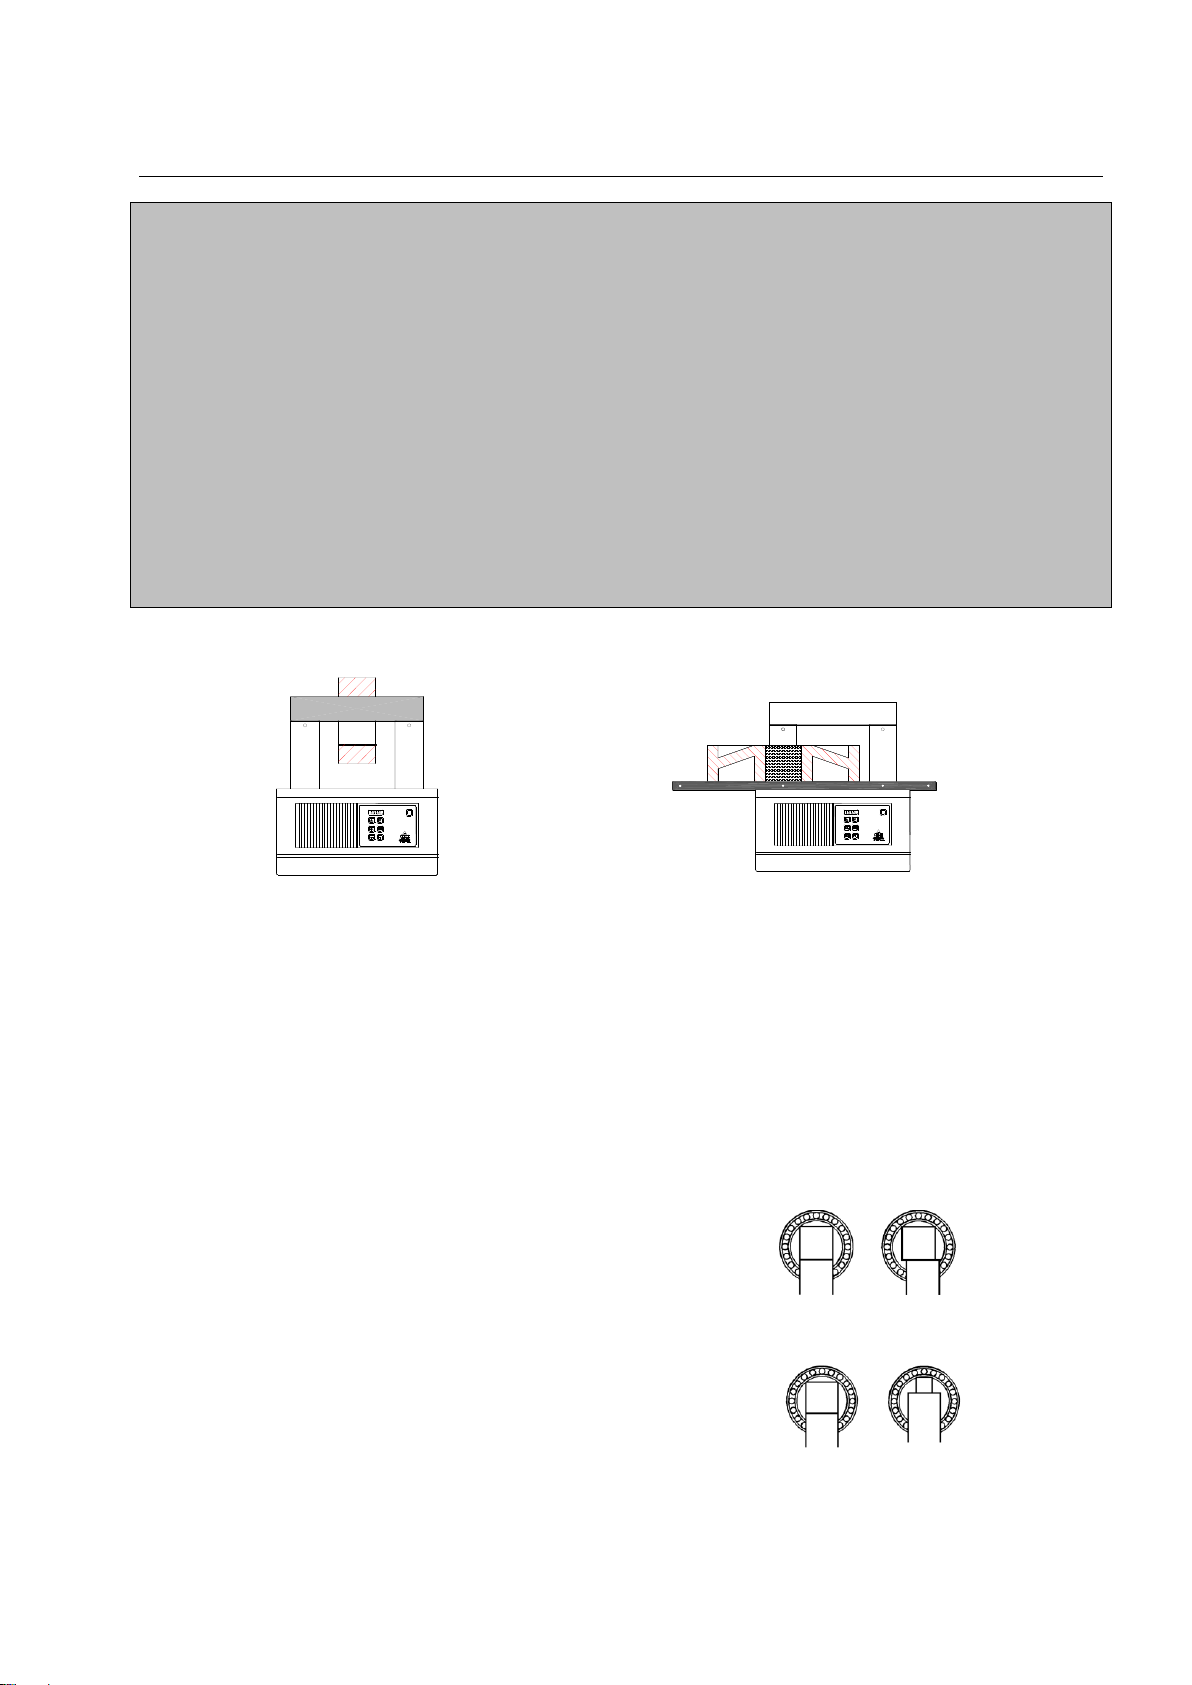
The work piece can be set up in two different ways:
Yoke passing through the work piece
Yoke in the horizontal position
(The bore is large enough for the pole to pass
through it. The work piece in this example is
shown resting on the horizontal supports).
Larger work pieces can be isolated from the environment by packing them in isolation material like
a welding cloth. This will keep the heat in the work piece and will avoid that the heat is transmitted
to the air.
5.1 Setting up the work piece where the yoke passes through it
Make sure that the bright sides of the yoke
are lubricated sufficiently (improve contact,
avoid excessive vibration) and are aligned
on the top of poles. Use supplied lubricant.
Correct Incorrect
Always choose a yoke, which fills the bore
of the bearings as fully as possible. You
can even combine 2 yokes - this helps to
heat more quickly & evenly.
Correct Incorrect
9
For Swing Arm Yokes: Swing the yoke out towards the front of the heater until it falls in the
positioning lock of the hinge construction. Slide the workpiece over the yoke till it lies in the
middle of the yoke and swing the yoke (with work piece mounted) back on top of the poles.
Always make sure that the workpiece has no direct contact with the plastic housing of the
heater.
When heating cycle is ready, follow the above instructions in opposite order to remove the
heated work piece. Wear protective clothing like heat resistant gloves because the workpiece
is hot now. (Supplied gloves are suitable for 150°C (302°F).
Always treat yokes carefully. Falling, jolting, etc, can damage them. Always put the yoke away
immediately after use
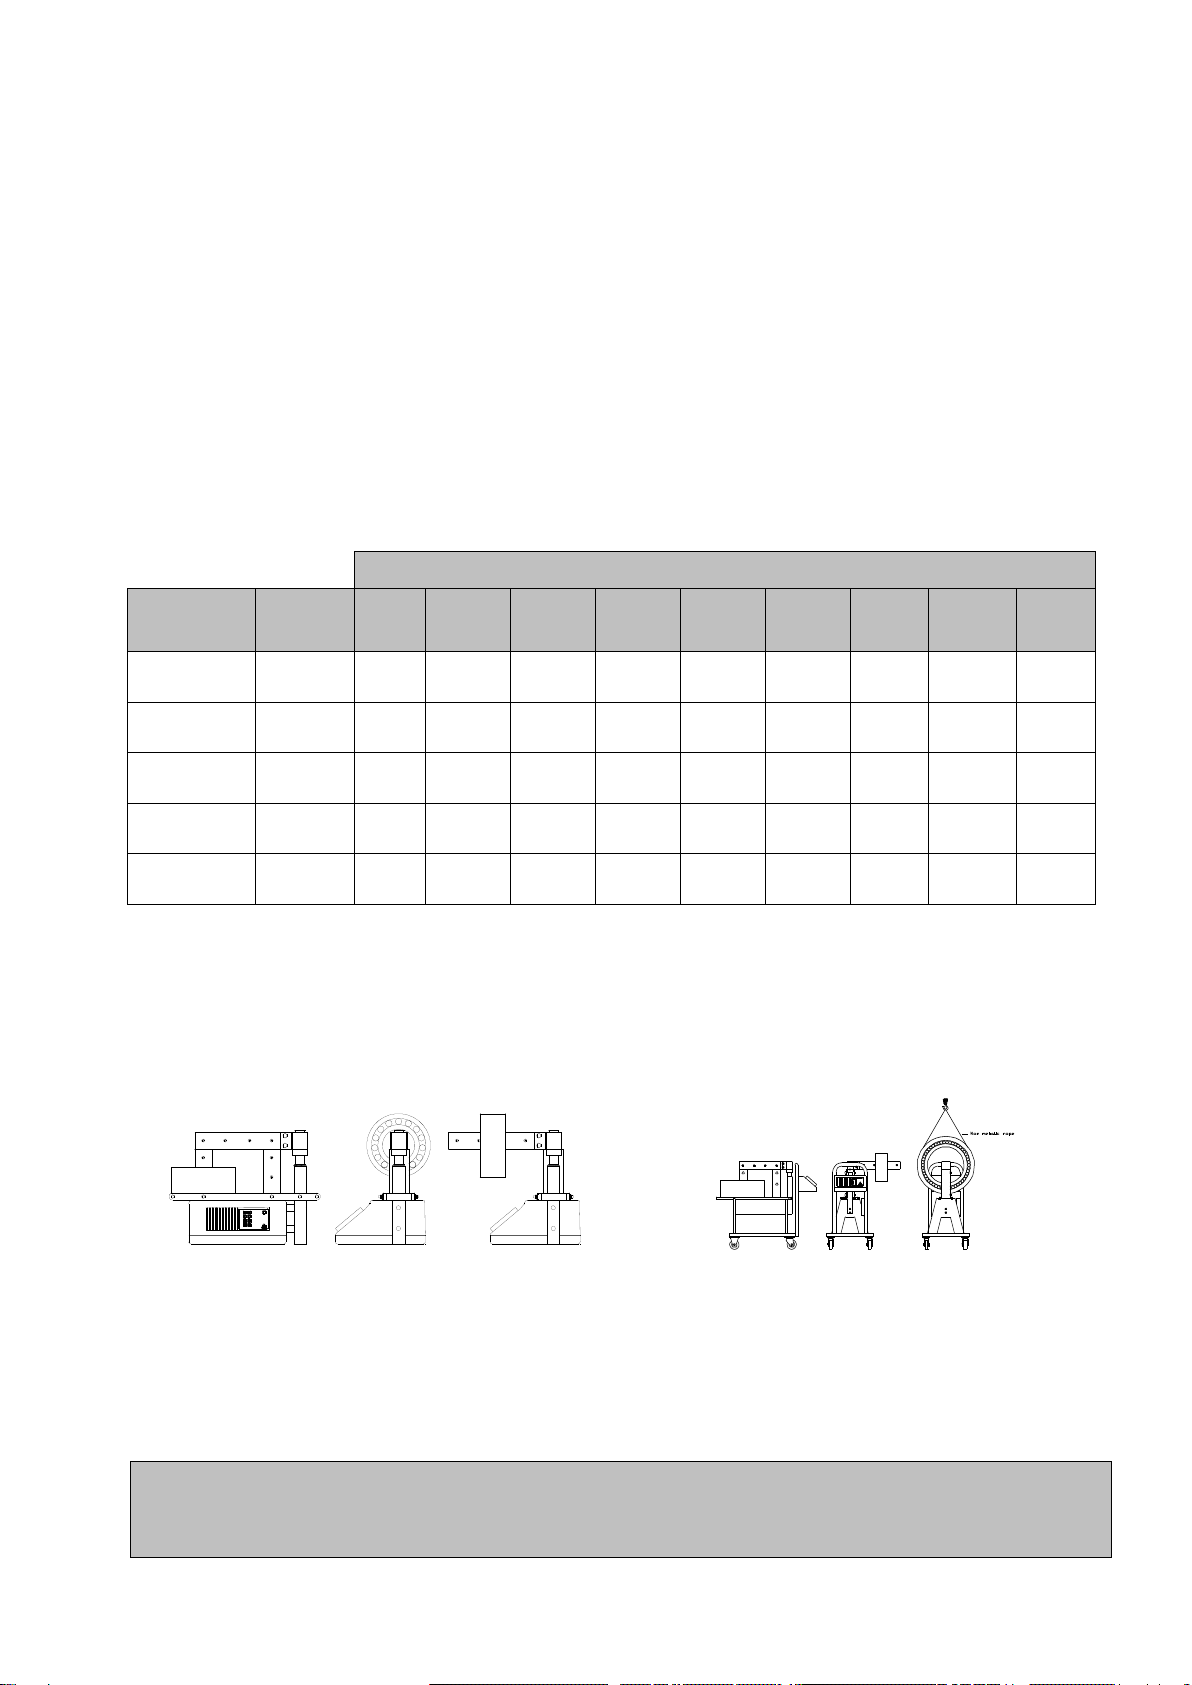
5.2. Maximum weights for PVH and SVH models
Table showing the maximum permitted weights on the horizontal supports & swiveling yokes:
Arm Yoke Size
Heater
Series
On Base
Supports
7mm/
1/4"
10mm/
3/8”
14mm/
9/16”
20mm
13/16”
30mm/
1-3/16“
40mm/
1-9/16“
60mm/
2-3/8“
70mm/
2-3/4“
80mm/
3-1/8“
PV2412
n/a
2 kg/
4,5 lb
3 kg/
6,52 lb
4 kg/
9lb
5 kg/
11 lb
n/a
15 kg/
33 lb
n/a
n/a
n/a
PVH3813
65 kg/
143 lb
2 kg/
4,5 lb
3 kg/
6,52 lb
4 kg/
9lb
5 kg/
11 lb
n/a
15 kg/
33 lb
n/a
n/a
n/a
SVH5223
150 kg/
330 lb
n/a
n/a
4 kg/
9lb
n/a
15 kg/
33 lb
n/a
45 kg/
99 lb
n/a
n/a
SV5020
150 kg/
330 lb
n/a
n/a
n/a
n/a
15 kg/
33 lb
n/a
n/a
50 kg/
110 lb
n/a
SVH7931
SVH7931M
350 kg/
770 lb
n/a
n/a
n/a
n/a
n/a
n/a
n/a
n/a
80 kg/
176 lb
To avoid the heater from tipping and damage to the yokes and the hinge construction, the
maximum weight for each size yoke is restricted.
Parts with a higher weight can rest on the horizontal supports (if fitted), or be supported by a
non-metallic rope from a crane, avoiding any weight on the yoke.
PVH3813 & SVH5223 & SV5020
SVH7931 & SVH7931M
CAUTION!
Always treat the yokes carefully. They can easily be damaged through dropping, jolting etc.
Always store the yokes immediately after use.

10
6. Magnetic Temperature Probe
Always use magnetic temperature probe (hereafter referred to as
the ‘probe’) for heating in the Temperature Mode.
The probe can be used as a temperature-control aid for heating in
the Time Mode.
The probe is suitable for operation up to a maximum temperature of 240ºC (464ºF) - special
probes are supplied with custom machines designed to operate above this temperature.
As a safety feature, the connection between magnet and probe will break above the maximum
temperature. If this occurs when operating in the Temperature Mode, the machine will turn
itself off since the probe will fail to register any increase in the temperature over a set period of
time.
A probe fixed to a clamp is also available when heating non-magnetic work pieces.
Ensure that the area where the probe is located is
completely clean.
Always place the probe as close as possible to the bore
of the work piece (see opposite).
Connect the probe by inserting the plug into the socket at
the back of the heater (the terminals have a different
orientation, so that the plug will only fit in one).
CAUTION!
Treat the probe with care. It is a valuable part of the heater and can easily be broken through
careless handling. After use, we suggest that it is placed on the side of the vertical pole.
Correct Incorrect

11
7. Operation
There are two modes of heating:
Temperature Mode:
Time Mode:
Used for controlled heating up to the
desired temperature.
Used when you wish to keep the work
piece at the desired temperature for up to
15 minutes.
Suitable for batch production. If the time
taken to heat the work piece to the desired
temperature is known.
Emergency use if the temperature probe is
lost or defective. The temperature of the
work piece should be checked using an
external thermometer.
7.1 Using the Temperature Mode (Default mode whenever the machine is switched on)
Set up the work piece and probe according to the instructions in sections 5 & 6.
Switch the machine on. The display will show 100c (or 100F). Enter the desired temperature
to which the work piece will be heated up to using the ‘▲’ or ‘▼’ key (by pressing the
temperature mode key () you can choose between steps of 1º or 10º - this is the
same whether working in C or F).
Press the ‘START’ key. Heating starts and a soft buzzing sound will be heard.
The current temperature of the work piece appears on the display. When the desired
temperature has been reached, the display starts to blink and a loud beeping is emitted.
Unless you press the ‘STOP’ key, the heat-retention function will keep the bearing at that
temperature for 5 minutes. The machine resumes heating after a temperature drop of 3º (C or
F). When the set temperature is reached once more the induction heater emits a loud beep.
Press the ‘STOP’ key to switch off the machine.
Pressing the ‘STOP’ key always causes automatically demagnetisation.
The heating process or the heat-retention function can be interrupted at any time by pressing
the ‘STOP’ key.
7.2 Using the Time Mode
Set up the work piece and temperature probe according to the instructions in sections 5 & 6
(the temperature probe is only necessary if you want to check the temperature).
Switch the machine on and press the time mode key ‘ ‘. Press the ‘▲' or ‘▼’ key to set the
desired time (by pressing the time mode key ' ' you can choose between steps of one
minute or one second).
Press the ‘START’ key. Heating starts and a soft buzzing sound will be heard.
If the temperature key ‘‘is pressed while heating, the current temperature is displayed for 3
seconds. After that the countdown is resumed.
During the heating process the set time runs to 00:00. When 00:00 is reached the induction
heater switches off. The work piece is then automatically demagnetised and a loud continuous
beeping is emitted. Press the ‘STOP’ key to switch off the machine.
7.3 Work piece removal
After pressing the ‘STOP’ key, place the probe on the side of the vertical pole. Pressing the
‘STOP’ key always causes the work piece to be automatically demagnetised.
Using the supplied heat-resistant gloves grip the yoke with the bearing on it and place it on
a clean, heat-resistant surface. Mount the bearing immediately to prevent cooling. If using a
model with a swing arm, swivel the yoke with the bearing on it into the fixed, open position (at
45º). Slide the bearing from the yoke. Mount the bearing immediately to avoid heat loss.

12
7.4 Malfunctioning
If the temperature of the work piece fails to increase by 1º (either C or F) within a set time-
span, the heater switches off automatically. Four blinking dashes will appear (----) in the
display, and a loud intermittent beep is emitted. Press the ‘STOP’ key to stop the beeping and
check whether:
the probe is still attached to the work piece, and is connected correctly into its socket.
the probe wiring has been damaged.
the probe surface is clean.
the heater capacity is too small for the work piece.
If the probe is defective, the Time Mode can still be used. The temperature should be checked
using an external thermometer.
If a loud vibrating noise is heard, first check to see that the contact surfaces of the yokes are
greased sufficiently. Then check to see that the yoke is making optimal contact with poles. (To
adjust yokes: Place yoke on heater, unscrew the bolts in the yoke ¼ turn. Switch on heater
and the yoke will set itself. Re-tighten the bolts. You can also use a nylon hammer as an aid to
reposition the laminates).
7.5 The Induction heater can be used in °C or °F.
To change this follow steps:
Press the temperature button for 10 seconds, you will hear a short “bleep”.
Then wait, after another 10 seconds a second “bleep” will sound and in the display the
temperature mode will switch from Celsius to Fahrenheit or vice versa.
The heater is now ready for use in the newly set temperature mode.
WARNING!
If in any doubt, isolate the machine and contact your local distributor.
8. Cleaning and Maintenance
Store in a dry, frost-proof area, free from humidity.
Keep clean with a soft, dry cloth.
Keep the contact parts of the poles clean. Grease regularly with an acid-free grease for
optimal contact with the yokes and to prevent corrosion (on swing-arm models, also grease the
vertical pin regularly).
Contact your supplier if there is any suspicion of malfunctioning.
WARNING!
Proper maintenance and handling practices are critical. Failure to follow installation
instructions and to maintain proper lubrication can result in equipment failure, creating
a risk of serious bodily harm.

13
Table des matières
1. Consignes de sécurité 14
2. Introduction 15
2.1 But d'utilisation
2.2 Conditions d'utilisation
2.3 Conseils d'utilisation
3. Installation 16
4. Explication des symboles et affichage 17
5. Installation 18
5.1. Installation de la pièce à chauffer
5.2. Charges maximales pour les modèles à bras pivotant
6. La sonde magnétique de température 20
7. Fonctionnement 20
7.1 Utilisation du mode Température
7.2 Utilisation du mode Durée
7.3 Dépose de la pièce usinée
7.4 Fonctionnement défectueux
7.5 Modification de Celsius à Fahrenheit
8. Nettoyage et entretien 22
F

14
1. Consignes de sécurité
AVERTISSEMENT! = Risque potentiel de blessures pour l’utilisateur
PRUDENCE! = Risque d’endommager l’appareil ou la pièce à chauffer
AVERTISSEMENT!
Les chauffages par induction génèrent un champ magnétique susceptible d’altérer le
fonctionnement d’appareils médicaux comme des pacemaker ou des prothèses
auditives. Il est conseillé de rester à distance (5 mètres /16 ft) de l’appareil si vous
portez de tels appareils.
Les pièces chauffées peuvent générer des brûlures. Utilisez les gants de protection
fournis quand vous manipulez de telles pièces (valables jusqu’à 150°C / 302° F)
Ne pas utiliser de chauffage par induction dans les zones où le risque d’explosion
existe ou, si le câble d’alimentation est endommagé.
Les opérations de maintenance et de manutention de cet appareil sont dangereuses.
Ne pas respecter le présent manuel peut entraîner des pannes ou des
disfonctionnements, créant un risque d’accident.
PRUDENCE!
Les équipements électroniques sensibles (ex: téléphones portables, ordinateurs, montres…)
peuvent être endommagés par le champ magnétique et ne doivent pas être utilisés près du
chauffe roulement.
Consignes de sécurité
L’utilisateur doit connaître le contenu de ce manuel et se familiariser avec des pratiques de
travail sures en atelier.
Suivez toujours les consignes du manuel de l’utilisateur.
Vérifiez que la machine soit alimentée à la tension adéquate. Si le chauffe roulement
a été vendu sans prise d’alimentation, faites-en fabriquer une par un électricien qualifié.
N’utilisez jamais et ne rangez jamais le chauffe-roulement dans un endroit humide. Les
appareils de chauffage à induction de Betex ne peuvent être utilisés qu’à l’intérieur.
Lorsque les modèles mobiles sont en position d’arrêt, enclenchez toujours le frein.
Si le chauffe-roulement est équipé de supports horizontaux coulissants, bloquez toujours ces
derniers à l’aide de la goupille de sécurité, en position “in “ comme en position “out”.
Utilisez un équipement de manipulation adéquat pour le poids de la pièce usinée ou du
barreau.
Ne soutenez jamais les pièces avec un câble métallique et ne laissez jamais un objet
métallique pendre à proximité du champ magnétique. Des courants électriques très élevés
passent à travers le câble, entraînant ainsi son réchauffement.
Ne tenez jamais d’objets métalliques à proximité des barreaux et des montants métalliques.
Lorsque l’appareil est en chauffe, restez à au moins 1 mètre de distance.
Ne retirez jamais les barreaux durant le cycle de réchauffement.
Ne modifiez jamais le chauffe-roulement et n’utilisez jamais des barreaux que vous avez
fabriqués vous-même.
Vérifiez toujours que le barreau soit correctement ajusté par rapport aux montants métalliques
car le contraire pourrait entraîner des vibrations excessives.
N’allumez la machine que lorsque le barreau est correctement placé –sur les
modèles équipés d’un bras pivotant (ou d’un barreau pivotant), le bras doit toujours être fermé.
Remarque : Nos produits faisant continuellement l’objet d’améliorations, nous nous réservons le
droit de les modifier.

15
Dispositifs de sécurité
Le chauffe-roulement s’arrête automatiquement lorsque la température ambiante dépasse
70°C / 158°F.
Si le chauffe-roulement fonctionne en mode température, il s’arrête automatiquement si le taux
d’augmentation de la température est trop faible.
Le bras pivotant des modèles en étant équipés peut être maintenu en position ouverte
Avertissement:
Nous conseillons aux personnes de se tenir à une distance de sécurité d’au moins 1
mètre (39 In) de l’appareil. La machine fonctionne par le biais d’un champ d’induction.
N’oubliez pas que ce dernier peut affecter l’équipement électronique, tel que les montres,
les cartes magnétiques, etc.
2. Introduction
2.1 Utilisation
Les chauffe-roulements à induction BESSEY servent à chauffer les roulements, les bagues, les
engrenages et autres pièces métalliques formant un circuit électrique fermé. Ce réchauffement
facilite toute opération d’ajustement avec serrage.
Les appareils servent à chauffer la pièce jusqu’à une température maximale de 240°C(464ºF), à
l’exception des modèles de la série PV2412 pour lesquels la température ne dépasse pas 150°C
(302ºF) et les modèles personnalisés dont la température maximale peut aller jusqu’à 480°C
(896ºF)..
Les chauffe-roulements PV/PVH/SVH peuvent être utilisés de manière continue. Cependant, ne
faites jamais fonctionner l’appareil à une température supérieure ou égale à 240°C (464°F)
pendant plus d’une demi-heure. Si vous chauffez la pièce en mode durée, la température doit être
vérifiée à l’aide d’un thermomètre externe.
PRUDENCE :
- En général, les roulements ne peuvent être chauffés qu’à une température maximale de 120°C
(248ºF).
- Les roulements de précision ne peuvent être chauffés qu’à une température maximale de 70°C
(158ºF). Tout réchauffement à des températures supérieures peut affecter la structure
métallurgique et la stabilité dimensionnelle des roulements, entraînant leur défaillance prématurée
ou affectant leurs performances.
- N’utilisez jamais d’appareils de chauffage par induction pour les roulements ou les pièces dont
les dimensions ne sont pas conformes aux dimensions minimales ou maximales spécifies dans
les données techniques.
N’éteignez jamais l’appareil à l’aide de l’interrupteur principal durant le déroulement d’un cycle de
chauffage.
2.2 Conditions d’exploitation
Ces appareils sont conçus pour utilisation dans un environnement industriel, à une température
ambiante de 0oC à 50oC (32ºF to 122ºF) et à un taux d’humidité atmosphérique allant de 5 à 90
%. Le chauffe-roulement par induction ne peut être utilisé qu’à l’intérieur.
2.3 Principes de fonctionnement
Le chauffe-roulement fonctionne de la même façon qu’un transformateur. La bobine principale
correspond au chauffe-roulement et la deuxième bobine à la pièce à chauffer.
16
Lorsque l’appareil est sous tension, un courant alternatif faible à forte
tension passe dans toute la bobine principale. Cela transmet un courant élevé à faible tension
dans la pièce à chauffer qui joue le rôle de bobine secondaire. Ce courant élevé chauffe la pièce.
Comme le courant ne circule que dans la pièce, cette dernière est donc la seule à chauffer. La
pièce est automatiquement démagnétisée à la fin de chaque cycle de chauffage.
3. Installation
Retirez l’emballage et placez le chauffe-roulement sur une surface plate, stable et non
ferreuse.
La boîte contient généralement le chauffe-roulement, un barreau ou un jeu de barreaux, la
sonde de température, une paire de gants résistant à la chaleur et une petite fiole de lubrifiant.
Vérifiez que la tension d’alimentation et l’intensité du courant sont conformes aux
spécifications de la plaque située à l’arrière de la machine.
Comme il existe de nombreux types de branchements, tous les chauffe roulements à induction
de Betex ne sont pas fournis avec une prise. Si c’est votre cas, un électricien qualifié peut
vous en fabriquer une. Les fils doivent être connectés selon une des 3 options suivantes, en
fonction du type de câble fourni avec le chauffe-roulement :
Appareils 230V/120V
Marron
Phase
Noir
Phase
Bleu
Neutral
Blanc
Neutral
Vert/jaune
Masse
Vert
Masse
Noir “1”
Neutral
Noir “2”
Phase
Vert/jaune
Masse
Appareils 400, 450, 500V
Marron
Phase
Marron
Phase
Bleu
Phase
Noir
Phase
Vert/jaune
Masse
Vert/Jaune
Masse
Noir “1”
Phase
Noir “2”
Phase
Vert/jaune
Masse
Assurez-vous que le câble d’alimentation ne peut pas entrer en contact avec le roulement
devant être chauffé. Branchez la prise de l’appareil sur une prise murale résistant aux
décharges électriques.
Vérifiez que les côtés brillants de barreau sont suffisamment graissés (ce qui améliore le
contact et empêche les vibrations excessives) et sont alignés sur la partie supérieure des
montants métalliques. Utiliser un lubrifiant fourni.
Mettez l’appareil sous tension au moyen de l’interrupteur principal. La machine émet un court
signal sonore et son écran affiche un “objectif de température préétabli” par le fabricant.
Connectez la sonde de température en branchant la fiche dans sa prise. Faites correspondre
le –et le + des prises mâle et femelle.
Le chauffe-roulement par induction peut désormais être utilisé en mode température
17
4. Explication des symboles et affichage
Interdit pour les personnes portant un stimulateur
cardiaque. Le champ magnétique peut avoir des
conséquences.
Objets métalliques ou montres non autorisés. Le champ
magnétique peut avoir des conséquences.
Gants isolants obligatoires
Lire les instructions
Attention aux champs magnétiques
Affichage:
Augmentation de la temps/température -
Fonction temps -
Démarrage, met en route le cycle de
chauffage en fonction -
- indiquant la temps ou température exact
- diminution de la température/temps
- Fonction température
- arrêt, termine le cycle de chauffage et
assure la démagnétisation

18
5. Installation de la pièce à chauffer
AVERTISEMENT !
• Utilisez un matériel de levage adéquat pour les composants et les barreaux lourds. Le
levage manuel d’objets lourds cause souvent des blessures.
• Le poids de la pièce à chauffer ne doit pas dépasser le poids maximum cité à la section
5.2 ci-dessous. Si ces limites venaient à être dépassées, une défaillance catastrophique
de l’équipement pourrait entraîner des blessures corporelles.
• Si le chauffe-roulement est équipé de supports horizontaux coulissants, bloquez-les
toujours à l’aide de la goupille de sécurité adéquate, en position “in” comme en position
“out”. Un mouvement inattendu de la pièce à chauffer peut entraîner des blessures
corporelles.
• Vérifiez que le câble d’alimentation du secteur ne peut pas entrer en contact avec la
pièce à chauffer. Tout endommagement du câble peut entraîner une électrocution.
• Ne soutenez jamais les pièces au moyen d’un câble métallique et ne laissez jamais un
objet métallique pendre à proximité du champ magnétique. Des courants électriques très
élevés pourraient circuler dans le câble, causant ainsi son réchauffement rapide et des
brûlures éventuelles.
La pièce à chauffer peut être installée de deux façons différentes :
De manière à ce que le barreau
traverse la pièce à chauffer
De manière à ce que le barreau soit en
position horizontale
(L’alésage est assez grand pour que le montant
métallique puisse le traverser. Dans cet exemple,
la pièce usinée est posée sur des supports
horizontaux)
5.1 Installation de la pièce à chauffer de manière à ce qu’elle soit traversée par le barreau
Vérifiez que les côtés brillants de barreau sont suffisamment
graissés (ce qui améliore le contact et empêche les vibrations
excessives) et sont alignés sur la partie supérieure des montants
métalliques. Utiliser un lubrifiant fourni.
Correct Incorrect
Choisissez toujours un barreau qui remplit le plus possible
L’alésage du roulement. Vous pouvez même combiner 2
Barreaux –ce qui permet de chauffer la pièce plus
Rapidement et de manière plus uniforme.
Correct Incorrect

19
Cas des barreaux pivotant : Faites tourner le barreau vers la partie avant du chauffe-
roulement, jusqu’à ce qu’elle s’emboîte dans la charnière. Faites glisser la pièce à chauffer
jusqu’à ce qu’elle se trouve au milieu du barreau et faites pivoter ce dernier, ainsi que la pièce,
sur la partie supérieure des montants métalliques.
Faites en sorte que la pièce à chauffer n’entre jamais en contact direct avec le boîtier en
plastique du chauffe-roulement.
Lorsque le cycle de chauffage est terminé, suivez les instructions précédentes, dans l’ordre
inverse, pour retirer la pièce chauffée. Portez des vêtements protecteurs, tels des gants
résistant à la chaleur, car la pièce est désormais chaude. (Les gants fournis peuvent supporter
des températures allant jusqu’à 150°C / 302°F.)
Manipulez toujours les barreaux avec soin car. Toute chute ou secousse peut les
endommager. Rangez toujours les barreaux après les avoir utilisés.
5.2 Poids maximum pour modèles PVH and SVH
Cette table indique le poids maximum sur les supports horizontaux et sur les différents bras
pivotant :
Bras
Appareil
Support
s
20mm/
13/16 In
30 mm/
1-3/16 In
40mm/
1-9/16 In
50 mm/
2 in
60 mm/
2-3/8 In
70 mm/
2-3/4 In
80 mm/
3-1/8 In
PVH
65 kg/
143 lb
5 kg/
11 lb
10 kg/
22 lb
15 kg/
33 lb
20 kg/
44 lb
25 kg/
55 lb
n/a
n/a
SVH
150 kg/
330 lb
10 kg/
22 lb
15 kg/
33 lb
25 kg/
55 lb
40 kg/
88 lb
45 kg/
99 lb
n/a
n/a
SV5020
150 kg/
330 lb
10 kg
15 kg
25 kg
40 kg
n/a
n/a
n/a
SVH7931
SVH7931M
350 kg/
770 lb
n/a
n/a
n/a
n/a
n/a
n/a
80 kg
Pour éviter que le chauffe-roulement ne bascule et que les barreaux et les charnières ne
soient endommagés, le poids maximum de chaque taille de barreau est limité.
Les pièces plus lourdes peuvent reposer sur des supports horizontaux (s’ils sont compatibles)
ou peuvent être soutenues par une corde non métallique, attachée à une grue, ce qui leur
évite de peser sur le barreau.
PVH3813 & SVH5223 & SV5020
SVH7931 & SVH7931M
PRUDENCE!
Toujours prendre soin des barreaux. Ils peuvent facilement être endommagés lors d’opération
de manutention. Toujours les ranger immédiatement après utilisation.

20
6. La Sonde de Température magnétique
Utilisez toujours la sonde magnétique de température (nommée la «
sonde » ci-après) pour chauffer la pièce en mode Température.
Cette sonde peut être utilisée comme un élément de contrôle de la
température lors du réchauffement de la pièce en mode Durée.
La sonde peut être utilisée à une température maximale de 240°C /
464°F alors que les machines personnalisées, fonctionnant à des
températures supérieures, sont dotées de sondes spéciales.
Pour raisons de sécurité, la connexion entre l’aimant et la sonde est interrompue lorsque la
température dépasse la température maximale autorisée. Si cela se produit lorsque
l’appareil fonctionne en mode Température, la machine s’arrête automatiquement puisque
la sonde ne peut plus enregistrer de hausse de température durant une durée déterminée.
Lorsque vous chauffez des pièces non magnétiques, vous pouvez aussi utiliser une sonde
attachée à une pince.
Vérifiez seulement que la sonde est installée dans un endroit très propre.
Placez toujours la sonde le plus près possible de l’alésage de la pièce usinée (consultez le
diagramme ci-contre).
Connectez la sonde en insérant la fiche mâle dans la prise
femelle à l’arrière du chauffe-roulement (les bornes sont
orientées différemment afin que la fiche ne puisse pénétrer
que d’une seule manière –les modèles de la gamme VHIN10
sont équipés d’une sonde connectée de manière permanente). Correct Incorrect
PRUDENCE!
Manipuler la sonde avec précaution: c’est un élément vulnérable de l’appareil. Après
utilisation, placez la sonde sur le côté du pôle vertical.
7. Fonctionnement
Il existe deux modes de chauffage :
Mode Température :
Mode Durée :
• Utilisé pour un réchauffement contrôlé
jusqu’à la température désirée.
• Utilisez ce mode lorsque vous désirez que la
pièce usinée reste à une température désirée
pendant 15 minutes maxi.
• À utiliser pour la production par lot.
Utilisez ce mode si vous connaissez la durée
nécessaire au réchauffement de la pièce
jusqu’à la température désirée.
• Utilisez ce mode en cas d’urgence, si vous
avez perdu la sonde de température ou que
cette dernière ne fonctionne pas. La
température de la pièce usinée doit alors être
vérifiée au moyen d’un thermomètre externe.
7.1 Utilisation du mode Température (Mode par défaut lorsque la machine est sous tension)
Préparez la pièce et la sonde en fonction des instructions des sections 5 et 6.
Mettez la machine sous tension. L’écran affiche 100°C (or 100°F) À l’aide des touches ‘▲’ ou
‘▼, saisissez la température à laquelle vous désirez chauffer la pièce (en appuyant sur la
touche du mode température [·], vous pouvez choisir entre des incréments de 1o ou de 10o,
que vous travailliez en degrés Celsius ou Fahrenheits).
Appuyez sur la touche ‘START’ Le cycle de chauffe démarre et fait entendre un faible
bourdonnement.
This manual suits for next models
9
Table of contents
Languages:
Other Bessey Heater manuals


Popular Heater manuals by other brands


Eterna
Eterna CONVHTSTD installation instructions

EUROM
EUROM GOLDEN 1500 Comfort RC manual

Frico
Frico Thermozone SF WL Series Assembly and operating instructions

ECG
ECG TK 2010 TC operating manual

Somogyi Elektronic
Somogyi Elektronic home FK 23 instruction manual

Dimplex
Dimplex SIV20 operating instructions


