manuals.online logo
Brands
  1. Home
  2. •
  3. Brands
  4. •
  5. BEST EXPERIENCE
  6. •
  7. Indoor Furnishing
  8. •
  9. BEST EXPERIENCE Springs Window Fashions Cellular Skylight... Instruction sheet

BEST EXPERIENCE Springs Window Fashions Cellular Skylight... Instruction sheet

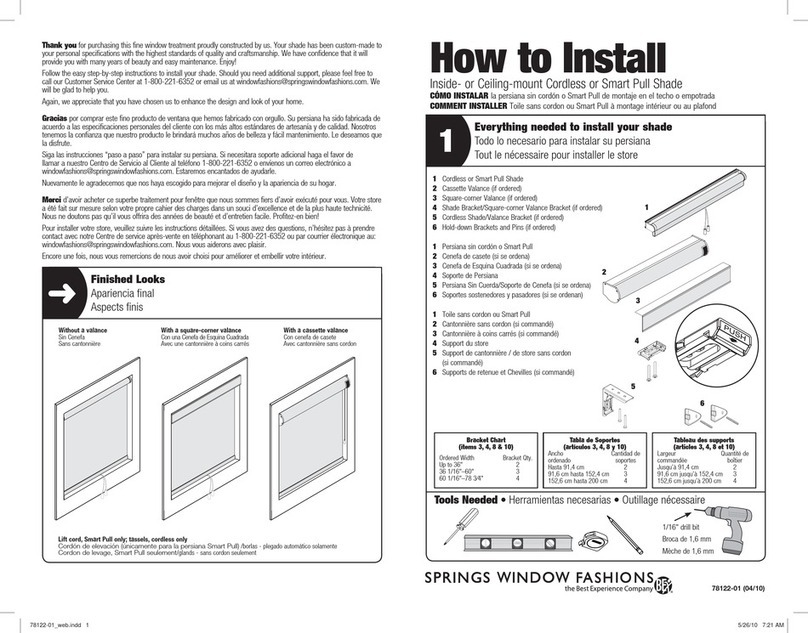
Thank you for purchasing this fine window treatment proudly constructed by us. Your shade has been custom-sized
to your personal specifications with the highest standards of quality and craftsmanship. We have confidence that it will
provide you with many years of beauty and easy maintenance. Enjoy!
Follow the easy step-by-step instructions to install your shade. Should you need additional support, please feel free to
call our Customer Service Center at 1-800-221-6352 or email us at [email protected]. We
will be glad to help you.
Again, we appreciate that you have chosen us to enhance the design and look of your home.
Gracias por adquirir este fino tratamiento de ventana orgullosamente fabricado para usted. Su cortina ha sido hecha
a la medida del cliente según sus especificaciones personales con los más altos estándares de calidad y trabajo
artesanal. Nosotros tenemos la confianza que le proveerá muchos años de belleza y fácil mantenimiento. ¡Disfrútela!
Siga las fáciles instrucciones “paso a paso" para instalar su cortina. Si necesita ayuda adicional, favor de proceder con
toda libertad llamando al Centro de Servicio al Cliente al teléfono 1-800-221-6352 o enviando un correo electrónico
a [email protected]. Estaremos muy dispuestos para ayudarle.
Nuevamente, nosotros apreciamos que nos haya escogido para mejorar el diseño y la apariencia de su hogar.
Merci d’avoir acheté ce superbe traitement de fenêtre que nous sommes fiers d’avoir exécuté pour vous. Votre
store a été fait sur mesure selon votre propre cahier des charges dans un souci d’excellence et de la plus haute
technicité. Nous ne doutons pas qu’il vous offrira des années de beauté et d’entretien facile Profitez-en bien!
Pour installer votre store, veuillez suivre les instructions détaillées. Si vous avez des questions n’hésitez pas à
prendre contact avec notre Centre de service après-vente en téléphonant au 1-800-221-6352 ou par courrier
électronique au [email protected]. Nous vous aiderons avec plaisir.
Encore une fois, nous vous remercions de nous avoir choisi pour améliorer et embellir votre intérieur.
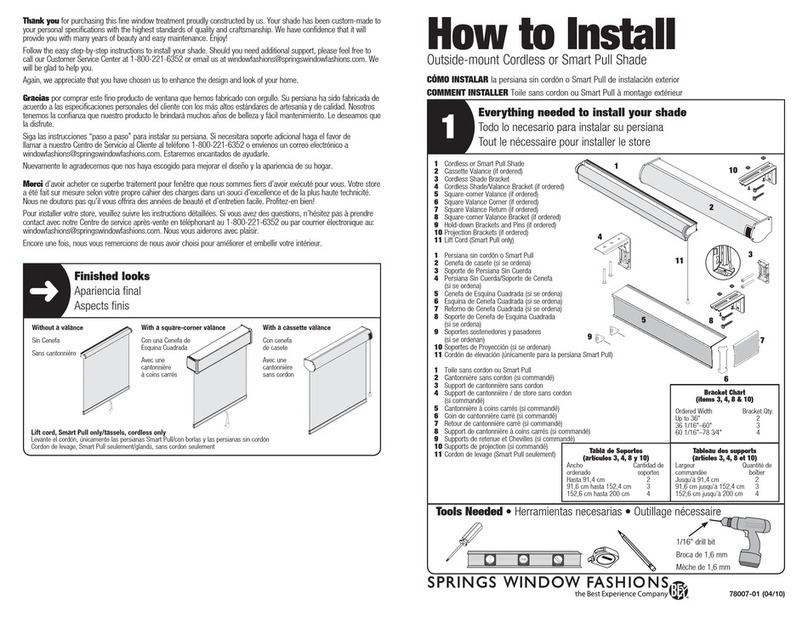
How to Install
Finished look
Apariencia Final
Aspect fini
➜
1 Skylight Shade
2Brackets
3 Side Rails
4 Screws, Nut and Bolt
1 Cortina de Tragaluz
2Soportes
3 Rieles Laterales
4 Tornillos, Tuercas y Pernos
1 Store de lucarne
2Supports
3 Tringles latérales
4 Vis, boulon et écrou
5/64" drill bit
Broca de 5/64"
Mèche de 5/64"
1Everything needed to install your shade
Todo lo necesario para instalar su cortina.
Tout le nécessaire pour installer votre store
Tools Needed • Herramientas necesarias • Outillage nécessaire
Outside-mount Cellular or Pleated Skylight Shade
CÓMO INSTALAR la Cortina de Tragaluz de Montaje Exterior
COMMENT INSTALLER un store de lucarne en pose extérieure
Bracket Chart
Tabla de Soportes
Tableau des supports
Ordered Width Bracket Qty.
Ancho ordenado Cantidad de soportes
Largeur commandée Quantité de boîtier
12 3/4"–42" 2
42 1/16"–61" 3
1
4
2
3
Single Cell
Celda Sencilla
Cellulaire simple
Double Cell
Celda Doble
Cellulaire double
Pleated
Plisada
Plissé
Note: Shades over 30" wide have
a center support cord. Do not cut.
Nota: Las cortinas mayores de 30"
de ancho tienen una cuerda de
soporte en el centro. No La Corte.
Nota : Les stores de plus de 30"
de largeur sont munis d’un cordon
de soutien central. Ne pas couper.
WEB 78119-00 (9/09)
6
Mount shade in brackets
Monte la cortina en los soportes
Poser le store dans les supports
Remove insert from bottomrail
Remueva el objeto insertado del riel inferior
Retirer la garniture intérieure de la barre inférieure
2
Gently remove the insert from the channel in the bottomrail, revealing the spring
tension components. Keep insert. Remove tape securing the components.
Remueva suavemente el objeto insertado del canal del riel inferior, revelando los
componentes del resorte de tensión. Guarde el objeto insertado. Remueva la cinta
adhesiva que asegura los componentes.
Retirer doucement la garniture intérieure de la rainure de la barre inférieure, en
faisant apparaître les pièces du ressort de tension. Conserver la garniture. Enlever
le ruban adhésif maintenant les pièces.
Hold shade in desired location, level and mark
Sostenga la cortina en la ubicación deseada, nivele y marque
Tenir le store à l’emplacement souhaité, mettre à niveau et marquer
3
Measure and mark bracket locations
Mida y marque la ubicación de los soportes
Mesurer et marquer l’emplacement des supports
4
Measure in 4" from the marks made in step 3. Hold brackets up to the marks and
mark screw locations. If shade is larger than 42", mark center for third bracket.
Mida 4" desde las marcas hechas en el paso 3. Sostenga los soportes hasta
donde están las marcas y marque la ubicación de los tornillos. Si la cortina es más
larga que 42", marque el centro para un tercer soporte.
Mesurer 4" à partir des marques faites à l’étape 3. Tenir les supports sur les
marques et marquer l’emplacement des vis. Si le store fait plus de 42", marquer le
centre pour le troisième support.
4" 4"
5Drill holes and mount brackets
Taladre los agujeros y monte los soportes
Percer les trous et monter les supports
SNAP! • ¡Conecte! • Snap! SNAP! • ¡Conecte! • Snap!
WEB 78119-00 (9/09)
Springs Window Fashions • Middleton, WI 53562-1096
Hold bottomrail level under window opening and mark
Sostenga el riel inferior a nivel por debajo de la abertura de la ventana y marque
Tenir la barre inférieure à niveau sous l’ouverture de la fenêtre et marquer
7
Measure and mark bracket locations
Mida y marque la ubicación de los soportes
Mesurer et marquer l’emplacement des supports
8
10 Mount bottomrail in brackets
Monte el riel inferior en los soportes
Monter la barre inférieure dans les supports
9Drill holes and mount brackets
Taladre los agujeros y monte los soportes
Poser le store dans les supports
Remove tie securing shade and adjust tension
Remueva el sujetador que asegura la cortina y ajuste la tensión
Défaire le nœud maintenant le store et régler la tension
11
Remove the tie securing shade and check the cord tension. If the tension is too
loose, move the tension plate in the bottomrail away from the spring. If it is too
tight, move the tension plate toward the spring.
Remueva el sujetador que sostiene la cortina y compruebe la tensión de la cuerda.
Si la tensión es muy floja, mueva la placa de tensión del riel inferior alejándola del
resorte. Si es muy apretado, mueva la placa de tensión hacia el resorte.
Défaire le nœud maintenant le store et vérifier la tension du cordon. Si la tension
est trop faible, déplacer la plaque de tension dans la barre inférieure en l’éloignant
du ressort. Si la tension est trop forte, déplacer la plaque de tension dans la barre
inférieure vers le ressort.
SNAP!
¡Conecte!
SNAP!
SNAP!
¡Conecte!
SNAP!
Measure in 4" from marks made in step 7. Hold brackets up to the marks and mark
screw locations. If shade is larger than 42", mark center for third bracket.
Mida 4" desde las marcas hechas en el paso 7. Sostenga los soportes hasta
donde están las marcas y marque la ubicación de los tornillos. Si la cortina es más
larga que 42", marque el centro para un tercer soporte.
Mesurer 4" à partir des marques faites à l’étape 7. Tenir les supports sur les
marques et marquer l’emplacement des vis. Si le store fait plus de 42", marquer le
centre pour le troisième support.
4" 4"
WEB 78119-00 (9/09)

Springs Window Fashions • Middleton, WI 53562-1096
Place cords under nut
Coloque las cuerdas debajo de la tuerca
Placer les cordons sous l’écrou
12
13
Position side rails and mark screw locations
Coloque los rieles laterales y marque la ubicación de los tornillos
Positionner les tringles latérales et marquer l’emplacement des vis
14
Drill holes and mount side rails
Taladre los agujeros y monte los rieles laterales
Percer les trous et monter les tringles latérales
15
Replace insert in bottomrail
Reemplace el objeto insertado en el riel inferior
Replacer la garniture intérieure dabs la barre inférieure
Place bolt in lower rail hole, near the spring. Thread nut on bolt. Raise and lower
shade using the handle to check tension. Place cord under the nut and tighten.
Coloque el perno en el agujero inferior del riel, cerca del resorte. Enrosque la
tuerca en el perno. Levante y baje la cortina utilizando la manivela para chequear
la tensión. Coloque la cuerda bajo de la tuerca y apriete.
Placer le boulon dans le trou inférieur de la tringle, près du ressort. Visser l’écrou
sur le boulon. Ouvrir et fermer le store à l’aide de la poignée pour vérifier la
tension. Placer le cordon sous l’écrou et serrer.
Over time your shade may need tension adjustment
A través del tiempo su cortina puede necesitar ajustes de la tensión.
À la longue, il est possible que la tension du store ait besoin d’être réajustée
➜
WEB 78119-00 (9/09)
Springs Window Fashions • Middleton, WI 53562-1096

This manual suits for next models

1

Other BEST EXPERIENCE Indoor Furnishing manuals

BEST EXPERIENCE Springs Window Fashions Inside-mount Continuous-loop Roller/Solar... Instruction sheet

BEST EXPERIENCE

BEST EXPERIENCE Springs Window Fashions Inside-mount Continuous-loop Roller/Solar... Instruction sheet

BEST EXPERIENCE Springs Window Fashions Natural Shades Instruction sheet

BEST EXPERIENCE

BEST EXPERIENCE Springs Window Fashions Natural Shades Instruction sheet

BEST EXPERIENCE Springs Window Fashions Natural Drape Instruction sheet

BEST EXPERIENCE

BEST EXPERIENCE Springs Window Fashions Natural Drape Instruction sheet

BEST EXPERIENCE Springs Window Fashions Smart Pull Shade Instruction sheet

BEST EXPERIENCE

BEST EXPERIENCE Springs Window Fashions Smart Pull Shade Instruction sheet

BEST EXPERIENCE Springs Window Fashions  Cordless Pull Shade Instruction sheet

BEST EXPERIENCE

BEST EXPERIENCE Springs Window Fashions Cordless Pull Shade Instruction sheet

BEST EXPERIENCE SPRINGS WINDOW FASHIONS BUDGET BLINDS SMART HOME MOTORIZED... User manual

BEST EXPERIENCE

BEST EXPERIENCE SPRINGS WINDOW FASHIONS BUDGET BLINDS SMART HOME MOTORIZED... User manual

Popular Indoor Furnishing manuals by other brands

VAS BBCXL505GB manual

VAS

VAS BBCXL505GB manual

INK+IVY Lounge Chair Assembly instructions

INK+IVY

INK+IVY Lounge Chair Assembly instructions

Lexor PRIVE 300 Instructions for assembly

Lexor

Lexor PRIVE 300 Instructions for assembly

Mercado Medic REAL PLUS Instructions for use and care

Mercado Medic

Mercado Medic REAL PLUS Instructions for use and care

Coaster 305911 Assembly instruction

Coaster

Coaster 305911 Assembly instruction

Knight Cubit Tambour Assembly instructions

Knight

Knight Cubit Tambour Assembly instructions

Furniture of America Vilgot CM4493-3PK Assembly instructions

Furniture of America

Furniture of America Vilgot CM4493-3PK Assembly instructions

DREAMS Jackson Bed King Assembly instructions

DREAMS

DREAMS Jackson Bed King Assembly instructions

OfficeSource PL231LD Assembly instructions

OfficeSource

OfficeSource PL231LD Assembly instructions

pakoworld MILL Assembly manual

pakoworld

pakoworld MILL Assembly manual

Crate&Barrel Sawyer manual

Crate&Barrel

Crate&Barrel Sawyer manual

Production Basics 3000 Assembly manual

Production Basics

Production Basics 3000 Assembly manual

KMART 43061532 Assembly instructions

KMART

KMART 43061532 Assembly instructions

Bush Business Furniture WC12942A Assembly instructions

Bush Business Furniture

Bush Business Furniture WC12942A Assembly instructions

Martha Stewart HOLLS Assembly instructions

Martha Stewart

Martha Stewart HOLLS Assembly instructions

Unfinished Furniture of Wilmington WC-3222 Assembly instructions

Unfinished Furniture of Wilmington

Unfinished Furniture of Wilmington WC-3222 Assembly instructions

aspenhome I256-450 Assembly instructions

aspenhome

aspenhome I256-450 Assembly instructions

GFW LANCASTER CONSOLE HALL TABLE Assembly instructions

GFW

GFW LANCASTER CONSOLE HALL TABLE Assembly instructions

manuals.online logo
manuals.online logoBrands
  • About & Mission
  • Contact us
  • Privacy Policy
  • Terms and Conditions

Copyright 2025 Manuals.Online. All Rights Reserved.