5
4
21
3
WALL ANCHORING INSTRUCTIONS
INSTALLATION RECOMMENDATIONS - WOOD STUDS
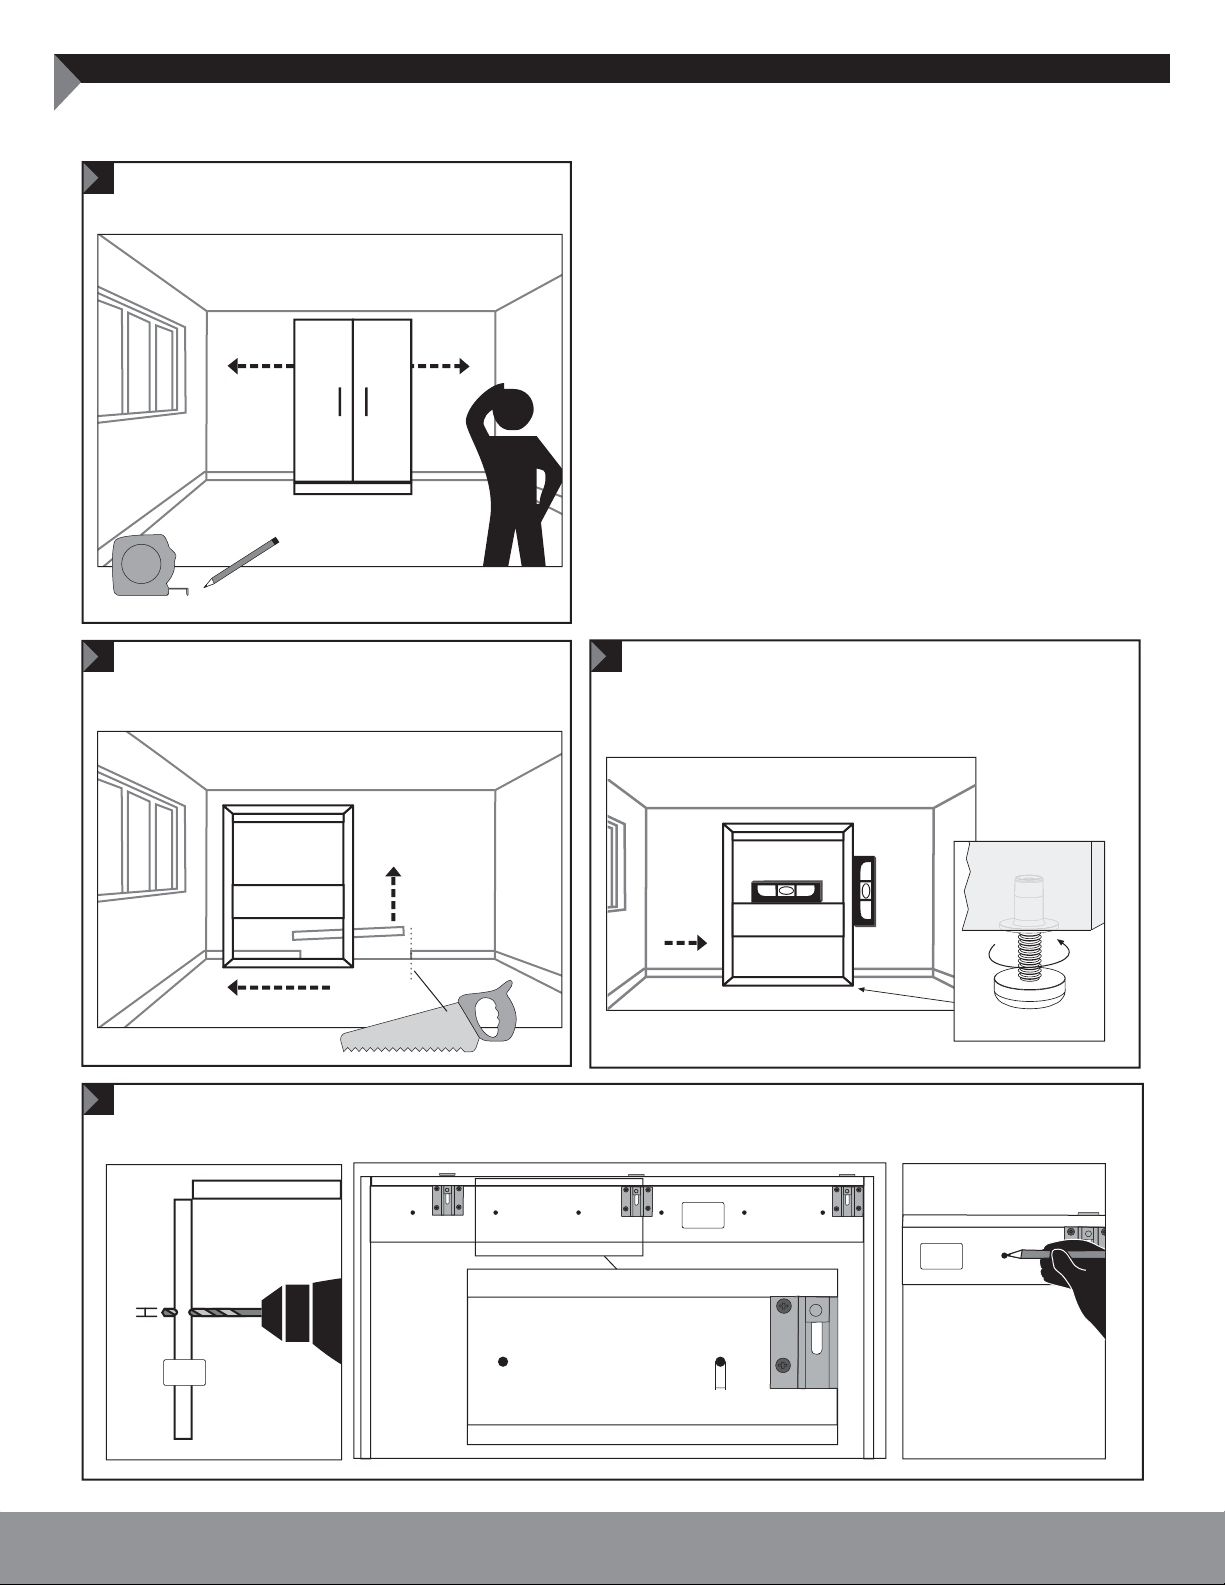
Determine the position of the bed in the room. Locate and mark the positioning
of 3 studs using a stud nder.
Put the bed back in its place. Level by adjusting
the legs PA-844 previously installed. If you install
the bed on a carpet, you must raise the bed by
an extra 3/8“ (10 mm).
Move the bed if necessary, then cut and
remove the oor trim.
Line up plywood part #87 on the wall and mark the middle of the studs on the plywood, then pre-drill
part #87 with 2 pilot holes of 1/4” (6 mm) diameter per stud, 2” (50 mm) apart vertically (6 holes in total).
DO NOT DRILL HOLES INTO THE WOOD STUDS.
87
87
2” (50 mm)
1/4”
(6 mm)
87
2” (50 mm)
1/4”
(6 mm)
PA-844
REQUIRED TOOLS
WALL ANCHORING INSTRUCTIONS
INSTALLATION RECOMMENDATIONS — WOOD STUDS
2”
(50 mm)
87
“COARSE THREAD SCREWS No #10”
6 screws included Robertson (square-tip) bit included
3 1/2“ (89 mm)
HARDWARE
Wood studs
WALL COMPOSITION
ACCORDING TO YOUR WALL TYPE AND COMPOSITION, YOUR PROFESSIONAL INSTALLER SHOULD APPROVE
THE CHOICE OF ANCHOR SCREWS AND SELECT, IF REQUIRED, MORE APPROPRIATE ANCHORING DEVICES.
Wood drill
bit 1/4” (6 mm) Stud
nder
6
VR-1047 BT-1048
8
Slide the metal channel of the anchor through the hole in the wall, hold the straps together and pull toward you
until the channel rests behind the wall. Slide the cap along the straps until it is ush with the wall. Snap o the straps.
WALL ANCHORING INSTRUCTIONS
INSTALLATION RECOMMENDATIONS — METAL STUDS
9
87
Put the bed back in its place.
Insert the screw (10-24) X APPROPRIATE LENGTH
into the hole of part #87 and screw the bed until
snug against the wall.
Metal
studs
Drywall
OTHER TYPES OF WALLS
If the structure of the wall is not wood, metal or masonry: The service of
a professional ** would be required for the wall anchoring. BESTAR is released from
any responsibility if wall anchoring of this furniture is not done by a professional.
PROBLEMS OR INFORMATION
www.bestar.ca
1888 823-7827
** A CERTIFIED CONSTRUCTION PROFESSIONAL, IN COMPLIANCE WITH APPLICABLE REGULATIONS IN THE PROVINCE, STATE,
OR COUNTRY WHERE THE FURNITURE IS INSTALLED.
6
7
87 Drywall Masonry
Minimum 1 1/4” (32mm)
Maximum 1 3/4” (44 mm)
Put the bed back in its place.
Put the CONCRETE SCREWS 3/16"
(5mm) diameter X APPROPRIATE
LENGTH into the holes of part #87
and screw the bed onto the masonry
wall until tight against the wall.
Screw must be at least 1 1/4” (32mm)
deep into masonry.
USE AN ELECTRIC SCREWDRIVER
WITH AN ADJUSTABLE TENSION
CLUTCH THAT HELPS PREVENT
OVER-TIGHTENING AND STRIPPING.
Using a 5/32” (4 mm) diameter masonry bit, drill into the drywall
and masonry (a hammer drill is required).
Masonry
Drywall
Wood
Wood
WALL ANCHORING INSTRUCTIONS
INSTALLATION RECOMMENDATIONS — MASONRY
INSTALLATION AND APPROPRIATE HARDWARE
Using appropriate hardware, all the anchor screws of the wall bed must be rmly
secured to the wood or metal studs, the structural components, or a masonry wall.
Only wall anchor screws for wood-frame walls are provided with this bed.
NEVER USE DRYWALL ANCHOR SCREWS OR SECURE THE BED TO DRYWALL
See wall anchoring requirements and installation notes provided in the
instruction manual, according to the type of wall, and use the appropriate
anchors such as described in this manual.
NUMBER OF SCREWS NEEDED
Two (2) screws are required for each anchor point. Three (3) wall anchor points
are necessary for the proper installation of the wall bed. So you need a total
of six (6) wall anchor screws.
THE SCREWS MUST BE VERY WELL ANCHORED TO THE STRUCTURAL
COMPONENTS OF THE WALL.
IMPORTANT WARNINGS !
5
Move the bed again.
5
2
1
WALL ANCHORING INSTRUCTIONS
INSTALLATION RECOMMENDATIONS — METAL STUDS
Determine the position of the bed in the room. Locate and mark the positioning of 3 studs
by using a stud nder.
2” (50 mm)
1/4”
(6 mm)
87
Line up plywood part #87 on the wall and mark the middle of the studs on the plywood, then pre-drill
part #87 with 2 pilot holes of 1/4” (6 mm) diameter per stud, 2” (50 mm) apart vertically (6 holes in total).
With the bed in position, mark the positioning of the 6 holes on the drywall.
87
87
2” (50 mm)
1/4” (6 mm)
4
3
Put the bed back in its place. Level by adjusting
the legs PA-844 previously installed. If you install
the bed on a carpet, you must raise the bed by
an extra 3/8” (10 mm).
Move the bed if necessary, then cut
and remove the oor trim.
PA-844
7
Using a 1/2” (13 mm) diameter metal bit, drill into the drywall
and the metal studs.
Metal
studs Drywall
WALL ANCHORING INSTRUCTIONS
INSTALLATION RECOMMENDATIONS — METAL STUDS
INSTALLATION AND APPROPRIATE HARDWARE
Using appropriate hardware, all the anchor screws of the wall bed must be rmly
secured to the wood or metal studs, the structural components, or a masonry wall.
Only wall anchor screws for wood-frame walls are provided with this bed.
NEVER USE DRYWALL ANCHOR SCREWS OR SECURE THE BED TO DRYWALL
See wall anchoring requirements and installation notes provided in the
instruction manual, according to the type of wall, and use the appropriate
anchors such as described in this manual.
NUMBER OF SCREWS NEEDED
Two (2) screws are required for each anchor point. Three (3) wall anchor points
are necessary for the proper installation of the wall bed. So you need a total
of six (6) wall anchor screws.
THE SCREWS MUST BE VERY WELL ANCHORED TO THE STRUCTURAL
COMPONENTS OF THE WALL.
IMPORTANT WARNINGS !
6
Move the bed again.
REQUIRED TOOLS
Masonry
WALL COMPOSITION
WALL ANCHORING INSTRUCTIONS
INSTALLATION RECOMMENDATIONS — MASONRY
“CONCRETE SCREWS 3/16” (5 mm) diameter X APPROPRIATE LENGTH”
NOT included
HARDWARE
Hammer drill
Masonry drill bit
5/32” (4 mm)
Diameter
Wood drill bit
1/4” (6 mm)
Diameter
ACCORDING TO YOUR WALL TYPE AND COMPOSITION, YOUR PROFESSIONAL INSTALLER SHOULD APPROVE
THE CHOICE OF ANCHOR SCREWS AND SELECT, IF REQUIRED, MORE APPROPRIATE ANCHORING DEVICES.
6
87
4
1
WALL ANCHORING INSTRUCTIONS
INSTALLATION RECOMMENDATIONS — MASONRY
Determine and mark the position
of the bed in the room.
87
Pre-drill the piece of plywood #87 with 6 pilot holes of 1/4” (6mm) diameter distributed horizontally in order to cover
the width of the anchoring section. With the bed in position, mark the position of the 6 holes on the masonry wall.
87
1/4”
(6 mm)
87
1/4” (6 mm)
Locate and mark
the positioning
of the 6 anchor
points.
3
2
Put the bed back in its place. Level by adjusting
the legs PA-844 previously installed. If you install
the bed on a carpet, you must raise the bed by
an extra 3/8” (10 mm).
Move the bed if necessary, then cut
and remove the oor trim.
PA-844
OTHER TYPES OF WALLS
If the structure of the wall is not wood, metal or masonry: The service of
a professional ** would be required for the wall anchoring. BESTAR is released from
any responsibility if wall anchoring of this furniture is not done by a professional.
WALL ANCHORING REQUIREMENTS
& INSTALLATION RECOMMENDATIONS
PROBLEMS OR INFORMATION
www.bestar.ca
1888 823-7827
INSTALLATION AND APPROPRIATE HARDWARE
Using appropriate hardware, all the anchor screws of the wall bed must be rmly
secured to the wood or metal studs, the structural components, or a masonry wall.
Only wall anchor screws for wood-frame walls are provided with this bed.
NEVER USE DRYWALL ANCHOR SCREWS OR SECURE THE BED TO DRYWALL
See wall anchoring requirements and installation notes provided in the
instruction manual, according to the type of wall, and use the appropriate
anchors such as described in this manual.
NUMBER OF SCREWS NEEDED
Two (2) screws are required for each anchor point. Three (3) wall anchor points
are necessary for the proper installation of the wall bed. So you need a total
of six (6) wall anchor screws.
THE SCREWS MUST BE VERY WELL ANCHORED TO THE STRUCTURAL
COMPONENTS OF THE WALL.
IMPORTANT WARNINGS !
IMPORTANT WARNINGS
Risk of serious injuries if the wall bed tips over.
To prevent wall bed from tipping over, mount it permanently to the wall.
Only a qualied person* must carry out the installation and any possible adjustment of the wall bed
(including disassembly). If the wall bed is not rmly mounted (anchored) to the wall, it might tip over
and cause serious injuries to the installer, users of the bed as well as the people near the bed.
The choice of wall anchoring depends on the type of wall. Use wall anchors suitable for the wall material.
* Qualied person: it is necessary to have a good understanding of the wall structure where the bed is anchored, including the positioning of the
wall studs and structural components in the case of a wood or metal structure. If you do not have the necessary skills, make sure that the wall
anchoring is done by someone who has the qualications and required knowledge. When you choose the installer, make sure to comply with
all applicable regulations in the province, state or country where the furniture is installed.
Important information to read before starting the assembly.
Keep this information for future reference.
** A CERTIFIED CONSTRUCTION PROFESSIONAL, IN COMPLIANCE WITH APPLICABLE REGULATIONS IN THE PROVINCE, STATE,
OR COUNTRY WHERE THE FURNITURE IS INSTALLED.
!
116183 AN 19SERVICE/SERVICIO: 1-888 8BESTAR (1-888 823-7827)