Bestron ATS400Z User manual

BREAKFAST CLUB
DE
Handleiding
Bedienungsanleitung
Mode d’emploi
FR
NL
EN
Manual del usuario
Instruction manual
Istruzioni per l’uso
IT
ES
50
60
Hz
220
240
Volts
700
Watts
T
O
P
Q
U
A
L
I
T
Y
G
U
A
R
A
N
T
E
E
ATS400Z
INSTRUCTION MANUAL

DE
FR
NL
EN
IT
ES
Bedienungsanleitung 3
Mode d’emploi 5
Handleiding 7
Instruction manual 9
Istruzioni per l’uso 11
Manual del usuario 13
2

SICHERHEITSBESTIMMUNGEN
• Bei einem Defekt sollte das Gerät unverhot einen Defekt
aufweisen, versuchen Sie dann nie, die Reparatur selbst
vorzunehmen. Lassen Sie Reparaturen immer von einem
qualizierten Mechaniker ausführen.
• Dieses Gerät darf nicht von Kinder älter als 8 Jahren und Personen
mit vermindertem körperlichen, sinnlichen oder geistigen Vermögen
oder Mangel an Erfahrung und Kenntnis benutzt werden.
• Die Reinigung und Wartung dürfen nicht von Kindern durchgeführt
werden, außer wenn sie älter als 8 Jahre sind und beaufsichtigt werden.
• Halten Sie das Gerät und das Kabel außerhalb der Reichweite von
Kindern bis 8 Jahren.
• Kinder müssen im Auge gehalten werden, um sich dessen sicher
zu sein, dass sie nicht mit dem Gerät spielen.
• Stellen Sie Elektrogeräte immer auf einer stabilen, ebenen und
hitzebeständigen Oberäche auf, auf der sie nicht umfallen können.
• Sorgen Sie dafür, dass Elektrogeräte, Kabel oder Stecker nicht mit
Wasser in Berührung kommen.
• Fassen Sie Elektrogeräte nie an, wenn sie ins Wasser gefallen
sind. Ziehen Sie direkt den Stecker aus der Steckdose. Benutzen
Sie das Gerät nicht mehr.
• Das Gerät darf nicht mittels eines externen Zeitschalters oder durch
ein separates System mit Fernbedienung eingeschaltet werden.
UMWELT
Werfen Sie Verpackungsmaterial, wie zum Beispiel Plastik und
Karton, in die dazu bestimmten Container.
• Dieses Produkt am Ende der Nutzungsdauer nicht als normalen
Haushaltabfall entsorgen, sondern bei einer Sammelstelle
zur Wiederverwendung von elektrischem und elektronischem
Gerät. Achten Sie auf das Symbol auf dem Produkt, der
Gebrauchsanweisung oder Verpackung.
• Die Materialien können wie angegeben wiederverwendet werden.
Durch Ihre Hilfe bei der Wiederverwendung, der Verarbeitung der
Materialien oder anderen Formen der Nutzung des alten Gerätes
leisten Sie einen wichtigen Beitrag zum Schutz unserer Umwelt.
• Informieren Sie sich bei der Gemeinde nach der richtigen
Sammelstelle bei Ihnen in der Nähe.
3
DE

BENUTZUNG - Allgemein
Die folgende Beschreibung ist dem Bild auf Seite 2 zugeordnet:
1. Gehäuse 2. Krümelschublade
3. Stopptaste 4. Temperaturregelknopf
5. Kabel und Stecker 6. Hebel den Brotschlitten
7. Brotschlitten
BENUTZUNG - Vor der ersten Verwendung
Lassen Sie den Toaster erst einige Male bei maximalen Einstellung toasten (Einstellung 6) und ohne
Brot. So werden die letzte Reste des Herstellungsprozesses entfernt. Es kann eine leichte Rauch- und
Geruchsentwicklung entstehen.
BENUTZUNG - Vorbereitung
1. Stellen Sie das Gerät auf eine stabile und ebene Fläche.
2. Stecken Sie den Stecker (5) in die Steckdose.
BENUTZUNG - Brot toasten
1. Stellen Sie die Temperatur und die Röstzeit mit dem Temperaturregelknopf ein (4).
a. Bei der niedrigsten Einstellung (Einstellung 1) ist die Temperatur am niedrigsten und die Röstzeit am
kürzesten.
b. Bei der höchsten Einstellung (Einstellung 6) ist die Temperatur am höchsten und die Röstzeit am
längsten.
c. Beginnen Sie im Zweifelsfall immer mit der niedrigsten Einstellung.
d. Altes Brot müssen Sie auf einer niedrigeren Einstellung rösten als frisches Brot.
e. Weizenvollkornbrot müssen Sie auf einer höheren Einstellung rösten als Weißbrot.
2. Legen Sie eine Scheibe Brot in jeden Brotschlitten (7) des Toasters.
3. Drücken Sie mit dem Hebel den Brotschlitten (6) nach unten, bis dieser einrastet. Das Gerät beginnt
jetzt mit dem Toasten und schaltet sich danach automatisch aus. Die Brotschlitten kommen dann
automatisch nach oben.
4. Nehmen Sie das getoastete Brot aus dem Toaster.
5. Ziehen Sie den Stecker aus der Steckdose.
6. Lassen Sie den Toaster abkühlen, bevor Sie ihn verstauen.
ACHTUNG:
• Ist die Temperatur zu hoch eingestellt, beginnt das Brot zu riechen. Drücken Sie in diesem Fall auf die
Stopptaste (3), um den Toastvorgang vorzeitig zu unterbrechen.
• Bleibt das Brot im Toaster stecken, ziehen Sie dann den Stecker (5) aus der Steckdose und lassen Sie
den Toaster abkühlen. Nehmen Sie danach das Brot vorsichtig aus dem Toaster. Verwenden Sie hierfür
keine scharfen Gegenstände und/oder Metallgegenstände.
REINIGUNG UND WARTUNG
1. Ziehen Sie den Stecker aus der Steckdose und lassen Sie das Gerät abkühlen.
2. Ziehen Sie die Krümelschublade (2) aus dem Gerät (siehe Abbildung 2) und entfernen Sie
zurückgebliebene Krümel.
3. Reinigen Sie die Außenkante des Geräts mit einem feuchten Tuch und wischen Sie es mit einem
trockenen Tuch ab. Achten Sie darauf, dass keine Feuchtigkeit ins Innere des Geräts gelangt.
4. Schieben Sie die Krümelschublade wieder zurück ins Gerät.
ACHTUNG:
• Tauchen Sie das Gerät, den Stecker und das Kabel nie ins Wasser. Stellen Sie das Gerät keinesfalls in
einen Geschirrspüler.
• Verwenden Sie zur Reinigung keine aggressiven Reinigungs- oder Scheuermittel oder scharfen
Gegenstände (wie Messer oder harte Bürsten).
SERVICE
Sollte sich unverhofft eine Störung ergeben, dann können Sie mit dem BESTRON-Kundendienst Kontakt
aufnehmen: www.bestron.com/service
4
DE

CONSIGNES DE SÉCURITÉ
• Si l’appareil devait tomber en panne, n’essayez jamais de le
réparer vous-même Faites toujours réaliser les réparations par un
technicien qualié.
• Le présent appareil peut être n’utilisé pas par des enfants de plus
de 8 ans et par des personnes dont les facultés physiques, senso-
rielles ou psychiques sont diminuées ou des personnes n’ayant ni
l’expérience ni les connaissances requises.
• Le nettoyage et l’entretien ne peuvent être effectués par des enfants
de moins de 8 ans. Les enfants de plus de 8 ans doivent être sous
la surveillance d’un adulte.
• Conservez l’appareil et le câble hors de portée des enfants de moins
de 8 ans.
• Il faut surveiller les enfants pour s’assurer qu’ils ne jouent pas avec
l’appareil.
• Placez toujours les appareils électriques sur des supports stables, plats
et résistants à la chaleur, à un endroit où ils ne peuvent pas tomber.
• Certains composants d’un appareil électrique peuvent être chaud,
voire bouillants Ne les touchez pas pour éviter de vous brûler.
• Veillez à ce que les appareils électriques, les cordons et les ches
ne soient pas en contact avec de l’eau, d’autres liquides ou d’autres
sources de chaleur.
• L’appareil ne peut pas être mis en marche à l’aide d’un minuteur
externe ou par un système séparé à télécommande.
ENVIRONNEMENT
Jetez les emballages comme le plastique et les boîtes dans les
conteneurs prévus à cet eet
• Ne pas jeter ce produit à la n de sa durée de vie dans les déchets
ménagers normaux, mais dans un point de collecte pour recyclage
des appareils électriques et électroniques Faites attention au
symbole sur le produit, le mode d’emploi ou l’emballage.
• Les matériaux peuvent être réutilisés, comme indiqué. Grâce à
votre aide pour la réutilisation, la transformation des matériaux
et autres formes de valorisation des anciens appareils, vous
contribuez grandement à la préservation de notre environnement.
• Informez-vous auprès de votre commune pour connaitre le point de
collecte approprié près de chez vous.
5
FR

FONCTIONNEMENT
L’appareil est uniquement destiné à un usage domestique et non à un usage professionnel.
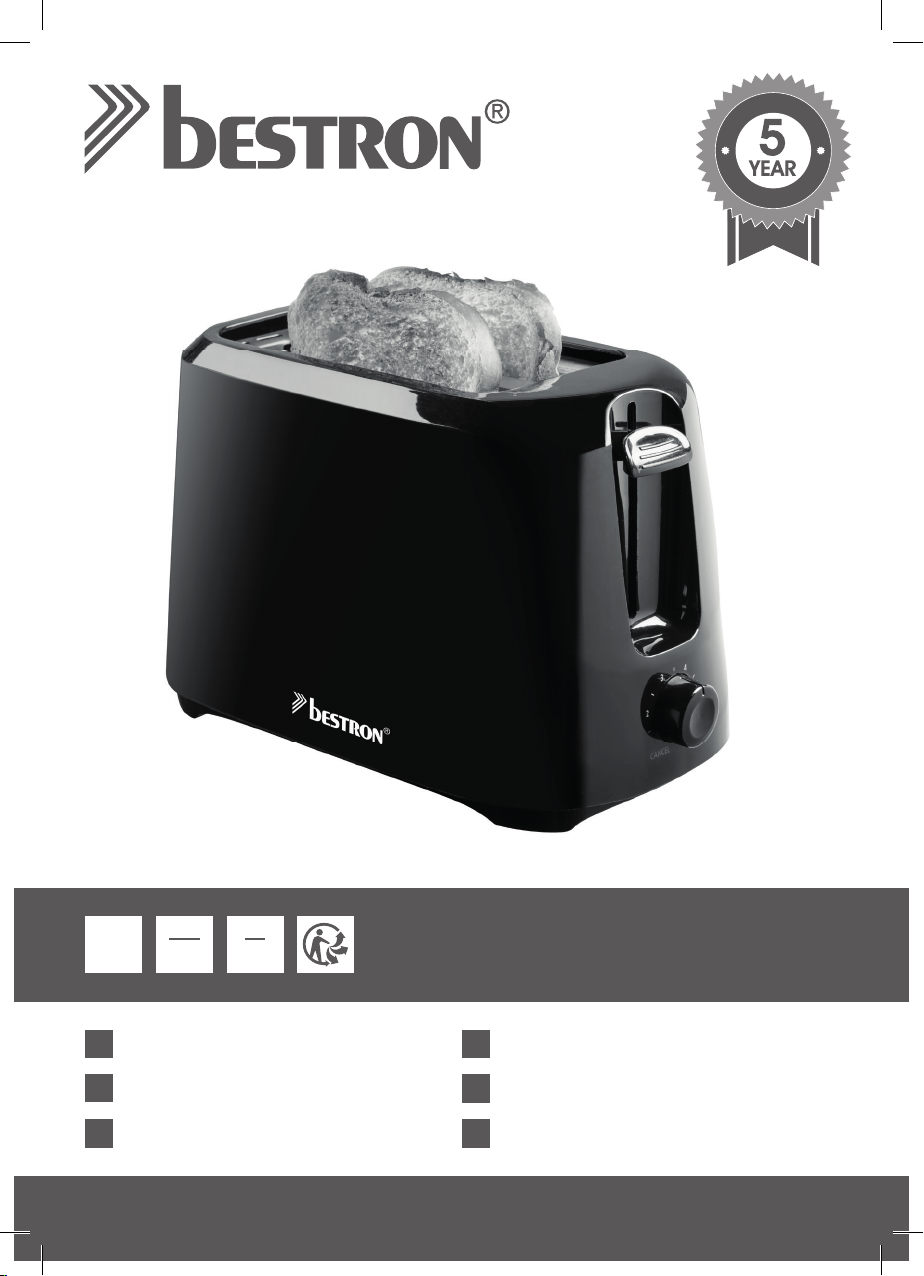
La description suivante fait partie de l’illustration page 2
1. Extérieur 2. Tiroir à miettes
3. Bouton d’arrêt 4. Bouton de réglage de la température
5. Cordon et fiche 6. Bouton de grilles à pain
7. Grilles à pain
FONCTIONNEMENT - Avant la première utilisation
Faites d’abord fonctionner votre grille-pain plusieurs fois à la position maximale (position 6) et sans pain.
Vous nettoyez ainsi les derniers restes du processus de fabrication. Une légère fumée peut se développer.
FONCTIONNEMENT - Préparation
1. Installez l’appareil sur une surface plane et stable.
2. Branchez la fiche (5).
FONCTIONNEMENT - Griller du pain
1. Réglez la température et la durée au moyen du bouton de réglage de la température (4).
a. La position inférieure (position 1) commande la température la plus basse et la durée la plus brève.
b. La position supérieure (position 6) commande la température la plus élevée et la durée la plus
longue.
c. En cas de doute, commencez par une position inférieure.
d. Vous grillerez le pain rassis à une température plus basse que le pain frais.
e. Vous grillerez le pain brun à une température plus élevée que le pain blanc.
2. Mettez deux tranches de pain sur la grilles (7) du grille-pain.
3. Enfoncez les grilles au moyen du bouton de grilles à pain (6) jusqu’à ce que celui-ci se verrouille.
L’appareil commence à griller, et quand il a fini, s’éteint automatiquement. Les grilles se relèvent alors
automatiquement.
4. Sortez le pain grillé du grille-pain.
5. Débranchez la fiche.
6. Laissez refroidir le grille-pain avant de le ranger.
ATTENTION:
• Si la température est trop élevée, le pain dégagera de la fumée. Dans ce cas, appuyez sur le bouton
d’arrêt (3) pour interrompre le fonctionnement du grille-pain.
• Si une tranche de pain reste coincée dans le grille-pain, débranchez la prise (5) et laissez le grille-pain
se refroidir. Sortez ensuite le pain grillé du grille-pain, avec précaution. Nutilisez jamais d’ustensiles
acérés et/ou métalliques dans ce but.
NETTOYAGE ET ENTRETIEN
1. Débranchez la fiche et laissez refroidir l’appareil.
2. Retirez le tiroir (2) à miettes de l’appareil (voir la figure 2) et videz les miettes.
3. Nettoyez l’extérieur de l’appareil avec un chiffon humide et essuyez-le avec un chiffon sec. Ne laissez
pas l’humidité pénétrer à l’intérieur de l’appareil.
4. Remettez le tiroir à miettes à sa place.
ATTENTION:
• N’immergez jamais l’appareil, le cordon ni la fiche dans l’eau. Ne mettez jamais l’appareil au lave-
vaisselle.
• N’utilisez pas de détergents agressifs ou décapants ni d’objets tranchants (tels que couteaux ou brosses
dures) pour le nettoyage.
SERVICE
En cas de panne ou de dysfonctionnement de votre appareil, contactez le service assistance de
BESTRON : www.bestron.com/service
6
FR

VEILIGHEIDSVOORSCHRIFTEN
• Mocht het apparaat onverhoopt defect raken, probeer dan nooit zélf
de reparatie uit te voeren. Laat reparaties altijd uitvoeren door een
gekwaliceerde monteur.
• Dit apparaat mag niet worden gebruikt door kinderen jonger dan
8 jaar en personen met verminderde lichamelijke, zintuiglijke of
geestelijke vermogens of gebrek aan ervaring en kennis.
• Reiniging en onderhoud moeten niet worden gedaan door kinderen,
behalve als zij ouder dan 8 jaar zijn en onder toezicht staan.
• Houd het toestel en de kabel buiten bereik van kinderen tot 8 jaar oud.
• Kinderen moeten in de gaten gehouden worden om er zeker van te
zijn dat ze niet met het apparaat spelen.
• Plaats elektrische apparaten altijd op een stabiele en vlakke,
hittebestendige ondergrond, op een plaats waar het niet kan vallen.
• Bepaalde delen van een elektrisch apparaat kunnen warm of zelfs
heet worden. Raak deze niet aan om te voorkomen dat u zich
verbrandt.
• Zorg ervoor dat elektrische apparaten, snoeren of stekkers niet
in aanraking komen met water, andere vloeistoen of andere
hittebronnen.
• Het apparaat mag niet in werking worden gesteld door middel van
een externe tijdschakelaar, of door een afzonderlijk systeem met
afstandsbediening.
MILIEU
Werp verpakkingsmateriaal zoals plastic en dozen in de daarvoor
bestemde containers.
• Dit product aan het eind van de gebruiksduur niet inleveren
als normaal huishoudelijk afval, maar bij een inzamelpunt voor
hergebruik van elektrische en elektronische apparatuur. Let op het
symbool op het product, de gebruiksaanwijzing of de verpakking.
• De materialen kunnen hergebruikt worden zoals aangegeven.
Door uw hulp bij hergebruik, de verwerking van de materialen of
ander vormen van de benutting van oude apparatuur levert u een
belangrijke bijdrage aan de bescherming van ons milieu.
• Informeer bij de gemeente naar het juiste inzamelpunt bij
u in de buurt.
7
NL

GEBRUIK
Het apparaat is alleen bedoeld voor huishoudelijke doeleinden, niet voor professioneel gebruik.
De volgende beschrijving hoort bij de afbeelding op pagina 2
1. Behuizing 2. Kruimellade
3. Stopknop 4. Temperatuurregelknop
5. Snoer en stekker 6. Broodslede knop
7. Broodsledes
WERKING - Voor het eerste gebruik
Laat de broodrooster eerst een paar keer werken op de hoogste stand (stand 6) en zonder brood. Op
deze manier worden de laatste resten van het fabricageproces verwijderd. Er kan een lichte rook- en
geurontwikkeling ontstaan.
WERKING - Voorbereiding
1. Zet het apparaat op een stabiele en vlakke ondergrond.
2. Steek de stekker (5) in het stopcontact.
WERKING - Brood roosteren
1. Stel de temperatuur en de roostertijd in met de temperatuurregelknop (4).
a. Bij de laagste stand (stand 1) is de temperatuur het laagst en de roostertijd het kortst.
b. Bij de hoogste stand (stand 6) is de temperatuur het hoogst en de roostertijd het langst.
c. Begin in twijfelgevallen altijd op een lage stand.
d. Oud brood moet u op een lagere stand roosteren dan vers brood.
e. Bruin brood moet u op een hogere stand roosteren dan wit brood.
2. Plaats een snee brood in elke broodslede (7).
3. Druk de broodsledes omlaag met de broodslede knop (6) totdat deze vergrendelt. Het apparaat begint
nu te roosteren en schakelt na het roosteren automatisch uit. De broodsledes komen dan automatisch
omhoog.
4. Verwijder het geroosterde brood uit de broodrooster.
5. Haal de stekker uit het stopcontact.
6. Laat de broodrooster afkoelen voordat u deze opbergt.
LET OP:
• Is de temperatuur te hoog ingesteld, dan gaat het brood roken. Druk in dit geval op de stopknop (3) om
het roosteren voortijdig te onderbreken.
• Blijft er brood in de broodrooster steken, trek dan de stekker (5) uit het stopcontact en laat de
broodrooster afkoelen. Verwijder vervolgens het brood voorzichtig uit de broodrooster. Gebruik hiervoor
geen scherpe en/of metalen voorwerpen.
REINIGING EN ONDERHOUD
1. Neem de stekker uit het stopcontact en laat het apparaat afkoelen.
2. Trek de kruimellade (2) uit het apparaat (zie figuur 2) en verwijder achtergebleven kruimels.
3. Reinig de buitenkant van het apparaat met een vochtige doek en veeg het na met een droge doek. Zorg
ervoor dat er geen vocht binnenin het apparaat komt.
4. Schuif de kruimellade weer terug in het apparaat.
LET OP:
• Dompel het apparaat, de stekker en het snoer nooit onder in water. Zet het apparaat nooit in een
afwasmachine.
• Gebruik geen agressieve of schurende schoonmaakmiddelen of scherpe voorwerpen (zoals messen
of harde borstels) bij het reinigen.
SERVICE
Mocht zich onverhoopt een storing voordoen, dan kunt u contact opnemen met de BESTRON-servicedienst:
www.bestron.com/service
8
NL

SAFETY INSTRUCTIONS
• In the unlikely event that the device should become defective, never
try to carry out the repair yourself. Always have repairs carried out
by a qualied technician.
• This appliance may be not used by children over the age of 8 years
old and persons with reduced physical, sensory or mental capabilities
or lack of experience and know-how.
• Children are not allowed to clean and maintain the appliance, except
if they are over the age of 8 years old and supervised.
• Keep the appliance and the cable out of reach of children under the
age of 8 years old.
• Children must be supervised to ensure that they do not play with
the appliance.
• Always place electrical appliances on a stable and at, heat-
resistant surface, in a place where it cannot fall.
• Certain parts of an electrical appliance can become warm or even
hot. To avoid burns, do not touch these parts of the device.
• Do not allow electrical devices, cables or plugs to come into contact
with water, other liquids or other heat sources.
• The appliance must not be operated by means of an external timer
switch, or by a separate system with remote control.
ENVIRONMENT
Dispose of packaging materials such as plastic and boxes in the
appropriate containers.
• Do not hand this product in as normal household waste at the
end of its life cycle, but hand it in at a collection point for reuse of
electrical and electronic equipment. Look for the symbol on the
product, instructions for use or packaging.
• The materials can be reused as indicated. By helping with reuse,
recycling of materials or other forms of use of old equipment, you
are making an important contribution to protecting the environment
• Ask the municipality for the correct collection point in your area.
9
EN

OPERATION
The appliance is intended only for domestic use, not for professional use.
The following description is associated with the image on page 2:
1. Housing 2. Crumb tray
3. Stop button 4. Temperature-control dial
5. Power cord and plug 6. Bread carriages lever
7. Bread carriages
OPERATION - Before first use
Operate the toaster a couple of times, without bread, at the maximum setting (setting 6). This will remove
the last traces from the manufacturing process. A little smoke and odour may be emitted by the toaster when
it is used for the first time.
OPERATION - Preparation
1. Put the appliance on a stable and flat surface.
2. Put the plug (5) into the wall socket.
OPERATION - Toasting bread
1. Adjust the temperature and the toasting time with the temperature-control dial (4).
a. The temperature is lowest at setting 1, and the toasting time is the shortest.
b. The temperature is highest at setting 6, and the toasting time is the longest.
c. In the event of doubt, always begin at a lower setting.
d. Older bread will need to be toasted at a lower setting than fresh bread.
e. Brown bread will need to be toasted at a higher setting than white bread.
2. Put two slices of bread in the toaster’s bread carriages (7).
3. Lower the slices of bread by pressing the bread carriages lever (6) downwards until it locks into place.
The appliance will now start toasting the bread; it will automatically switch off once the toast is ready.
The slices of toast will rise automatically.
4. Remove the toast from the toaster.
5. Remove the plug from the wall socket.
6. Allow the toaster to cool down before storing it.
WARNING:
• The bread will emit smoke if the temperature is adjusted to too high a setting. If this happens, press the
stop button (3) to stop toasting the bread.
• If toast remains caught in the toaster, then you should remove the plug (5) from the wall socket and allow
the toaster to cool. You can now carefully remove the toast from the toaster. Do not use sharp and/or
metal implements.
CLEANING AND MAINTENANCE
1. Remove the plug from the wall socket, and allow the appliance to cool.
2. Take the crumb tray (2) out of the appliance (see figure 2) , and remove any breadcrumbs.
3. Clean the exterior of the appliance with a damp cloth, and dry with a clean cloth. Make sure no moisture
gets into the appliance.
4. Slide the crumb tray back into the appliance.
WARNING:
• Never immerse the appliance, plug or power cord in water. Never put the appliance in a dishwasher.
• Never use corrosive or scouring cleaning agents or sharp objects (such as knives or hard brushes) to
clean the appliance.
SERVICE
If an unexpected problem occurs, please contact the BESTRON service department:
www.bestron.com/service
10
EN

NORME DI SICUREZZA
• Nell’improbabile caso in cui il dispositivo risulti difettoso, non tentare
mai di ripararlo da solo. Fai eseguire sempre le riparazioni da un
tecnico qualicato.
• Questo apparecchio non può essere utilizzato da bambini di età
superiore agli 8 anni e da persone con ridotte capacità fisiche,
sensoriali o mentali o con poca esperienza e conoscenza.
• Pulizia e manutenzione non devono essere effettuate dai bambini, a
meno che non abbiano più di 8 anni e sotto la supervisione di un adulto.
• Mantenere l’unità e il cavo di alimentazione fuori dalla portata dei
bambini di età inferiore agli 8 anni.
• I bambini devono essere sorvegliati per accertarsi che non giochino
mai con questo dispositivo.
• Posizionare sempre gli apparecchi elettronici su una supercie
stabile e in piano, che sia resistente al calore, e in un luogo in cui
non possano cadere a terra.
• Alcune componenti dell’apparecchio elettronico possono riscaldarsi
o addirittura essere roventi. Per evitare ustioni, non toccare mai
queste componenti del dispositivo.
• Fai in modo che i dispositivi elettronici, i cavi di alimentazione o le
spine non entrino mai a contatto con acqua, altri liquidi o siano posti
troppo vicino ad altre fonti di calore.
• L’apparecchio non deve essere messo in funzione con un timer
esterno o un sistema separato provvisto di telecomando.
DISPOSIZIONI AMBIENTALI
Smaltire i materiali di imballaggio quali la plastica e le scatole negli
appositi contenitori.
• Al termine del ciclo di vita, non trattare il prodotto come fosse un
normale riuto domestico, portalo piuttosto in un punto di raccolta
per il riutilizzo di apparecchiature elettriche ed elettroniche.
Cerca il simbolo sul prodotto stesso, nelle istruzioni per l’uso o
sull’imballaggio.
• I materiali possono essere riutilizzati come ivi specicato.
Contribuendo al riutilizzo, al riciclaggio di materiali o ad altre
forme di uso di vecchie apparecchiature, stai dando un importante
contributo per la salvaguardia dell’ambiente.
• Chiedi al tuo Comune dove si trova il punto di raccolta più vicino a te.
11
IT

FUNZIONAMENTO
L’apparecchio è destinato esclusivamente all’uso domestico, non a quello professionale.
La seguente descrizione si riferisce all’immagine presente a pagina 2
1. Corpo dell’apparecchio 2. Vassoio raccoglibriciole
3. Tasto stop 4. Termostato regolabile
5. Cavo di alimentazione e spina 6. Leva di cestello per pane
7. Cestello per pane
FUNZIONAMENTO - Operazioni preliminari al primo utilizzo
Far funzionare il tostapane vuoto alla massima posizione (posizione 6) per un paio di volte. In questo modo
gli ultimi residui del processo di produzione verranno eliminati. Durante questa operazione potrà verificarsi
una leggera emissione di fumo accompagnata da un odore particolare.
FUNZIONAMENTO - Preparazione
1. Posizionare l’apparecchio su una superficie stabile e piana.
2. Inserire la spina (5) nella presa di corrente.
FUNZIONAMENTO - Tostature del pane
1. Regolare la temperatura e il tempo di tostatura mediante il termostato regolabile (4).
a. La posizione più bassa (posizione 1) corrisponde alla temperatura minima e al tempo di tostatura
più breve.
b. La posizione più alta (posizione 6) corrisponde alla temperatura più alta e al tempo di tostatura più
lungo.
c. In caso di dubbio iniziare sempre con una temperatura bassa.
d. Il pane raffermo richiede una temperatura più bassa rispetto al pane fresco.
e. Il pane integrale richiede una temperatura più alta rispetto al pane bianco.
2. Inserire una fetta di pane nel cestello per pane (7).
3. Spingere i cestelli verso il basso mediante la leva fino a quando non si agganciano (6) L’apparecchio
inizierà a tostare il pane e si spegnerà automaticamente al termine della tostatura. I cestelli si
solleveranno quindi automaticamente.
4. Rimuovere il pane tostato dal tostapane.
5. Disinserire la spina dalla presa di corrente.
6. Lasciare raffreddare il tostapane prima di riporlo.
ATTENZIONE:
• Se la temperatura è regolata su una posizione troppo elevata, il pane può carbonizzarsi. In questo
caso premere il tasto stop (3) per interrompere anticipatamente la tostatura.
• Qualora nel tostapane rimanga incastrato del pane, etrarre la spina (5) dalla presa e lasciare
raffreddare l’apparecchio. Provvedere quindi a eliminare con cautela il pane dal tostapane. Non
utilizzare oggetti taglienti o in metallo per eseguire questa operazione.
PULIZIA E MANUTENZIONE
1. Estrarre la spina dalla presa e lasciare raffreddare l’apparecchio.
2. Estrarre il vassoio raccoglibriciole (2) dall’apparecchio (vedere la figura 2) e rimuovere le briciole
residue.
3. Pulire l’esterno dell’apparecchio con un panno umido e asciugare con un panno asciutto. Assicurarsi
che nessun liquido penetri all’interno dell’apparecchio.
4. Reinserire il vassoio raccoglibriciole nell’apparecchio.
ATTENZIONE:
• Non immergere mai in acqua l’apparecchio, la spina o il cavo. Non lavare mai l’apparecchio in
lavastoviglie.
• Non utilizzare per la pulizia prodotti aggressivi o abrasivi, né utensili taglienti (coltelli o spazzole dure).
SERVIZIO ASSISTENZA
Nell’indesiderata eventualità di un malfunzionamento, contattare il servizio assistenza BESTRON visitando
il seguente sito: www.bestron.com/service
12
IT

NORMAS DE SEGURIDAD
• En el improbable caso de que el aparato se averíe, nunca intente
repararlo usted mismo. Encargue siempre las reparaciones a un
técnico cualicado.
• Este aparato no puede ser utilizado por niños menores de 8 años y
por personas con una limitación física, sensorial o mental o con falta
de experiencia y conocimiento.
• La limpieza y mantenimiento no las pueden realizar niños, excepto
si son mayores de 8 años y están bajo la supervisión de un adulto.
• Mantenga el equipo y el cable alejados del alcance de los niños de
8 años.
• Los niños deben ser supervisados para garantizar que no jueguen
con el dispositivo.
• Coloque siempre los aparatos eléctricos sobre una supercie
estable y plana resistente al calor, en un lugar del que no puedan
caer.
• Algunas partes de la herramienta eléctrica pueden calentarse algo
o incluso mucho. No deben tocarse, para evitar quemarse.
• No permita que los aparatos eléctricos, cables o enchufes entren
en contacto con el agua, otros líquidos u otras fuentes de calor.
• El aparato no debe encenderse por medio de un temporizador
externo, ni por un sistema de control remoto separado.
MEDIO AMBIENTE
Deseche el material de embalaje, como el plástico y las cajas, en
los contenedores adecuados.
• Al nal de su vida útil, no elimine este producto como residuo
doméstico normal. Llévelo a un punto de recogida y reutilización
de equipos eléctricos y electrónicos. Observe el símbolo que
aparece en el producto, en el manual de usuario o en el embalaje.
• Los materiales pueden reutilizarse como se indica. Ayudando
a reutilizar, eliminar o reciclar de alguna manera los equipos
antiguos, usted contribuye de manera importante a la protección de
nuestro medio ambiente.
• Pregunte a su ayuntamiento por el punto de recogida adecuado en
su barrio.
13
ES

FUNCIONAMIENTO
El aparato está diseñado únicamente para su uso doméstico, no para uso profesional.
La siguiente descripción está asociada con la imagen de la página 2:
1. Carcasa 2. Bandeja recogemigas
3. Botón de parada 4. Botón para regular la temperatura
5. Cable y enchufe 6. Botón de ranura para el pan
7. Ranura para el pan
FUNCIONAMIENTO - Antes del primer uso
Haga funcionar el tostador varias veces a la posición máxima (posición 6), sin pan. De esta forma se quitan
los últimos restos del proceso de fabricación. Puede desprenderse un poco de olor y de humo.
FUNCIONAMIENTO - Preparación
1. Coloque el aparato sobre una superficie plana y estable.
2. Introduzca el enchufe (5) en la toma de pared.
FUNCIONAMIENTO - Tostar pan
1. Ajuste la temperatura y el tiempo de tueste con el botón para regular la temperatura (4).
a. En la posición mínima (posición 1) se consigue la temperatura más baja y el menor tiempo de tueste.
b. En la posición máxima (posición 6) se consigue la temperatura más alta y el mayor tiempo de tueste.
c. En caso de duda, empiece siempre ajustando una posición baja.
d. Para tostar pan seco deberá seleccionar una posición inferior que para el pan fresco.
e. Para tostar pan integral deberá seleccionar una posición superior que para el pan blanco.
2. Coloque una rebanada de pan en cada ranura del tostador (7).
3. Baje las rebanadas pulsando la botón de ranura para el pan hasta que ésta quede bloqueada (6). El
aparato empieza a tostar el pan y se apaga automáticamente cuando haya terminado el tueste. Las
rebanadas de pan son levantadas automáticamente
4. Saque el pan tostado del tostador.
5. Retire el enchufe de la toma de pared.
6. Deje enfriar la tostadora antes de guardarla.
ATENCIÓN:
• Cuando la temperatura ajustada es demasiado alta, el pan empezará a echar humo. En tal caso, pulse
el botón de parada para interrumpir el tueste (3).
• Si el pan se queda atascado en el tostador, retire el enchufe (5) de la fuente de alimentación y deje
enfriar el tostador. A continuación, saque el pan del tostador con cuidado. No use objetos con filo o
metálicos para sacarlo.
LIMPIEZA Y MANTENIMIENTO
1. Retire el enchufe de la fuente de alimentación y deje enfriar el aparato.
2. Retire la bandeja recogemigas (2) del aparato (véase la figura 2) y saque las migas restantes.
3. Limpie la parte exterior del aparato con un paño húmedo y séquelo con un paño seco. Asegúrese de
que la humedad no entra al interior del aparato.
4. Vuelva a colocar la bandeja recogemigas en el aparato.
ATENCIÓN:
• No sumerja nunca el aparato, ni el enchufe, ni el cable en agua. No lo meta nunca en el lavavajillas.
• No use limpiadores fuertes ni abrasivos, ni objetos con filo (como cuchillos o cepillos con cerdas duras)
para limpiar el aparato.
SERVICIO DE ATENCIÓN
Si hubiera una avería inesperada, póngase en contacto con el servicio de atención BESTRON:
www.bestron.com/service.
14
ES


NEED HELP? CHAT WITH US!
WHATSAPP CUSTOMER SERVICE
BRAUCHEN SIE HILFE? CHATTE MIT UNS! WHATSAPP KUNDENSERVICE
BESOIN D’AIDE? DISCUTE AVEC NOUS! SERVICE CLIENTÈLE WHATSAPP
HULP NODIG? CHAT MET ONS! WHATSAPP KLANTENSERVICE
HO BISOGNO DI AIUTO? CHATTA CON NOI! SERVIZIO CLIENTI WHATSAPP
¿NECESITAS AYUDA? ¡HABLA CON NOSOTROS! SERVICIO AL CLIENTE DE WHATSAPP
BESTRON.COM/WHATSAPP
ALL YOU WANT TO KNOW ABOUT
YOUR UNIQUE 5 YEAR WARRANTY
ALLES, WAS SIE ÜBER IHRE EINZIGARTIGE 5-JAHRES-GARANTIE WISSEN MÖCHTEN
TOUT CE QUE VOUS VOULEZ SAVOIR SUR VOTRE GARANTIE UNIQUE DE 5 ANS
ALLES WAT U WILT WETEN OVER UW UNIEKE GARANTIE VAN 5 JAAR
TUTTO QUELLO CHE VUOI SAPERE SULLA TUA GARANZIA UNICA DI 5 ANNI
TODO LO QUE QUIERES SABER SOBRE TU ÚNICA GARANTÍA DE 5 AÑOS
BESTRON.COM/GUARANTEE
T
O
P
Q
U
A
L
I
T
Y
G
U
A
R
A
N
T
E
E
GERMANY & EASTERN EUROPE
CUSTOMER SERVICE
GERMANY [email protected]
CZECHIA [email protected]
SLOVENSKO [email protected]
HRVATSKA [email protected]
POLSKA [email protected]
ROMÂNIA [email protected]
BULGARIA [email protected]
SERVICE HOTLINE: 00800 954 39 543
230320-01
Table of contents
Languages:
Other Bestron Toaster manuals

Bestron
Bestron ATS100RE User manual

Bestron
Bestron ATO978W User manual

Bestron
Bestron ATS300EVB User manual

Bestron
Bestron ATS200RE User manual

Bestron
Bestron AYT600Z User manual

Bestron
Bestron ATO900STE User manual

Bestron
Bestron AYT600 User manual

Bestron
Bestron ATO978Z User manual

Bestron
Bestron ATS1000CO User manual

Bestron
Bestron ATS300RE User manual
Popular Toaster manuals by other brands

cecotec
cecotec TOAST&TASTE 9000 DOUBLE WHITE instruction manual

Bosch
Bosch TAT3A G Series instruction manual

Toastmaster
Toastmaster B604ABCAN Use and care guide

SEVERIN
SEVERIN AT 2509 Instructions for use

dyras
dyras T-389PNK instruction manual

Russell Hobbs
Russell Hobbs PERFECT TOAST RHT100 Series instructions