Better BT0318 User manual
DVD/VCD/CD/MP3/MP4/SD/USB PLAYER WITH FM/AM TUNER
BT0318
Operating Instructions
1
Safety Precautions
Safety Precautions .........................................1
Panel Controls................................................2
Remote Controls......................................... 3-4
General Operation ..................................... 4-5
Radio Mode ....................................................6
USB/SD/MMC/MP3 Mode ..............................7
Disc Mode................................................... 7-9
Track Playback ........................................10-11
DVD Setup.............................................. 12-13
Electrical Connections..................................14
Anti-Theft System.........................................15
Installation Guide..........................................16
Troubleshooting............................................17
Specications ...............................................18
Contents
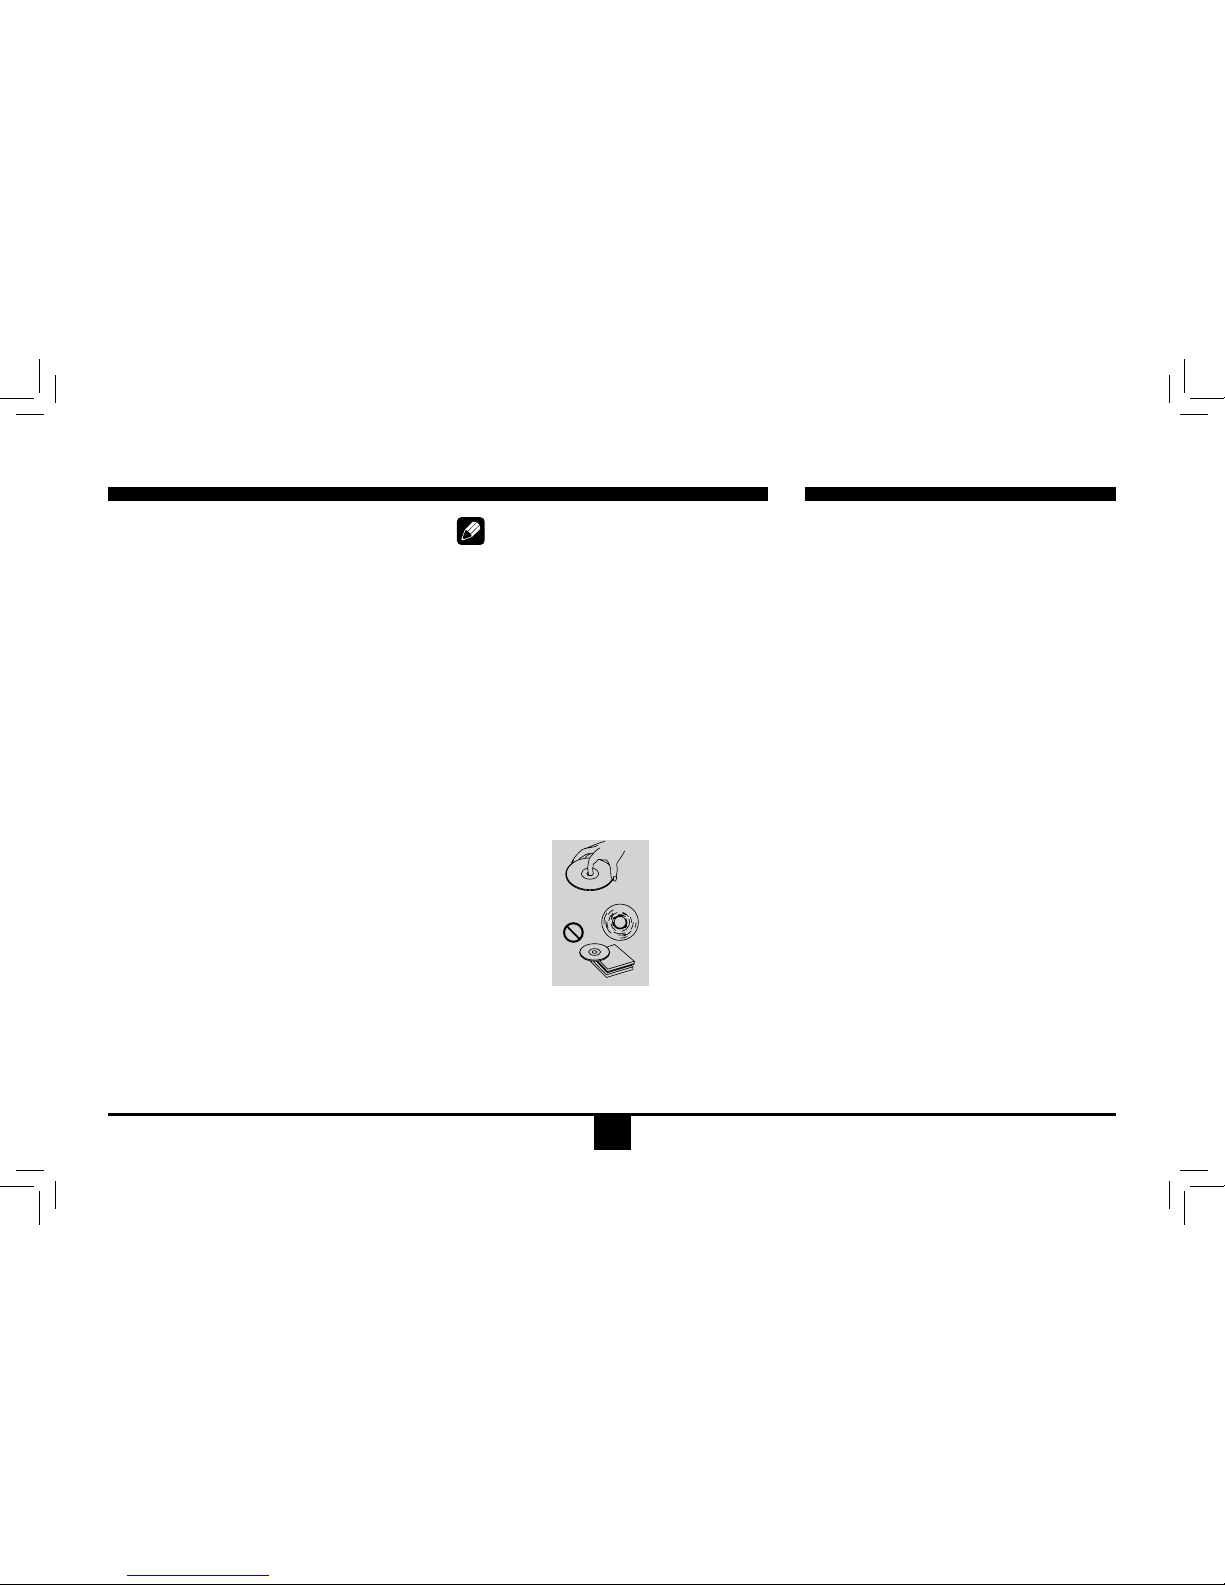
Note:
• Playingadefectiveordustydisccancause
dropouts in sound.
• Holddiscsasillustrated.
• Donottouchtheunlabeledside.
• Donotattach anyseal,labelordata
protection sheet to either side of a disc.
• Donot exposea disctodirectsunlightor
excessiveheat.
• Wipea dirtydisc fromthe centeroutward
withacleaningcloth.
• Never use solvents such as benzine or
alcohol.
• Thisunitcannotplay3-inch(8cm)discs.
• Neverinserta3-inchdisccontained inthe
adapter or an irregularly shaped disc.
The unit may not be able to eject it.
Precautions
• Useonly ina 12-voltDC negative-ground
electrical system.
• Whenreplacingthefuse,besuretouseone
withanidenticalamperagerating.Using
afusewithahigheramperagerating may
cause serious damage to the unit.
• Donotattempt todisassembletheunit.
Laser beams from the optical pickup are
dangerous to the eyes.
• Makesurethatpinsorotherforeignobjects
do not get inside the unit; they may cause
malfunctions,orcreate safetyhazardssuch
aselectricalshockorlaserbeamexposure.
• Ifyouhaveparkedthecarforalongtimein
hotorcoldweather,waituntilthetemperature
in the car becomes normal before operating
the unit.
• Keepthevolumeatalevelatwhichyoucan
hearoutsidewarningsound(hornssirens,etc.).
• Donotopencoversanddonotrepairthemby
yourself.Consult thedealeroranexperienced
technician for help.
• In addition to ordinary CDs, this unit can
playbackCD-RorCD-RW,MP3.
Toprovideacleardemonstrationand
an
alternativeforeasyunderstanding ofthe
operationofthisunit, graphicillustrationis
used.
However,thisillustration isnotnecessarily
printed as the actual image found on the unit.
2
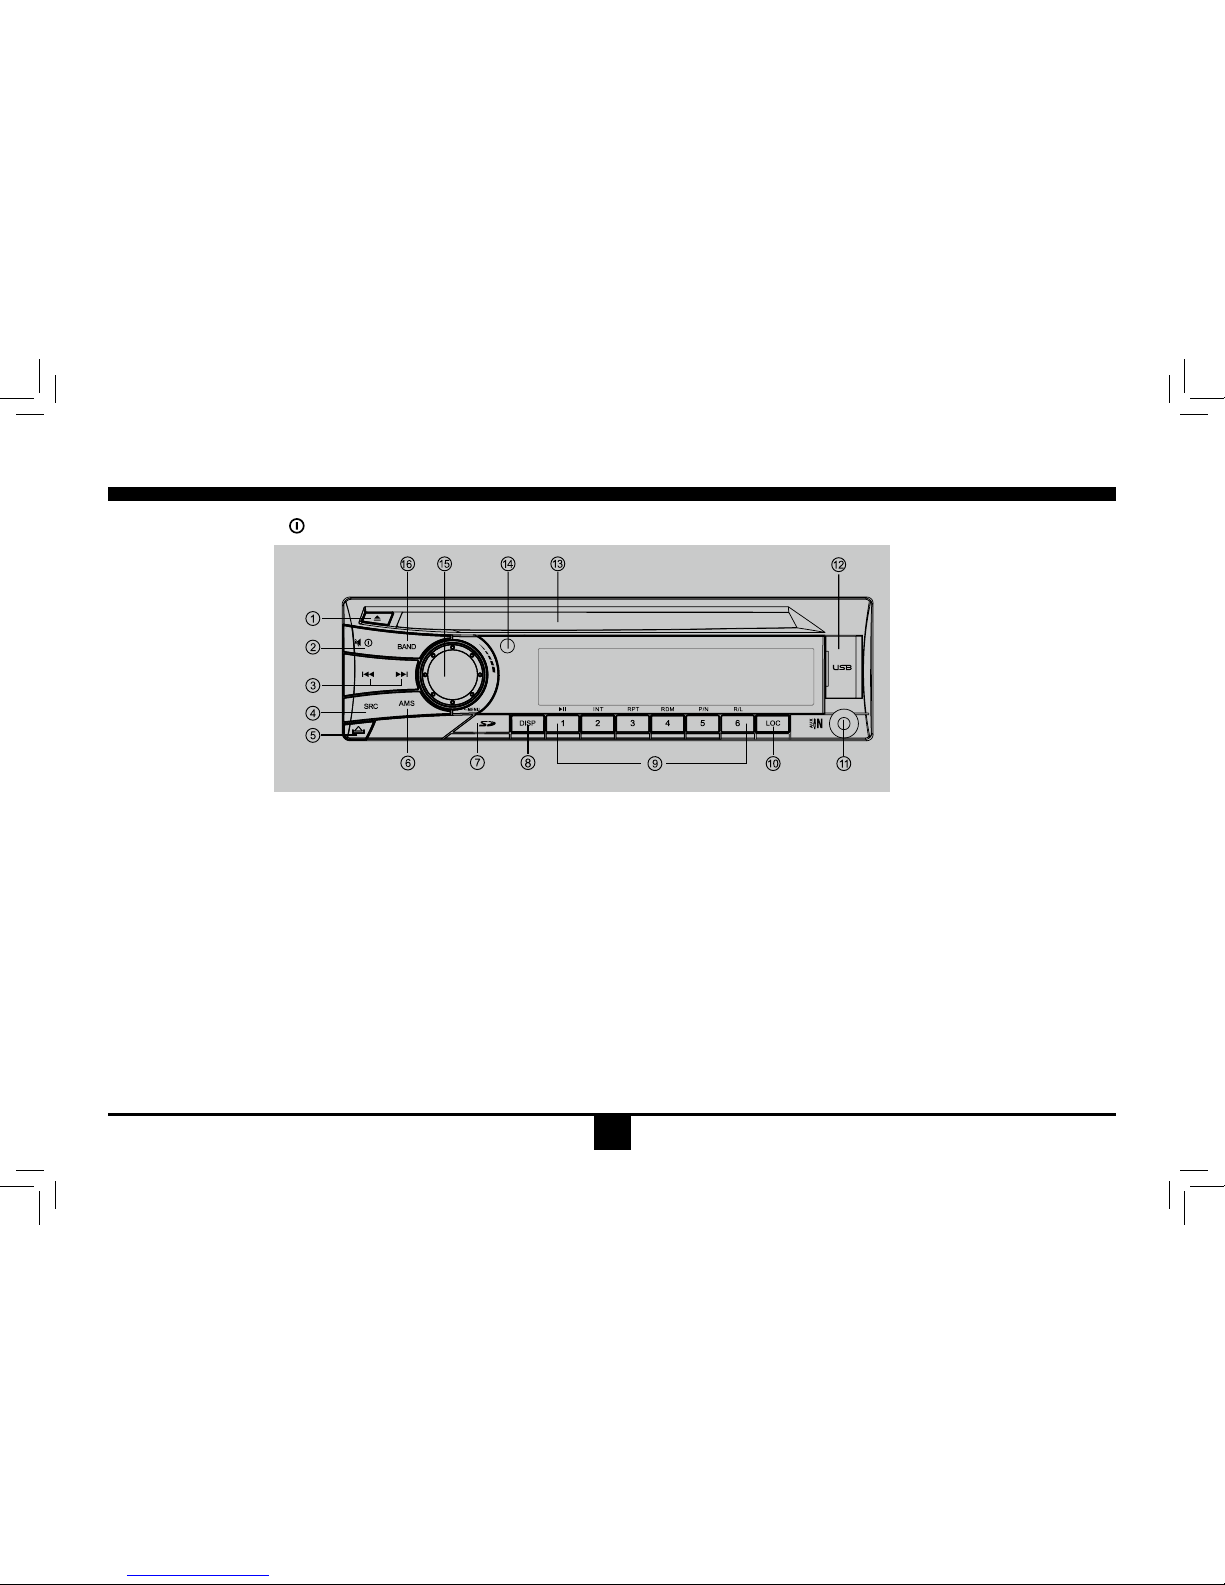
Panel Controls
Power on/off: Press to turn on/off the unit.
1. Disc eject
2.-Poweron/off(pressmorethan2seconds)
- Mute
3. - Radio tune
- Track seek
4.-Aux
- Tuner
-Disc(whendiscinserted)
-USB(whenUSBinserted)
-Card(whenSD/MMCinserted)
5. Panel open
6. Radio station auto preset
7. SD/MMCcardslot(locatedbehindthefront
panel)
10. Radio local/distant
11.AUXIN
12. USB connector
13. Disc slot
14. Remote sensor
15.-Rotatethecontroltoadjustvolumelevel
- Audio mode select.
- Press more than 2 seconds to enter into
menu mode.
16.BandSwitch:
FM1 - FM2 - FM3 - AM1 - AM2
8.-Shortpresstoswitchtoclockdisplay,
pressagaintoexit.
- Long press to enter clock setting.
9.1button:Play/Pause
2button:scanplay
3button:Trackrepeatplay
4button:Trackrandomplay
5button:-VideosystemNTSC\PAL\AUTO
-Selectfolderdown
6button:-DVDaudio/VCDaudioL/R/ST
- Select folder up
*1-6Radiopreset:
- Press to tune in a preset station.
- Holdformorethan2secondstostorestation.
3
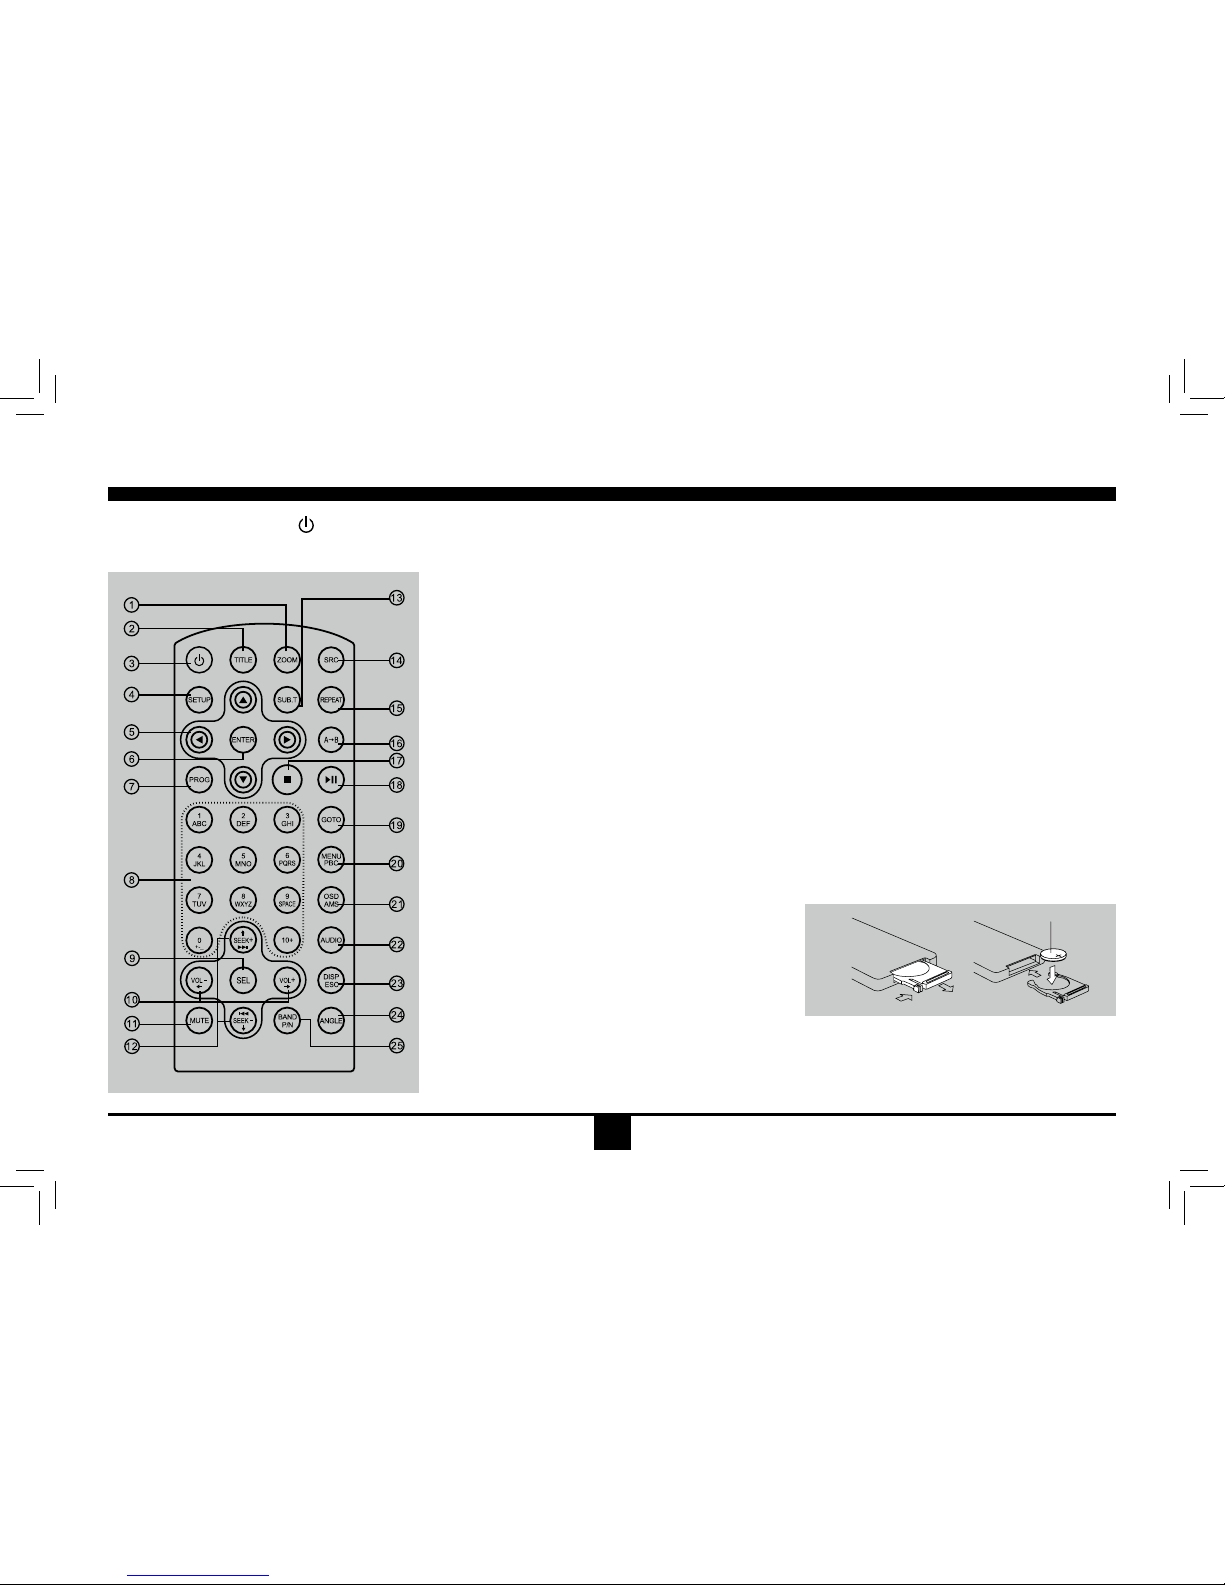
Remote Controls
Power on/off: Press to turn on/
off the unit.
Replacing the lithium battery of
remote control unit.
Whentherangeofoperationofthecard
remotecontrolbecomesshort orno function,
replacethelithiumbatterywithanewone.
Make sure the battery polarity replacement is
correct.
1.Pulloutthebatteryholderwhilepressingthe
stopper.
2.Insertthebutton-typelithiumbatterywith
the(+)markfacingupward.Insertthebattery
holder into the remote control.
1 2
(CR 2025)
1.Zoom(DVD/VCDonly)
2.Title(DVDonly)
3.Poweron/off
4. Setup
5. Menu cursor
6. Enter
7. Program
8. Digit area
9.-Shortpresstoselectaudiomenu,androtate
theknobtoadjustlevel.
-Longpresstoenterintosettingmenu,then
each press changes the mode.
10. Volume
11. Mute
12. - Radio tune
- Track skip/seek
13.Subtitle(DVDonly)
14. -Aux
- Tuner
-Disc(whendiscinserted)
-USB(whenUSBinserted)
-Card(whenSD/MMCinserted)
15. Repeat
16. Repeat A-B
17. Stop/Return
18. Play/Pause
19. Goto search
20. - DVD menu
-PBC(forVCD2.0orup)
21.-OSD:Onscreendisplay
-AMS:Radiopresetscan/Radioautopreset
22. - DVD audio
- VCD audio L/R/ST
23.-Shortpresstoswitchtoclockdisplay,
pressagaintoexit.
- Long press to enter clock setting.
-Returntopreviousmenu(Settingmenu)
24.Angle(DVDonly)
25.-VideosystemNTSC\PAL\AUTO
-Radioband(inRadiomode)
4
Remote Controls
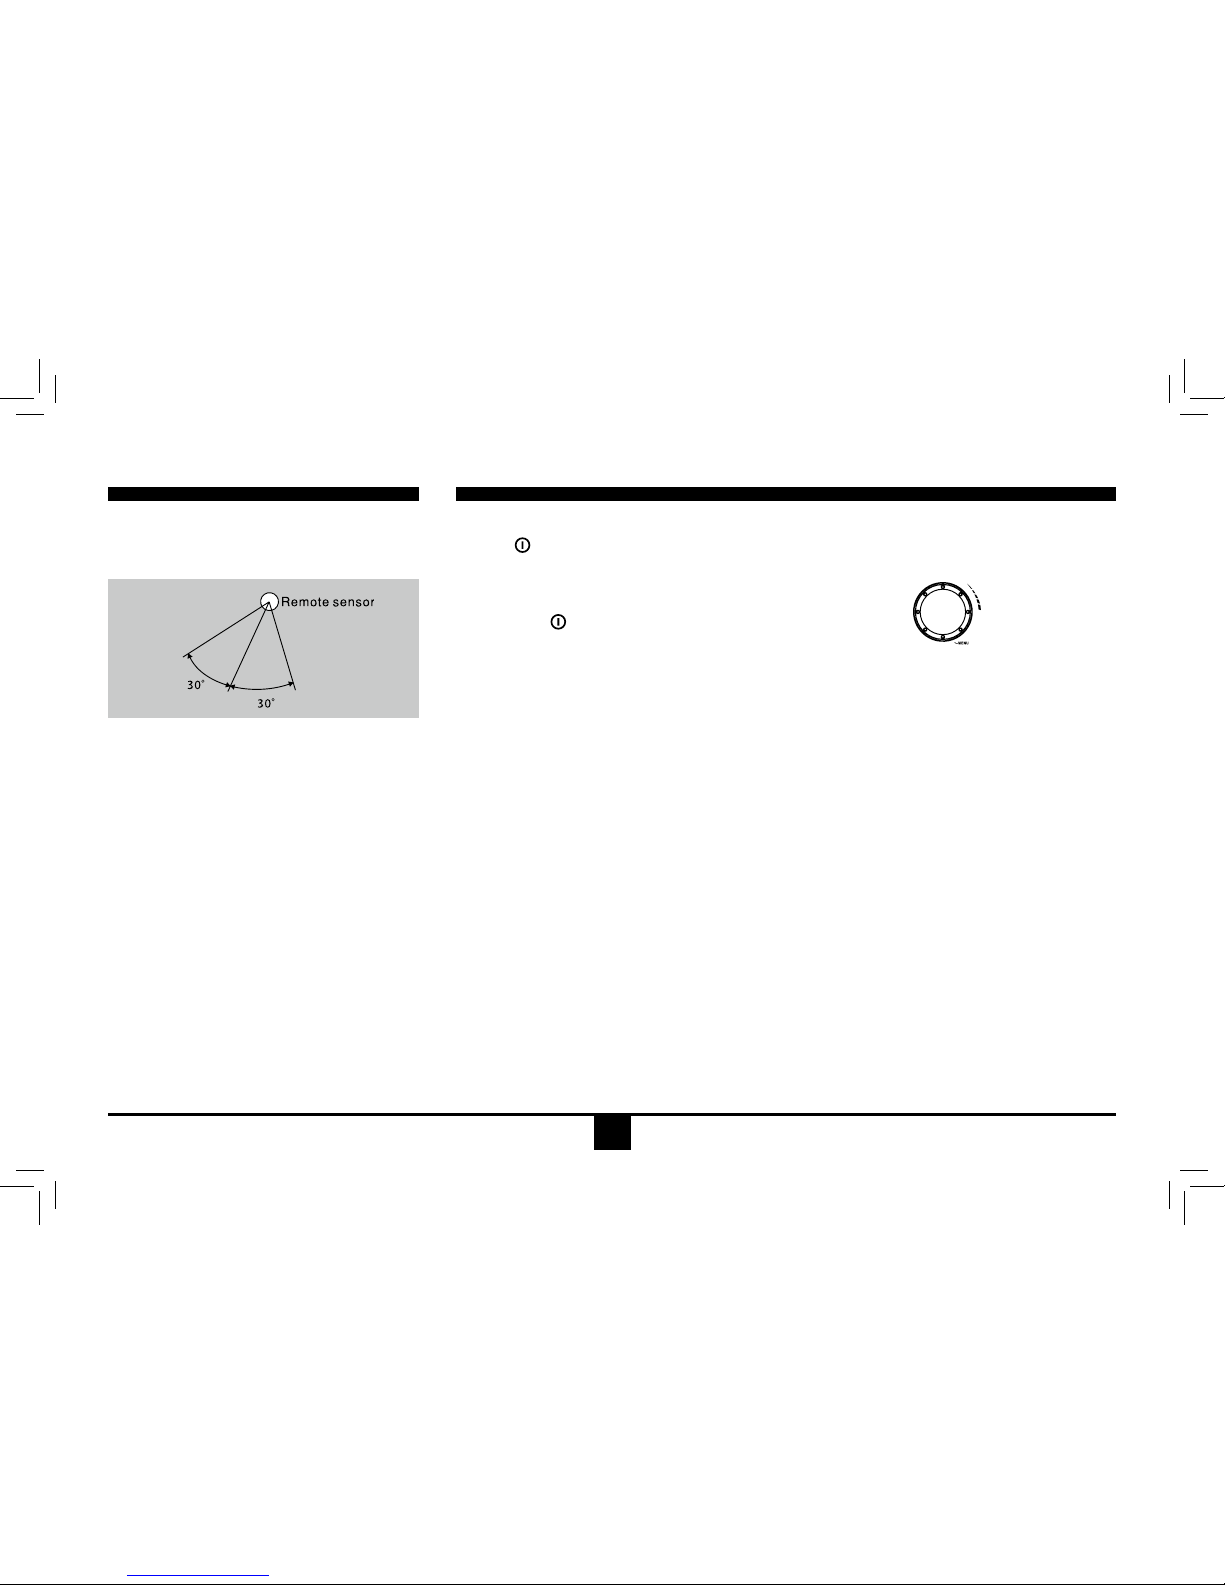
Remote control operating range
Theremotecontrolcanoperatewithina
distance of 3~5m.
Warning
• Storethebatterywherechildrencannot
reach.Ifachildaccidentallyswallowsthe
battery,consultadoctorimmediately.
• Donotrecharge,short,disassembleorheat
thebatteryordisposeitinare.
• Donotleavethebatterywith othermetallic
materials.Otherwise,the battery may start
togiveoffheat,crackorcatchre.
• Whenthrowingaway orsaving thebattery,
wrapitintapeandinsulate.
General Operation
Switching on and off
1. Press to turn on the unit.
2. Press SRC once or more to select your
desiredfunction:Aux(Aux-in),Tuner
(Radio),DISC,USB,CARD.
3. Long press againtopoweroff.
4.When you switch off the system or car
ignition,thesettings,tuner presetsand the
volumelevelwillberetainedintheunit's
memory.
Clock Display
Press DISP on the panel or on the remote
controltodisplayclocktime,andpressDISP
againtoexit.
Clock Setting
1. Press DISPmorethan2seconds,hour
displayblinks, then rotatethe knob to set
hour.
2. Press the VOLknobtoconrm,andminute
displayblinks,thenrotatetheVOL knob to
set minute.
3. Press DISPagaintoexit.
Audio Setting
Press the VOL knobtoselectaudiosetting,
and rotate the knob to adjust.
- VOL
DisplayshowsthevolumelevelVOLandnum-
ber from 0 to 40.
- BAS
DisplayshowstheBASSlevel.
BASSrange:-7to+7.
- MID
DisplayshowstheMiddlelevel.
Middlerange:-7to+7.
- TRE
DisplayshowstheTREBLElevel.
TREBLErange:-7to+7.
- BAL
DisplayshowstheBALANCElevel.
BALANCE range:12L(full left)to12 R (full
right).
L=leftspeaker,R=rightspeaker.
- FAD
DisplayshowstheFADERlevel.
FADERrange:12R(full rear)to12F(full
front).
R=rearspeaker,F=frontspeaker.

5
General Operation
Menu Setting
Press the VOL knob more than 2 seconds
toenterintomenumode,theneachpress
changes the mode.
- EQ Mode
TheEqualizerfunctionappliespresetsound
effects to the unit’s audio output signal. Rotate
theknobtoselectEQsoundeffect:
FLAT-CLASSIC-ROCK-POP-JAZZ-USER
Withtheequalizerfunctionactivated,ifbassor
trebleisadjusted,theEQ Modewill revertto
“Off”.Whentheequalizerfunctionisactivated,
themostrecentlyselectedbass/treblelevels
cannotbeadjusted.When theequalizer
functionisnotactive,theunitwillreturntothe
mostrecentlyselectedbassandtreblelevels.
- LOUD ON/ OFF
When listening tomusic at low volumes,this
featurewillselectivelyboostcertainbassand
treble frequencies.
- BEEP ON/ OFF
Thebeeptonefeatureallows theselection of
an audible beep tone to be heard each time
the menu is accessed.
- SUBW ON/ OFF
Rotatetheknobtochoosesubwoofer-outon
or off.
- 12 /24 HOURS Mode
12 HOURS MODE:
The clock displays in the type of 12 hours such
as 11:18 AM.
24 HOURS MODE:
The clock displays in the type of 24 hours such
as 20:18.
- MONO/STEREO
Selectable when the current source is Radio
mode.
Thisoptionallowsyoutoselect radio FM
mono/stereo.
- AREA SET
Thisoptionallowsyoutoselecttheappropriate
frequency spacing for your area.
Rotate the knob to choose USA or Europe.
- SWC SET
Rotatetheknobtoselecta SWCcontrol
button:POWER-MUTE-SOURE-VOLUP-
VOLDN-SEEKUP-SEEKDN-BAND

6
Radio Mode
Selecting a Band
Press BAND once or more to select FM1 -
FM2 - FM3 - AM1 - AM2.
Displayshowswaveband,frequency,and
preset station number if already stored.
Selecting a Station
Press the or tuning button to tune to
another station.
Tuning
- AUTO SEEK
Press the or buttonstoseekthenext/
previousstationautomatically.
- MANUAL SEEK
Press and hold the or buttons to enter
manual tuning mode. Press the buttons again
tomovetheradiofrequencynumberup or
downonestep.
Note:
• Duringmanual seeking,ifthepause
betweentwooperatingstepsis longerthan
5seconds,whenyoucontinuetopress the
or buttons, theunit willenter auto
seeking.
• Duringmanualseeking,whenyoupressand
hold the or buttons,theunitwillseek
continuously.
Preset Mode
Sixnumberedpresetbuttonsstoreandrecall
stations for each band. The stored stations
(1-6)forthecurrentbandcanbeviewedon
the screen.
Storing Stations
- Auto storing
1.Selectaband(ifneeded).
2. Press AMS briefly to search all stations in
the band,the6strongestavailablestation
willbeautomaticallysavedinthepreset
button(numbers1-6).
- Manual storing
1.Selecta band(if needed),then selecta
station.
2.Pressand hold a preset button (numbers
1-6)onthefrontpanelorremotecontrol.
Recalling a Station
1.Selectaband(ifneeded).
2.Pressapresetbutton(numbers1-6)onthe
front panel or remote control to select the
corresponding stored station.
7
USB/SD/MMC/MP3 Mode
Accessing Disc Mode
If a disc is already in the disc slot but is not
playing,presstheSRC button on the front
panelorontheremotecontroltoswitchtothe
DISCsource.ToplaylesfromanSDorUSB
that is already inserted, choose the CARD
or USB source. The disc playback screen is
indicatedbelow:
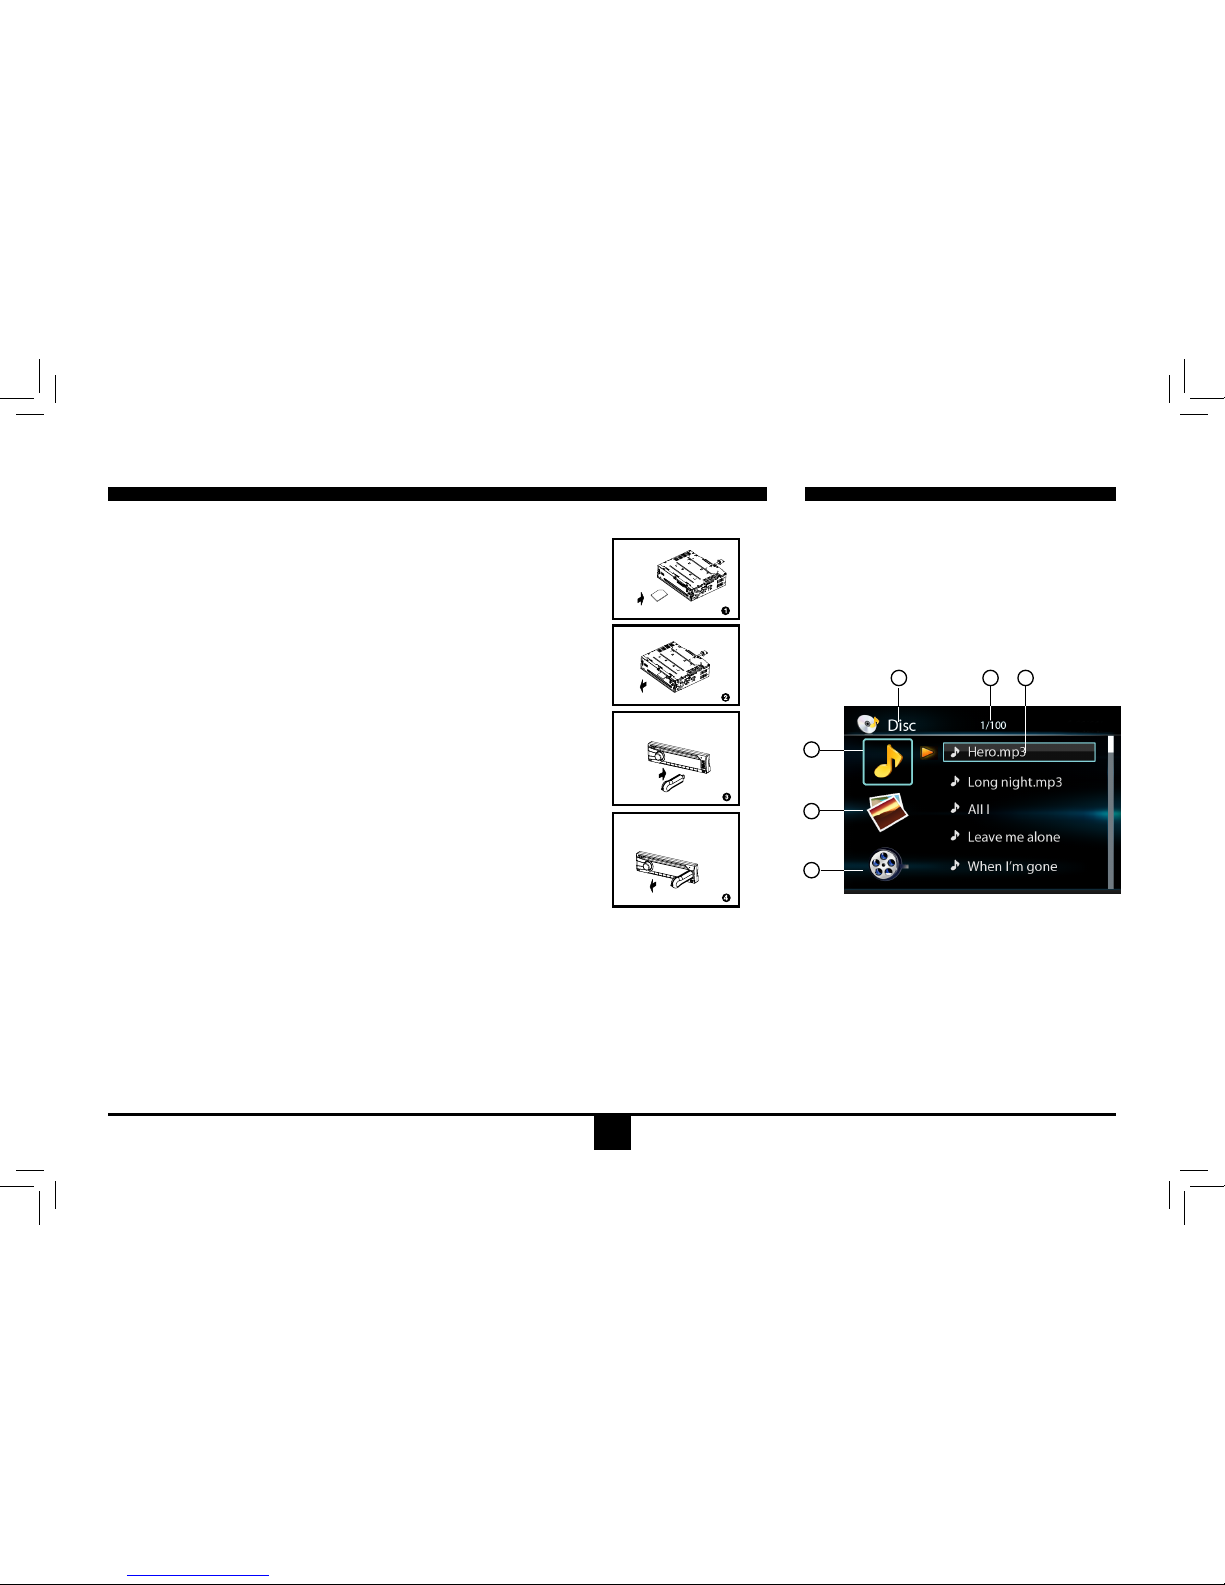
Disc Mode
1. Source Indicator
2. Current Track/Total Track
3.NameoftheSongDisplay
4. Audio Folder
5. Picture Folder
6. Video Folder
2
4
5
6
1 3
1. Loading SD/MMC Card
Insert the SD/MMC card into the slot.
Theunitwillplaythemusicautomaticallyandthe LCDwillshow
CARD.
2. Take out SD/MMC Card
PushSRCbuttonandswitchtononCARDmode,slightlypressSD/
MMCcard,takeoutthecardwhenitwaspoppedout.
3. Loading USB equipment
Opentherubbercap,inserttheUSBintotheconnectorandtheunit
playthemusicintheUSBstorerautomatically,and theLCD will
showUSB.
4. Take out USB equipment
PushtheSRCbuttonandswitchtononUSBmode,thentakeoffthe
USBstorer,closetherubbercap.
USB/SD/MMC Notes
USBfunctions(ashmemorytype)MP3musicplay.
1. SD/MMC card support.
2.USBashmemory2in1(SD/MMC)support.
3. Support FAT 16 & FAT 32
4.Filename:32byte/dirname:32byte/tagname:32byte.
5.Tag(id3tagver2.0)
Title/artist/album:32bytesupport.
6. Multi card reader not support.
7. USB 1.1 support.
Not all kinds of USB devices are compatible with the unit.

8
Insert a Disc
Insertthediscintotheslot,andtheunitwill
change to disc mode automatically.
Note:
• Pleaseconrmwhetherthereisadiscin
the unit before you insert another one.
• Theunitwillexitcurrentplayingsourceand
enterDVDmodewhenonediscisinserted.
Eject the Disc
Press to eject the disc.
Note:
• Afterejectingthedisc,theunitrevertsto
radio mode.
• Youcanejectadiscwiththeunitpowered
off. The unit remains off after the disc is
ejected.
Disc Playback
1.When disc inserted, display shows LOAD.
ForMP3ordiscwithmixedfiles,reading
timemayexceed1minute.
2.ERRORwillbedisplayediferrorfoundin
disc operation.
3.ForVCD/CD,VCDorCDiconwillappear
on the display.
4.WhileMP3/WMAlesplayback,MP3/WMA
iconwillappearonthedisplay.
5.ForDVD,DVDiconwillappearonthe
display and TITLE appears. Press ENTER
or to play.
File Type Supported
Audio le: MP3(*.mp3), WMA(*.wma)
Video le:
MP4 (*.avi)
MPEG 2 (*.vob)
MPEG 1 (*.dat)
Picture le: JPEG (*.jpg)
MP3 le:
ISO9660orISO9660+Joliet format- Max.
30 characters.
Max. nested directory is 8 levels.
The max. album number is 99.
The max. length of each track is 99 minutes
59 seconds.
Supported sampling frequency for MP3 disc:
8KHz to 48KHz (44.1KHz preferably).
Supported bit-rates of MP3 disc are: 32 - 320
kbps (128 kbps preferably).
Disc and File NOT Supported
*.AAC, *.DLF, *.M3U, *.PLS, MP3 PRO files
and files with DRM.
Open session discs.
Audio/Picture/Video File Playback
WhenAUDIO/PICTURE/VIDEO leisplayed,
Category/Folder/Filelistwillbedisplayedon
thescreen,andle/foldernamebeing played
willbedisplayedontop.Currentselecteditem
willbehighlighted.
Category Select
Use / to select AUDIO
PICTURE
VIDEO
Press ENTERtoconrm.
Folder Select
Use / to enter folder list and use / to
selectdesiredfolder,pressENTERtoconrm.
File Select
Use / to enter file list and use / to
selectdesiredle,pressENTER to play back.
ForPICTURE,press to slide show the
pictures,pressPROG to select picture
showingstyle.
ForMUSIC,press willenterpoweron logo,
then press to return.
Disc Mode
9
Note:
MP3andWMA(WindowsMediaAudio)music
lesaredigitalaudiolesthatarecompressed
toallowmorefiles tobe stored.Thisunit
canplayMP3/WMAandvideodirectlyfrom
filescontainedonaCD-R/RW,DVD-ROM,
DVD+RW, DVD-RW,DVD+R,DVD-Rand
DVD-VIDEO, oran SD card orUSBDevice.
Manytypesofsoftware areavailable forcon-
vertingaudiofilesinto MP3/WMA formats.
NeroorRoxioEasy CDCreatorarerecom-
mended.ThisunitcanplayMP3(MPEG1,2,
2.5AudioLayer3).However,theMP3record-
ing media and accepted formats are limited.
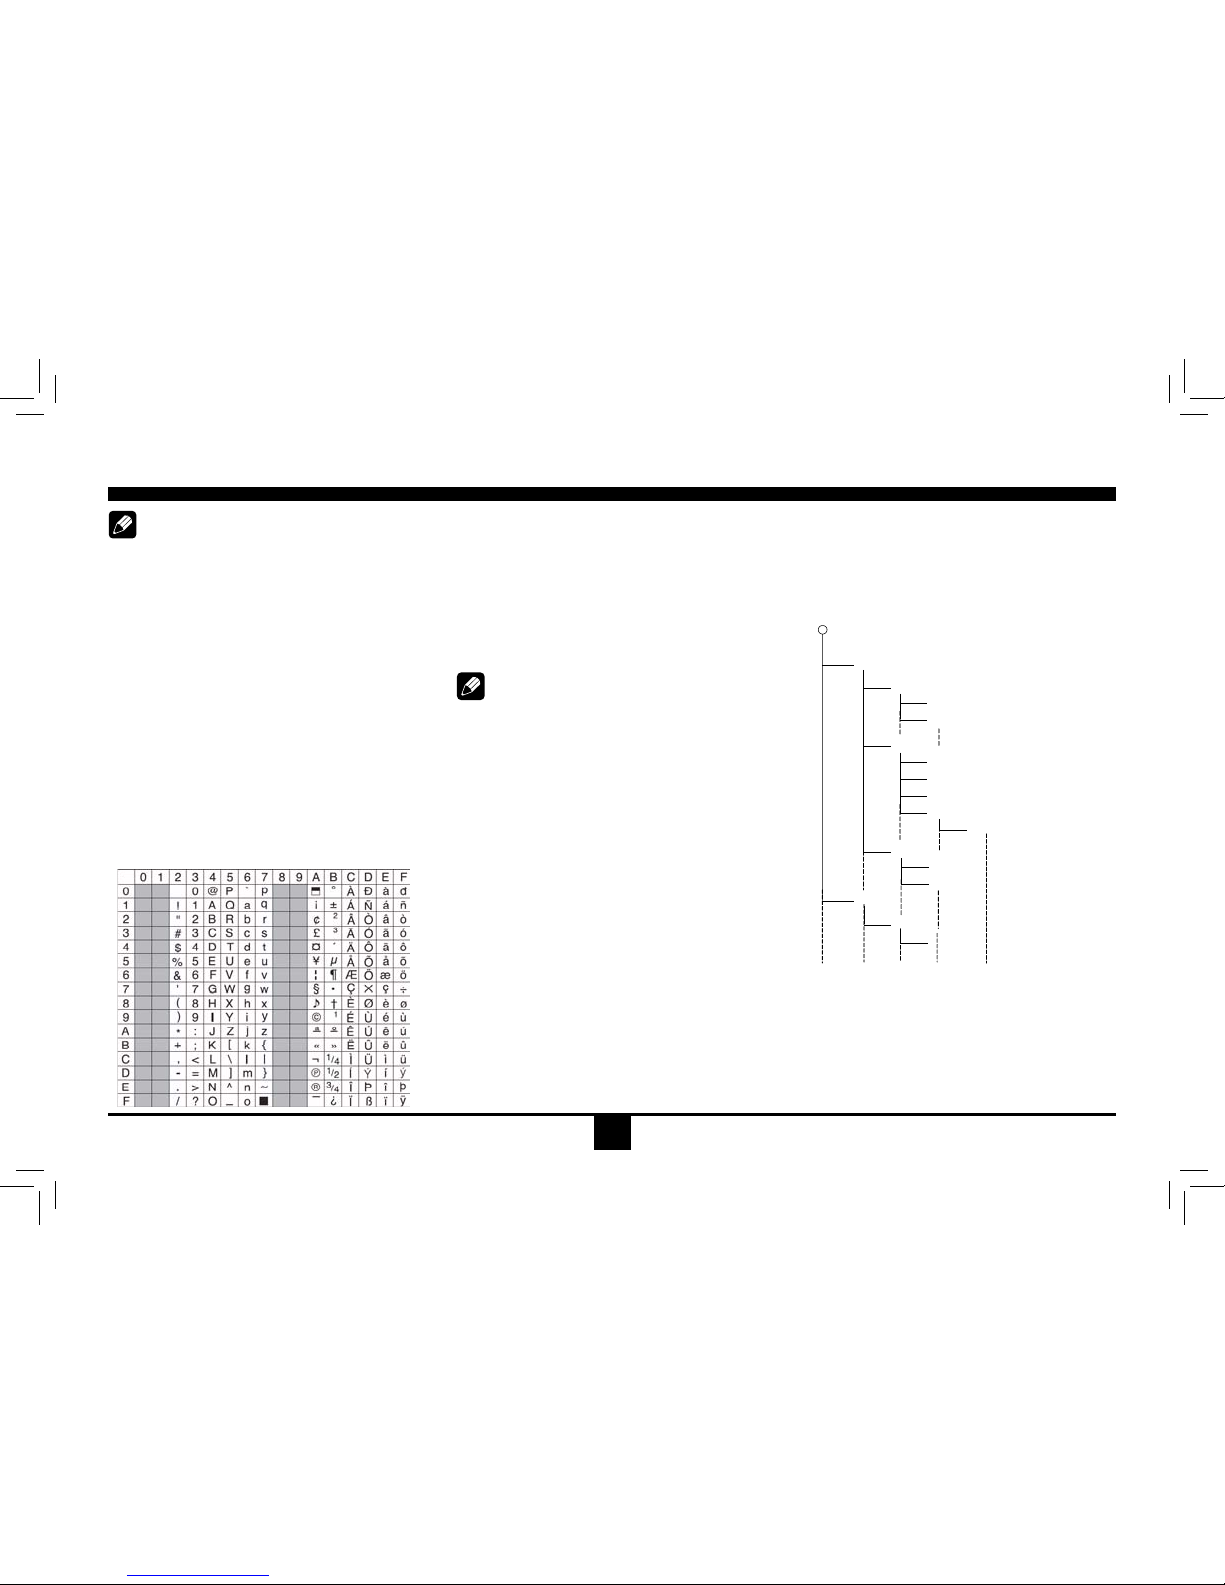
Entering ID3 Tag
ThisunitsupportsID3tagversion2.0.
Forcharactercodes,refertothetabletothe
below.
Entering File and Folder Names
Namesusingthecode listcharactersarethe
only file names and folder names that can
be entered and displayed. Using any other
characterwillcausethe leand foldernames
tobedisplayedincorrectly.Theunitrecognizes
andplaysonlyfiles withthe MP3/WMA
extension.
Note:
Alenameenteredwithcharactersnotonthe
code list may not play correctly.
Electronic Shock Protection
• 10secondsforCD-DA(CDA)
• >45secondsforMP3recorded at44.1kHz,
128kbps
• >90secondsforWMArecordedat44.1kHz,
128kbps
Bit Rates
The unit supports bit rates from 32 - 320 kbps.
MP3 Playing Order
When selected for play, files and folders
(FolderSearch,FileSearchorFolderSelect)
areaccessedinthe orderin whichtheywere
writtentothemedia.Asa result,the orderin
whichtheyareexpectedtobeplayedmay
notmatchtheorderinwhichtheyareactually
played. You may be able to set the order in
whichMP3/WMAfilesareto beplayed by
assigningfilenamesbeginningwithplay
sequence numbers such as "01" to "99". For
example,amediumwith thefollowing folder/
lehierarchyissubject toFolderSearch,File
SearchorFolderSelectasshownbelow.
()
0
1
2♪①
♪②
5
♪⑧
♪⑦
6
7♪⑨
♪③
3
4
♪④
♪⑤
♪⑥
Layer1 Layer 2 Layer 3 Layer 4 Layer5
○Root Folder
Folder
♪File
Theplayerwillonlyrecognize threefolder
levelsanddoesnotdisplayfolderscontaining
onlyotherfolders.In theexampleabove,the
unitwilldisplayfolders 3,4, 6,and 8,butnot
2 and 7 since they do not contain any tracks
directly.Folder5isnotrecognizedatallsince
itisatthefourthlevel.
Disc Mode
10
Track Playback
Select Desired Track
- Press or toskiptothenexttrack.
- Use 1-9and0, 10+buttonson theremote
control to select desired track number.
Fast Forward/Backward During
Playback
Press or for more than 2 seconds once
ormoretoselectX2,X4, X8,X20 tofast
backwardorforwardtrackduringplayback.
-Duringthefastforwardorbackward
operation,press brieytoplaybackagain.
-Duringthefastforwardorbackward
operation,thevolumewillbemuted.
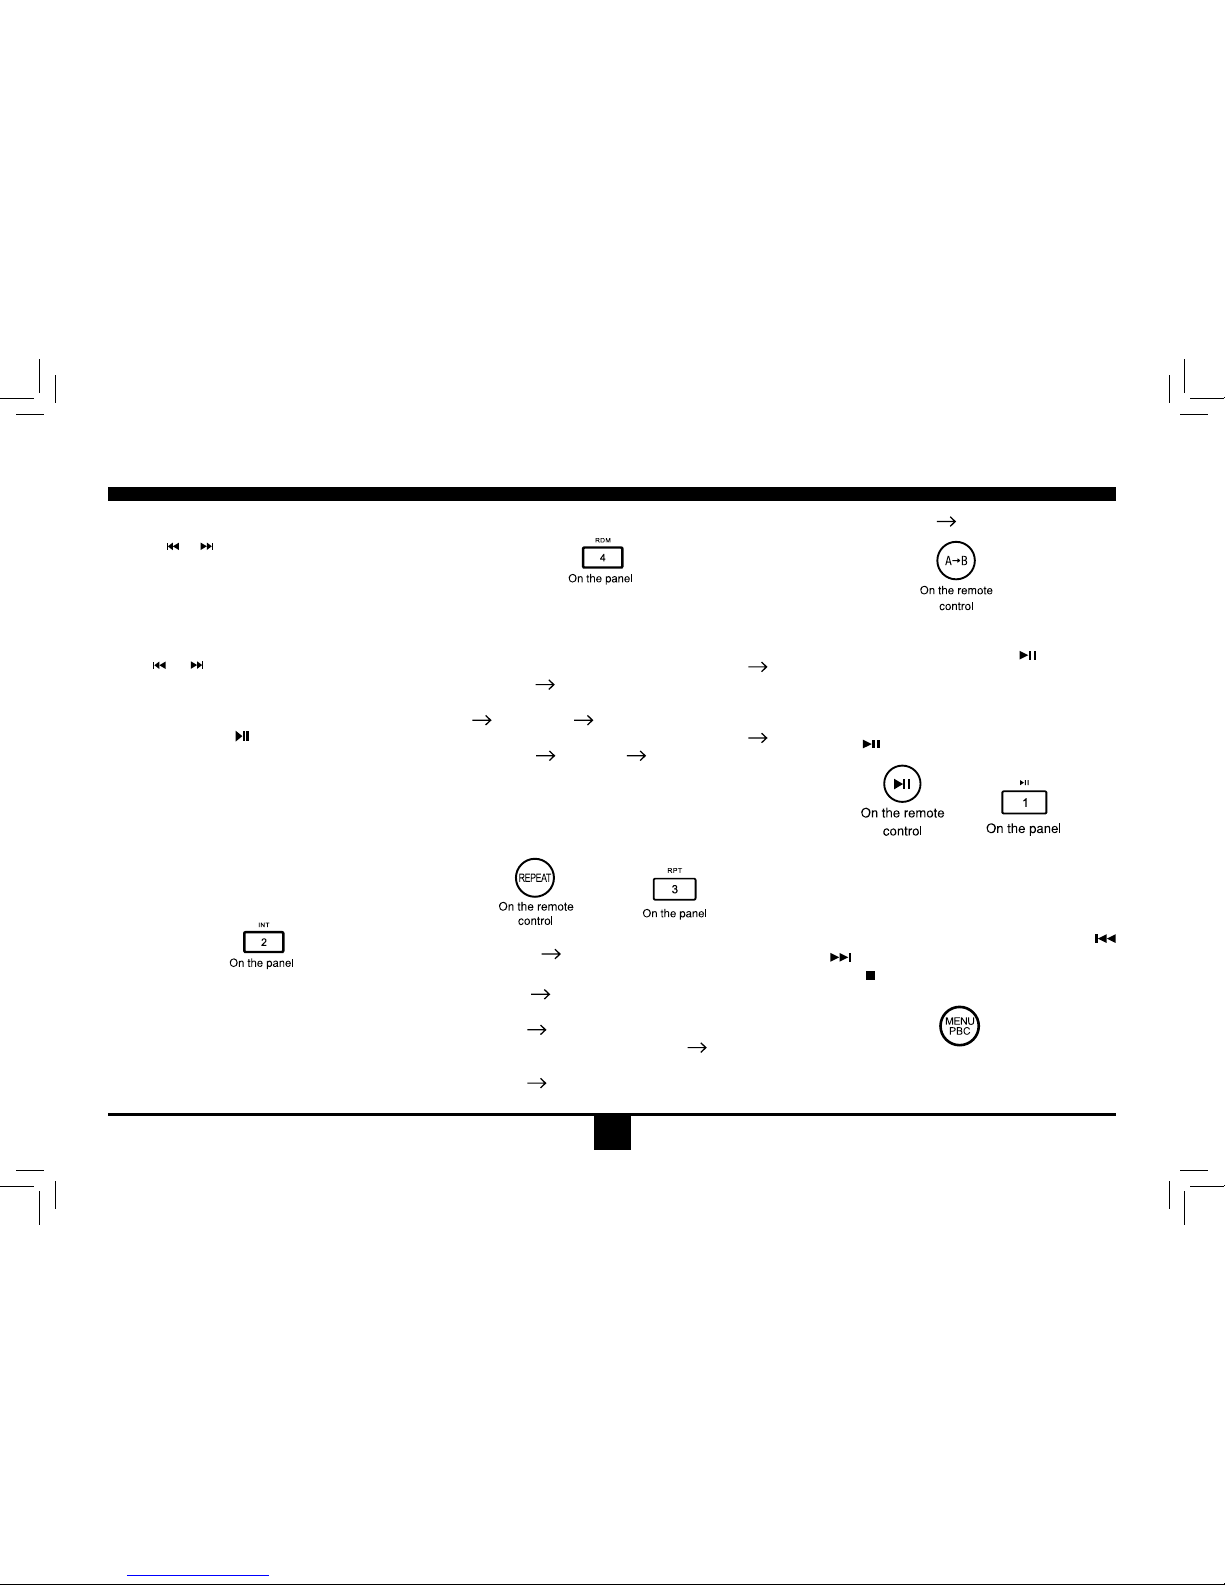
Intro (for CD/VCD only)
Youcanplaythebeginningofevery trackfor
10 seconds in sequence.
1.Duringplayback,pressINT once.
SCANON/OFFwillappearonthedisplay.
2. Press INT again to select the current track.
Random Rrack Playback (for CD/
VCD/MP3 Only)
You can play all the tracks in random order.
1.Duringplayback,pressRDM once or more.
-RDMiconwillappearonthedisplay.
2. Press RDM again to select normal playback.
Repeat
Duringplayback,pressREPEAT or RPT once
or more.
- RPTiconwillappearonthedisplay.
- ForVCD/CD:DisplayappearsRPTONE
RPT ALL RPT OFF
- For DVD:DisplayappearsRPTCHAPTER
RPT TITLE RPT OFF
- ForFiledisc:DisplayappearsRPTONE
RPT DIR RPT ALL RPT OFF
Note:Ifyoudo notselect RPTon,whenthe
entirediscorTITLE playbackhas finished,
thesystemwillstop.Ifnoothercontrol,after5
minutestheunitwillturnintostandbymode.
Repeat A B
Select desired passage to repeat playback.
- Press A B once to select starting point.
DisplayshowsREPEATA.
- Press A B again to select ending point.
DisplayshowsREPEATA B , an d
selected passage start to replay.
- Press A Bonceagaintoexit.
DisplayshowsA BCANCEL.
Pause
- Duringplayback,press to pa u s e
playback.
- Thesoundwillbemuted.
- Display"PAUSE"intheTV screen,display
and blink "PAUSE" on the panel display.
Press again to continue playback.
PBC - Playback Control (for VCD only)
1.Ifyouinsert aVCD withPBC,playback
starts from the beginning of the 1st track
automatically.
2. Press MENU PBCtoshowmenu,use
/ or digit button to select desired track.
Press toreturn to poweronlogo. Press
MENU PBCagaintoexitmenu.
On the remote
control
11
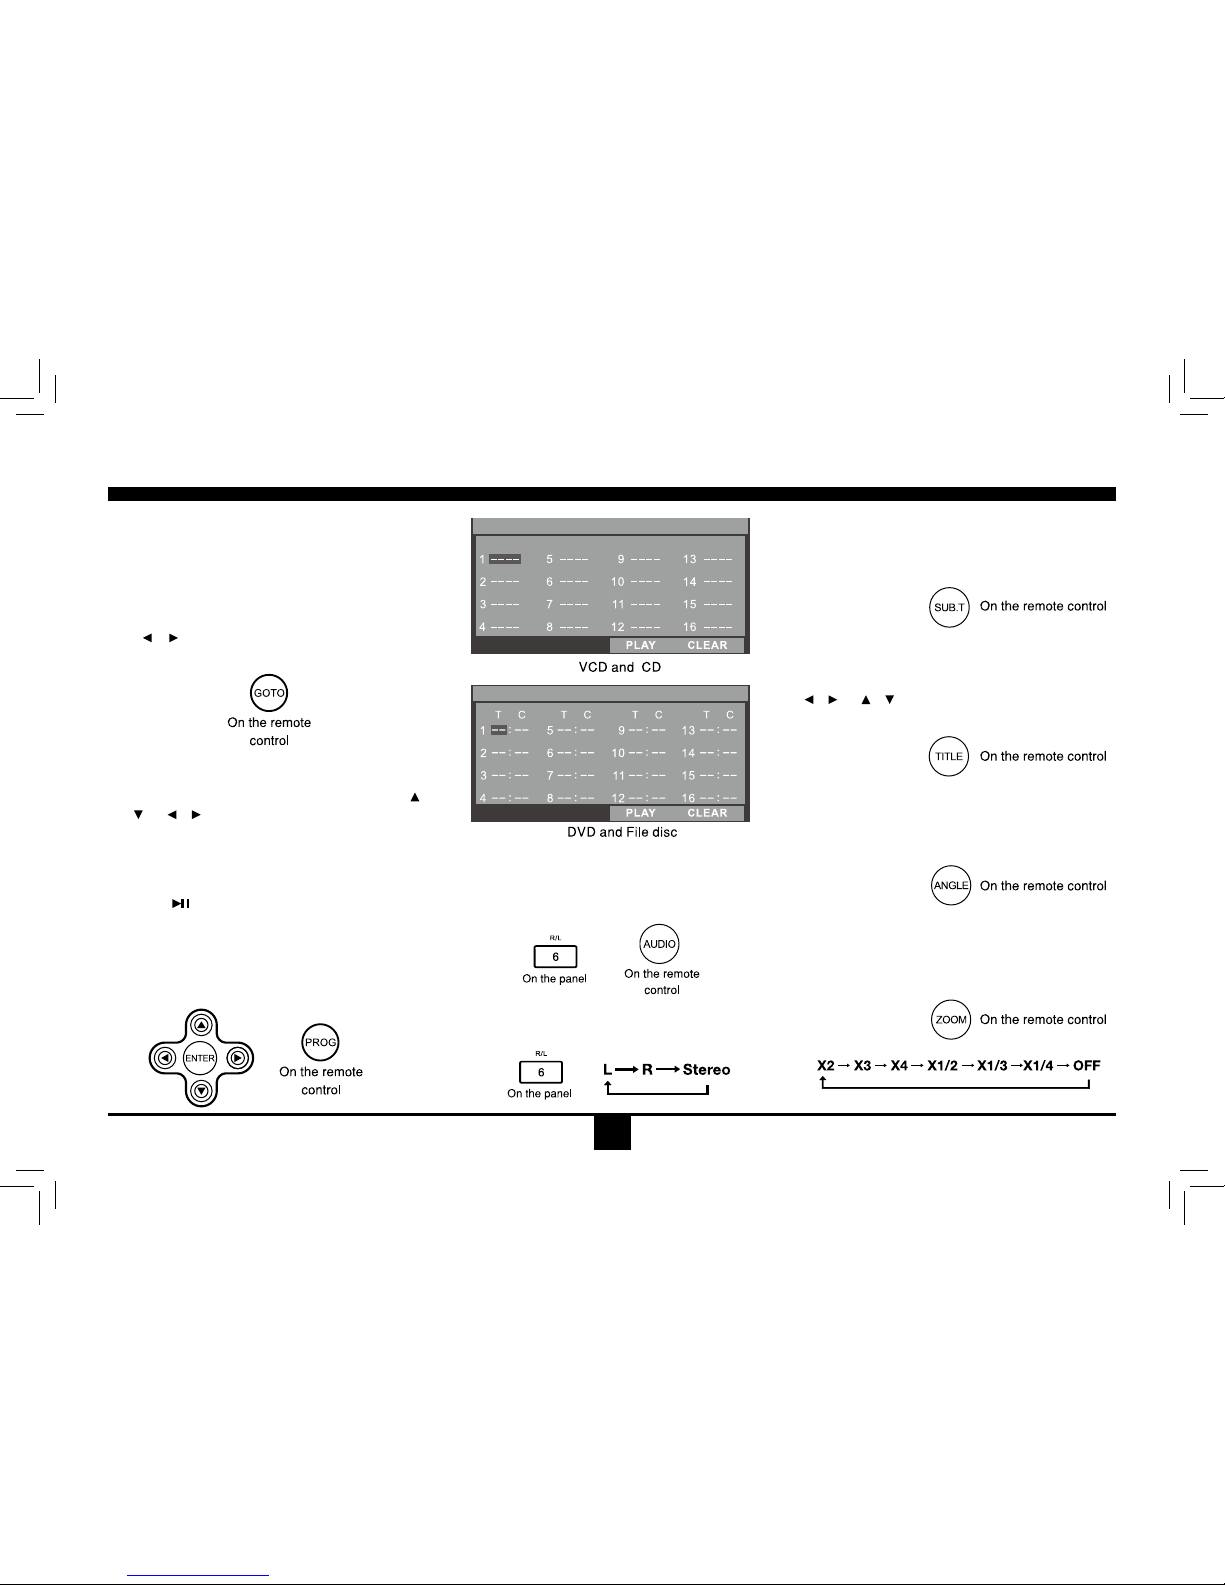
DVD Subtitle Select
Press SUB.T to select the subtitle language
toshowiftheDVDhasmultiplelanguage
subtitles.
DVD Title Select
Press TITLEtodisplaytitleorchapterlist,use
/ or / cursor ordigitnumbertoselect,
press ENTER to play.
DVD Angle Select
Press ANGLEtoselectdifferentangletoview
iftheDVDhasmultiple-angleviews.
Zoom
Press ZOOMbutton,thepicturewillbe
zoomedaccordingly.
Track Playback
GOTO
Goto desired track/chapter or time point
directly.
Press GOTObuttonon theremote control,
track or DVD Title/Chapter and time display on
top of the screen. Current item is highlighted.
Use / to select desired item. Use digit
button to select number. Press ENTER to
conrm.
Program
- Press PROG to enter program list. Use
/ or / cursor and digit button to enter
number.
ForDVDandFiledisc,selecttitleand
chapter number.
ForVCDandCD,selecttracknumber.
- Press toplay, ormove thecursorto
select "PLAY" and press ENTER to play.
- Ifyouwanttodeletethelist,movethecursor
to"CLEAR",pressENTER to delete all the
list set before.
- Press PROGagaintoexitprogramplay.
DVD Audio Select
Press AUDIO or R/L to select audio language
to listen if the DVD has multiple audio
languages.
VCD Audio Select
Press R/L to select audio channel to listen.
PROGRAM
PROGRAM
12
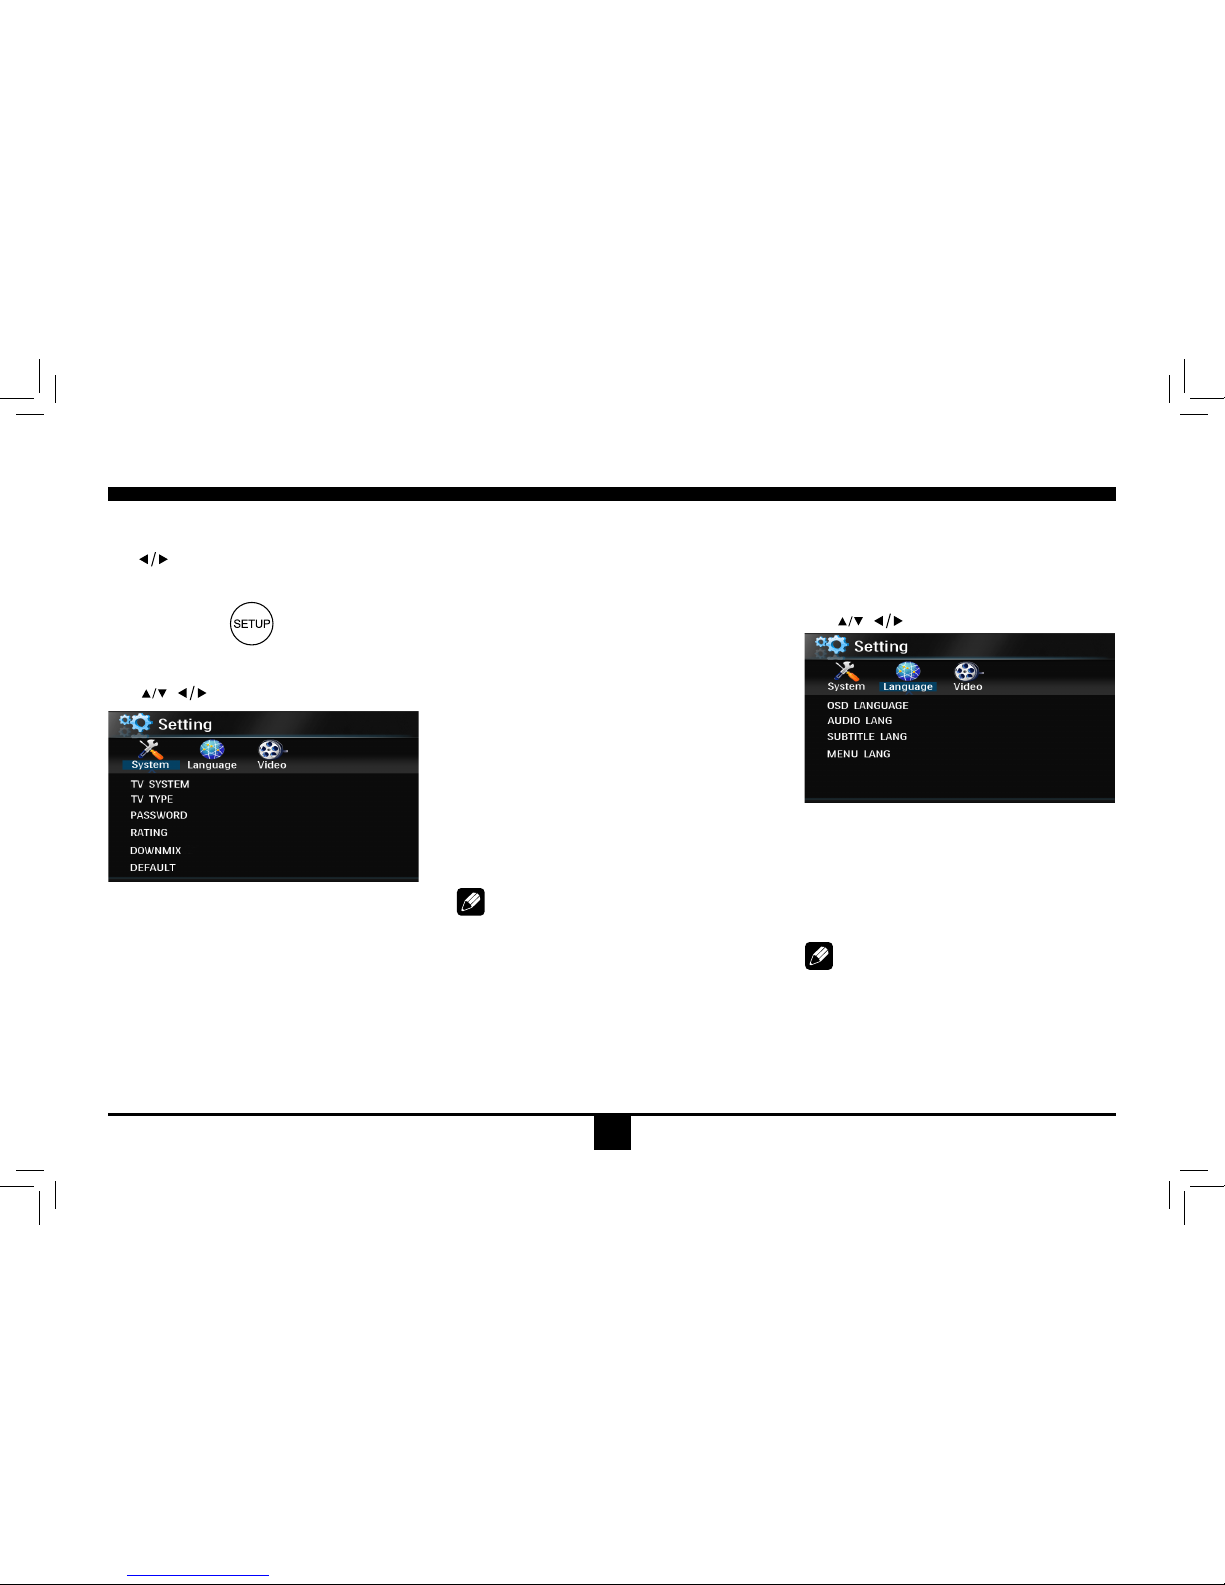
Press SETUP to display setup menu on the
screen.
Use toselectsetupitems:
SYSTEM - LANGUAGE - VIDEO
DVD System Setup
Use , to select and ENTERtoconrm.
- TV SYSTEM: NTSC/PAL/AUTO
Select the TV system in the setting menu.
- TV TYPE: 4:3PS/4:3LB/16:9
SelectTVtypetowatchwidescreenmovies.
4:3PanScan:For4:3TV,leftandrightedges
willbecut.
4:3LetterBox:For4:3TV,blackbars willap-
pear on top and bottom.
16:9:For16:9widescreenTV.
DVD Setup
- PASSWORD
1. Press number button " 0000 " on the remote
control,thenpresstheENTER button to
conrm.
2.Pressthedesired4-digitpassword,andthen
press ENTERbuttontoconrm.
3.Recordthepasswordandkeepitinasafe
place for future reference.
If you forget the password, please
enter 0000 to reset a new password.
The password: 0000
- RATING:
1 KID SAFE/2 G/3 PG/4 PG13/5 PG-R/6 R/7
NC-17/8 ADULT
Theratingofthediscisfrom1to8:
(1)withthemostlimitswhenplaying.
(8)withtheleastlimitswhenplaying.
Originalsetting:8
Note:
The rating can be selected only under the
passwordunlockedstatus,and thelimitscan
beworkedonlyunderthepasswordlocked
status.
- DOWNMIX:
LT(/RT)/STEREO/VSS
Select composite audio output from 2 channel
speaker system.
- DEFAULT: RESTORE
Ifthisitemisselected,theunitwillreturnto
original setting.
DVD Language Setup
Use , to select and ENTERtoconrm.
- OSD LANGUAGE
Selectonelanguagethatyouarefamiliarwith
to display system menu.
- AUDIO LANG
Select one dialogue language that you are
familiarwithwhenplayingbackDVDdiscs.
Note:
If the DVD disc has the audio file in the
selectedlanguage,thedialogues youlistened
towillbeintheselectedlanguage.
IftheDVDdiscdoesnotcontaintheaudiole
intheselectedlanguage,thedialoguesyou
listenedtowillbeinthedefaultlanguage.

13
You can change the language by pressing
[AUDIO] key of the remote controller.
- SUBTITLE LANG
Selectonelanguagethatyouarefamiliarwith
to display DVD subtitles.
If the DVD disc has the subtitle file in the
selectedlanguage,thesubtitle willbe
displayed in the selected language.
If the DVD disc does not contain the subtitle
leintheselectedlanguage,thesubtitlewillbe
displayed in the default language.
- MENU LANG
Selectonelanguagethatyouarefamiliarwith
to display DVD menu.
Note:
IftheDVDdisc hasthe selectedlanguage,
theDVDMENU/TITLEwillbedisplayedinthe
selected language.
If the DVD disc does not contain the selected
language,the DVDMENU/TITLE willbe
displayed in the default language.
DVD Video Setup
Use , to select and ENTERtoconrm.
- BRIGHTNESS
Setthebrightnessofthevideooutputwith
from 0 to 12.
- CONTRAST
Setthecontrastof thevideooutputwith
from 0 to 12.
- HUE
Setthehueofthevideooutputwith
from -6
to+6.
- SATURATION
Setthesaturationofthevideooutputwith
from 0 to 12.
- SHARPNESS
Setthesharpnessofthevideooutputwith
from 0 to 8.
DVD Setup
14
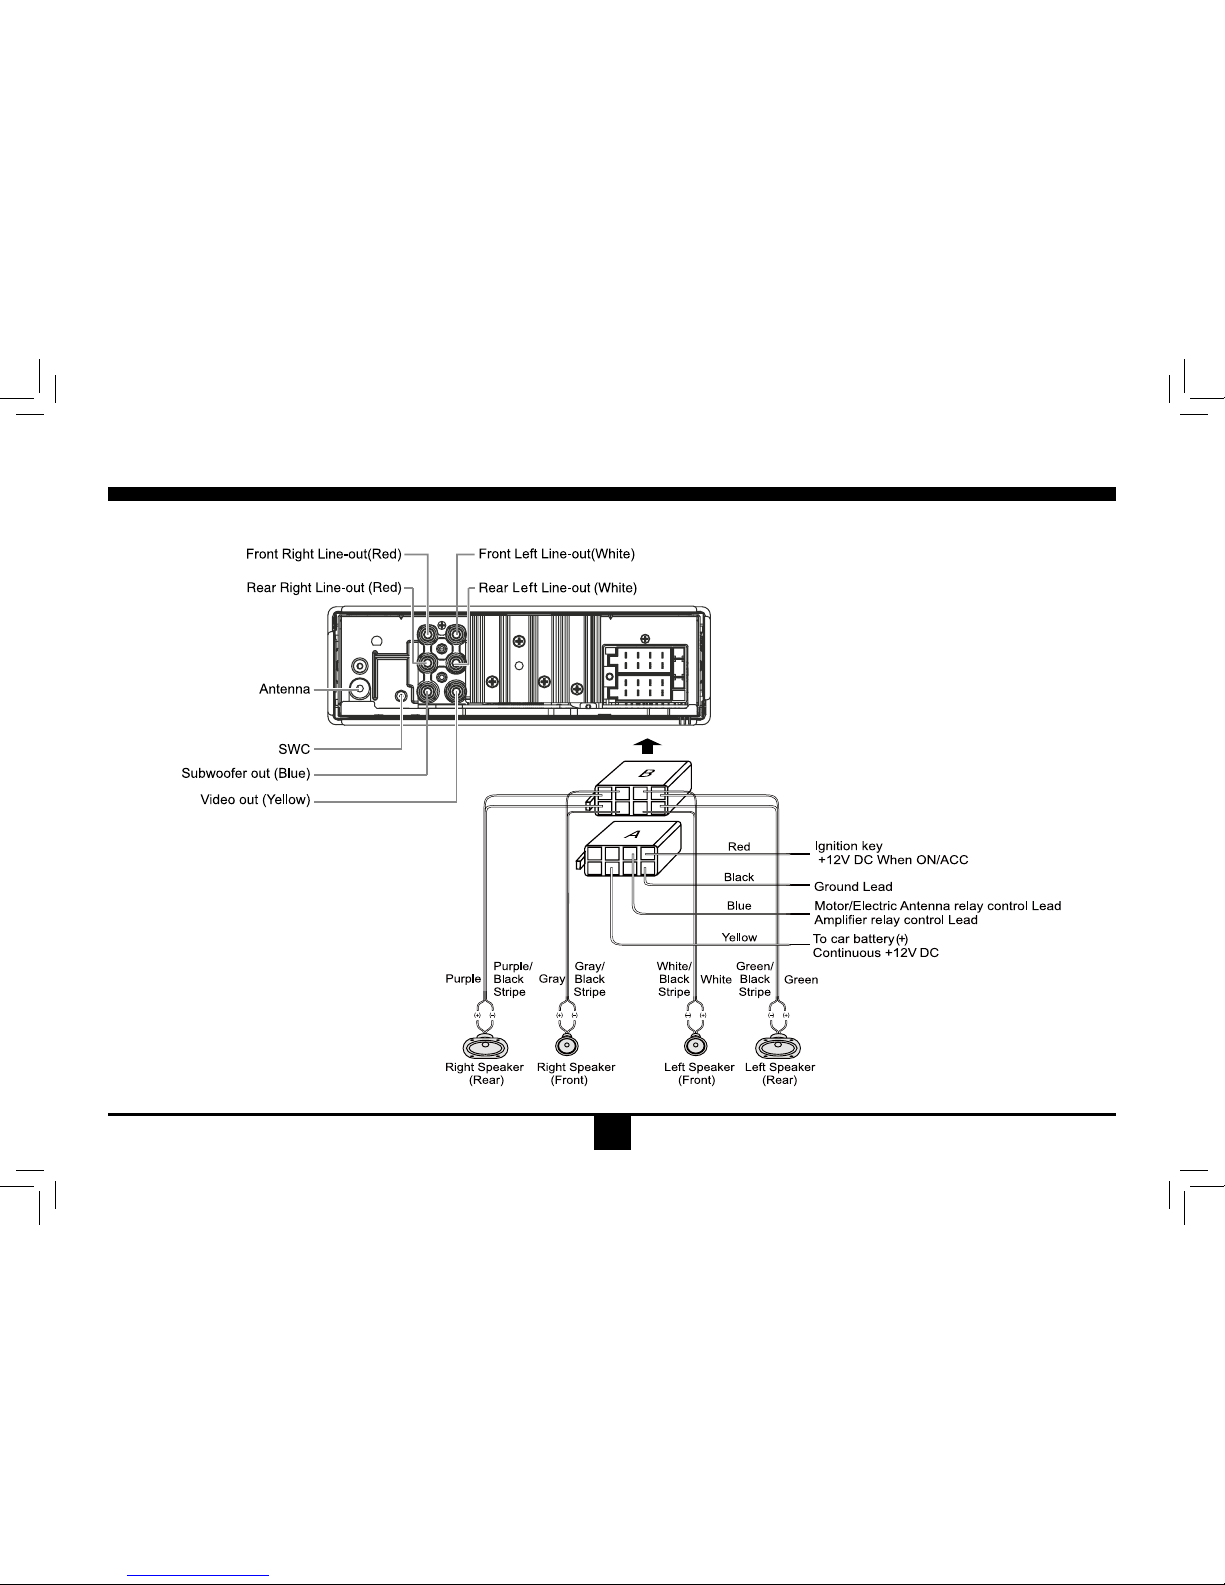
Electrical Connections
Wiring Diagram
15
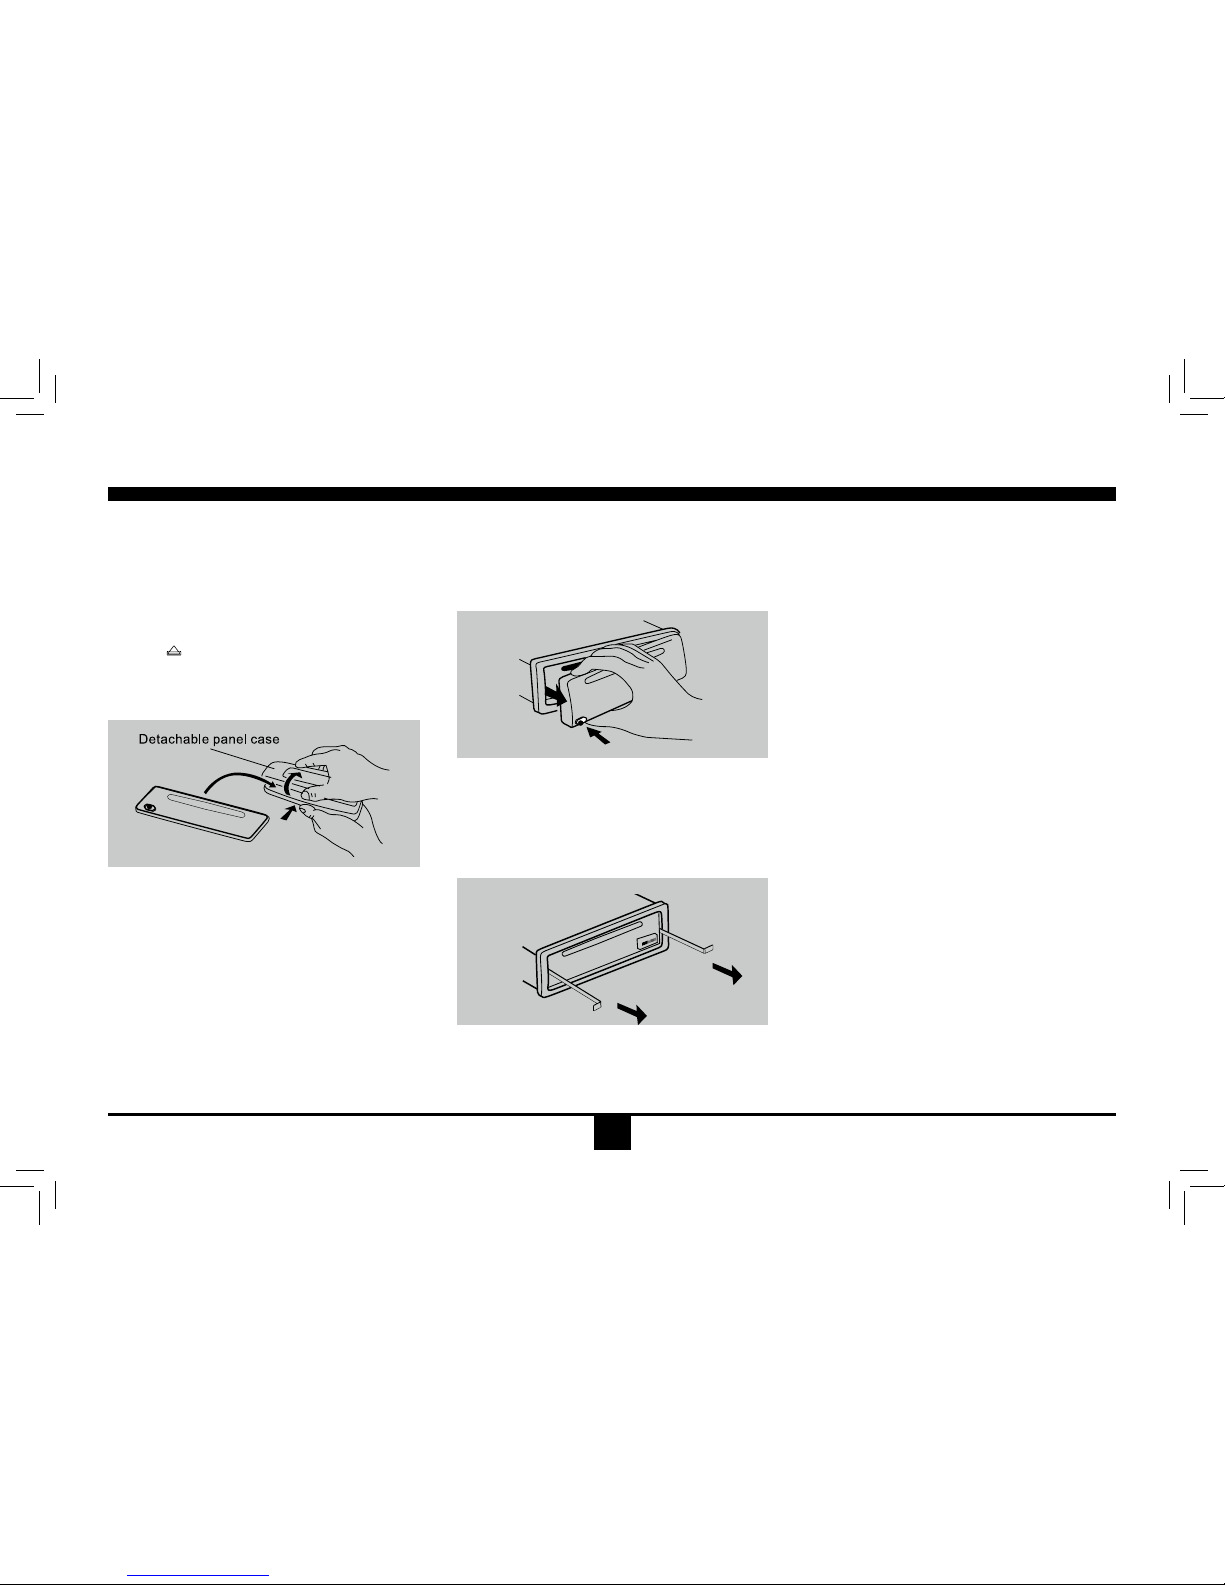
Anti-Theft System
Thisunitisequippedwithaip-downdetachable
panel.
Panelcanbedetachedandtakenwithyou,
helping to deter theft.
Removing the Panel
1.Switchoffthepoweroftheunit.
2. Press buttontoipdownthepanel.
3. At an angle hold the panel to pull it out.
4. Place the panel into the case and take it
withyouwhenyouleavethecar.
Installing the Panel
1.Holdthe paneland ensurethepanelfaces
towardyou,andsettheright sideof the
panel in the panel bracket.
2. Press the left side of the panel until it locks.
Removing the Unit
1.Removethepanelandthetrimplate.
2.Insertboth removalkeys intohole onthe
front of the set until they lock.
3. Pull out the unit.
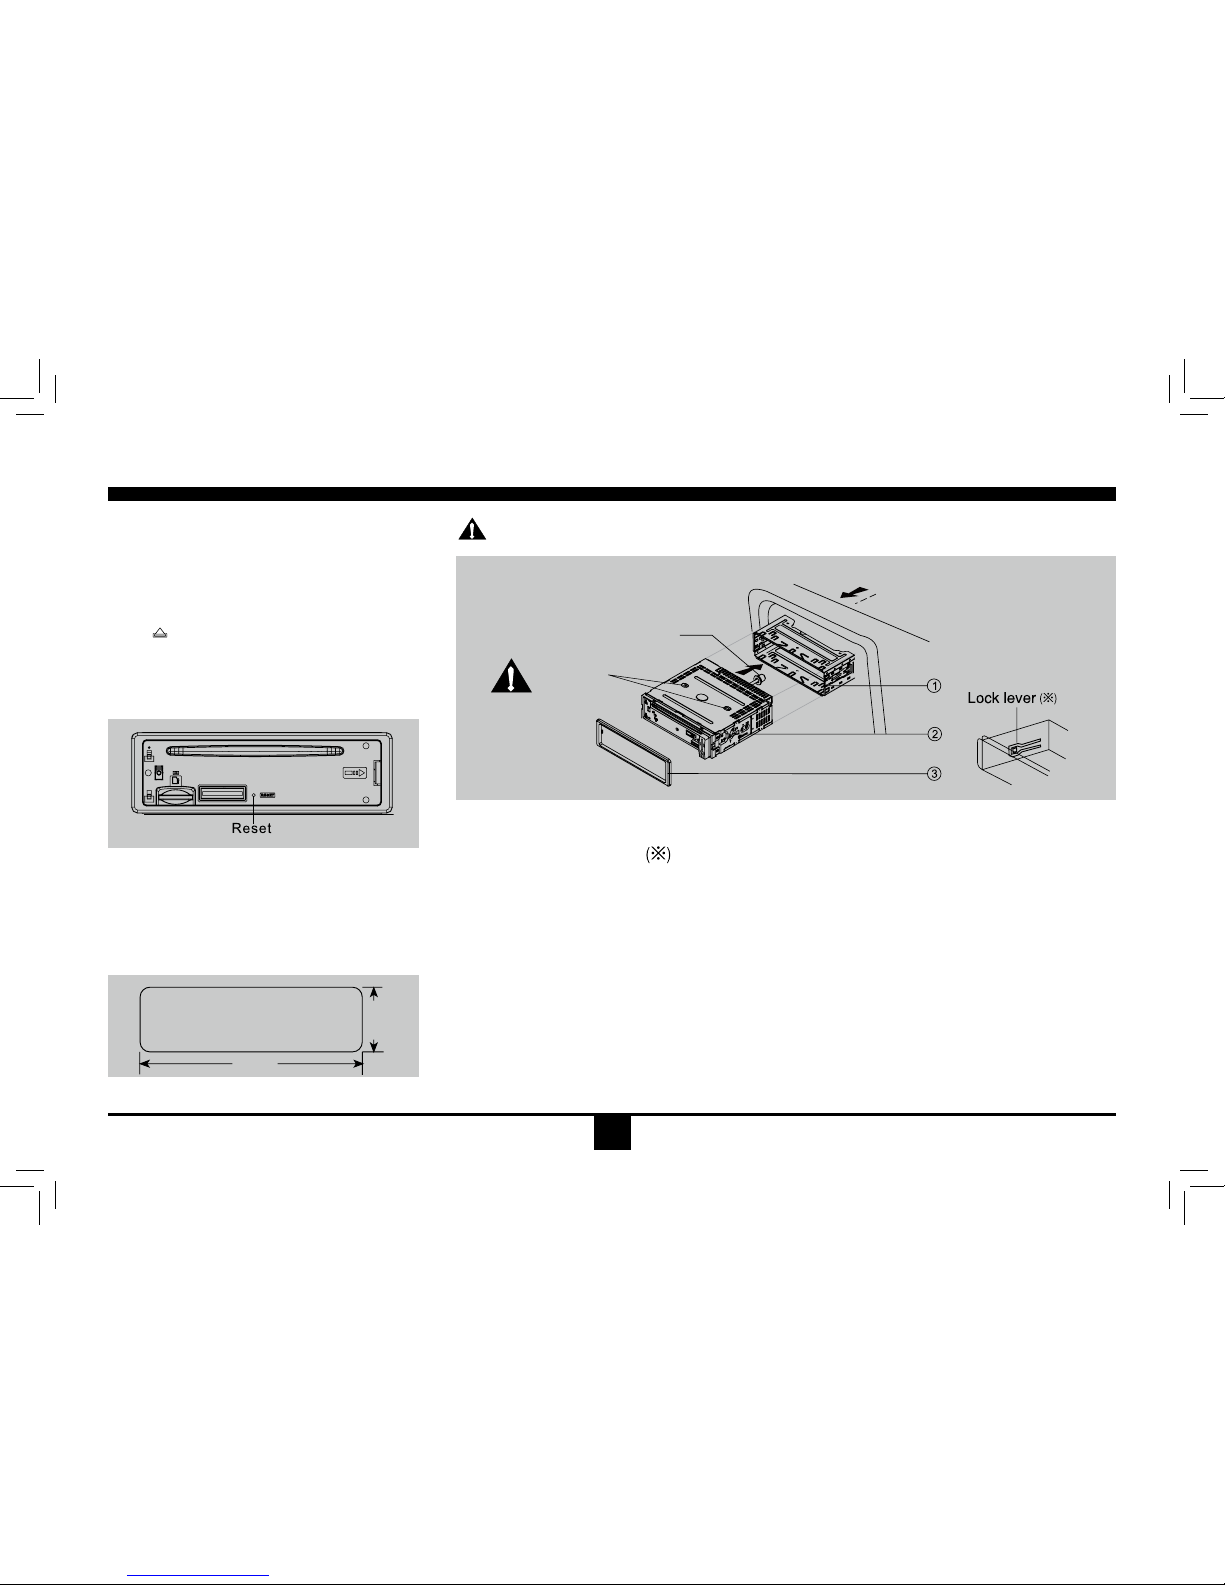
16
Installation Guide
Important:Removethesetwoscrewsbeforeinstallation.Otherwise,theplayerwillnotwork.
1. Inset mounting collar into the dashboard, and bend the mounting tabs out with a screw-
driver.
Makesurethatlocklever isushwiththemountingcollar(notprojectingoutward).
2. Secure the rear of the unit.
Afterxingmountingboltandpowerconnector,xtherearoftheunittothecarbodybyrubber
cushion.
3. Insert trim plate.
Installation Procedures
Firstcompletetheelectricalconnections,and
then check for correctness.
Reset
Press buttontoflip downthepanel.Then
press the RESETbuttonwithapointedobject
to reset the unit to the original status.
Note:PresstheRESETbuttonwillerasethe
clock and stored stations.
Installation Opening
This unit can be installed in any dashboard
havinganopeningasshownbelow.
The dashboard should be 4.75mm - 5.56mm
thick in order to be able to support the unit.
Mounting bolt
rubber cushion
Transport
screws
53mm
183mm

17
Troubleshooting
Ifyoususpectsomethingiswrong,immediately
switchpoweroff.Immediatelystopusingitand
callthestorewhereyoupurchasedit.
Nevertrytorepairtheunityourselfbecauseit
is dangerous to do so.
General
No power or no sound.
Car'sengineswitchisnoton.
Turn your car's key to ACC or ON.
Cable is not correctly connected.
Check connection.
Fuseisblown.
Replace fuse.
Check volume or mute on / off.
Iftheabovesolutionscannothelp.
Press the RESET button.
Disc
Disc is inside but no sound.
Discisupsidedown.
Place disc in the correct direction, and the
label side up.
Disc is dirty or damaged.
Clean disc or change another disc.
Disc sound skips, tone quality is
low.
Disc is dirty or damaged.
Clean CD or change another CD.
Sound skips due to vibration.
Mountingangleisover30o.
Adjust mounting angle to less than 30o.
Unstable mounting.
Mount the unit securely with the mounting
parts.
Radio
Noise in broadcasts.
Stationistoofar,orsignalsaretooweak.
Select other stations of higher signal level.
Preset station lost.
Battery cable is not correctly connected.
Connect the battery cable to the terminal
that is always live.
Error display messages
Display shows ERROR.
Discisdirty,damagedorupsidedown.
Press to eject the disc.
When video le initializing time is
too long.
Filereaderrororletypenotsupported.
Press SRC to exit. Then press SRC to play
disc again.

18
AM Radio
Frequency range
Usablesensitivity
(S/N=20dB)
530-1710KHz
30dBμ
Disc Player
System
Frequency response
Signal/noise ratio
Total harmonic distortion
Channel separation
Video signal format system
Video output
Disc digital
audio system
20Hz-20KHz
>80dB
Less than
0.20%(1KHz)
>60dB
N T S C / P A L /
AUTO
1 0.2V
Components
Mounting collar
MachinescrewsM5x6mm
Mountingbolt(50mm)
Removablefaceplatecase
Trim plate
Removalkey
Operating instructions
Rubber cushion
Remote control unit
Battery(CR2025)
1
4
1
1
1
2
1
1
1
1
Specications
Note:
Specifications and the design are subject to
changewithoutnoticeduetoimprovements.
General
Powersupply
Maximumpoweroutput
Continuouspower
output
Max.currentconsumption
Suitable speaker
impedance
Pre-Ampoutputvoltage
Fuse
Dimensions(WxHxD)
Weight
Aux-inlevel
12VDC(11V-16V)
Testvoltage14.4V,
negativeground
50Wx4channels
20Wx4channels(4
10%T.H.D.)
12A
4-8ohm
2.0V
(CDplaymode:1KHz,
0dB,10K load)
15A
178x50x166mm
1.6kg
≥300mV
Frequency range
Usablesensitivity
Frequency response
Stereo separation
Image response ratio
IF response ratio
Signal/noise ratio
87.5-108.0MHz
8dBμ
30Hz-15KHz
30dB(1KHz)
50dB
70dB
>55dB
FM Stereo Radio

CLASS 1
LASER PRODUCT
P.N.:127075005555
Table of contents
Other Better Media Player manuals


