KETRON SD9 User manual

Welcome!
https://www.ketron.it/images/ketron/Manuali_HTML/SD9/english/01_benvenuti.html[12/05/2020 15:50:26]
Welcome!
Thank you for purchasing the Ketron SD9 Multimedia Player! This “Instruction Manual” describes what you need to
do to use your Multimedia Keyboard immediately. Please read this Instruction Manual carefully to ensure that you
obtain the best performance from your instrument either live or in a recording studio.
SD9 revolutionises the way you use this instrument thanks to its new wide colour Touch Screen. Most of the
functions may in fact be enabled with just a “touch” of the keys on the screen.

Specifications
https://www.ketron.it/images/ketron/Manuali_HTML/SD9/english/00_specifications.html[12/05/2020 15:52:50]
Specifications
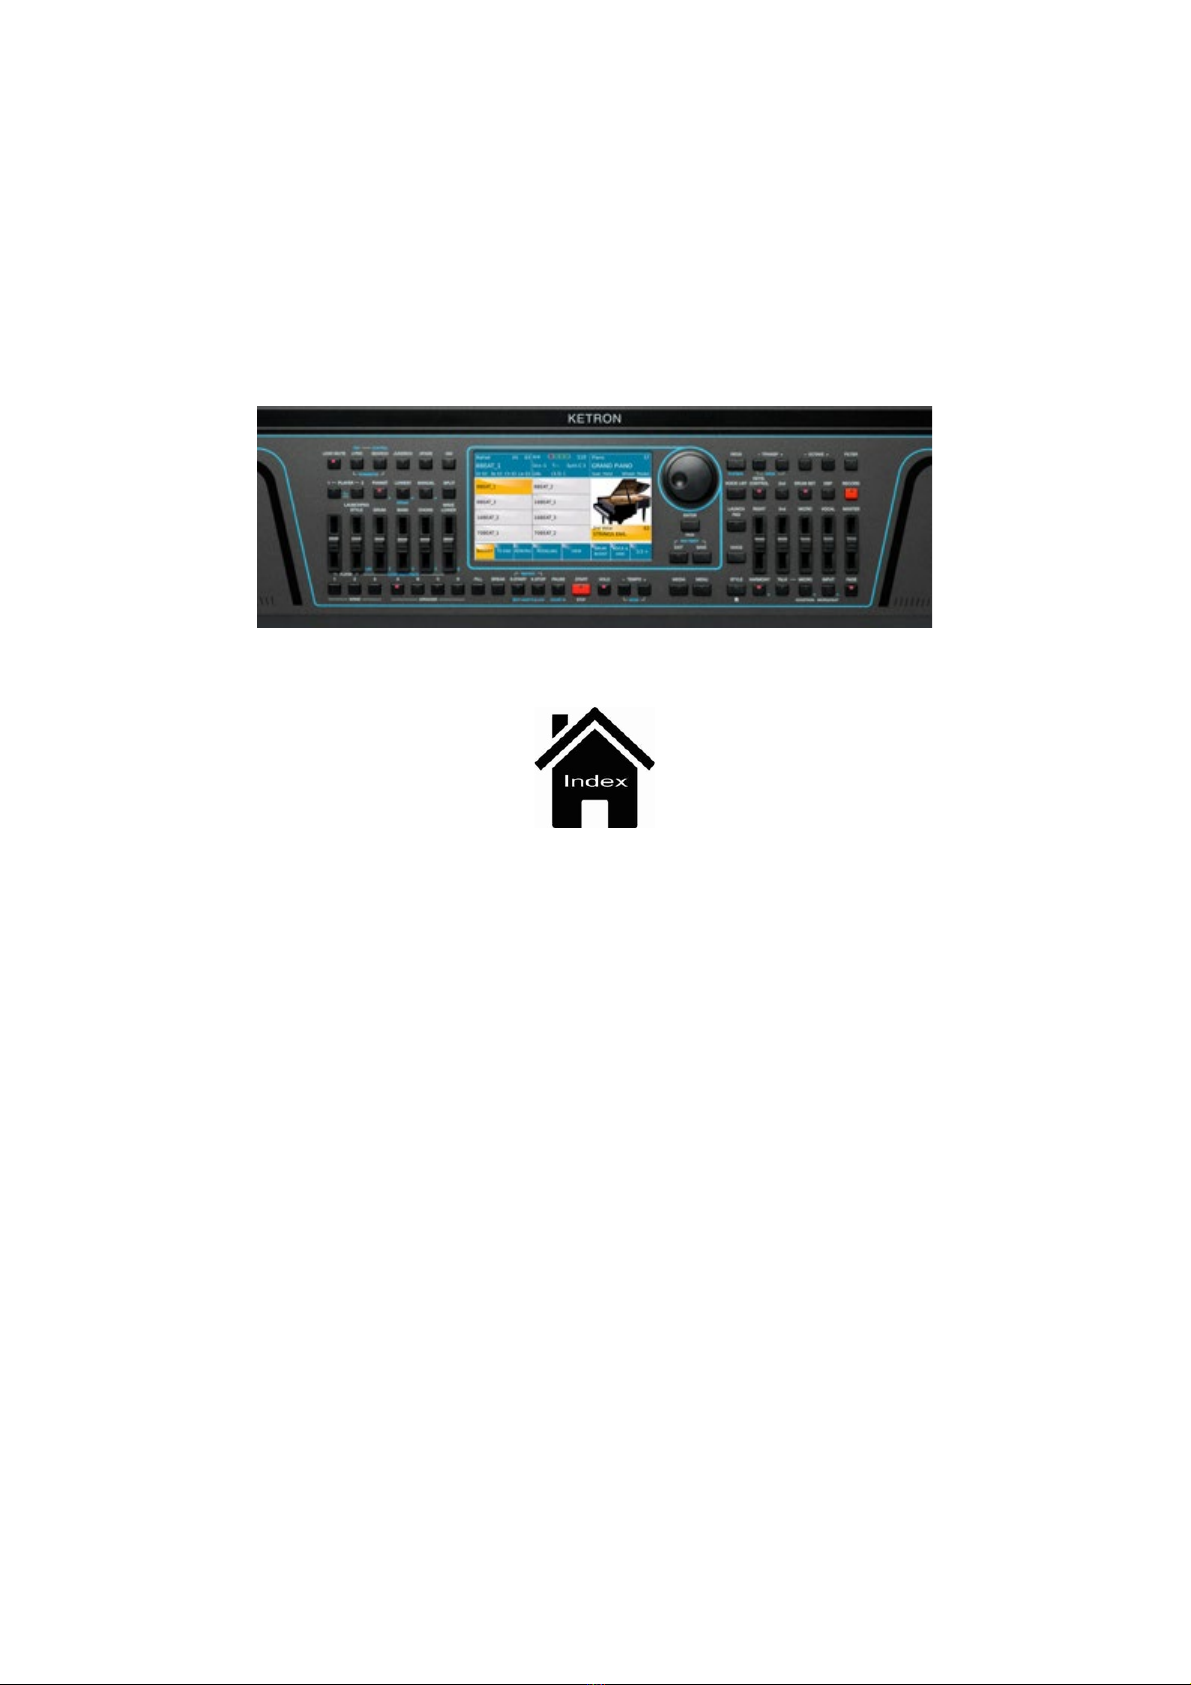
Keyboard : 76 semi-weighted keys. 4 Velocity Curves. Programmable touch response. Aftertouch.
Portamento.Wheels: Pitch. Modulation. Transposer : +/- 24. Octave : +/- 2.
Poliphony : 128 note. Multitimbral 64 parts.
Display : Lcd color Tft 7”. Touch screen capacitive 800 x 480 dots. Brightness control.
Sound & Voices : 672 GM Sounds. 5 Sound Banks. 61 Drum Sets. 368 Preset Voices. 1500 User Voices. 2nd
Voice. V-Tone. Advanced Voice Editing. Voice List : 80 Voices programmable and Style assignable. Filter
and Resonance live controls.
Live Drum : Up to 100 Stereo Live Drums. Wav streaming with Time stretching and 3 Band stereo Equalizer.
Full Arranger structure with ABCD, Fill, Break, Intro-End.
Live Guitar : 150 audio Live Guitars (Folk Acoustic, Electric, Nylon). Stereo and Mix version.
Grooves : 530 Grooves with Latin Percussions, Brazilian, individual and full Drums loops.
Audio Drum (Grv) : 159 sliced audio Drums loops. Full Arranger structure with ABCD, Fill, Break, Intro-
End.
Arranger : 400 styles. 140 Live Styles with Live Drums, Live Guitars and Grooves. Compatibility with User
Audio Drum @ from Audya series and SD Series (SD7, SD40, SD80). 4 Arranger ABCD. 4 Fill. 4 Break. 3
Intro. 3 Ending. Auto Fill. Fill to Arrange. To End. Reintro. Key Start. Key Stop. Restart. Pause. Count In.
Midi Drum Mixer & Remap. Drum Boost. 4 Voice Variations. Voice to ABCD. Voice List assign to Style. 5
User Tabs. Pianist and Bassist mode. Manual Bass. Bass to Lowest. Bass to Root.
Style Edit : Full Pattern creation and Editing. Functions : Record, Copy, Clear, Quantize, Velocity, Octave.
User Style section ( unlimited disk locations).
Live Modeling : Style Live Modeling Library with Live Drums, Grv (Audio Drum Loops), Live Guitars,
Grooves, Bass, Piano, Guitar, Orchestral and Synth templates.
Launchpad : Up to 2048 Launchpad projects. 12 pads with 6 Scenes. 30 internal demos. 3 x Wav
simultaneous with Time stretching and Midi synchronization. Functions : Record, Phase, Song, Single/Loop,
Pad control, Harmonic/Melodic mode, Live Efx pad control. Drum kit Looper. Style Import. Full interaction
with Style Live Modeling.
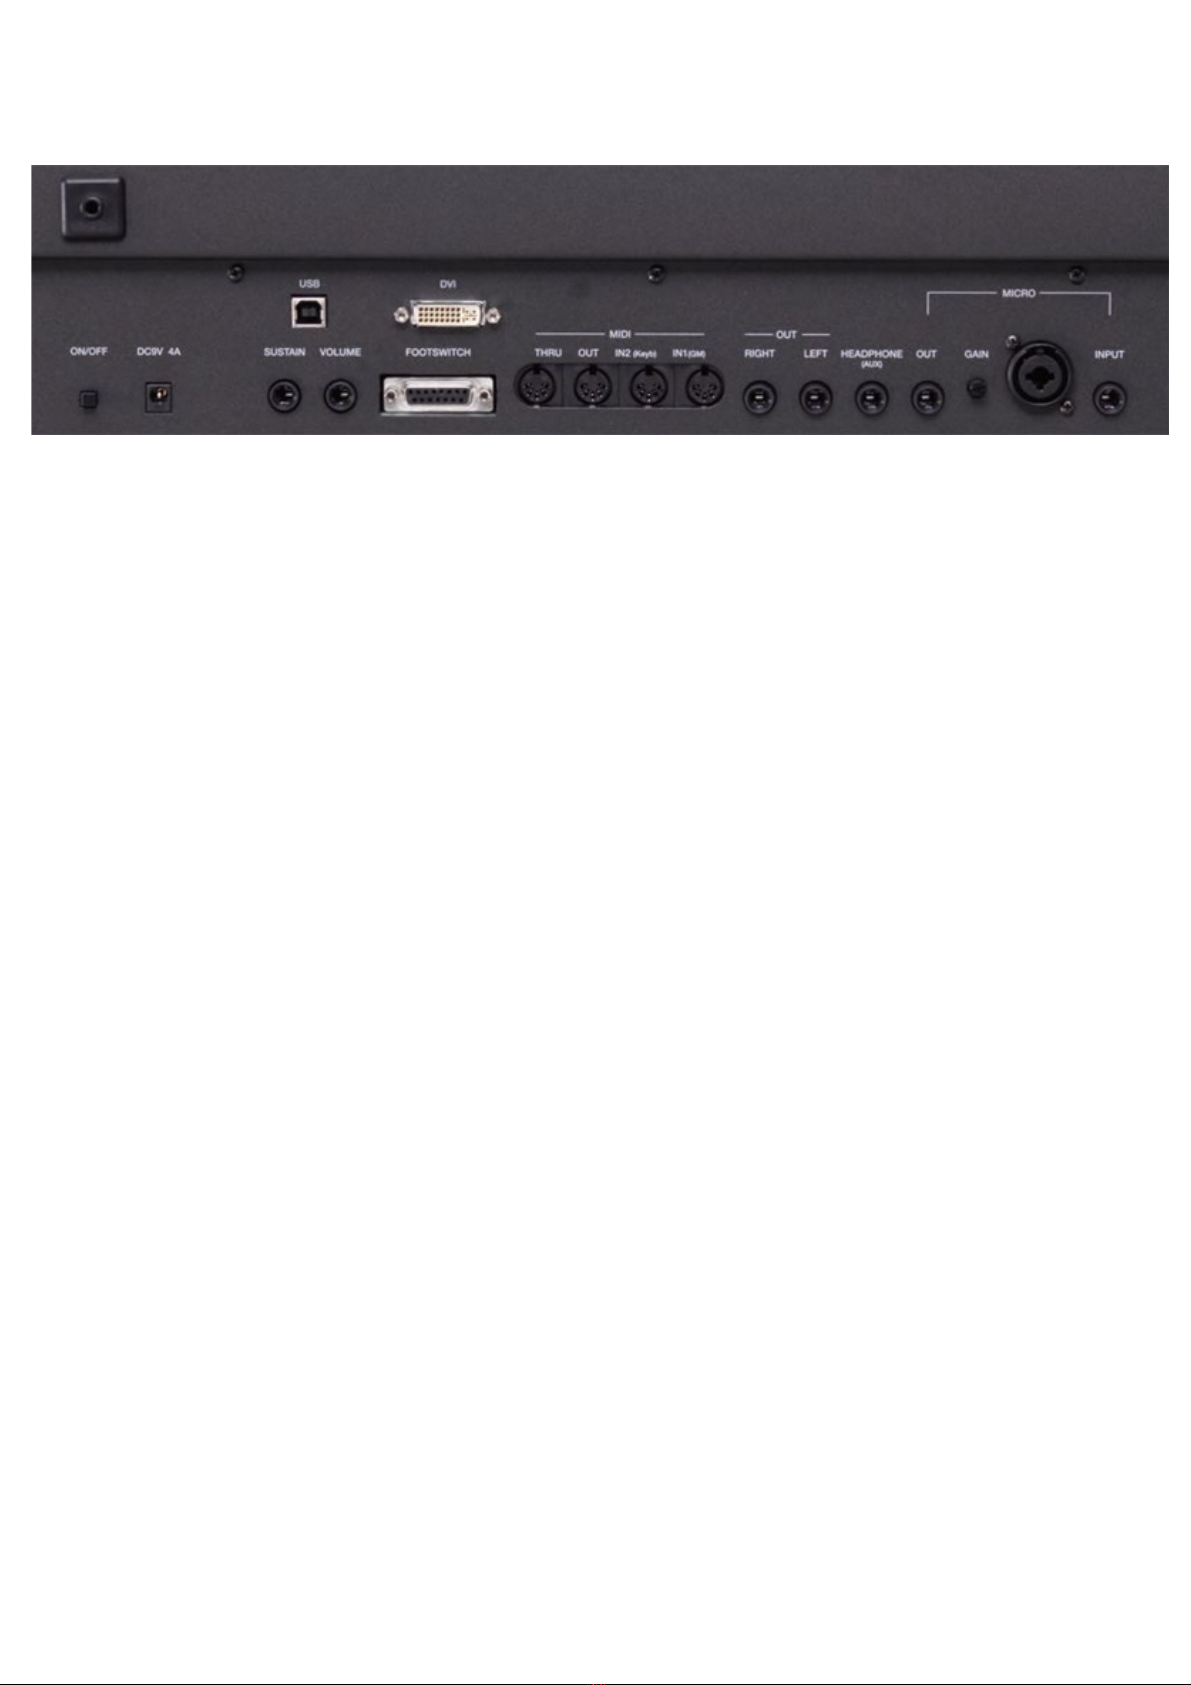
Player : Double Player. Files recognized : Wav, Midi , Mp3, Mp4, Avi, Mov, Flv, Cdg, Jpg, Txt, Pdf.
Functions : Marker. Sync/Next. Autoplay. Lead Mute. GM part. Lyric Off. Cross fade. File Search. Play List.
My Folder. Transposer. Time stretching. Metronome Click. Midi Multimix. Song Drum Restyle. Audio and
Midi synchronize.
Audio Multitrack Player :5+1 Audio tracks with separate slider control. Metronome click out.
DJ : Double Audio and Midi player with Tempo & Pitch stretching, Pfl, Sync, Tap tempo, Cue, Fx Pad,
Backspin, Brake.
Juke Box : Play List, My Folders, SFX Special Effects.
Pic& Movie : Jpg & Mp4, Avi, Mov, Flv, Karaoke background, Movie/PDF To RGB, Pic List, Autoshow.
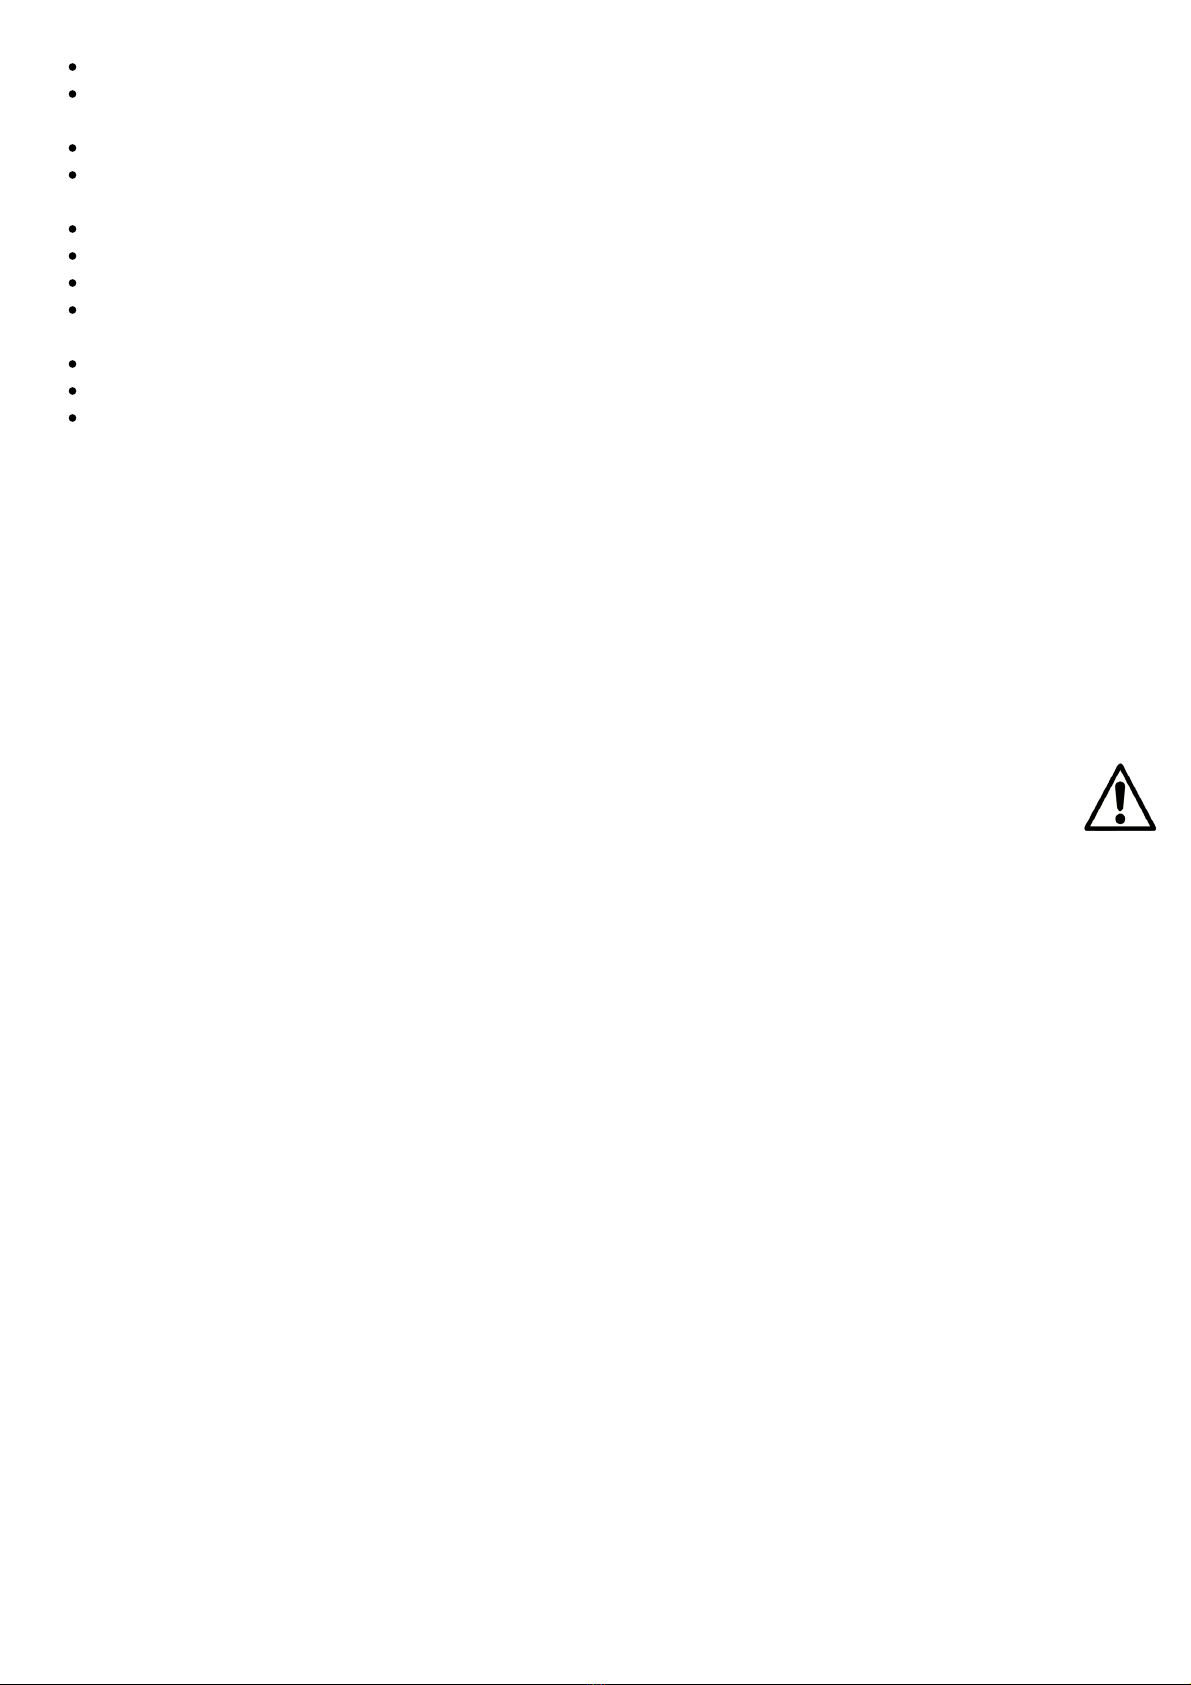
Dvi : Video Monitor Out, Karaoke Lyric / Mirror.
Menu : Disk, Midi, Play Modes, Audio Edit, Language, Footswitch, Preferences, Controls, Video, Reg. Set
up, Arabic Mode.
Media : Internal Storage: SSD Card 16G. Usb: 3 Host + 1 device. External Storage: Removable HD_ SATA
2.3_2,5 “.
Play Modes : Master keyboard. Accordion Style and Classic. Organ (with Pedalboard). Guitar mode with Efx
(thru Input).
Keyboard Control : Live Efx Chain editing. Aftertouch, Portamento, Double controls.
Registrations : 4 Banks x 1024 Regs. Full Panel and function programming. 4 Playbox with 1024 files per
folder ( including Midifile, Mp3, Wav).
Dsp : 2 x DSP with 2 separate Reverb units, Chorus, Reverb, Flanger, Phaser, Tremolo, Rotary, Autopan,
Echo Delay, Tap Delay, Equalizer, Distorsion, Amp simulator, Compressor, Filter. 64 Insert EFX Chains (10
User programmable ).
Recording : HD Recording. 1 Stereo track. Loop. Audio Edit with Cut, Normalize. Midi Recording with
Phrase and Song.
User Memory : up to 400 MB free User programmable.

Specifications
https://www.ketron.it/images/ketron/Manuali_HTML/SD9/english/00_specifications.html[12/05/2020 15:52:50]
Micro : XLR Input. Gain control. Volume. Reverb. Micro On/Off Edit. Talk.
Voicetron : 3 Voice Voicetron. Manual, Unison, Midi Mode, Pitch Corrections, Autotune, Harmony Duet &
Trio. 10 Voicetron User.
Instruction Manual : Html on board.
Midi : In1 ( Gm ), In 2 ( Keyb ). Out. Thru. Midi Set up : Standard, Computer & Sequencer, Keyboard Right,
Accordion, Player, Style.
Out : Left/Right Stereo, Pedal Volume, Sustain Pedal, Micro Out.
Input : Guitar ( Instrument ) / Micro2.
Headphone : Stereo Headphone. Aux separate Out Assign ( to Drums, Right, Bass, Click).
Optional : Footswitch 6 or 13, Volume Pedal, Sustain pedal, Bag,Hard case, Midi Pedalboard, Hd, SSD,
Start/Stop Pedal.
Power Supply : External 9V-4A.
Dimensions : 108,5 x 14,5 x 40 cm. (42,5 x 5,7 x 15,7 inches).
Weight : 16 Kg. (35 lbs. )
*All specifications and appearances are subject to change without notice.
SAFETY INSTRUCTIONS
RISK OF FIRE, ELECTRIC SHOCK OR INJURY TO PERSONS.
Caution: to reduce the risk of fire or electric shock, do not expose the instrument to rain or humidity.
IMPORTANT INSTRUCTIONS FOR SAFETY AND INSTALLATION
CAUTION – When using an electrical product it is important to take a number of precautions such as the following:
• Read the Instruction Manual before using the instrument.
• An adult should always supervise children when they play the instrument.
• Do not use the instrument in areas subject to seepage or water spray, such as next to a sink, a swimming pool, on a
damp surfaces etc.; do not place containers with liquids on the instrument to prevent accidental seepage of liquid
into the instrument.
• The instrument should be used only on a stand recommended by the manufacturer.
• Do not use the instrument at a very high volume for long periods of time: very high noise levels are dangerous to
health.
• Position the instrument in such a way as to ensure appropriate ventilation.
• Keep the instrument away from heat sources such as central heating radiators, stoves etc.
• Connect the instrument to the mains only with the mains adapter. You will find the identification and power supply
details under the instrument.
• Disconnect the power supply cable if the instrument is not to be used for a long period of time.
• If necessary, disconnect the instrument using the power supply switch on the back panel. When positioning the
instrument, always ensure that this switch is easy to reach.
• Take the instrument to a service centre if:
a. the power supply cable or plug are damaged.

Specifications
https://www.ketron.it/images/ketron/Manuali_HTML/SD9/english/00_specifications.html[12/05/2020 15:52:50]
b. objects or liquid have fallen into the instrument.
c. the instrument has been exposed to rain.
d. the instrument is not functioning properly or performance is impaired.
e. the instrument has been dropped or the chassis is damaged.
• Never attempt to repair the instrument on your own; all repairs should be carried out by a qualified technician.
KEEP THIS INSTRUCTION MANUAL IN A SAFE PLACE
PREVENTING RADIO/TV DISTURBANCE
This instrument operates on the radio frequency band. If it is not installed correctly and strictly in compliance with
the instructions provided it may disturb the reception of radio-television appliances. Although the instrument you
have purchased has been designed in compliance with applicable laws and in such a way as to provide reasonable
protection against such disturbances, there is no guarantee that these will not occur. To check whether any
disturbance you are experiencing is in fact produced by your instrument, turn it off to see if the disturbance
disappears. Turn the instrument on again to see if the disturbance reappears. Once you are certain that your
instrument is in fact causing the disturbance, take any of the following measures:
• Adjust the antenna of the radio or TV receiver.
• Place the instrument in a different position with respect to the radio or TV receiver.
• Place the instrument further away from the receiver.
• Connect the plug of the instrument to another socket so that the instrument and the receiver are connected to two
different circuits.
• If necessary, call in a servicing technician.
POWER SUPPLY
• When you connect the instrument to other appliances (amplifier, mixer, Midi instruments etc.), ensure that all the
units are off.
• Read the recommendations regarding Radio and TV disturbances.
INSTRUMENT CARE
• Clean the surfaces of the instrument with a soft dry cloth. Never use gasoline, diluting agents or solvents of any
kind.
OTHER PRECAUTIONS
If you wish to use your instrument in a foreign country and have doubts about the power supply, consult a qualified
technician before you leave. The instrument should never be subjected to strong shocks.
CURRENT ADAPTERS
When connecting this instrument to the mains socket, use only the KETRON current adapter supplied with the
instrument. The use of different current adapters may damage the power supply circuits of the instrument. It is
therefore of fundamental importance to use only an original adapter, requesting the correct model when ordering a
new adapter.
INFORMATION FOR USERS
“Implementation of Directive 2002/95/CE, 2002/96/CE and 2003/108/CE on reduced use of dangerous substances in

Specifications
https://www.ketron.it/images/ketron/Manuali_HTML/SD9/english/00_specifications.html[12/05/2020 15:52:50]
electrical and electronic appliances and waste disposal”.
The crossed bin symbol shown on the appliance means that at the end of its life the instrument must be disposed of
separately from other waste. At the end of its life the user should therefore take the instrument to a separate waste
centre for electronic and electrical products, or return the same to the dealer when purchasing a new and similar
instrument, whichever is applicable. Disposing of the instrument correctly so that it may be consequently recycled
and disposed of in an environmentally compatible manner helps to prevent possible negative effects to the
environment and health and ensures that the components of the instrument are recycled. Unauthorised disposal of the
product by the user entails the application of administrative penalties.

Connections
https://www.ketron.it/images/ketron/Manuali_HTML/SD9/english/02_connessioni.html[12/05/2020 15:54:12]
Connections
DC 9 V 4A Mains power supply socket Please use only the power supply supplied with the instrument.
Output: 9 V, 4 A.
ON/OFF ON/OFF key. This instrument may take up to 30 seconds to start up. To turn off the
instrument, press the ON/OFF key and wait for the instrument to turn off. This may take up to
10 seconds.
SUSTAIN PEDAL Standard jack to connect a Sustain pedal (optional).
VOLUME PEDAL Standard stereo jack to connect a Volume pedal (optional).
VIDEO DVI Digital video interface for connection to an external video monitor.
USB DEVICE This is used to connect a computer USB device or other devices to manage the SD9 as an
external removable unit.
FOOTSWITCH Standard multi-pin plug for connection of an optional pedal to control a number of internal
functions. Compatible with Ketron FS6/FS13.
MIDI Plugs for MIDI IN1 (GM), MIDI IN 2 (Key),, MIDI OUT and MIDI THRU connection.
MAIN OUT Standard mono jack for the main output to connect to a PA STEREO system: left (Left Mono),
right (Right Mono). We strongly recommend that you use the stereo connection for best
performance of the instrument and relevant EFXs. A Mono connection (namely use of only the
Left or Right output) will give poorer reproduction with respect to quality of the sounds and
EFXs of the instrument.
HEADPHONE - AUX Standard stereo jack for connection to a headphone. The volume of the headphone is
controlled by the Master section.Aux separate Out Assign
MICRO IN Standard mono combo plug (Jack/Xlr) for connection of a dynamic microphone.
GAIN MICRO Potentiometer for adjustment of the Micro 1 input signal gain.
MICRO OUT Standard mono jack dedicated exclusively to the Micro 1 output.

Connections
https://www.ketron.it/images/ketron/Manuali_HTML/SD9/english/02_connessioni.html[12/05/2020 15:54:12]
INPUT Standard mono jack for connection of auxiliary other instrument such Keyboard, Expander,
Guitar or Dynamic Microphone
On the right of the instrument you will find 3 USB Hosts for connection to external USB devices such as Pen drives, HD
etc.

Sync/Next
https://www.ketron.it/images/ketron/Manuali_HTML/SD9/english/49_syncnext.html[12/05/2020 15:54:52]
Sync/Next
The SYNC/NEXT function allows you to select the next song to play while a song is playing.
To pass immediately to the next song, select NEXT and the next song will start to play at the end of the current
beat of the file you are playing.
PLAYER GM

Intro
https://www.ketron.it/images/ketron/Manuali_HTML/SD9/english/04_intro.html[12/05/2020 15:55:34]
Introduction
The Introduction screen (HOME) is displayed automatically when you turn on the instrument and provides access to
the main functions, such as:
-SOUND FAMILY SELECTION -
Press this icon to select page of the families of sound that will appear in this way:

Intro
https://www.ketron.it/images/ketron/Manuali_HTML/SD9/english/04_intro.html[12/05/2020 15:55:34]
-
SINGLE STYLE SELECTION
-
Press this icon to select different Styles from selected family Style:
-STYLE FAMILY SELECTION -
Press this icon to select Styles groups page as shown in the image below:
-MENU CONTROL AREA -

Player
https://www.ketron.it/images/ketron/Manuali_HTML/SD9/english/05_player.html[12/05/2020 15:55:58]
Player GM
When you select the icon PLAYER-GM on the Intro screen, the contents of the internal solid disk (SSD) are
displayed to load the files.
When you select the Player menu, the contents of the media device selected (SSD, Card, USB, etc) are displayed.
To navigate use:
1. The Touch Screen that allows you to select the file directly and enter the folder with a double click.
2. The Dial DATA/ VALUE to scroll files, folders or edit the parameters in Editing mode.
3. The Exit key to escape from folders and back root.
4. The Enter key to enter the folder selected rather than double clicking on the Touch screen.
When you touch the file, it will be selected and highlighted in orange and loaded in player 1.

Player
https://www.ketron.it/images/ketron/Manuali_HTML/SD9/english/05_player.html[12/05/2020 15:55:58]
SD9 is now ready for you to play!
Press START/STOP to start reproduction or touch the filename selected a second time or press Enter. When the file
is in play, the red light of the START /STOP key lights up.
N.B : when the Auto Play function on the FUNCTION menu (displayed at the bottom on the right) is
enabled, the songs in the folder are reproduced automatically from first to last.
This is the main screen of the PLAYER GM section, created specifically for Midifiles, audio files, videos and
images.
On this screen, if the file contains the Lyrics, these may be displayed on the screen or on an external monitor.
The upper bar displays the current status at all time, showing the following information:
Name of the file selected, preceded by a number in square brackets that indicates the player selected.
- Metronome time (only for Midifiles).
- Speed (only for Midifile).
- Transposition value set for the file playing.
- Volumes of the Drum, Bass, Chord, Orch. (Lower) and Lead sections.

Player
https://www.ketron.it/images/ketron/Manuali_HTML/SD9/english/05_player.html[12/05/2020 15:55:58]
Using the box on the right, you may scroll the list of files and folders from top to bottom. During execution a beat /
time counter is displayed. For more information regarding the current file and to go back or forwards, select the
PLAYER.
If the PFL TO PLAYER function is enabled on the PREFERENCE menu, the virtual key PFL
is displayed on the right hand bar, which may be used to listen to the song you are playing through the headphones.
If the file contains Karaoke type lyrics, these are displayed at the centre of the screen instead of the contents of the
folder selected, while the list of files may be displayed by pressing the LYRIC OFF key on the left of the
front panel. Press the key again to display the lyrics. With the lyrics file you can pass to Full screen mode by
touching the centre of the screen where the lyrics are scrolling. Touch a second time to return to normal display
mode.
If the file does not contain lyrics, a separate .txt file may be associated to the file. To do this, the .txt file must have
the same name as the music file and must be stored in the same folder (E.g. Newyork.mid and lyrics Newyork.txt).
SKIP FILE LINK function must however be disabled on the Function page.
In order to associate a lyrics file to a Style, simply load the lyrics file and save in registration. To do this, load the
.txt file in Player mode, then press Style and save the Registration. In this way the .txt file will be stored in
Registration so that if it is accidentally deleted from the disk, the lyrics file will in any case be saved in Registration.
The bottom bar allows you to enter other functions, such as the following:

Player
https://www.ketron.it/images/ketron/Manuali_HTML/SD9/english/05_player.html[12/05/2020 15:55:58]
-SYNC/NEXT: To programme the next song
-DRUM RESTYLE: To link a style on your midifile
-PLAYLIST: To manage the personal list of songs
-MY FOLDER : To manage personal folders
-MARKER : To pass from one section to another of a file (the file must container the markers)
-FUNCTION: To customise the settings of PLAYER GM
To load player 2 simply press PLAYER 2 and repeat the steps described previously.
If the file you are playing contains lyrics, a KARAOKE key appears in the right hand box at the top. When you
select this, display functions for the lyrics will appear. These functions may be selected while the song is playing and
the lyrics are scrolling on the screen, or even on Stop mode.
The default screen displays the following:

Player
https://www.ketron.it/images/ketron/Manuali_HTML/SD9/english/05_player.html[12/05/2020 15:55:58]
- COLOUR : Allows you to select the background for the lyrics
- FONT: Allows you to select the font and colour of the lyrics.
-LYRIC TEXT: inserted in the Karaoke menu -> FONT the possibility to choose the maximum number of
characters for each line of text. The range is from 30 to 50. Can be saved on Custom Startup Default value: 30
-ZOOM-: Reduces the size of the lyrics.
- ZOOM+: Increases the size of the lyrics.
- POSITION: Aligns the lyrics at the centre when enabled, and to the left when disabled.
-DEFAULT: Restores the original settings of the colours and Karaoke desk, if these have been modified.
If a standard Midi file or ".kar" (karaoke) file is loaded on player, all the 16 Midi tracks of the song may be

Player
https://www.ketron.it/images/ketron/Manuali_HTML/SD9/english/05_player.html[12/05/2020 15:55:58]
displayed by pressing the key
GM PART
on the front panel.
When the players are used, some keys remain enabled:
- SEARCH: Provides access to a page where you may search the files to reproduce on player.
- XFADE: Allows you to cross fade the 2 files being played.
- TEMPO: Allows you to change the speed of the song you are playing.
- TRANSPOSER: Allows you to increase or reduce the key of the module (including Mp3 and Midi files)
at semitone intervals within a total range of +/- 12 semitones. This function makes it easier to play with difficult
tones and makes it possible to play according to the vocal range of the singer.
- OCTAVE: The [+] and [-] buttons allow the pitch of the RIGHT part to be shifted up or down by one
octave. The display shows the current value of OCTAVE Up or Down.
- ENTER: Standard key to confirm and accept modifications; this key may also be used during navigation to
enter or load the files selected.
- EXIT: Use this key to escape from a screen and return to the previous screen or cancel an operation.
- SAVE: Use this key to save your settings.
- MEDIA: Use this key to access the internal Hard Disk and all the external mass memories connected.
- MENU: Allows you to access the full settings menu of SD9.
Finally, files may be replayed in standard JUKE BOX and DJ modes by pressing the relevant keys on the
front panel on the left of the display.
Front Panel

Style
https://www.ketron.it/images/ketron/Manuali_HTML/SD9/english/06_style.html[12/05/2020 15:56:20]
Style
SD9 is also an Arranger and therefore features an entire section dedicated to automatic accompaniments called Styles.
Here will be treated menus and dedicated keys that affect both the Style that the Arranger Menu
Each Style has:
Two tracks for drums (AUDIO DRUM) and percussions on Midi channels 9 and 10.
One Bass track on Midi channel 5l.
One LIVE GUITAR Track
Five harmonic tracks CH1, CH2,CH3,CH4,CH5 that function on Midi channels 6,7,8,11,12.
Two "Real Time" tracks, namely Lower 1 and Lower 2 that are assigned to the left split of the keyboard, which
function on Midi channels 3 and 4.
One LEAD track that functions on the Upper section, namely on the right of the keyboard Split.
All the Midi settings of the SD9 may in any case be edited in the MIDI section.
A lyrics file may also be displayed when playing a Style. If you wish to associate a lyrics file to a Style, exit "Style" mode,
load the lyrics file, return to "Style" mode and save the Registration .
Each Style has:
3 Intros;
3 Endings;
4 Arrangements (A, B, C, D); (or more related of Style configuration by pressing once more the Variation button)
Display show the presence of the variation 2 available in the Pattern A in use.
4 Fill; (or more related of Style configuration )
4 Breaks.
Another way to change the Style is by quickly inserting or removing the last 3 harmonic accompaniment tracks CH3,
CH4, CH5 with the key Variation that will be described in more detail later.
By pressing the STYLE key on the front panel, you will access the main screen of the Arranger built into the
instrument.

Style
https://www.ketron.it/images/ketron/Manuali_HTML/SD9/english/06_style.html[12/05/2020 15:56:20]
Once selected on the upper-left of the display (Style menu selection area) you can access to the selection of individual
styles. Styles family or single Styles can be selectend also by pressing EXIT button.
Display show on the right column of the main categories of automatic accompaniment such Ballad, Pop, Dance etc ...
including selection for USER andMY LISTmenu BALLAD Category is selected as default .
USER folder is the location where you are going to Save Styles which will be modified.
The folder MY LIST is menu where you can allocate Styles used frequently.Thus just to avoid frantic searching in
the various families of styles.
On the right are displayed Styles belonging to the selected category. 8 BEAT 1 is selected as default.
Down here the direct access buttons for the Style and Arranger management plus and other functions available also from
the Touch screen display:

Style
https://www.ketron.it/images/ketron/Manuali_HTML/SD9/english/06_style.html[12/05/2020 15:56:20]
- INTRO/ENDING:1 - 2 - 3
-ARRANGE:A-B-C-D
- FILL:Plays a different Fill according to the arrangement that has been enabled.
-BREAK:Inserts a different Break according to the arrangement enabled.
- KEY START:When this key is on, an automatic accompaniment is enabled when you play a chord on the Lower
section of the keyboard connected to the Midi In of the instrument, without having to press the START/STOP key on the
panel.
- KEY STOP: This key stops the accompaniment when you lift your hand from the Lower section of the keyboard.
-PAUSE / RESTART/ COUNT IN: Button to perform Start and Count In function on Style or Pause
when Player is used.
-START: Press this button to activates the execution of the selected style or the file associated with the Player 1/ 2
- HOLD ON: Keeps the accompaniment playing even when you stop playing the chord with your left hand until you
play the next chord.
-TEMPO + - / MODE: Pressing these buttons you can raise (SLOW) or increase (FAST) the tempo of the
Arranger (or the selected file from the Player 1 or 2). Pressing both buttons simultaneously a PopUp menu (Mode) where
you can set following functions:
- LOCK: Locks the speed while you are playing Style or a file from Player (1-2).
- ACC: (Accelerating) Increases the speed of the file you are playing at steps of 5 BPM.
- RIT: (Delaying): Decreases the speed of the file you are playing at steps of 5 BPM
- TAP: (Tapping): To synchronise the time with the “tapping” of your fingers.
-
EDIT -DRUM ON -RESTYLE
: These button allow to go thru EDIT menu of
RESTYLE
.
Other manuals for SD9
3
Table of contents
Other KETRON Media Player manuals